Tuesday, 6 June 2017

Inspect Element: How to Temporarily Edit Any Webpage

There's a powerful tool hiding in your browser: Inspect Element.

Right-click on any webpage, click Inspect, and you'll see the innards of that site: its source code, the images and CSS that form its design, the fonts and icons it uses, the Javascript code that powers animations, and more. You can see how long the site takes to load, how much bandwidth it took to download it, and the exact color used in its text.

Or, you could use it to change anything you want on the page.

Inspect Element is a perfect way to learn what makes the web tick, figure out what's broken on your sites, mock up what a color and font change would look like, and keep yourself from having to Photoshop out private details in screenshots. It's a super-power you never knew your browser possessed.

Let's learn how to use Google Chrome Inspect Element to help your work, whether you're a developer or a marketer who's never written a line of code. If you're reading this on your phone, it's time to switch over to your laptop, open Google Chrome, and get ready to tweak some code.

Wait, Why Should I Use Inspect Element?
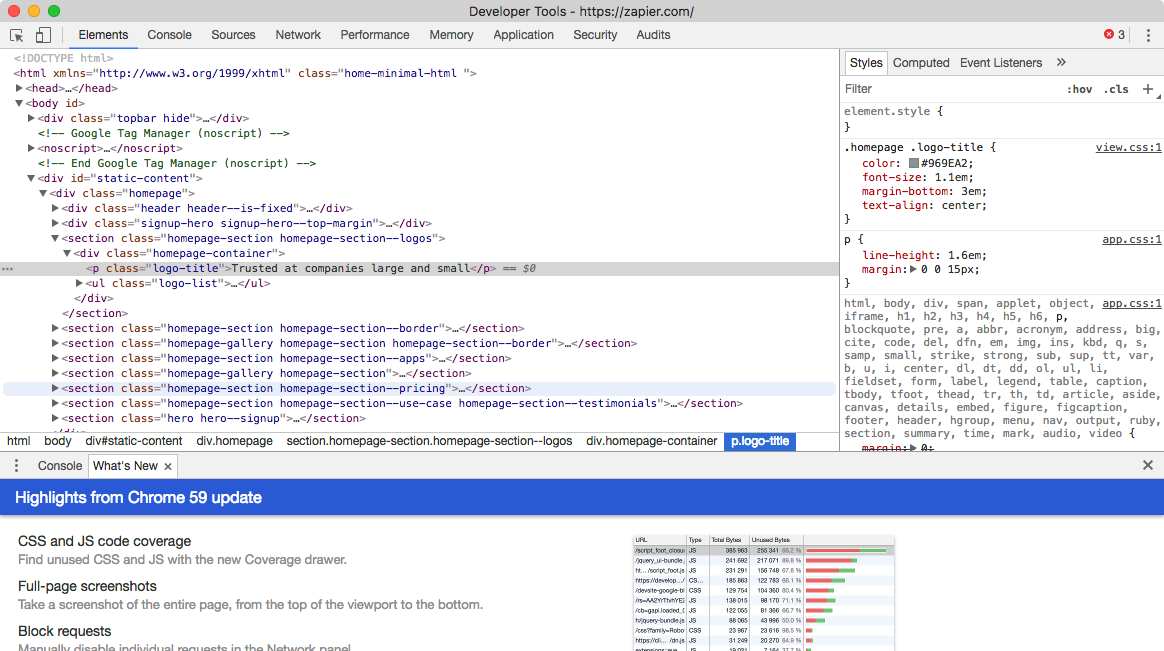
chrome inspect element
Google Chrome Inspect Element lets you view a website's source code and tweak anything you want

If you've never peeked at a website's code out of curiosity, you might be wondering why you should learn how to use Inspect Element.

  • Designer: Want to preview how a site design would look on mobile? Or want to see how a different shade of green would look on a signup button? You can do both in seconds with Inspect Element.
  • Marketer: Curious what keywords competitors use in their site headers, or want to see if your site's loading too slow for Google's PageSpeed test? Inspect Element can show both.
  • Writer: Tired of blurring out your name and email in screenshots? With Inspect Element, you can change any text on a webpage in a second.
  • Support Agent: Need a better way to tell developers what needs fixed on a site? Inspect Element lets you make a quick example change to show what you're talking about.

For these and dozens of other use cases, Inspect Element is a handy tool to keep around. It's part of the Developer Tools in your browser, which includes a number of extra features: a console to run code, a View Source page to see just the raw code behind a site, a Sources page with a list of every file loaded in a website, and more. You can explore all those on your own, but for now, let's see how to use the main Elements tab to tweak a webpage on our own.

How to Get Started with Inspect Element

There are a few ways to access Google Chrome Inspect Element. Just open a website you want to try editing (to follow along with this tutorial, open Zapier.com, then open the Inspect Element tools in one of these 3 ways:

  • Right-click anywhere on the webpage, and at the very bottom of the menu that pops up, you will see "Inspect". Click that.
  • Click the hamburger menu (the icon with 3 stacked lines) on the far right of your Google Chrome toolbar, click More Tools, then select Developer Tools. Alternately, in the file menu, click View —> Developer —> Developer Tools.
  • Prefer keyboard shortcuts? Press CMD+Option+I on a Mac, or F12 on a PC to open Inspect Elements without clicking anything.

By default, the Developer Tools open in a pane at the very bottom of your browser, and will show the Elements tab—that's the famed Inspect Elements we've been looking for.

You won't have much space to work with Inspect Element at the bottom of your screen, so click the three vertical dots on the top right-hand side of the inspect element pane near the "X" (which you'd click to close the pane). Now, you'll see an option to move the pane to the right-hand side of your browser (right-dock view) or to open the pane in a completely separate window (undock view).
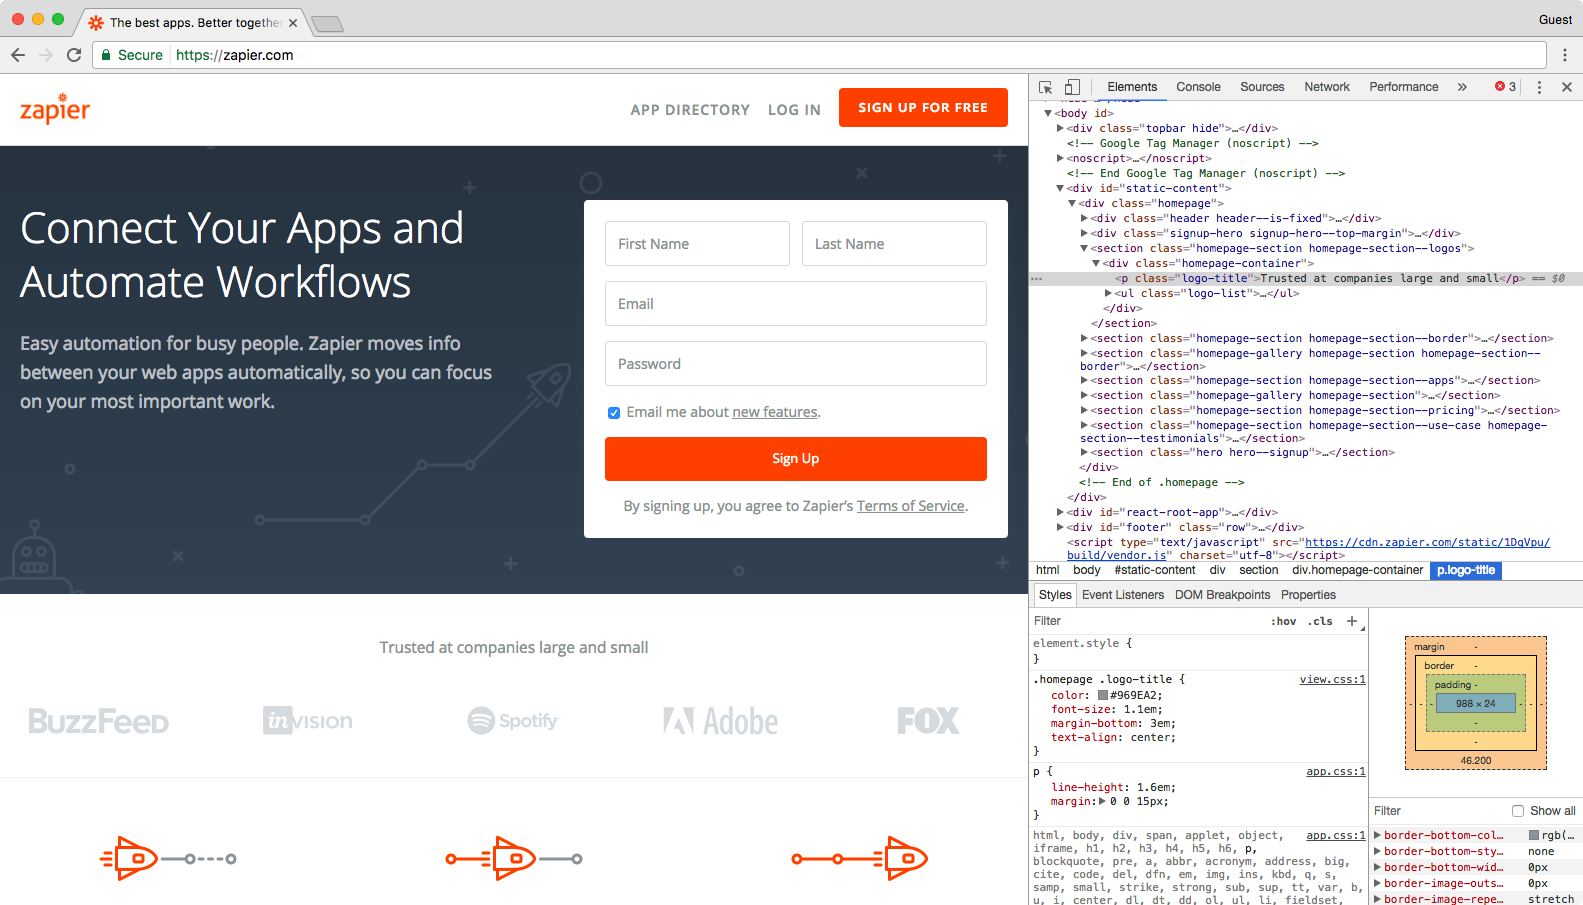
Inspect Element

For this tutorial, let's dock the pane on the right side of your browser window since it'll give us more space to work. You can make the Developer Tools panel wider or more narrow by hovering over the left-side border. Once the cursor appears, drag the pane left to widen it or right narrow it.


Now that we're in Inspect Element, there an array of useful tools at our fingertips that we can use to make any site look exactly how we want. For this tutorial, we will focus on the Elements, Emulation, and Search tabs.

Search

The "Search" tab allows you to search a web page for specific content or for an HTML element. It's a bit hidden: you'll need to click the 3 dots then click Search All Files to uncover it. Then you'll be able to search through every file in a webpage for anything you want.

Elements

"Inspect Element" is the tool we will explore most in this tutorial, and it's what opens first when you launch the Developer Tools in most browsers. Or, click the "Elements" tab in the Developer Tools to get back to it if you've been exploring elsewhere.

In the Explore tab, you can see all of the HTML, JavaScript, and CSS that built a website. It's almost the same as just viewing the source of a website, with one important difference: you can change any of the code, and see the changes in real-time on the site you have open. You can change anything from the copy to the typeface, then screenshot the new design or save your changes (just go to View > Developer > View Source and save the page as an HTML file, or copy the code changes to your text editor). Once you re-load the page, though, all of your changes will be gone forever.

Emulation

Ever wanted to preview a webpage on a phone without pulling your phone out of your pocket? The "Emulation" tab lets you view a web page as it would look on any device, with presets for popular devices or an option to set your own screen resolution and aspect ratio. You can even set an emulated internet speed, to see how quickly a site would load over dial-up.

It's also a bit hidden: you'll need to open Inspect Element and click the phone icon button to start it. Then, you'll have a perfect tool to understand how others experience a webpage.


It's time to get to work. We'll first use Search to find things on a webpage, then use Elements to edit text and more on a site, and finally will use Emulation to see how our site would look on a phone from a specific location.

Find Anything on a Site With Inspect Element Search

Wondering exactly what goes into your favorite sites? Search is your best tool for that, aside from reading a site's entire source code. You could just open the default Elements view, press CTRL+F or CMD+F and search through the source code, but the full Search tool will let you search through every file on a page, helping you find text inside CSS and JavaScript files or locate an icon image you need for an article.

To get started, open Zapier.com in Chrome if you haven't already, then open Inspect Element, click the 3 vertical dots in the top-right corner of the Developer Tools pane (near the closing "X"), and select "Search All Files." The Search tab will appear on the bottom half of the Developer Tools pane.

Search Chrome Inspect Element

In the search field, you can type anything—ANYTHING—that you want to find on this web page, and it will appear in this pane. Let's see how we can use this.

Type meta name into the search field, press your Enter key, and you'll immediately see every occurrence of "meta name" in the code on this page. Now, you can see this page's metadata, the SEO keywords its targeting, and whether or not it's configured to let Google index it for search. That's an easy way to see what your competitors are targeting—and to make sure you didn't mess anything up on your site.
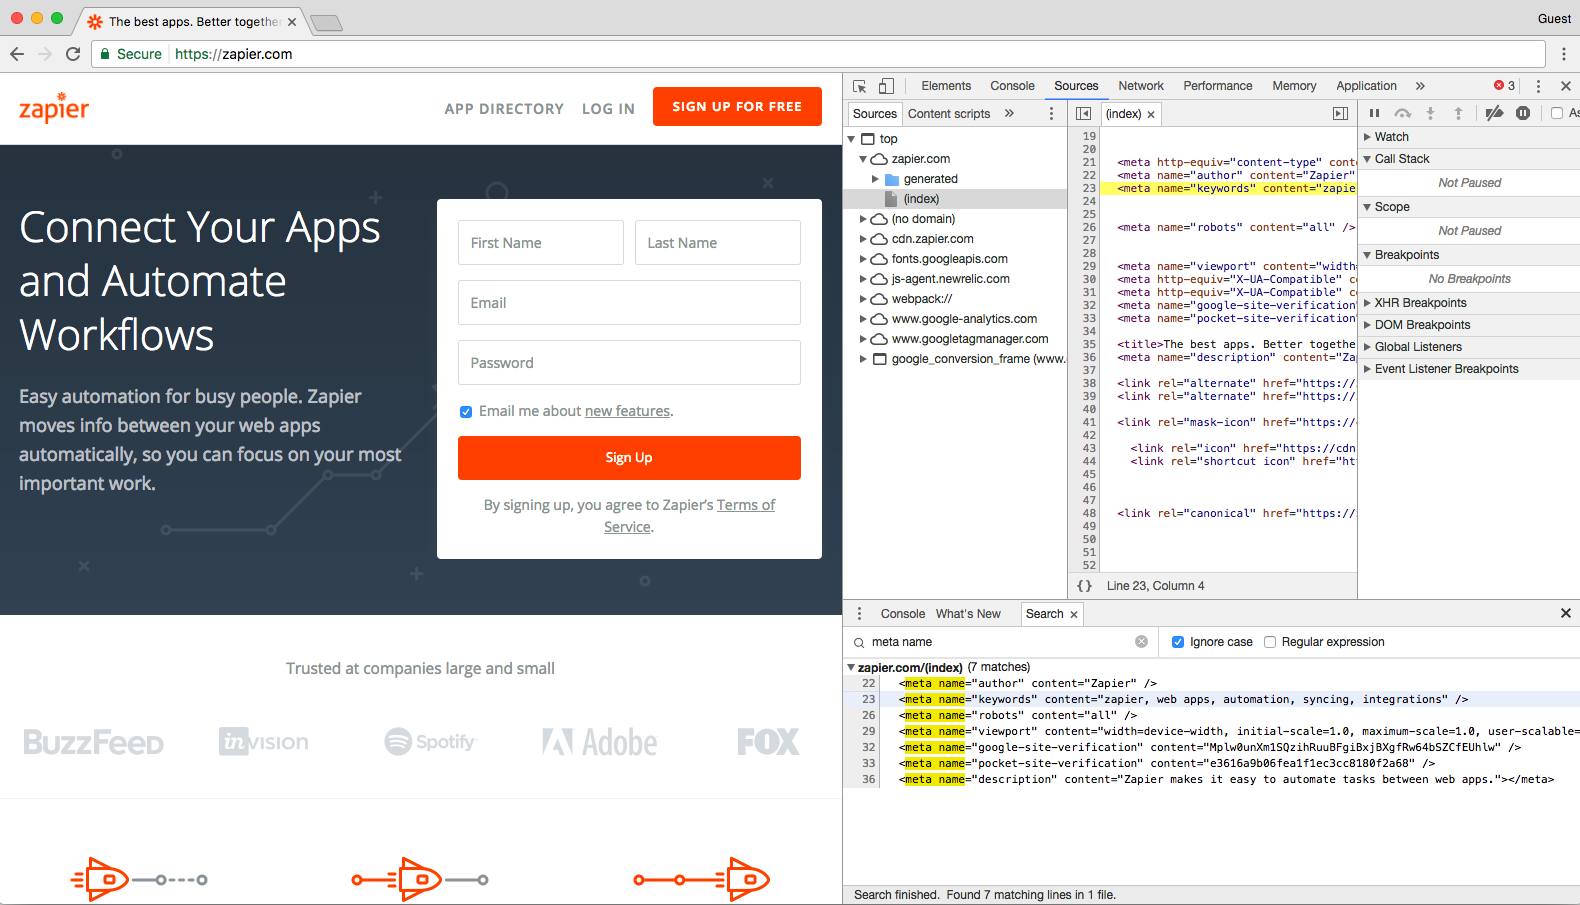
Chrome Inspect Element metadata

Let's try another query. Delete meta name, type h2 into the search field instead, and press "enter." You'll see every occurrence of "h2" in Zapier's JavaScript files at the top, but once you scroll to the bottom, you can see every "h2" header on this page.

Search is an effective tool for designers as well since you can search by color, too. Type #ff4a00 into the search field and press "enter" (and make sure to check the box beside "Ignore case" to see all of the results). You should now see every time the color #ff4a00, Zapier's shade of orange, in this site's CSS and HTML files. Then, just click the line that reads "color: #ff4a00;" to jump to that line in the site's HTML, so you can tweak it on your own (something we'll look at in the next section.
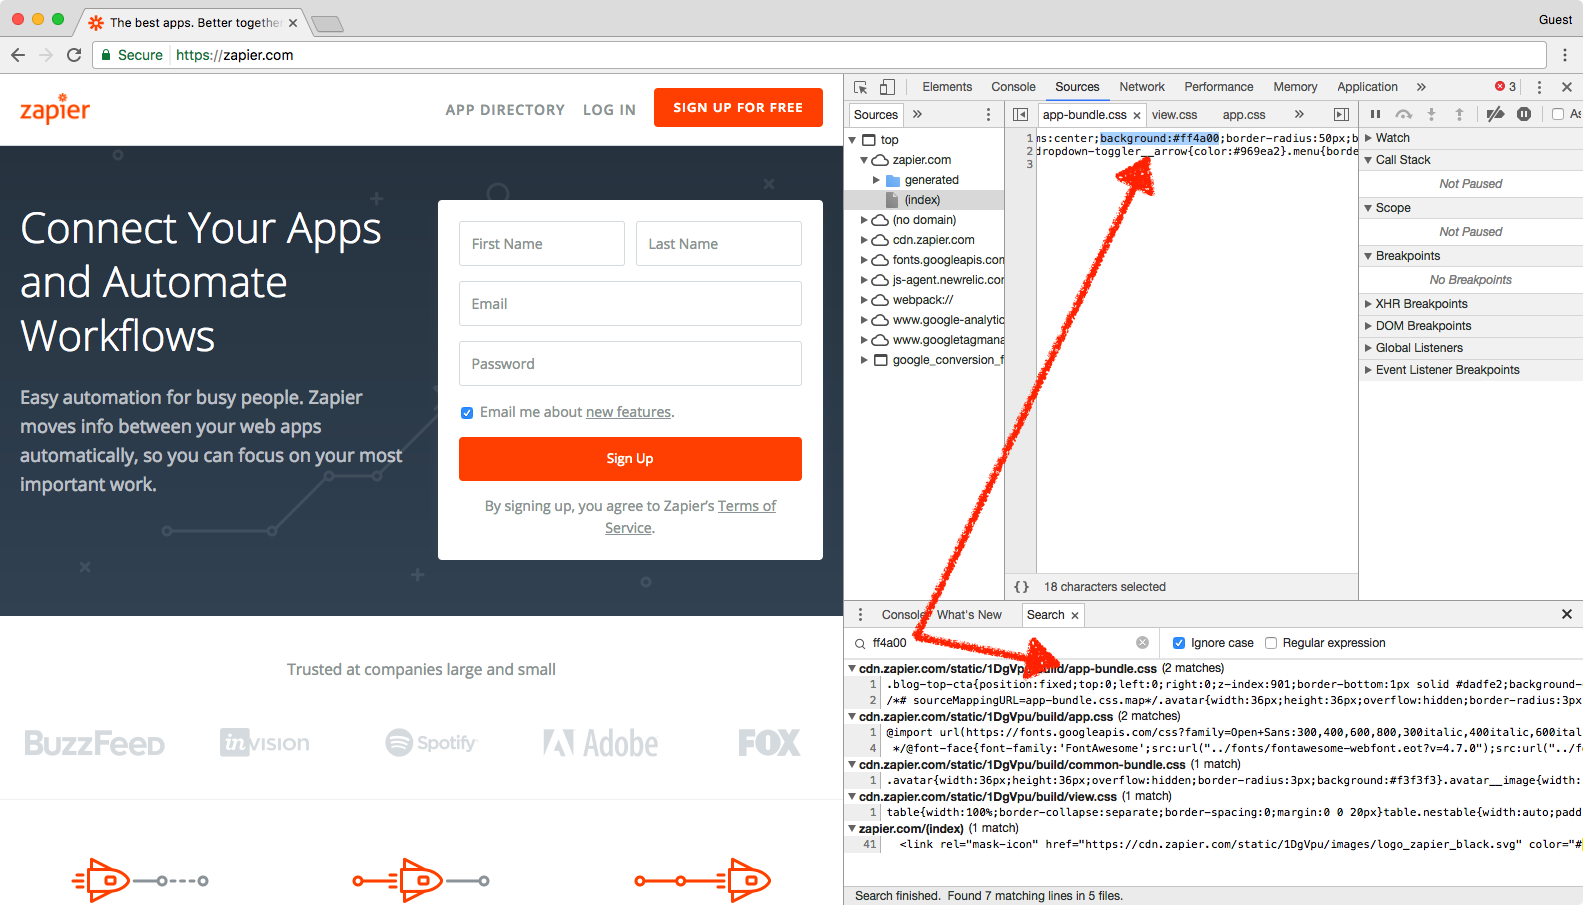
Search for color in Chrome Inspect Element

This is a handy way for designers to make sure that a site is following their brand's style guide. With the "Search" tool, designers can easily check the CSS of a web page to see if a color is applied to the wrong element, if an incorrect font-family is used on a web page, or if you're still using your old color somewhere on your site.

The "Search" tool is also the perfect way to communicate with developers better since you can show them exactly where you've found a mistake or exactly what needs changing. Just tell them the line number where the problem exists, and you'll get your fix that much quicker.

Or, you can change the web page yourself with the Elements, the core part of Chrome's Developer Tools.

Change Anything with Elements

Front-end developers use the Inspect Element tool every day to modify the appearance of a web page and experiment with new ideas—and you can, too. Inspect Elements lets you tweak the appearance and content of a web page, by adding temporary edits to the site's CSS and HTML files.

Once you close or reload the page, your changes will be gone; you'll only see the changes on your own computer and aren't actually editing the real website itself. That way, you can feel free to experiment and change anything—and then copy and save the very best changes to use again later.

Let's see what we can do with it.

Click the "Elements" tab in the Developer Tools pane—and if you want more room, tap your "Esc" key to close the search box you had open before. You should see the HTML for this page—now you know how the sausage gets made.
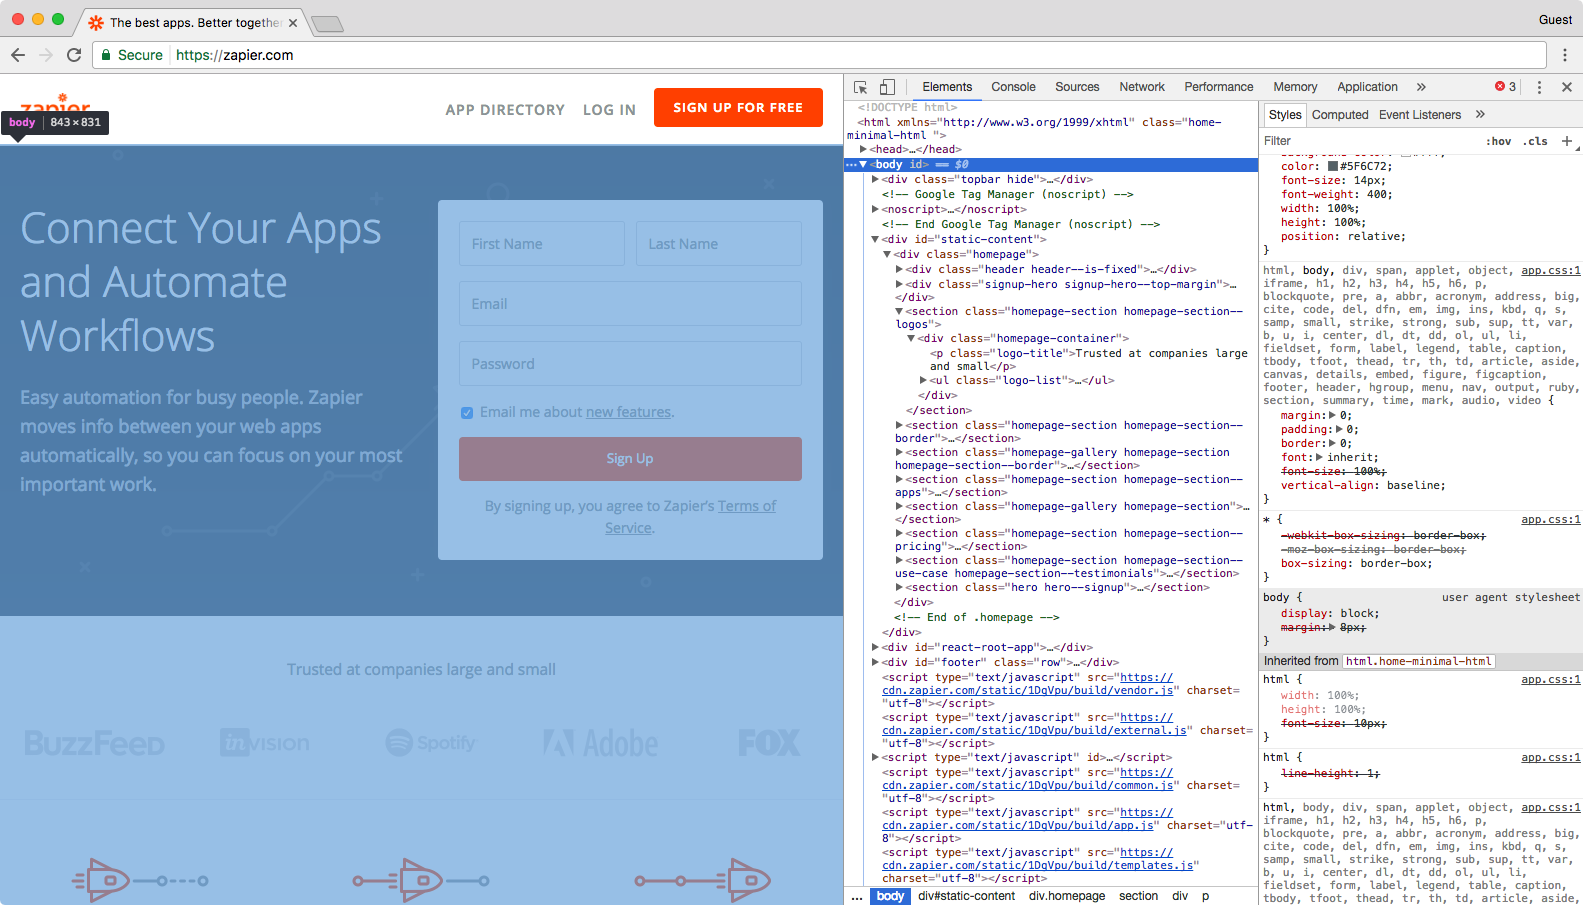
Chrome Inspect Element

In the top-left corner of the developer pane, you will see an icon of a mouse on top of a square. Click it, then you can select any element on the page that you would like to change. So let's change some things!

Change the Text on a Webpage

Ever wanted to change text on a site—perhaps to see how a new tagline would look on your homepage, or to take your email address off of a Gmail screenshot? Now you can.

Click the "mouse on top of a square" icon, then click any text on the page—perhaps the tagline on the Zapier homepage. In your Developer Tools pane, you will see a line of text with a blue highlight that looks something like this:
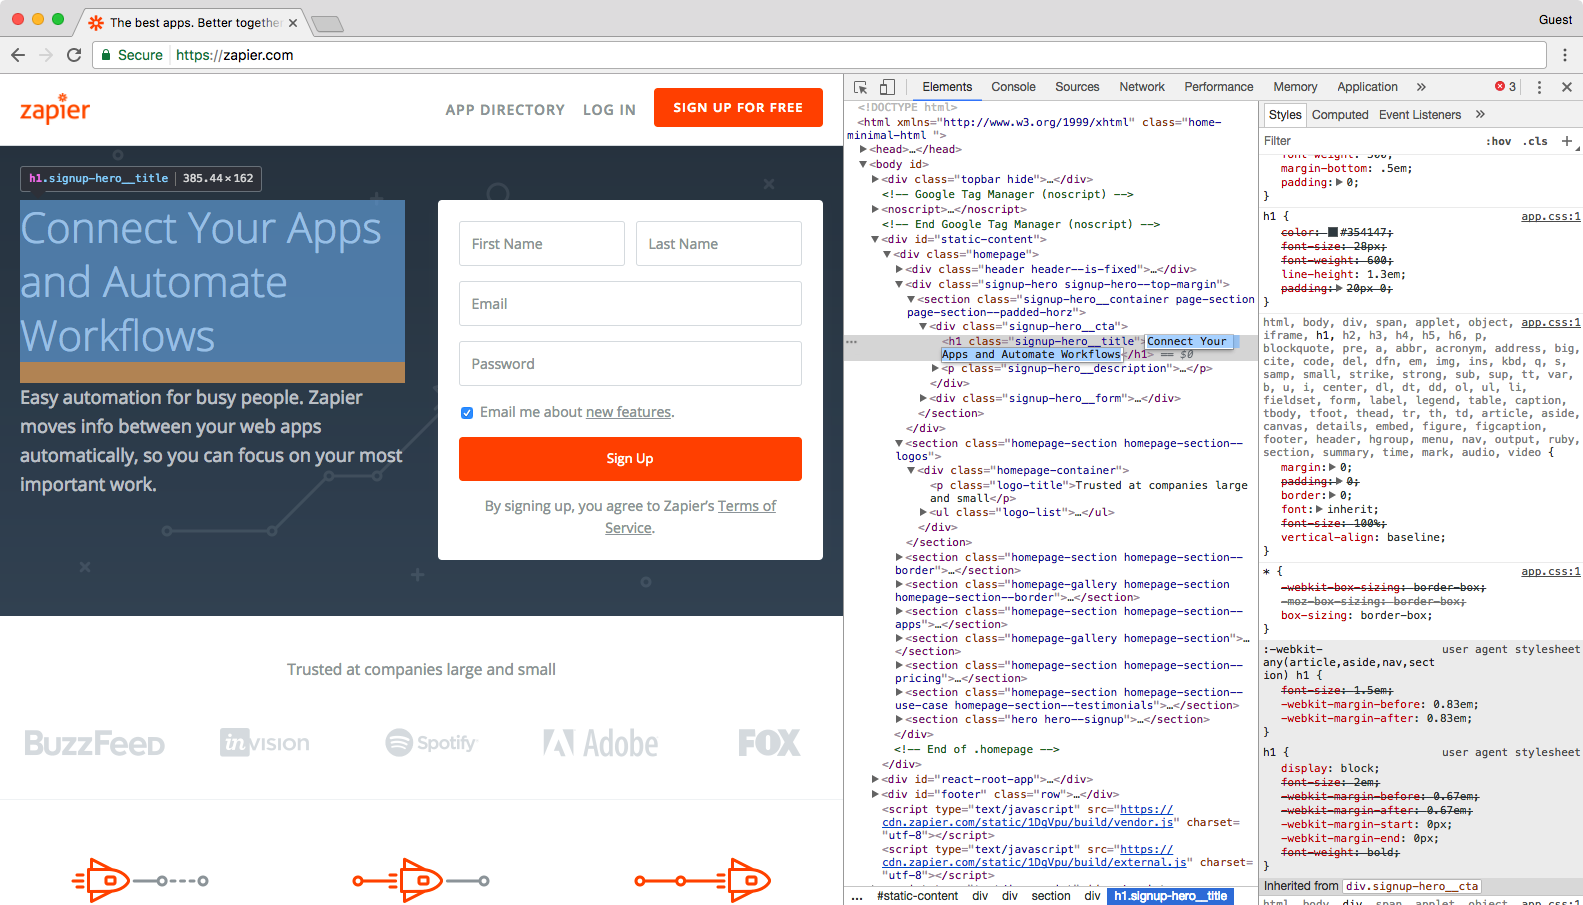
Change tagline in Chrome inspect element

Double-click the "Connect Your Apps" text that's highlighted blue in the Developer Tools pane, and it will turn into an editable text field.

Type anything you like in this text field ("Auri is a genius" should work just fine), and press enter. Voila! You've just changed the text on the web page.

Refresh the page, and everything will go back to normal.

Fun? Let's change some more things on this page.

Your Developer Tools pane re-loads with the page, but let's close it. Press the "X" in the top-right corner of the page.

Cool. Now we're going open it back up—right at the text we want to edit. All you have to do is right-click on the part of the page you want to edit, then click the Inspect or Inspect Element link that appears on the bottom of the right-click menu.
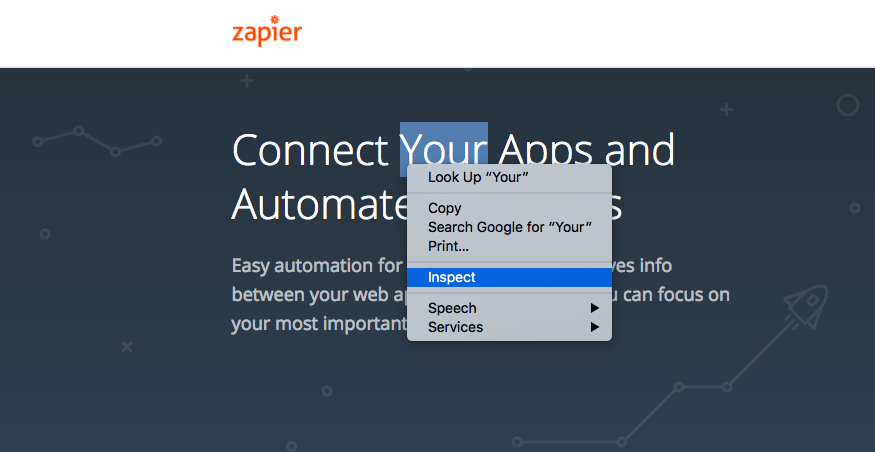
Right-click to open Inspect Element

When your Developer Tools pane opens, it should automatically highlight that sentence. Pretty neat, huh? It's the little things that count.

Now that we've selected the tagline on the Zapier site, let's change how it looks.

Change the Color and Font of Elements

To the right of this sentence in the Developer Tools pane, you will see a sub-pane with 3 additional tabs: Styles, Computed, and Event Listeners. Each allows you to change how this sentence looks on the page. Let's get started on "Styles" tab.
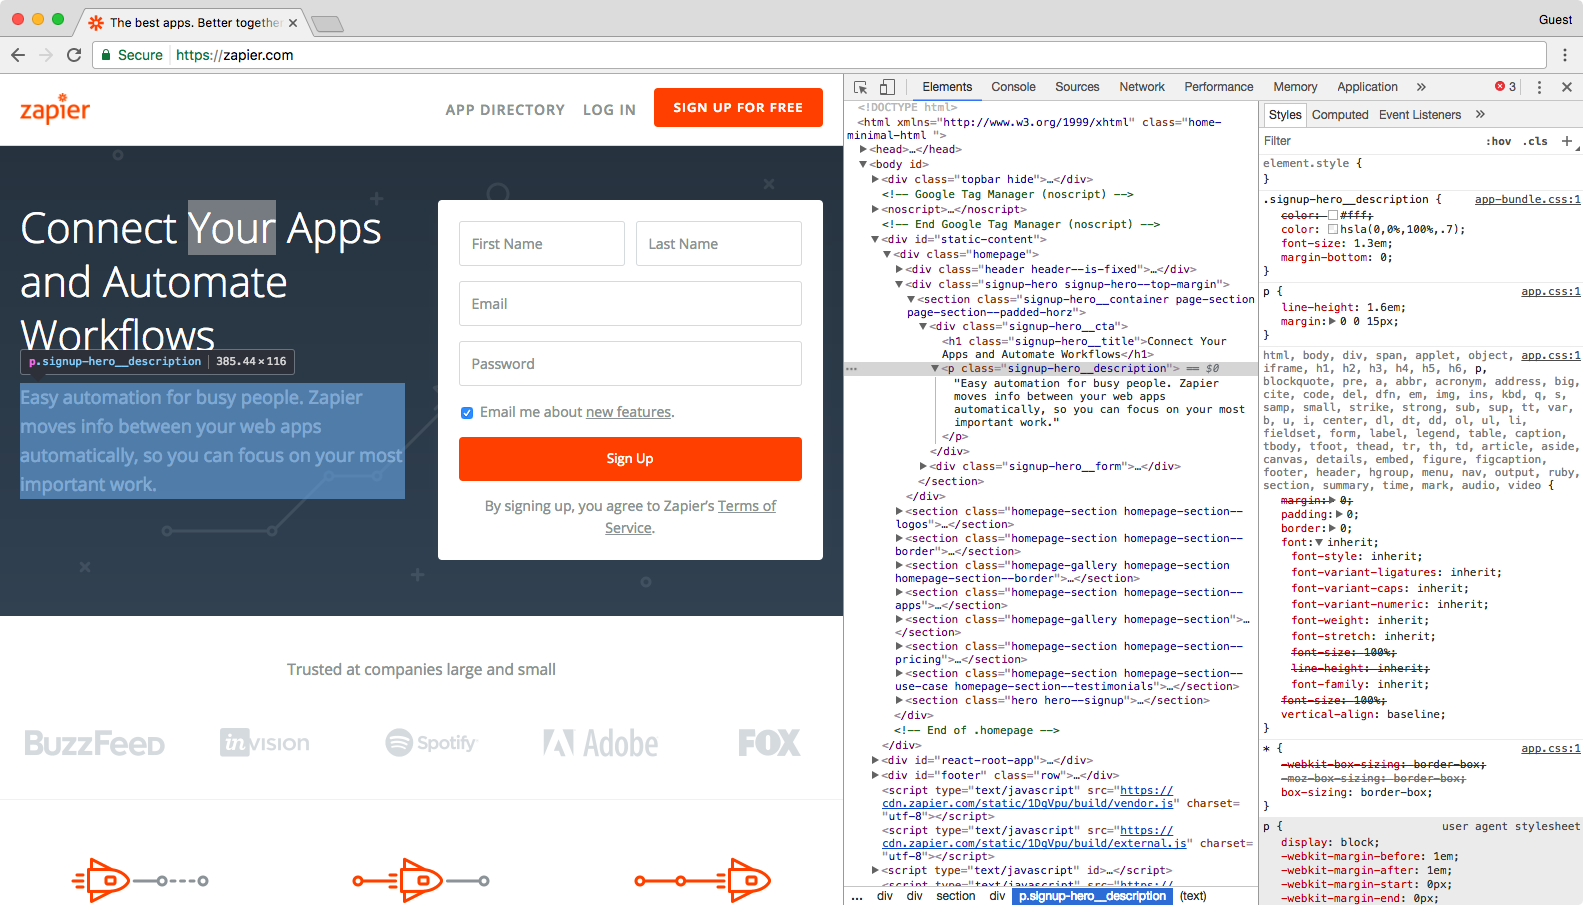
Edit Styles in Inspect Element

You may notice that some things are crossed out in the "Styles" tab. This means that these styles are not active for the element we've selected them, so changing these values will have no effect. We can ignore these for our purposes.

Let's try changing something. Click the arrow icon in the top of Inspect Element again, and select the text right under the "Sign Up" button on the page. Find "text-align" in the "Styles" tab (you may have to scroll a bit to find this).
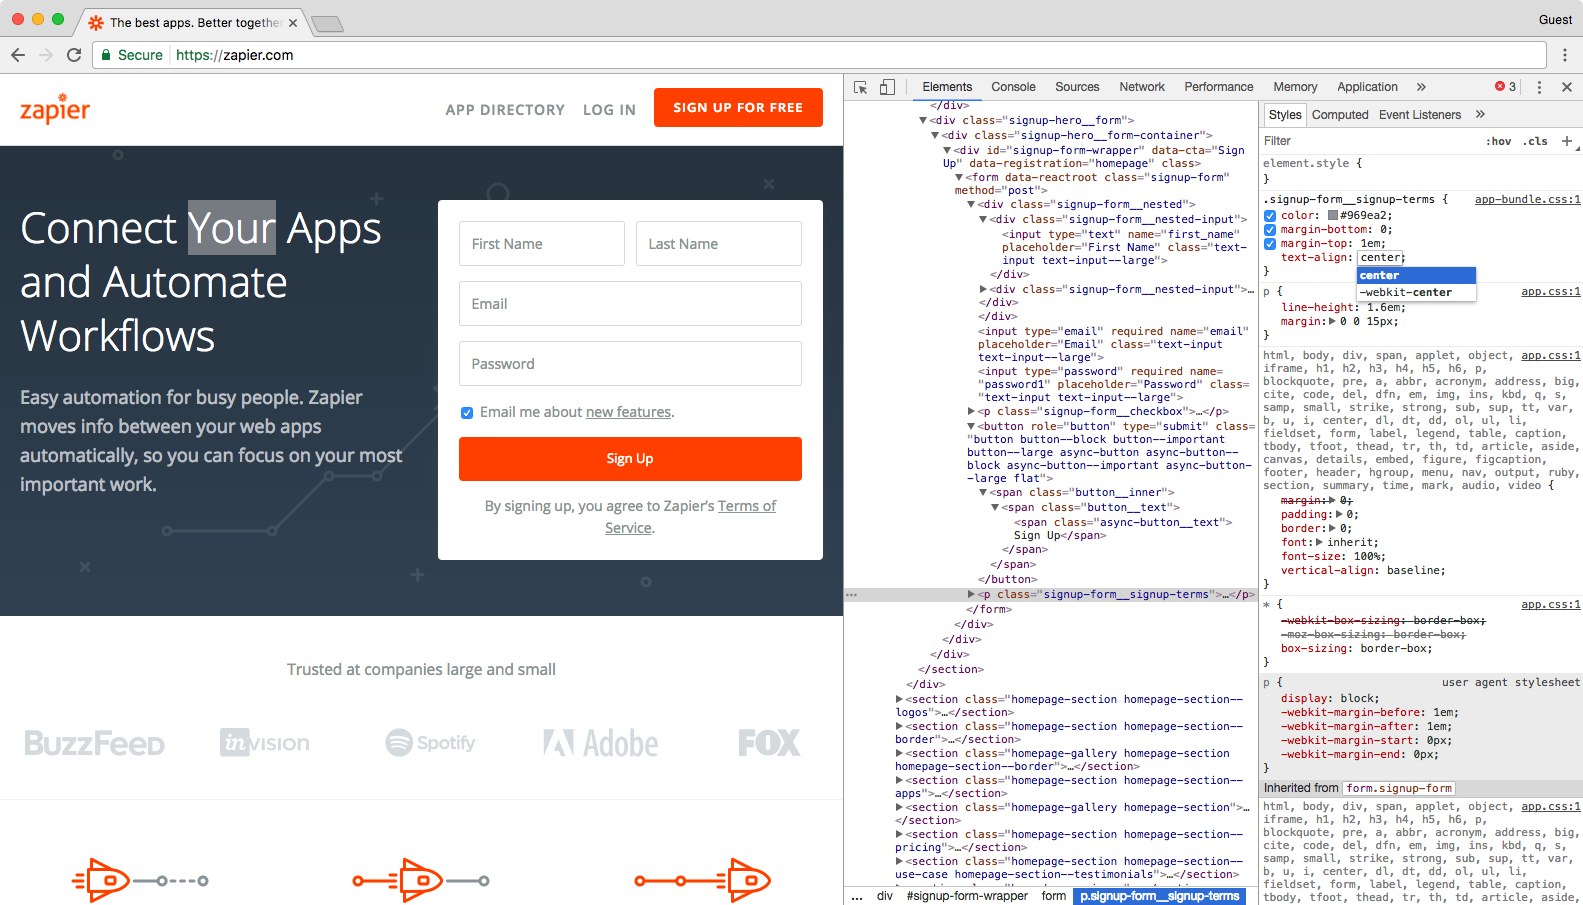
Edit text alignment in Inspect Element

Right now, it is set to "center", but double-click "center" and type left. This makes the text left-aligned on the page.

Now let's play around with the color. Use the mouse icon in Inspect Element to select the button this time, then in the Styles tab find this line:
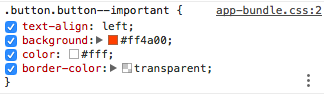
Button color

And double-click "#ff4a00". Type #4199ad (do not forget the #) and press "enter."

We just changed the color of our button from orange to blue! Now let's try something really cool.

Change Element States

Want to see how a button or link will look once someone hovers over or clicks it? Chrome Inspect Element can show that too with its force element state tools. You can see how the element will look once a visitor hovers over the element (hover state), selects the element (focus state), and/or has clicked that link (visited state).

Let's try this out. Make sure you've selected the signup button on the Zapier home page. Then, right-click on that code in the Elements tab, and select :active: in that menu.
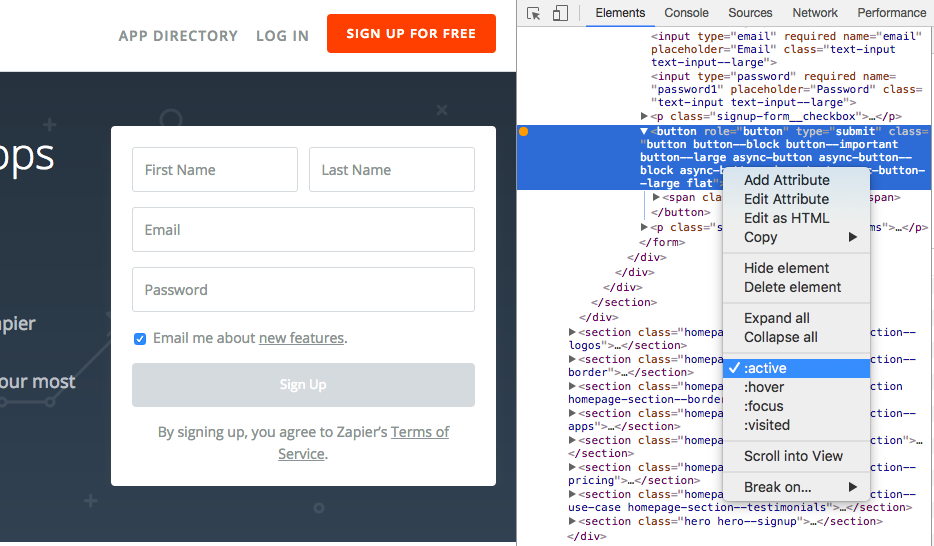
change hover state

That will change the button to grey, which Zapier's site shows as you click the button.

Now change the background-color value to #FF4A00, and you should instantly see the button color change.

Try experimenting—change the :hover: color, then un-check :hover: in the right-click menu and drag your mouse over the button to see the new button color.

Change Images

You can easily change images on a web page with Inspect Element, too. Let's swap the Superhero background on the Zapier site with this dramatic photo of a solar flare from NASA.

Solar Flare

First, copy and paste this link to the image:

https://c1.staticflickr.com/9/8314/7931831962_7652860bae_b.jpg

Now, open Inspect Element on the background of the Zapier homepage, and make sure you've selected the signup-hero line in the code. Double-click the background URL link in the "Styles" pane, and paste the link you copied above.
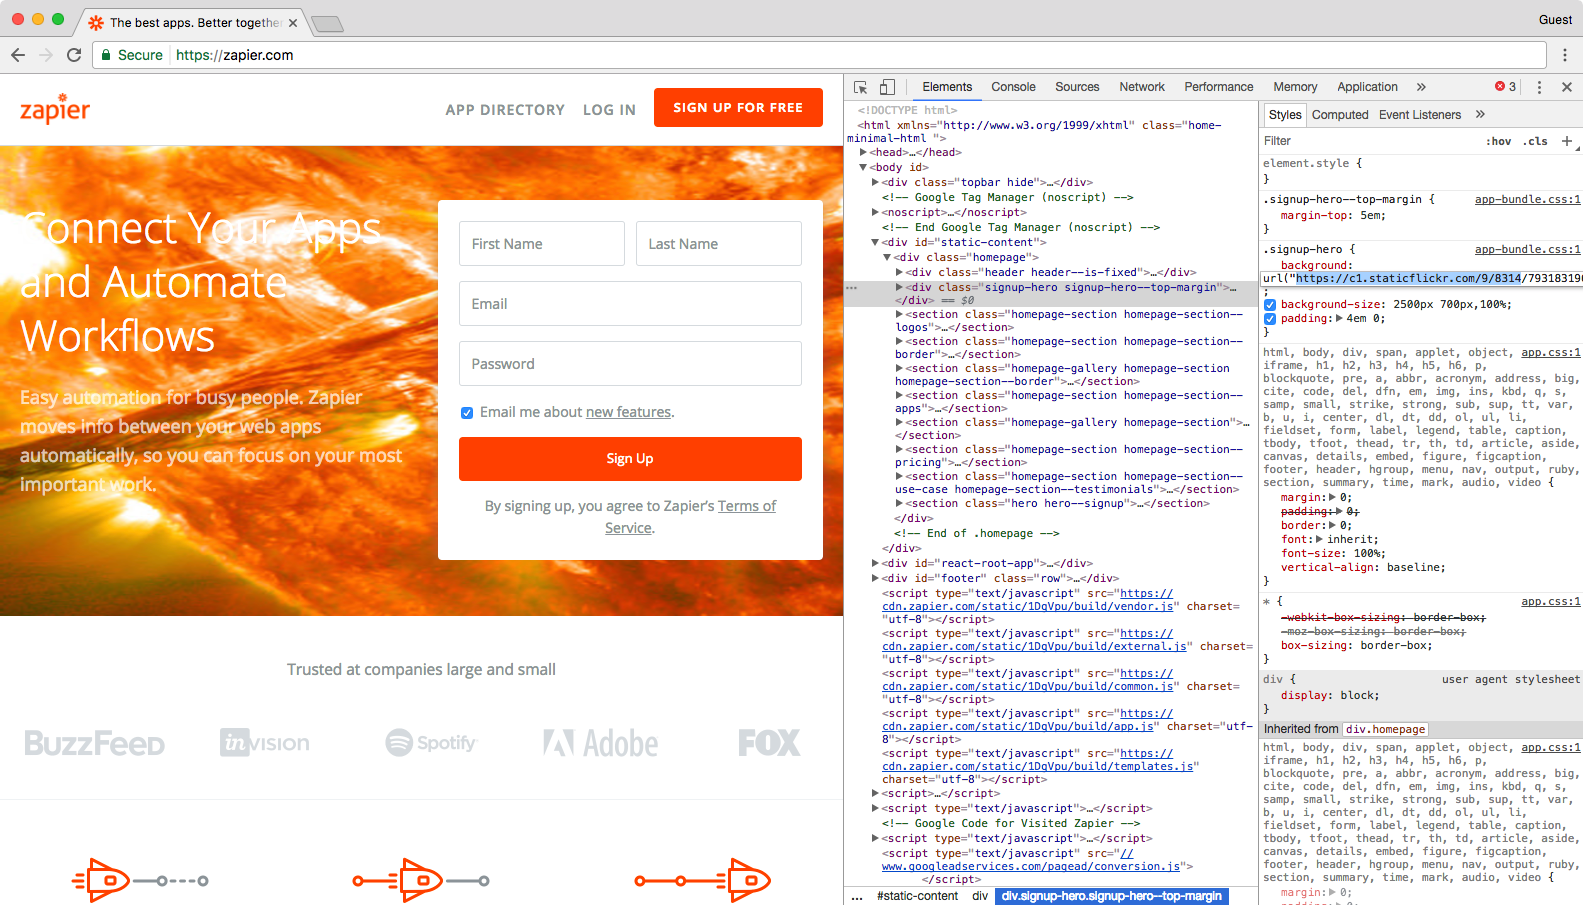
edit image in inspect element

Press "enter" and see the difference immediately.


Editing text is handy, swapping out images is fun, and changing colors and styles just might help you quickly mockup the changes you want made to your site. But how will that new tagline and button design look on mobile?

That's where Emulation comes in—it's where everything we've reviewed so far can be applied even further. Let's see how.

Test a Site on Any Device With Emulation

Everything has to be responsive today. Websites are no longer only viewed on computers—they're more likely than ever to be viewed on a phone, tablet, TV, or just about any other type of screen. That should always be kept in mind when creating new content and designs.

Emulation is a great tool to approximate how websites will look to users across various devices, browsers, and even locations. Though this does not replace actually testing on a variety of devices and browsers, it's a great start.

In the Developer Tools pane, you'll notice a little phone icon in the top-left corner. Click it. This should change the page into a tiny, phone-styled page with a menu at the top to change the size.
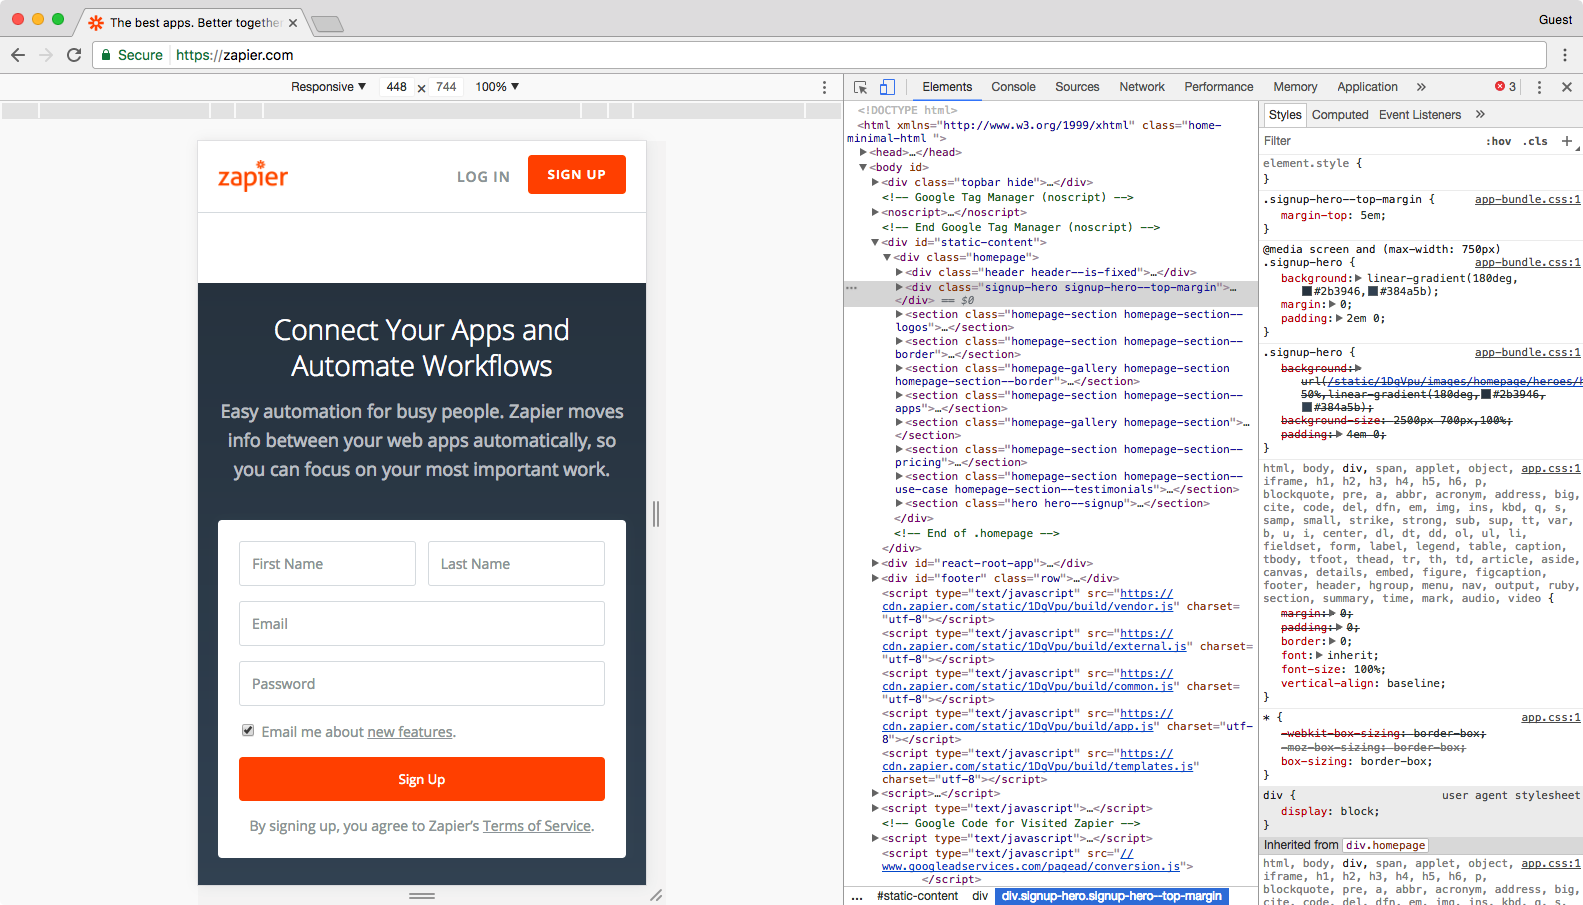
Chrome Inspect Element Phone Emulation

Resize the small browser to see how things look if you were browsing on a tablet, phone, or even smaller screen. Or, click the menu at the top to select default device sizes like iPad Pro or iPhone 6 Plus—go ahead and select the latter.

The web page screen should shrink down to an iPhone 6 Plus' size, and you can zoom in a bit by clicking the + icon next to the number at the top right of the grid—that's how the site would look if someone zoomed in on mobile.

Go ahead enlarge the view by dragging the right edge of the web page emulation right. See what happens? We're no longer in the iPhone 6 Plus view. Dragging the screen along the grid allows you to see how the web page will change as the screen size changes, but your view will no longer reflect the device model that you chose previously.

Let's go back to the iPhone 6 Plus view by selecting this in the model drop-down list again. Next to the drop-down list is the word "Portrait." As you may have guessed, this allows you to toggle between the landscape and horizontal view.

Now, we can see how this post would look if you were reading it on an iPhone 6 Plus. Feel free to play around with the other devices to see how this web page and the screen resolution changes. All of the other developer tools that we have gone over so far will also react to the device view. For example, select the text of Zapier's tagline again.

In the iPhone 6 Plus view, we can see that this text is 2em, while in the default view on a computer, it's 3em.
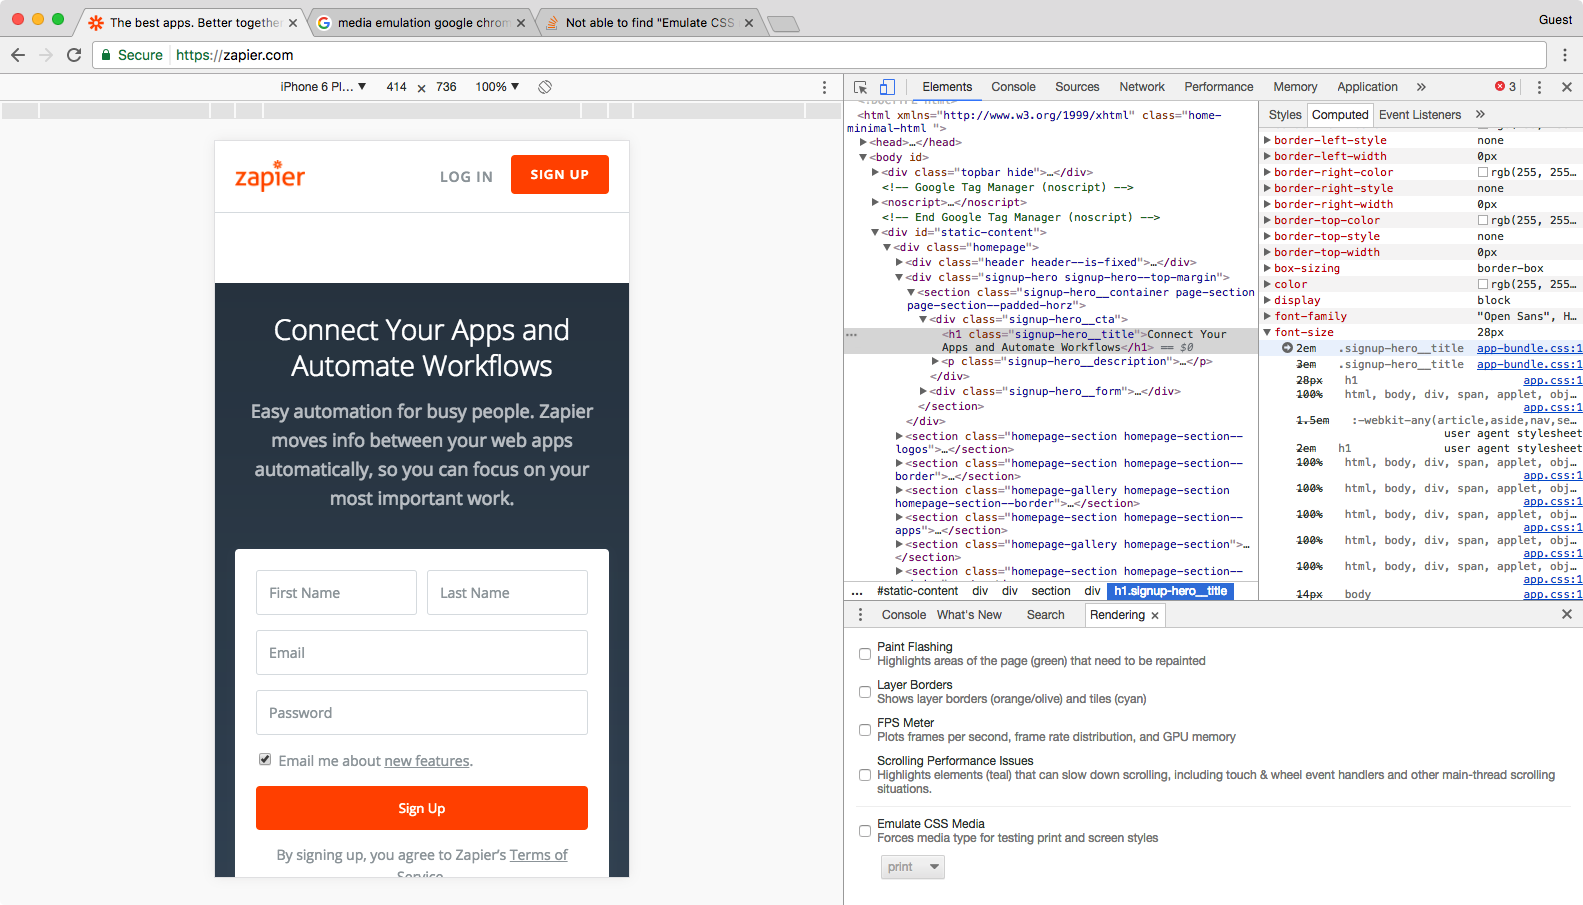
text size

The "em" is a font-size unit that allows you to automatically change the size of text relative to the surrounding text. For example, let's say we have a user with large custom font settings on their browser. If you set your paragraph font-size to 14px, your font will always be 14px to that user no matter what. However, if you set your paragraph font-size to 1em, your user's browser will use this unit to scale your text to your user's large settings. Phones and tablets do this to zoom text nicely.

Now let's switch to the Apple iPad view and select the "testing across devices" header above. This time, the font-size is 3em. The font-size changed based on the device view, back to the default size it'd use on a computer, thanks to the tablet's larger screen.


Emulate Mobile Device Sensors

You may have noticed that your mouse now appears as a little circle on the web page. This allows you to interact with the page as if you are on your mobile device. If you click while dragging the page down, this does not highlight text like it normally would in your browser—it drags the screen down like you are on a touchscreen device. Using this view, you can see how large touch zones are on a web page. This means that you can see which buttons, icons, links, or other elements are easily touchable with the finger.

You can even make your browser act like a phone. Press your "Esc" key to open the search pane in Inspect Element again, and this time click the 3-dot menu on the left side for a menu of options. Select Sensors to get three new tools: Geolocation, Orientation, and Touch.

Chrome Inspect Element Sensors tab

Touch lets you turn on or off the default circle selector that acts more like a finger than a normal mouse cursor. Orientation lets you interact with motion-sensitive websites such as online games that let you move things by moving your phone. And Geolocation lets you pretend you're in a different location.

Let's try viewing this site from Google's Headquarters in Mountain View, CA.

Check the box next to "Emulate geolocation coordinates," and enter the value 37 into the Lat = text field and 122 into the Lon= text field. Press enter on your keyboard.

Nothing changes, right?

This is because there isn't content on this page that changes based on your location. If you change the coordinates on a site like Groupon.com that uses your location to show localized content, though, you would get different results. Go to Google.com in a different location, and you'll perhaps see a new Google logo for a holiday in another country, or at least will get the results in a different language.

Emulation is a great way to put yourself in your user's shoes and consider what the user may be seeing on your web page—and it's a fun way to explore the international web.

Emulate Mobile Networks

You can also see what it's like to browse a site on different networks, perhaps to see if your site will load even if your users are on a slower EDGE network.

To give it a try, click the three circle button in the left of Inspect Element's search tab again, and select "Network Conditions". There, you can choose from a variety of standard networks, from slow GPRS networks to fast WiFi and 4G. Now, reload the page, and you'll see just how long it'd take for the site to load on a slow connection—and how the site looks while it's loading. That'll show why you should improve your site to load faster on slow connections.

Network settings in Chrome inspect element

You can also change your user agent—uncheck "Select automatically" beside "User Agent" and select "Internet Explorer 7" perhaps to see if the site changes its rendering for older browsers. That's also a handy hack to make webpages load even if they claim they only work in a different browser like Internet Explorer.


Challenges

Let's end with a few challenges. Go show us what you've learned!

  1. Change headlines on CNN.com and tweet us a screenshot of your trending article headline.
  2. Duplicate your favorite web site using "View Source," and mess around with the HTML to make it your own.
  3. See how your website renders on a mobile device, and show your developer what could be done better by fixing it yourself!

The Marketing team at Zapier team relies on Inspect Element to tweak private information out of screenshots in our app reviews, while our design team uses it to mockup changes and see how things would look on various screens.

How do you use Inspect Element? We'd love to hear your stories in the comments below!

This tutorial was originally published on January 5, 2015, then was updated and republished on June 6, 2017 with screenshots and steps from the latest version of Google Chrome.


source https://zapier.com/blog/inspect-element-tutorial/

Monday, 5 June 2017

How to Find, Hire, and Work with Freelance Writers

As businesses increasingly rely on content to drive their brands forward, there's a growing need for top-notch writers—whether it's to spice up landing page copy or to churn out engaging blog entries.

But often for a business, hiring a full-time writer doesn't make sense: the demand for content isn't steady enough, or the price tag for a new marketing hire is too high.

That's where freelancers come in—they're the on-demand resource for content needs. Businesses turn to freelance writers for blog posts, case studies, white papers, and other copy, but also leverage them for grant work, ghostwriting articles or speeches, technical writing, email campaigns, and newsletters.

So how do you get the ball rolling and hire a freelance writer? And perhaps more importantly, how do you find and keep a top freelance writer who can bring your company's voice to the masses? We've done our homework to answer all those questions for you—with insight from a few established freelancers, to boot.


Find Freelance Writers

Good news: There are a lot of freelance writers out there. And, well, that's also bad news.

The massive talent pool works to your advantage because it means that writers need to compete with each other on rates and deadlines. But, you'll also need to wade through plenty of mediocrity to find true talent. That last part is important when you're looking for public-facing content that will represent your brand.

There are plenty of places online to find freelance writers, but before you start searching, determine what you're looking for in a writer. Do you want an expert in a particular area? Are you willing to work with a young, unproven writer who seems to be a wizard with words? Do you want someone who has a marketing background or who knows SEO tactics? Do they need to live in your area? Knowing exactly what you want in a writer will make your search easier.

There are six main routes to finding good freelancers:

1. Referrals

You ask your friends for referrals when you're searching for doctors, babysitters and restaurants—do the same for writers. If someone you know has good things to say about a writer he or she has worked with, you don't have to fret over whether this new person will meet a deadline or turn in something sloppy. Ask people in your network if they've worked with a freelance writer in the past, and they may serve you an expert wordsmith on a silver platter.

2. Agencies

If you have a larger budget, agencies will do the matchmaking for you. Bigger firms like Creative Circle and Outsource have huge stables of writers hoping to grab odd jobs. There are specialists, too, like Seliger & Associates for grant writing or BlogMutt for business blogging. You'll also find companies like Contently and Skyword which offer a hybrid approach, giving you both writers and the tools to manage them.

But before you work with an agency, be sure to check out their reviews online—there are a few out there that have seriously bad reviews from past writers who were paid peanuts for a project. Skip the drama and work with a reputable organization.

3. Content Mills

Speedlancer

If you're on a strict budget, try "content mills," websites that give huge volumes of work to up-and-coming freelance writers who will complete projects for pennies on the dollar. Upwork showcases writers' profiles along with hourly rates, and you can also search by type of writing. Speedlancer offers content by word-length along with consultation for a 30-day editorial calendar.

Fiverr's writing and translation category is another option: it's an online marketplace where people—including writers—post jobs they will complete for a measly five dollars. And of course, there's always Craigslist, if you don't mind a flooded inbox.

4. Blogs and Magazines

Jane Porter

The next time you read an article on a blog or magazine site, such as Entrepreneur.com or FastCompany.com, check out the author's bio—often you'll find the words "contributing writer" or "freelance" among these few lines. If you're impressed by the piece, consider asking the individual if they're looking for new freelance clients. If the individual's email isn't provided, Google the person's name and you're sure to either find a website or LinkedIn page.

This route, however, might lead you to pay more than you anticipated as these writers are often at the top of their game, allowing them to charge significantly more. And just because the writer has been published on a notable site doesn't guarantee they're an A+ freelancer, either. These publications have turnover all the time, so research the writer's other work before you pull the trigger.

5. Social Media

LinkedIn freelance writer search

With a little expertise, LinkedIn search and Twitter search can be valuable resources for finding agencies and writers. Plus, it lets you scope out the freelancer's portfolios and blogs before you contact them.

With LinkedIn, the earliest results will be people who are in your network to some degree, which means that you can ask your colleagues for recommendations and introductions. And once you stumble upon an intriguing writer on Twitter, rest assured that person will be following other writers, too. Or you can consult your Twitter followers for potentials by tapping into Followerwonk, an app (free for one social profile) that lets you search for keywords in the bios of your followers.

6. Google Search

Then, there's the tool that you use to search for everything else: Google.

Google is best if you're looking for writers who specialize in something, like someone who can blog about biotech. If you Google "hire freelance writer," you'll spend a lot of time sifting through blog posts and articles about freelance writing (like, um, this one) but not get a whole lot of actual writers. Instead, search for something like "freelance writer luxury brands" to nail your specific request.

No matter which way you go, you should always run a Google search on a writer's online presence; check out the individual's past work, website and blog to get an idea of the person's voice and ability.

At the end of the day, when you're choosing a freelance writer, the rule is much like a hotel stay: most of the time, you get what you pay for.

Bonus: Copyblogger Media's Certified Content Marketers

Copyblogger Media's Certified Content Marketers

If it's a content marketer you're seeking to help write blog posts, author white papers and create customer case studies, then start with Copyblogger's list of Certified Content Marketers. The media company stands behind the dozens of marketers on the list, having each of them complete advanced coursework and submit work for review in order to make the cut.


Hire Freelance Writers

Kristi Hines

Every writer is different when it comes to the hiring process. Some require formal contracts, others consider an email confirming the job requirements and fees sufficient.

On your end, there's no set formula when it comes to hiring a writer. Some companies like to "audition" a writer before hiring them—and unless free trial work is explicitly offered by the writer, you should expect to pay them for their time, even if it's at a reduced rate. Other companies simply consider the writer's body of work.

Freelance writers work remotely, so it's wise to establish expectations for communication methods right off the bat. You'll need to be sure to include them in things like editorial schedule coordination and processes, and you may want to establish regular check-ins for long-term projects.

Companies that are looking to hire the same freelance writer on a regular basis may prefer that a writer be incorporated; it prevents confusion around whether someone is an employee or a contractor in the case of an audit (and there are tax differences if you're writing off the cost of hiring a freelancer, which you should be!).

Lastly, remember to ask your writers for a W-9 so you're not scrambling for the paperwork come the end of the quarter.


Pay Freelance Writers

Samar Owais

Some writers accept payment through PayPal or Dwolla; some want a check mailed to their home address. Some ask that payment be finalized within 30 days; others will wait 60.

Rates are going to vary from writer to writer, too—especially if a project is research-heavy, complex, or short-notice. Plus, most writers charge by the word, but others prefer to be compensated by the hour, or even by the project.

One thing's clear: Squaring away the payment question is the most variable part of working with freelancers.

Kristi Hines, a freelance writer who primarily writes blog posts and ebooks for businesses, charges by word count.

"For blog posts, I offer clients blog posts at 500, 750, 1,000, 1,500, and 2,000 words. Those seem to be the most popular lengths," she says.

She also offers clients the option of doing 30-day net invoicing or a monthly blog post package with an advance payment discount.

UK-based freelancer Sophie Lizard, who specializes in science, technology and psychology writing, charges by the month for a predetermined set of deliverables, as well as by half-day and by word count.

Samar Owais, who helps small businesses market themselves through blogging and email newsletters, asks for 50 percent of her fee before the project starts, preferably via bank transfer, and opts for payment on a per-project basis.

Peter Bowerman, a writer who provides content like brochures and video scripts for businesses, charges by the project, and says that's what clients prefer since it helps them set a budget.

"The only time an hourly rate makes sense is when the project scope is undefined or ever-evolving," Peter says. He typically gets 50% upfront in the form of a check, but can take credit cards or PayPal.

"Once I have a good solid working relationship with the client, I usually skip the upfront deposit and just collect the full fee on the back end," Peter says. "But clients who are new to hiring writers should expect to pay an upfront deposit of one-third or more. "

Tom Ewer, who mainly writes blog posts but has also written web copy and whitepapers, determines his fees using a mixture of word count and project.

"I invoice my clients on the first of the month for work carried out in the previous month, and am typically paid within a day or two," he says.

So determine what works for you, find out what works for them, and once you've settled on a price and a payment method, you're good to go!


Keep Freelance Writers

Once you find and hire a freelancer writer who is top-notch and understands what you want… once you agree to a payment setup and they start delivering consistent, high-quality content… you still face a final challenge: holding on to them.

1. Be Fair with Deadlines

A little common courtesy goes a long way in attracting great freelance talent. Consider their time, the information they need, and the paycheck they expect.

"Don't subject writers to ridiculously short deadlines just because you dragged your feet on your end," Peter Bowerman says. "Pay them on time, and don't make them chase down their money; give them what they need—in terms of source material—to do their job."

2. Be Responsive in Your Inbox

"There needs to be a good balance of communication between both parties to maintain a strong relationship," Kristi Hines says. "While you don't want to ask your freelancer for daily status updates, you don't want to disappear for weeks at a time, either."

Since freelancers are remote workers, it's always a plus to involve them as often as it makes sense; it will help build a valuable working relationship and also turn them into a cheerleader for your brand.

"Making freelancers feel like part of the team is a great way to keep them on board and engaged with your company," Hines says. "The more engaged your freelancer is, the more they will naturally promote your content and your business."

3. Be Receptive to New Ideas

You hired this freelancer because you needed their expertise. For some people, it's hard to let go and hand over creative power to someone else.

"If you're paying good money for a writer, then you should expect to them to challenge you when they feel that the direction you're proposing isn't ideal," Bowerman says. "In the end, you're the boss, so you get it the way you want it. That said, don't ignore their advice along the way."

Samar Owais advises that you treat your freelancer like a partner and not hired help. "They're experts in their fields so trust their judgment," he says. "Offer constructive criticism, and above all, appreciate the good work they do."

4. Be Organized with Feedback

When you establish a check-in system with your freelance writers, you should outline who they report to and who they're working with. Make sure there aren't too many cooks in the kitchen.

"A good way to lose a freelancer is to have a bunch of people provide feedback instead of having one person do it and make your freelancer run in circles trying to satisfy each of them," Owais says.

Sophie Lizard says the key to this is balance: "The best way to keep a freelance writer is to give them plenty of direction without micromanaging—show them exactly what you need, then let them get on with creating it."

5. Be Ready for Rising Costs

As the cost of groceries and rent rises, remember that your freelance writer is seeing the same change in numbers—and has to make changes accordingly.

"Probably the most common reason you lose a freelancer is that, over time, as that freelancer got more established, they raised their rates and…you can no longer afford them," Bowerman warns. "Before you cut a freelancer loose—or they leave—ask yourself if the value they bring isn't, in fact, worth their higher rates. Will it be that easy to replace them? If it will be, then part ways; if not, then how much time will you spend breaking a new writer in, and is it worth it?"


Get Started

In the end, hiring a freelance writer can either be a smooth and painless process, or one filled with frustrating dead-ends, missed deadlines and unexpected high rates. Enter the process with a content topic and type, budget and, most of all, patience, and it shouldn't be long before you find success with freelance writers.

If this is your first time hiring a freelance writer, be up front about that fact. A great freelancer will help you get accustomed to the process as well, making it a better experience for both of you.

If you've hired a freelance writer before, what was your experience and what advice would you give to those navigating this process for the first time?


source https://zapier.com/blog/how-to-hire-freelance-writers/

Friday, 2 June 2017

How to Ruthlessly Prioritize Your Task List to Get More Done

Have you ever noticed how easy it is to make a to-do, but how much harder it is to actually get one done? Good news: there's a secret to completing your to-do, and it's prioritization.

That might sound obvious, but the real trick is to be as ruthless as you can stand, prioritizing tasks until you have only one thing to focus on right now. Then you can't help but get to work!

Prioritization is really hard because it's mostly about saying no. To help ease you in, I've ordered these methods of prioritization with the most ruthless ones at the end. Let's dive in.

Analyze Your Task List

Let's start by looking for any tasks that can be dumped completely. Delegation is a perfect way to quickly cut down your task list—is there anything you're waiting on others for? Get it off your list. Put it somewhere you won't forget it, like a follow-up list or a shared project, but getting it off your normal to-do will relieve the pressure of seeing it there all the time.

Next, take all of the tasks that do apply to you and put them where they belong in this priority matrix from Steven Covey:

priority matrix

Anything that's due soon (or overdue) counts as urgent. As for what's truly important and what's more of a "nice to do" task is up to you, but try to be as honest as you can. Anything that's setting you up for long-term success could be counted as important, such as relationship building, personal health or growth activities or preventive maintenance.

This tool is particularly helpful for those times when you're drowning under a million things to do, as it helps you to visualize what's really important and what can wait. Once you've laid out your tasks, aim to get through the urgent and important tasks so you're not butting up against deadlines. Then you can focus on the most productive quadrant: important but not urgent. These are the tasks that are easy to put off, but provide lots of value when they do get done.

And whatever you do, avoid the busy work and time wasters that land in the not urgent and not important quadrant as much as you can.

Make a Prioritized Task List for Today

schedule

Now that you can more clearly see what needs doing straight away, make a to-do for today only. Ignore everything else you could be doing (until you're ready to plan tomorrow's list).

I like to include any calendar events on my "Today" list, so I see an overview of my entire day and set my expectations accordingly. This also stops me from planning too many tasks on days I'm in meetings for hours.

A good rule of thumb when planning out your day is to underestimate how much you can get done and overestimate how long each task will take. No doubt you've got plenty of things you can do if you happen to check everything off your list for today, which is a much better feeling that always moving unfinished tasks over to tomorrow.

Use MITs

It’s very simple: your MIT is the task you most want or need to get done today. - Leo Babauta, Zen Habits

I advocate for using Most Important Tasks (or MITs) because they've really helped me to write more realistic to-dos. It's a method of prioritizing tasks that has you choose just a few (usually three) tasks to get done per day.

When using MITs, your to-do would have 1-3 of these and anything else listed would become bonus, "nice to do if you have the time" tasks. You only work on bonus tasks if all your MITs are done, and if all you get through are your MITs, you've still had a successful day.

Pick a Single Focus

limitless

We're getting into ruthless territory now. When you're really struggling to get anything done, you should try this method, even if it's just temporarily.

When you look at your task list or your MITs for today, pick a single thing to focus on. It could be one big task you really want to get done, or it could be a theme that relates to several of your tasks, like "increase sales". Choosing a single task or idea to focus on can be a good way to remind yourself to stay on track whenever you find yourself getting distracted.

Google Chrome extensions like Momentum and Limitless (above) are great for these reminders, as they show you what your focus is for today each time you open a new browser tab.

Find Your 20% Task

Pareto Principle

You've probably heard of this idea before, known as the Pareto principle: you tend to get 80% of your results from 20% of your work. You can easily outsource some of the 80% that's not getting you great results, but what's really tricky is working out what that 20% is that brings in the results. Once you do, you can apply the ultimate ruthless prioritization to your workday: make finishing your 20% work your priority—and your benchmark for a productive day.

The best way I've found to identify my 20% work is this simple exercise: first, ask yourself what you'd work on if you could only do three things today. Be ruthless; only pick three. Next, cut that down to two. And finally, just one. If you absolutely had to stop working after doing just one task, which would you do?

It's a really tough question to answer since we all have so many things to get through each day, but I've found it's a good way to realize which of your tasks provides the biggest value when it's finished. For me, writing a new blog post would almost always be my 20% work, since I get returns from writing in various ways—future SEO traffic, social shares and inbound traffic, more visibility for my personal brand and the site I'm writing for, and so on.


I use a combination of these methods depending on how much work I have to get through and how much I'm struggling to get started. As you practice being ruthless with your to-do, you'll find it gets easier and you'll be able to pick the right method at the right time. And hopefully, you'll find that ruthlessly prioritizing tasks can actually be quite liberating!

Credits: Header photo courtesy Kailash Gyawali. Priority matrix courtesy US Geological Survey. Today's task list courtesy Carissa GoodNCrazy. Limitless screenshot courtesy Pune Startups.


source https://zapier.com/blog/prioritize-task-list-methods/

The Beginner's Guide to Dictation Software: The Best Apps for Voice to Text Productivity

Perfect ideas don't wait for you to sit down at your desk. They come during hikes, while you're walking your dog, and in the middle of lunch. Shouldn’t you be able to save those thoughts at any time, no matter where you are or what you’re doing?

That’s what voice dictation is for. It lets you record your ideas hands-free, even if you're folding laundry, walking to the grocery store, or making dinner. And it's one of the best accessibility features on computers, helping anyone write their words without typing.

Voice recognition software can translate hundreds of thousands of words in dozens of languages, in real time. Talk to your devices and tell them to open new apps, send an email, or even tell you a joke. They're what make Siri and Alexa fun—but use that same tech to turn your voice into text much faster than you could ever type, and they'll improve your productivity, too.

We wanted to find how much voice dictation tools impact efficiency, and how well they work. So we tested free, built-in speech recognition software and paid apps on desktop and mobile to see which ones were best at comprehension, accuracy, and ease of use.

Here are the very best dictation apps to turn your voice into text, along with tips for finding the right microphone and creating detailed speech-to-text notes. Plus, you’ll find out if voice dictation is right for you.


How Voice Dictation Helped me be More Productive

I write thousands of words every week, and I'm embarrassed to say that I had never tried voice dictation tools before recently. You can imagine my pleasant surprise when I realized I could dictate an introduction paragraph and turn voice to text in half the time it would take me to type.

After evaluating more than a dozen desktop and mobile apps, my favorite was Google Docs Voice Typing. Google Docs had the best accuracy without forcing me to talk like an android. It also has the most extensive list of voice commands for editing and formatting text—and it's free. Anything you want to do in Google Docs, you could do with your voice.

For mobile, my favorite dictation app was the built-in dictation tool in iOS on iPhone and iPad—and its cousin from Google on Android devices. From opening new apps to texting a friend to quickly recording an idea, I knew I could always count on Siri. The dictation works in any app or browser that has a virtual keyboard, so I didn’t have to jump around in different apps. I also like how easy it is to get up-and-running: Once you turn Siri on, there's little to no learning curve.

I also experienced all the standard benefits of voice dictation. I saved time and energy, was able to multitask while dictating an outline to a new post, and could safely add something to my to-do list while going on a bike ride.

Plus, there was an unexpected benefit: Using a voice dictation app silenced my internal editor. With dictation, I was able to do a pure brain-dump of ideas and, as a result, had more material to work with. Dictation lets me focus on ideation instead of prose.

But my favorite tools might not be for you. Here are some different options to check out over multiple platforms.

The Best Dictation Software

I evaluated dozens of dictation apps and tested them for comprehension, accuracy, and ease of use. Here are our top four dictation tools to turn voice to text on your computer.

App Icon:  Best for: Accuracy Price Languages
Apple Dictation Apple Dictation Continuous, real-time dictation 250 words, 2 inaccurate Free 31
Windows Speech Recognition Windows Speech Recognition Navigating your computer hands-free 200 words, 30 inaccurate Free 8
Google Docs Voice Typing Google Docs Voice Typing Long-form writing 200 words, 1 inaccurate Free 43
Dragon NaturallySpeaking Dragon NaturallySpeaking Hands-free workflows 250 words, 1 inaccurate from $15/mo. or $99 one-time 31

Apple Dictation (iOS, Mac)

Apple Dictation

Look no further than your Mac, iPhone, or iPad for one of the best dictations app. Apple’s Siri-powered, built-in Dictation is included recent versions of macOS and iOS. By default, you can dictate up to 30 seconds at a time while connected to the Internet, using Siri’s servers to detect and translate what you said. It’s great for dictating something quickly on the go, but not the best choice for composing an essay.

If your Mac is running OS X 10.9 or later or you have an iPhone 6s or newer, you can use Enhanced Dictation for unlimited dictation. Enable it from the Dictation option in System Preferences, and your Mac will download a file with advanced dictation tools. Then, just press a hotkey or say a dictation keyword phrase on your Mac—or press the microphone icon on your iPhone or iPad's keyboard—and you’ll hear that familiar Siri ding prompting you to start dictation.

This is when Dictation is at its best. You can dictate continuously, with no time limit and without being connected to the Internet. The text will appear in real time in almost any app, aside from Google Docs. There’s no need to touch your mouse at all; you can say commands like New Line to start writing on a new line; just stop talking to pause the dictation.

And for quicker dictation, you can just use Siri. Ask it to save a note or send a message, and you can dictate the text right from Apple's voice assistant.

Accuracy: Of the 200 words I dictated using standard Dictation, only three were inaccurate. Of the 250 words I dictated using Enhanced Dictation, only two were inaccurate.

My Recommendation: I would only recommend using Apple’s pre-built dictation feature if you can use Enhanced Dictation. The standard Dictation is just too annoying and inconvenient for anything longer than 30-seconds—though it's still great for dictating quick messages on the go. On the other hand, the enhanced option makes dictation as easy as possible—it’s free, you don’t have to use your mouse, and you can work offline in a number of different languages.

Languages: Apple Dictation supports 31 languages, including English, Arabic, Catalan, Chinese, Croatian, Czech, Danish, Dutch, Finnish, French, German, Greek, Hebrew, Hungarian, Indonesian, Italian, Japanese, Korean, Malay, Norwegian, Polish, Portuguese, Romanian, Russian, Slovak, Spanish, Swedish, Thai, Turkish, Ukrainian, and Vietnamese. Siri and Enhanced Dictation supports only 20 languages.

Dictation Commands: Click here for a full list of dictation voice commands.

Price: Free with a Mac, iPhone, or iPad

Windows Speech Recognition (Windows XP and newer)

Windows Speech Recognition

Windows also offers free, built-in voice dictation with Speech Recognition. Available on all versions of Windows since XP, Speech Recognition lets you type and use simple commands with your voice.

Enable Speech Recognition by clicking on the Start button and selecting All Programs > Accessories > Ease of Access > Windows Speech Recognition. You can then choose to activate Speech Recognition with your mouse (manual activation) or with a voice command of Start Listening (voice activation mode).

Then just open a browser, program, or web application to start dictating. You can also use voice commands when working with text—they let you speak commands that do things like delete sentences, go to the end of the current document, and put a cursor after a specific word.

If you have Windows 10, you can enable Cortana for a more powerful hands-free experience. Microsoft’s personal assistant can be activated by saying “Hey Cortana” and you can use voice commands for things like searching, opening different apps, saving quick notes, or finding directions—much like Siri on a Mac.

Accuracy: The first time I used Speech Recognition, I dictated 200 words and 30 were incorrect. However, Speech Recognition needs to be trained and the accuracy will improve the more you use it. If your PC has a tough time translating, click on the microphone widget and select Configuration > Improve Voice Recognition. You'll be sent to a voice training where Speech Recognition learns your voice and accent.

My Recommendation: Cortana and Speech Recognition together offer a strong dictation package. You can use voice commands to control and type almost anywhere, and can start and stop dictation without your mouse. But don’t judge Speech Recognition’s quality after the first go-round—you'll need to use it a couple times to see its full potential.

Languages: Windows Dictation and Cortana work with 8 languages, including English, French, Spanish, German, Japanese, Simplified Chinese, and Chinese.

Dictation Commands: Click here for a full list of voice commands.

Price: Free

Google Docs Voice Typing (Web)

Google Docs

Google Docs takes voice dictation to the next level. It not only lets you type with your voice, but also helps you select text, add formatting, and move around your document, all with a few phrases.

Only available in Google Docs inside Google Chrome, Voice Typing is a free tool from Google. Enable Voice Typing in the Tools menu and you’ll see a microphone appear on your document. Simply click that microphone to start and stop dictation, and the translated text will appear in real time.

The real magic of Google Docs Voice Typing comes from its voice commands that let you format and edit as you go. You can say Create Bulleted List to make bullet points, Select Word or Phrase to edit, italicize, bold, underline, or delete, or Go to End of Paragraph to move around in your document. With more than 100 commands, you can do almost anything in Google Docs without using your hands.

Accuracy: Of the 200 words I dictated, only one was incorrect. Voice Typing was also able to keep up and accurately translate when I was speaking at my normal pace. Plus, it understands the context: When you say a voice command like Create Bulleted List, for example, it may start to type that out as a normal dictation, but then it soon realizes you are dictating a formatting command and will automatically delete the dictation and apply the formatting.

My Recommendation: I use Google Docs every day and found Voice Typing to be incredibly helpful. It's one of the only voice dictation apps that I could realistically see myself using for dictating a long piece. I love how hands-off you can be—the fact that you can edit and format with voice commands is a major differentiator among free dictation apps.

Languages: Voice Typing works with 43 languages; however, voice commands (for editing and formatting) are only available in English.

Dictation Commands: Click here and go to the Voice commands section for a list of all available commands.

Price: Free

Dragon NaturallySpeaking & Anywhere (Android, iOS, Windows, Mac)

Dragon NaturallySpeaking

If you never want to touch your keyboard or mouse again, Dragon NaturallySpeaking is the voice dictation tool for you. Created by Nuance Communications, Dragon is the industry standard speech recognition software that works across all programs and web browsers. It offers nine different products that range from personal to industry-specific tools—like medical or legal editions with industry-specific dictionaries.

Based on the option you choose, you'll end up paying anywhere from $100-500 for Dragon on your computer. Dragon for Mac supports OS X Mavericks and newer, while Dragon NaturallySpeaking 13 for PC supports Windows 7 and newer. Or, on mobile, you'll pay around $15/month for the same dictation features on the go.

Once Dragon has acclimated to your voice and accent in the setup process, there is no limit to what you can do. You can use voice commands to control programs and web browsers, and dictate in any web application.

And with the Professional version, you can set custom commands for recurring tasks. When you say New Client, Dragon could open your sales management tool, log in for you, and build a new blank record. It's an advanced voice workflow tool that will help you do your job just by talking.

Accuracy: Dragon does not offer a free trial on desktop, so we used its mobile app to test accuracy and comprehension. Of the 250 words I dictated, only one was incorrect.

My Recommendation: Dragon NaturallySpeaking is a hefty investment—both in terms of price and learning curve. However, if you want to create a completely hands-free workflow, Dragon is worth it.

Languages: Dragon NaturallySpeaking supports 7 languages, including English, French, German, Italian, Spanish, Dutch, and Japanese—and its mobile apps work in 31 languages.

Price: $15/month Dragon Anywhere mobile apps for iOS and Android; from $99.99 for Dragon NaturallySpeaking Home; from $300 for full-featured Dragon Professional Mac or PC

The Best Mobile Dictation Apps

When inspiration hits, don't trust your brain to hang onto that idea until you can find a pen. Instead, whip out your phone and use it as a sounding board.

Here are the best six voice to text apps for dictation on mobile devices—along with the aforementioned Dragon Anywhere.

App Icon:  Best for: Price Languages
Siri Siri Simple dictation on Apple devices Free 20
Cortana Cortana Personalized, interactive dictation Free 8
Google Now Google Now Third-party integrations Free 43
Speech Recogniser Speech Recogniser Dictation and translation to other languages $9.99 26
ListNote ListNote Recording voice and turning it to text at the same time Free; $4.99 43
Gboard Gboard Voice to text in a powerful keyboard Free 21

Siri (iOS, macOS)

Best for: Simple dictation on Apple devices

Siri

Apple’s personal assistant, Siri, comes preinstalled on all its mobile products (iPhones, iPads, iPod touches, Apple Watches, and Apple TVs). Once you turn Siri on in Settings, hold down the Home button until you hear the Siri ding. Or, you can say “Hey Siri” to an iPhone 6s or newer, or an iPhone 5 or newer if charging.

While Siri will accurately translate your voice into text, she also has a few tricks up her sleeve: She can talk back to you and understand relationships and context. For example, you could ask Siri to check your voicemail, send a new email to a certain person, read your notifications, set reminders, get directions, make dinner reservations, or save a note.

Or, you can access the same dictation features as OS X dictation, just by tapping the mic icon on the keyboard in any app. That'll let you dictate for up to 30 seconds—even when offline with supported languages. It's enough to help you write a quick reply; not quite enough to dictate an essay, though.

Languages: Arabic, Cantonese, Danish, Dutch, English, Finnish, French, German, Hebrew, Italian, Japanese, Korean, Malay, Mandarin, Norwegian, Portuguese, Russian, Spanish, Swedish, Thai, and Turkish

Dictation Commands: Click here for examples of what you can say to Siri.

Price: Free

Cortana (Android, iOS, Windows)

Best for: Personalized, interactive dictation

Cortana

Siri isn’t the only personal assistant around. Microsoft’s Cortana comes with Windows Phone and is built into Windows 10 desktops—and also works on iOS and Android now. It's an artificial intelligence, hands-free helper.

Press and hold the Search button, open the Cortana app, or say the “Hey Cortana” voice command to begin. Cortana can send text messages, add items to your calendar, take notes, play music, check the weather and more. You can also just chat with her about whatever is on your mind—she may even tell you a joke.

When you need to save dictated text, just have her save a note—that'll add your dictated text to OneNote for easy access later.

Languages: Chinese (Simplified), English, French, German, Italian, Japanese, and Spanish.

Dictation Commands: Click here for a list of voice commands.

Price: Free

Google Now (Android, iOS, Web)

Best for: Third-party integrations

google now

Say “Ok Google” and your Android phone is instantly listening. On Android 4.4 and later, Google’s smart personal assistant, Google Now, comes with voice commands.

Open the Google app and go to Settings to turn on “Ok Google.” From there you can choose activation options like making “Ok Google” available all the time, or only when your phone is active or charging. Not an Android person? On iOS devices, you can use "Ok Google" inside the Google app for its core search features—which is at least enough to search the web and save a new dictated note to Google Keep.

You can use “Ok Google” on Android for almost anything, such as calls, text, email, browsing the web, locking your phone, opening and closing apps. “Ok Google” voice commands also work with a handful of third-party apps, including NPR One, WhatsApp, Viber, and Zillow. And on your computer, you can use the same voice recognition to search the web from google.com with your voice.

Languages: 43, including English, French, German, Italian, Japanese, Korean, Portuguese, and Russian, Spanish, and more.

Dictation Commands: Click here for a list of voice search and actions.

Price: Free

Speech Recogniser (iOS)

Best for: Dictation and translation to other languages

speech recogniser

The Speech Recogniser app is a dictation powerhouse. You can use it to translate your text into more than 26 languages, post directly to Facebook or Twitter, copy your transcribed text to other apps or send via email.

Once you install and open Speech Recogniser, you choose a source language on the home screen and tap the start button to activate the dictation. When you’re done, a new screen will appear with your text. You can then translate, share, or even play back your dictation.

It's a quick way to jot down transcribed notes and even translate them into another language when you need.

Languages: English, Arabic, Bulgarian, Catalan, Czech, Danish, Dutch, Finnish, French, German, Greek, Hindi, Hungarian, Indonesian, Italian, Japanese, Korean, Malay, Norwegian Bokmål, Polish, Portuguese, Romanian, Russian, Simplified Chinese, Spanish, Swedish, Thai, Traditional Chinese, Turkish, and Ukrainian.

Price: $9.99

ListNote Speech-to-Text Notes (Android)

Best for: Recording voice and turning it to text at the same time

listnote

With over 20,000 reviews on the Google Play Store, ListNote Speech-to-Text Notes is one of the most popular speech recognition apps for Android.

It combines the classic notepad functionality with voice dictation, using your phone's built-in Google Voice Search to turn voice to text while recording the audio at the same time. Each dictation is saved as a searchable note that you can categorize and color-code. You can then share these notes via email, text, Twitter, or any other note-taking app. And, you can listen to the recorded audio while reading through the transcribed text and your own notes at the same time.

ListNote also offers a handful of unique features, like the "Time to Breathe" option that lets you choose how long to wait before stopping speech input. You can also enable password protection for your notes or back up and encrypt them on an SD card.

Languages: Supports all 43 of Google's built-in dictation languages, including Chinese, Czech, Dutch, English, French, German, Italian, Japanese, Korean, Polish, Portuguese, Russian, Spanish, and more.

Price: Free

Gboard (Android, iOS)

Best for: Universal voice-to-text

Gboard for iOS inside Apple Notes

Gboard is perhaps the most powerful keyboard yet. You can type or swipe in text on iOS and Android, using Google's smart predictive text to type without mistakes. Or, you can search Google right from your keyboard, pulling in GIFs and images from the web and checking the weather without leaving your keyboard.

Press-and-hold on the space bar, and it'll turn into one of the better mobile dictation tools, too. You can talk as long as you want, and Gboard will keep transcribing your text—and will add it all to your app once you're done.

That way, in any app you're using, you can get the same dictation results on iOS and Android—without time limits.

Languages: English, Catalan, Chinese, Croatian, Czech, Danish, Dutch, Finnish, French, German, Greek, Hungarian, Italian, Malay, Polish, Portuguese, Romanian, Russian, Spanish, Swedish, and Turkish

Price: Free


How to Successfully Dictate Text

sound

Do you, like, speak with a lot of, um, filler words? Or, do you tend to speak in very long sentences because you have so many details you want to convey and you always remember new things you want to add as you start talking?

Your shiny new dictation apps are impressive, but they aren’t perfect. You won’t be able to to talk to the app in the same way you talk to your best friend, with mile-a-minute stories or slang. Keep these pointers in mind when chatting with a dictation tool:

  • Have a plan: Create a mental outline of what you want to say and the main message you want to write down before starting dictation. It's not that you have to spend hours fleshing out your idea, it’s just easier to structure and organize your piece if you’ve spent some time thinking about the end goal.
  • Talk like you write: We tend to write far more clearly than we speak. Some of that comes down to editing, but speech includes more slang, half-sentences, pauses, and incorrect grammar. Your dictation app will jot down exactly what you say, so unless you're writing example conversation, you'll need to talk far more like written text.
  • Speak like a newscaster: Almost everyone slurs words together or softens the “t” or “d” sounds at the end of sentences. With a dictation app, you need to enunciate much more clearly than in normal speech. You don’t need to speak like a robot; instead, pretend that you're reporting the news.
  • Use short sentences: Some apps—including Apple’s dictation feature—can only listen for 30 to 40 seconds by default. If you tend to ramble, your sentences could get cut off. Try to speak in short, concise sentences. You can always go back and add more detail if necessary.
  • Avoid filler words: Try not to use filler words including “you know,” “like,” or “um.” If you forget what you were going to say or don’t know what to say, just take a quick pause. It’s better to wait quietly or pause the dictation than to have to edit out everything.
  • Remember to punctuate: Dictation tools won’t be able to interpret your pauses as periods or commas. Instead, you’ll have to say “comma,” “period,” “hyphen,” and so on. If you’re worried about forgetting to say the punctuation aloud, write them on Post-It notes and hang them up around you.
  • Practice: It takes some time to adjust your speaking style for voice dictation apps, but it gets easier the more you practice. At first, write down what you want to say and then read it to your dictation app. This will let you see what the app does and doesn’t understand, and allow you to make tweaks as you go. As you get more comfortable, you can transition to dictating from memory (rather than reading aloud) and eventually speaking spontaneously.

Which Microphone to Use for Dictation?

While each dictation app on this list is compatible with your built-in microphone, the best option for quality and accuracy is to use an external microphone.

The earbuds that came with your phone are a great place to start. For an upgrade, here are three general kinds of microphones you can choose from, along with recommendations from The Wirecutter:

  • Wired headset: Headsets offer the highest quality dictation experience. Because the microphone is directly in front of your mouth, you don’t need to worry about ambient noise. A wired headset does limit your movement because you’re attached to your computer, but it also provides for one of the most reliable, accurate dictations. Check out: The Jabra UC Voice 550 Duo for around $50.
  • Wireless headset: If you want more freedom, go for a wireless headset. These are often more expensive than a wired headset, but you can get up and move around. Make sure to pay attention to the range on wireless headsets; some are limited to 30 feet, while others go up to 100 feet. Check out: The Plantronics Voyager Edge for around $130.
  • Desktop microphone: If you don’t want to wear a mic on your head, or want even higher audio quality, a desktop microphone is a good alternative. This kind of microphone sits on your desk and requires you to park yourself right in front of it. If you move your head or shift positions, the accuracy will suffer. And, of course, it won't work with mobile dictation apps without an adaptor. But if you want to record videos or podcasts, you'll get the best quality recordings along with reliable dictation. Check out: The Yeti by Blue for around $130.

There's no right or wrong microphone—it all depends on what you are looking for. If you're in a busy, loud environment, a headset might be better for canceling out background noise. If you like to pace around your room for inspiration, you should go for a wireless headset. Or, if you don’t want anything attached to your head, a desktop microphone might be the best choice.

And if you're mostly dictating short things on the go, your phone's built-in mic will likely get the job done just fine.


Is Voice Dictation Right for You?

I started this journey as a dictation newbie. After trying more than a dozen dictation apps, I’m sold. I can save time, multitask, and silence my internal editor.

If you’re still wary of voice dictation, remember that you don’t have to use it for every single thing you do. Try it for something quick and easy, like making a grocery list or setting a reminder on your phone. As you get more comfortable, you can use it for a creative brainstorm or even composing an email. You just might get addicted.

However you use voice dictation, I guarantee this: You'll miss your keyboard or mouse far less than you'd expect.

Do you have any favorite voice dictation apps? We’d love to hear about them in the comments below!

Microphone photo by Antoine Beauvillain via tookapic.


source https://zapier.com/blog/best-text-dictation-software/

Thursday, 1 June 2017

How to Fix Your Broken Perception of Time

Your boss just asked that dreaded question: "When can you get me that report?"

How do you respond? You might answer based on how long it took to complete a similar task. Maybe you'll try to impress her by promising to get it done today. Whatever you say, chances are your estimate will be wrong.

Let's face it: humans are notoriously bad at setting deadlines and estimating time. The comforting fact is that it's largely not our fault.

Many factors play a part in our distorted perception of time, and most are difficult or impossible to modify. Time itself is not something we can change either, despite all our dreams of time machines.

What can we do? To fix our broken perception of time, we can reevaluate our relationship with it, become more aware of how we spend our days, and understand how our perception of time influences productivity. We can also seek time-management methods that will make us feel more in control of our time and less like its victims.


Why Is Your Perception of Time Broken?

Time isn't as fixed as clocks would make us think

Time is a fascinating concept; just thinking about it can make your head swirl. Although it affects us all, not everyone experiences time equally. Our perceptions of time are shaped by our native and local cultures, the languages we speak, our occupation and age, the technologies we use, and above all else, by the processes in our brains.

It's All In Your Head

We don't naturally perceive time as a specific quantity. We instead perceive changes that happen as a result of time passing. We observe the duration and succession of events, and translate that into measurement units—seconds, minutes, days. This is the one situation when it's appropriate to say "it's all in your head", because it's true—your time perception is created in the brain.

Among other things, our perception of time depends on how fast our brains process sensory input. It is also affected by the senses themselves, and studies show that an auditory event can appear to last longer than a visual one.

Chemicals play a part, too, including dopamine. According to recent research, we feel like time is passing faster when we're engaged in pleasurable, rewarding activities which increase dopamine activity in the brain.

Damage to certain parts of the brain can seriously skew our perception of time. We find examples of this in medical conditions such as dyschronometria, Parkinson's disease, and schizophrenia. A study published in 2015 found that depression can impact the way we perceive time.

Last but not least, our memory is both cause and effect of glitchy time perception. When we experience a lot of changes within a period of time, we tend to remember the event as lasting longer.

Your Body Constantly Changes in Response to Time

biological clock
The human biological clock, via Wikimedia

One of the central questions in time perception research is whether our bodies have a single “main clock”, or if our perception of time is governed by multiple structures in the brain. What is certain is that we have a sort of an internal timing mechanism. Called the circadian clock, it keeps our mental and physiological processes synchronized with the Earth’s day-night cycle. Disruptions in this rhythm can affect our well-being and, consequently, our productivity.

The most obvious way our bodies respond to passing of time is ageing. As we get older, our organisms change, and so does our perception of time, making us feel like time is passing faster. The next time grandma sighs "How time flies!", remember that it really does—from her perspective.

Your Culture Makes You Do Weird Things

people blur
Running late or early? That may depend more or your location and culture than the clock

Being late is almost never a good thing, but if you're meeting an Indian colleague, they probably won't mind if you don't show up exactly on time. However, if you're going to a meeting in Japan, you'd better hurry up. In his book "A Geography of Time", Robert Levine explains how attitudes to time vary across countries and cultures. Western Europeans and Japanese value punctuality, while Brazilians seem to have infinite tolerance when deciding what counts as being late for an event. In Germany, you're expected to arrive early, and in Mexico everyone counts on you coming late—because that's exactly what they will do.

The languages we speak and write clearly reflect those differences. People who use a right-to-left writing system map events on a timeline in the direction of their writing, placing the most recent events on the left side.

Levine mentions that tribes and ethnic groups from rural parts of the world measure time by events from their surroundings. Instead of at 7 AM, they meet "when the cows come out to graze". Another example is Shambala, an East African language without words for past or future—the speakers describe time as “today” and “not today”.

You don't need to step outside the English language to find proof of this. We ask how far the closest Starbucks is, and our friend says it's a five-minute drive. Many people in the US and Western European countries use time to express distance. One of the reasons is that they assign a high economic value to time, and tend to filter everything through it. When “time is money” people don't want to waste it, which increases the general pace of life.

Every culture has its notion of “social time” which comes with a set of behaviors and expectations. It's important to recognize this when working in a multicultural environment, and respect other cultures' attitudes to time. In other words, if you're in Spain and everything closes down for the midday break, don't fight it.

You're Not In Sync With Your Surroundings

Of course, living in a particular culture doesn't automatically make you synchronized with all its people. We know that perception and experience of time are highly individual, and everyone has their own natural schedule. However, if your internal time (the relationship between your sleep cycles and energy levels) doesn't align with the social time of your current location, you might have trouble staying productive.

For example, you might feel social pressure to be a "morning person", even though you produce your best work later in the day. Maybe you simply need more sleep than others. Maybe your workplace favors the monochronic approach and expects you to perform tasks one at a time, but you're a polychron—someone who functions better when multitasking.
Seemingly innocent things like working with clients from different time-zones or living in a country that enforces daylight saving can also unsettle your perception of time. This is related to the competing notions of "clock time" and "event time" which operate on a higher level.

Most modern workplaces follow the "clock time"; a system where all activities are strictly scheduled, and tasks must be completed within a specific period. In clock time, there is no room for unpredictable obstacles that can derail our plans and cause us to miss a deadline.

Since our daily lives are a flow of events that drag on, overlap, or get postponed, it would be more natural for us to follow the "event time", a system that allows us to complete tasks whenever it’s most convenient. However, we often have to adhere to both systems in order to accomplish all that is expected from us. Add to this the demands imposed by social time and our internal time, and it's no wonder we fail to keep in sync with our surroundings.

Technology Plays Tricks on You

Pebble watch

Technology is a blessing and a curse when it comes to our relationship with time. Clocks, calendars, and their digital counterparts help us make sense of our workdays, but they inevitably influence the way we perceive time. A simple instrument such as a digital clock affects your perception of time differently than an analogue one. The latter represents time as a process, with visual cues as to what has passed and what comes next. A digital clock just shows the time in this moment.

Unsurprisingly, more complex devices have a more profound effect. Many of us reach for the phone whenever we are bored or waiting for something. Using our phones makes time seem to pass faster, creating an illusion of control. We browse social media to fill in the "empty" waiting time and convince ourselves it's better than "doing nothing". In this way, social media can blur the line between leisure and work time, between productive activity and distraction.

And yet, we're not the only ones who practice deception. It's no secret that designers use certain colors to influence emotion and perception. Using blue and green for progress bars makes people think their files are downloading faster. Some interfaces trick us with animations and lazy loading to make waiting time seem shorter. Many websites provide their own estimates of how long it takes to consume the content. If a promised 3-minute read turns out to take longer, don't worry. You can always bookmark it in one of the countless apps that strengthen the illusion that you will somehow have more time later.

How Your Perception of Time Affects Your Productivity

Time

The effects of our distorted perception of time spread like a chain reaction. We become prone to biases and time illusions. Those biases then influence our decision-making and time estimates. Since our productivity is directly related to both, it's easy to see how a distorted perception of time can negatively affect our performance.

You’re Terrible at Estimating Time

We make many time estimates every day; without them, it would be difficult to plan anything. The problem is that they are often inaccurate. A study on time management showed that, in general, people are better at estimating time in passing than predicting the duration of future events.

A well-known bias that illustrates this is the planning fallacy, a phenomenon where we underestimate the time required to complete the task despite our previous experience. However, if we're motivated to complete the task early so that we can begin working on the next one, we're more likely to make a safe estimation and say the task will take longer.

Another thing that impacts our estimations is divided attention, which Paul Fraisse highlights in his review of time perception research. When we have multiple tasks going on, it's harder for us to estimate duration than when we have a single task. We also often forget to include time for breaks into our estimates.

It's important to realize that our time perception and estimations depend on the context, which encompasses our emotional state, motivation, and type of work. Psychologists believe that our self-perception also plays a key part. If we’re confident in our ability to perform the required task, we are less likely to procrastinate, and therefore our time estimation is more likely to be correct.

Still, positive emotions can be a double-edged sword. If an activity is pleasant, time seems to pass more quickly, or we might not even notice it passing. A study on the experience of “time loss” among videogame players reported that a staggering 99% of participants lost track of time while playing. This also happens when you're deeply focused on work.You become completely immersed in your tasks and stop paying attention to time; in other words, you enter the flow state.

You Choose the Wrong Productivity Methods

Even when we're aware of our time-related biases, we don't always choose the best way to cope with them. Many of us try to compensate by "time deepening"—trying to work faster or juggling several tasks at once. We try sleeping less, or we attempt to optimize our time usage by combining different time-management methods. While the latter is generally a reasonable approach, remember that not every productivity method is suitable for your job, type of task, or your personality.

Some time management tips can even conflict each other. For example, finding your “prime time” and doing “the worst thing first” can be counterproductive if applied simultaneously. If your prime time is in the morning, you will not be motivated to spend it on an unpleasant task.

Other time-focused techniques, like timeboxing and Pomodoro, can put too much pressure on the individual and lower the quality of work as one aims for speed. They can be great for administrative tasks, but creative work doesn't always play well with constraints.

As anyone who has tried GTD (Getting Things Done) knows, this method makes it easy to fall into the trap of spending time on organizing to-do lists instead of completing them. You will still feel like you used your time productively, but little will actually get done.

What Can You Do to Fix Your Perception of Time?

watch repairman

We've looked at the causes of our broken perception of time and the consequences it has on our productivity. Plenty of those explanations might sound like excuses despite their scientific background. While you might not relate to all of them, you can still apply that knowledge to become better at organizing your time. Of course, this process requires a reasonable amount of self-control and a willingness to experiment with your habits.

1. Acknowledge

The first step is admitting there’s a problem. Think of situations where you experienced "time loss", or instances when you significantly misjudged the duration of an event. What was the context? In which activities were you engaged? Which factors contribute the most to twists in your perception of time? This will help you focus on the cause(s) of distortion.

2. Analyze

RescueTime

Successful time management is not only about correctly estimating time. It's also about accurately keeping track of passed time. If you're still in the dark about your biggest time-sinks, turn to time-tracking. You can do it actively or passively.

The active approach requires manual input. This can take the form of a handwritten journal, or you can use time-tracking apps like Toggl to log what you are doing. You can set reminders at regular or random intervals, or use an app like SaveMyTime that implements spot checks and prompts you about your current activity. Note that this approach isn't for everyone, since it interrupts your workflow and might break your concentration.

On the other hand, the passive approach relies on software that runs in the background and automatically collects data. RescueTime is a great option for tracking your online activities.

Once you've collected sufficient data, don't let it go to waste! Time-tracking makes little sense if you don't learn anything from it. Visualizing data helps you understand it, and you can use Zapier with RescueTime and Toggl to generate neat reports. Create Zaps that will automatically deliver time-tracking summaries to your inbox, add them to Google Sheets, log them to an Evernote note, and more.

Observe patterns in collected data. Does your productivity spike at certain points during the day? Do you tend to work in large chunks of time? How much time do you waste on social media?

These insights will highlight your habits and productivity-related preferences, making it easier to find a productivity method that suits you. You will also become aware of how you spend your time, and hopefully realize what causes your perception of time to clash with reality.

3. Alleviate

When you get a clearer picture of the weakest points in your time perception, you can work on reducing their impact. You won't become as accurate as a Swiss watch, but you can improve your time estimates and adopt a healthier attitude to time management. Here are some tips to try.

Become More Aware of Time

sand timer

Place a clock (preferably an analogue one) in front of you while you work. Use an hourglass for an even stronger visualization.

Why this works: Visualizing the passage of time increases your awareness of it, since it demands more of your attention. Some people find clocks distracting, or feel anxiety and pressure to rush through their tasks when facing a clock, so this won't work for everyone. However, it might work for you. Seeing the seconds tick away can urge you to snap out of procrastination and focus on your priorities.

Practice Estimating Time

Work against a countdown to train yourself to always spend the same amount of time on a recurring task (responding to emails, household chores…). If you don't mind listening to music while you work, pick an album that matches the desired task duration. Before you start working on a task, guess how long it will take to complete it.

Why this works: Task timing helps you establish a rhythm that can make your time estimates more precise. Personal development writer Steve Pavlina suggests that keeping a record of your guesses can help you calculate your "fudge ratio" - how much your estimates deviate from the actual time you spend. You can use this knowledge to combat the planning fallacy.

Change What You Can

Using the insights from your time-tracking experiments, eliminate apps that encourage procrastination (or at least try to minimize their usage). Instead of reflexively clicking "save for later" on every article you come across, stop and ask yourself "will I really read this later?".

Similarly, you can change your attitude towards unfinished tasks by being strict and honest with your priorities, as Laura Vanderkam advises in her book “168 Hours: You Have More Time Than You Think.”. If you often catch yourself saying "I don't have time for this," practice framing it as "this is not a priority."

For a more radical change, consider traveling and, if possible, staying for a while in a country where general attitudes to time are very different from your own.

Why this works: Actively thinking about the tasks you choose (not) to do makes you feel in control of your time, instead of perceiving it as something that just happens to you. A change of environment can make you more aware of how you use your time and inspire you to be more productive, writes Julia Roy at Fast Company.

Try New Things

If you've never tried volunteering or meditation, now is the time, as both can positively influence your perception of time.

Why this works: As a study from 2012 says, "giving time gives you time", which is to say that volunteering makes you feel like you have more free time. Volunteering on tasks you don't usually do can show you how much you can achieve in a given period of time.

When it comes to meditation, research shows that doing it regularly improves your ability to maintain attention longer, meaning it won't be so easy to distract you with cat videos anymore.

Trying new things can apply to productivity methods, too. Armed with a fresh understanding of your relationship with time, you can be better at adapting task-management tools to your needs.

4. Accept

No matter how much you tweak your perception of time, there will always be some time lost. You will get stuck in traffic. You’ll have to wait for important files from a coworker. You’ll watch just one more YouTube video.

And you know what? Time will keep passing, indifferent to your struggles.

Perhaps the best you can do is simply accept you’re human. You’re not a robot who can always perform at the same speed, with invariable amounts of energy and enthusiasm. We all get 168 hours in a week, but we don’t have equal resources to help us make use of those hours. Do you have an army of assistants, housekeepers and nannies? Keep that in mind when comparing yourself to other people's amazing time-management skills.

Establish discipline at your own pace, and don’t dwell on the time you’ve “wasted” so far. Instead focus on the endless potential of the minutes, hours, and days ahead of you.

Image Credits: Title photo by col_adamson via Flickr, Salvador Dali's The Persistence of Memory via Wikiart, Biological clock graphic by YassineMrabet via Wikimedia, Crowd blur photo via Pexels, Time photo by Sean MacEntee via Flickr, Watch repairman photo by Seán Ó Domhnaill via Flickr, Pebble watch photo by Jonas Birmé via Flickr, Sand timer via Pexels.


source https://zapier.com/blog/fix-time-perception/