Monday, 7 May 2018

Automate Your Inbox with these Tips, Tools, and Templates

Email helps us connect, communicate, and collaborate—but does it help too much? We receive an average of 94 business emails every day and devote almost one-third of our time at work to email management. Bottom line: the benefits of email often come at the expense of productivity.

To reclaim your time, automate your inbox. Here are the tips, tools, and templates you need to get started.

An Introduction to Inbox Automation

Let's start with a definition:

Inbox automation is the process of setting up workflows that complete repetitive email tasks automatically—so you don't have to.

When you think about it, a lot of the emails we receive are redundant. We answer the same questions over and over again, go back and forth looking for a good time to schedule a meeting, and move newsletters into a folder of emails we'll get around to reading… one of these days. These tasks are necessary, but they're usually repetitive and mindless.

They're ideal for automation.

Even if you're just automating the process of moving newsletters into a to-do folder—a task that takes no more than five seconds—the time you save adds up. And the more inbox automation workflows you create, the more time you save, and the more time you have to focus on the important tasks that happen outside of your inbox.

Start by Deciding What Tasks You Should Automate

Before automating your inbox, you need to determine what types of inbox management tasks to automate. There are a couple ways to do this:

  1. Scan through a month's worth of emails in your archive to look for examples of repetitive tasks you completed recently.

  2. Track the types of tasks you complete in your inbox for a month. Take notes on the types of things you do regularly.

Here are some examples of common time-wasting emails:

  • Frequently answered questions: Questions you answer over and over again.
  • Availability requests: People looking for openings in your schedule to set a meeting.
  • Newsletters and marketing emails: Things you want to read or review… later.
  • Unsolicited requests: Strangers who want you to do something for them.
  • Tasks: To-dos that belong in your task management system.

Reviewing a month's worth of emails probably won't catch every task you should automate, but it will help you identify the ones that eat away at your time most often.

Once you know the types of emails you want to automate, it's time to set up your automated workflows. Follow the instructions below to set up workflows for the most common time-wasting inbox management tasks, and start reclaiming the time you waste in your inbox.

Automate Responses to Frequently Answered Questions

Back when I worked as a product manager, I was the go-to subject-matter expert (SME) for my product. Being an SME sounds much fancier than it is: For the most part, it just means answering the same questions over and over again—usually via email.

There are a few ways to deal with responding to FAQ's. You could

  • recreate and retype the answer every time.
  • find an old answer and copy-paste it into the new email.
  • use a tool to save commonly used responses and add them to new emails with one click.

Door #3 requires the least amount of time and effort. And with the right tool, it's easy to set up. Here are several options to consider.

TextExpander

TextExpander lets you create and save snippets of text and insert them into new emails and replies instantly using a keyboard shortcut.

Here's how to set it up:

  1. Create an account and download the app from the TextExpander website.
  2. Create a snippet in the TextExpander app for each response you send frequently. Make sure to give your snippet a name in the "Label" field and create a keyboard shortcut in the "Abbreviation" field.
    TextExpander set up
  3. After creating your snippets and keyboard shortcuts, just type the appropriate abbreviation into an email response, and TextExpander will automatically insert the snippet.
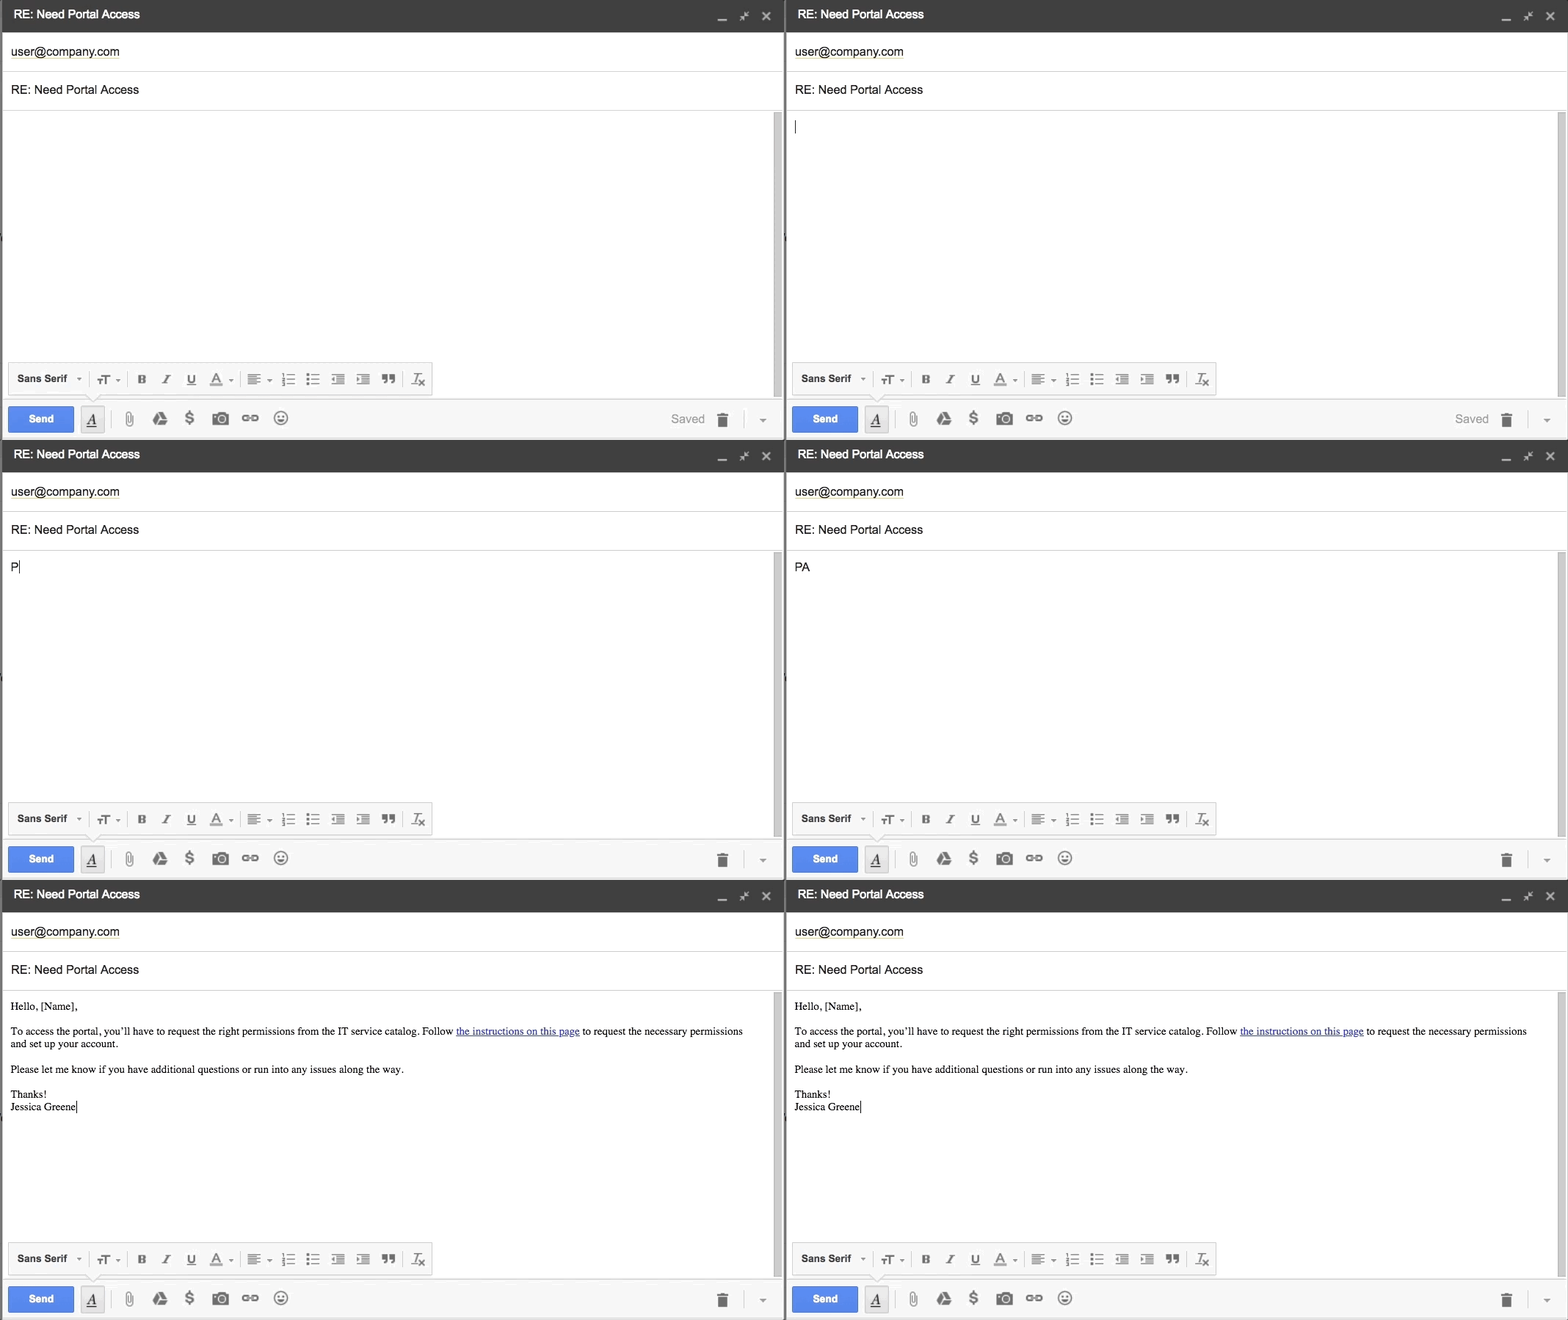
TextExpander inserting snippet

Magic.

The best thing about TextExpander is it works in every application—not just email. So if you also answer questions in Slack or over IM, you can use TextExpander in those programs too.

TextExpander pricing: From $3.33/month for the Life Hacker plan after a 30-day free trial.

Outlook 365 Quick Parts

If you use Outlook 365 and don't want to pay a monthly fee for TextExpander, use Outlook's Quick Parts feature to create and insert default responses. Here's how to set it up:

  1. Find a pre-typed response you want to save, or type a new response into a new email. Highlight all of the text, and click the "Insert" tab.
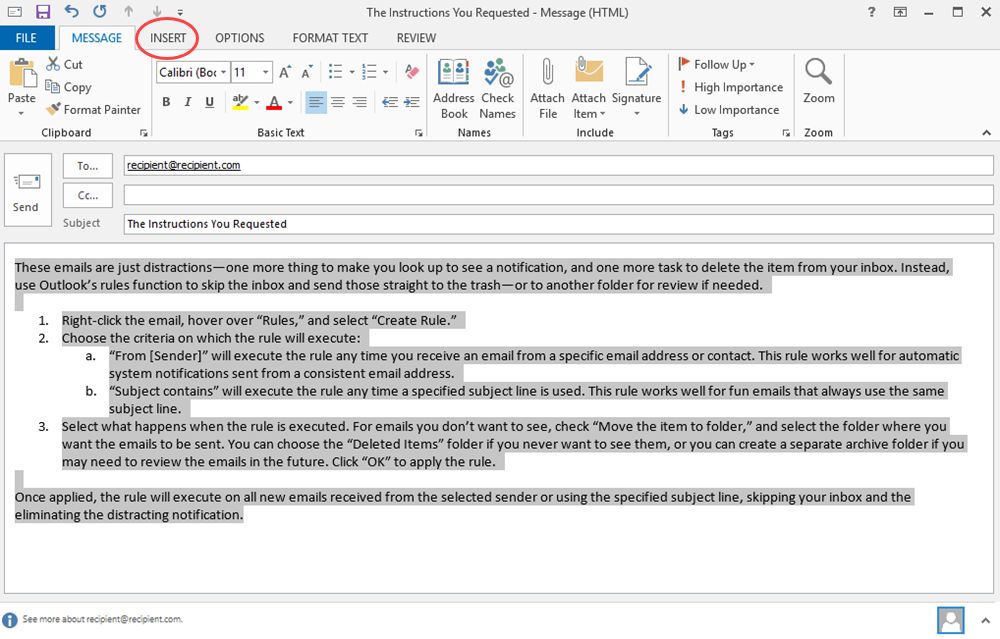
    Choose Quick Parts text
  2. Click "Quick Parts," and select "Save Selection to Quick Part Gallery."
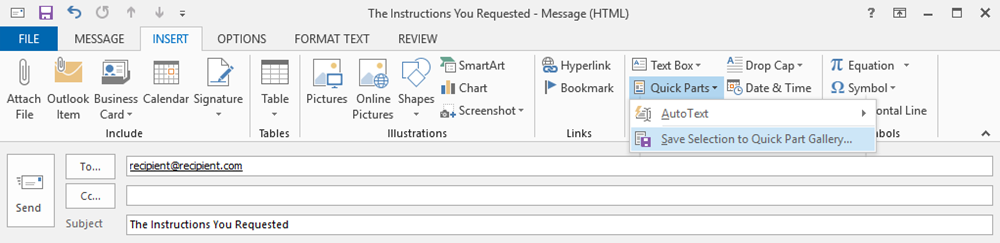
    Save Selection to Quick Part Gallery
  3. Name your Quick Part for easy identification later, and click "OK."
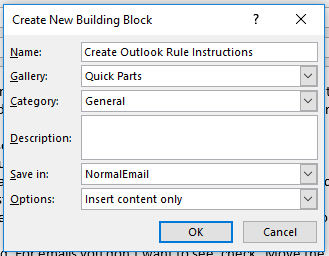
    Save Selection to Quick Part Gallery
  4. Now, when you want to insert that response into a new email or reply, click the "Insert" tab, click "Quick Parts," and select the response you want to insert.
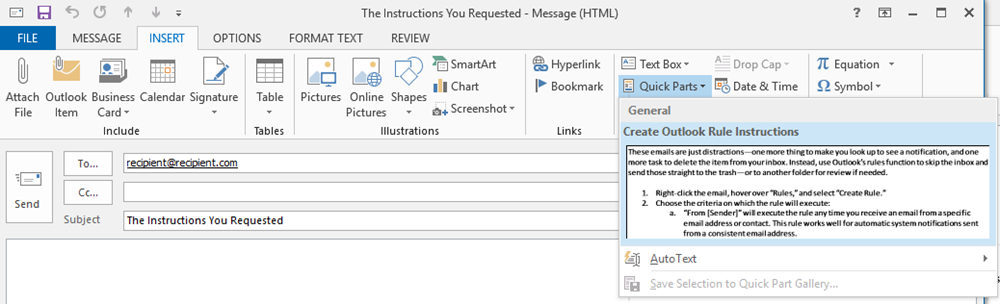
    Insert saved text

    The text will automatically appear in the body of your email.

Quick Parts pricing: Quick Parts is a free, default feature of Outlook 365.

Gmail canned responses

Gmail also offers a solution for repeat responses: canned responses. Canned responses is a free, optional feature available in Google Labs. Here's how to set it up:

  1. Log in to your Gmail account.
  2. Click the gear icon, and select "Settings."
    Click settings
  3. If you're using the 2012 version of Gmail, click the "Labs" tab. If you're using the new 2018 interface, click "Advanced." Next to "Canned Responses (Templates)," select the "Enable" radio button. Scroll down to the bottom of the page to save your changes.
    Enabling canned responses
  4. With canned responses enabled, start creating your snippets. Find the text you want to save, or type it into a new email. Click either the down arrow (2012 Gmail) or three vertical dots (2018 Gmail) at the bottom-right of the compose email form, hover over "Canned responses," and select "New canned response."
    Creating new canned response
  5. To insert a saved canned response into a new email or reply, click the down arrow (2012 Gmail) or three vertical dots (2018 Gmail) at the bottom-right of the compose email form, hover over "Canned responses," and select the title of the response you want to insert.
    Selecting saved canned response

    You guessed it: The text will automatically appear in the body of your email.

Gmail canned responses pricing: Canned responses is a free Gmail feature available through Google Labs.

Share Your Availability Automatically

Most companies offer a way for coworkers to view each other's availability, which makes scheduling internal meetings a breeze. But when you're trying to schedule time with someone from another organization, well, that's a different story.

It usually goes something like this:

  • Do you have time this week to jump on a call?
  • Sure! I'm available today from 2-3 p.m.; tomorrow from 8-9 a.m., 11-noon, and 3-4 p.m.; and Friday from 9-11 a.m.
  • Sorry, none of those times work for me. How about next week?
  • I can meet anytime on Monday, but I'm out of the office for the rest of the week.

And so on.

You review your calendar, type all of your open slots into an email, and hope both parties have one shared open hour. It's not a good use of anyone's time.

Instead, reclaim your time by adopting a tool that automatically shares your availability for you.

Calendly

Platforms: Google, Outlook 365, and iCloud

Calendly automatically pulls your availability from your calendar and shares openings in your schedule with anyone who has your Calendly link. It integrates directly with Google, Office 365, and iCloud calendars so you never again have to send out a diary of your availability.

Here's how to set it up:

  1. Sign up for an account on the Calendly website.

  2. Follow Calendly's guidance to set up your account and meeting types.

  3. Grab the link to your scheduling page, and send it to anyone who asks for your availability.

  4. People can select a meeting day and time from your Calendly scheduling page, and Calendly adds the meeting to your calendar and sends notifications to all participants.
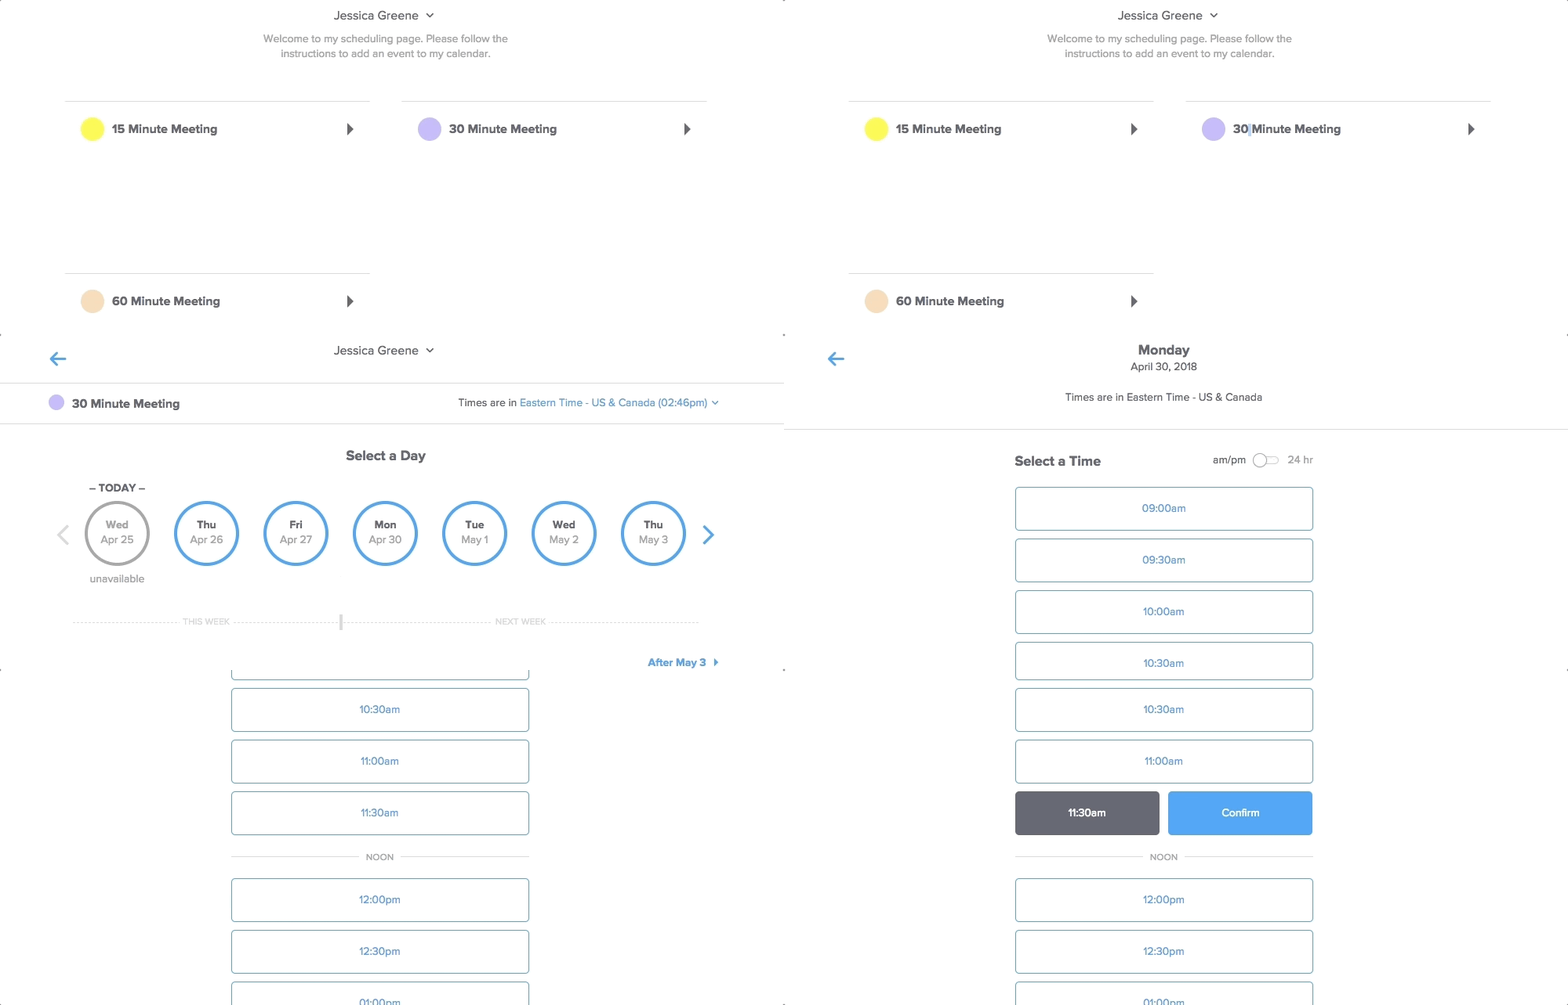
Calendly view

Calendly also has an option to embed your scheduling page on your website—a useful feature for salespeople looking to schedule calls or demos with leads and avoid email altogether.

Calendly pricing: Free for the Basic plan that includes one event type and a personalized Calendly scheduling link.

Mixmax

Platforms: Gmail and Google Inbox

If you don't want to make your entire calendar available to strangers, Mixmax offers a different solution: It allows you to choose available times and embed a schedule of those times directly into an email.

Here's how to set it up:

  1. Click the "Install for free" button on the Mixmax home page, and accept Google's confirmation that you want to install the extension.
  2. Open your email account, and click the "Activate Mixmax" button.
  3. After navigating through the installation and welcome workflows, open a new email, click the calendar icon, and select "Share availability."
    Clicking share availability
  4. Select the times you want to share, and click "Insert times." Mixmax embeds the times you selected into the email. Recipients just need to click the time they prefer, and Mixmax schedules the meeting and sends out notifications automatically.
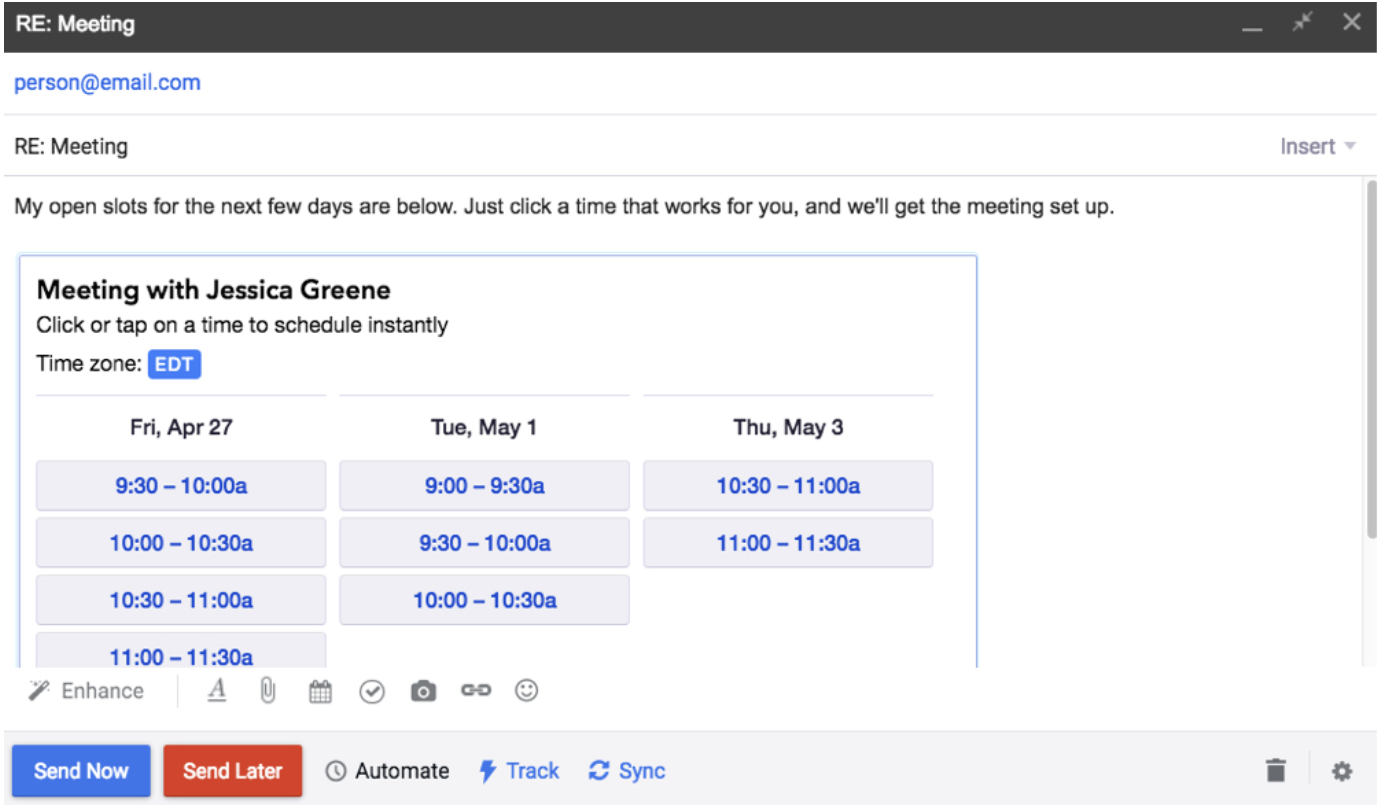
Mixmax view within email

Mixmax also offers an email template feature, so if you decide it's the right scheduling tool for you, use it for FAQ's too in lieu of the tools listed in the previous section.

Mixmax pricing: From $9/month per user for the Starter plan that includes unlimited scheduling.

x.ai

Platforms: Google, Outlook.com, and Outlook 365
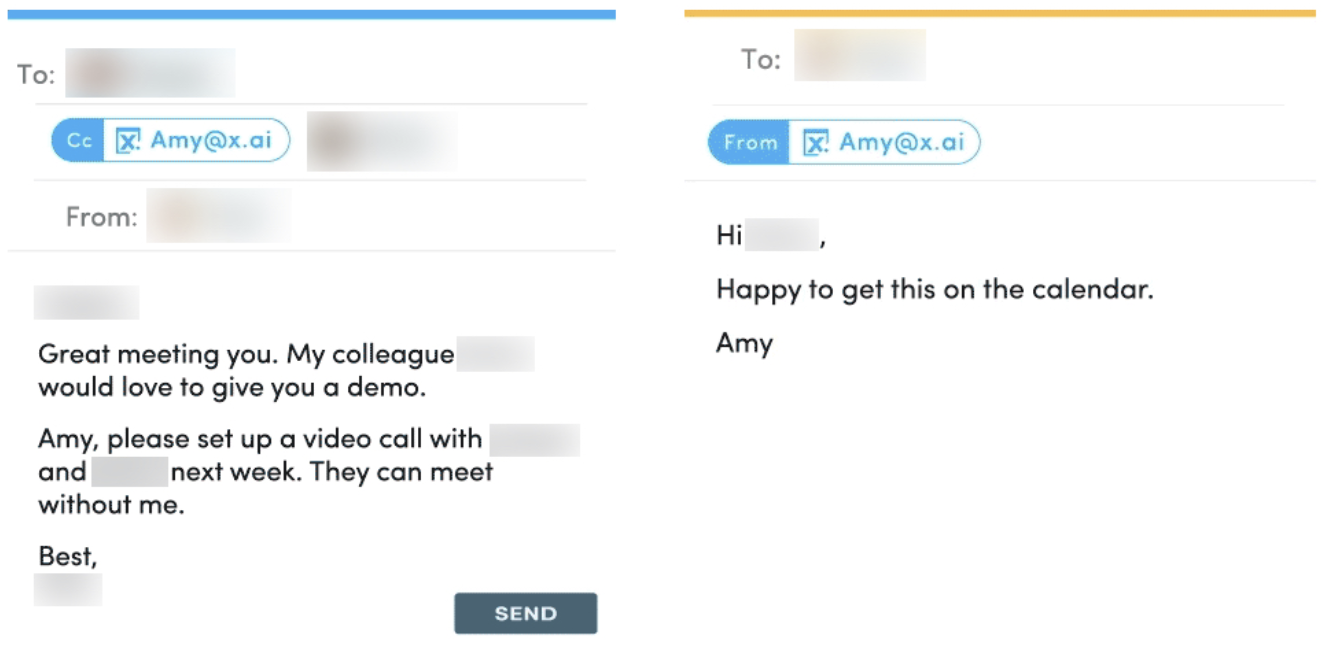
View of x.ai

If you want to provide a more personalized experience, use X.ai. X.ai's Amy is an AI-powered personal assistant that communicates with you and your email recipients in the same way a real person would. Just copy Amy on any email and ask her to set up a meeting, and she handles all of the coordination and scheduling for you.

Sure, it's a little HAL-like, but it does the trick.

X.ai pricing: From $17/month for the Individual plan that includes all scheduling features for a single user.

Get Promotional Emails out of Your Inbox Automatically

When I see a notification that I have an email, it takes a whole lot of self control not to check it immediately. My favorite description of this phenomenon comes from Jocelyn K. Glei, author of Unsubscribe. She says email is like a slot machine: Most of the time, you lose, but sometimes, you find something amazing.

And that's why it's addictive.

The amazing emails come to mind when you see a new notification, but often what you find is a marketing email, some company's newsletter, or an Amazon receipt for something you literally just ordered and still managed to forget about.

Handling these types of emails doesn't take a lot of time, but each one you receive is a distraction. And considering it takes 16 minutes to refocus after an interruption, incoming email notifications have a bigger impact than just the 5 seconds it takes to deal with them.

To prevent promotional emails from taxing your productivity, use the following tools and tricks to get them out of your inbox and into a more appropriate queue.

Gmail filters

Set up a few filters in Gmail to move promotional emails into a to-do folder, archive them, or delete them automatically. Here's how to do it:

  1. When you receive a promotional email, click either the down arrow (Gmail 2012) or three vertical dots (Gmail 2018) at the top-right of the email, and select "Filter messages like this."
    Selectiing filter messages like this
  2. Gmail will auto-populate the correct details in the "From" field of the create filter form, so on the screen that pops up, just click "Create filter with this search" (Gmail 2012) or "Create filter" (Gmail 2018).
  3. On the next screen, choose what you want Gmail to do with emails from that sender. Select "Skip the Inbox (Archive it)" to automatically archive those emails, "Delete it" to automatically delete those emails, or "Apply the label" to automatically move emails from that sender into your to-do queue. Finally, click "Create filter" to apply your changes.
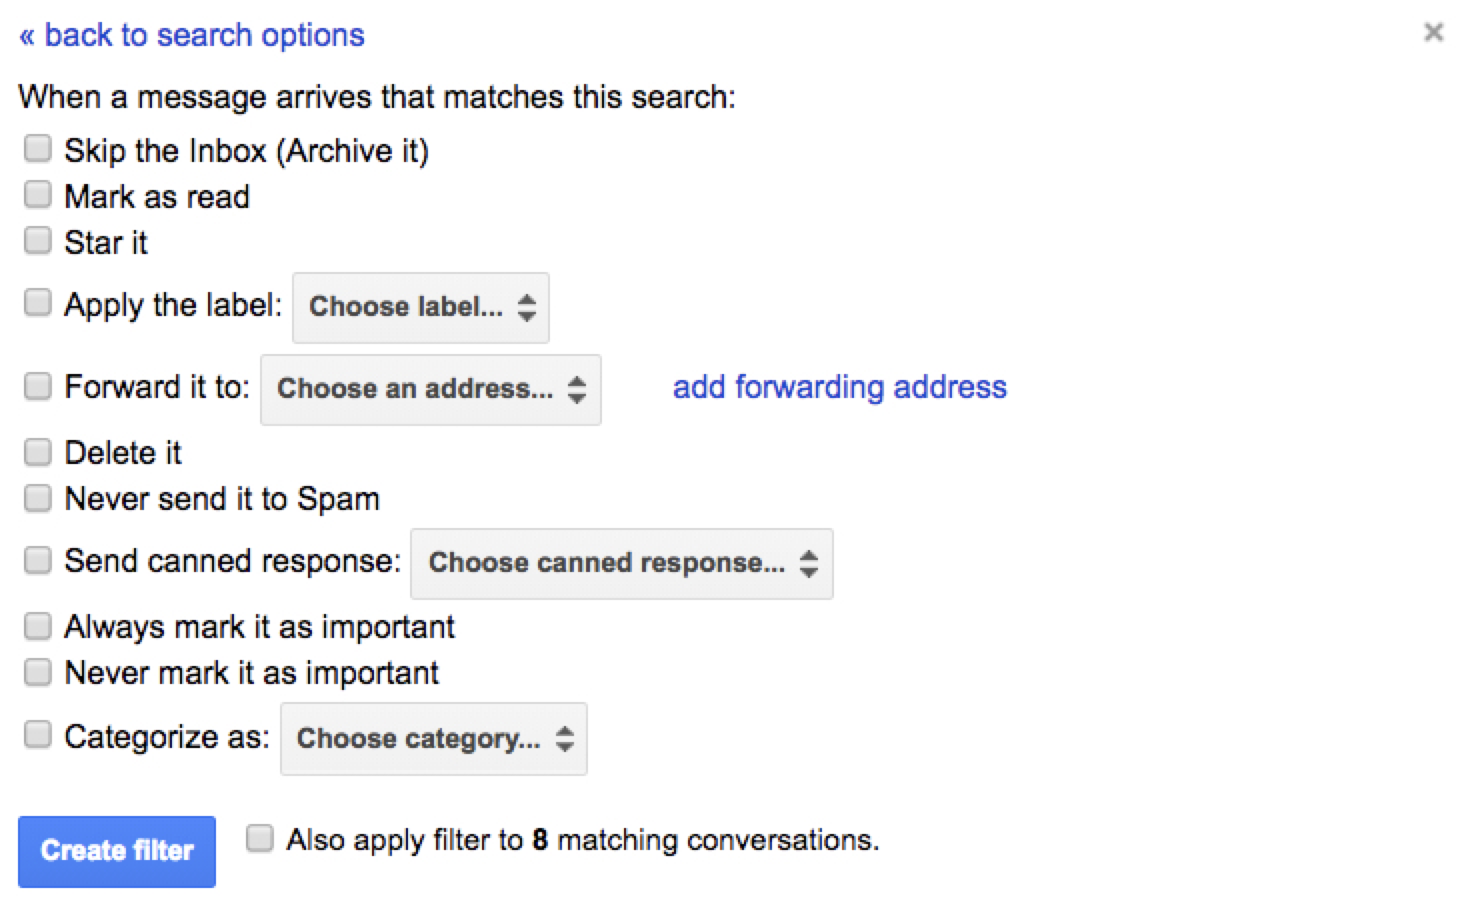
Creating the filter

Do this for each marketing email you receive to ensure that future emails skip your inbox and go to the right place, or check out our guide to Gmail filters to discover additional tips on using filters to keep your inbox organized.

Gmail filters pricing: Filters are a free, default Gmail feature.

Outlook rules

Outlook rules do the same thing as Gmail filters: They let you establish workflows for automatically deleting or moving emails. Here's how to set them up:

  1. Right-click a promotional email you want to apply a rule to, hover over "Rules," and select "Create Rule."
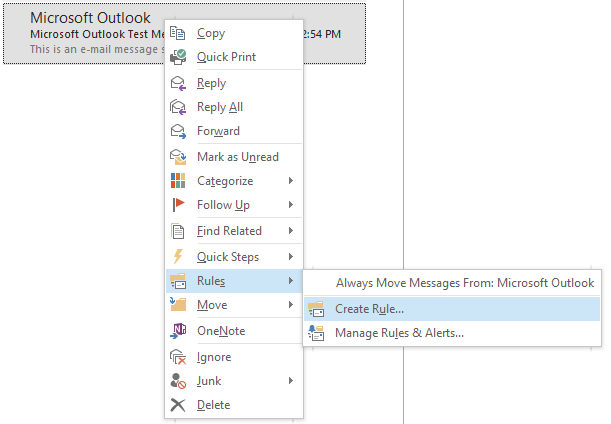
    Selecting create rule
  2. Choose the criteria for the rule, and select "Move the item to folder." Next, select the folder where you want the emails to go. Choose "Deleted Items" to automatically delete future emails from that sender, or select a to-do folder to move future emails into a to-do queue. Click "OK" to apply your changes.
    Choosing criteria

    Do this for each promotional email you receive to make sure future emails skip your inbox and go to the right place.

    Outlook rules pricing: Rules is a free, default feature of Outlook.com and Outlook 365.

    Rules in Mail for Mac

    If you manage your email with Apple's Mail program, set up rules to automatically handle incoming promotional emails. Here's how to set it up:

    1. From the main program menu, click "Mail" and select "Preferences."
      Choose preferences
    2. Select "Rules," then "Add Rule."
    3. Give your rule a title, select the criteria for the rule, and select what should happen when applying the rule. To automatically delete the email, select "Trash" in the "to mailbox" dropdown. To move the email into a to-do queue, select your to-do folder in the "to mailbox" dropdown. Click "OK" to apply your changes.
    Selecting criteria

    Do this for each promotional email you receive to make sure future emails skip your inbox and go to the right place.

    Rules in Mail pricing: Rules is a free, default feature of Apple's Mail program.

    Respond to Fewer Unsolicited Requests

    Not too long ago, I received an email from someone asking me to link to one of their articles—from my writing portfolio. I didn't bother writing back to explain that the page is a list of links to things I've written. Even the smallest amount of effort on the sender's part would have made that clear.

    Mass emails and lazy senders generally don't deserve a response, but there are times when people send emails that were obviously written just for you. I hate to be rude and ignore these emails. But every response I send takes time away from my work—the stuff that pays the bills.

    Unsolicited requests are a real challenge for many industry influencers and company executives. These people get frequent interview requests from journalists, requests for advice from marketers looking to build influencer roundup articles, and general queries from other professionals looking for help from the experts they admire.

    To minimize the number of unsolicited requests you have to respond to, use Earn.com to charge a fee for every email reply.

    That's right: make them pay.

    Earn.com lets you earn bitcoin for every email you reply to. Set up an Earn.com profile, and choose the amount you want to earn for replying to emails ($1, $5, $20, or $100). You can choose to keep the money you earn for yourself or donate it to charity.

    View of earn.com

    Once you have your account set up and verified, you can start redirecting unsolicited email senders to your page on Earn.com to ask them to pay for a reply.

    If you use Gmail, Earn offers an extension that automatically bounces emails from unknown senders to your Earn.com profile. Here's how to set it up:

    1. Log in to Earn.com, and select the "Bounces" link.

    2. Click the "Enable" button.

    3. Connect Earn.com to your Gmail account.

    4. Customize the response that unsolicited senders receive when the extension bounces emails to your Earn.com profile. See the suggested templates below for ideas on how to politely ask senders to pay for a reply.

    5. Choose whether or not you want to automatically bounce unrecognized senders. Note: If you turn this feature on, any sender that's not in your Gmail contacts—or that you haven't manually whitelisted—will receive an auto-bounce email. This could cause problems if, for example, you get an unanticipated email from someone offering you a job or from a customer you haven't corresponded with before.

    6. Whitelist specific senders or domains that you don't want to auto-bounce to Earn.

    Whitelisting specific senders

    If you don't use Gmail—or if you just want complete control over which senders bounce to Earn.com—create a default response template for unsolicited emails using one of the tools/features in the frequently answered questions section above, and reply with it to any sender you want to bounce through Earn.com.

    Asking people to pay for your time may go against your nature, but if you're an influencer in your field, it helps limit the number of unsolicited requests and questions you have to spend time replying to. Most people won't be willing to pay for a reply, reducing the number of to-dos in your inbox, and helping you identify the people who really need a response.

    Earn.com pricing: Free to create an Earn.com profile and accept messages on the platform.

    Suggested templates

    Use this template if you're donating your Earn.com proceeds to a charity:

    Hello,

    Thanks for reaching out!

    Unfortunately, my current workload prevents me from responding to every request I receive. However, I do respond to all paid emails sent through Earn.com, and I donate all of the proceeds to [name of charity].

    If you're still interested, feel free to resend your message using the following link: [Earn.com profile URL].

    Sincerely,
    [Your Name]

    Use this template if you're keeping your Earn.com proceeds:

    Hello,

    Thanks for reaching out!

    Unfortunately, my current workload prevents me from responding to every request I receive. However, I do respond to all paid emails sent through Earn.com. This helps me manage my time better and gives you the assurance of a guaranteed response.

    If you're still interested, feel free to resend your message using the following link: [Earn.com profile URL].

    Sincerely,
    [Your Name]

    Automatically Move Tasks out of Your Gmail Inbox

    Most people receive to-do items via email, but many of us manage our to-do lists in a separate application.

    For example, I work with most of my editors over email, but I manage my assignments and due dates in Trello. I could manually copy and paste all new assignment requests from Gmail to Trello, but it's not a great use of my time. Instead, I use Zapier to automatically create a card in Trello for any emails I label as to-do.

    And it's not just for Trello. Zapier offers integrations from Gmail to most popular project/task management applications:

    To use these Zaps, create a label in Gmail that you'll use to trigger the workflow. To create a new label:

    1. Click the gear icon, select "Settings," and choose the "Labels" tab.
    2. Click the "Create new label" button, give your label a name, and click "Create."
      Create new label
    3. Next, visit Zapier, log in to your account, and select Gmail and your preferred task management program to see available Zaps.
      Choose preferred program
    4. Look for a Zap that triggers on new, labeled Gmail emails, and follow the instructions to set up the Zap.

    Now, when you receive an email that contains a to-do, just apply the right label, and your Zap will automatically copy the details into your task management system.

    Zapier pricing: Zapier's Free plan lets you use up to five Zaps and run up to 100 tasks each month.


    Regardless of whether you work for a corporation and receive nearly 100 emails a day or are a freelancer who receives fewer than 100 over the course of an entire month, every email is a distraction. Each one takes your attention away from more important work. And even if it only takes a few seconds to deal with it, that small distraction impacts your overall productivity.

    Automating your inbox and letting technology take care of repetitive and time-consuming tasks frees you up to focus on more important work—to accomplish more every day.

    Title photo by ribkhan via Pixabay.


source https://zapier.com/blog/automate-email-inbox/

Friday, 4 May 2018

Squarespace Form Blocks: How to Set Up Forms, Collect Information, and Move It Where You Need It

Every website owner has an opportunity to engage with and learn about the people who visit the site. One of the most structured ways to initiate this interaction is through web forms.

Web forms are exactly what they sound like. They're forms on a web page that visitors fill out to share information, request a meeting, sign up for a newsletter, apply for a job, or otherwise connect with the site owner (likely, that's you) in some predefined way.

One way to add forms to a site is by embedding them from another web form builder tool, but you might have a better option if you use Squarespace to build and host your site. Squarespace includes a web forms tool called Form Blocks. These built-in tools let you create forms right within your admin panel.

What Are Form Blocks?

Squarespace's Form Blocks are web forms you can add to your Squarespace site to ask for information from visitors. You aren't restricted to only using Form Blocks to make web forms on a Squarespace site, but there are two key reasons to choose them over third-party tools. First, they're already inside the Squarespace admin interface, so you don't have to jump from one app to the other to work with them. Second, the forms you create will match the look and feel of your site without any extra work on your part.

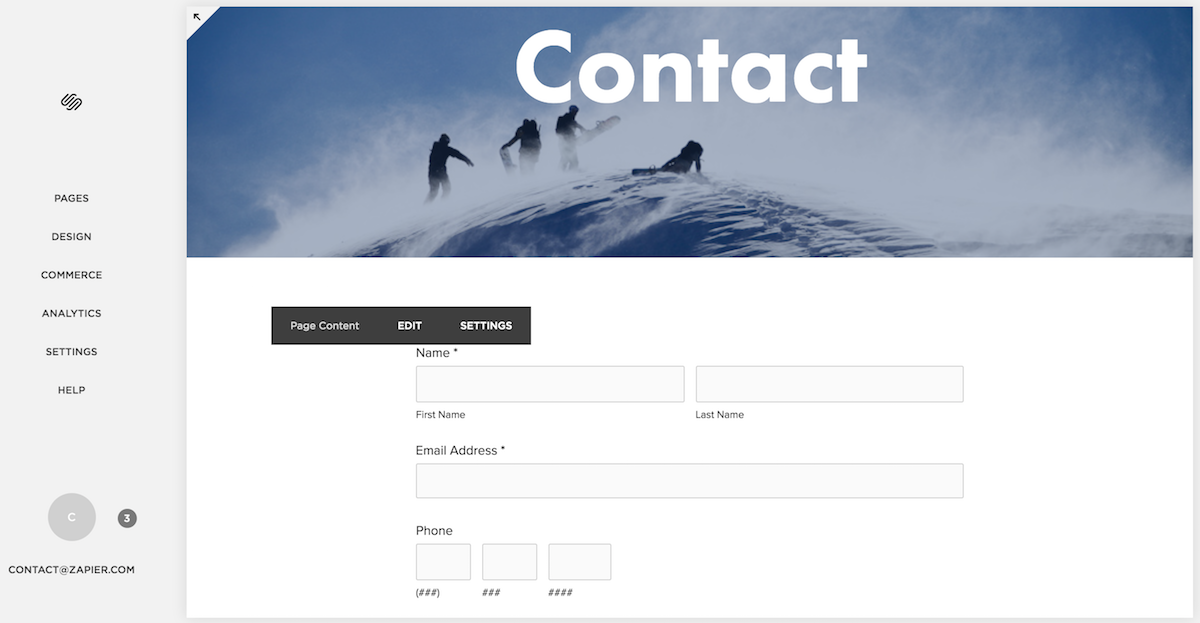
One of the most common use cases for a web form is a Contact Us page, where you allow people to type in their name, email address, a subject line, and a message that will be delivered to you.

There are a few advantages to using a Contact Us form rather than giving readers your email address. For one, the form allow you to ask for exactly the information you want, whether it's the sender's name, their geographic location, or other data such as a reference number for a purchase. Another benefit is you can limit the character count on the fields you put into your forms to curb long ranting emails and encourage more effective and succinct communication.

A Contact Us page is just one example. There are countless other examples, from standard newsletter signup forms to others that you can build for specific use cases. Say you run a real estate business and want a form that lets potential sellers request an appointment and simultaneously provide details about the property they want to sell. Or perhaps you run a catering business and want a form where clients can request a tasting, note any food allergies, and provide details about the event they need catered. Because you can customize the form, you can ask for exactly the details you need, such as event date and time, location, number of guests, whether it's a buffet or plated meal, and so forth.

How to Use Form Blocks in Squarespace

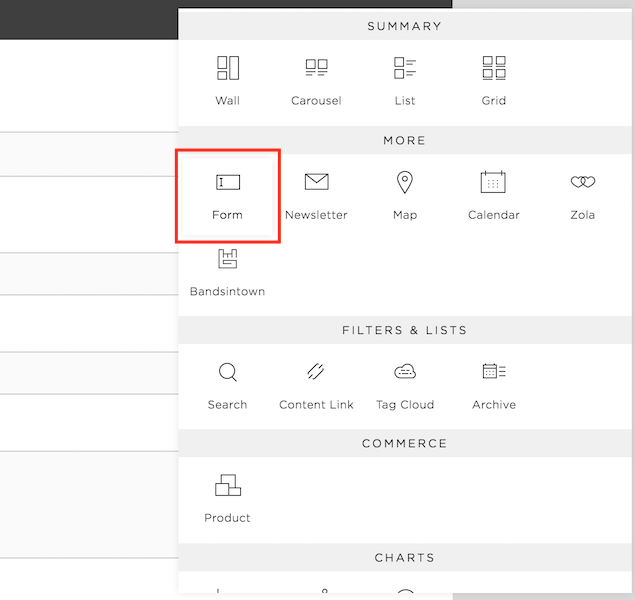
To create a Form Block, log into your Squarespace account, find the page where you want to add a web form, select Edit Page, and click on the area of the page where you want the form to appear. Add a Content Block, and scroll down to the section labeled More, where you'll find Form.

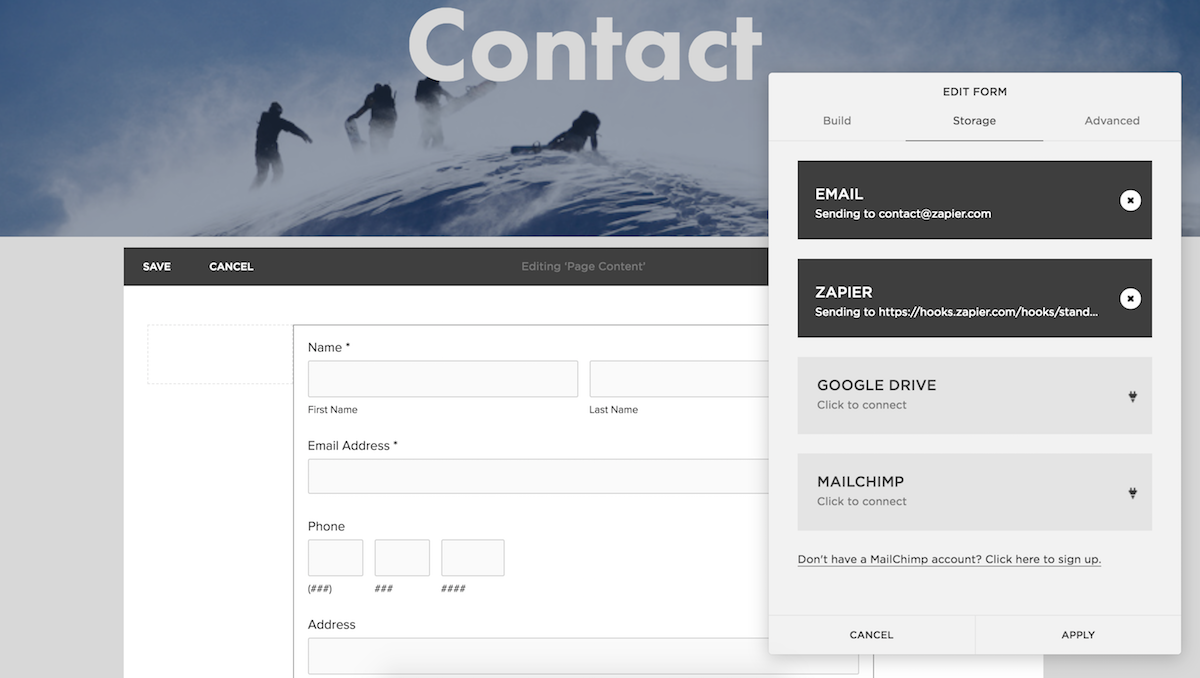
There are three sections of the Form tool to consider: Build, Storage, and Advanced. For the most part, the options are clear and easy to understand.

The Build tab gives you tools to actually make the form. Here, you add fields to your form, such as Name and Email Address (there are 19 in all), and customize them. Similar to other tools in Squarespace, the Form Block builder is easy to use, although it doesn't support drag-and-drop. Instead, there's a small editor off to the side, and the form that you build inside that editor appears on the page so you can preview exactly how it will look when done.

The Storage tab lets you choose where the data being collected in the form goes and gets saved. Squarespace gives you four options: email, Google Drive, MailChimp, and Zapier (more on each in the next section).

The Advanced tab has three additional options. First, you can customize the form submit button's color and other options. Second, you can create a message that visitors see after they submit a form. Third, you can customize your form to use a Lightbox style. Lightbox simply means the form isn't completely visible until the visitor clicks to expand it, at which point it opens as an overlay form on the web page the visitor is on—not a new window or tab.

Where Does Information From Form Blocks Go?

How does information get from the web form to you, the person running the website? As mentioned, there are four options, and they live under the Storage tab.

Email. The email option packages the submitted information into an email and delivers it to the inbox of your choice—by default, the account administrator email.

Google Drive. With the Google Drive option, Squarespace takes the information collected from the Form Block and enters it into a new Google Sheet. Note that you can't set it up with an existing Google Sheet, only a new one and its default worksheet rather than a specific worksheet.

MailChimp. The MailChimp option in Squarespace is specific to email newsletter signups, and it adds people to a new subscriber list. Similar to the Google Drive option, you can't create a connection with an existing MailChimp subscriber list. You have to set up a new one when you make a new form. Connecting to MailChimp is a Premium feature, so you must have a Squarespace Business or Commerce account to use it.

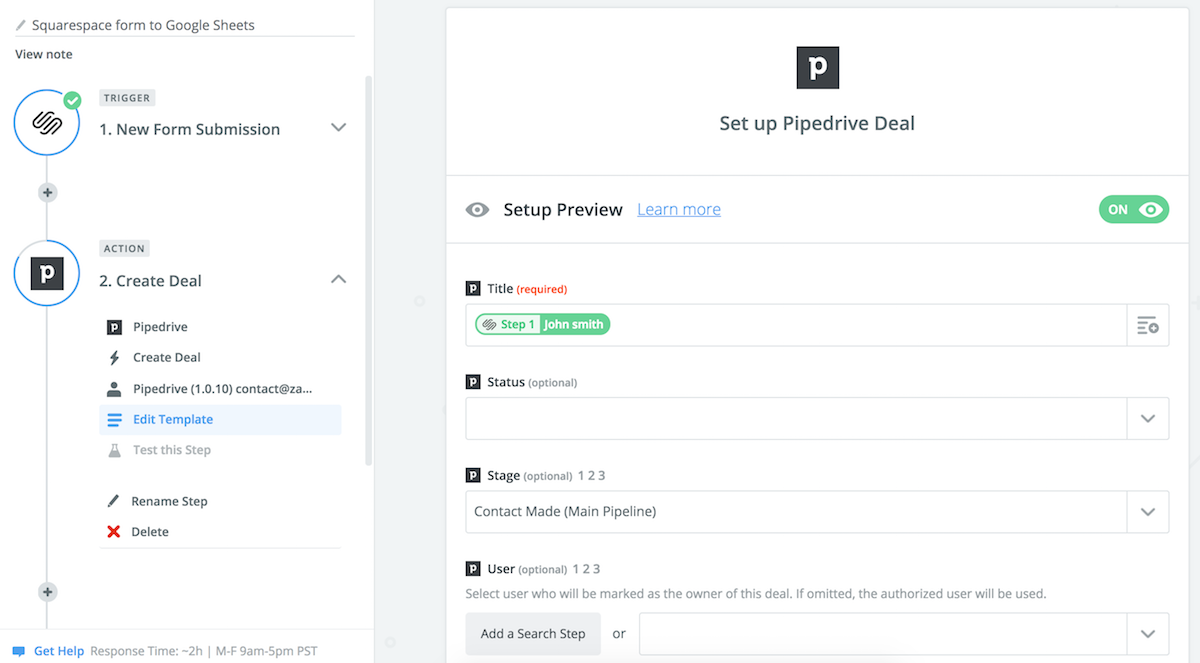
Zapier. The Zapier option opens up many more possibilities, as Zapier acts as a middleman to deliver information from your Form Blocks to any other supported app, such as Salesforce, Slack, Trello, Airtable, and others. For example, let's say you have a form where potential business partners can get in touch with you. You could connect your Squarespace account with the customer relationship management (CRM) app Pipedrive, so when someone submits a form on your website, it automatically creates a new deal in the app, with as many relevant fields as possible pre-filled. Or let's say you want to put a form on your website for collecting ideas from customers. You could use Zapier to automatically take responses from the form and drop them into a Slack channel where the appropriate team members can read them and take action.

While I'd refer you to step-by-step instructions for setting up Zapier and Form Blocks when you're ready to implement it, the gist of it is that you have to generate an API key (a random set of characters that lets you integrate Squarespace with other apps) from Squarespace and copy it into Zapier. You can create the API key under Settings > Advanced > API Keys > Create Key. Then you can create a Zap (our word for an automated workflow) in Zapier that starts with Squarespace Form Blocks and results in whatever action you want, whether it's creating new entries in Pipedrive or simply sending you a Slack notification that someone filled out your form.

There are a few limitations when connecting Squarespace and Zapier. For starters, you need a Squarespace Business or Commerce account. Squarespace also includes specialized form options for cover pages, newsletters at checkouts, and promotional pop-ups, although unfortunately, those don't work with Zapier integrations for now.

Tips for Using Form Blocks

Although web forms allow website owners to connect with site visitors in a controlled way, there's still plenty of room for something to go wrong. How can you best set up a Form Block to solicit information that's helpful to you and that respondents will want to share? What can you do to curb spam responses? And how can you get around some of the limitations of Squarespace Form Blocks?

Think Through Your Process First

Think about how you're going to use the information before you start collecting it. Will a team of salespeople need to see the information and use it for contacting potential clients? Are you going to compile the data and run it through some analysis, or create reports? Whatever you intend to do with the data will influence where and how you store it, whether it's in a Google Sheet that you can export easily or as new entries in an app like HubSpot. Before you create the form in Squarespace, make these decisions about where the data will go and what you'll do with it.

If you know the information needs to end up in another business app you use, for example, it's a tremendous timesaver to let Zapier automate that work for you. When you use automations to transfer data from one system to another, it's always more efficient than moving it manually, and it eliminates the possibility of human-introduced errors that sometimes result from tedious copy and pasting.

Ask Appropriate Questions

One way to make sure you're making the most of web forms is to learn some best practices for asking questions in a survey or similar data-gathering effort. For example, if you want honest answers, you'll need to know how to avoid leading questions. Sometimes you want people to write their own answers, and sometimes you want them to choose from a set of options. A few tips on phrasing questions can go a long way.

Install a Challenge for Bots

Online bots are always on the hunt for open web forms where they can dump information that you likely don't want. One of the easiest ways to curb the number of bots that get through to you is to add a reCaptcha challenge to the Squarespace web form. reCaptchas are small, embedded boxes with a quick challenge, such as selecting all images showing trees, that prove you're human and not a bot. Adding a reCaptcha isn't foolproof for preventing all spam, but it can drastically cut down on bot-based submissions.

Allow People to Attach Files

While Form Blocks is often the easiest tool for creating web forms on a Squarespace page, it doesn't work ideally for all use cases. For example, with Form Blocks, there isn't an option to let visitors upload a file to their form. You might want that functionality, however, if your intention is to use the form for job applicants to submit a resume, cover letter, or a sample of their work.

The way to enable file uploads is by using an alternative web form builder, such as TypeForm or Wufoo, and integrating it with your site. You can find detailed instructions for how to work with many specific third-party services in Squarespace's help pages.

Run a Giveaway

Let's say you want to give away a digital download or coupon code as a gift to anyone who completes your web form. Create your web form using Squarespace Form Blocks and in the Advanced tab, choose Post-Submit Message. Whatever you put into the field will appear after a visitor successfully completes and submits your form. In this message, you can add a link to the free download, display a coupon code, or provide a password to a protected link where the visitor can download a file. There are a number of ways you can achieve the same end. (A nod to Paper and Oats for inspiration on this idea.)


Web forms can open up new avenues of engagement with your website visitors. While Squarespace's Form Blocks let you build forms from the same interface that you build and maintain your website, you aren't limited to what's immediately visible in your account. By connecting with Zapier or by using third-party web form builders, you can quickly expand the possibilities. To learn more about web forms more generally, see Zapier's in-depth guide to forms and surveys.


source https://zapier.com/blog/how-to-use-squarespace-form-blocks/

Thursday, 3 May 2018

The 20 Best Email Apps for 2018

Email is, in many ways, the digital hub of modern life. We use it to communicate with colleagues and friends, confirm appointments, save receipts, and restore forgotten passwords. At the same time, checking your inbox shouldn't be the focal point of your day, even though odds are you feel less stressed when you have fewer unread messages.

The best email apps help you manage the most important aspects of your digital life without making them more complicated. Some let you turn your inbox into a to-do list. Others are deeply customizable, giving you greater control.

What Makes a Great Email App?

For this list of the best email apps, we only considered email clients, leaving out email services and email assistant apps. An email client is a piece of software you install on your computer or mobile device to access email, even if that email is hosted by another service. An example is the Mail app that comes pre-installed on iOS devices. By way of the Mail app, you can access a Gmail account and a Yahoo Mail account. Gmail and Yahoo Mail in this case would be email services, which we did not consider for this list of the best email apps. Client apps almost always let you access multiple email accounts, giving you the option to see all your messages in one consolidate view.

We also homed in on email apps for personal use, which nixed from consideration a few apps that tend to be more prominent in the business world, such as Microsoft Outlook (desktop app) and IBM Notes. They both have their place among email aficionados but tend to be more well suited for organizations than individuals.

As mentioned, we did not consider email assistant apps, or services that work within your existing email to make it better in some targeted way. An example is SaneBox, a service that works inside your existing email service to automatically sorts incoming messages (among other things). Another example is Boomerang, which adds new features and tools to Gmail and Outlook that help improve your writing and help you remember when to follow-up on messages. Both these apps are highly capable, but they aren't clients and so they weren't considered for this list.

There can be some confusion about email clients and services, however, because some apps cover both ground. Gmail, for instance, is not just an email service but also has a mobile email client app by the same name. The Gmail mobile app lets you read and reply to messages from not only your Gmail account, but also your Yahoo Mail address, Microsoft Office 365 account, and others.

In addition to being an email client, the apps in this list meet other criteria, such as being in a state of full release. In other words, no beta products allowed. Ease of use played a major role in our decision-making, as did stability. We also looked for apps that had at least one standout feature or reason for choosing it, which is listed below in the "best for" line in each app's description below.

When it comes to email apps, there's no reason you can't choose several to use for different purposes. You might have one app you adore installed on your personal computer, something else for work email, and yet another for mobile devices. Which ones you choose will depend on how you like to interact with your email and what you do with it. Whatever the case, the best email apps have you covered.

The 20 Best Email Apps


airmail

Airmail

Best for Customizing Your Inbox

Airmail started out as a simple email app, but over time, it grew with features, and today it's one of the most powerful email client apps available. Customizable notifications make sure you only get alerts when you receive emails from your most important contacts. Swipe gestures are also customizable. Airmail can help you write faster, with built-in templates for your most-used responses. And, it works with your favorite productivity apps, including Fantastical, Evernote, OmniFocus, Dropbox, and others.

Supported Platforms: iOS, macOS

Price: $4.99, $9.99


dispath

Dispatch

Best for Typing in Snippets

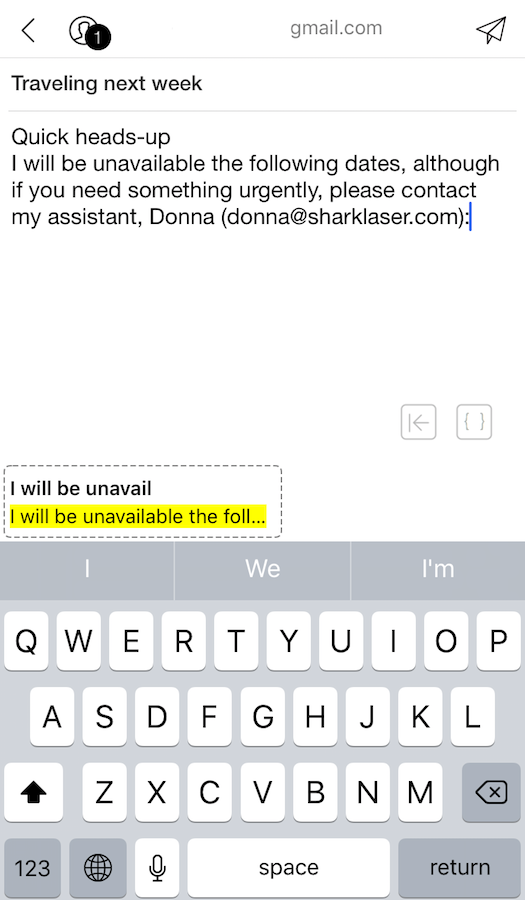
For people in the "less is more" camp, Dispatch is an attractive email app. This iOS-only client helps you reply to emails quickly by letting you use snippets, or auto-generated words and phrases you write often. In other words, it essentially gives you the functionality of a text expander inside a mobile email app. Dispatch also has tools designed to help you reach inbox zero, such as swipe gestures for archiving messages. If you don't want to reply or archive a message, the app still encourages you to take action on them somehow, with other simple tools for sending mail to other productivity apps you use.

Available on: iOS

Price: $6.99


edison

Edison Mail

Best for Categorizing Messages Automatically

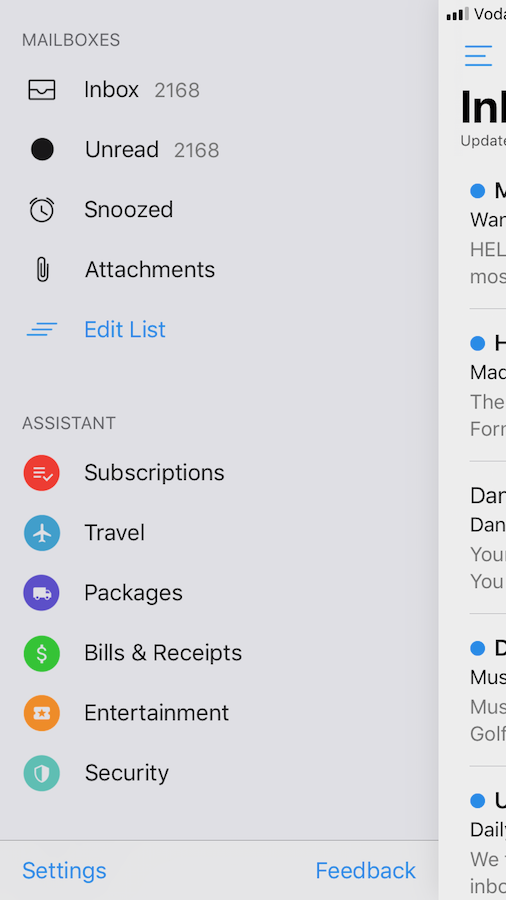
Edison Mail is a mobile email client app designed to give you assistance with sorting and organizing your email. It can automatically sort incoming messages into appropriate groups, such as messages that contain tracking numbers for shipping, those pertaining to subscriptions, and receipts. An undo-send button gives the app universal appeal, and option to turn off read receipts make Edison even more valuable to people to like to be in control of their email. Don't confuse this app with the Edison Assistant (formerly called EasilyDo or Smart Assistant by EasilyDo), as the latter is does more to help you organize your life beyond email alone.

Available on: Android, iOS

Price: free


emclient

eM Client

Best for Merging Email, Calendar, Contacts, Tasks

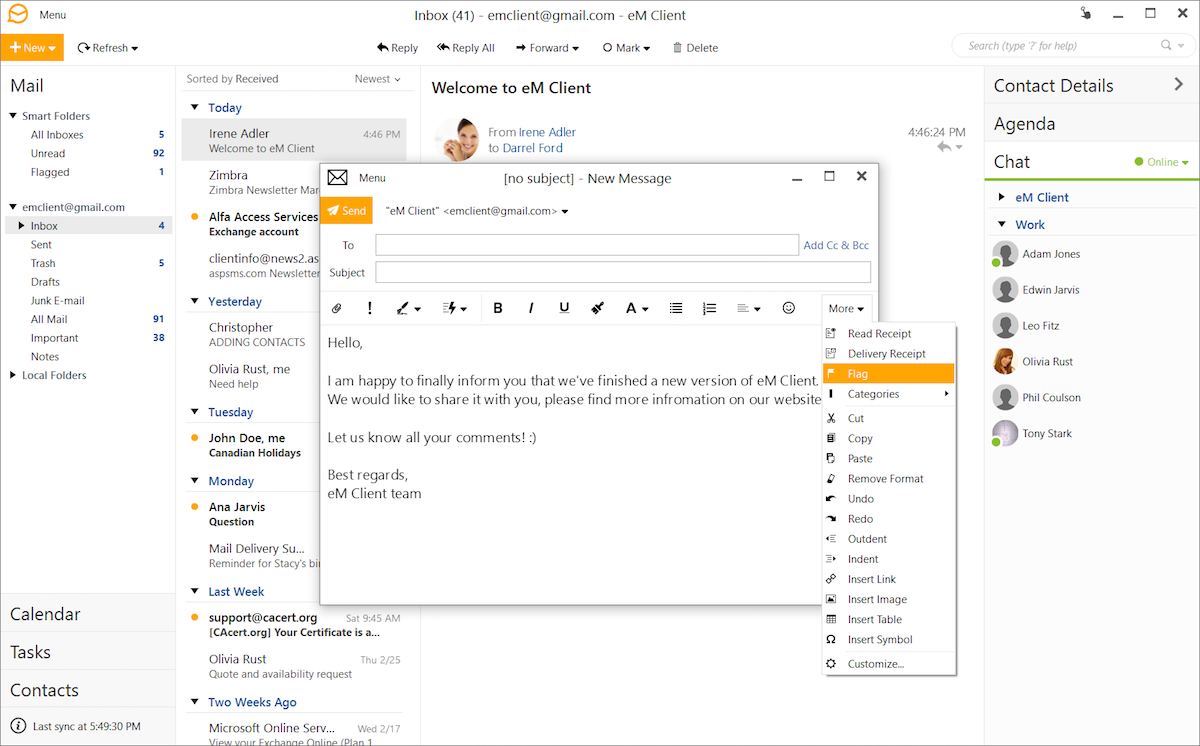
If you're looking for a powerhouse of an email app for Windows, eM Client is a great option. It not only combines email, calendar, contacts, and tasks in one place, but also supports touch interfaces. While the price for a Pro account may sound a little steep, eM Client offers some functionality that's rarely found in other email apps, such as language translation. That's reason enough to choose eM Client if you frequently send and receive messages in multiple languages and aren't fluent in all of them.

Available on: Windows

Price: free; $49.95 for Pro


GmailMobile

Gmail Mobile

Best for Searching and Organizing Messages

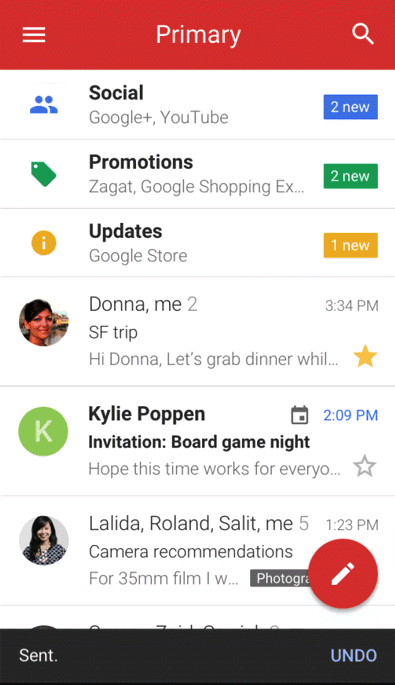
While Gmail is the gold standard among webmail services, its mobile app is surprisingly light on features. But that's not the deciding factor on whether to choose the Gmail app for your phone. The real selling point of this app is how fast and capable it is at searching even the most bloated inboxes. When you use it with a Gmail account (or two; it supports multiple Gmail addresses), you get the same great options for automatically sorting mail into tabs that the service creates for you: Primary, Social, and Updates. With limitless ways to sort mail with filters and labels and exceptional spam filtering, Gmail makes it a breeze to see your most important messages quickly.

Available on: Android, iOS

Price: free


hop

Hop

Best for Making Email More Like Messaging

If you prefer text messaging or team chat to email, Hop is worth a try. This email client for Android and iOS devices turns message threads into chat-like conversations, so your emails look less like a verbose expanse of text and more like what you see in iMessage or WhatsApp, with GIFs, voice memos, one-tap image sharing, and everything else you'd expect in a chat app. And similar to team chat apps, Hop lets you create channels for organizing conversations around a certain topic. Hop works best when you use it to message with other people who are also using it, too.

Available on: Android, iOS

Price: free


Google Inbox

Inbox by Gmail

Best for Turning Gmail Into a To-do List

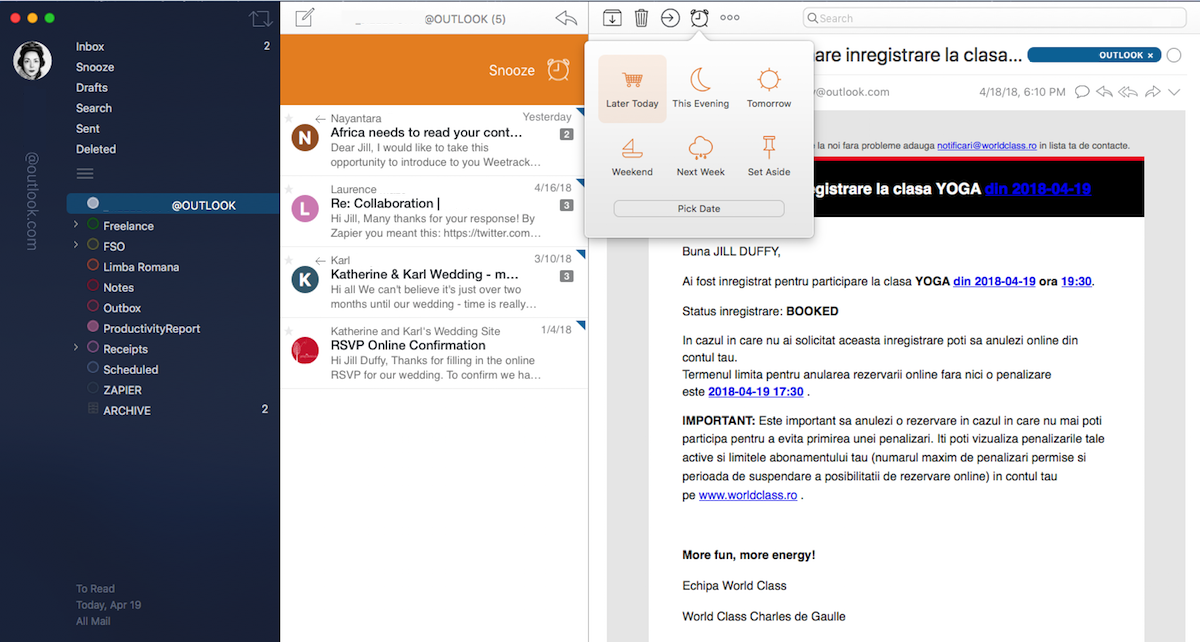
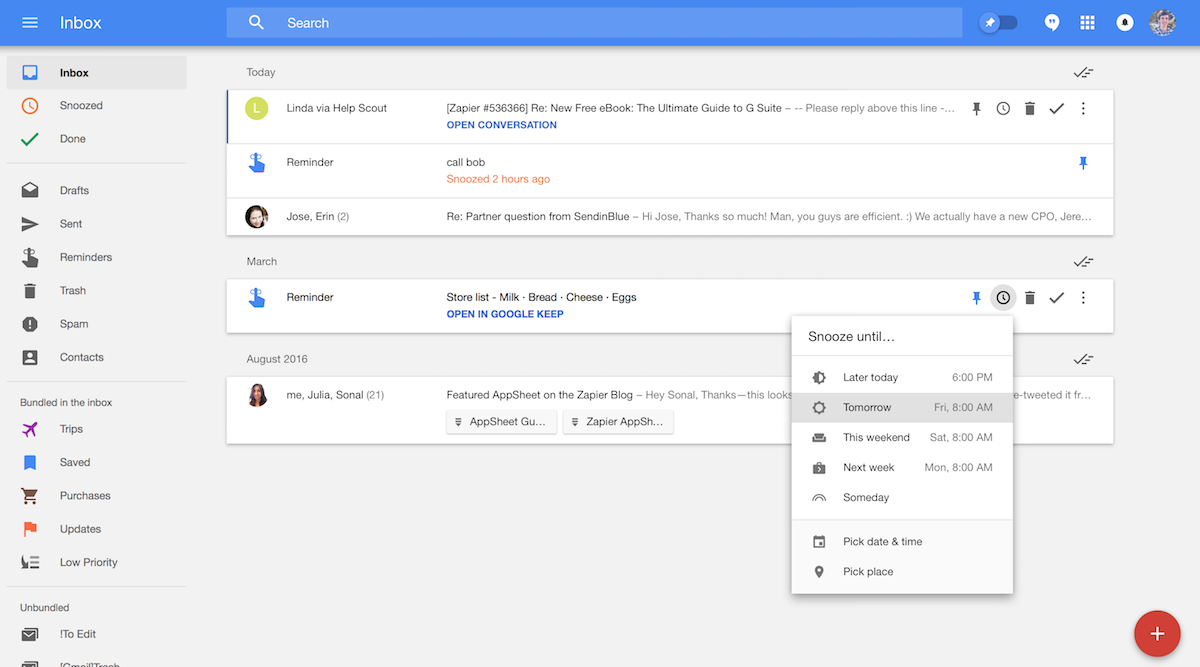
Inbox by Gmail gives you a different way to experience Gmail. The app does two things. First, it automatically sorts incoming mail. Second, it turns messages into tasks, making your inbox more like a to-do list. On the sorting front, Inbox by Gmail bundles your trips, purchase receipts, and promotions into groups so you view or archive them in bulk with ease. You can add your own bundles, to group work messages and more automatically. Additionally, you can pin important emails to the top of your inbox, snooze messages until you need them, and write new tasks that you can manage right alongside your emails.

Available on: Android, iOS, web

Price: free; requires Gmail account


mailandcalendar

Mail and Calendar by Microsoft

Best for Keeping Email Simple

Mail and Calendar by Microsoft is a Windows desktop app that keeps email simple. Formerly called Outlook Express, this app covers the basics of email without adding excessive features. It offers threaded email conversations, notifications, and flags to mark your most important messages, along with Outlook-style calendar integration. It's also touch-enabled. If you're a Windows users who prefers to not be distracted by added features, it's a good option.

Available on: Windows (Outlook Mobile is considered the mobile version of this app)

Price: free


Apple Mail.app

Mail by Apple

Best for Annotating Images, Signing Documents

The Mail app that comes preinstalled on iOS devices and most Macs may seem like a basic email client, but its simplicity belies the powerful tools under the hood. With its Markup tools, you can add annotations to images and sign documents right from your inbox. You can also use Apple's Mail Drop feature (the same one that works with iCloud) to send extremely large attachments without it eating into your allotted email storage space.

Available on: iOS, macOS

Price: included with Mac and iOS devices


mailbird

Mailbird

Best for Increasing Productivity With Integrations

Mailbird is a Windows email app with a contemporary design. You can personalize your inbox with custom layouts and sidebar themes. It also includes integration options with popular productivity apps, such as Asana, Todoist, Slack, and others. While rich with features, such as the ability to snooze messages until later and automated scrolling for speed readers, some advanced capabilities are restricted to higher tiers of service. For example, an undo send option is only available to Mailbird Business subscribers.

Available on: Windows

Price: free limited version, $12/month for Pro, $39 for lifetime Pro, $20/month per person for Business


mailmate

MailMate

Best for Composing in Markdown

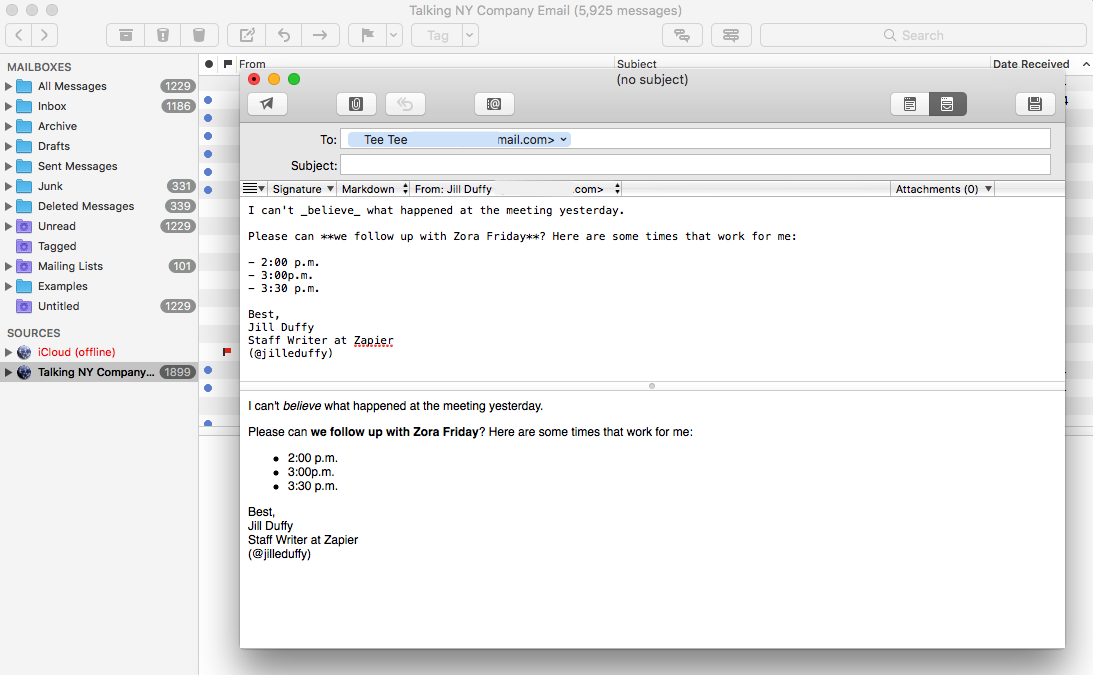
Well suited for those who love plain text and keyboard shortcuts, MailMate lets you jump through your inbox without lifting your fingers from the keyboard. It also supports Markdown formatting and unique views, such as the ability to surface all messages that are similar to the message you're currently viewing. MailMate is perhaps the best Mac email app for power users who value plain text over features such as snooze and undo send.

Available on: macOS

Price: $49.99


Newton

Newton

Best for Integrating With Amazon Echo

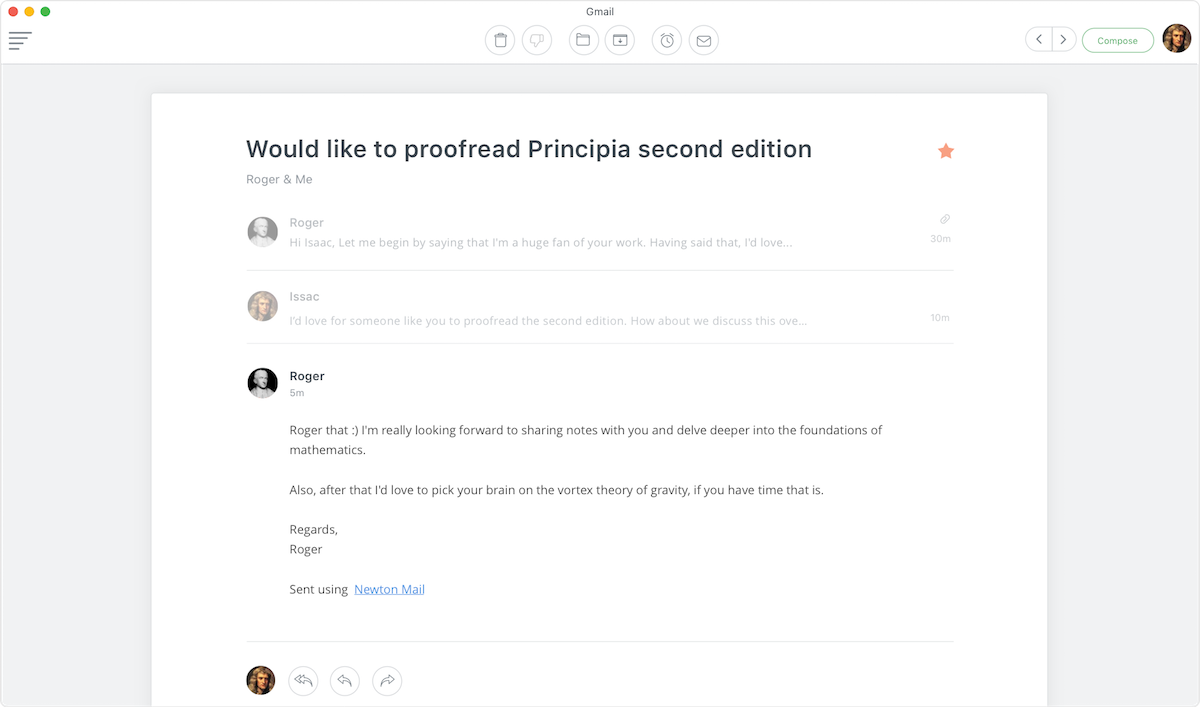
Formerly called CloudMagic, Newton has all the same features found in the best mail apps: the ability to snooze messages, schedule when an email will send, see details about your contacts, integrate with apps, and receive a notification when messages you've sent have been opened. The best thing about Newton, however, is that Amazon Echo can go through your emails for you when you set up Newton's Alexa skill. Say, "Alexa, ask Newton who just mailed me," and she'll follow suit.

Available on: Android, iOS, macOS, Windows

Price: $49.99/year


outlookmobile

Outlook Mobile

Best for Viewing a Focused Inbox

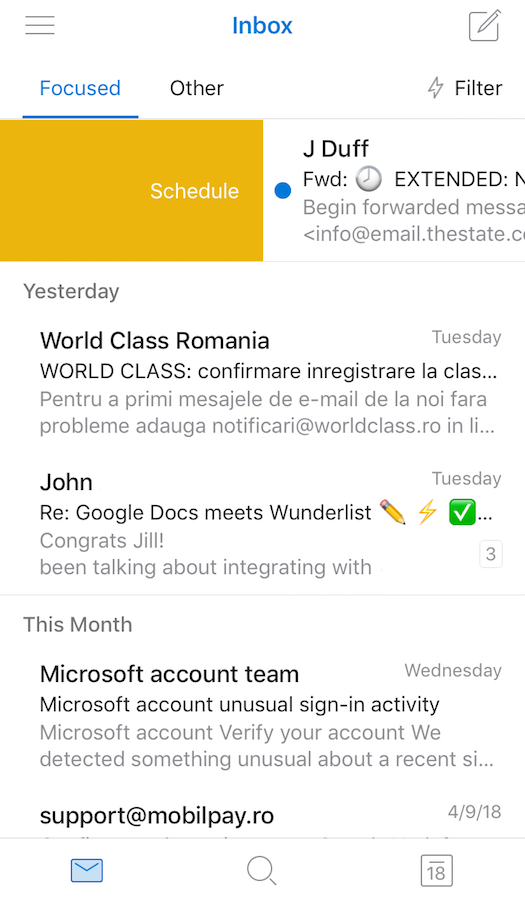
While the Outlook desktop app is as powerful as it is bloated with features, the Outlook Mobile app offers quite a different experience. When you use it with a Microsoft email account, you can take advantage of its Focused Inbox view, which automatically finds emails that are likely to be important to you and filters out other distracting messages, keeping them in a tab called Other. The Outlook mobile app also has customizable swipe gestures for deleting, archiving, marking as read, flagging, moving, and snoozing messages (the snooze function is actually called "schedule," but it would be snooze in any other app).

Available on: Android, iOS

Price: free


Polymail

Polymail

Best for Collaborating With a Sales Team

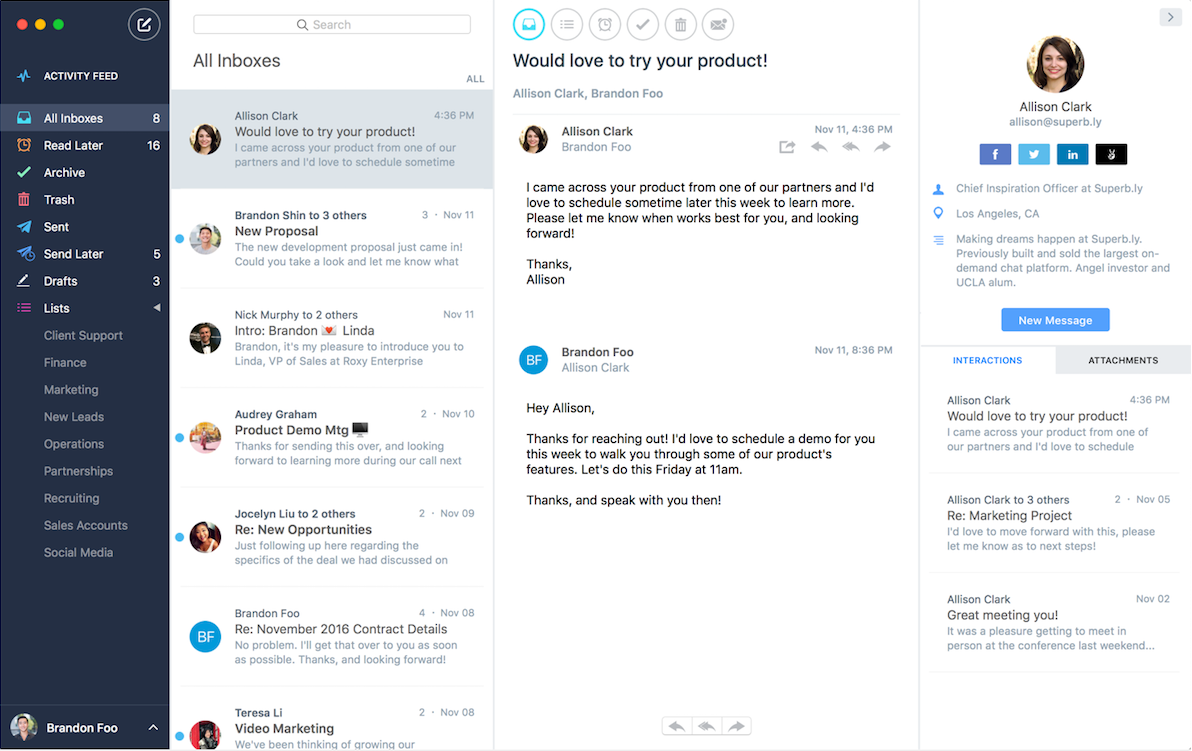
Polymail's strong suit is that you can use it collaboratively, especially among sales teams. Create email templates, for example, and you can share them with everyone on a team. For groups that use Salesforce, you can connect the two apps and get information you need from Salesforce while writing messages. Teams can also track email stats together to see how much time everyone spends in their inboxes, or how likely each person is to get a reply. Another great feature is Polymail's ability to watch and report back when recipients open your messages, and who among them downloads attachments you send. You'll also notice in the chart below that Polymail is packed with features, everything from the ability to snooze a message until later to an undo send button.

Available on: iOS, macOS, web

Price: free; paid plans from $13/month


Postbox

Postbox

Best for Organizing Multiple Inboxes

Since its inception as a spin-off of Mozilla's Thunderbird, Postbox has grown into a powerful app, rich with options for keeping your mail organized. A tabbed interface lets you keep multiple messages open at once. Tags and folders help you categorize and sort mail. Another stellar capability is how Postbox can display a contact info sidebar, letting you dig into the detail about the sender. There's a lot to explore in this powerful and well designed app.

Available on: macOS, Windows

Price: $40


Spark

Spark

Best for Cutting Down Time Spent in Email

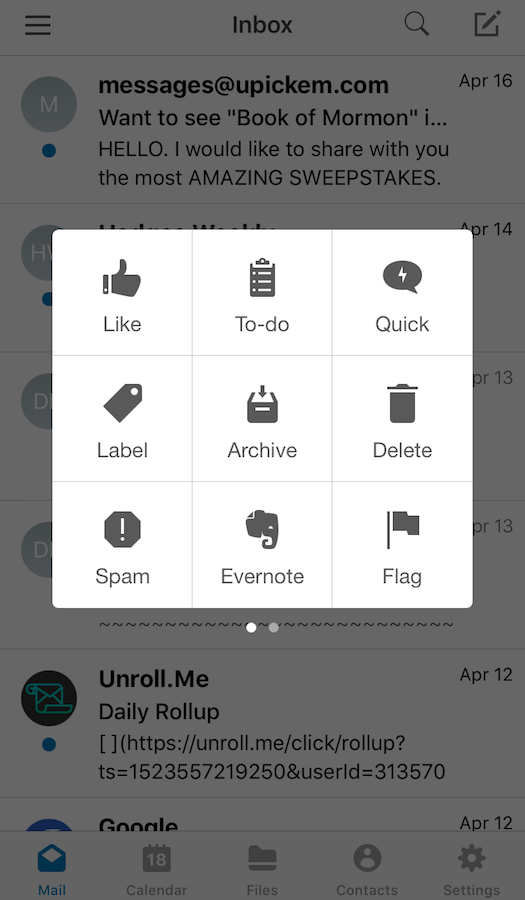
Every email doesn't need a lengthy reply. Sometimes a thumbs-up or crying face is all you need. With Spark, that's all you have to send, and in the end, that saves you time. After you read an email, tap Quick Reply to send an instant emoji response and archive the message in one step. Spark also saves you time in how it handles calendar invitations. Instead of a standard invite email, Spark shows you a preview of the event in your calendar with Accept and Reject options. This app has a wealth of other features, too, such as undo send, snooze, reminders, and more.

Available on: iOS, macOS

Price: free


thunderbird

Thunderbird

Best for Working in Tabs

From the makers of Firefox comes an email application that copies one of the best features of web browsers: tabs. Thunderbird isn't the only email client to use a tabbed interface, but it is one of the best. When you quit the app, Thunderbird saves your open tabs and reloads them the next time you launch it. An extensive collection of add-ons let you expand what Thunderbird can do.

Available on: Linux, macOS, Windows

Price: free


triage

Triage: Email First Aid

Best for Processing Messages Quickly on iOS

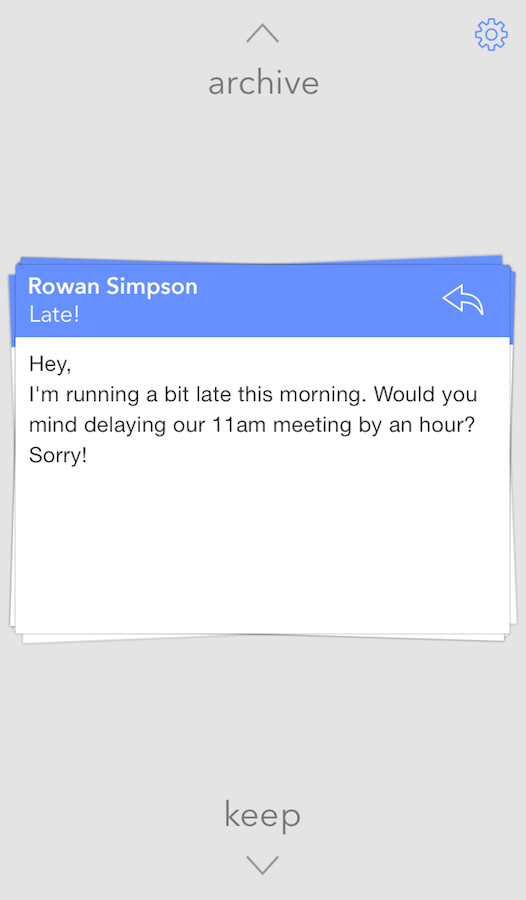
Swipe up to archive, swipe down to keep, tap to reply, and plow through your unread messages. The iOS app Triage is designed to make getting through your inbox quick and relatively painless. It's a great option if you are into the inbox zero mindset. The app's name and tagline ("first aid for your inbox") captures the idea that you can use Triage when your email situation becomes critical. While it may not be your go-to email app daily, Triage is one of the best options for taking decisive action to curb an overwhelming inbox no matter where you are.

Available on: iOS

Price: $1.99


Unibox

Unibox

Best for Grouping Messages by Sender

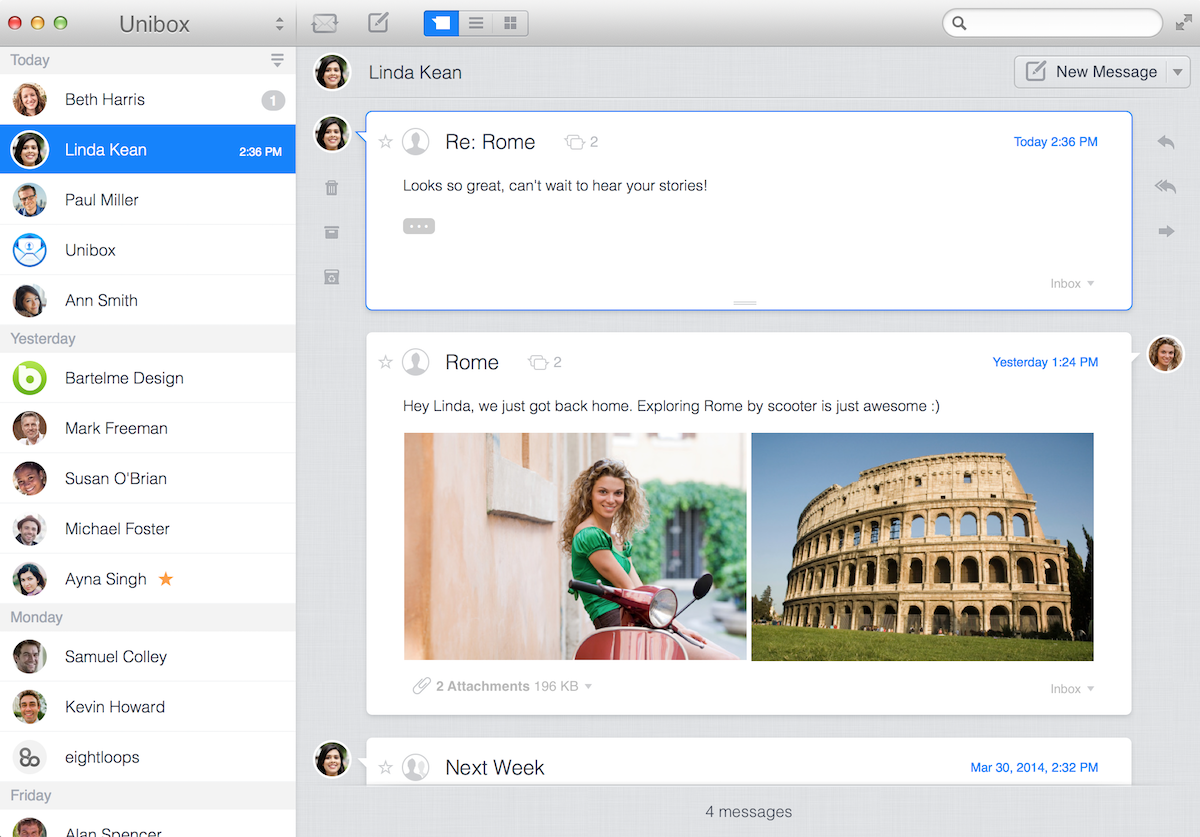
Unibox turns email into a communication form that's extremely similar to messaging. It does so in part by grouping your emails by contact. Instead of seeing a list of unread messages, Unibox sorts your messages based on who's sent you one recently. You can tap a contact to see every message you've sent back and forth in a chat-style conversation view, then quickly reply from the top of your conversation list. There's nothing to organize and no pressure to clean out your inbox. All you'll have to do is look who's been in touch lately.

Available on: iOS, macOS

Price: $13.99


vmwareboxer

VMware Boxer

Best for Customizing Email for Mobile

VMware Boxer, also known simply as Boxer, takes a mobile-first approach to email. A highly customizable interface lets you assign different actions to swipe gestures. As with most email client apps, you can consolidate messages from a variety of email services, such as Gmail and Outlook.com, into one view. Boxer is also great for putting your calendar and contacts' information right into the same app where you process email, so there's less flipping back and forth to find a free time to meet.

Available on: Android, iOS

Price: free


Originally published 2 June 2015 by Paula DuPont; updated in 2017 and 2018 with new apps current information. Zapier senior writer and editor Matthew Guay contributed to this article.


source https://zapier.com/blog/best-email-app/

Tuesday, 1 May 2018

The Best Transcription Apps and Services in 2018

Ryan Law contributed to this article, as did Zapier Senior Writer and Editor, Matthew Guay

Transcription is no longer the sole reserve of journalists or doctors. It's more affordable than ever, ready to unlock the SEO benefit of a podcast or video transcript, turn interviews into powerful quotes and social proof, or even document meetings and conferences.

From services powered by human transcribers to powerful machine learning-powered apps, there’s a wider selection of transcription services than ever before. To help you find the best service for your unique use case, we tested nine of the most popular, inexpensive transcription apps and found the best four—each designed to save you hours of painstaking transcription time.

What Makes a Great Transcription Service?

To find the best transcription services, we focused on three critical criteria: accuracy, speed, and price.

Accuracy is paramount to a transcription app, so we put each service through its paces with a short two-minute audio clip. The clip contained 282 words, two speakers, two different accents, and a few niche brand names and pieces of industry jargon—and to compare the accuracy of each platform, we calculated how many mistakes each made.

Speed is another crucial factor. Given enough time, we could all transcribe audio with close to 100% accuracy, but these services are designed to take the manual labor out of transcription. From the moment we hit “upload” to the second the transcription was finished, the timer was running.

Finally, we come to price. Transcription services are cheaper than ever, and a growing number of computer-powered transcription services have forced prices down further. Years ago, transcribing an hour of audio could easily cost over $120, but today you could hire someone on Fiverr to do this for you from $5 for 10 minutes of audio. All of the services in this list cost $1 or less per minute of transcribing time, beating even that low price.

But how do computer-powered services compare to old-fashioned human transcription, in terms of price, speed, and accuracy? To decide, we tested the biggest names from both camps to see which came out on top.


The Best Computer-Powered Transcription Apps

Want a quick, cheap, and fairly accurate transcription? Online transcription apps are generally more affordable than human-powered transcription services. These apps are a solid choice when you need something transcribed fast and the audio doesn't contain a lot of complicated lingo that needs human deciphering.

Temi

Best for fast, frictionless transcription

Temi screenshot
  • Accuracy: 16 mistakes, 94%
  • Speed: 1 minute
  • Pricing: $0.10/minute, free trial (first four uploads) available

Temi touts itself as “speech to text transcription in 5 minutes,” and true to its description, the service made short work of our two-minute audio sample. Temi took just 60 seconds to analyse the audio, understand the speech, and email the finished transcription. In addition to having one of the quickest turnarounds of the apps tested, Temi also has the lowest per-minute price. This should be your go-to transcription app if speed and price are your priorities.

Uploading audio to Temi was also the easiest of the bunch: the entire process only took just four clicks from opening the site, taking advantage of Temi’s free trial offer to get started without any payment details or account setup, and receiving the finished transcript.

For the most part, Temi’s accuracy was spot-on, only falling short in a few instances where it missed words or misinterpreted some tricky acronyms (it transcribed “A and D” as “Andy,” “indie,” and “Emiri” at different stages).

Though it doesn’t have quite the depth of functionality as other transcription services on this list, it more than makes up for it in terms of its speed and price: At just 10 cents per minute, it’s the cheapest transcription service with a high accuracy rate.

Trint

Best for transcribing, editing, and collaborating in one place

Trint screenshot
  • Accuracy: 14 mistakes, 95%
  • Speed: 2 minutes
  • Pricing: $0.25/minute, free trial (first 30 minutes of audio) available

Trint took just two minutes from upload to finished transcription and was the most accurate of the transcription apps tested. Although it costs more than Temi, it also includes more handy features.

Trint provides a host of functionality with tools. You can review your audio alongside your time-stamped transcription, and use handy keyboard hotkeys to rewind, pause, and fast-forward the recording. Once it's finished, you can email the finished transcription to colleagues in a click.

Trint’s intuitive interface supports a broad range of file formats and ways to upload audio, and after poring through the transcript, I found only 14 mistakes—giving it a high 95% accuracy rate.

Great speed and great accuracy at a competitive price: If you're looking for a transcription app that you can use with your team, give Trint a look.

Human-Powered Transcription Apps

Although computers these days do a great job of transcribing speech to text, if you need the utmost accuracy or have complicated audio to transcribe, transcription services powered by people are the way to go. They're the most accurate, and these services are both fast and competitively priced.

Rev

Best for near-perfect transcriptions.

Rev screenshot
  • Accuracy: 5 mistakes, 98%
  • Speed: 17 minutes
  • Pricing: $1/minute

At $1 per minute and with a turnaround of less than 20 minutes, Rev is among the best values in transcription services. The service is easy to use, fast, and extremely accurate—it's the service we use here at Zapier for transcribing interviews.

In stark contrast to the machine-powered transcription services, Rev’s human transcriber (thanks Gemma!) nailed every single brand name, acronym, and piece of industry jargon. There were no missing phrases, and the only problem was a brief patch of apparently inaudible sound—culminating in an impressive 98% accuracy rate for Rev. Though the service took markedly longer than the machine services, I was only waiting for 17 minutes, pretty crazy when you consider the logistics required to pair my project up to a transcriber.

The editing and review features were basic but functional, but with such a high accuracy rate, it didn’t matter as there was little I needed to change. These figures aren’t unusual for Rev: they tout a 99% accuracy rate, and guarantee that audio excerpts less than 30 minutes will be transcribed within 12 hours.

See our Rev review for more details or check out how you can automate Rev with over 1,000 other apps:

Scribie

Best for accurate transcription when time isn’t a worry

Scribie screenshot
  • Accuracy: 6 mistakes, 98%
  • Speed: 36 hours
  • Pricing: $0.60/minute

Like Rev, Scribie’s human transcriber managed to pick out and correctly identify every acronym and brand name. In fact, the only errors I came across were a couple word omissions, and nothing that changed the meaning of the conversation.

With Scribie’s budget pricing coming in at just $0.60 per word, their 98% accuracy rate was also accompanied by the lowest cost of any transcription service in this category.

The tradeoff is turnaround time. Scribie’s cheapest tier is their “5 day turnaround,” and although the finished transcription was delivered well within that timeframe, it still took 36-hours from upload to delivered file. If timing isn't an issue for you, Scribie is an affordable and accurate transcription service option.

Honorable Mention: Self-Service Apps & Freelancers

oTranscribe
Want to transcribe text yourself? An app like oTranscribe (pictured) can help.

The real benefit of a transcription service is freeing up your time. But if you’re willing to be more hands-on, you can think about DIY-transcription or hiring and managing freelancers.

DIY-transcription is simply doing the hard work of transcribing audio yourself. Apps like Transcribe and oTranscribe were developed with this in mind. They pair audio players with simple text editors to easily transcribe as you listen. For example, after uploading your video, you can click play and then start typing the content yourself as you listen along, with hotkeys that offer crucial functionality (such as pausing and rewinding) at your fingertips to make the process as fast as possible. YouTube, similarly, allows you to enter closed captioning text when you edit an uploaded video.

There are also a wealth of transcription professionals available at freelancing sites like Mechanical Turk, Upwork, and Fivver. Select the transcriber, and send them the audio file to have them transcribe it for you. Note, though, that transcription quality can vary depending on the quality of the audio file you send and the transcriber's skills. I tried to have an interview with a programmer transcribed via Fivver, for example, and in the end had to scrap the project, because the transcriber wasn't able to make out the abbreviations and acronyms in the conversation.


Overall, the transcription services powered by people scored higher in the accuracy stake while costing a bit more. But, crucially, there’s a smaller gulf in quality that I was expecting. The machine-powered services were faster without exception, and offered their services at a fraction of the price.

If accuracy and minimal editing are prerequisites for your transcriptions, you’ll be best served by the human touch. If you’re looking to turn recorded audio into text in the quickest, cheapest way possible (and you don’t mind the occasional slip-up), it’s worth trying a computer-driven service.

One thing’s for sure: both approaches are better than laboring over your own transcriptions.


Want to save more typing time? Here are more resources to help you get more out of audio and type less:


source https://zapier.com/blog/best-transcription-apps/