Thursday, 26 April 2018

Research Is a Team Sport: How to Conduct UX Research (Templates Included)

Before working at Zapier, I didn't have first-hand experience with UX (user experience) research. Largely based on instinct or a few Google Analytics reports, those experiences put decision-making in a black box for me. I never really understood the “why” behind design decisions.

But a simple idea completely changed how I thought of research: Research is a team sport. It’s the idea that you bring everyone along on an all-hands research extravaganza. Everyone helps, everyone gains empathy, and everyone knows why a project takes a certain path.

Here’s how our team makes it easy for everyone to participate in UX research efforts. Bonus: We've provided templates and other resources at the end of this article so you can apply these methods yourself to get to know better how your users experience your product.

Form Questions and Methods

When we kick off a research project, our team comes up with a list of the right questions to ask, which is one of the hardest parts of research. Rather than focus on the final questions you’ll ask, first think about what your team doesn’t know: Have group discussions, go through thought exercises (start with Questions and Assumptions), try to uncover any knowledge gaps your team has. When you have a healthy list of unknowns, you’ll be in better shape to frame your final questions.

In addition to knowledge gaps, you also have anecdotal beliefs of what a customer will do with or how they’ll think about your feature—we call these assumptions. These assumptions are likely phrased in an observable way (e.g., new users will think this is intuitive); if they aren't, convert them so they are.

Build an Interview Script

To research how a new feature might work, we need to observe how customers interact with that feature. These observations can be difficult if the feature doesn’t exist yet, which is often the case. So to get our insights before engineering starts building, we put together a script and click-through prototype to take different types of customers through a flow and watch what they do.

Using this script and prototype approach works well on a remote team. We hop on a video call with a participant, send them a link to the prototype, have them share their screen, guide them with our script, and make our observations.

A good script starts with a list of observation goals. You’ll build this list by converting your unknowns, questions, and assumptions from earlier into actionable statements. These goals guide the prototype design and help you put together non-leading questions around that statement so your script feels like a conversation.

Observation goals must be observable—you have to observe the customer providing either an invalidating or validating response, or completing a task. To get participants to do this, you need to form questions around each observation goal. These questions are meant to put the customer in a situation similar to what they’d experience in the wild. To show how this might work, let’s continue with the example from above.

Notice that we don’t outright ask if it’s easy to turn on a Zap (our word for automated workflows). More often than not, participants will answer yes to a question like this to not hurt your feelings, or as a default if they’re uncertain. Leading questions gets you the answer you’re looking for (aka “confirmation bias"), and that’s not the goal of research. Instead, you want to observe customer behavior as close as possible to what it would be like in an everyday situation.

At Zapier, our team uses a script template to create a rhythm throughout our interview. The template handles things like intros, outros, and handy interview tips. We paste our observation goals into the template and use it to guide our discussions. After a few sessions, you likely won't even need the script as you could probably recite it in your sleep. (Template available at the end of this post.)

Design the Prototype

Now that your team has observation goals and questions to gather unbiased observations, it’s a good time to jump into design. Chances are your team has already been noodling around with ideas. Take those ideas and put them into a realistic scenario. Consider the observation goals in your script and make the flow feel as natural as possible—something the user would normally experience within your product.

You may need to give more or less context to your script and prototype. Along with the goals you’re trying to observe, you may have to include backstory to make your feature feel more natural.

Take our example: Since we want to see if it’s easy to turn on a Zap, it might be nice to give participants more context to get them to that point. To make this observation goal feel realistic, we can have them create the Zap before turning it on. In the end, though, you and your team will know what’s right for your project.

Recruit for UX Testing

Armed with a script and prototype, it’s time to go out and observe! But there's a new question: Who will you observe? Recruiting for tests is an article in and of itself, so I’ll keep it brief. Before your team reaches out to possible participants, make sure you understand the types of people you want to talk to. For example, you might want them to be non-tech savvy or only work in marketing. It all depends on who your team’s target market is for the feature you’re working on. When you know the traits of the people you’d like to talk to, it’s time to send out a screener survey.

A screener survey helps you find the right people with the right traits. You craft a series of questions with a “correct” answer based on what you’re looking for. For non-tech savvy people, you may ask, “On a scale of 1-5, how tech savvy are you?”. That way, you can recruit anyone who answers 2 or lower. When crafting survey questions, make sure you’re not hinting at the preferred responses, so keep the questions broad.

When you have a number of responses, your team can schedule sessions with participants. As far as how many people you should schedule, there are plenty of opinions out there on sample size for qualitative research. We tend to notice patterns in the 10-12 range.

Observe and Revise

It’s observation time—gather the team, start a pot of coffee, and put on your empathy hat! We encourage our entire cross-functional team (product management, design, engineering, research, marketing, and support) to join. The observation phase gives our team first-hand knowledge of how our customers behave. As a group, we witness why customers do certain things and watch them run into roadblocks. Seeing this as a group will align your thinking quickly so everyone has a better idea of glaring issues that need to be fixed.

Before the session starts, you’ll want to figure out who’s going to facilitate, who will take notes, and who will listen and watch. Folks listening and watching provide commentary in Slack as the session takes place.

Since these sessions take place remotely, we use Zoom to host video calls with participants. Each call is scheduled beforehand with Calendly. About an hour before our meeting, we built a Zap to email the participant a reminder that our session is coming up with a link to join the Zoom call. When the session time starts, the participant joins the call and talks exclusively with the facilitator.

At the same time, we have a Zap spin up a Slack thread for the session, letting members of our cross-functional team (and anyone in the company) know when it starts. When others on the team join to observe, they keep their mics muted and cameras off to avoid disrupting the session. This Slack thread is what we call our “Slackroom” (borrowed/modified from Airbnb to fit our remote work setting). In the Slackroom, we talk about pain points as they happen in the session. We also take this as an opportunity to discuss participants experiencing recurring issues and share sketches and ideas that might help.

The pain points that participants experience, along with the conversation in our Slackroom, provide great prompts that inspire divergent design thinking. This part of the process generates a lot of ideas—which comes in handy when your team gets into final revisions.

Take Notes

For note-taking, we use Google Sheets (template included below). We formatted the spreadsheet so we can quickly choose what goal the note relates to, the emotion of the user at the time of the note, which teammate manages the note in case we need to follow up, and a spot for individual researcher notes. We gather early findings in the researcher note column before we do our formal synthesis. From that column, we create an early findings report for folks who couldn’t attend so they get a feel for things before the full report is released to the entire company.

Synthesize

After all the sessions are complete, a couple of folks from the team—typically a researcher and designer—will pull our notes into a collaborative online whiteboard, called Mural, and do an epic affinity diagramming exercise asynchronously. The goal of this exercise is to group similar notes into clusters and give that cluster a theme name. For example, maybe there are a lot of notes related to pain points about the location of the Zap's ON switch. We'd put these together and name it something like “Switch Location Is Confusing”.

At the end of this exercise, you’ll walk away with a handful of theme clusters (many times we end up with 10 clusters or less). There are situations where grouping similar clusters makes sense as well; you’d follow the same process and give that new group a theme name. There are also situations where you’ll have outlier notes. That’s perfectly normal—we even have a whiteboard section called the “parking lot” where we place these notes.

These theme clusters will be the takeaways from your research efforts. You’ll use these to put together a report of findings for your company and make adjustments to your new feature. Though we won’t wait until this point to make design changes, by doing everything together, our process becomes less of a waterfall (research > design > engineering > marketing) and more parallel (building features side-by-side).

Research Together

This process has been immensely helpful and approachable for all members of our team: Everyone contributes and knows why projects go in a specific direction.

Remember, this is just one way to approach research and it may not fit your situation. One process rarely fits all problems—remember to be flexible, mix and match methods, or make up your own.

Happy researching!


source https://zapier.com/blog/conduct-research-remote-team/

Wednesday, 25 April 2018

Everything You Need to Know About the New Gmail

It's not often we jump up and down over email, but today's Gmail update is like a present. Currently rolling out to both personal users and G Suite customers, the new Gmail gives us features we've needed but perhaps didn't know we needed, all in one update.

Google has tweaked Gmail over the years here and there, but this is the biggest revamp for the email service for as long as we can remember. It's not just redesign or a small tweak like adding an unsubscribe link to newsletters: Gmail's host of new features might actually make email more manageable for you.

Among the additions: a new side panel so you can see your emails and events, notes, and tasks in one place; the option to snooze emails until later and quickly archive them with one click; and, my favorite, a way to send self-destructing emails. (I feel like a spy.) If you use and love Inbox by Gmail on your phone, you'll find the web-based version now closer to that more efficient experience. Here's how to get the new Gmail and its best new features.

How to Get the New Gmail Version Right Now

Click the gear icon on the top right of your screen and then choose the "Try the new Gmail" option, if it's available. The update is currently rolling out to new users, so it might not be available to you yet. Patience is a virtue.

Try the new Gmail

Preview Attachments Without Opening Emails

Once Gmail reloads with its snazzy new look, you'll be asked to choose a view for your inbox: Default, Comfortable, or Compact. They're similar to the previous Gmail "comfortable" and "compact" views, which basically change the line height of the emails in your inbox, except now the Default view gives you a sneak peek of attachments in messages. You'll see an icon of the type of file attached (such as a photo or a Google Doc) and the file name. Click on the file name and you can preview the attachment without having to open the email message itself. Handy!

Gmail attachment preview

See Your Calendar, Notes, and Tasks in One Window

Gmail's compose button is now rounder (and dare we say friendlier) than the boxy button of old, and there's a new sidebar on the right for quick access to Google Calendar, Keep, Tasks, and other add-ons you might have enabled.

Google redesign - panel

Click on the icon and the app will show up in a new side panel, which means you can see your calendar, notes, or to-dos side-by-side with your emails. No more jumping around between tabs or windows to manage your day-to-day.

Google Tasks

By incorporating Tasks into Gmail this way, Google has made it much more likely that people will actually use the to-do app. Gmail (and Google Calendar and Keep) previously supported task creation, but it was buried in the user interface and inconsistent across apps—I admit, I can't seem to even find it when switching back to the now-"Classic" Gmail interface.

In the new Gmail, you can drag emails into the Tasks pane and have them turned into to-dos. (And, let's face it, most of our emails are either things we need to act on or can ignore.)

Gmail calendar panel

And, along with this Gmail revamp, Google has at last also launched a standalone Google Tasks app for mobile. So now you'll actually be able to find and use Google Tasks on iPhone and Android. Though bare-bones at the moment, you can set due dates, add subtasks, drag-and-drop to prioritize tasks, and create tasks from email in the Google Tasks app.

Snooze, Archive, and Delete Emails with One Click

Gmail in the browser has taken a few clues from its mobile sibling, Inbox by Gmail. Just like you can swipe on mobile to archive or delete a message, now you can do the desktop version of that in Gmail in your web browser as well. Hover your mouse over the email and click on one of the icons to quickly manage it.

Gmail new menu

One option in that new hover menu is a brand new feature for Gmail: Snooze. As the name implies, this feature hides the email message from view until a specified time—kind of like when your alarm goes off in the morning and you just can't deal with the day yet so you snooze it.

Previously, you'd need to use a Gmail add-on, such as Boomerang or SaneBox, to snooze emails in Gmail. Now you can just click on Snooze to set a time when that email will reappear in your inbox—that is, when you're ready to deal with it.

Send Confidential, Self-Destructing Emails

Email isn't the most secure way to send confidential information, such as your tax returns or the security code to your front door. Yet because it's the most popular way to communicate with others digitally, we still keep sending emails even if there might be some super secret information in there.

Gmail's new confidential mode will give security pros and paranoid people like myself some peace of mind: Now, when you write an email, you can pick an expiration date for your emails (so the message and attachments are no longer readable), revoke previously sent emails, and require the recipient to add authentication via a text message before seeing your email. In other words, more control over when and who can see this email. Note that this doesn't fully protect you, since the recipient could take a screenshot of your message before the expiration time—so, as always, just don't send sensitive information via email if you can deliver it in a more secure method.

You'll find this option at the bottom of an email you're drafting. This feature is still rolling out, though; I wasn't able to test at the time of this writing.

An Email Assistant in Your Inbox

Finally, no surprise, given Google's AI (artificial intelligence) smarts, but Gmail's gotten smarter. If an email has lingered in your inbox for a while that Google thinks is important to you, based on your previous email interactions, it will gently "nudge" you by calling more attention to that email so you can follow up on it—or, you know, finally archive the message. This is handy for those of us who tend to read messages but leave them in our inbox. (Guilty as charged.)

As with Inbox, Gmail will also now suggest automatic responses for your emails, based on the message content. So instead of having to think up a reply to common emails like invites to a party, you can just click the handy "Thanks, I'll be there" or "Sorry, I'm busy that day" replies and get on with your day.


All in all, these Gmail updates are awesome. Try them as soon as you get a chance when that "Try the new Gmail" option shows up in your settings and let us know what you think. For more help with the new Gmail, see Google's Gmail update announcement.


source https://zapier.com/blog/gmail-update-new-features/

The Google Chat Guide: Everything You Need to Know About Google Hangouts Meet, Chat, and More

There might be only one real criteria for the best chat app for your team: How easy it is for everyone to use. With dozens of great video and text chat apps for teams–each of which include quite similar features–the deciding factor is often down to the way your team works.

Google Hangouts quickly became that default, easiest-to-use video calls option for many teams thanks to it running in your browser and being deeply integrated in Google's other apps. Create a new Google Calendar event, and you'll get a Hangouts video chat link included automatically—and can pick up your chat conversations right inside Gmail.

It's no longer just Hangouts, though. There's Hangouts Meet as a way to schedule video calls, and Hangouts Chat for continuous text chat with your team about your products. And on the consumer side, Google's combining its messaging efforts into the new Google Chat app.

Here's how to start using Google's Hangouts Meet and Chat apps today—and which of Google's half-dozen chat apps you should use.

Originally published March 10, 2017; updated April 25, 2018 with details about the newly released Hangouts Chat and upcoming Google Chat apps.

Google Hangouts Meet: It's Hangouts, Redesigned

Google Hangouts Meet
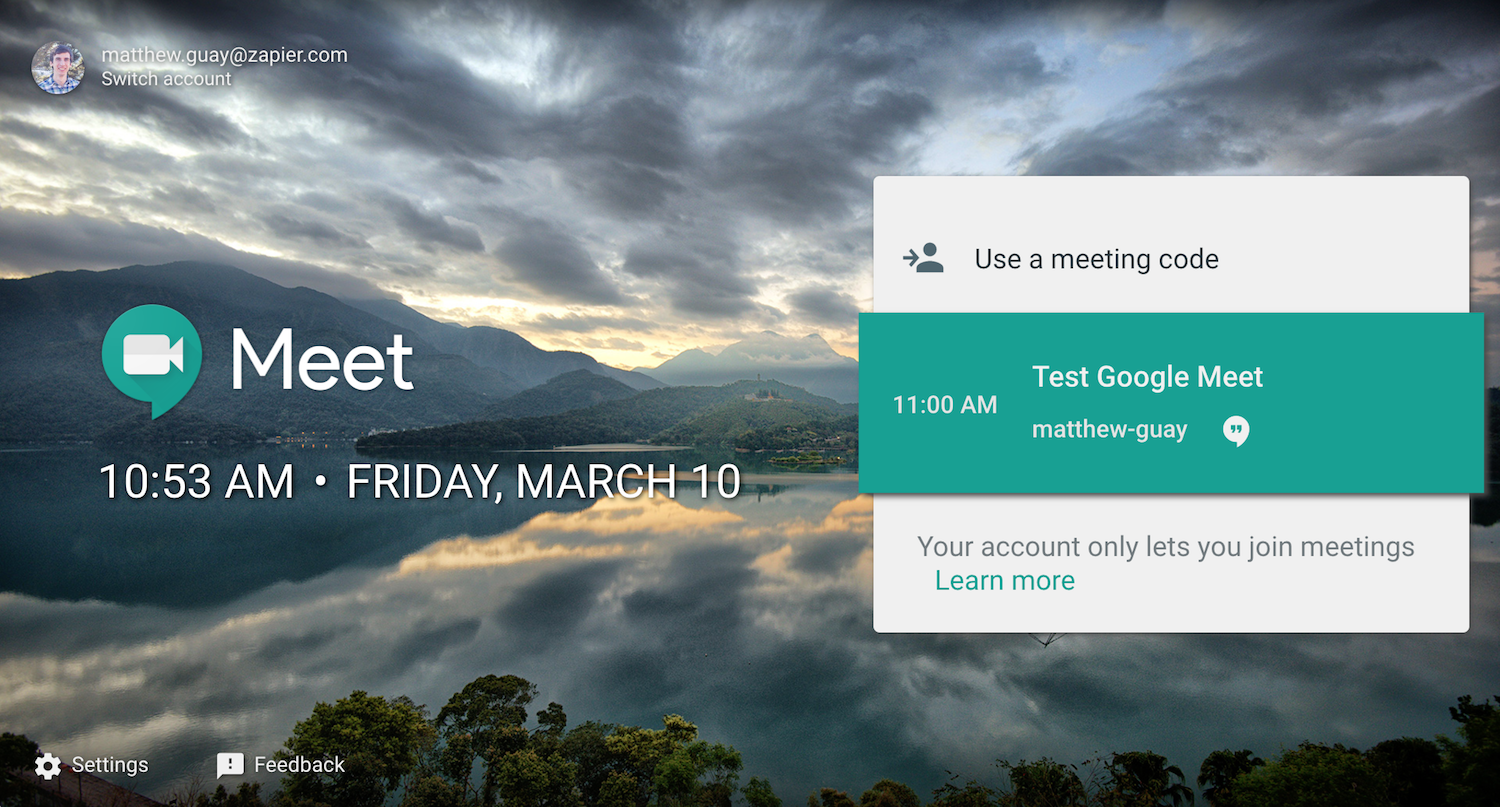
The new Google Meet appointment page feels like a slightly bolder Hangouts, focused on scheduled appointments

The best thing to come out the Google+ social network experiment was Hangouts. It's a solid, free video chat app that's built into Gmail and Google Calendar, making it the simplest way to jump on a call with colleagues. Its text chat is basic, much like the older IM-style Google Talk app, but Hangouts' high-quality videos with 25 participants more than made up for that.

Hangouts' video calls are still there, but if you're working with a team and have scheduled meetings, Google Hangouts Meet or just Meet is the app to use. It's Hangouts, designed around scheduled calls. You'll book appointments first in Google Calendar, then open meet.google.com and jump on the call when it's time.

For the most part, Meet is the same as Hangouts' video calls—only with a fresh new design focused just on video chat. There's no text chat—that's saved for the companion Hangouts Chat app. Instead, you'll get full-screen video with up to 25 participants for G Suite Basic and Business plans and 50 participants with G Suite Enterprise.

How to Use Google Hangouts Meet Today

Schedule a video call in Google Calendar
Enable Hangouts on your Google Calendar meetings, and you'll see them in Meet too

If you have a paid G Suite account, you can start using the new Google Hangouts Meet app for your team calls today. If your team's enabled Hangouts Meet in G Suite admin, you can schedule new calls right from Hangouts Meet—and for all other G Suite accounts you can schedule a video call in Google Calendar, and join them from Meet. Here's how.

First, make a new appointment in Google Calendar. Invite any participants, schedule it for the time you want, and then tap the Add video call link under the video location. That'll add a Google Hangouts link to your event—and also add it to the new Meet app.

Join Meet call
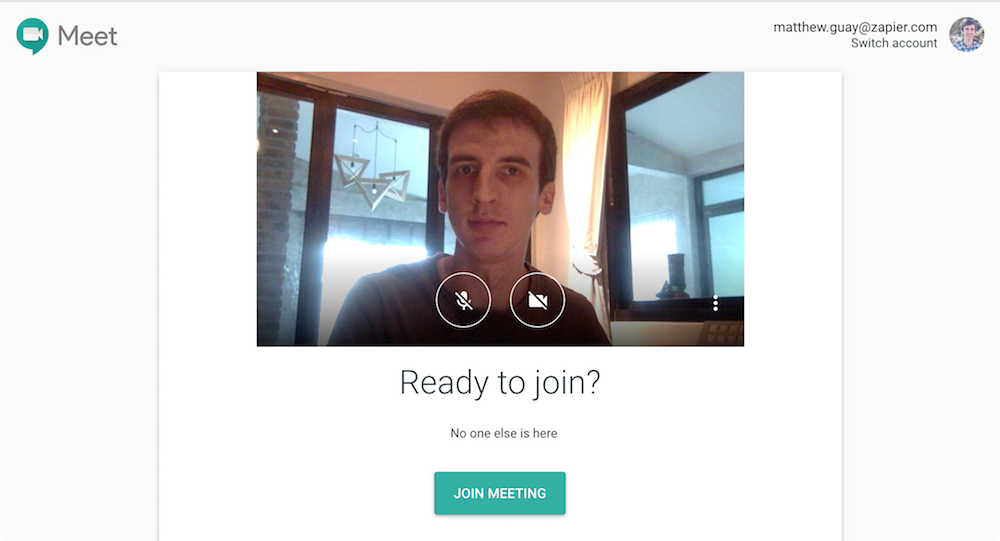
Meet lets you check your video before joining a call—just like Hangouts

Now, when it's time for your call, go to meet.google.com in Google Chrome—that's the only supported browser right now. You'll see a list of your upcoming meetings as in the top screenshot on this article. Tap the correct meeting, then join the video call much as you would for a standard Hangouts video.

Google Hangouts Meet video chat
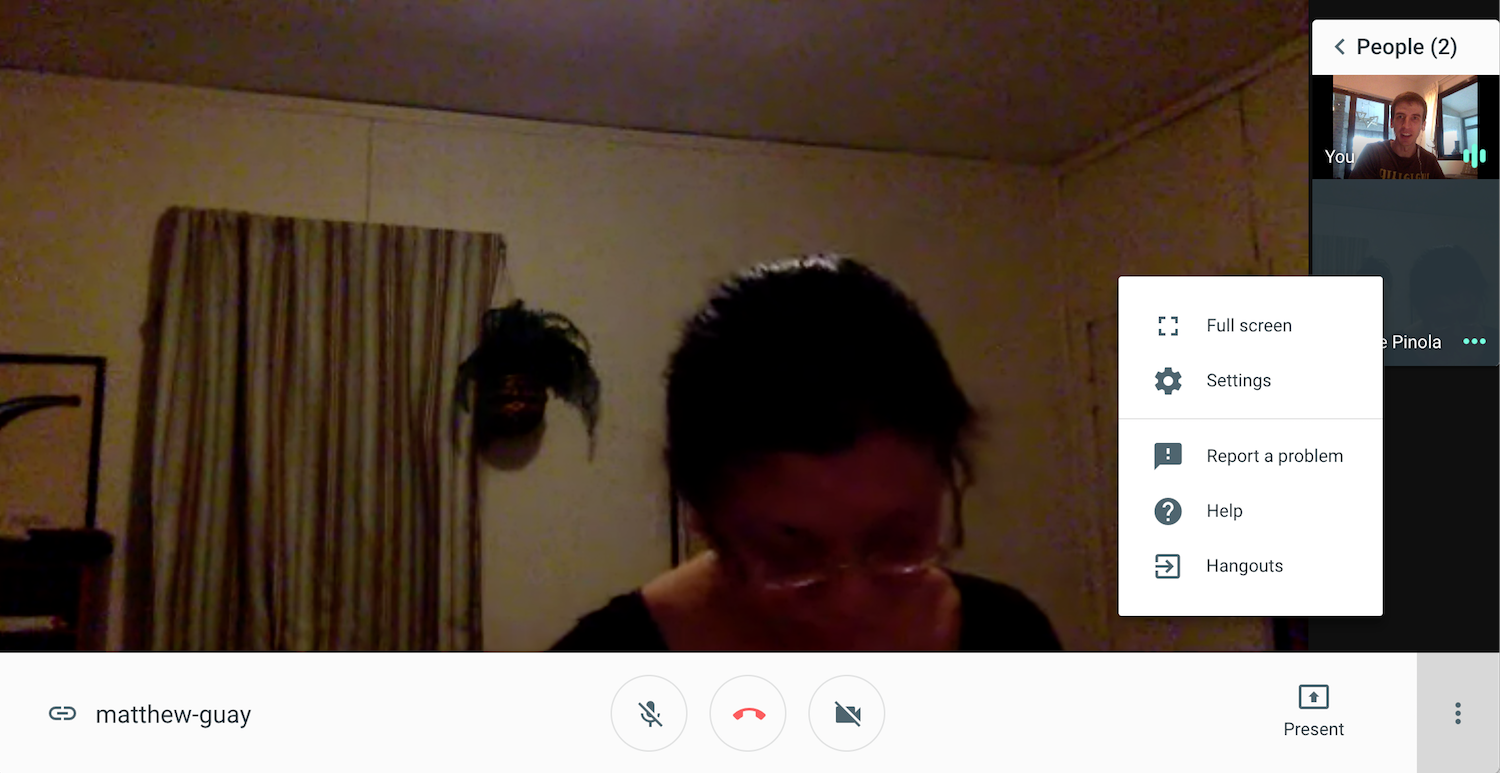
Meet keeps the focus on your call, with no text chat to distract

Unlike Google Hangouts' often dark interface, Meet puts its tools in a bright white toolbar. You can turn off your camera, mute your mic, or share your screen—and you can see each call participant on the right side of your screen. Much like Hangouts, the video of the person who's currently talking will be shown in the main part of your window.

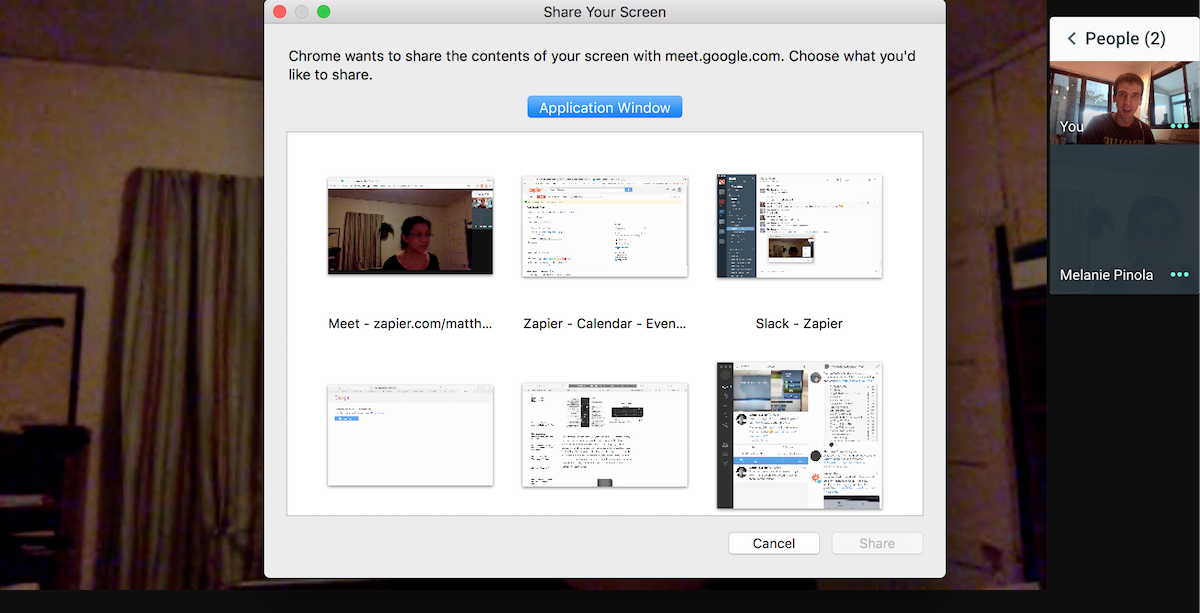
Hangouts Meet share screen

If you want to share your screen, Meet will let you share your full desktop or choose one app to share. Its window selector reminds us of Zoom—and it's actually part of the webpage, even though it looks like a separate window.

Google Meet worked well in our tests—much the same as traditional Hangouts. Its only problem is is the same: It drains your battery and kicks in your laptop's fans on longer calls.

If your video's running slow, you can switch from the default 720p stream to 360p video. Or you can switch to the traditional Hangouts interface if you'd like—just tap the menu button on the right, and select Hangouts to switch apps without quitting the call.

And that's it. Meet's a simplified version of traditional Hangouts video chat, still one of the best ways to jump on a call with your team. It's Chrome-only for now—but you can still use Hangouts' mobile apps to join Meet calls.

Google Hangouts Chat: Team Chat, Google Style

Google Hangouts Chat for teams
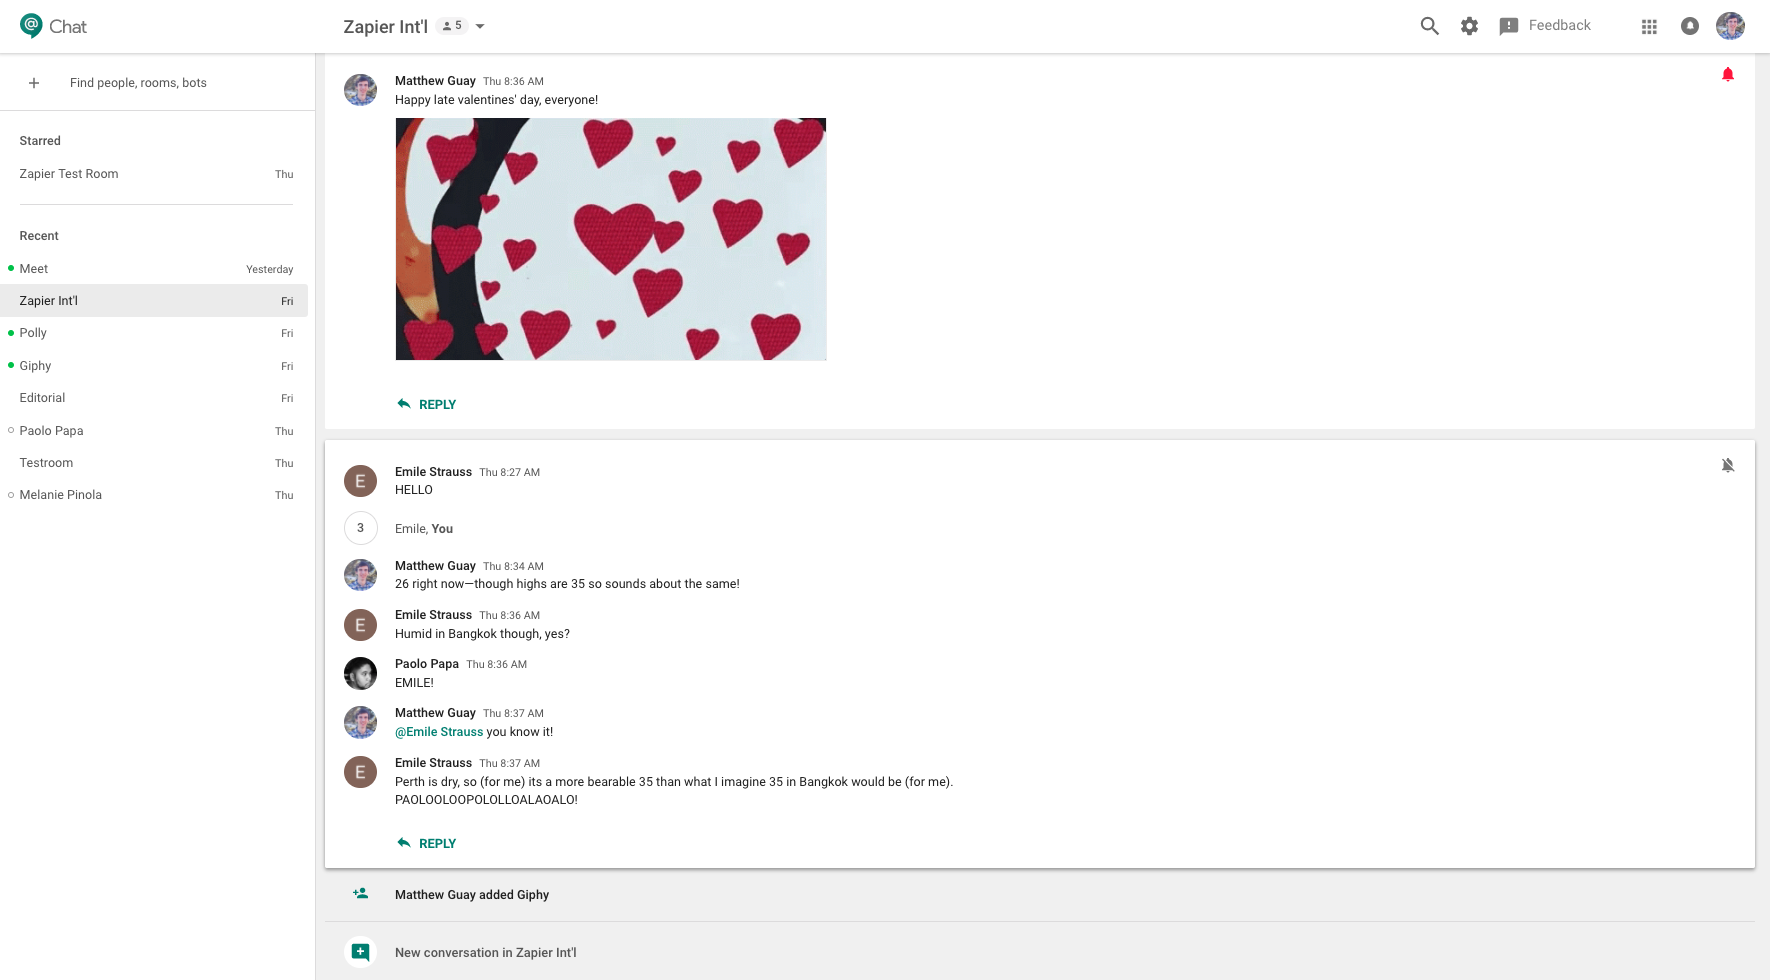
Google Hangouts Chat is a conversation-focused team chat app

Then, Hangouts Meet has a text chat sidekick: Google Hangouts Chat at the easy-to-remember chat.google.com. It's a brand-new team chat app from Google, one that's most similar to apps like Slack and HipChat than anything Google has released so far. And it's included with all G Suite accounts.

Hangouts Chat is focused on ongoing conversations between teams in your company. You'll make groups that are focused on the team you invite to chat. Everything's organized into conversations. Instead of posting new chat messages as followups to things posted earlier, you'll reply directly to older conversations or start new conversations when you have something new to talk about. Or you can message individuals for one-to-one chats inside your company.

It's also deeply integrated with the rest of G Suite, so you can share documents and manage appointments right from chat. Share a Google Docs document, say, and Hangouts Chat will automatically update its sharing settings to make sure everyone in your team can view that document. Then when you search for older things your team has talked about, you can filter search by Google Docs, Slides, or Sheets to find specific documents you've shared.

Along with focused conversations, Hangouts Chat helps you keep from being distracted with customizable notifications. You can choose which conversations you want notified about, and whether you'd like to get mobile or email notifications.

Google Hangouts Chat bot

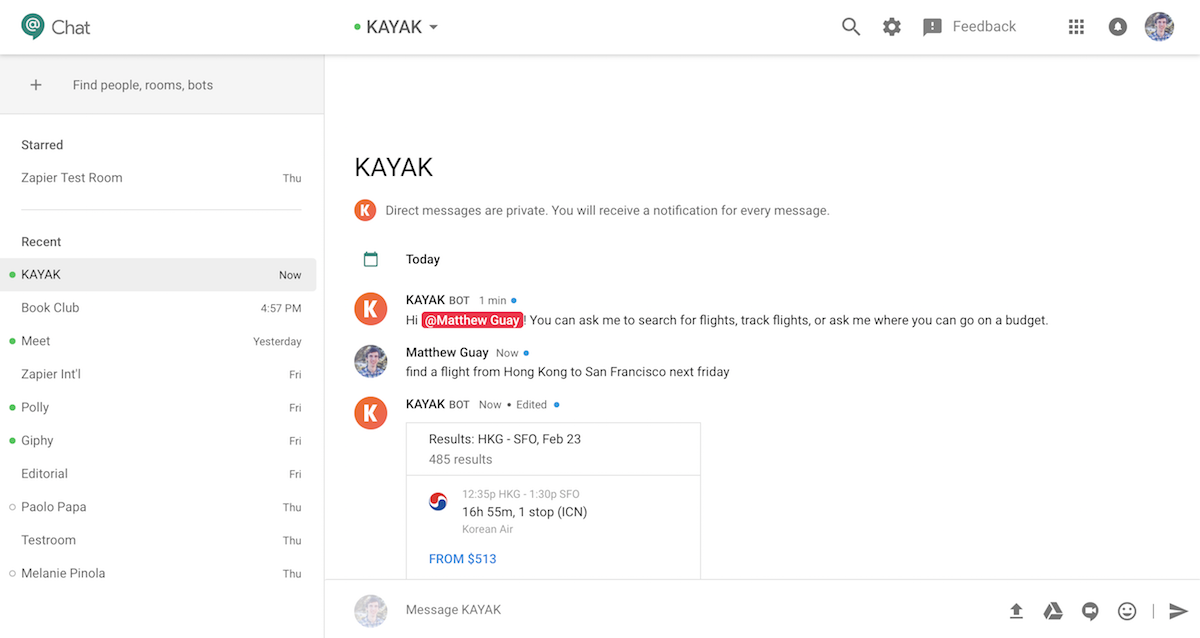
Perhaps most exciting is Google Hangouts Chat's built-in integrations and bots. It comes with a built in @meet bot which, similar to Google Assistant, will help you find appointments and other info from your Google account. You can browse through a wide range of bots that come with Hangouts Chat today, including one from Kayak that helps you find flights right from chat. And you can chat privately with bots or add them to rooms to get more done right from chat. Then, with integrations from apps like QuickBooks, Box, and Zapier, you can send notifications about new data into your team chat and build your own bots without coding.

Which Google Chat App Should I Use?

Over Google's history, the company has launched over a dozen voice and text chat apps. Google Talk and Wave are long gone, but with the new Meet and Chat apps, the search giant still supports a half-dozen chat apps. It's not certain which apps will still be around years from now—but today, its business chat apps are focused on Hangouts, while its consumer chat efforts are focused on a new Google Chat app.

Which of Google's chat apps should you use? Here's a quick guide to what each app offers:

Google Allo

for chatting with your friends

Google Allo

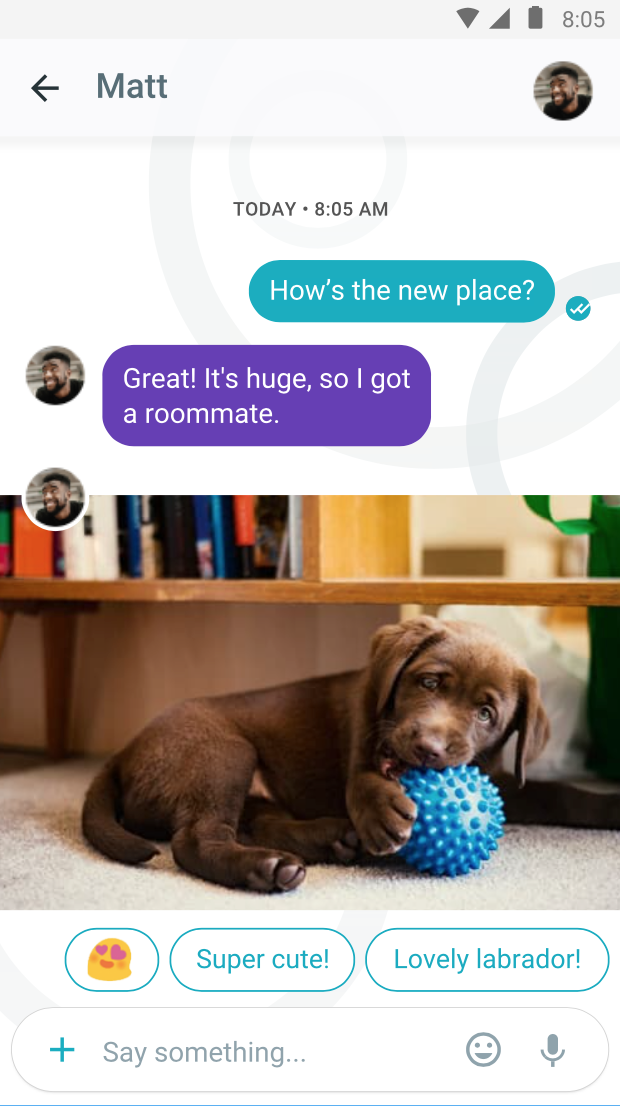
Allo combines a couple of Google's current focuses. It's a fun chat app designed to take on Facebook's Messenger and Apple's iMessage, with stickers, suggested replies, and built-in drawing tools. You can chat individually with friends–as long as they're using the Allo app as well–or can create a group with up to 250 people.

The biggest reason to try it out today, though, is for Google Assistant. A chatbot powered by a similar AI to the one in the Google Now voice assistant, Google Assistant can find travel details from your email, lookup plane ticket info, and tell you a joke. It's a Siri you don't have to talk to.

Allo's not Google's main focus today, with the team shifted to work on the upcoming Google Chat app, but if your friends all use Allo, it can still be a great chat app for personal conversations.

Google Duo

for quick one-to-one video calls

Google Duo

Ever wished FaceTime worked on Android phones too? Or want Hangouts video chat without all the extra features? Google Duo is the video chat app you've wanted.

Duo's one of the easiest to use video call apps. Just open the app, tap a contact, and talk to them in full-screen video seconds later. It's the video call counterpart to Allo, and just might replace the consumer-focused version of Hangouts video calls.

Android Messages

for sending SMS and MMS messages on Android

Android Messages

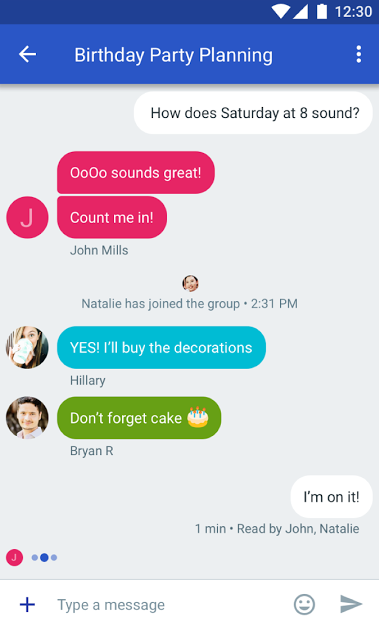
Want to send SMS and MMS messages on your Android device? This is the app it seems Google wants you to use—at least, until it's replaced with the upcoming Google Chat app.

Messages is simple, with an Allo-style interface for sending traditional messages from your phone. It works without an internet connection, and that's its strongest feature.

Google Hangouts

for group video calls

Google Hangouts

Google Hangouts is the chat app if you want an easy way to make video calls with groups. You can chat with anyone else with a Google account—paid or free. You can also video-call up to 25 people at once, complete with effects like adding a fake hat to your head or playing a sound effect to prank friends. Want to reach a broader audience? Hangouts is what powers YouTube Live, for live broadcasts streamed from your chat app.

Hangouts works everywhere: On mobile and on most desktop browsers. It's a click away in Gmail, and whenever you make a new Google Calendar appointment, you'll get a Hangouts link as well to easily jump on a call. It's great for business calls, and equally handy for personal chats.

Coming Soon: Google Chat

Don't look yet, but later this year Google will launch a new, unified messaging app on Android: Google Chat. Built around Rich Communication Services, a planned replacement standard for the global SMS messages that are supported by every carrier and phone, Google Chat won't be exactly a replacement for chat apps like Hangouts and Allo. It's not tied to an account—instead, it's tied to your phone number and will bring chat-like features to the traditional SMS messaging.

With upcoming Android updates, it will replace the built-in SMS app—and perhaps eventually come to desktops and the web. It might be the next best way to chat in 2019.


Related Reading

  • Want a different, non-Google app for video calls? Here are the 12 best video conferencing apps—each one tried and tested by our team.
  • See how Hangouts Chat stacks up to the best team chat apps in our roundup.
  • Want to make your team work together even better in G Suite? Download a free copy of Zapier's Ultimate Guide to G Suite to learn how to set up, customize, and collaborate in a G Suite account for your company.


source https://zapier.com/blog/google-hangouts-meet-guide/

Thursday, 19 April 2018

Organize Your Inbox with These 7 Gmail Filters

Banish newsletters, marketing emails, and spam from your inbox forever. Automatically move emails from important contacts into a priority queue. Find old, unimportant emails, and batch delete them to free up space in your mailbox. A few Gmail filters are all you need.

Filters let you create rules for how Gmail handles incoming email. These rules tell Gmail how to manage your email for you, letting you automate the process of organizing your inbox. Here's everything you need to know about Gmail filters and the most helpful filters to set up now.

How to Create a Filter in Gmail

There are a few different ways to create filters in Gmail:

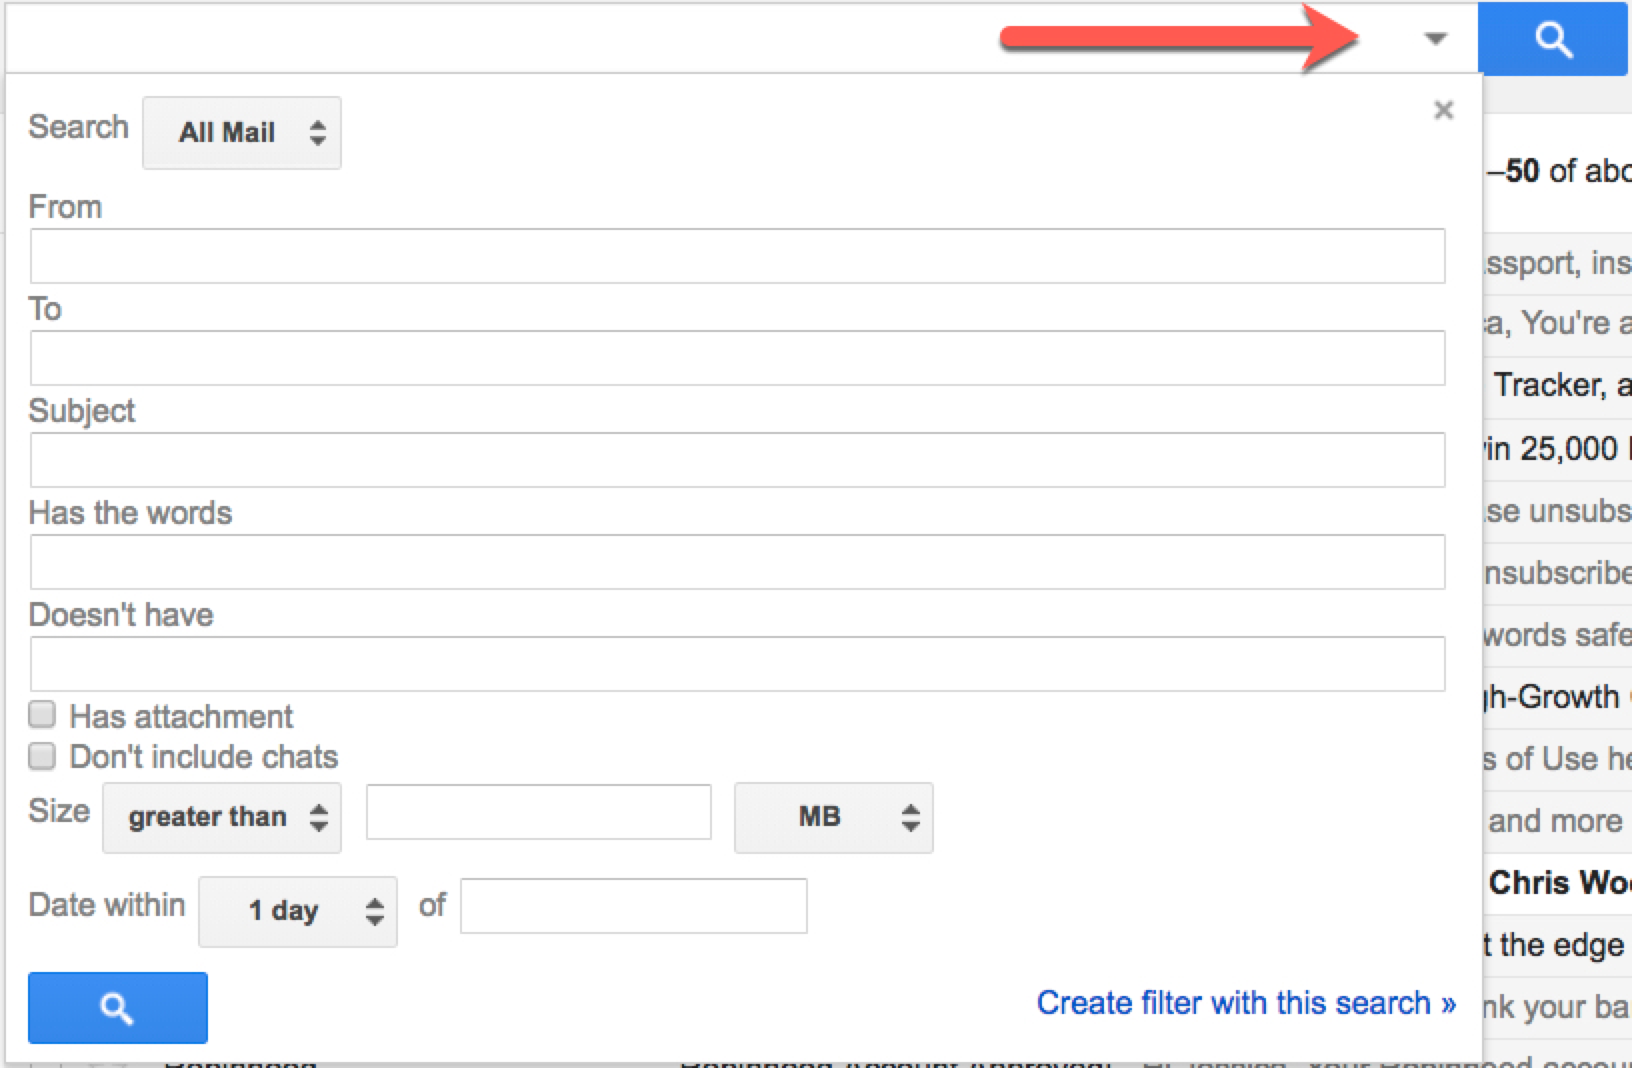
You can create a filter by clicking the down arrow in Gmail’s search box:

Create Gmail filter

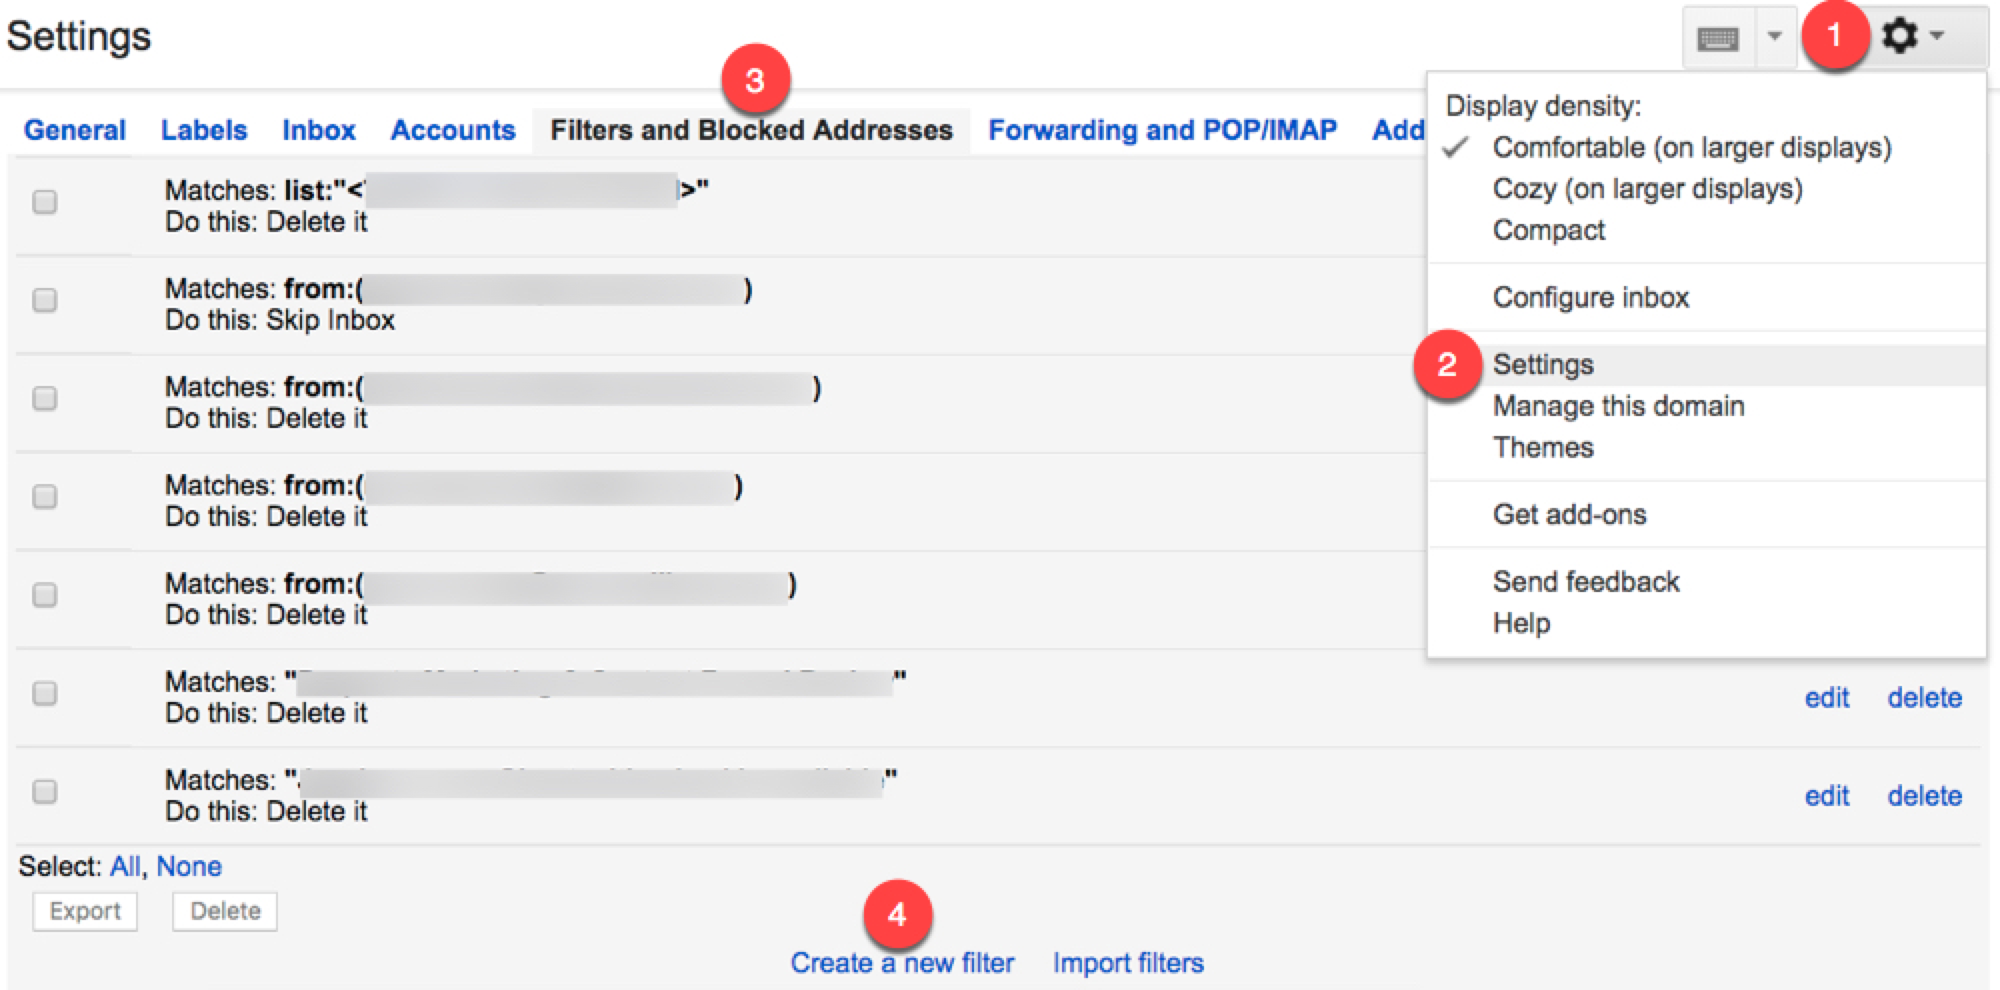
Or create a new filter in Gmail’s settings by clicking the gear icon, choosing “Settings,” selecting the “Filters and Blocked Addresses” tab, and clicking the “Create a new filter” link.

Create a Gmail filter

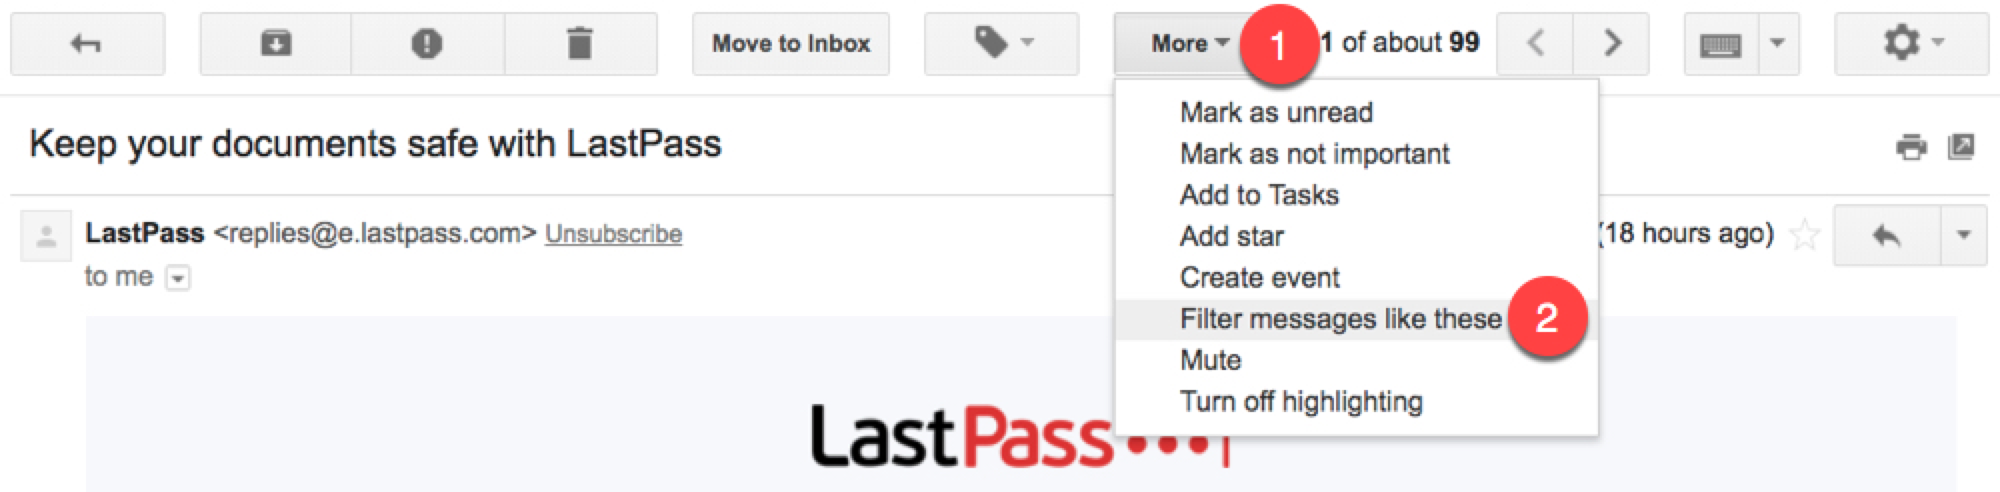
Create a filter from a specific email by opening the email, clicking the “More” button, and selecting “Filter messages like these.”

Filter Gmail messages

Whichever way you get to the filter creation form, there are multiple options for choosing filter criteria:

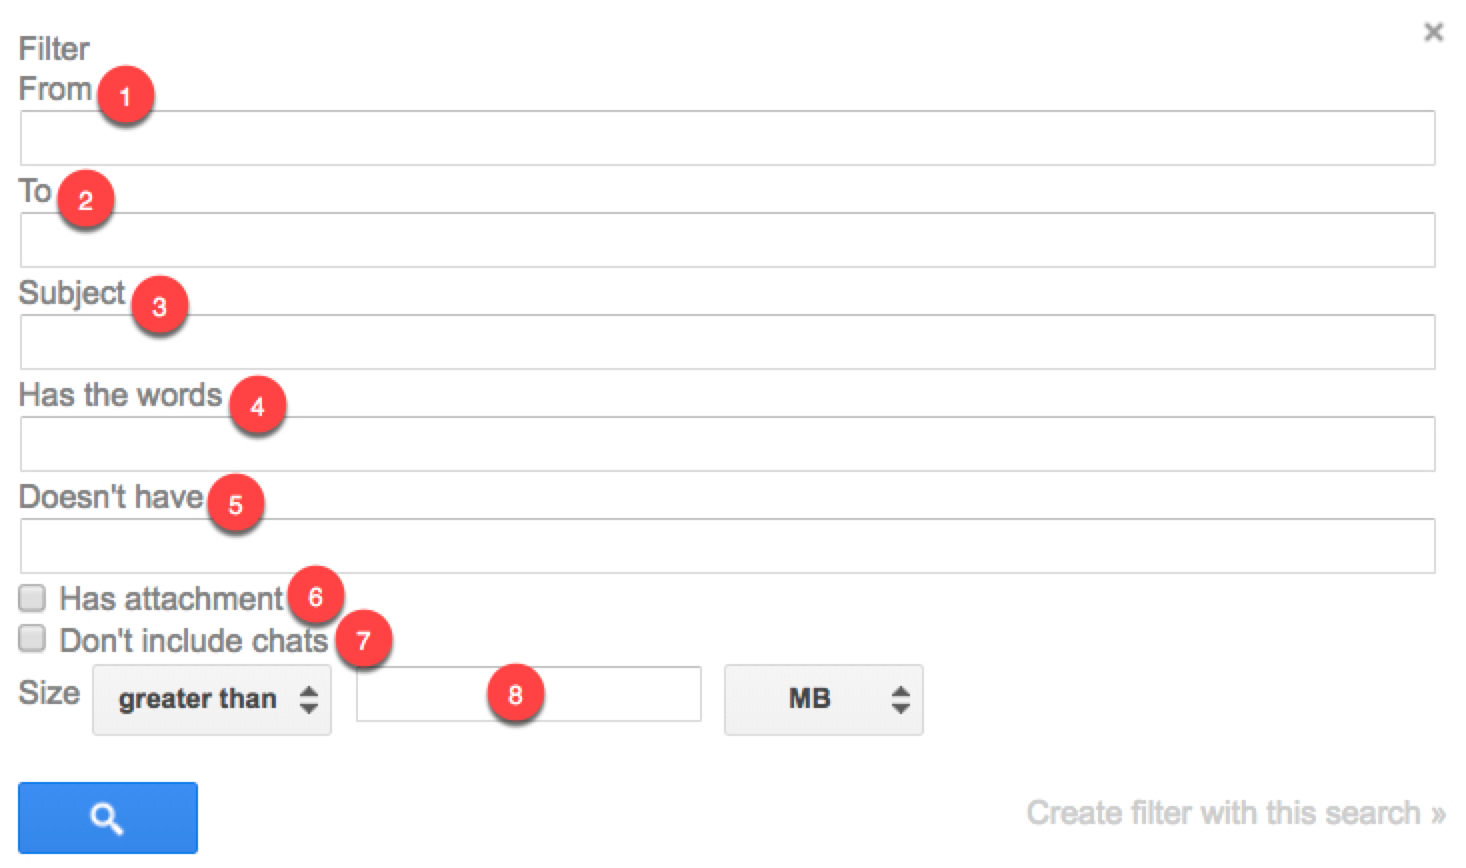
Gmail filter options
  1. From: Filter emails sent from a specific email address.
  2. To: Filter emails sent to a specific email address.
  3. Subject: Filter emails that use a specific subject line.
  4. Has the words: Filter emails that contain specified keywords.
  5. Doesn’t have: Filter emails that don’t contain specified keywords.
  6. Has attachment: Filter emails that include an attachment.
  7. Don’t include chats: Ignore Hangouts chats when applying filters.
  8. Size: Filter emails larger or smaller than a specific size.

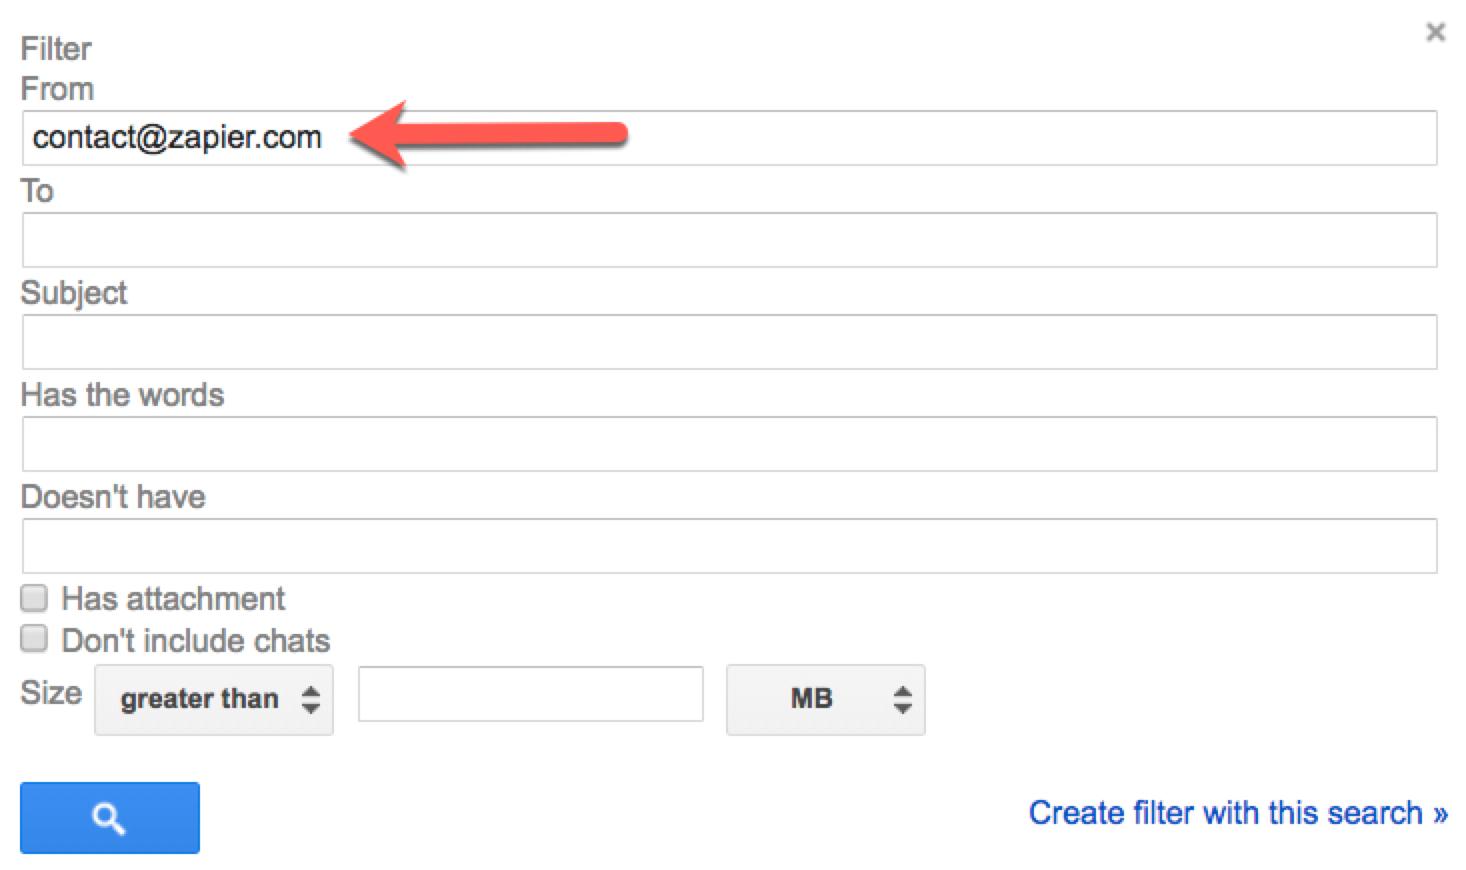
If you used the “More” option while in a specific email to open the filter creation menu, Gmail automatically fills in the from email address for you:

Gmail filter on email address

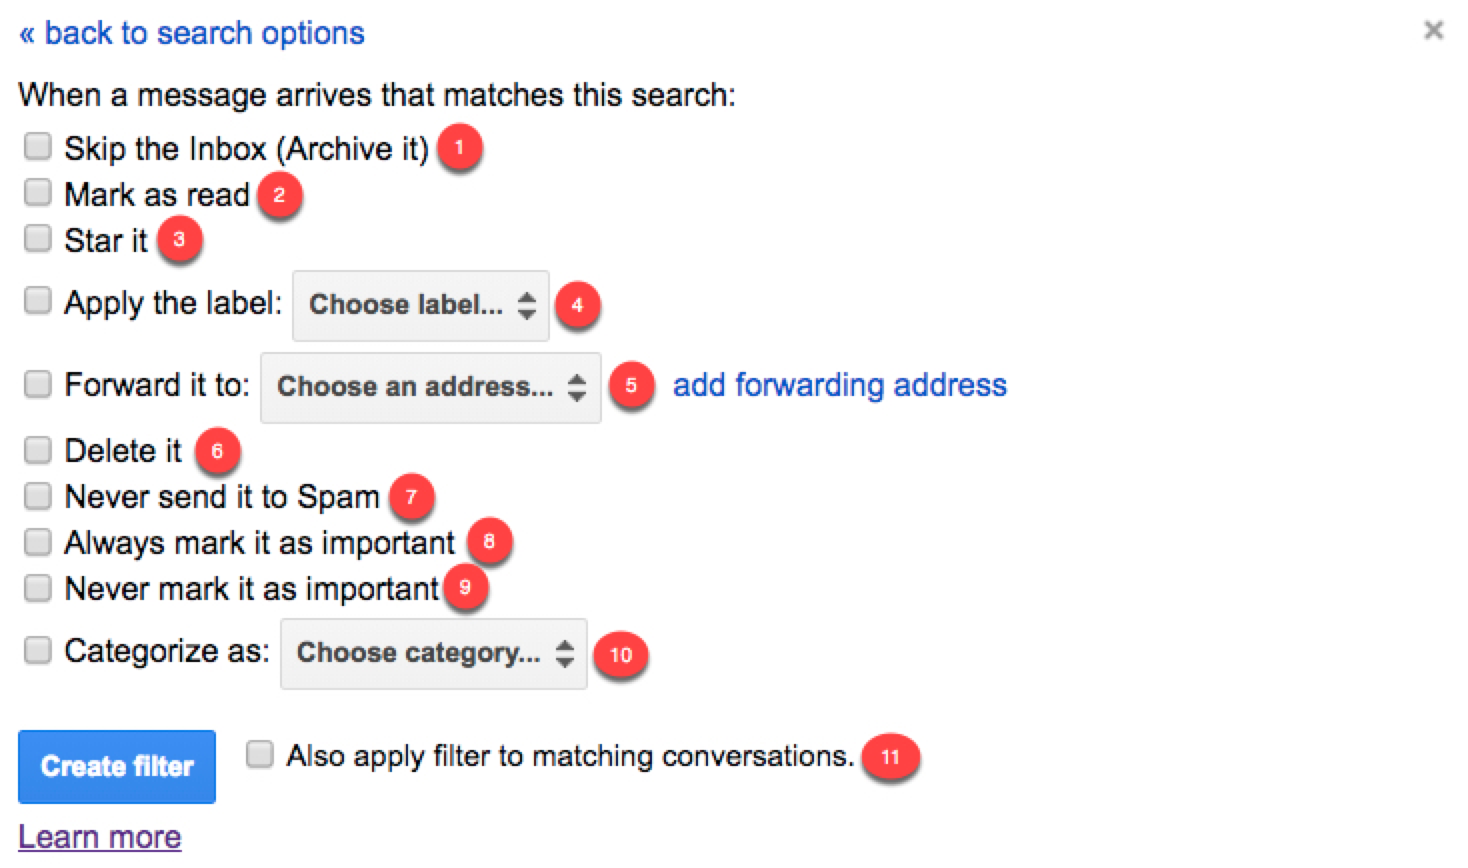
After selecting the criteria for your filter, click the “Create filter with this search” link to specify what Gmail does with emails that match this filter:

Create Gmail filter
  1. Skip the inbox: Archive the email so it doesn’t appear in your inbox.
  2. Mark as read: Have the email appear in your inbox as an already-read item.
  3. Star it: Automatically star the email.
  4. Apply the label: Apply a specific label to the email.
  5. Forward it to: Automatically forward the email to a different email address.
  6. Delete it: Send the email to the trash.
  7. Never send it to Spam: Prevent Gmail from tagging the email as spam.
  8. Always mark it as important: Automatically tag filtered emails as important.
  9. Never mark as important: Tell Gmail not to tag filtered emails as important.
  10. Categorize as: Automatically categorize filtered emails.
  11. Also apply filter to matching conversations: Automatically applies the selected conditions to every email in your account (new, archived, and deleted) that match the selected filter criteria.

How to Edit and Delete Gmail Filters

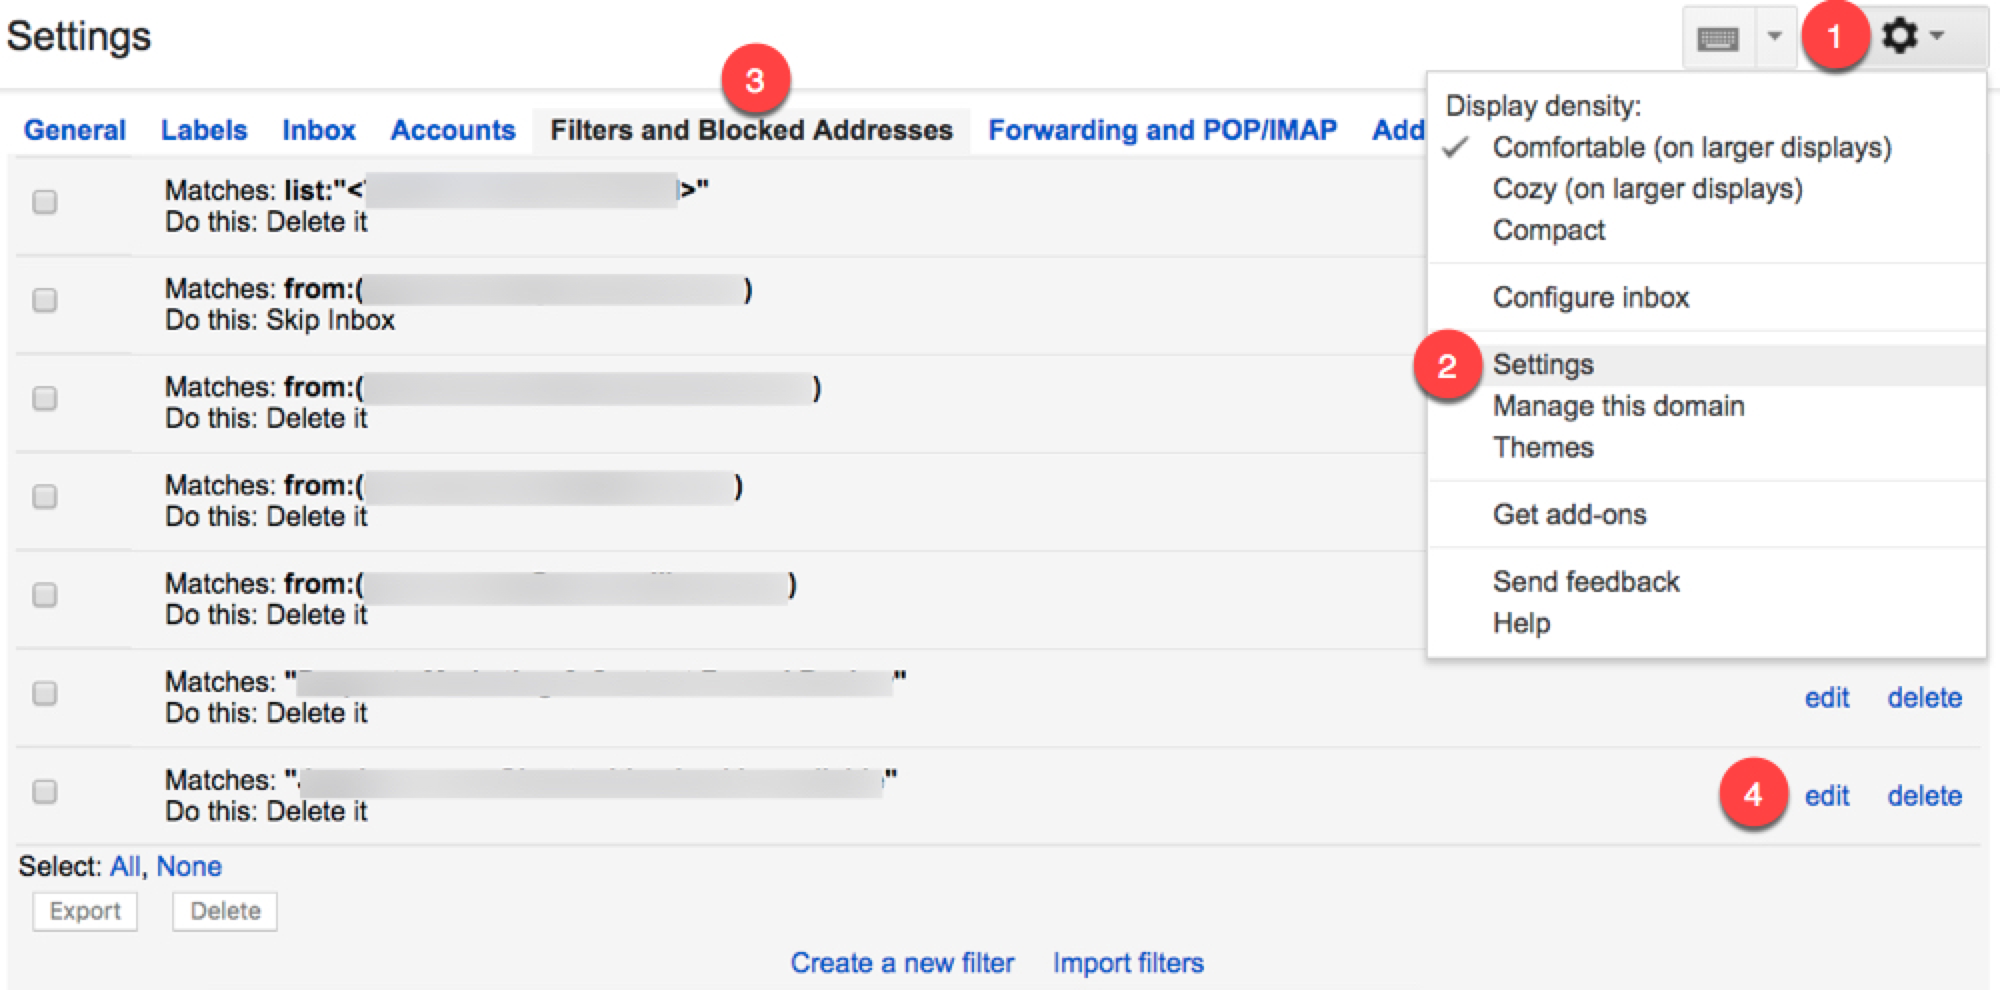
If your filters aren’t applying correctly or if you no longer need a filter you created, it’s easy to edit or delete Gmail filters:

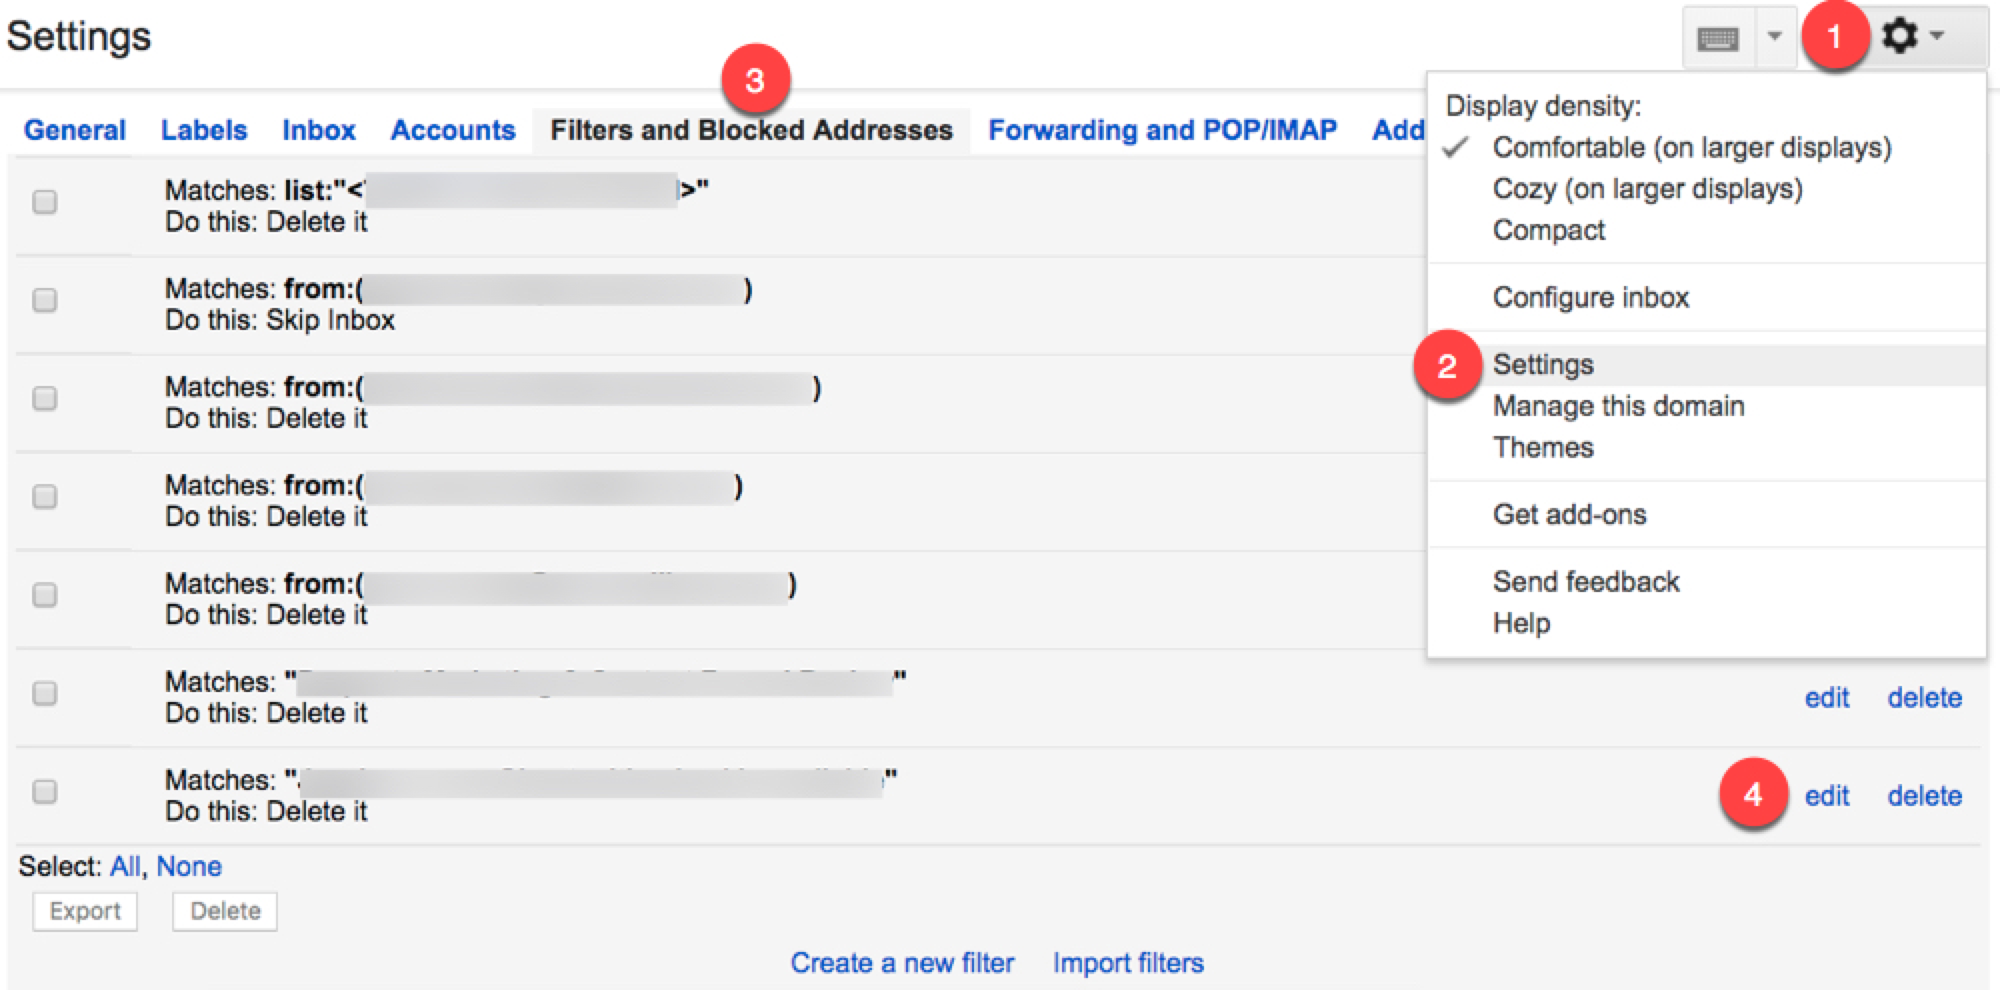
  1. Click the gear icon.
  2. Choose “Settings.”
  3. Select the “Filters and Blocked Addresses” tab.
  4. Find the filter you want to edit/delete.
  5. Click the “edit” link to update filter criteria and behavior, or click the “delete” link to delete it.
Edit Gmail filters

7 Ways to Organize Your Email Using Gmail Filters

Before we jump into the different ways you can use Gmail filters, let’s review the different types of operators that Google recognizes. Use these to create more powerful and precise filters:

Operator Function Example Use
OR The `OR` operator tells Gmail to filter on either one thing or another. unsubscribe OR browser Filter emails with either the word *unsubscribe* or the word *browser*.
- The minus sign (`-`) operator tells Gmail to exclude a specific item from the filter. -contact@zapier.com Don’t filter any emails that come from the address contact@zapier.com.
“ “ Surrounding text in quotation marks tells Gmail to look for an exact match of the text. “View in browser” Filter emails that use the exact phrase *view in browser*.
( ) Surrounding items with parenthesis tells Gmail to group those items together. -(contact@zapier.com OR support@zapier.com) Don’t filter any emails from either contact@zapier.com or support@zapier.com.
* An asterisk is a wildcard symbol that tells Gmail that it doesn’t matter what text appears there. -*@zapier.com Don’t filter emails that come from any address on the Zapier domain.

We’ll provide more guidance on using operators while creating filters in the examples below.

With that in mind, we’re ready to start creating filters in Gmail. Here are some of our favorites.

1. Automatically delete all newsletters and marketing emails

Unsubscribing from every newsletter and marketing email that arrives in your inbox manually is an epic waste of time when you can get Gmail to do it for you automatically.

This filter tells Gmail to send those messages to the trash, by watching for the word "unsubscribe" in the body of the email:

  1. Click the down arrow in Gmail’s search bar to open the create filter form.
  2. In the “Has the words” field, type unsubscribe.
  3. Click the “Create filter with this search” link.
  4. Check the box next to “Delete it.”
  5. Click the “Create filter” button.

Now, any email that contains the word unsubscribe—which will cover the majority of the newsletters and marketing emails you receive—will be automatically sent to your trash folder.

If you find that this filter isn’t catching everything, expand it to include other words that are commonly found in newsletters and marketing emails. Open your filter to edit it, and add all of the words you want to filter on, separating each with the OR operator.

unsubscribe OR “view in browser” OR “view as a web page” OR “privacy policy” OR “click here” OR “view online” OR “update your preferences” OR “opt out” OR “manage your account”

Open any newsletter or marketing email that makes it past your filter and look for keywords and phrases that are rarely used in other types of emails. When you find one, add it to your filter.

Caution: Gmail will automatically delete every email that uses one of the keywords or phrases in your filter. You only have 30 days to recover deleted items from the trash before they’re permanently deleted. If you think the filter might catch a personal email, make sure to skim through your deleted items at least once a month, or consider using the archiving method described in the next example.

2. Automatically archive all newsletters and marketing emails

Auto-archiving newsletters and marketing emails works well if you’re afraid that you’ll unintentionally delete something important, but my personal favorite use case for this filter is for companies that occasionally send promo codes.

Here’s an example: I don’t need a notification in my inbox every time Kohl’s has a sale. But if I have Kohl’s marketing emails in my archive, I can search through the marketing emails I’ve recently received before I start shopping to see if any included a coupon code.

To create a filter that automatically archives newsletters and marketing emails:

  1. Click the down arrow in Gmail’s search bar.
  2. In the “Has the words” field, type unsubscribe (or use operators to include additional terms).
  3. Click the “Create filter with this search” link.
  4. Check the box next to “Skip the inbox (Archive it).”
  5. Click the “Create filter” button.

This filter sends all emails that include the word unsubscribe to your “All Mail” folder. While you won’t see the emails in your inbox, you’ll always have access to them in your archive.

3. Move all newsletters and marketing emails to a specific location

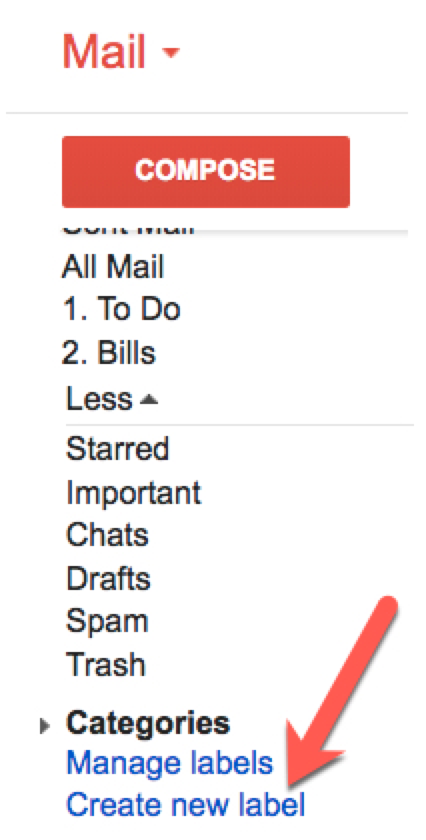
If you want to read the marketing emails and newsletters you receive, but just don’t want them clogging up your inbox, create a filter that automatically sends those emails to a to-do location. If you don’t already have a to-do location in Gmail, create a new label:

In your Gmail sidebar, expand the menu and scroll down until you see the “Create new label” link. Click the link.

Create a new label in Gmail

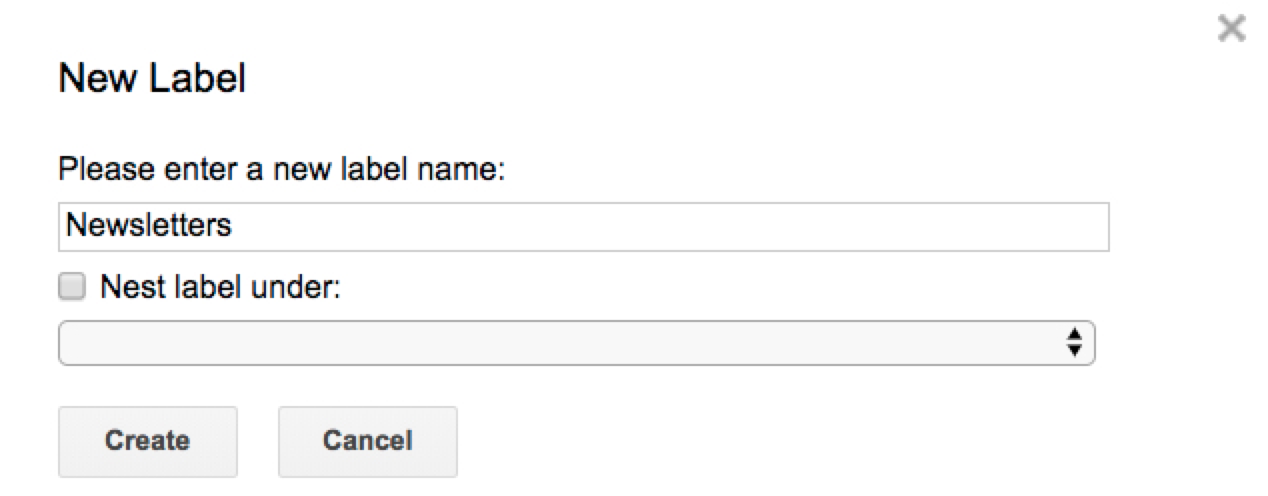
Then enter a name for your new label, and click “Create.”

Enter a label name

Gmail labels function like folders in Outlook and other email programs. Use them to sort emails into meaningful groupings.

Once you have a label for newsletters and marketing emails, create your filter:

  1. Click the down arrow in Gmail’s search bar.
  2. In the “Has the words” field, type unsubscribe (or use operators to include additional terms).
  3. Click the “Create filter with this search” link.
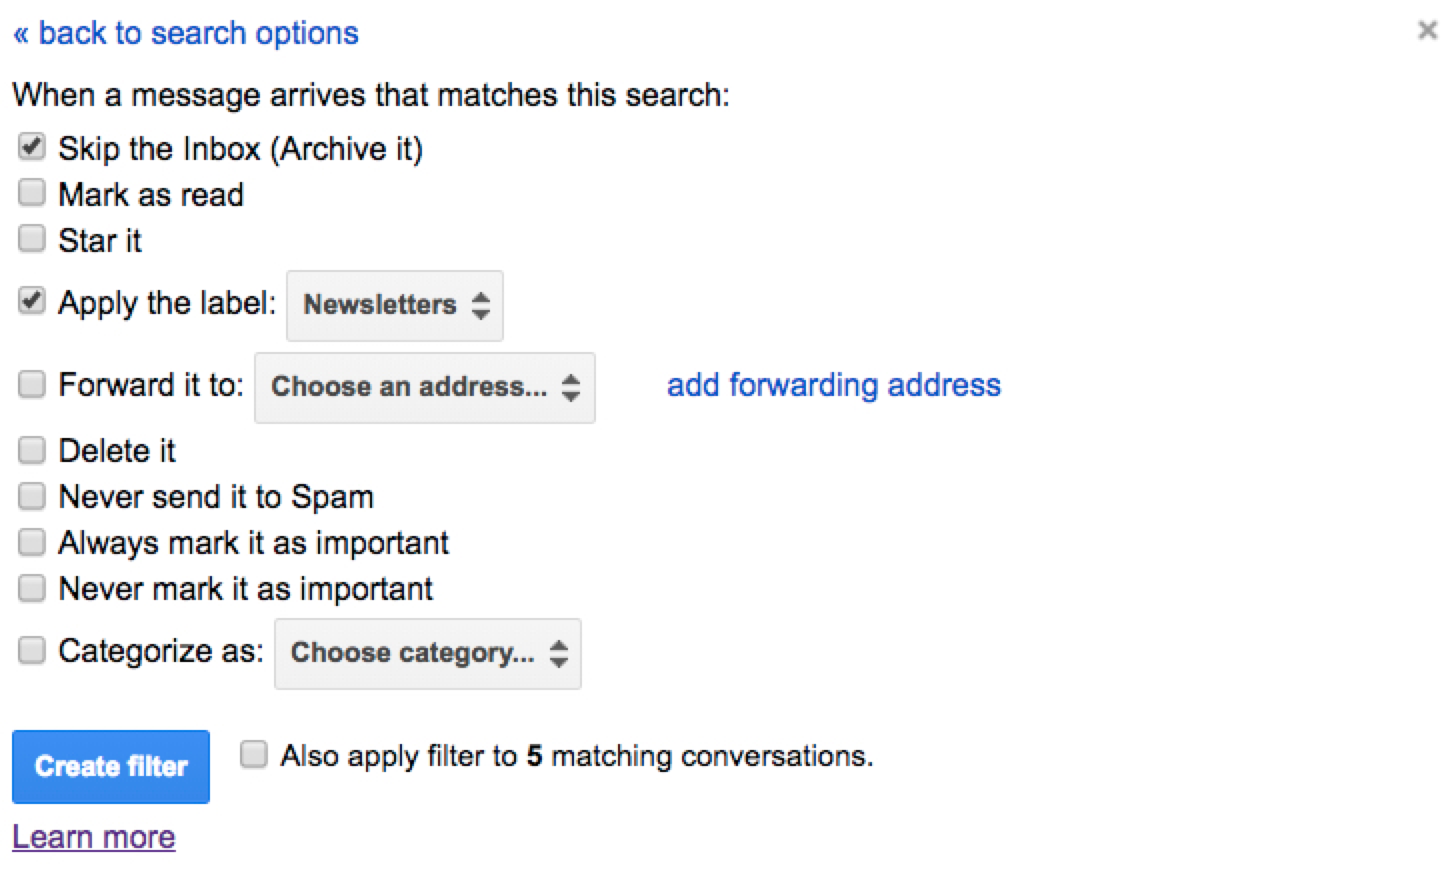
  4. Check the box next to “Skip the inbox (Archive it).”
  5. Check the box next to “Apply the label,” and use the dropdown to select the label you created in the last step.
Gmail filter archiving

Now Gmail will automatically move all emails that contain the word unsubscribe to the label you selected. They won’t appear in your inbox, but they’ll appear as unread in your new label for review when you have time.

4. Delete, archive, or move emails from specific senders

The three examples above show how to use filters to batch delete, archive, or move emails, but what if you just want to apply those filters to specific types of emails or to emails from specific senders? There are a few ways to create more precise filters in Gmail.

1. Filter by email address:
If you want to automatically delete, archive, or label emails from one specific sender, type that sender’s email address into the “From” field of the create label form, then select the appropriate action for the filter (delete, archive, or label).

Filter by email address

2. Filter by email domain:
If you want to automatically delete, archive, or label emails for all senders from a specific domain/company, type an asterisk before the @ symbol (ex: *@zapier.com) to tell Gmail to apply the filter to all emails received from accounts on that domain.

Filter by email domain

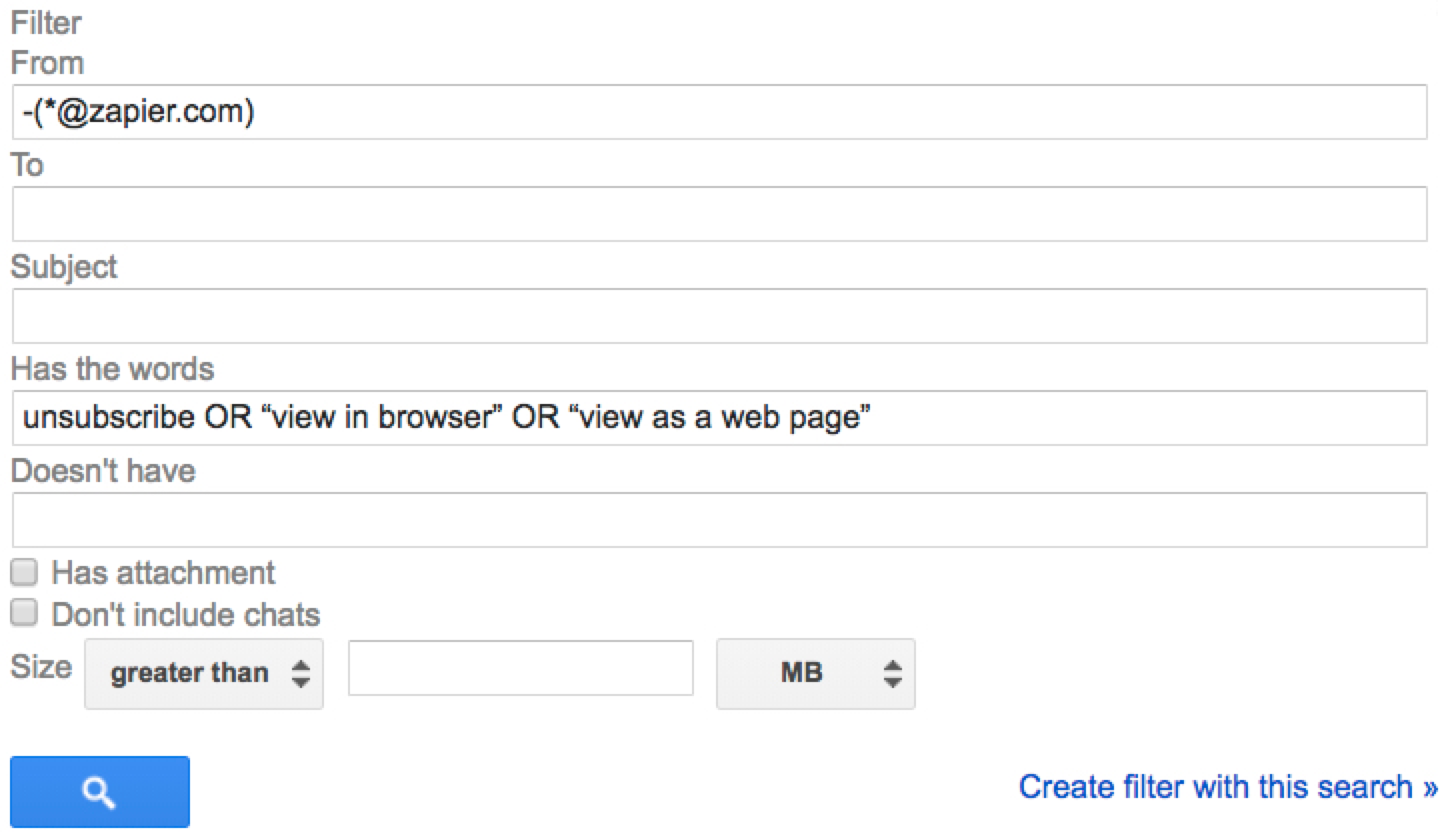
3. Exclude certain senders from mass filters:
If you want to automatically delete most marketing emails but still want to receive them from one specific company, use the exclude operator to tell Gmail not to apply the filter to emails from that address/company/domain. Type the following into the “From” field of the create filter form, even if you’re also filtering on keywords, subject, or some other criteria: -(*@domain.com).

Exclude from filter

5. Create separate inboxes for different email accounts

If you manage multiple email accounts from a central account and want emails sent to each address to appear in separate inboxes:

  1. Create a label for each account.
  2. Open the create filter form.
  3. Type the email address for your first account into the “To” field.
  4. Click “Create filter with this search.”
  5. Check the boxes next to “Skip the inbox (Archive it), and “Apply the label,” and select the appropriate label from the dropdown.
  6. Click the “Create filter” button.
  7. Repeat these steps for each additional account.

This moves emails from your inbox to individual queues that mimic account-specific inboxes.

This filter is also helpful if you’re trying to retire an old email address and want to be able to see quickly where you still need to update your email address.

6. Automatically empty your spam folder

Tired of spam emails piling up in your spam folder? Use this filter to automatically and permanently delete every email Gmail identifies as spam as soon as it arrives in your account:

  1. Click the down arrow in Gmail’s search bar.
  2. In the “Has the words” field, type is:spam.
  3. Click the “Create filter with this search” link.
  4. Click the “OK” button in the “Confirm creating filter” modal.
  5. Check the box next to “Delete it.”
  6. Click “Create filter.”

Caution: Though it happens rarely, Google will sometimes misidentify a legitimate email as spam. By setting this filter, you will have no way to sort through your spam folder to make sure nothing important landed there.

7. Build a to-do queue

I write a lot about productivity apps and tools, but when it comes down to it, my favorite place to keep a to-do list is my inbox. If there’s one way to guarantee that I won’t forget to do something, it’s to email myself a reminder the second I think about it.

Because I only ever email myself reminders of things I need to do—or send myself links to articles I want to read—I have a filter that automatically tags emails that I send myself with my to-do label. Here’s how to set it up:

  1. Create a to-do label, if you don’t have one already.
  2. Click the down arrow in Gmail’s search bar.
  3. In the “From” field, type your email address.
  4. Click the “Create filter with this search” link.
  5. Check the box next to “Skip the inbox (Archive it).”
  6. Check the box next to “Apply the label,” and use the dropdown to select your to-do label.

You can also use this filter for emails other people send you—your boss, a client, an editor, etc.—that always include tasks you need to complete. Just substitute your email for theirs in the “To” field of the create label form, or use the OR operator to have Gmail automatically label incoming emails from any listed address (for example, "myemail@gmail.com OR boss@gmail.com").

multiple emails filter

If you prefer to manage your to-do list in a specific project management tool, combine this filter with one of the following workflows from Zapier to have your labeled Gmail emails automatically converted to tasks in your preferred productivity tool:

How to Use Filters to Delete Old Emails

One final helpful feature of Gmail filters lets you conduct a search with any filter criteria you create and automatically delete all archived emails that match that filter. This helps when you’re running out of space in your mailbox and need to delete things you no longer need.

Say you’ve been automatically archiving newsletters and marketing emails, but now you want to delete all of them to free up space in your account:

  1. Click the gear icon.
  2. Choose “Settings.”
  3. Select the “Filters and Blocked Addresses” tab.
  4. Click the “edit” link next to your newsletter filter.
  5. Click “Continue” on the create filter form without changing any of the filter criteria.
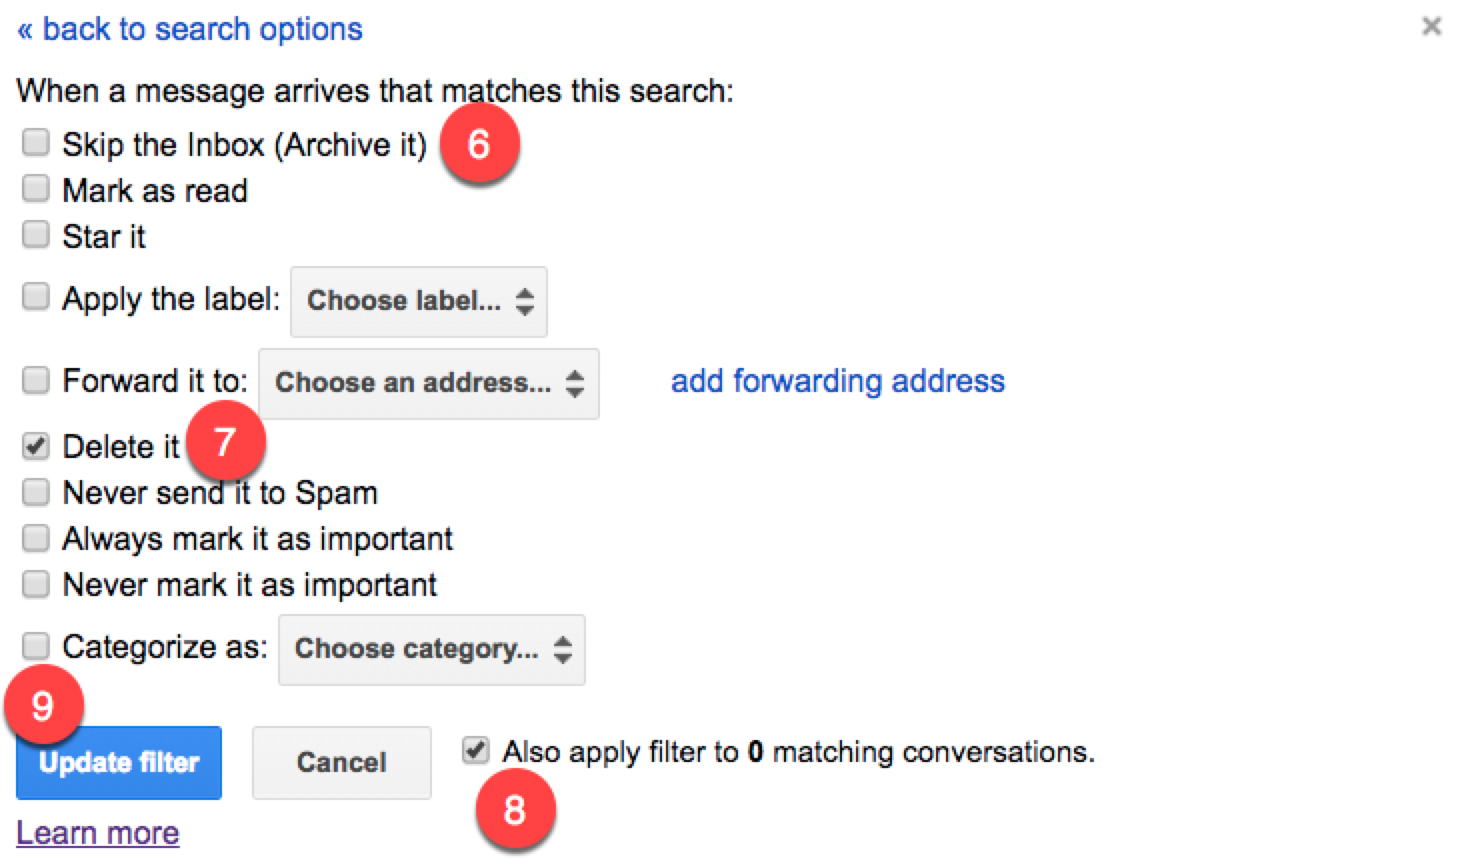
  6. Uncheck the “Skip the inbox (Archive it)” box.
  7. Check the “Delete it” box.
  8. Check the box next to “Also apply filter to # matching conversations.”
  9. Click “Update filter.”
Edit an existing Gmail filter
Use a Gmail filter to

This automatically deletes all of the archived emails that were previously caught by your newsletter filter, which should free up a lot of space in your mailbox.

Once Gmail finishes the deleting process, just edit your filter again to set it back to archiving the emails. Repeat the process any time you need to free up space in your account.


Without Gmail filters, you're micro-managing your email, and where's the fun in that? Once you've set up these filters, you can come back every day to a cleaner, more streamlined inbox.

Keep Reading:

Title photo by gabrielle_cc via Pixabay.


source https://zapier.com/blog/gmail-filters/

Tuesday, 17 April 2018

Photoshop Alternatives: The 10 Best Free Online Photo Editors

Sometimes you take the perfect picture from the perfect angle and all you need to do is crop, sharpen, and hope for hundreds of likes. But other times it's destined to be a full-on fiasco of white balance, focus, cropping, exposure—the works.

If you're not a professional photographer, it might not be worth the cash to get your hands on Photoshop, but that doesn't mean you can't get fancy with your photo editing. Free, web-based photo editors are a great alternative for getting the job done.

There are loads of online photo editors out there, but we chose our 10 favorites because they are:

  • Comparable to Photoshop. We looked for online editing tools that mimic fully-featured desktop image editors.
  • Feature heavy. We passed up one-trick ponies that only add filters or otherwise have a limited editing range. All of our choices offer tools for white balance, color adjustments, sharpening, cropping and straightening, healing, text overlay, and special effects.
  • Easy to use. All of these apps are user-friendly, even if some are more complex than others.
  • Social media-friendly. Let's be real: most of our photos end up on social media, so we wanted to be sure our picks allowed for easy social sharing.
  • Free. All of our choices offer at least a free basic version. Most of them also offer upgrades with expanded capabilities for a fee.

The 10 Best Free Online Photo Editors

Icon:  App Best for Platform>
Pixlr Pixlr editing photos with pro-level tools Web, Desktop, Chrome, iOS, Android
Photopea Photopea pretending you're using Photoshop Web, Desktop, iOS, Android
Polarr Polarr supporting raw formats Web, macOS Lite, Windows Lite, iOS, Android, Chrome extension
Sumopaint Sumopaint showing off artistic painting effects Web, Desktop
BeFunky BeFunky editing photos with special effects Web, iOS, Android
Fotor Fotor batch processing Web, iOS, Android
iPiccy iPiccy creating graphic design and getting the best free experience Web, iOS, Android
Ribbet Ribbet getting the hang of advanced photo editing Web, iOS
Fotojet Fotojet starting out with graphic design Web
LunaPic LunaPic editing both photos and videos Web

The Best Online Photo Editors for Enthusiasts

Pixlr

For editing photos with pro-level tools

Pixlr photo editor screenshot

If you're ready to do a deep dive into photo editing, Pixlr Editor is a great choice. It has extensive features and offers many of the same powerful tools as Photoshop. You can perform numerous complex operations in Pixlr: working in layers for compositing or to finetune effects; using color correction and sharpening tools to make your subject pop; and superimposing text, shapes, and other elements onto your image for eye-catching originality and flair.

The top menu bar features a series of pulldown menus for adjustments, filters, transformations, and distortions. While some elements like History, Layers, and Navigator can stay visible in the interface while you're working on an image—similar to Photoshop's docked panels—other elements, like Unsharp Mask, must be adjusted and accepted before proceeding to the next operation. How effective some controls are depends entirely on your image, but there are so many pro-level tools that you should be able to find a cure for most image problems.

Just because it's complex doesn't mean Pixlr is hard to use. It has friendly, colorful icons and handy sliders that let you easily adjust the parameters. Plus, it operates within its own application frame, which means it doesn't take up your entire browser window. Bonus: Pixlr can open Photoshop PSD files and save to its own format as well as PNG, JPEG, BMP, and TIFF formats for posting to social networks or saving to your hard drive.

Pixlr is a deep tool—and it has a learning curve, much like Photoshop. Before diving in, you'll want to either be familiar with similar photo tools or check out some online tutorials. Or, you know, be brave.

Note: The app comes in several different flavors: The web app, a free downloadable desktop app, a Chrome extension, and an online Express version that just lets you add quick Instagram-style filters, overlays, and stickers.

Pixlr pricing: Free

Photopea

For pretending you're using Photoshop

Photopea photo editor screenshot

Launching Photopea for the first time can give you an odd sense of déjà vu—specifically of the Photoshop variety. Photopea mimics the look and feel of Photoshop to an uncanny degree with an almost identical toolbar and nested controls and tools that generate similar menus.

Like Pixlr, it accepts native Photoshop PSD files, opening images with the exact layers contained in the original picture. It also works with native GIMP and Sketch files. Unlike Pixlr, it can also export to PSD format, which is convenient if you routinely handle Photoshop files.

Photopea isn't designed as a quick novelty or social networking app, but as a genuine alternative to Photoshop, with adjustment layers, layer styles, masks, text, and smart objects. That means it has fewer Instagram-style filters and effects than rival photo editors. Save your selfies for a different app.

Photopea can run on any device, but a big screen and precise pointing device will give you the best experience. Photopea runs locally—there's no server or internet upload—so you can even disconnect from the internet and keep using the app offline.

Photopea pricing: Free; 30-day licenses are $5 for a single user, $15 for a 5-person team, and $50 for a 20-person team. 90-day licenses are $12 for a single user, $40 for a 5-person team, and $120 for a 20-person team.

Polarr

For supporting raw formats

Polarr photo editor screenshot

The first time you use Polarr, it walks you through the major features with a sample image before setting you loose on your own photos.

You can choose a preset from the huge variety of built-in filters, which include unique options like Modern Film and Art Film. You can also tune up the image with a utility that's reminiscent of Apple Photos to fix brightness, contrast, highlights, haze, cropping, aspect ratio, and color tint and temperature. The free version also offers tools for hue, saturation, and luminance adjustments, as well as lens distortion, a spot removal healing brush, and the ability to fix facial imperfections for portraits.

Polarr supports raw formats, which is unusual for online image editors: just drag and drop your raw image into the web interface. When you're done with your image, you can save it in JPEG, PNG, or TIFF. You can even batch save with a choice of three quality settings and crops that include a range of precise output dimensions for LinkedIn, Instagram, Twitter, Facebook, Pinterest, and Tumblr.

As you work, the free version gives you access to the Pro version's radial, gradient, color, text, liquify, and brush mask effects, which you can try but not save.

Polarr pricing: Free; premium subscriptions for $20 (one-time fee, includes any upgrades)

Sumopaint

For showing off artistic painting effects

Sumopaint photo editor screenshot

Sumopaint is yet another app with a Photoshop-style look and feel. As an online service, Sumopaint's features are more limited than Photoshop's, but the main players—an assortment of selection, paint, and text tools; gradients, shapes, curves, blurs, smudges, foreground and background colors; cropping and magnifying—are all pretty familiar. The app's elegant interface highlights each tool as you choose it while a context-sensitive top menu shows only the controls related to that tool.

A series of Photoshop-inspired docked panels lets you zoom in and out and otherwise navigate your picture, choose colors, add layers, and apply numerous filters like 3D Effects, Blur, Distort, Sharpen, Stylize, and more. It also has a large collection of brushes that offer adjustable sizes, rotations, orientation, scattering, and other artistic painting effects.

You can use the Lite version for free, but the Pro version is ad-free and allows you to download the app for offline use; import images from URLs; send images via email; and get tons of additional presets, special effects, and brushes, along with perspective mapping, a sphere designer, and more.

Sumopaint pricing: Free; premium subscriptions for $2/day (~$30/month), $5/week (~$20/month), $9/month, or $48/year ($4/month), along with other pricing schemes

BeFunky

For editing photos with special effects

BeFunky photo editor screenshot

BeFunky is known for its special effects, as evidenced by the Layer Manager feature at the top of the main toolbar.

A pulldown menu, accessible from each major section—Edit, Touch Up, Effect, Artsy, Frames, Graphics, Overlay, Text, and Textures—lets you toggle between the photo editor, designer, and collage maker, which all have free and premium elements that you can refine with slider adjustments. The free version has a huge roster of elements and styles in addition to a mind-boggling array of stickers, fonts, and backgrounds. And the Paint mode lets you lay in effects with the paint brush rather than having to apply it uniformly through the entire shot.

You can do a lot with the free version of BeFunky, but if you like what you see, upgrade to access the editor's enhanced effects: HDR DLX, Sharpen DLX, Vibrant Colors DLX, and DeNoise DLX are easy-to-use tools that set it apart from other online editors by using updated algorithms to enhance the precision and photo realism of the chosen effect or function. The Touch Up feature gives you basic controls for free, but the majority of its corrections are available only the with premium version. The Artsy section is also part of the premium version, but you can try out all of the effects first to determine if it's worth it for you. Upgrading also removes the ads and can output high resolution 4000 x 4000 pixel images.

BeFunky pricing: Free; premium subscriptions for $4.95/month or $34.95/year ($2.91/month)

Fotor

For batch processing

Fotor photo editor screenshot

Fotor is feature-heavy but still sports a clean, flat, simple design that's sure to be inviting to newcomers.

In addition to all the basic online editing capabilities, Fotor offers vast functionality for special effects, face and body enhancement, frames, stickers, and text. You can put artistic touches on your images with the pro-level special effects like Lens Flare, Film Grain, Color Splash, and Tilt-Shift. And a handy Snapshot features lets you keep track of multiple edits.

The free version has plenty of choices to get you started, including the ability to create photo collages and template-based graphic design projects for promotions or social media. It also offers batch processing and the ability to save to the cloud. But if you're feeling fancy, Fotor's premium HDR module, which lets you use three bracketed photos to create an original HDR image, is worth the price of admission. The paid version also gives you access to the premium features sprinkled throughout all the modules, removes the ads and watermark, and offers more cloud storage and a larger canvas.

Fotor pricing: Free; premium subscriptions for $8.99/month or $39.99/year ($3.33/month)

The Best Online Photo Editors for Novices

iPiccy

For creating graphic design and enjoying the best free experience

iPiccy photo editor screenshot

In one word, iPiccy is approachable. The launch page gives you three options: editing a photo, creating a collage, or starting a design. Once you've made your choice, this easy-to-use, layer-based editor is quick and responsive, offering a variety of basic and advanced edits as well as controls for adjustments, colors, and filters. Almost any kind of edit—from color tint to dodge and burn or curves and levels—is available alongside its slider adjustment. The photo effects let you use a brush to mask discrete parts of your photo for special treatment. And a huge roster of retouching tools removes wrinkles, brightens eyes, and even applies makeup to enhance portrait features.

With iPiccy, you can choose multiple images for collages and designs and designate a space on your local hard drive to hold them together in one location—a handy feature as you're mulling over which shots to use.

When you're done with your masterpiece, feel free to go down the rabbit hole placing the app's many textures, stickers, frames, and images; using the various blending modes; painting directly on your image; or inserting some text with your own or online font collection. The best part: there's no premium version. All features are always available.

iPiccy pricing: Free

Ribbet

For getting the hang of advanced photo editing

Ribbet photo editor screenshot

Ribbet's simplified menu options are more like Apple Photos than Photoshop. You can start with a single image or elect to create a collage. Upon uploading a single picture, you get a toolbar with a Basic Edits menu. From there, you can apply an Auto Fix—something newcomers will appreciate—or you can take manual control of cropping, rotating, exposure, color, sharpening, and resizing functions. A familiar drag-and-drop interface lets you upload your photos to your own library for reuse.

While minimalist, Ribbet still has some convenient functionalities, like sizing photos specifically for social media cover shots in Facebook, Twitter, or YouTube; optimizing the output for printing; and the ability to launch Pixlr right from the app for additional features. Plus, there are so many stickers and frames that the app has a search box just for those.

The free version is plenty for novices, but a subscription will give you an ad-free experience, offer some extra features like in-depth retouching, and allow you to keep all photos and collages you create in an online editing history.

Ribbet pricing: Free; premium subscriptions for $4.95/month, $19.95/six months ($3.33/month), or $29.95/year ($2.50/month).

FotoJet

For starting out with graphic design

FotoJet photo editor screenshot

FotoJet gets you up and running with quick enhancements to your photos without a lot of fuss—and with no image editing experience necessary.

If you're looking for software that'll get the job done without overwhelming you, the basic Edit, Effect, Overlay, Frame, Text, and Clipart tools will satisfy most users. And for all the clipart aficionados out there, FotoJet gives you searchable access to Google's library of clipart for free.

With the premium version, you get an ad-free experience and advanced features—including Sharpen, Dehaze, and Vignette—along with more than 600 templates and 500 clipart images, fonts, effects, and overlays, and more.

FotoJet pricing: Free; premium subscriptions for $6.99/month or $39.99/year ($3.33 /month)

LunaPic

For editing both photos and videos

LunaPic photo editor screenshot

Compared with the slick presentations of other photo editing apps, LunaPic is an anomaly. All of LunaPic's features—drawing tools, effects, adjustments, and animations—are accessible via pulldown, un-nested menus, which makes the navigation simple if a tad less elegant.

If you can get past the not-so-shiny feel, you'll find an extremely capable editor that gives you lots of convenient features, like special effects—including video-style animated effects—that load in the blink of an eye. Some examples? An Old Movie Effect animation makes a color photo black-and-white and adds scratchy moving vertical age-lines. Groovy Rainbow gives you looping animations. Obamaize gives you a Shepard Fairey effect. Each effect builds on the previous one, but the history panel displays as individual thumbnails, so you can go back without having to hit Undo multiple times.

Unlike most others, LunaPic supports video editing in addition to photo editing, allowing the import of various video and graphic formats and letting you output animated GIFs or short AVI, MPG, or MP4 movies and WAV audio. You can even specify movie speed, number of frames, and width and top it off with a caption.

LunaPic pricing: Free


One of these online photo editors is sure to help you get your photos looking just right—without costing you a dime. All you need is your web browser, and you can do everything from basic photo editing to creating more artistic versions of your photos.

Keep Reading:


source https://zapier.com/blog/photoshop-alternatives-best-free-photo-editors/