Thursday, 20 September 2018

How Real Estate Agents Efficiently Manage New Leads

"Zapier helps me respond faster—and saves me time by updating contacts across all my various platforms."Mark Novak, Mark's Home Team


Real estate thrives on agents and brokers sourcing stellar leads and following up before competitors have the opportunity. That competition between agents and brokers has led to creative problem-solving.

In the case of Mark Novak, team leader and CEO at Mark's Home Team at Cummings & Co Realtors, he used automation to build a more efficient process for his leads, one that saves him and his team several hours every week. Now, he and his team receive emails right as new leads show interest—and it all happens automatically.

About Mark's Home Team

Mark imbues a need to constantly improve into the foundation of Mark's Home Team. He and his team understand that in order to exceed their clients' expectations, they need to be on the cutting edge—finding new ways to engage with and stay involved in the processes of buying and selling homes.

Mark Novak at a homebuyers seminar

This led Mark to discover app automation tool, Zapier. With Zapier, Mark and his team built simple processes to handle their leads—from generation to management within a CRM.

How Real Estate Agents Automate Their Leads

Speed is key for Mark and the team. They don't like their leads to wait for a response—afterall, if a lead is out hunting for a home, they've likely contacted multiple agents in the area.

To make sure they're ahead of their competition, Mark and the team developed a process that allowed them to generte leads off their website and Facebook ads—and receive notifications immediately.

By connecting their preferred tools to Zapier, Mark built Zaps, our word for an automated process or workflow, to bring his team and leads together, faster.

Mark's Home Team's Tools

Icon: App: Used For:
Facebook Lead Ads Facebook Lead Ads Lead generator
Real Geeks Real Geeks Marketing automation for real estate
Office 365 Office 365 Email and contacts
Follow Up Boss Follow Up Boss Customer relationship management (CRM) for real estate

The Workflows

In order to generate their leads, Mark and his team primarily lean on their website, which uses forms through Real Geeks, and Facebook's lead ads. With Zapier, the team built a couple of simple Zaps that bring their new leads from the source into their CRM, Follow Up Boss.

With these Zaps moving leads from generator to CRM, Mark instantly cut out hours of work every week and gave his team a bit of security, too: Now, they don't have to worry about missing a lead as they import data from one tool to another. Zapier just moves the leads in the background.

If you want your leads to magically appear in your CRM, give these Zaps a try:

The next piece of their process is the key to fast follow ups: When a new lead enters their information in a Facebook lead ad, a Zap emails the lead's information to Mark and the team. Instead of checking on leads in Facebook several times a day, Zapier instantly sends an email for each lead that generates.


With a few simple Zaps, Mark transformed how his team handles and interacts with their leads. Beyond saving themselves hours each week, Mark and his team of real estate agents have access to their new leads in real-time, giving them a leg up on the competition.

Want to quickly follow up with your leads like Mark? Give Zapier a try for free.

All images courtesy of Mark's Home Team.

Our stories explore how Zapier's users solve common problems. From marketers to CEOs, educators to real estate agents, millions use Zapier to automate their most tedious tasks. If you haven't yet, try Zapier for free to see what we're all about.


source https://zapier.com/blog/marks-home-team/

Tuesday, 18 September 2018

How to Create Siri Shortcuts Beyond Your iPhone

Ever wished you could have Siri do your job for you? With iOS 12 and the new Shortcuts app, you can finally customize Siri. Set up a workflow, then tell Siri what to do, and it can send emails and save contacts and more for you automatically. It's the first time you can teach Siri how to do whatever you want.

Siri Shortcuts can also work with Zapier workflows (called Zaps) to connect your iPhone or iPad with over 1,300 business apps. Here’s how to make your first Siri-powered Zaps to build even more powerful Shortcuts workflows.

What Are Siri Shortcuts?

Siri Shortcuts
You can automate almost anything in iOS with Apple's new Shortcuts app

In 2014—three years after Apple added Siri to the iPhone—a group of developers built an automation app for iOS: Workflow. Working on your phone often means switching between apps, carefully copying and pasting the data you want from one into another. Workflow was designed to move data and automate tasks for you. It copies data from one app—a new screenshot in Photos, a new contact in Contacts, or even your location from Maps—then runs actions on it. It could turn your videos into GIFs, copy your to-dos into a notebook, and more.

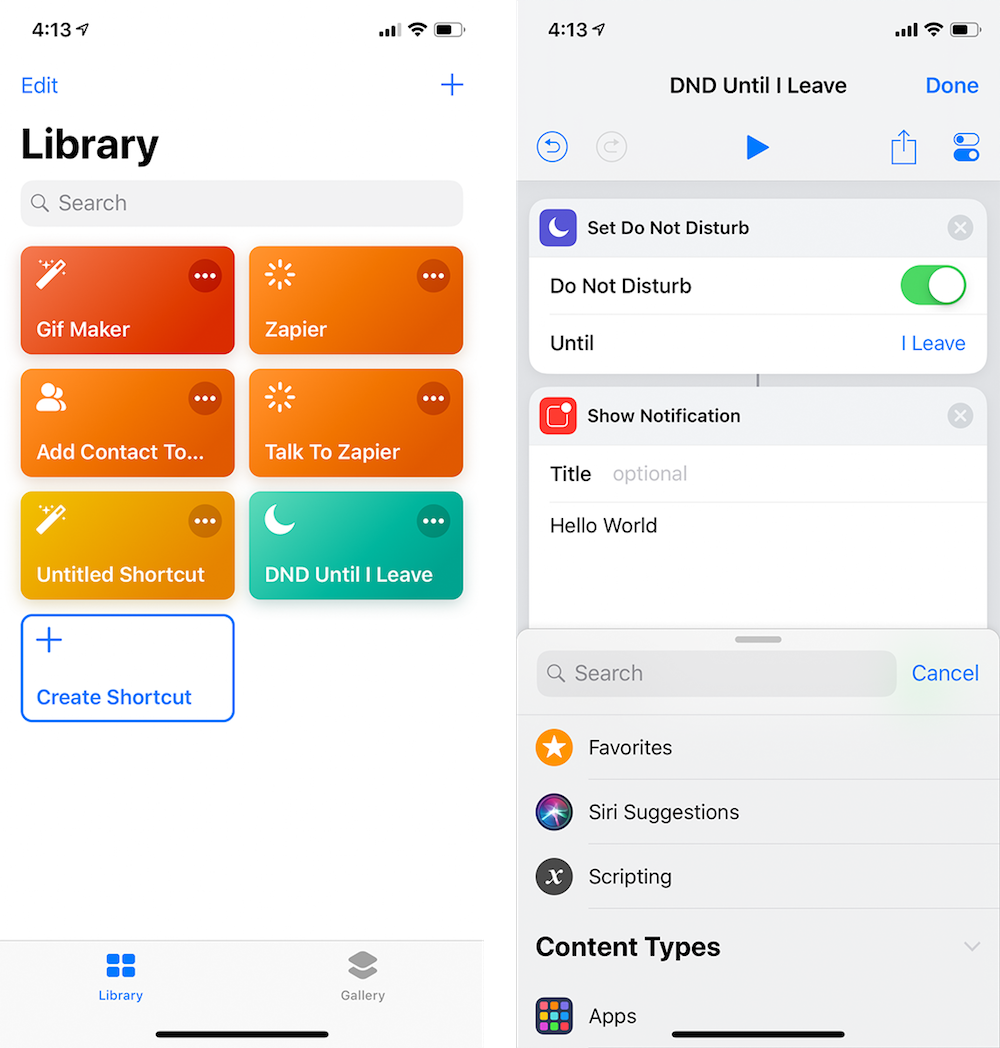
That app has been redesigned as Shortcuts, now an Apple app tied it deeply into iOS. Shortcuts today can grab your location, turn Do Not Disturb mode on or off, and run workflows from Siri.

Many iOS apps—including Evernote, Bear, GoodReader, Ulysses, Skype, and Overcast—work with the new Shortcuts app. And, you can add Zapier to Shortcuts to connect your phone to over 1,000 of the most popular online work apps. While Zapier doesn’t have an iOS app, it does include a Webhooks trigger. Combine it with Shortcuts’ Get Contents of URL actions, and you can copy anything from your iPhone or iPad and send it to your Zap.

If you don’t have it already, make sure your iPhone or iPad is running iOS 12 or later, and download the free Shortcuts app from the App Store. Then, it’s time to set up your first Zapier Shortcuts workflows.

How to Make a Zapier iOS Shortcut

1. Make a New Shortcut with Dictation, Input, Clipboard, or an App

Typically, you want Shortcuts to copy some text—a new task, note, contact, project, location, or anything else—and send it to Zapier. And then from there, Zapier can send that data to other apps you use. To build a Zapier Shortcuts workflow, first open the Shortcuts app on your iPhone or iPad, and click Create Shortcut.

The first thing your Shortcut needs is an action that will get the text or other info you want to send to Zapier. There are four actions that do that in Shortcuts:

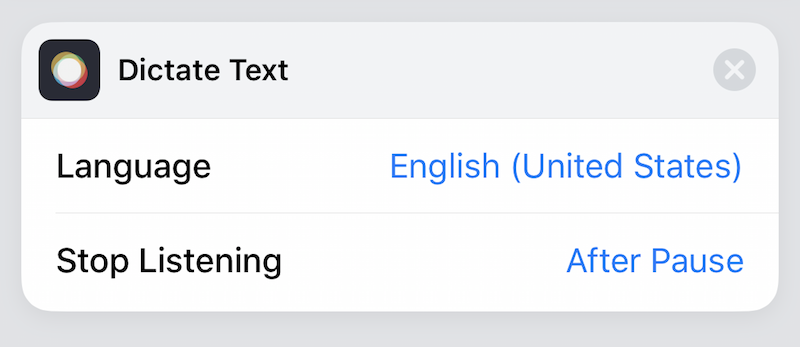
Siri Shortcuts Dictate Text

Dictate Text. Want to use Siri both to start the workflow and to add text to Zapier with your voice? Dictate Text is the option to choose. It lets you dictate a single note to Siri after a short pause. You can set a preferred language or have Shortcuts ask you every time.

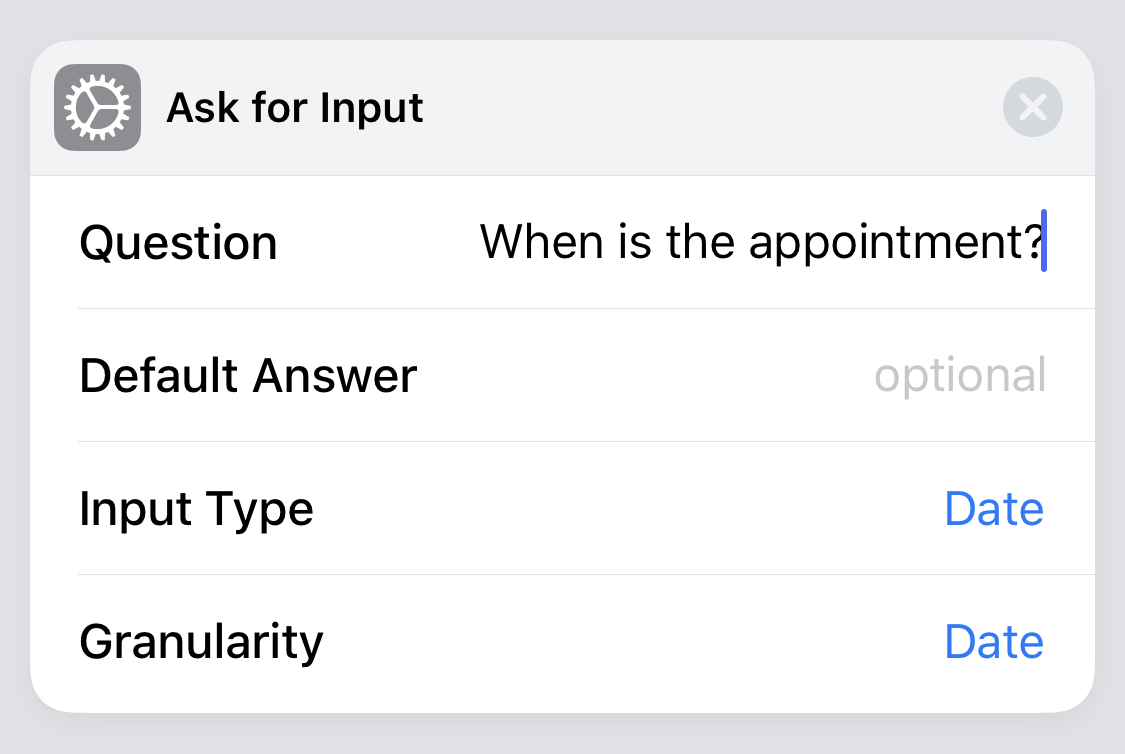
Siri Shortcuts Ask for Input

Ask for Input. Want to type detailed info to send to Zapier, perhaps info about a project or a new contact’s full details? Shortcuts’ Ask for Input shows a text box where you type or paste in text. Add multiple Ask for Input actions with questions to add detailed info, with options to type text, select dates, and enter numbers.

Siri Shortcts Clipboard

Get Clipboard. This is the simplest option—it grabs whatever you most recently copied. It’s perfect to, say, copy links and send them to Zapier.

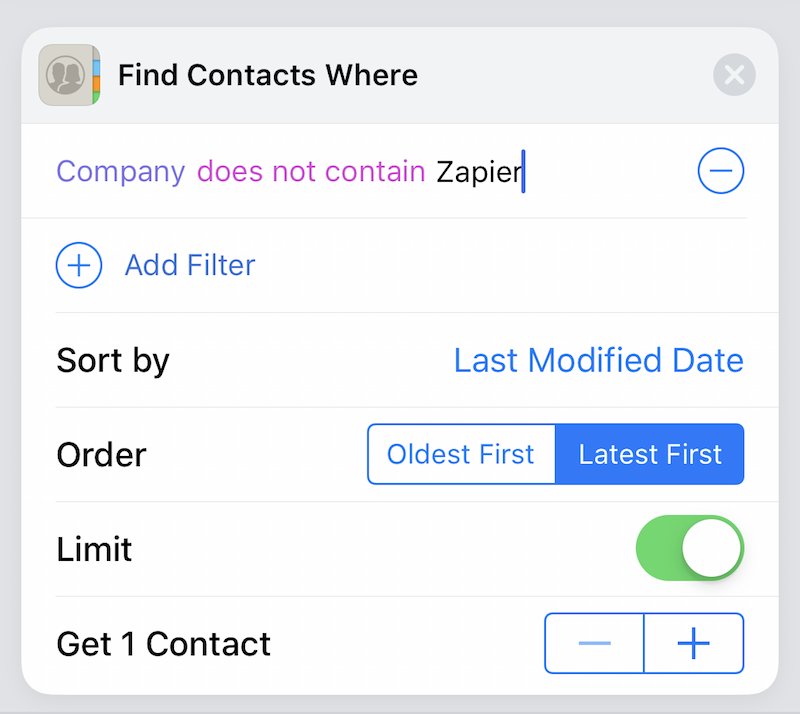
Siri Shortcuts Get Contact

Get, Search, or Find Actions from apps. Want to add data from other apps to Zapier? Search the action options in Shortcuts for actions that start with Get, Search, or Find, choose the app you want, then set its details to find the info you want from the app

Or get creative. Want Siri to trigger a Zap without any input? Perhaps you want Zapier to make a new project with default tasks or create a new Google Drive folder with today’s date. You could start those workflows in Shortcuts without any input and skip to step 2.

2. Add a URL Action with a Zapier Webhooks URL

Zapier Webhook
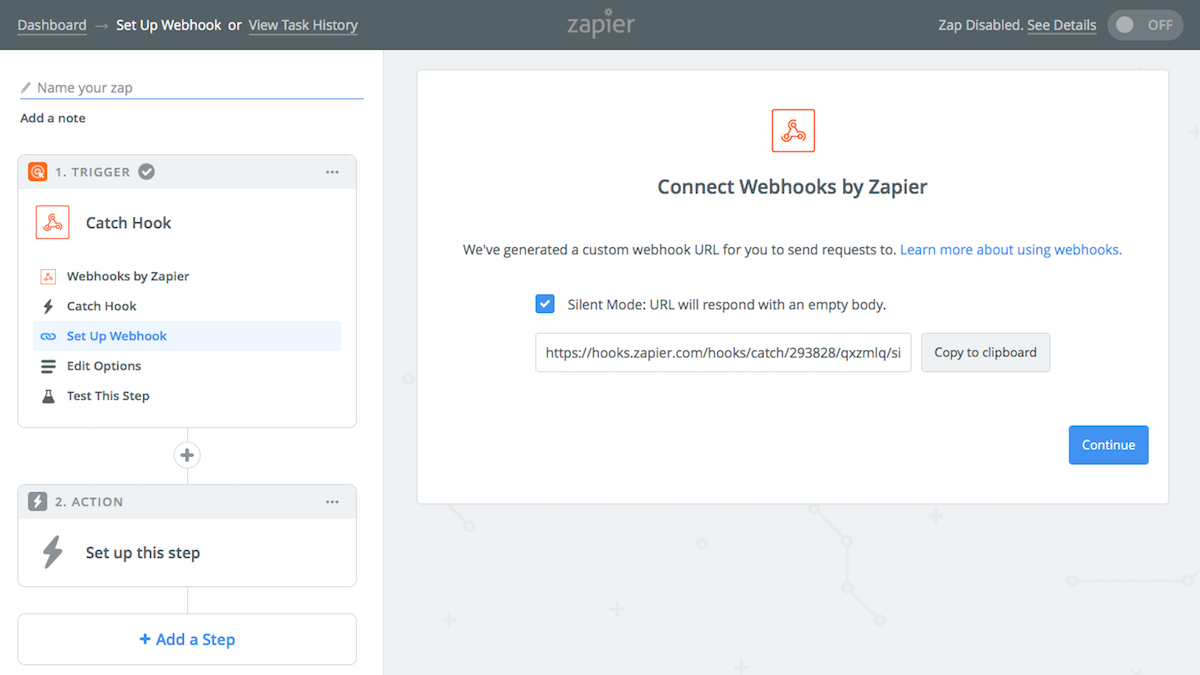
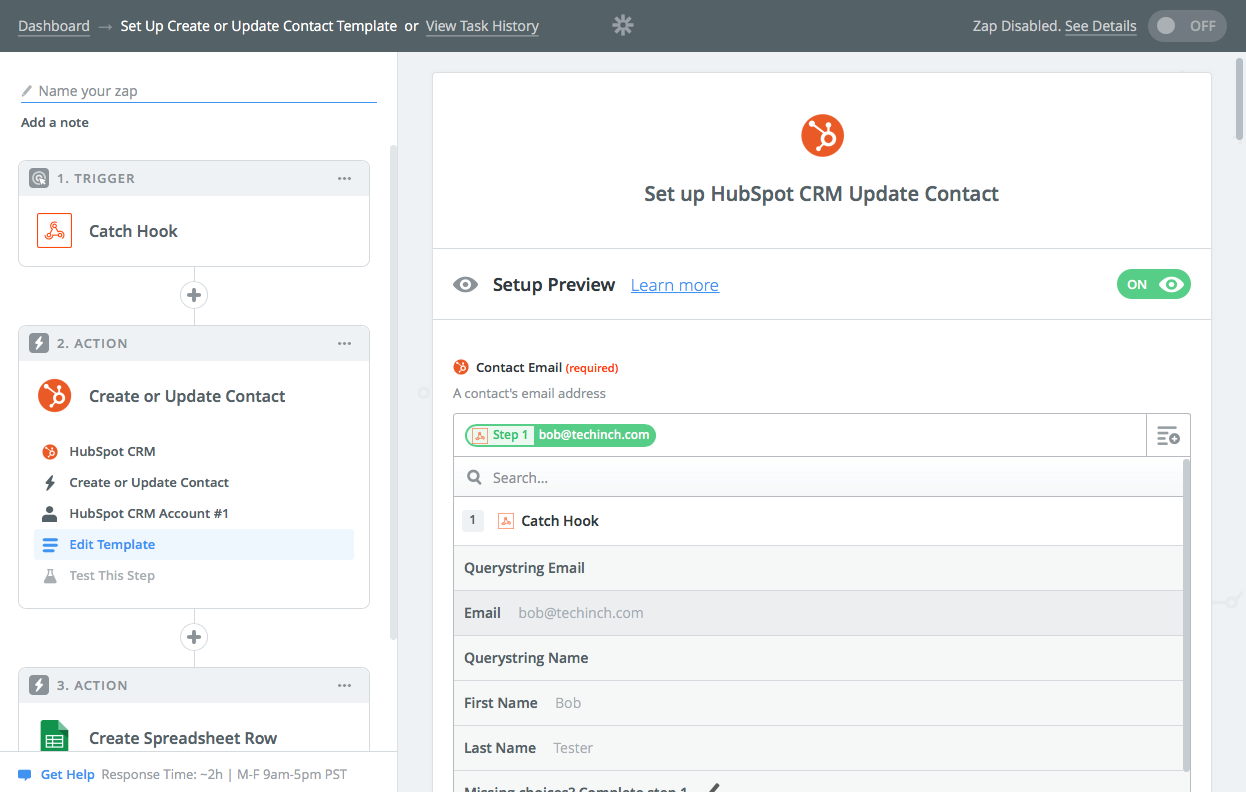
Build a Webhooks Zap alongside your iOS Shortcut

Now you need to switch gears and open Zapier. Make a new Zap, and choose the Webhooks app and its Catch Hook trigger. When prompted, copy the Webhooks link from Zapier either using the Copy to Clipboard button or manually. Shortcuts needs that link to send your text from step 1 to Zapier.

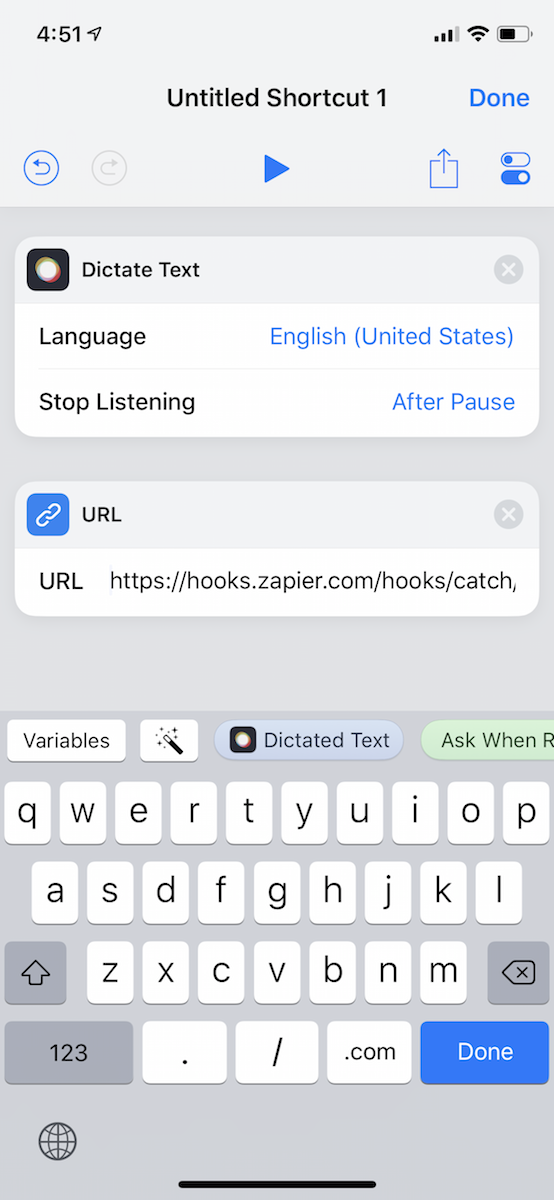
Add Zapier Webhooks URL to Siri Shortcuts

Go back to the Shortcuts app on your iPhone or iPad. In the action search pane on the bottom, search for URL and tap the URL option. Paste your Zapier Webhooks URL into that box, then tap Done.

3. Add a Get Contents of URL Action to Send Info to Zapier

Add Get Contents of URL for Zapier iOS Shortcuts

Now let's add the data you want to send to Zapier. In the Action search pane at the bottom of Shortcuts, search for Get Contents of URL. This action copies the text from your Shortcut’s first step and sends it to the Zapier link you added in the second step.

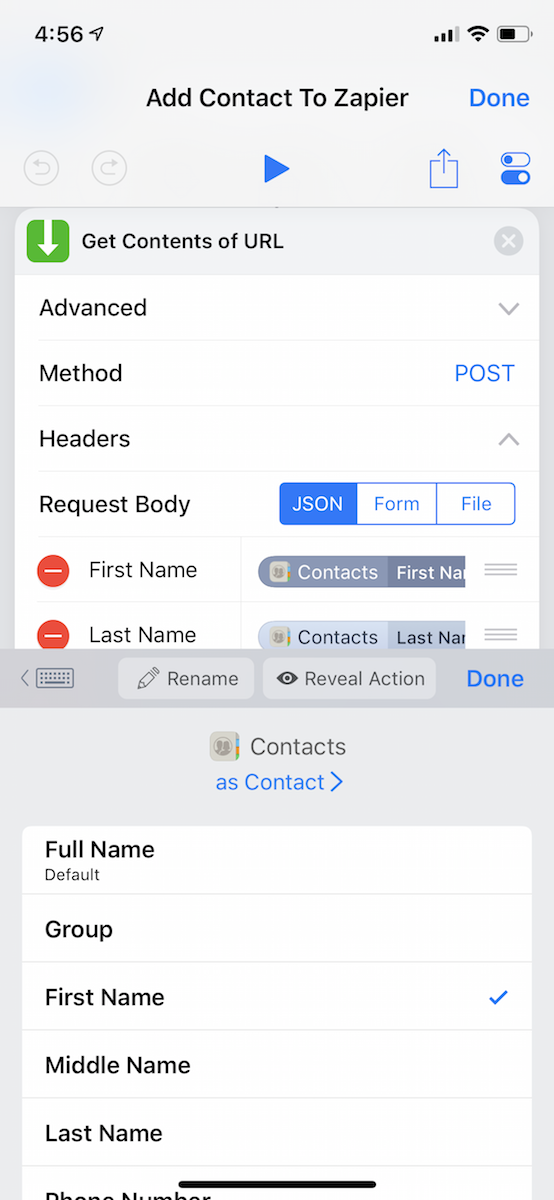
Once you add a Get Contents of URL action, tap the Advanced button and select Method. ChoosePOST from the options. Finally, tap Headers.

If you used a dictate, clipboard, or a single Ask for Input dialog as your first step, add one Header with a field name (perhaps “Notes”) on the left. Then tap the field on the right and select the Dictated Text or Clipboard or whatever other option shows up from your first step at the top of your clipboard.

Or, if you used multiple Ask for Input dialogs or are copying data from another app, you can add as many headers as you want to copy all that info to Zapier. In the screenshot above, I started with a new contact as the first step in the workflow, then added headers for the first and last name and email. Then, on the right side of the headers, I tapped the Contacts button above the keyboard, and Shortcuts let me select the specific detail I wanted from the app.

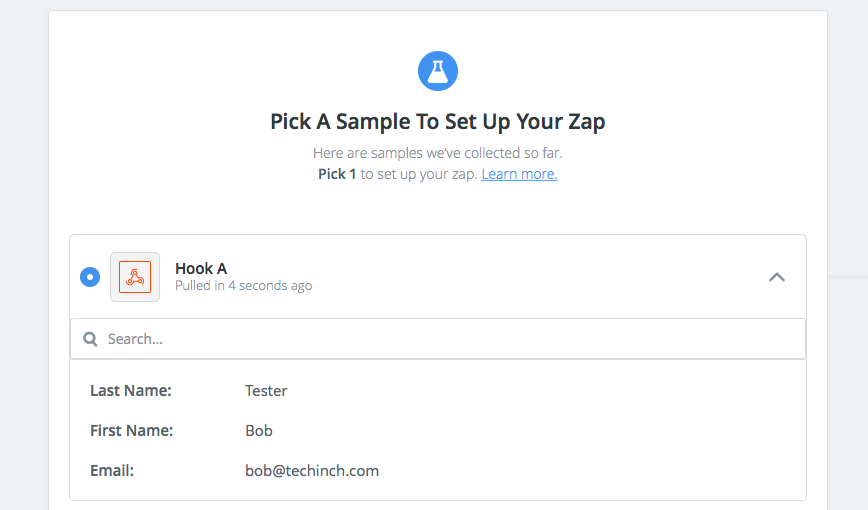
Zapier Webhooks data

Want to test and make sure everything’s working? Press the play button at the top of the workflow, enter or speak text if prompted, then check your Zap in Zapier. It should pull the details in on the Webhooks step.

4. Finish Your Zapier Workflow

Set up Zapier action

Now that you’re back in Zapier, finish setting up the Zapier side of your workflow. In this step, you tell Zapier what to do with the information it collected from Shortcuts. For example, you might want to create a new note with the text you dictated to Siri. Or perhaps paste the information into a spreadsheet like Google Sheets or Excel to log data, or a CRM like HubSpot CRM or Salesforce to save contacts..

Select the app and action you want, then in each of the fields, click the + icon on the right to select info from your iPhone or iPad to add to that app. You’ll only have one field if you used a Dictate, Clipboard, or single Ask for Input option in Shortcuts. If you added detailed data from an app or multiple Ask for Input options, you can copy each of those into another app in Zapier.

Zapier includes a few extra built-in apps to customize your Zap if you’d like:

  • Filter: Have Zapier watch for specific details—dates that aren’t weekends or contacts that don’t include your company’s name, for instance.
  • Delay: Have Zapier wait to do something until the time you want—perfect to send an email tomorrow morning, say.
  • Formatter: Have Zapier reformat your text, replace words, change date formats, pick items from a list, remove HTML formatting, and much more.
  • Multi-Steps: Add more steps to your Zap to carry out as many actionsas you want at once.

When finished, test your Zap and turn it on, and Zapier’s all ready for you to run your Shortcut from Siri.

5. Add Your Shortcut to Siri

Add Shortcut to Siri
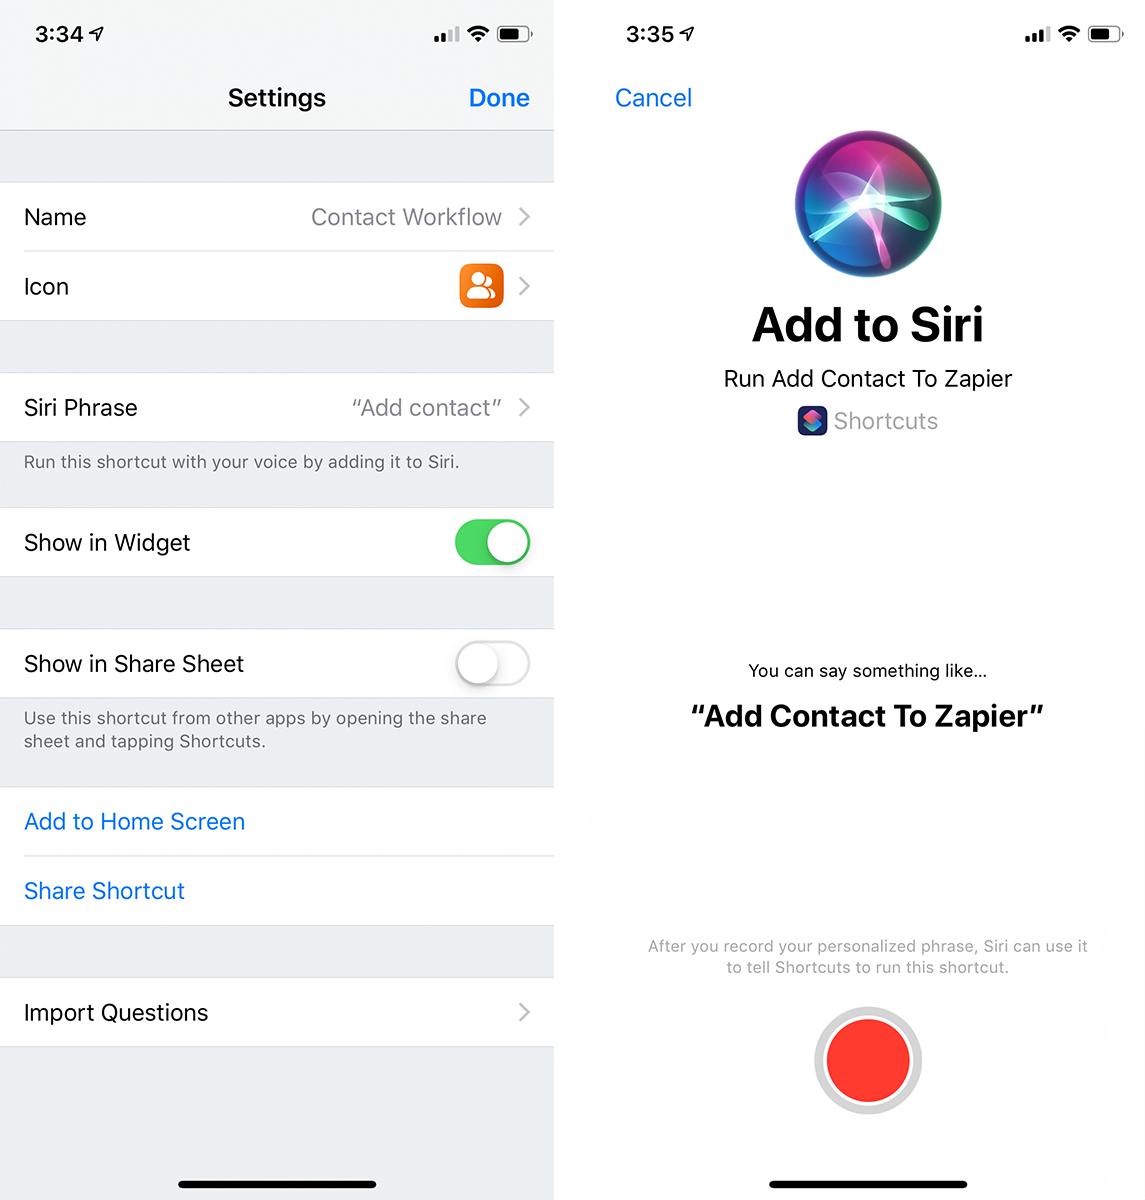
From your Shortcut options, you can add a custom command to Siri

There’s one final step: Add your shortcut to Siri. Back in the Shortcuts app, tap the settings icon in the top right corner (looks like two blue settings sliders). You can add a name and custom icon to your shortcut to make it easy to recognize on the Settings app home screen. Additionally, you can tap Add to Home Screen to add this shortcut as a new app icon that you can run from your iPhone or iPad’s home screen (more on that later).

The easiest way to use your Shortcut is from Siri, though, so tap the Siri Phrase button to add it. On the next screen, tap the record button then say the phrase you want to run the workflow—something simple that you’ll remember like “New Contact” or “Run Zap.”

And you’re done. Now, whenever you run this shortcut, it will grab the text you dictated or typed or copied from an app and send it to your Zap where Zapier will run it through your workflow.


How to Run a Zapier iOS Shortcut

Now that you’ve made your iOS Shortcut with Zapier, you’ll want to use it whenever you need to run that Zap. There are three ways you can use your Shortcut:

With Siri

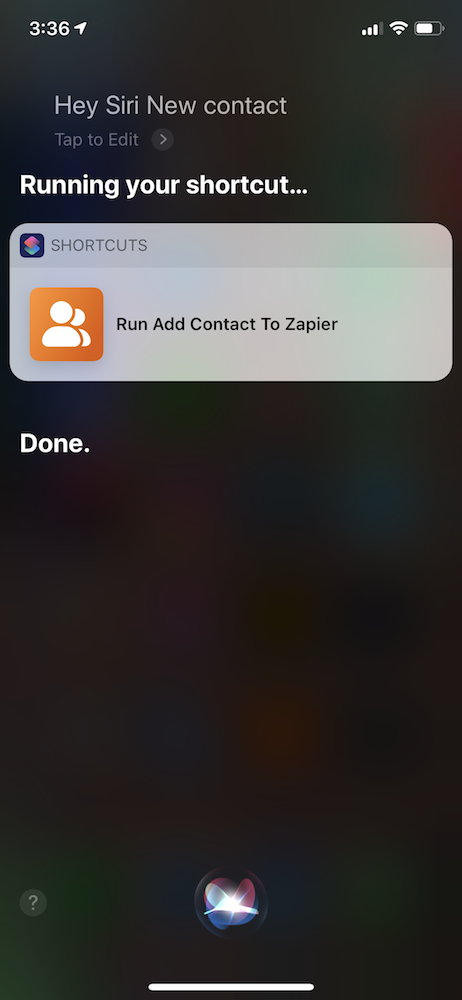
Run Shortcut with Siri
Now you can tell Siri exactly what to do

Say Hey, Siri! to your phone or press-and-hold the home button or the power button on an iPhone X-series phone. Then say the Siri Phrase you added to your shortcut. Siri will run the shortcut then say Done so you'll know it’s finished.

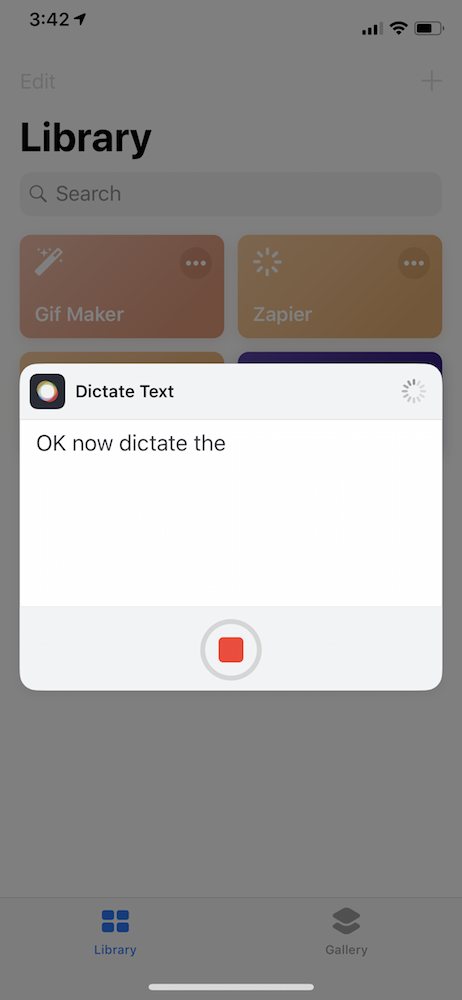
Siri Shortcuts Dictate Text

If your workflow includes a Dictate or Input Text option, Siri opens the Shortcuts app and displays a box to enter your text. With Dictate, you’ll hear another ping sound, then you can start talking and Siri will dictate whatever you say. With Input Text, Siri displays your question and you write an answer into the Shortcuts dialog box. Then Siri runs the remainder of the workflow for you.

From the Shortcuts App

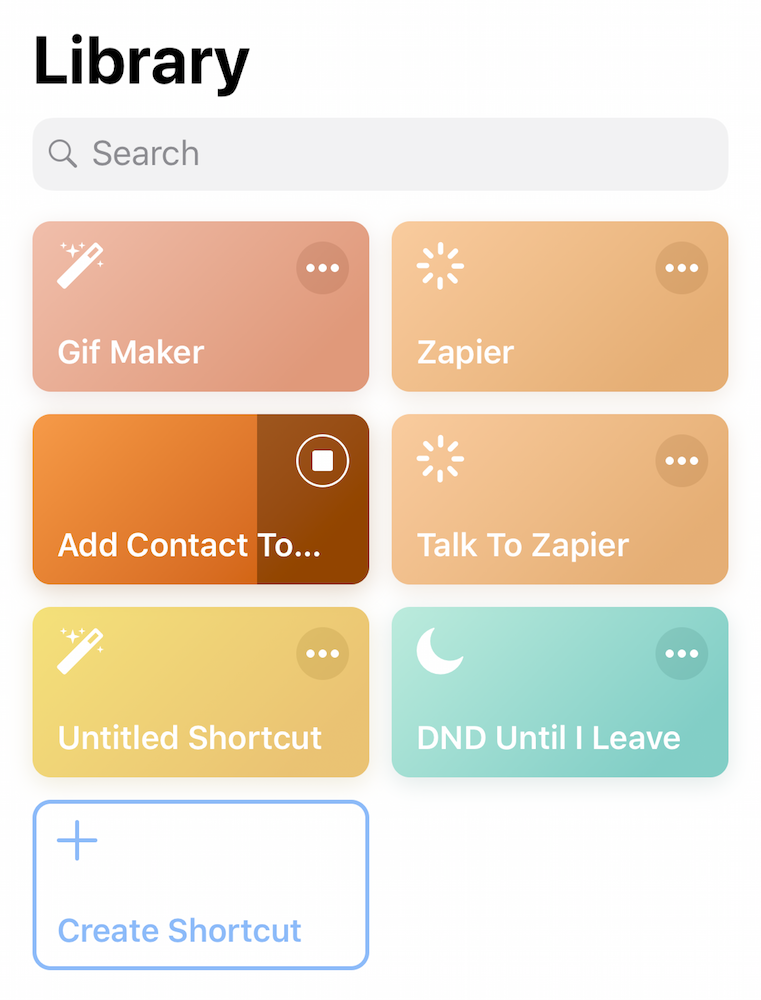
Run Shortcut from Shortcuts App

Prefer to use your phone silently? Open the Shortcuts app and tap your Zap-powered Shortcut to run it without saying anything to Siri. It opens the Dictation or Input Text dialogs just the same—and shows a progress bar on the Shortcut’s icon as the workflow runs.

From Your iOS Home Screen

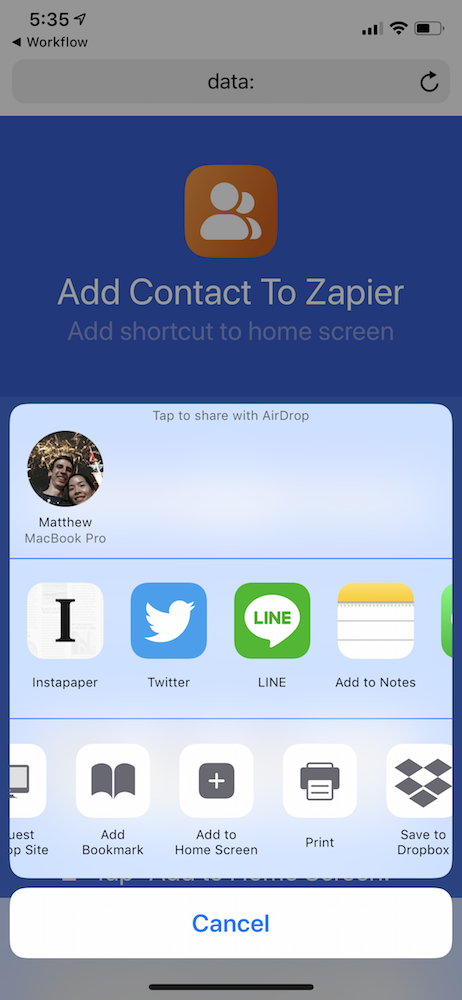
Add Shortcut to iOS Home Screen

You can also add the Shortcut to your iPhone or iPad’s home screen, like any other app icon. To add the Shortcut to your home screen, click the Share icon in the Shortcut and select Add to Home Screen. That opens a page in Safari, where you again need to click Share and then Add to Home Screen..

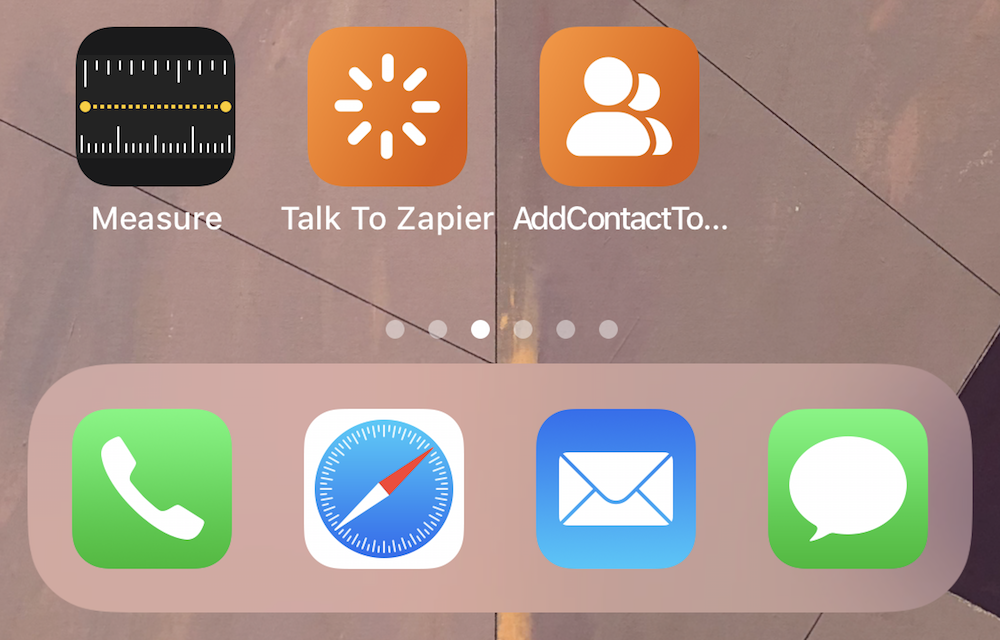
Shortcuts icon

Then, whenever you want to run the Shortcut, tap its icon to open the Shortcuts app and run that Shortcut directly.


Use Siri to Automate Your Work

Now, it’s time to get creative. What work tasks have you wished you could do more easily on the go? What could you tell Siri—or copy from an app on your iPhone—that would then be useful in your favorite work apps? What routine emails and tasks could you automate? Zapier could create new projects for you, add contacts to a CRM, log receipts and accounting details while you’re out, send emails to new contacts right after you meet them, and much more.

Here are some ideas to get started:

Log Data

Adding text to spreadsheets and databases is tough from your phone—so let Siri Shortcuts add them instead.

Save Contact Details

Whenever you add new people to your address book, Siri could add them to your email list or CRM automatically.

Send Messages

Need to text from a work number or want to send an email or Slack message without getting distracted by all the unread messages in your inbox? Siri can send the message for you.

Create Tasks

Think of something to do or come across a bug that needs to be fixed while you’re out? Tell Siri, and Zapier can add it to your list.


The new Siri Shortcuts app is the best way to customize your iPhone. You can make new Shortcuts to add new contacts, projects, notes, and more in your work apps. You can even add Zapier to other workflows to log data and build more powerful tools than you could in Shortcuts alone. Say you have a workflow that shows today’s weather, stock price, or sports scores. Add Zapier to it, and you could log those items to a spreadsheet. Or maybe you have a workflow to add new contacts to your address book—add Zapier to the end to automatically back up the contacts to a spreadsheet or add them to your CRM as well. Have a workflow to remind you to do a task when you get to work? Add Zapier to the end of the workflow to also add that task to your to-do list to make sure you don’t forget it.

Check out Zapier’s Automation Inspiration Guide for hundreds of ideas on ways to use Zapier—then combine those with new Siri Shortcuts for a powerful way to get work done from anywhere.

Connect Zapier to Your Other Devices

Siri’s not the only way to use Zapier outside of your work apps. Here are other ways to speed up your work from the tools you use most:


source https://zapier.com/blog/zapier-siri-shortcuts/
How to Use Pivot Tables in Google Sheets

Spreadsheets offer powerful analysis capabilities, but sometimes it feels like they're missing that extra layer of insight. When there's a massive amount of data, it's tough to summarize or draw conclusions from a basic tabular spreadsheet view.

Enter: the pivot table.

Most Excel power users employ pivot tables as their bread and butter, but Google Sheets offers the same tool, so you can use pivot tables while keeping things in G Suite. In this article, we'll walk through how to build pivot tables in Google Sheets.

What Are Pivot Tables?

In its simplest form, a spreadsheet is just a set of columns and rows. When a column and a row meet, cells are formed. You can use formulas to log data within these cells—and when your spreadsheet is small, it's simple enough to read through and understand the numbers.

But as your spreadsheet begins to grow, drawing conclusions requires a bit more power. That's where pivot tables come in. A pivot table takes a large set of data and summarizes it.

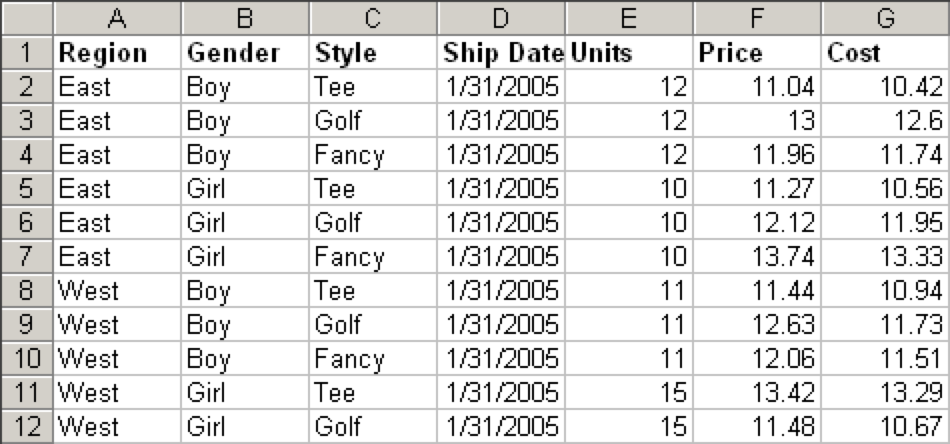
Think of it this way: Normal spreadsheets essentially have "flat data" represented by two axes, horizontal (columns) and vertical (rows):

Spreadsheet with seven columns and twelve rows, showing basic data

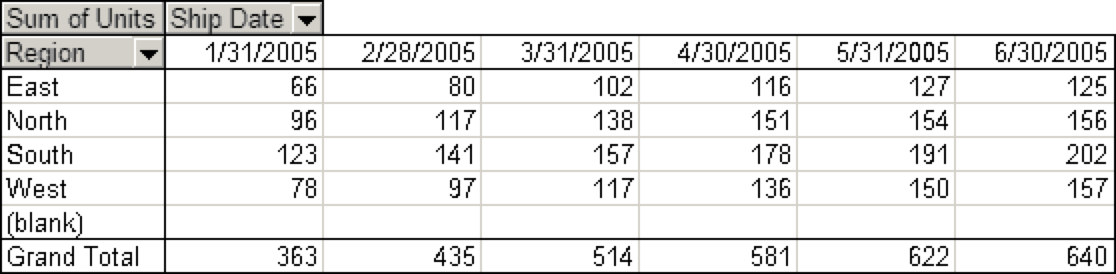
To derive more insights, you'll need to add data on another level. In the case above, for example, you start with each sale as its own row, and each column offers different information about that sale. But if you shift (or pivot) the axes of the table, you can add another dimension:

Pivot table showing units sold in each region for each ship date

Now, you're not looking at things by individual sale. Instead, you're looking at aggregated data: How many Units did we sell in each Region for every Ship Date?

So that's the rough idea: You can take a two-dimensional table and pivot it around an aggregation of the data to introduce a third dimension. And that's how you get a pivot table. Doing so helps you see the bird's eye view, derive meaning from large quantities of data, and surface unique insights.

While you could derive many of these insights using formulas, the pivot table allows you to distill it in a fraction of the time—and with less chance for human error. Plus, every time your boss asks for a new report based on the same data set, you can generate it with a few clicks, instead of starting from scratch.

How to Use Pivot Tables in Google Sheets

Google Sheets pivot tables are as easy to use as they are powerful. Here's a quick look at how to use them, followed by a more in-depth tutorial.

  1. Open a Google Sheets spreadsheet, and select all of the cells containing data.
  2. Click Data > Pivot Table.
  3. Check if Google's suggested pivot table analyses answer your questions.
  4. To create a customized pivot table, click Add next to Rows and Columns to select the data you'd like to analyze.
  5. Click Add next to Values to select the values you want to display within the rows and columns.
  6. Click Filters to display only values meeting certain criteria.

For this tutorial, we've created a Google Sheets spreadsheet with dummy data. Open the Google Sheet, and select File > Make a copy…, and then follow along with our detailed tutorial below.

Create the pivot table

You have a sheet filled with raw data, so the first thing to do is turn it into a pivot table.

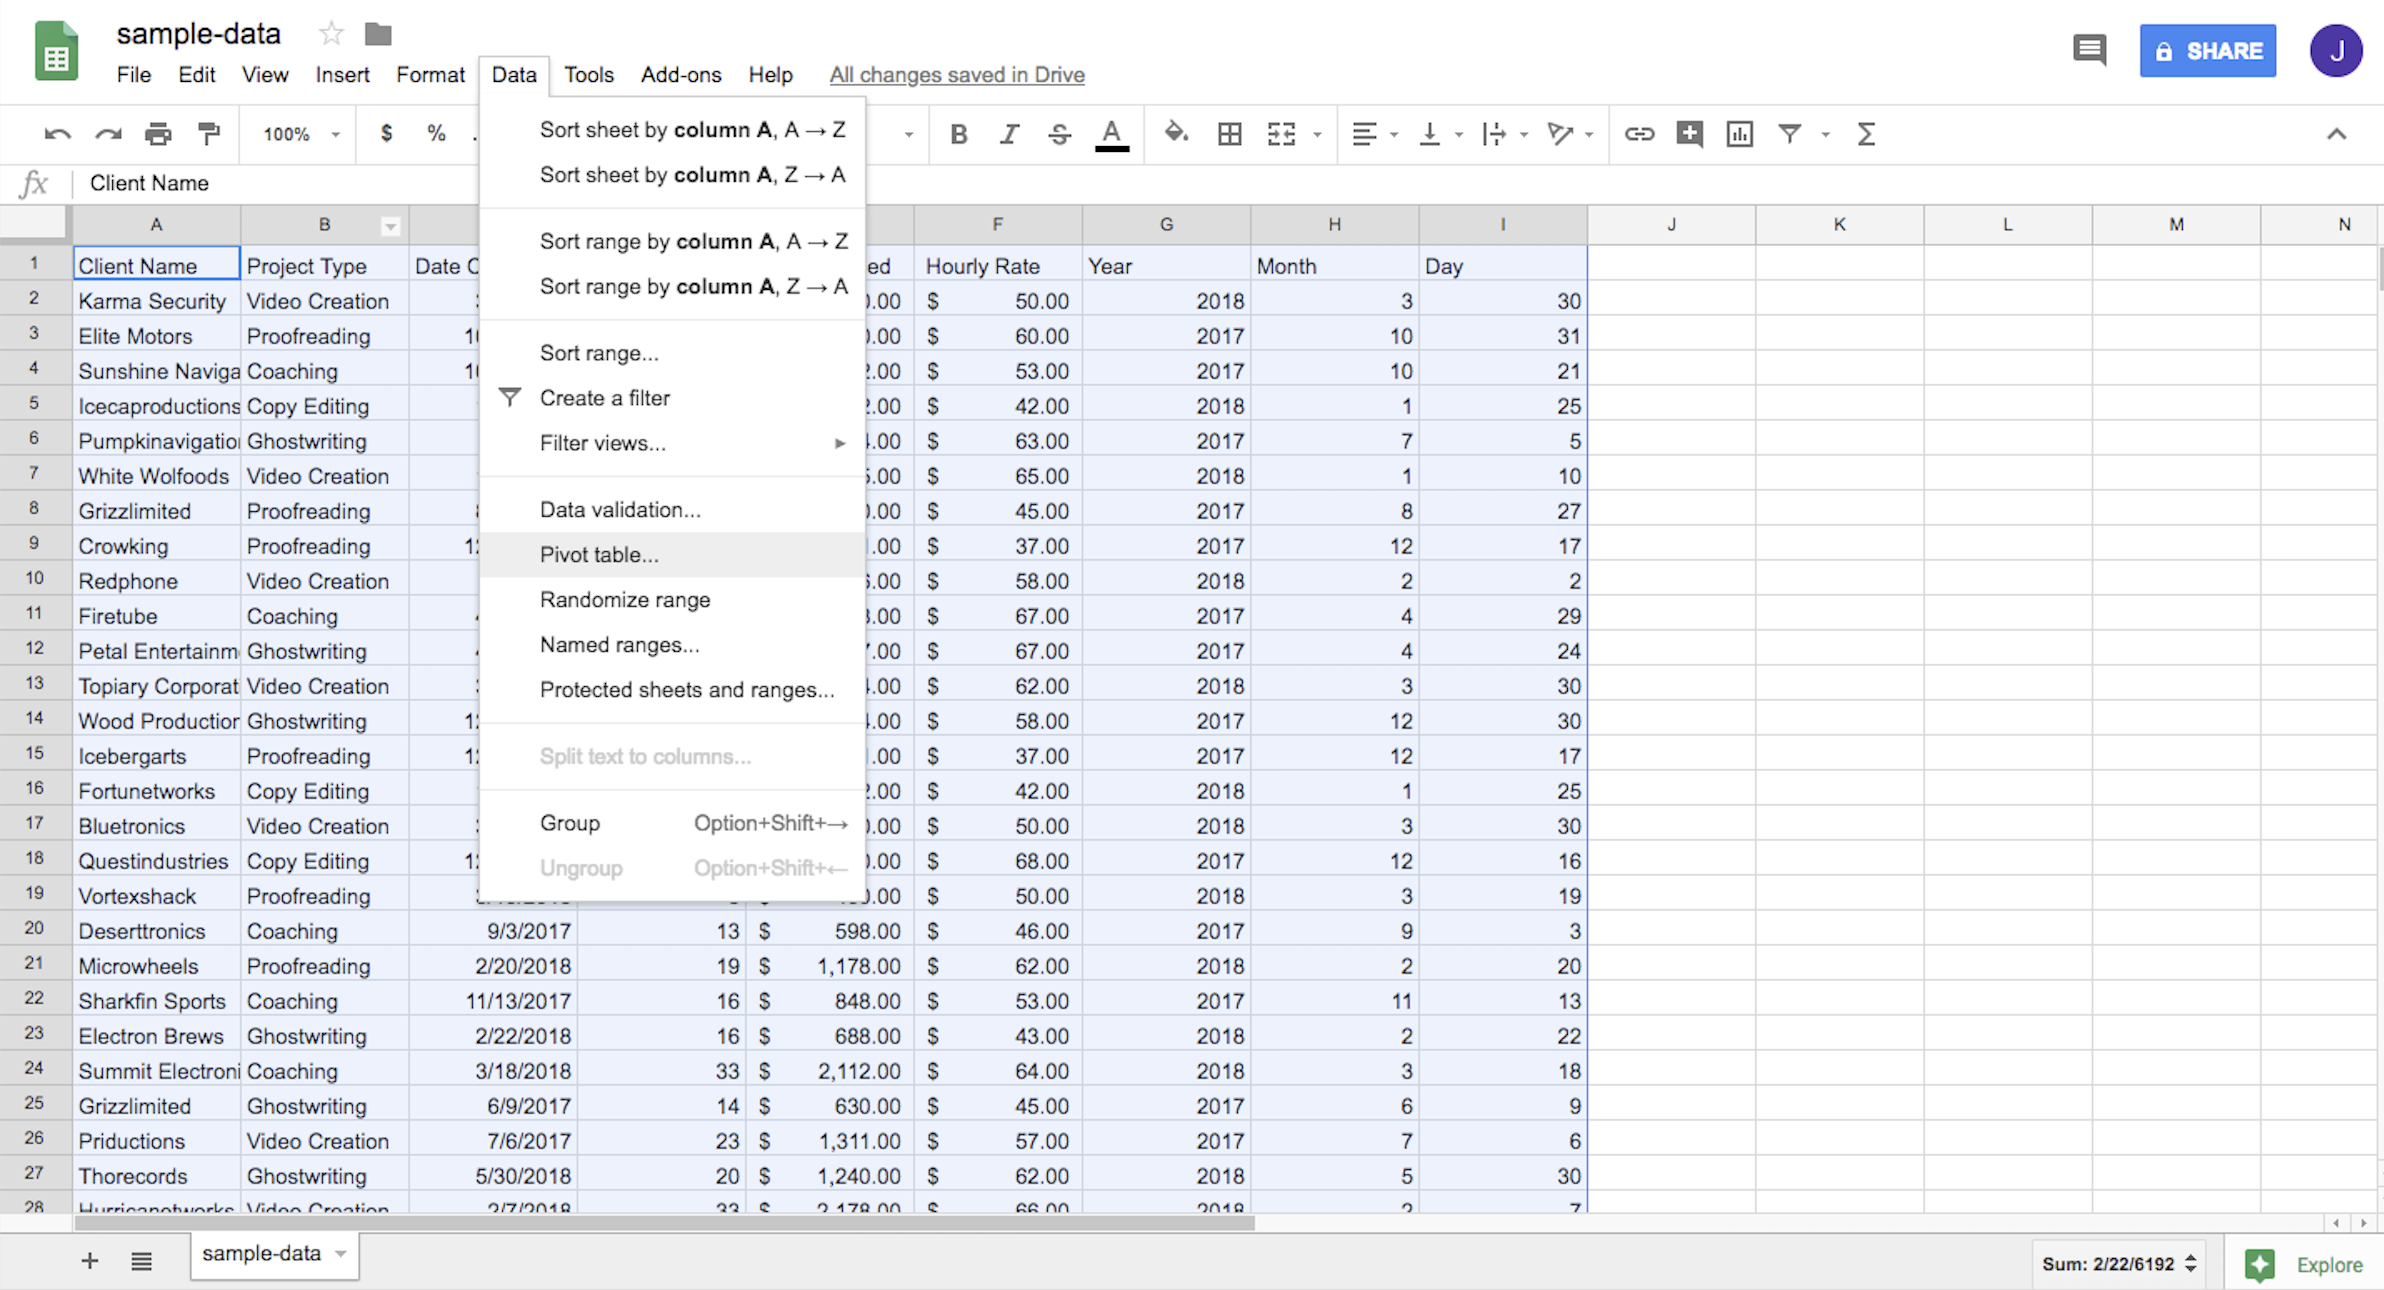
Select all of the cells containing data (command or ctrl + A is a handy shortcut). Then click Data > Pivot Table…, as shown below.

Highlighting all cells in the spreadsheet and selecting Data, then Pivot table

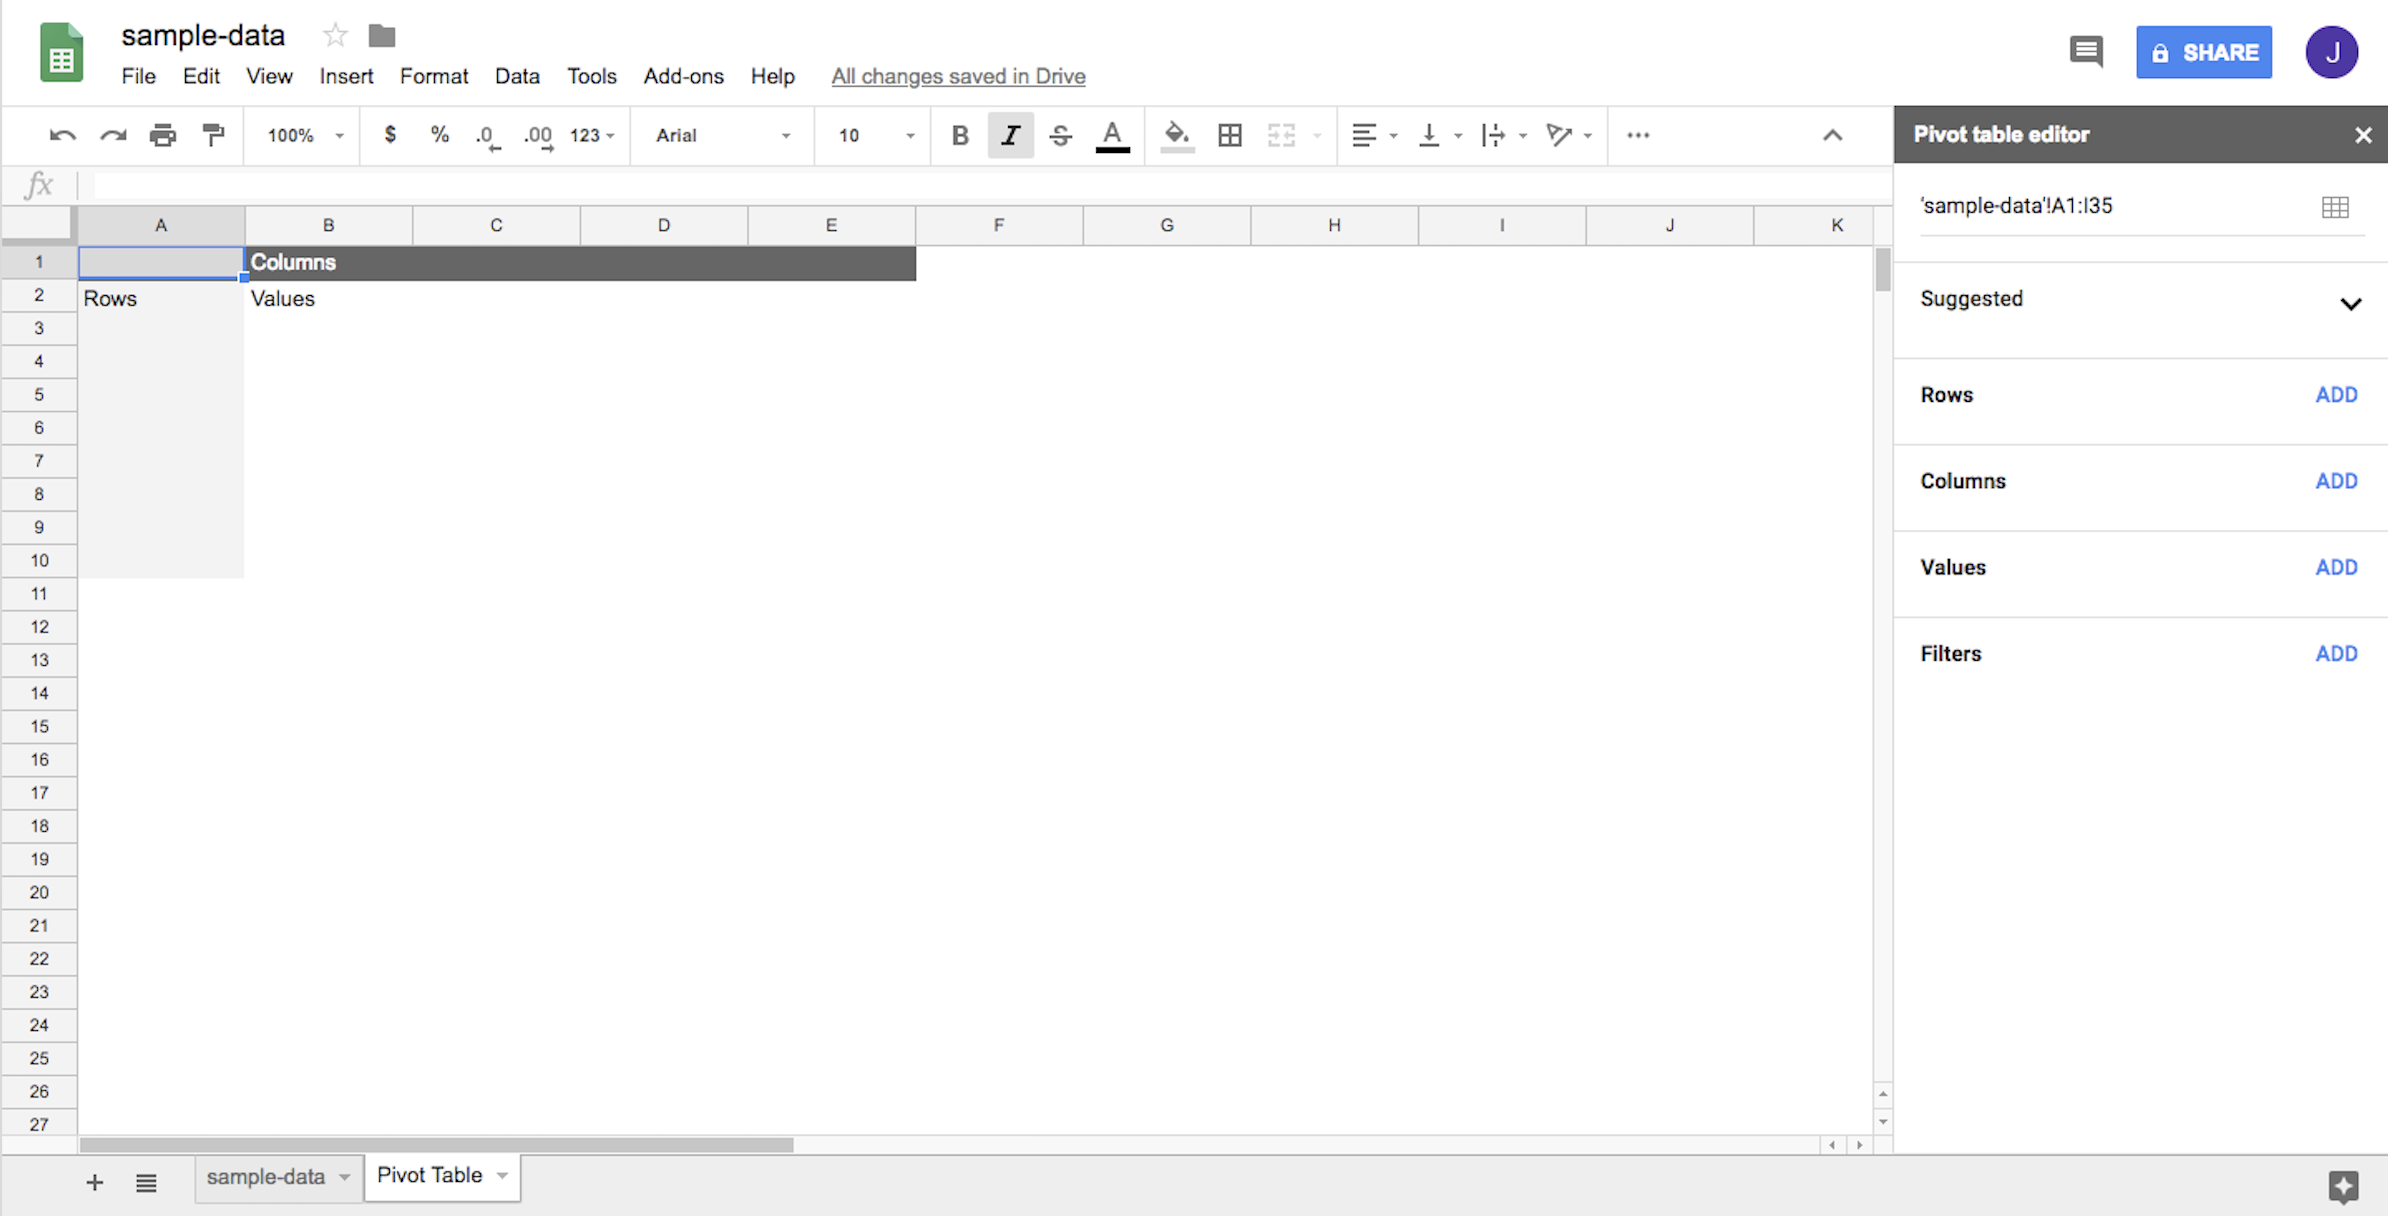
This will create a new sheet on your spreadsheet called "Pivot Table." And that's where you'll be working from.

Pivot Table sheet with a Pivot Table generated

Learn the pivot table editor

With your pivot table generated, you're ready to start doing some analysis. To do so, you'll use the pivot table editor to build different views of your data. You'll see the editor on the right-hand side of your Google Sheets spreadsheet.

The editor offers two ways to analyze: using Google's suggestions or choosing your dimensions manually.

Suggested pivot tables

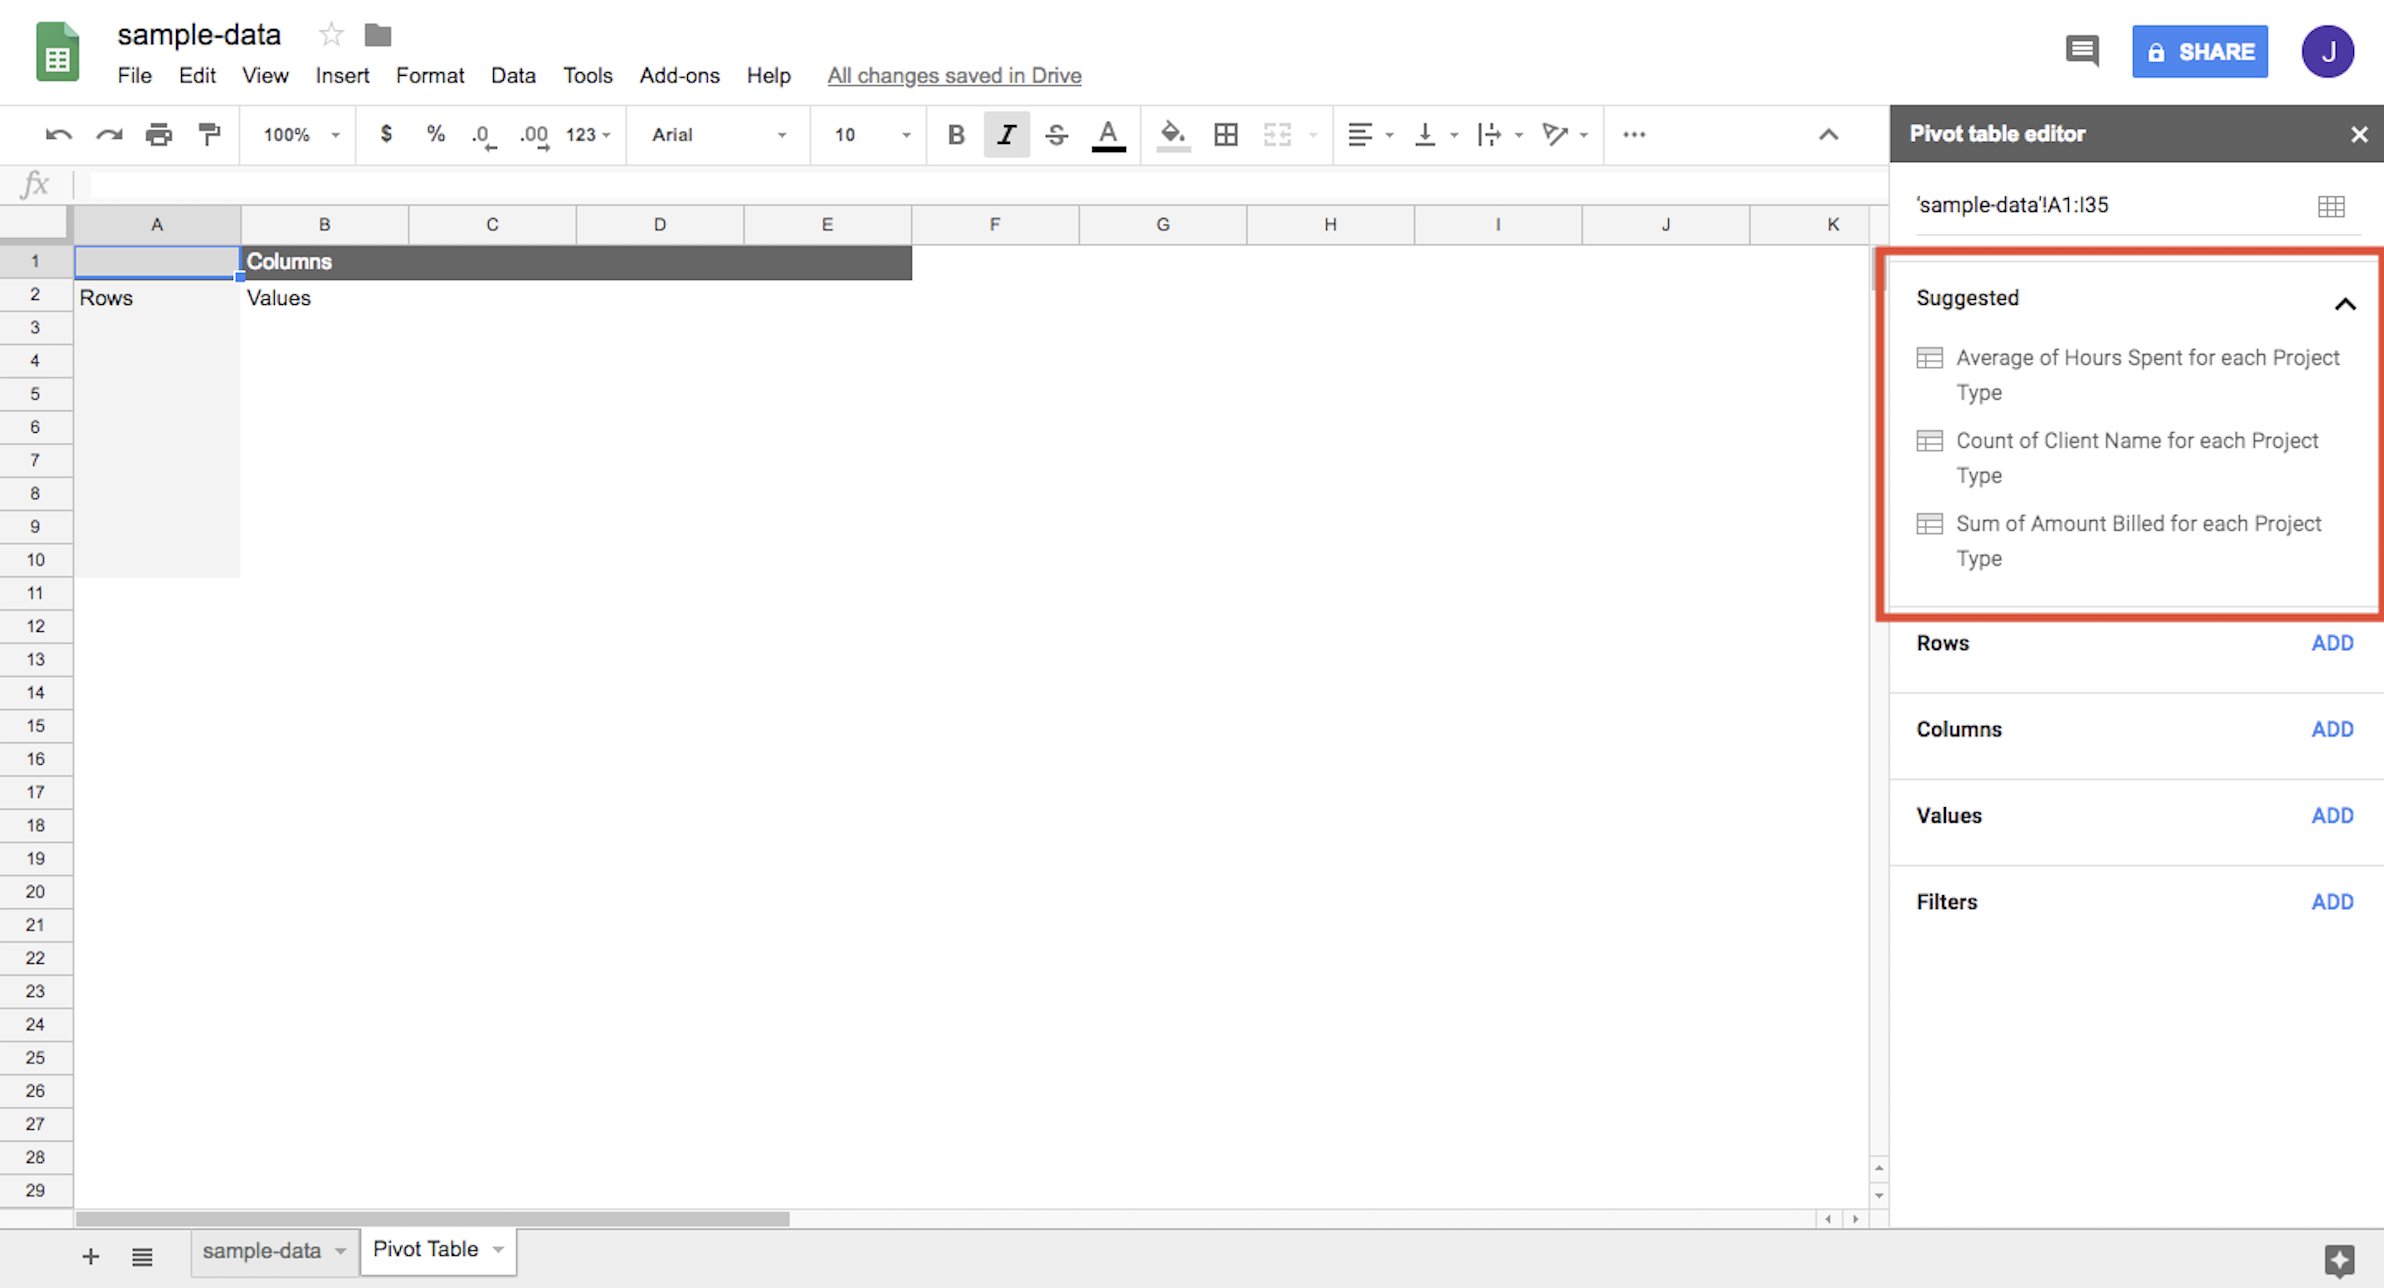
Google being Google, it knows what you want to know before you even know you want to know it. Under "Suggested" in the editor, Google offers analyses for your data set.

For example, given our data set example, it suggests the following analyses:

  • Average of Hours Spent for each Project Type
  • Count of Client Name for each Project Type
  • Sum of Amount Billed for each Project Type
Suggested feature for the pivot table editor on Google Sheets

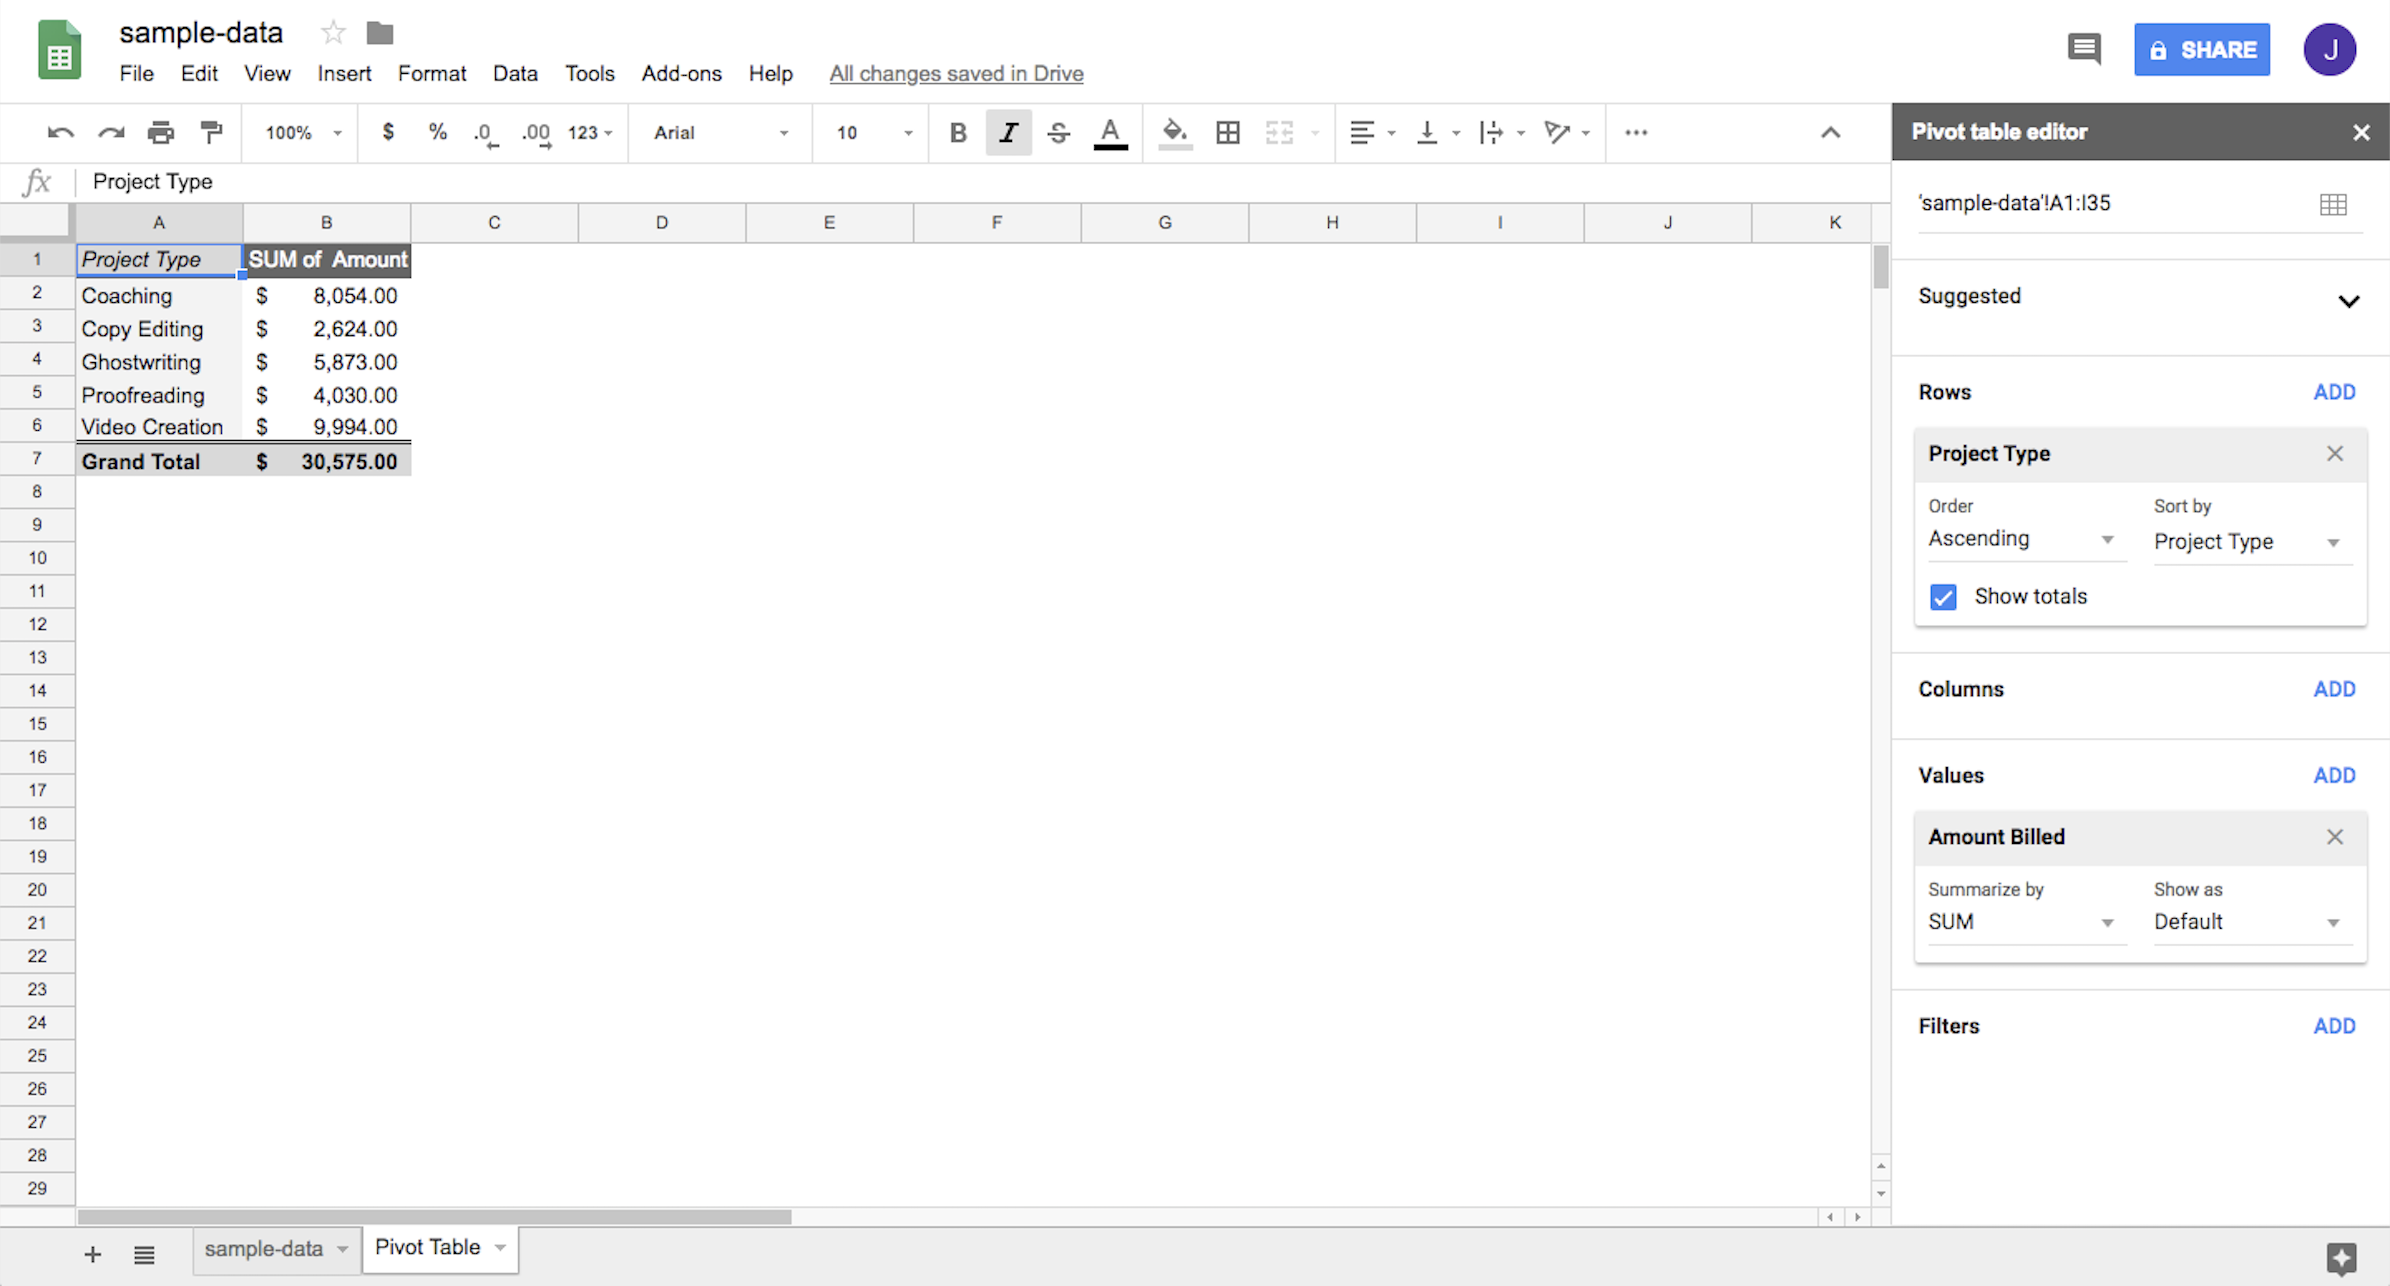
If you click on any of the suggested options, Google Sheets will automatically build out your initial pivot table. For example, click the third option ("Sum of Amount Billed for each Project Type"), and you'll see the project types in Column A and a total amount billed for each in Column B.

Analysis generated from using a suggested option

Manual options

If the suggested analysis isn't what you're looking for—or if you'd like to perform a different type of analysis—you can manually build your preferred output.

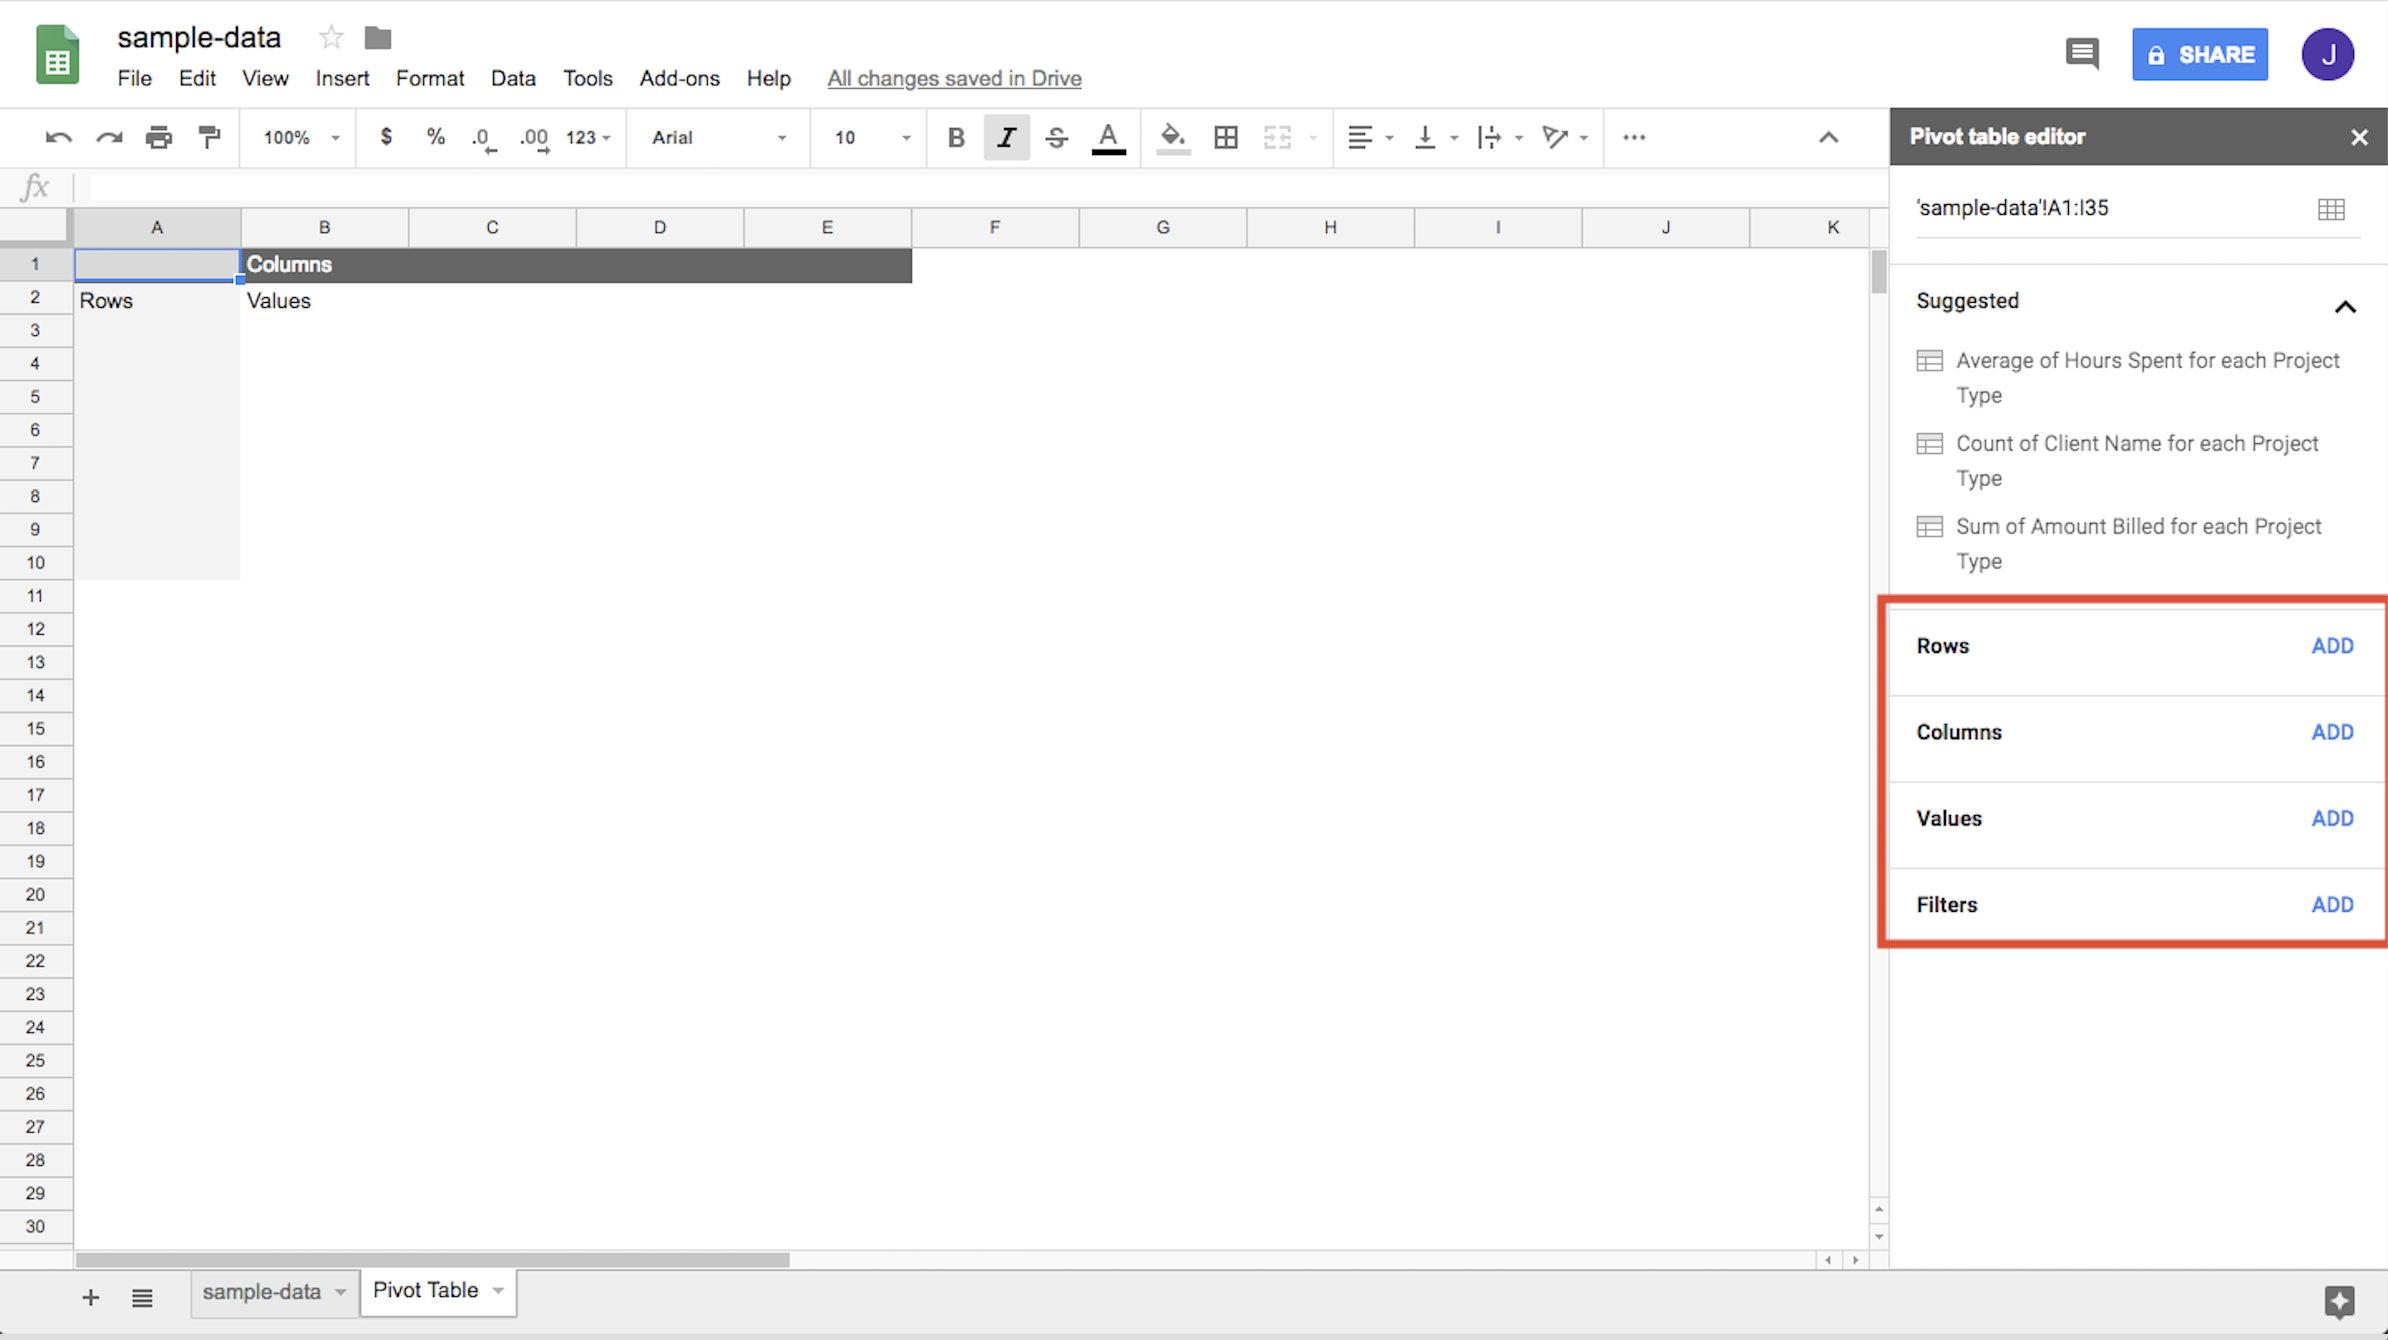
You'll find four options on the right side of your sheet that allow you to insert data into your pivot table:

  • Rows
  • Columns
  • Values
  • Filter
Manual option elements are Rows, Columns, Values, Filters.

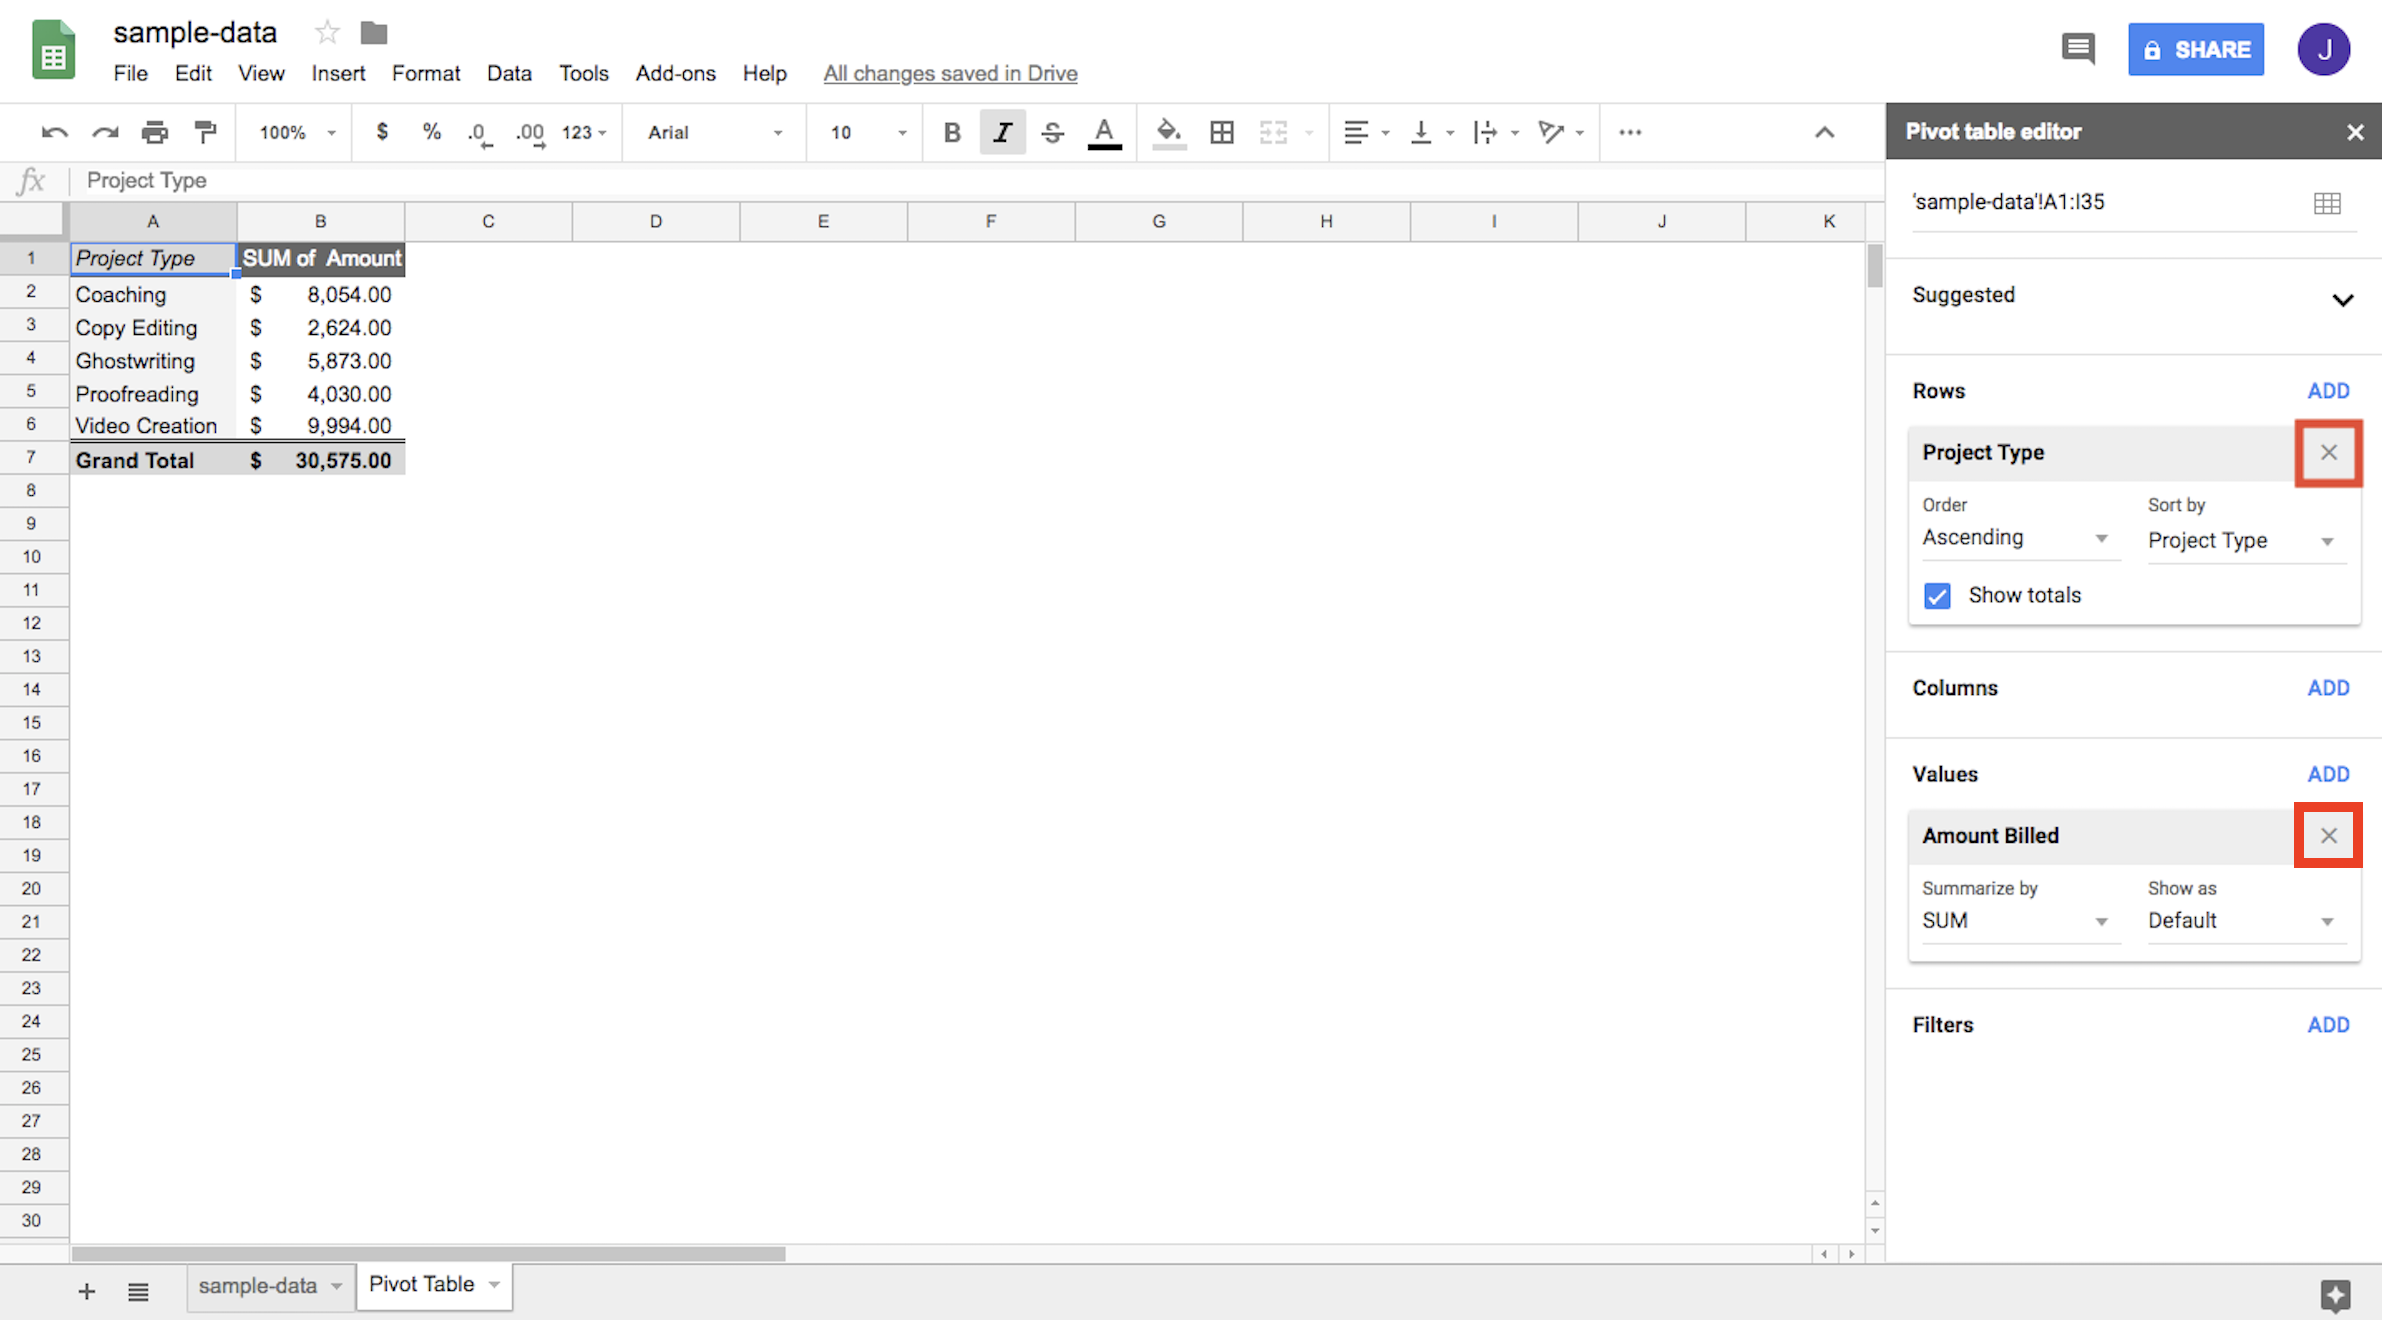
These are the various dimensions you can use to analyze your data. We'll walk through an example analysis to show you how to use them, but first, start by removing the existing selections (created by the suggested analysis we just performed) by clicking X for the Rows and Values options.

Removing selected manual options

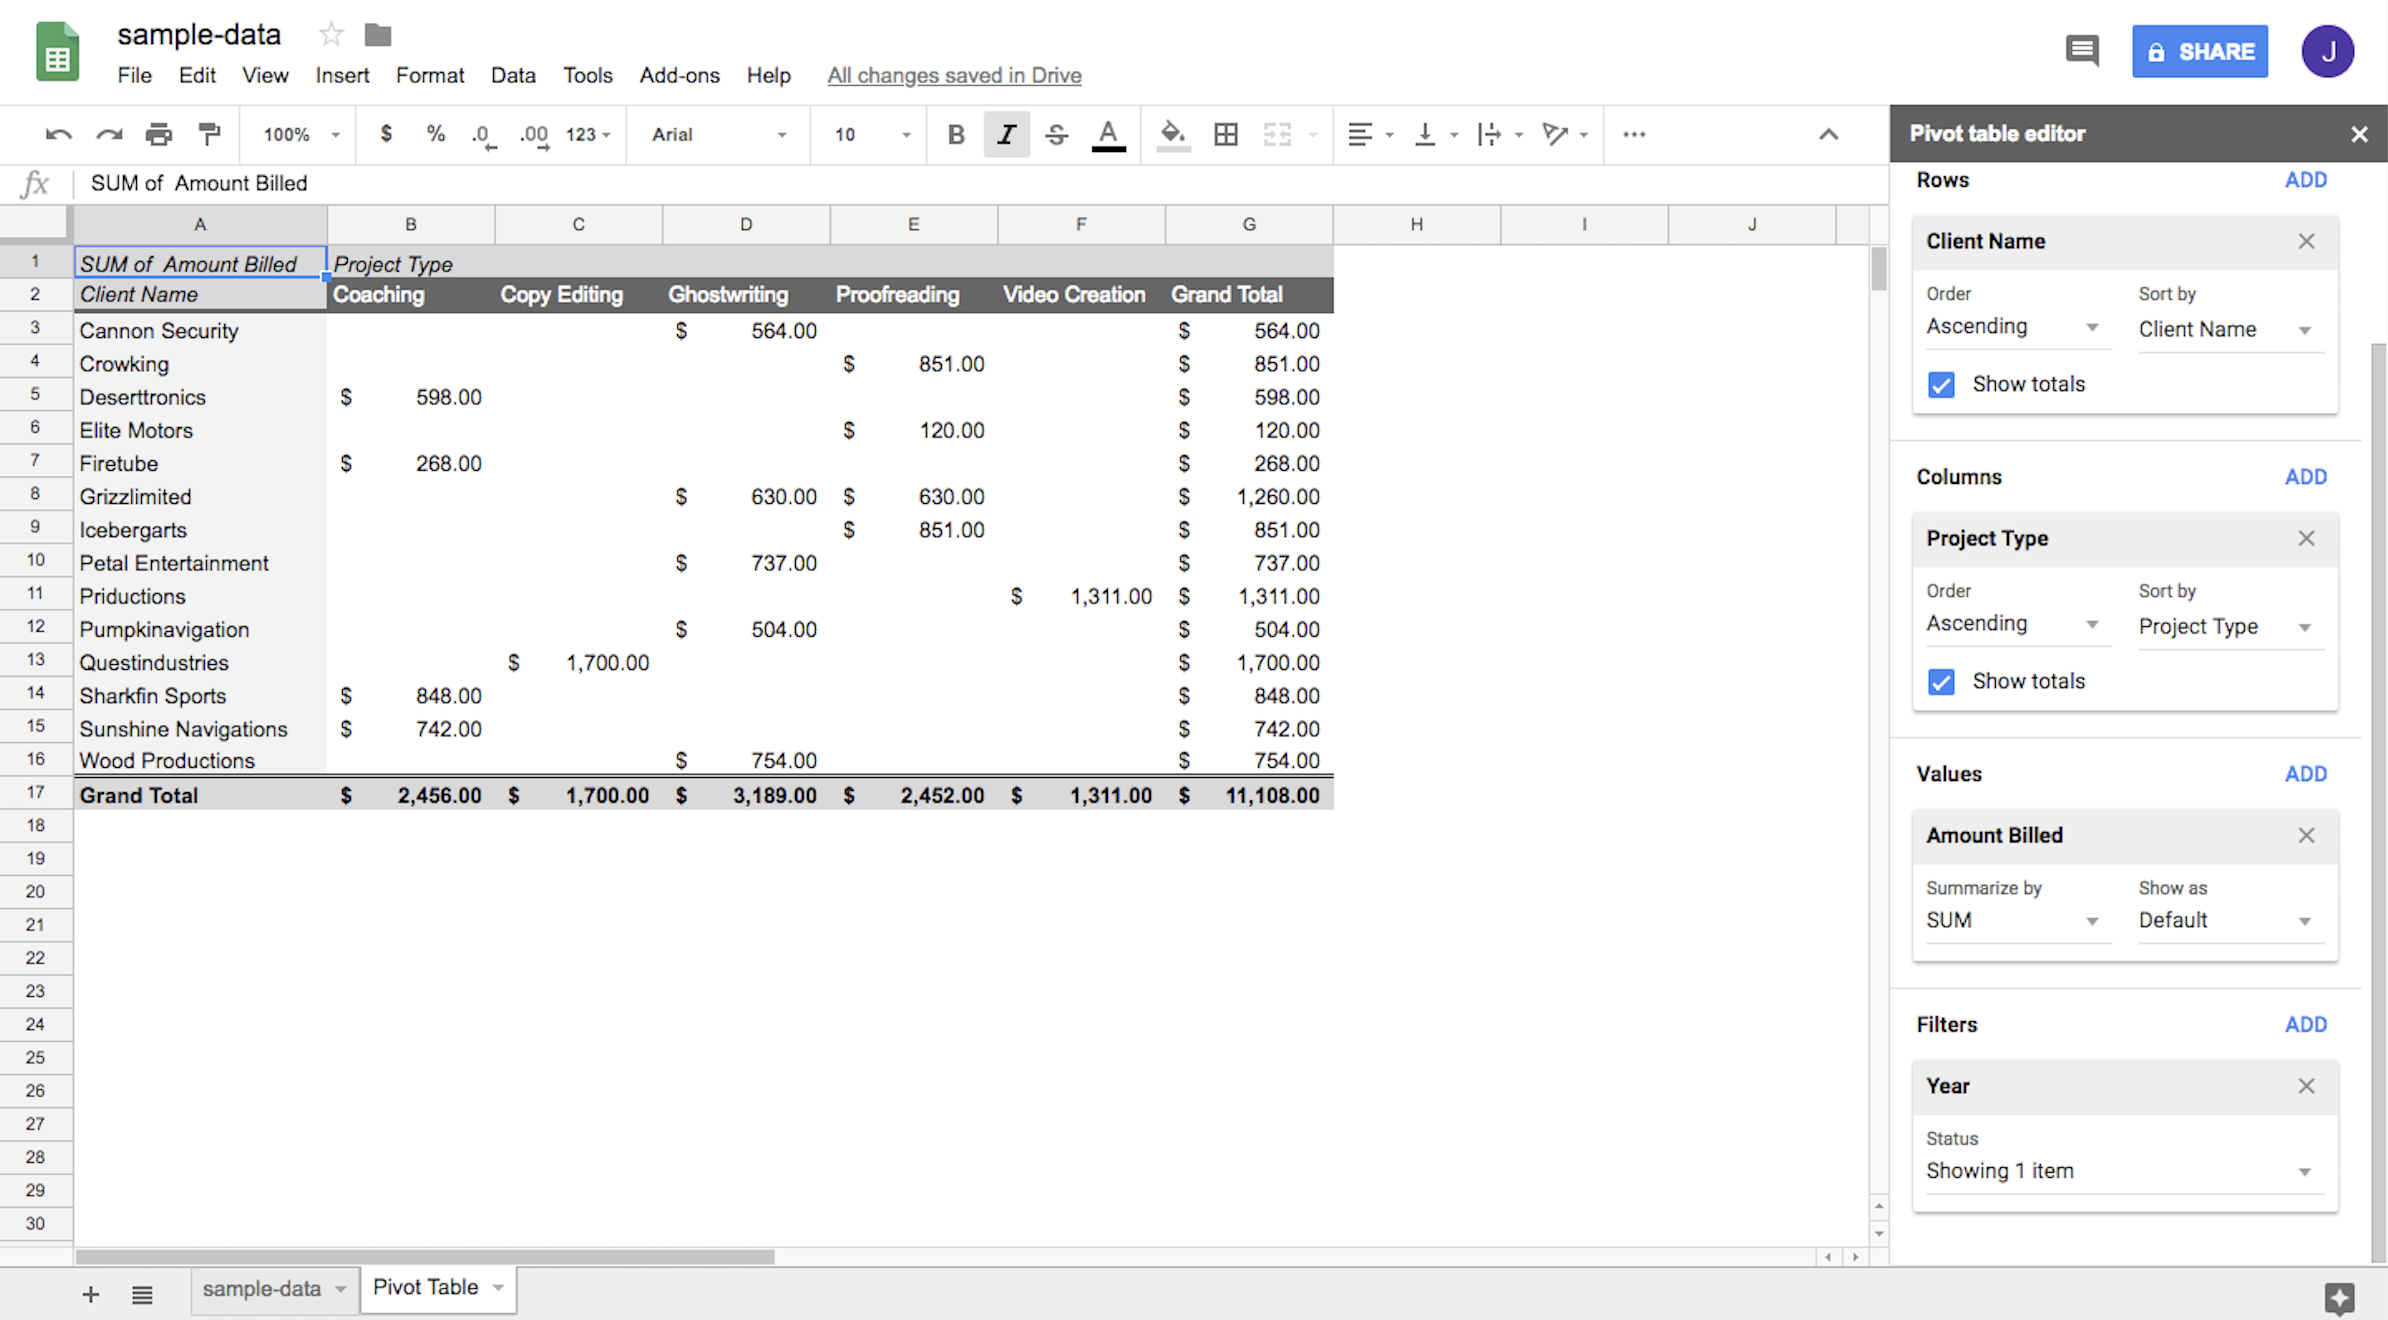
You should now be back to your original empty pivot table that you started off with. Here's the analysis we're looking to do:

For each of our clients, across different project types, how much did we bill in 2017?

In this case, we're looking for four things:

  • For each client
  • Across project types
  • Total amount billed
  • In 2017

As you night guess, each of those for pieces lines up with one of our elements: rows, columns, values, and filters.

  • Rows and columns help you build out the the two-dimensional data set on which you can calculate your third dimension values. In this instance, our base data is Client Name (row) and Project Type (column).

  • The value we want to get in the cells where Client Name and Project Type meet is Total Amount Billed.

  • How do we show data from only 2017? That's where the filter comes in. The filter allows you to analyze only a specific subset of data.

Click on "Add" for any one of those four options, and you'll get a dropdown with the column names from your original data sheet. If you click on one of those column names, the data will be added in the given format.

Build the report

Now let's get to actually building this thing. Remember, here's the question we're asking:

For each of our clients, across different project types, how much did we bill in 2017?

Step 1: Add rows

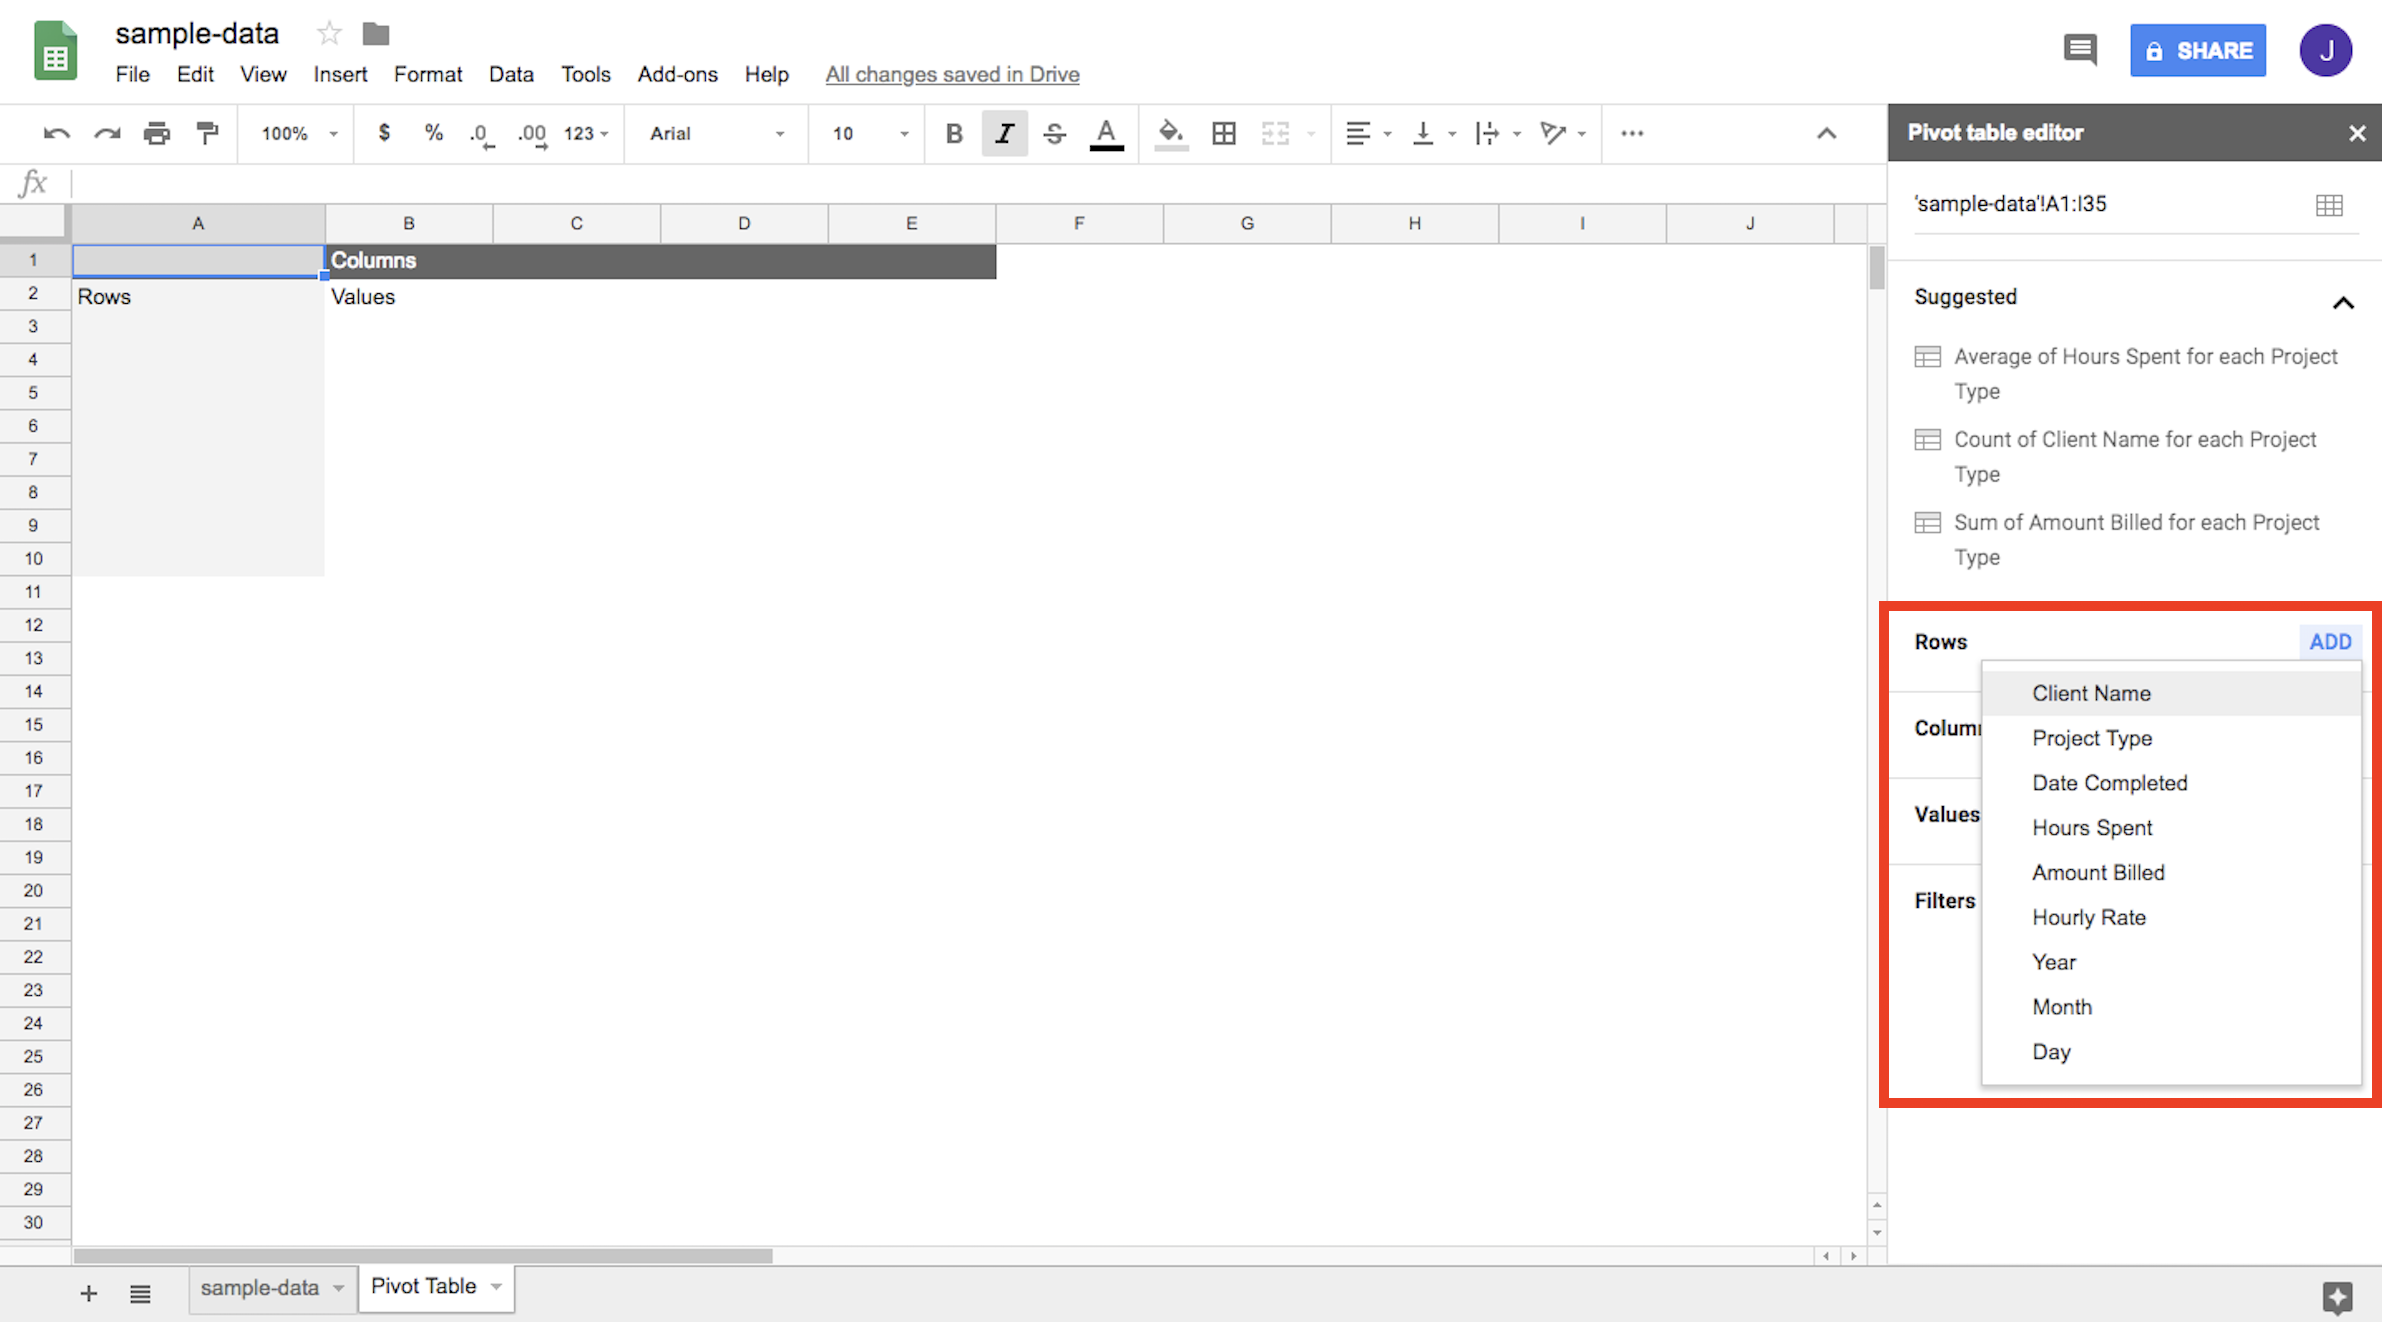
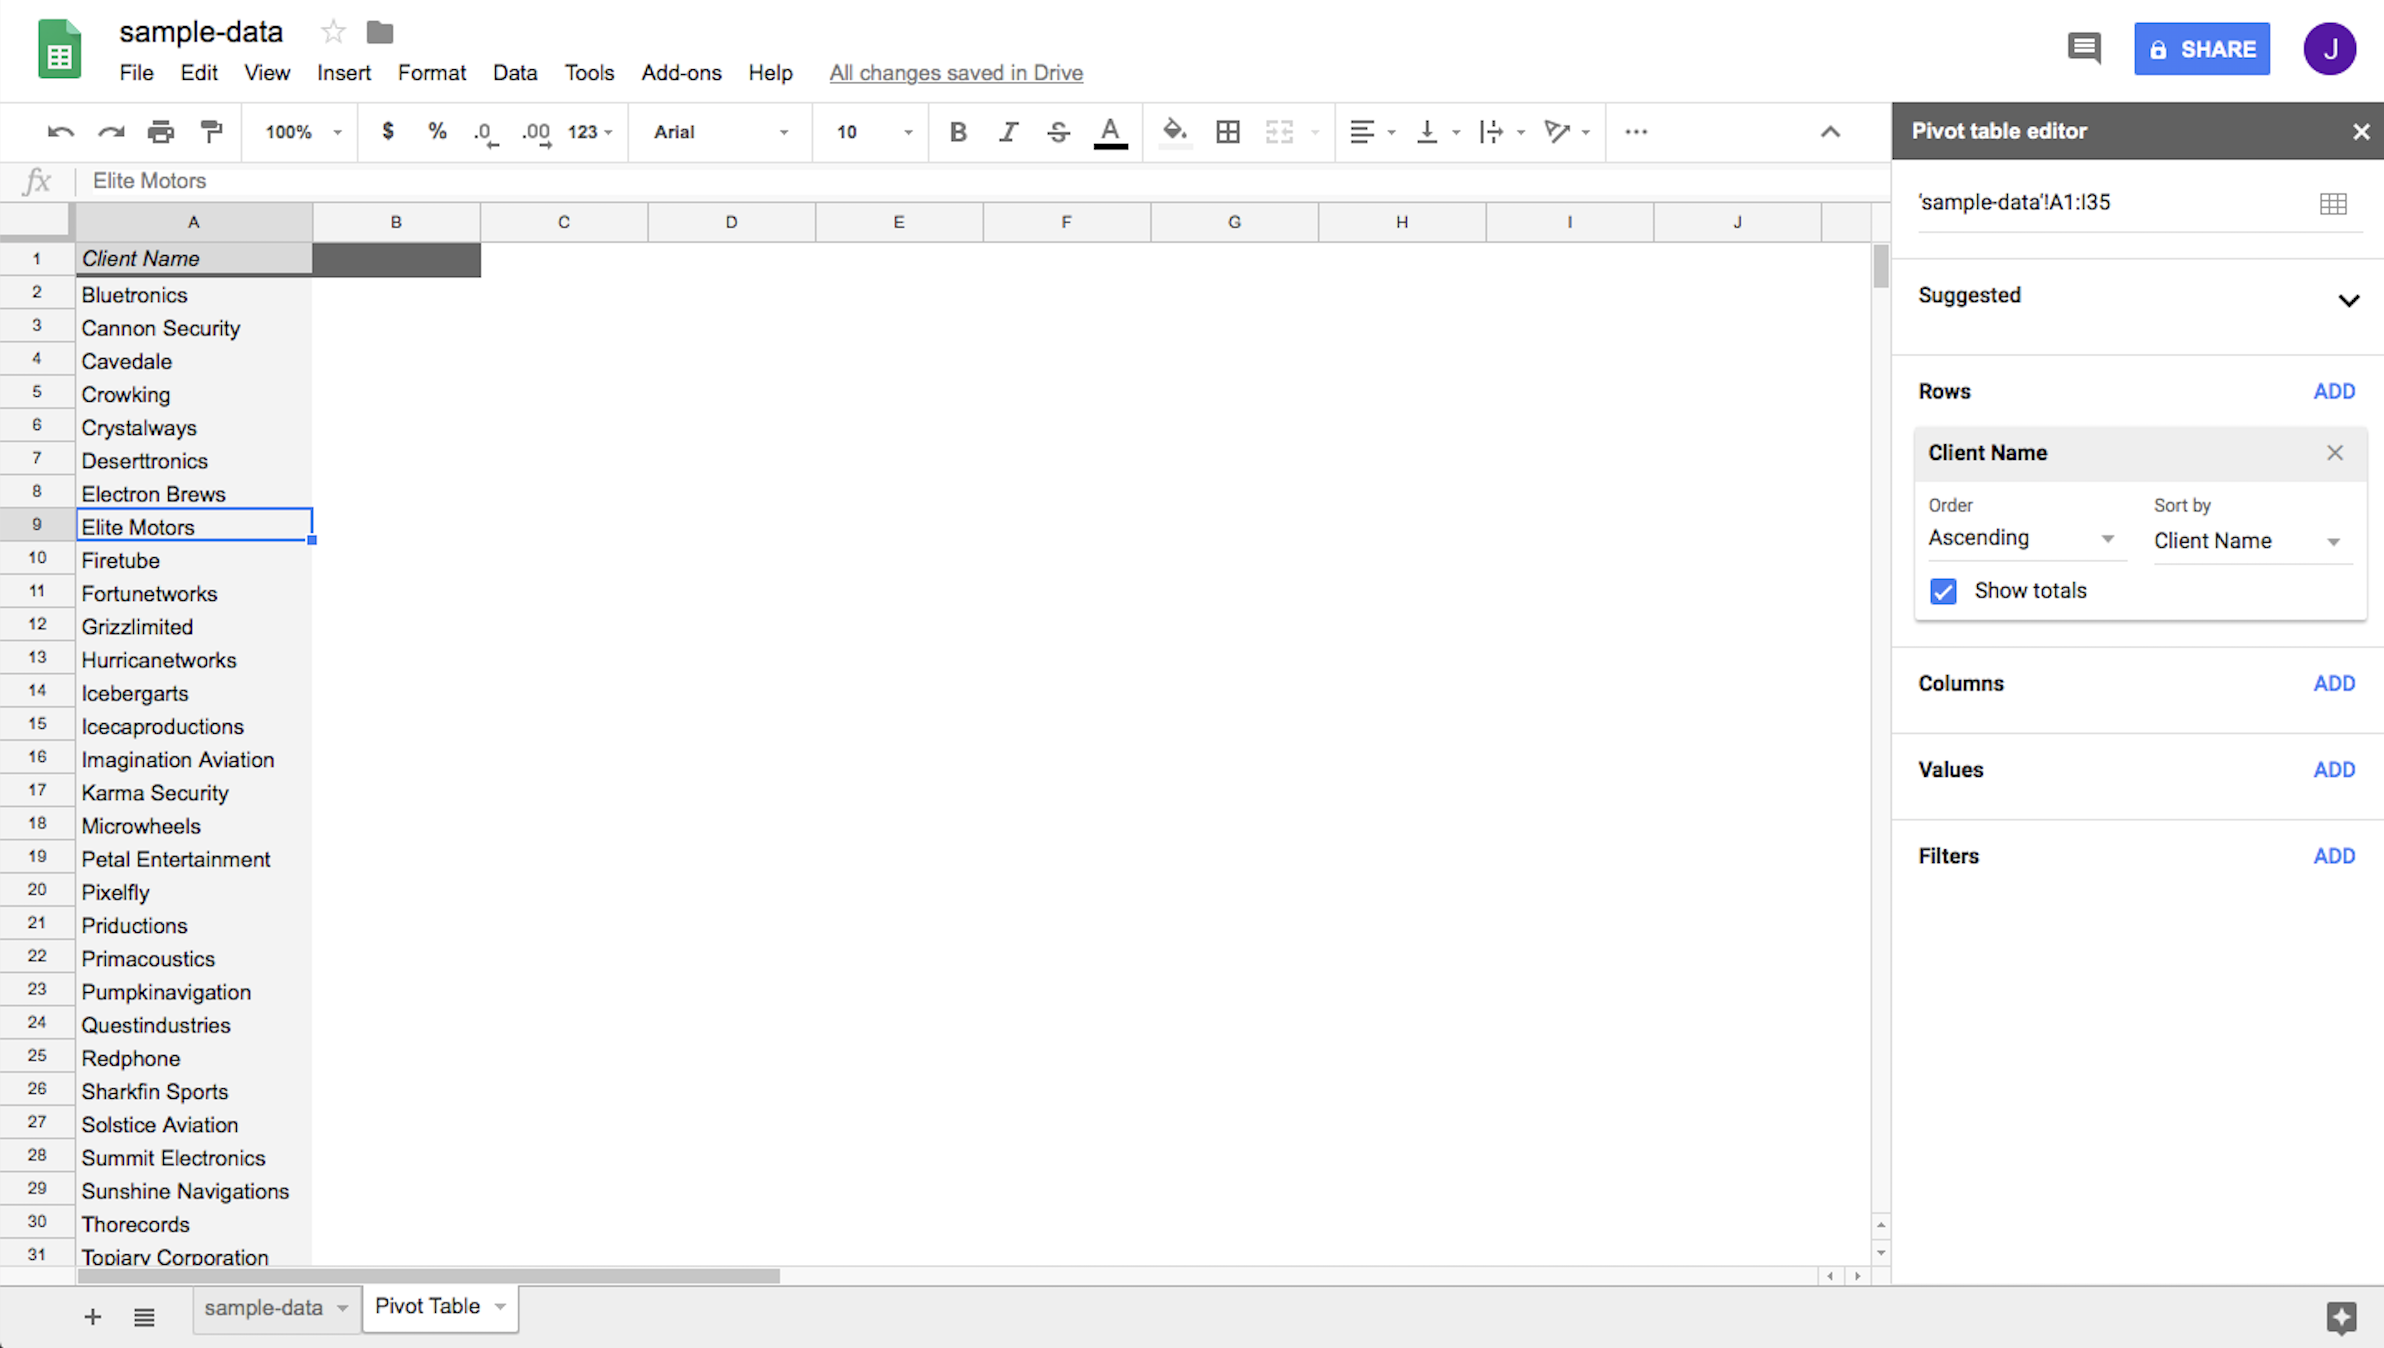
First, we need to set up our table to have both the list of clients and project types. Click on Add next to Rows, and select the Client Name column to pull data from.

Under Rows, select Add and then Client Name

As the selections imply, you'll now see all your clients' names as rows in your pivot table.

Client names as rows in the pivot table

It took the selected portion of the original data, removed any duplicates, and it's now showing you the data in an easy-to-digest report. Column A now has a unique list of clients in alphabetical order (A-Z) by default.

Of course, all you've done so far is add an existing column into your pivot table. You'll need to add more data if you really want to get value from your report.

Step 2: Add columns

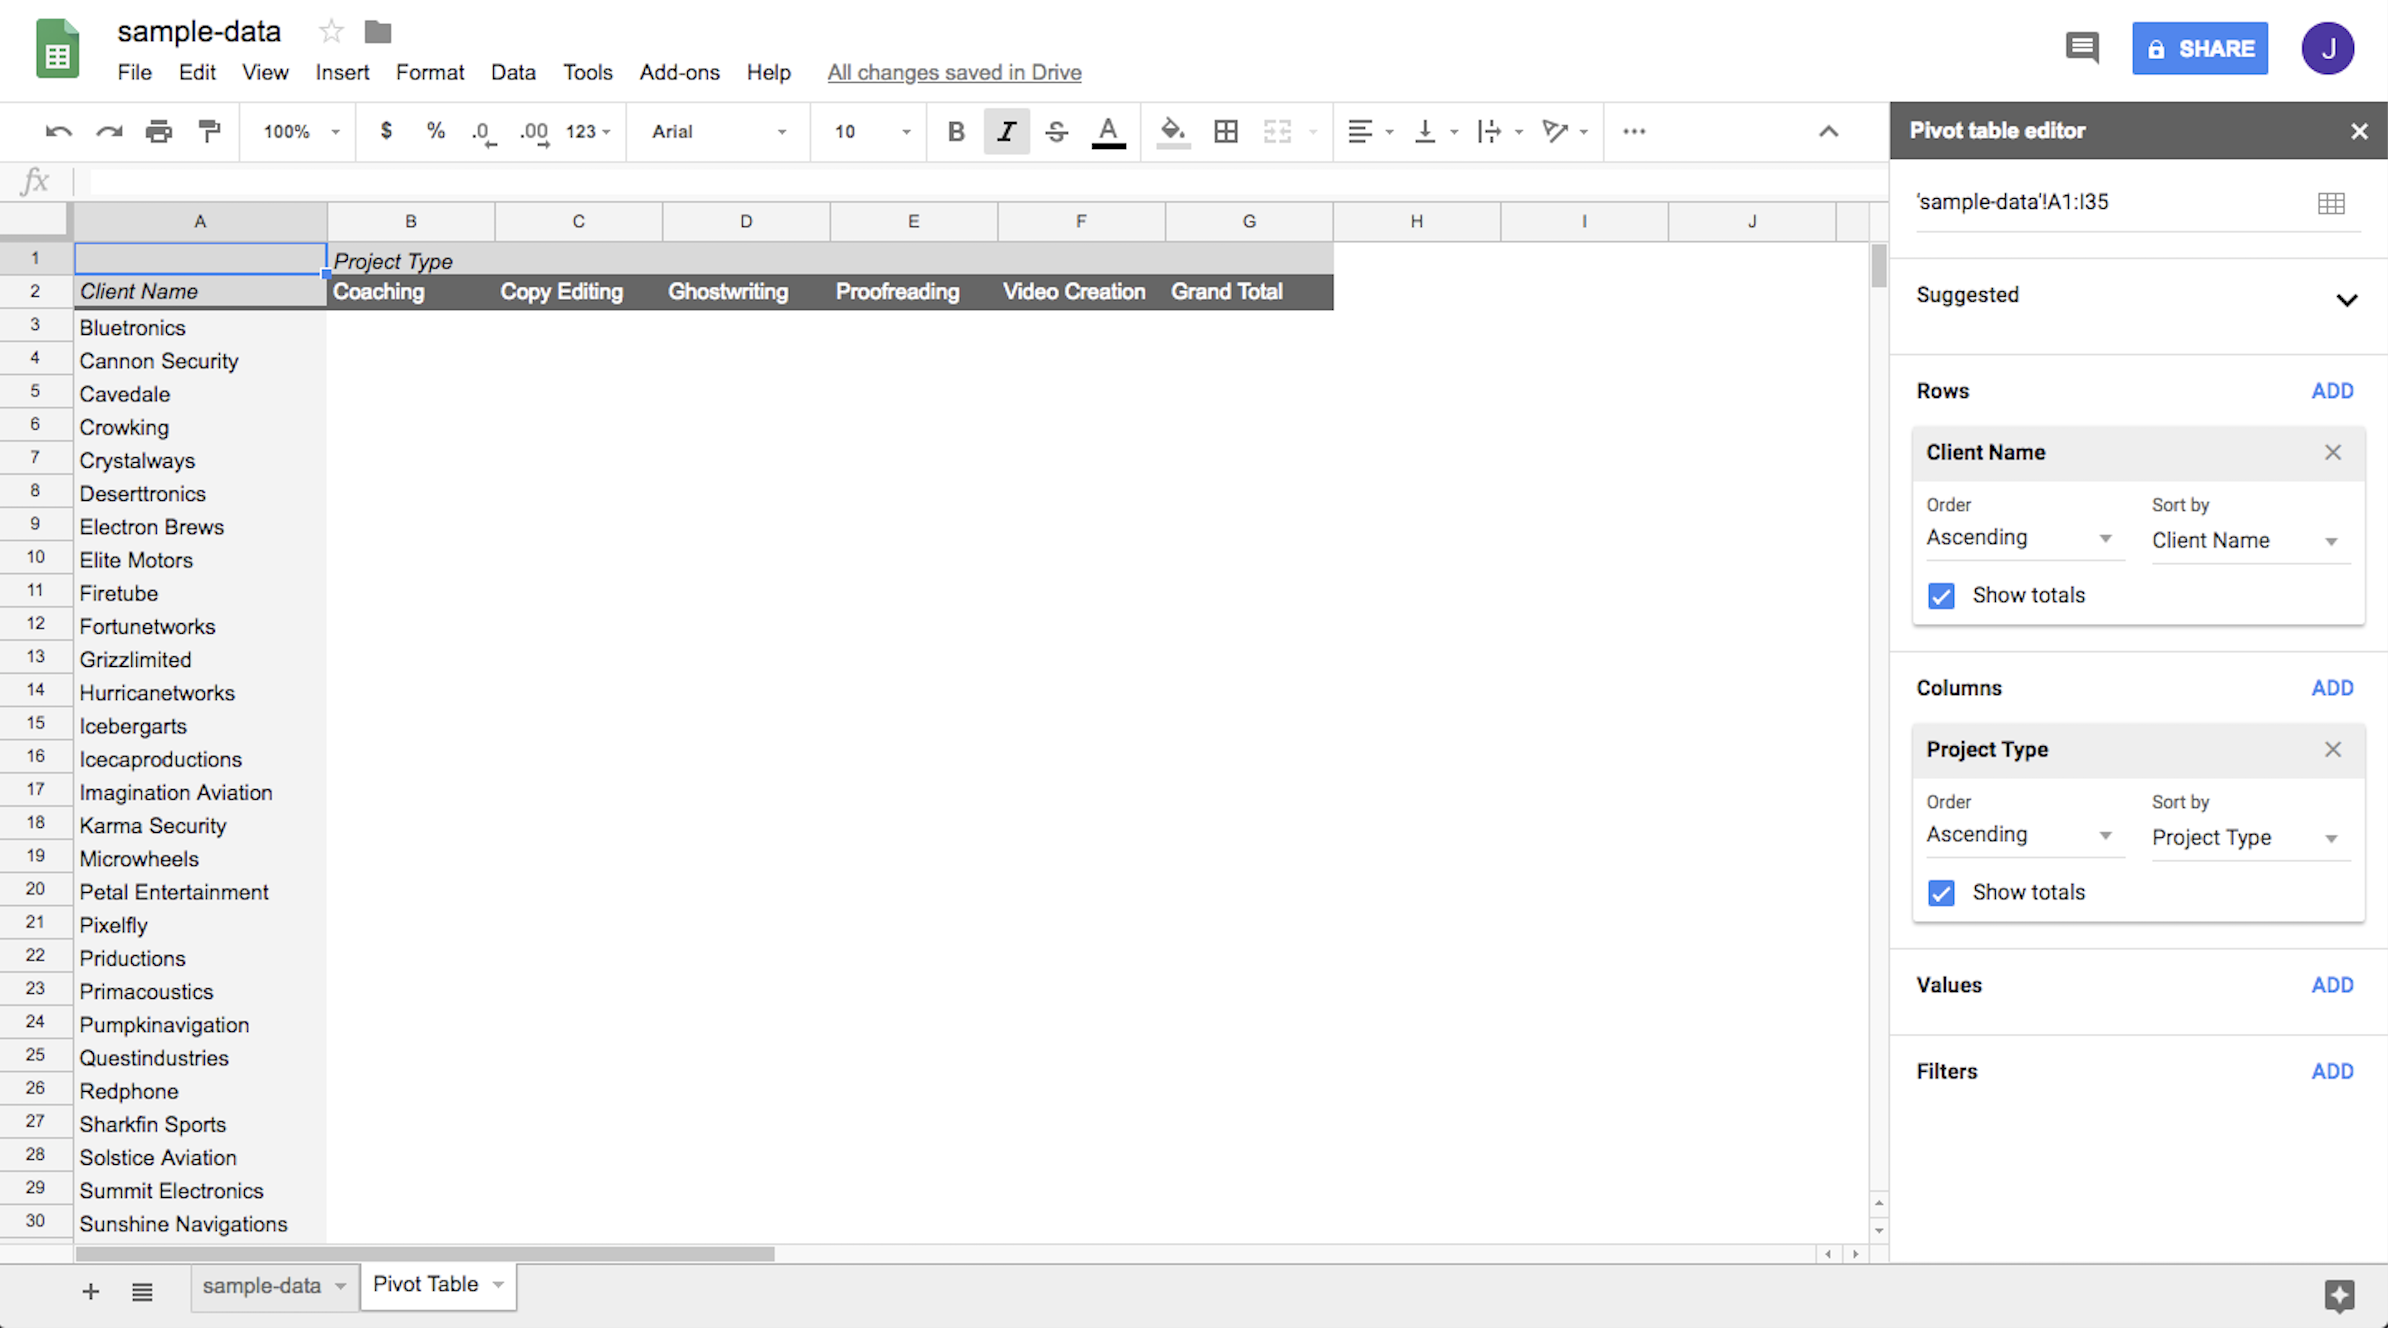
The next step is adding Project Type as the columns. In the pivot table editor, click on Add next to Columns, and select Project Type. Here's the result:

Adding project type as a column into the pivot table

Step 3: Add values

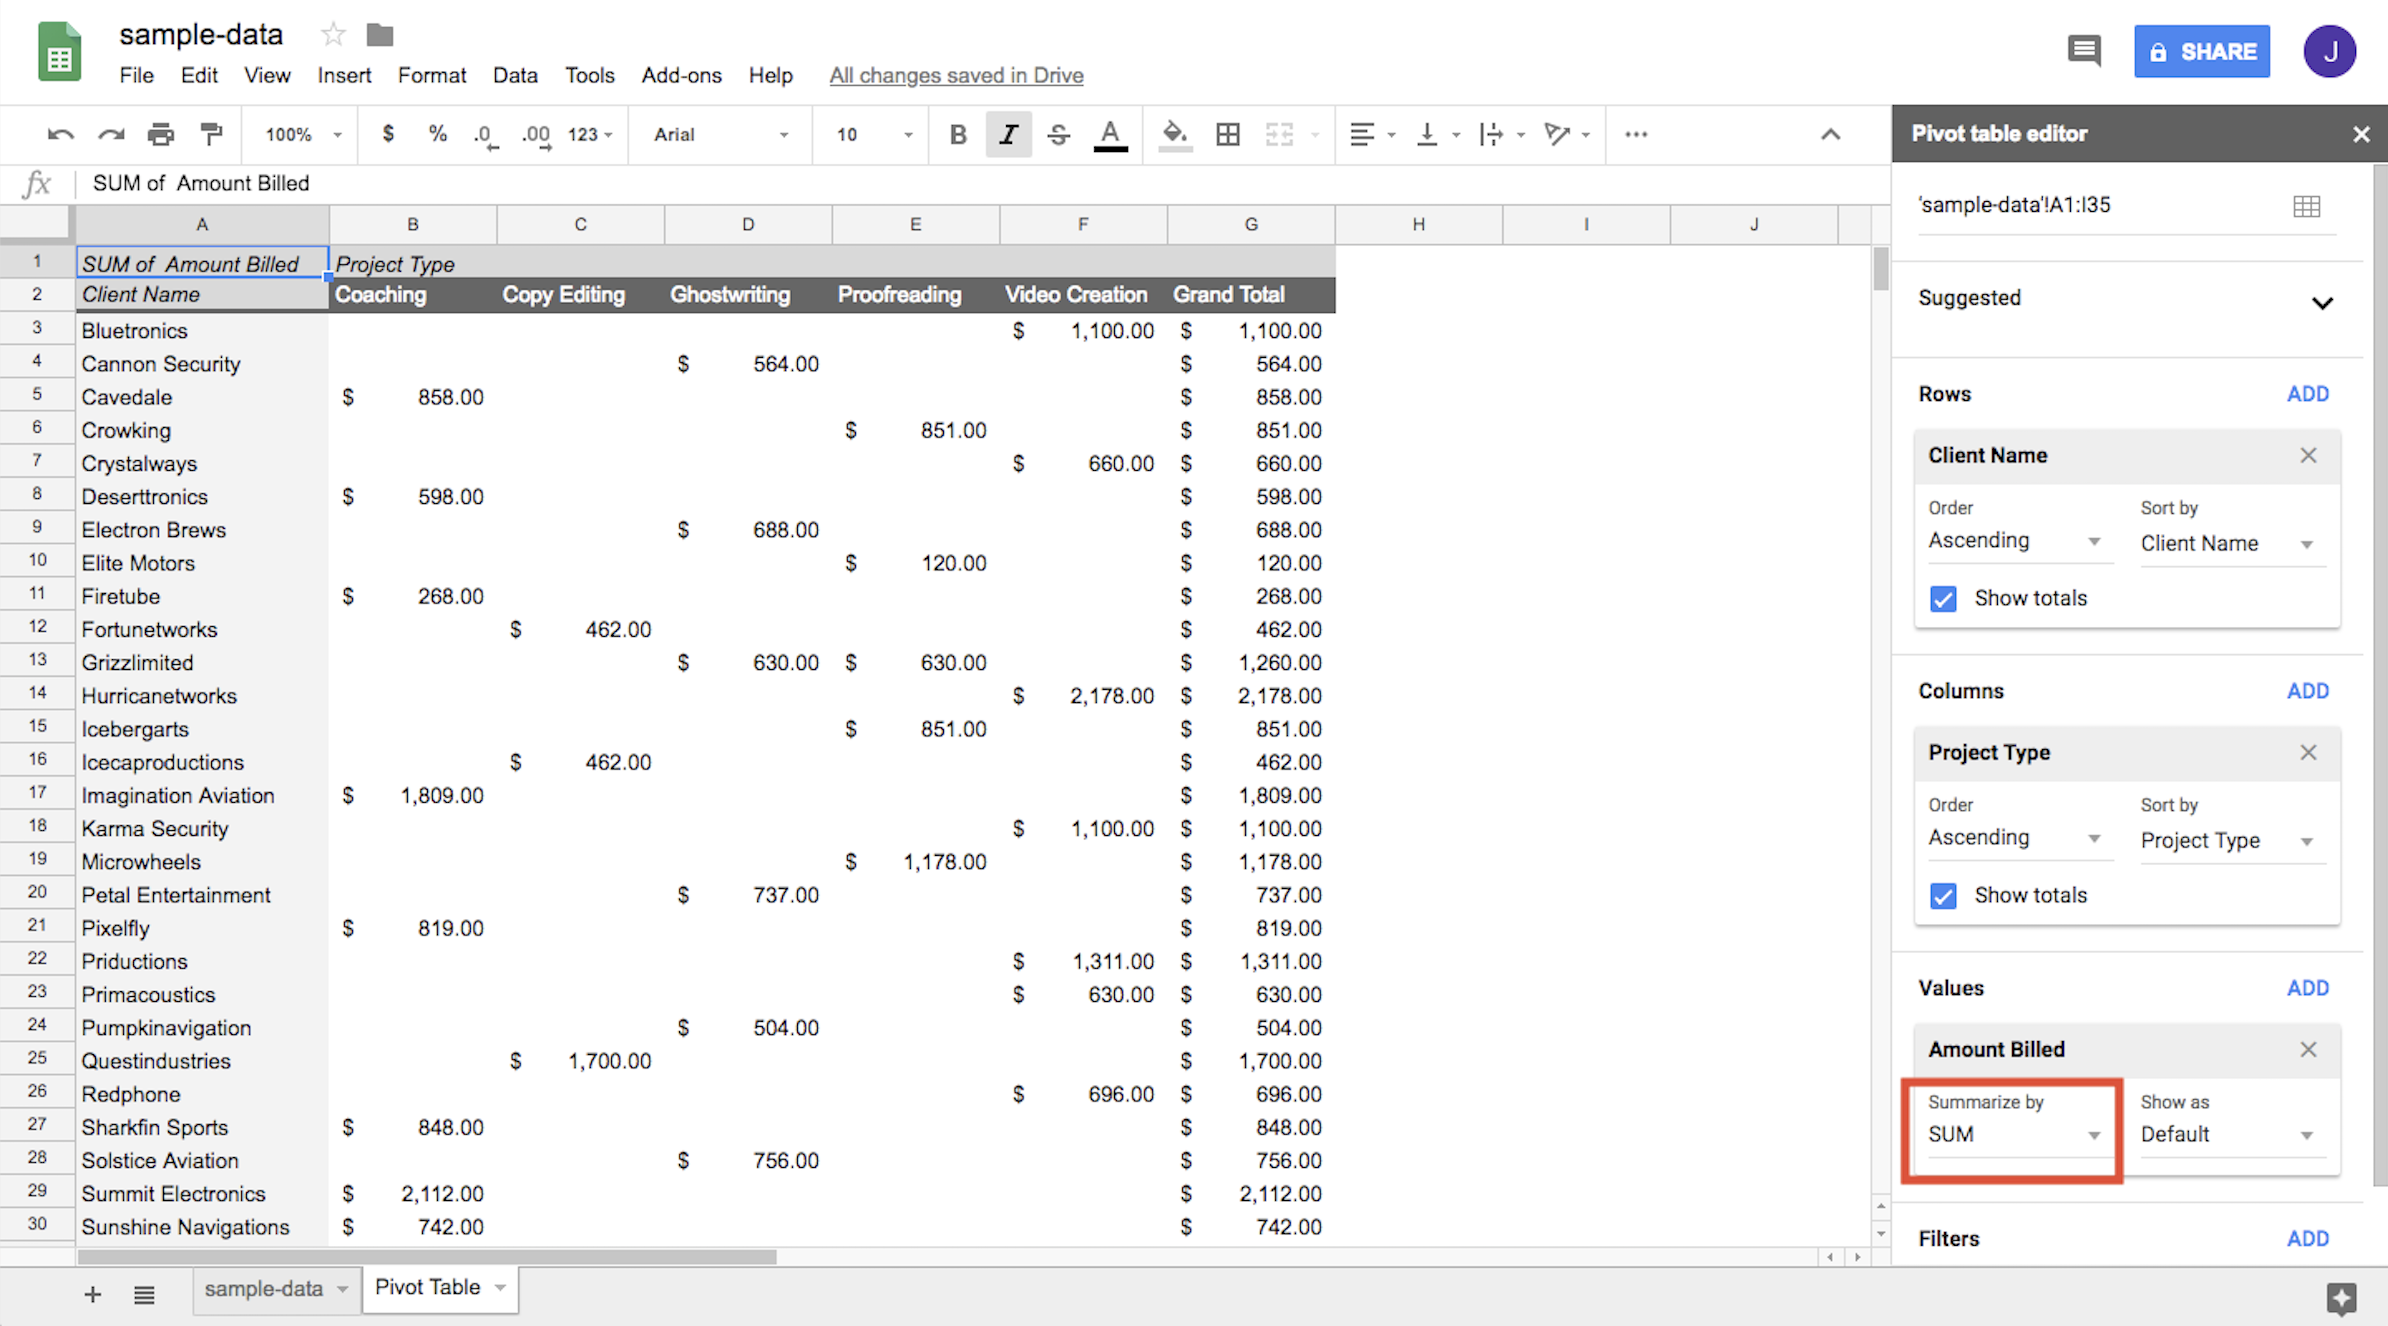
Now that we have our rows and columns, we'll need to bring in calculated values for each individual cell in the pivot table to see total amount billed. In the pivot table editor, click Add next to Values, and select Amount Billed.

To ensure you're seeing a total amount billed (versus, for example, the average amount billed), you'll head to the Summarize by field and select SUM.

Ensuring total amount billed is calculated by summarizing data as SUM

Now we have some useable information: the total amount billed for each type of project we've completed for a given client.

You'll also see that the "Grand Total" is added and calculated automatically. That allows us to see the total amount that we've billed to each client and the total amount that we've billed for a given project type across all clients.

Step 4: Add filters

You can already see the power of the pivot table, but what we've created still doesn't answer our question: we still haven't filtered the table to only show values for 2017.

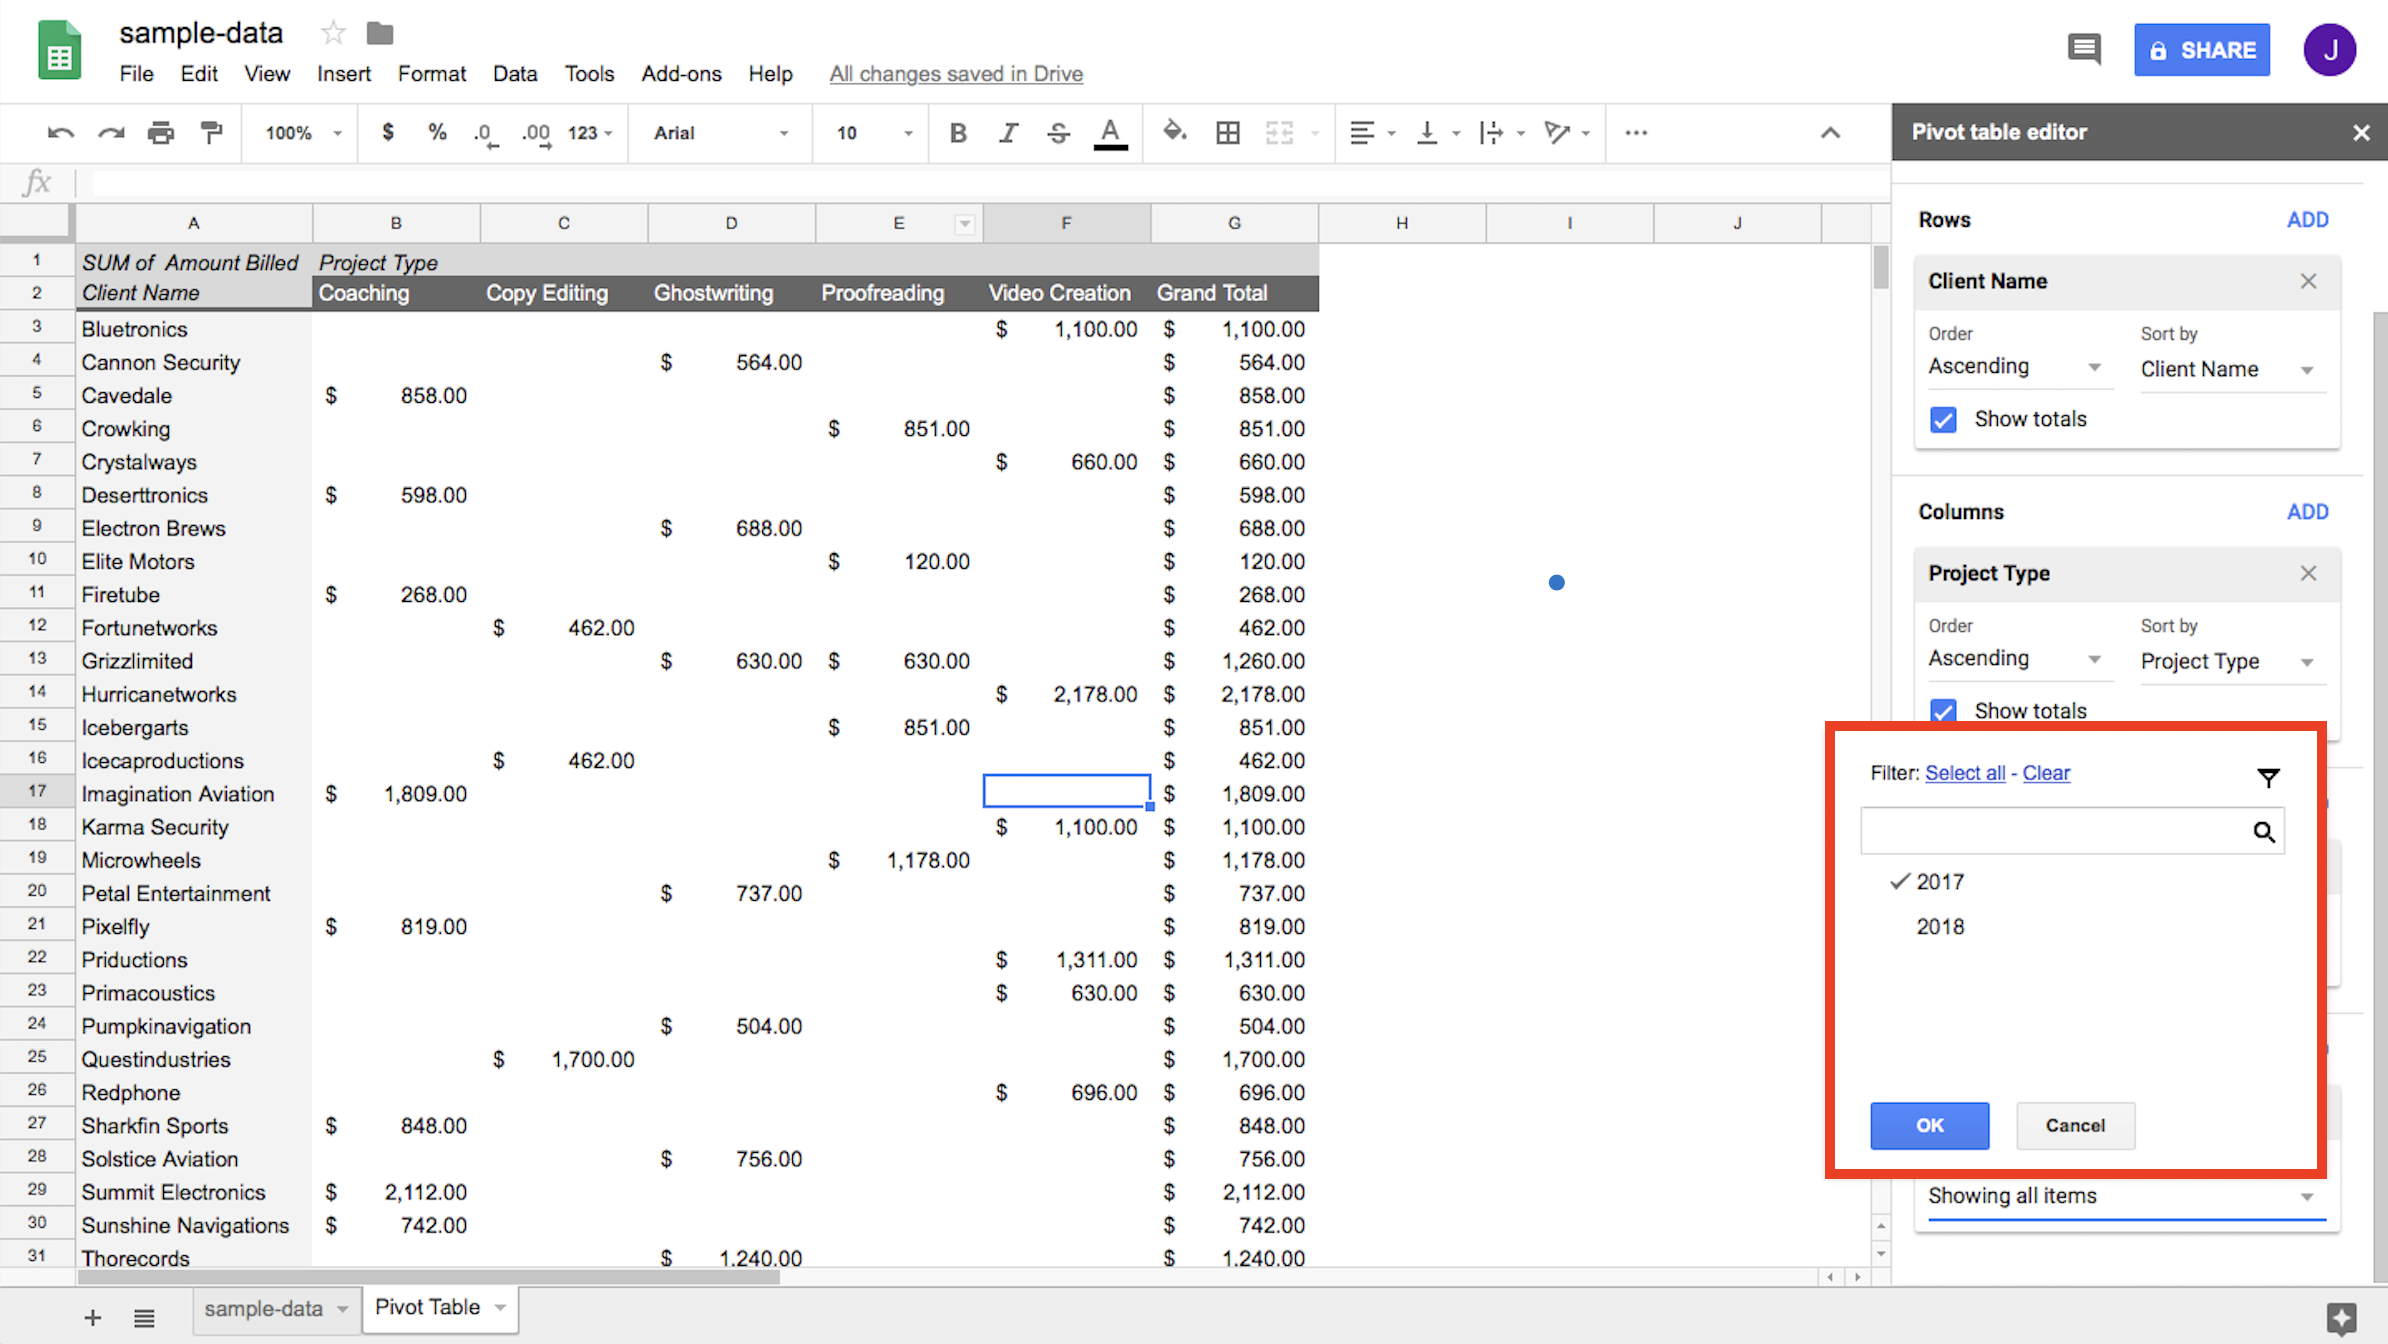
To do this, click Add next to the Filters option, and select Year. Both 2017 and 2018 (the two years in our original data set) will default to checked. Unselect 2018 and click OK to update the table so it only shows data from 2017.

Adding 2017 as a Filter on the data set

And that's that. You now have a pivot table table answering the question:

For each of our clients, across different project types, how much did we bill in 2017?

Pivot table illustrating for each client, across different project types, total amount billed in 2017

Read the pivot table

With all of the information we want right in front of us, we can now answer almost any question we have about the data. To solidify our understanding of using pivot tables in Google Sheets, we'll walk through two more examples.

Which client did we bill the most in 2017?

To answer this question, we'll need to simplify our report: We just need the names of our clients as rows and the sum of the amount billed to them as values.

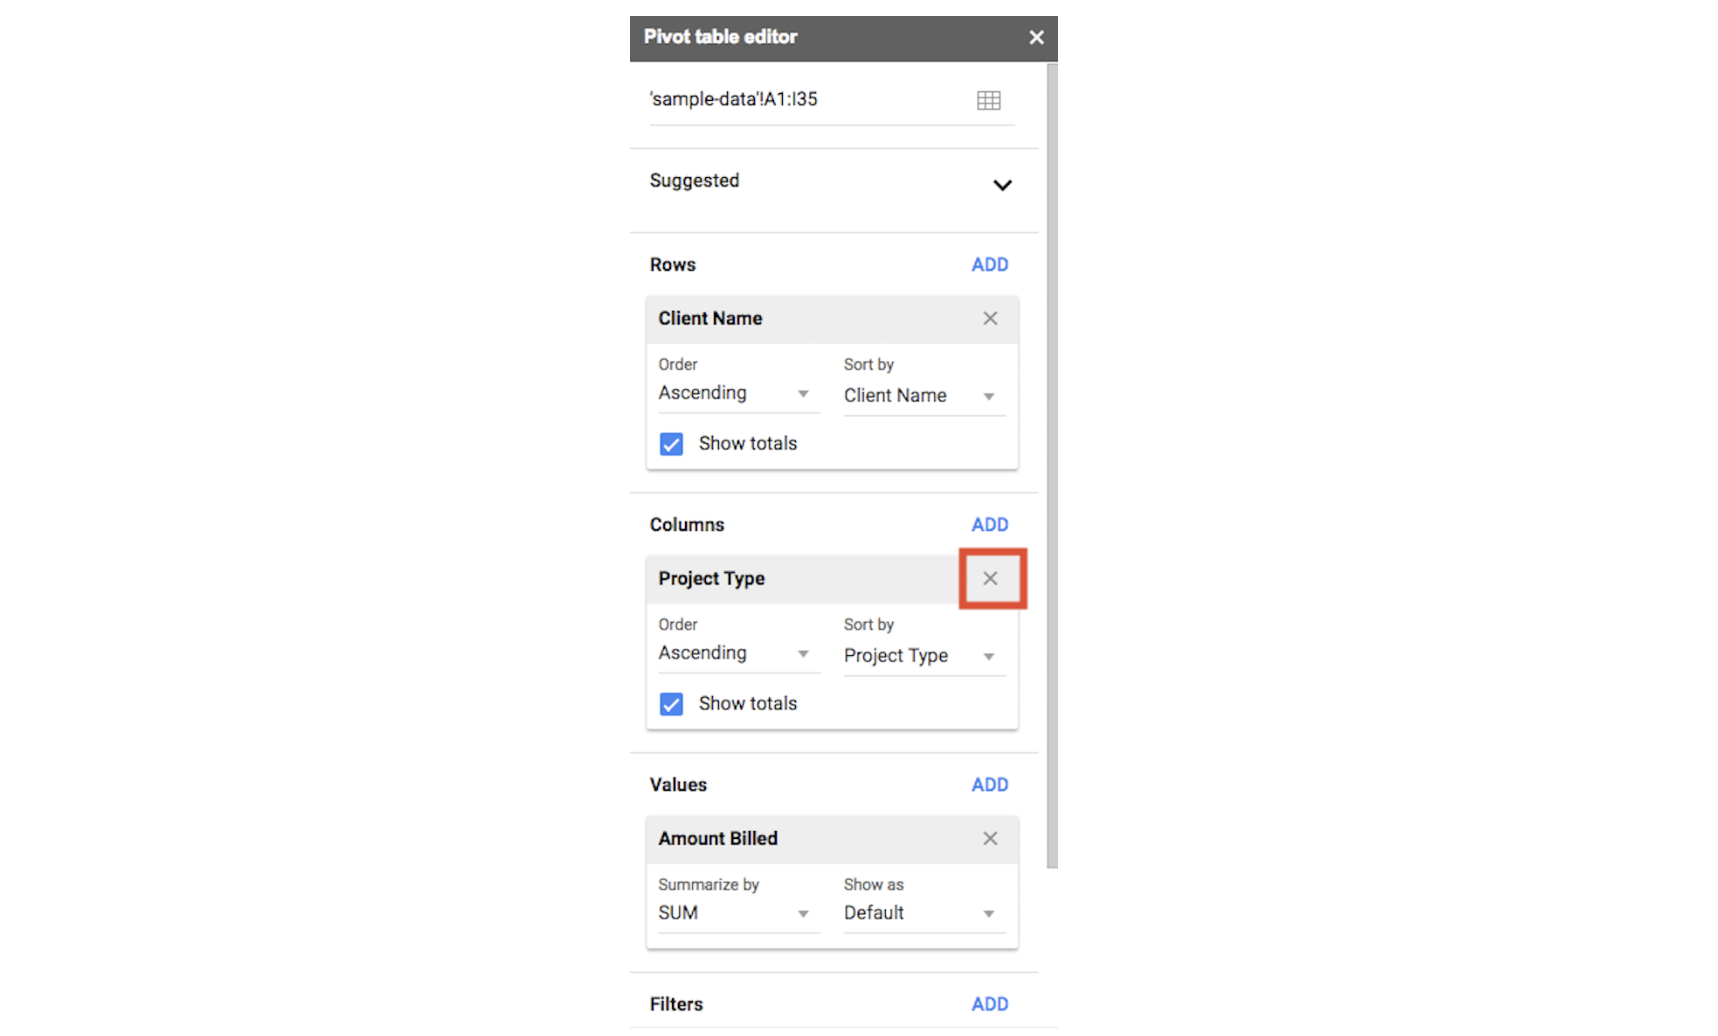
First, you'll need to remove Project Type from the columns by clicking the top right X in the Columns section next to Project Type.

Clicking the X next to Project Type

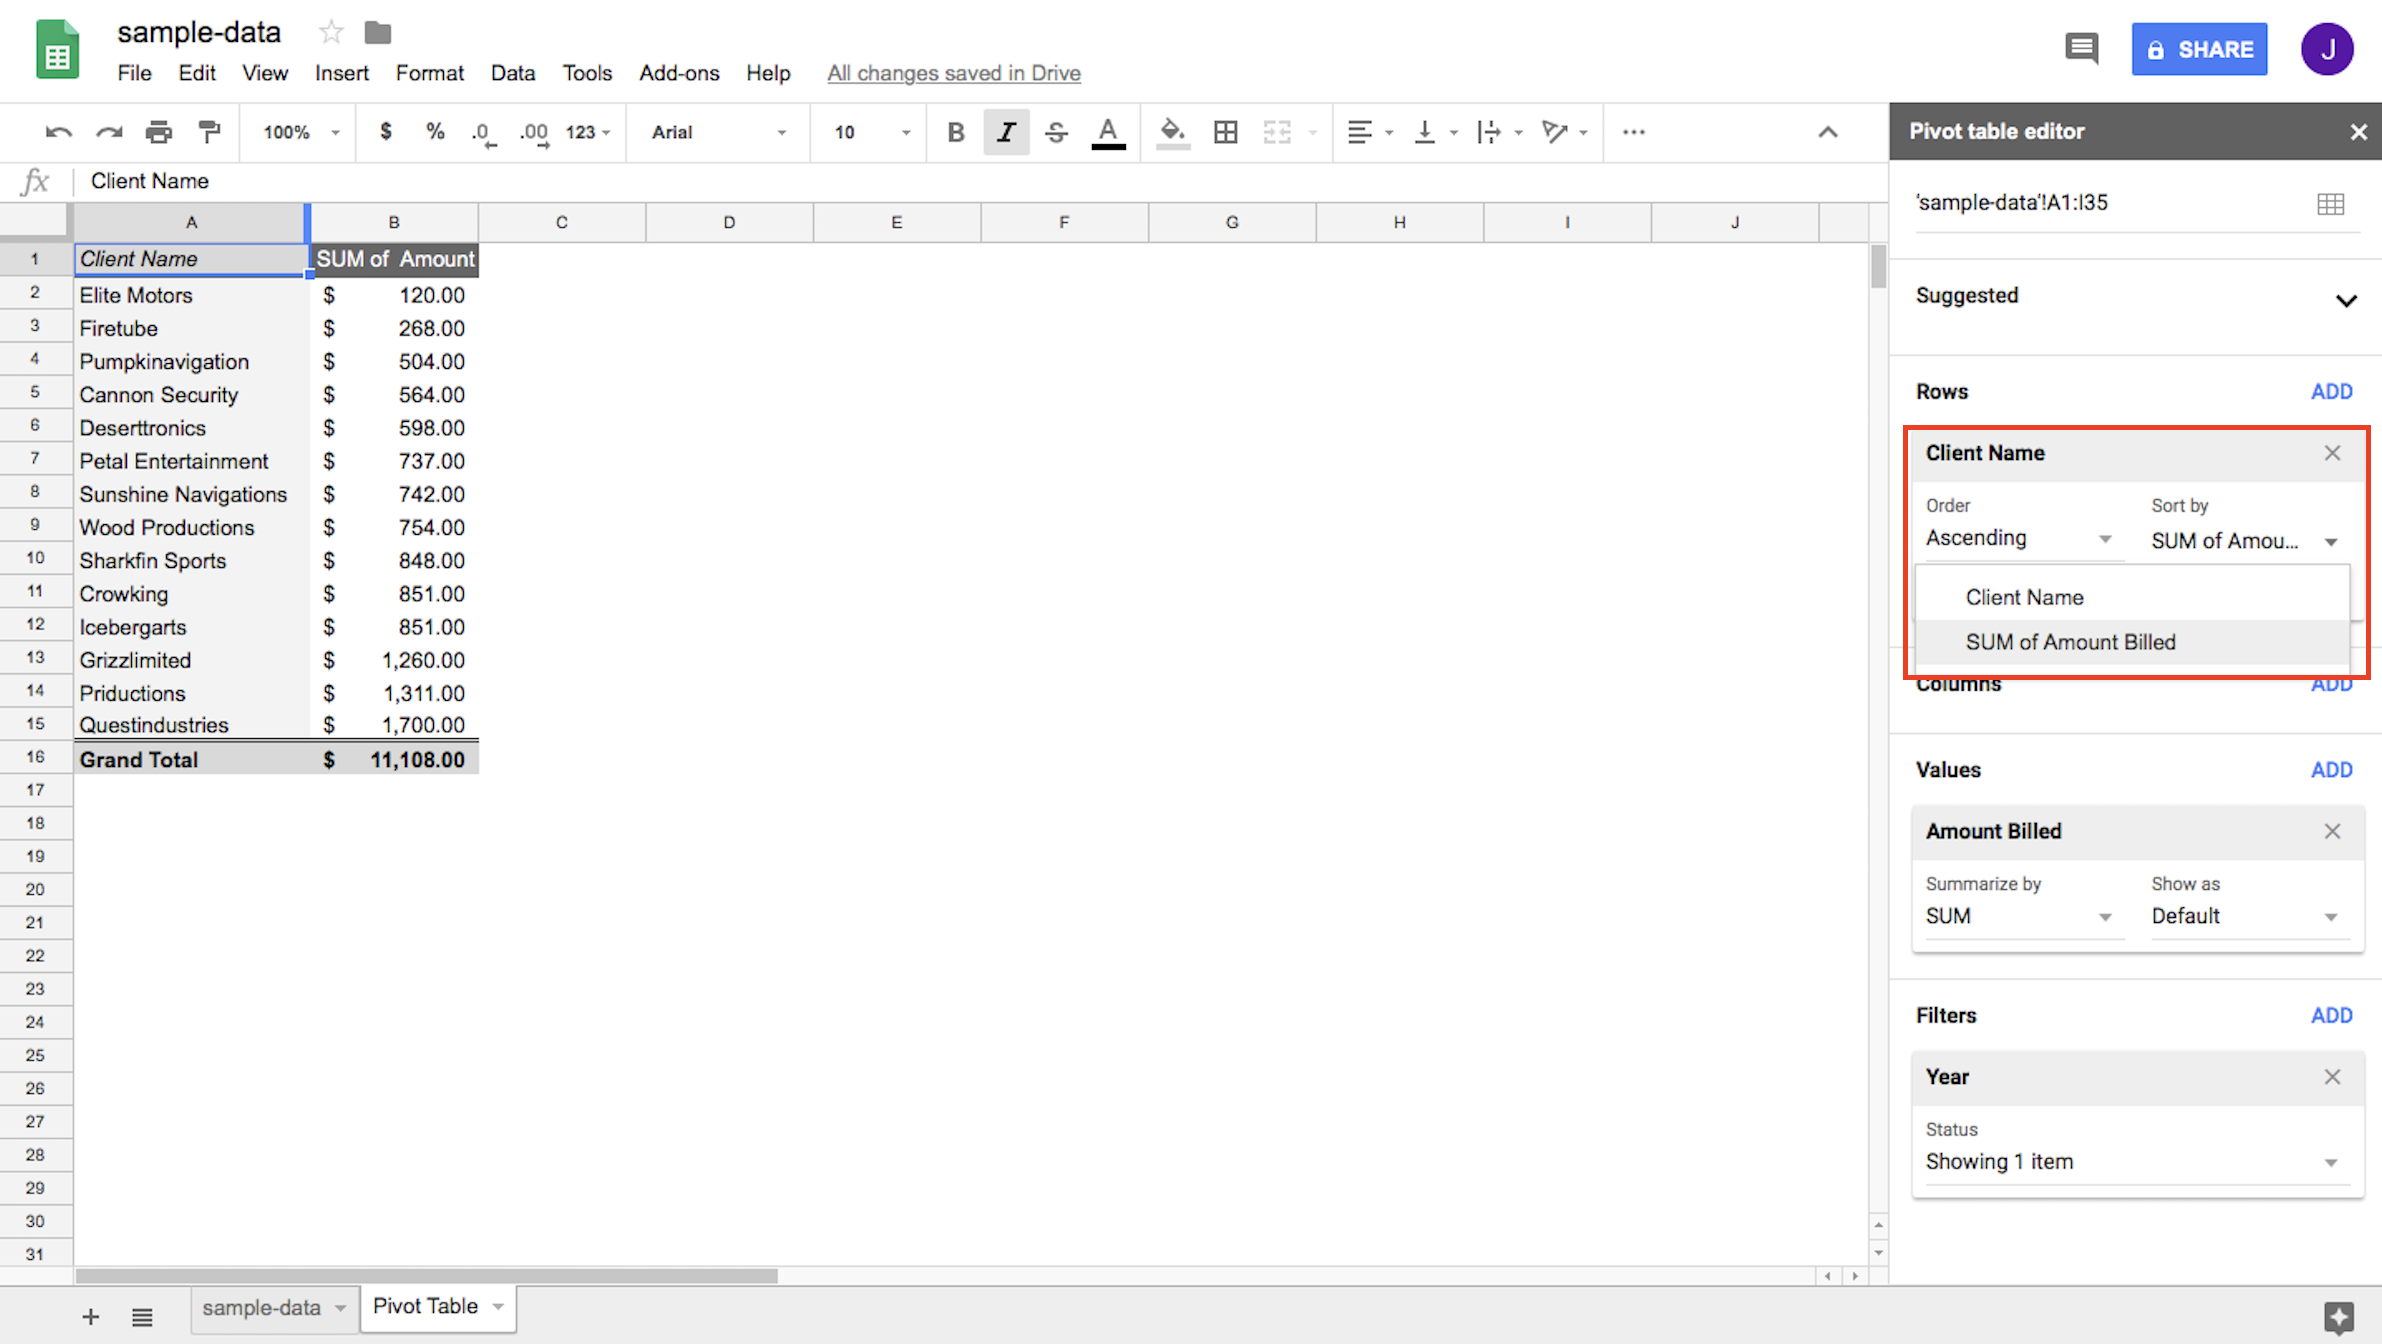
Next, under Client Name, select Sort by > SUM of amount billed, and the table will reorder itself to show you the data in ascending order.

Sorting by SUM of Amount Billed

Now we can answer our question: We billed sample company "Questindustries" the most in 2017, at $1,700.

Which project type had the highest hourly rate on average?

Here, we're going to shift our analysis from looking at the total amount billed to the highest average hourly rate for each project type.

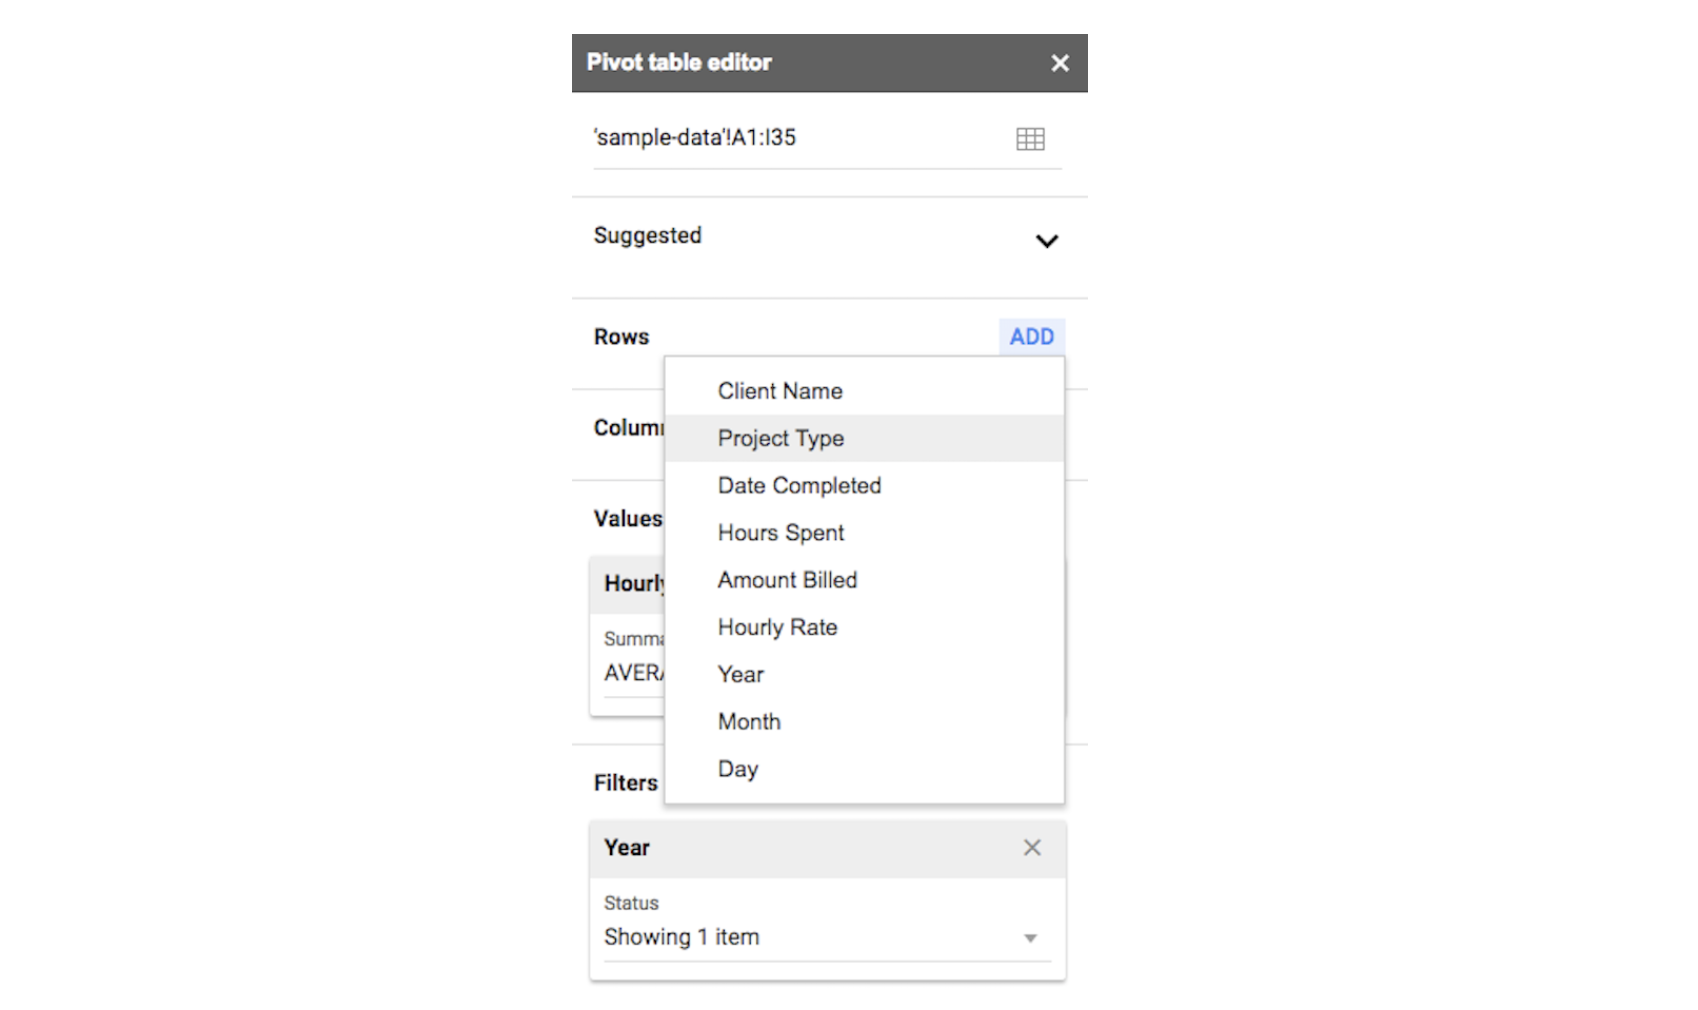
To do this, trade out Client Name for Project Type in the Rows section by clicking the top right X to clear your selection. Then select Project Type as your new rows value.

Replacing with Project Type in the Rows section

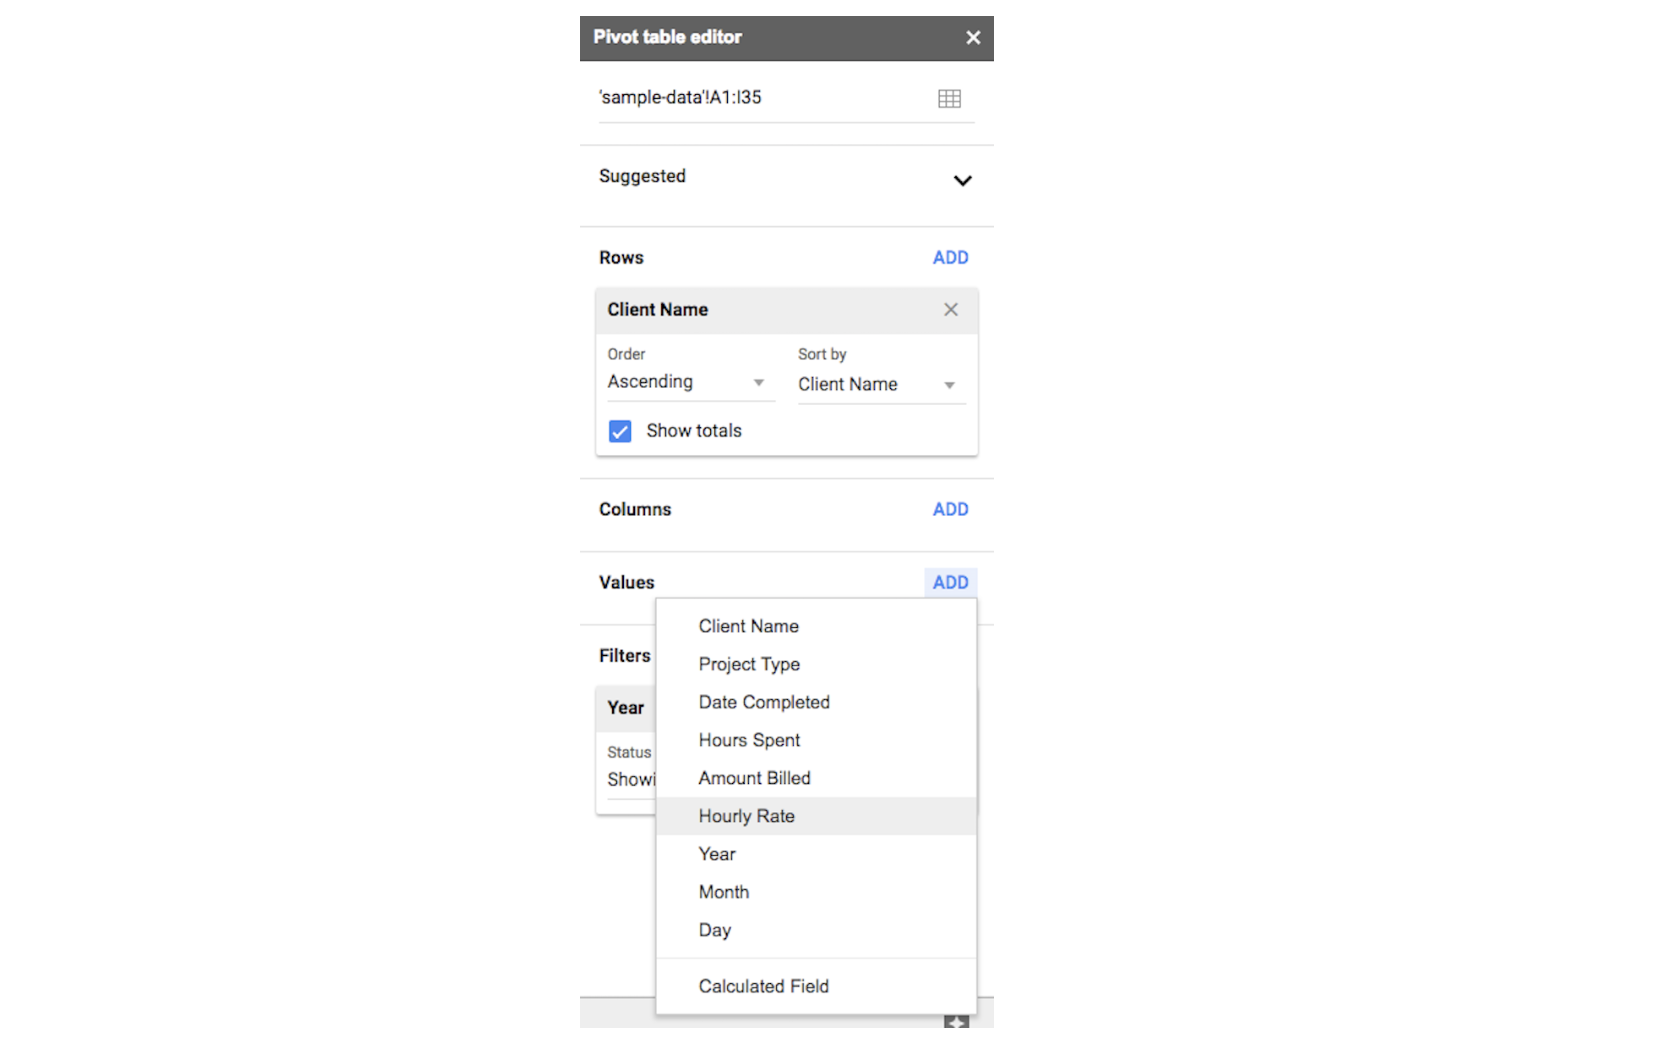
Then, in the Values section, remove Amount Billed and select Hourly Rate instead.

Replacing with Amount Billed with Hourly Rate in the Values section

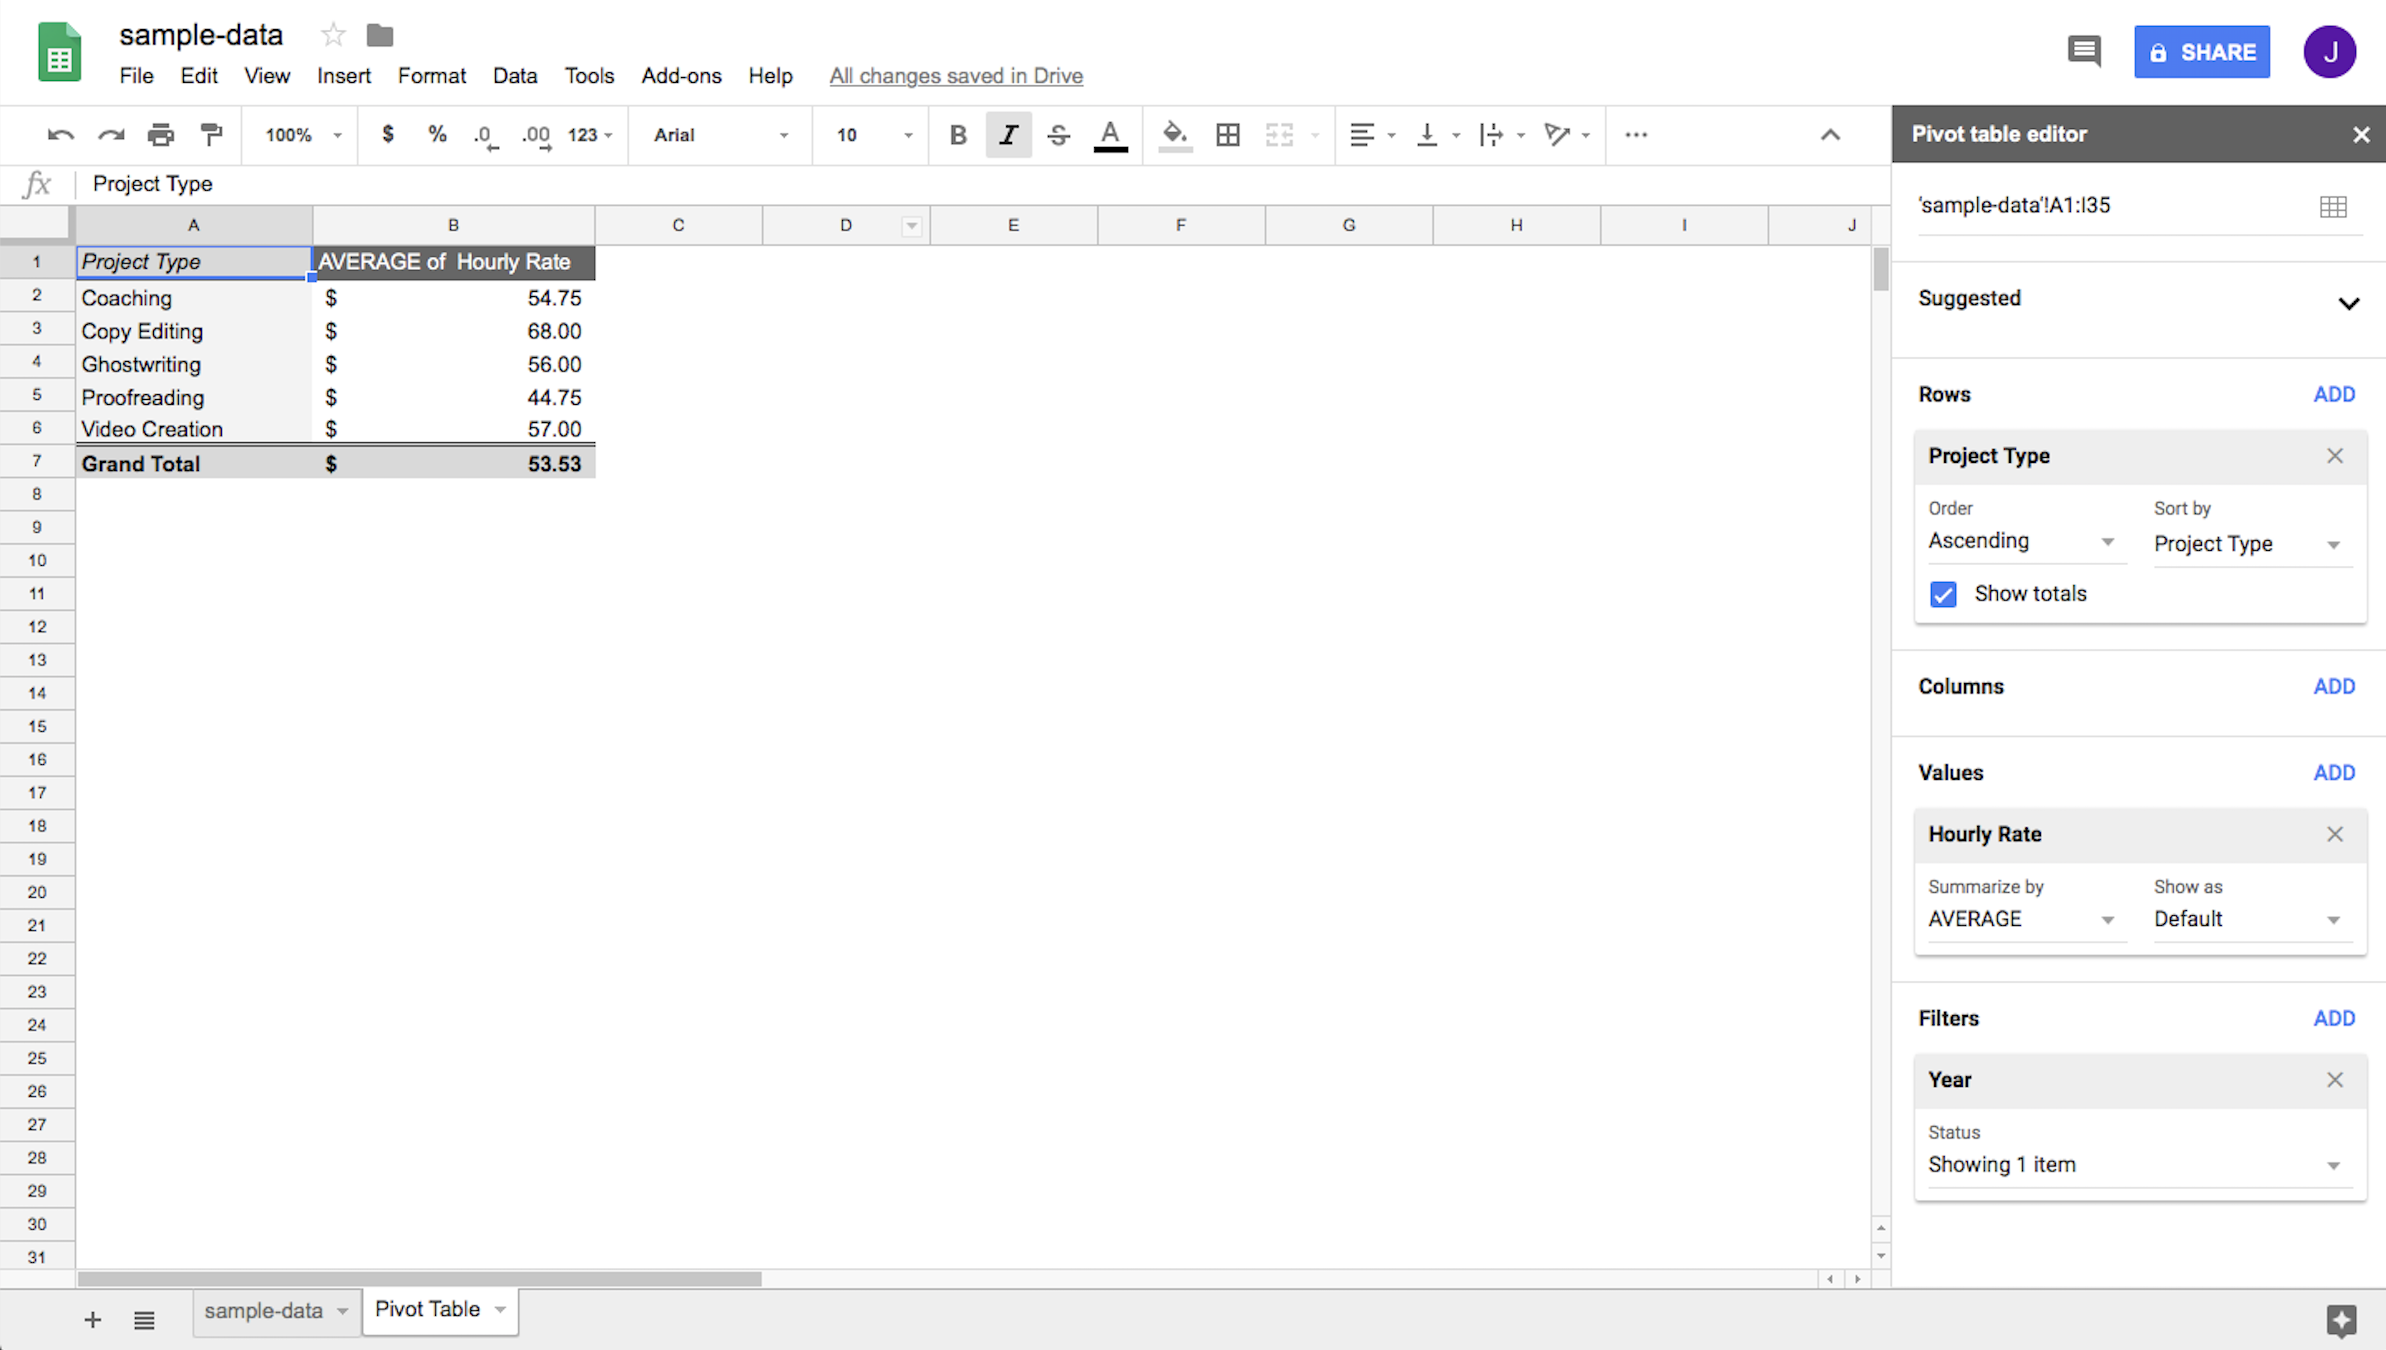
Then change the Values setting from SUM to AVERAGE in order to see the average amount billed, not the sum. You'll see that the highest average hourly rate we charged in 2017 was $68.00 for Copy Editing.

Replacing SUM with MAX in the Summarized by option with Values section

Why Use Google Sheets for Pivot Tables?

Zapier helps you get all of your company's data into Google Sheets without lifting a finger. Once you have all that data in one place, you need to analyze it—and now you can do that efficiently using pivot tables. With pivot tables in Google Sheets, you can unlock the potential of your data and distill the information for all stakeholders without using complicated formulas.

Once you've mastered the basics, try taking things to the next level. Use our sample spreadsheet to see what kinds of insights you can find with just a few clicks.


source https://zapier.com/blog/google-sheets-pivot-table/
Monday, 17 September 2018

The 10 Best Time Tracker Apps in 2018

People who track time spent working often do so because they need to create invoices for clients and get paid. Others track their time to have an accounting of how long different tasks take or to make sure that a flat-rate project doesn't cost more money to complete than it brings in. Regardless of why you record your time, running a time tracking app while your tasks are in progress is the most accurate way to do it.

After considering more than 40 apps, we found the 10 best time trackers for freelancers and small businesses—although you can also use these for personal time tracking as well. Here's a summary, with more information below about how we picked them and details about what makes each app shine.

What Makes a Great Time Tracking App?

Tracking time as you work results in more accurate invoices than estimating time worked after the fact. Having a higher degree of accuracy creates trust for your clients, too, but it also benefits the business. When you know how you spend your time with high accuracy, you can analyze it and make smarter business decisions as a result. There are several excellent apps that can help you get started.

Nearly all time tracking apps let you record time on task in real time, meaning they give you a running clock that you launch when you start a task, and you can pause or stop the app when you finish. The best apps, however, also let you correct time tracked after the fact, such as if you accidentally leave a timer running while you take off for lunch. You should be able to edit the time entry to subtract however many minutes you weren't working.

You also want an app that lets you enter a block of time post hoc in case you forget to launch a timer at all. For example, if your phone rings and you jump into a 20-minute consulting call, you might not have the presence of mind to start a timer, but you do want to log and bill for those hours worked.

Not every business charges by the hour, of course. If you charge a flat rate for projects, you likely need a time tracking app that can warn you before you spend too much time on a task and its value decreases. There's a difference between wrapping up a $1,500 project in 30 hours versus 60.

Some of the best time tracking apps for freelancers and small businesses are designed with solo entrepreneurs in mind, although many have functionality for tracking time across small teams, too. Does everyone of your colleagues charge the same hourly rate? How will you manage an invoice that lists multiple workers? A few of the best time tracking apps have plenty of options to help guide you through these questions and others.

Time tracking apps can have more functionality, too. Some are adept at handling multiple currencies, for example. Others have billing and invoicing tools built right into the app. Some offer expense tracking in addition to time tracking, letting you easily note supplies you buy, miles you drive, and other reimbursable expenses. Not every freelancer or small business needs all these features, however. You don't want to end up paying for features you don't use. That's why it's important to consider what each app has to offer and find the right fit for your business.

Not Included in This Roundup

Here, we focus specifically on time tracking apps for freelancers and small businesses. We don't consider employee monitoring software, which often includes some kind of time tracking. Employee monitoring tools are better suited for organizations that need to keep a close eye on when employees clock in and out and whether they are working the whole time they say they are. That's generally beyond the scope of a freelancer or small business.

Additionally, we don't include project management apps that come with an add-on or built-in time tracker. While time tracking clocks can be extremely advantageous inside a project management app, we assume that if that's what you need, you're likely shopping for a project management app, not a standalone time tracking app.

But for those freelancers and small business owners who need help tracking time, here are the best time tracking apps, listed alphabetically.

The 10 Best Time Tracking Apps

Everhour (web app, browser extension, and in other web apps via integration)

Best time tracker for viewing and managing team availability

EverHour time tracking app

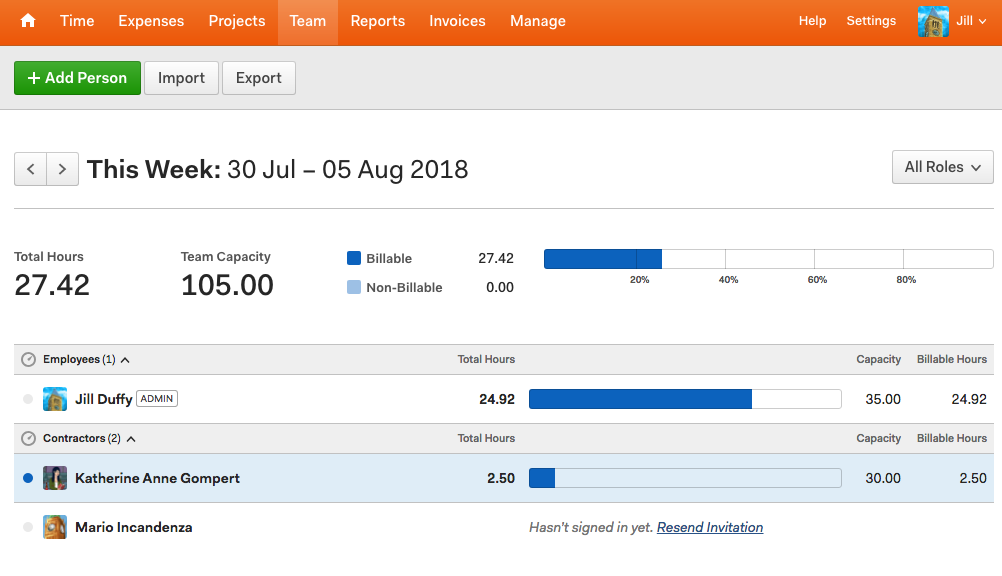
Everhour is an online-only time tracker and lightweight scheduling app that syncs with productivity apps you may already use. When you connect Everhour to a supported app, such as Asana, all the projects you've created in Asana show up as projects in Everhour. In that way, the work of setting up Everhour to reflect all your projects gets done for you automatically. You can get to recording your time on task much faster.

The syncing aspect goes one step further to add a timer button inside the web-based app of your choice, allowing you to start and stop recording time from within the app. For example, in Asana, you'll see a new button with options to Start Time, Add Time, Edit Time, and Add Estimate. In addition to Asana, Everhour also syncs with Basecamp, BitBucket, GitHub, Teamwork Projects, Trello, and a few other apps. While having a timer button sync from the app of your choice an excellent feature, it's not unique to Everhour. Toggl, FreshBooks, and a few other apps offer it, too.

When used collaboratively, Everhour can track employee availability. For each team member, including yourself, you can enter a maximum number of hours per day or week to work on a particular project. Everhour also has an option to log scheduled time off. You can then look at the team's schedule, and you'll see available hours (by day) in green, time off as gray, and sessions that went overtime in red.

Everhour does not have any mobile apps, and the web timer doesn't work offline, making it difficult to track time in certain circumstances. And while Everhour has an included invoicing system, it's fairly lightweight. If you choose Everhour and have invoicing needs, you'll want to explore its integration with more robust accounting apps, namely FreshBooks, QuickBooks, and Xero.

Price: $96/year for Solo account; $7/month per person for Team account with a minimum charge of $35/month


FreshBooks (Android, iOS, web, and browser extension, and in other web apps via integration)

Best time tracker for managing your business, while also tracking time

FreshBooks time tracking and accounting software

FreshBooks is better known as accounting software, but every tier of service it sells comes with a time tracking app. This time-tracking app is full-featured software—not some afterthought—with the ability to add details to sessions tracked and generate reports that show how you spend your working hours. FreshBooks also includes thorough support for collaborative team use.

When you start a task, you have a few options for how to track time spent on it. You can use FreshBooks' web interface, a Chrome extension, buttons integrated into other web-based productivity apps (Asana, Boomr, Basecamp, Daycast, Intervals, Teamwork Projects, and Trello), or the FreshBooks mobile app (for iOS and Android). Having a range of options gives you flexibility. For example, if you have a meeting where it might be rude to open your laptop, say a luncheon, you can still track time with the client politely using the mobile app. If you use the web app, the running clock follows you from page to page, but it's collapsible so that it doesn't get in the way.

While FreshBooks lets you connect to plenty of other apps, you can create even more FreshBooks integrations via Zapier.

Expense tracking and integrated invoicing are two more reasons to choose FreshBooks. When you tell the app to automatically add up the hours you've worked and create invoices, you can have FreshBooks tack on any expenses you've incurred, too. When your clients receive their bills, they can opt to pay you via FreshBooks easily and simply. If they do, FreshBooks will track that income as well, giving you more insight into the financial health of your business.

Pick FreshBooks as your time tracking app if you're also in need of software to help you run your business. Or, if you already use FreshBooks, give the time tracking tools a try.

Price: Plans from $162/year for billing up to 5 clients


Harvest (Android, iOS, macOS, Windows, web, browser extension, and in other web apps via integration)

Best time tracker for teams that need invoicing and expense tracking

Harvest time tracking and invoicing app

Among the best time tracking apps, Harvest is a top option for teams. Don't get me wrong. It's a stellar option for solo entrepreneurs, too. But it's built to handle a collaborative workload in a way that's clear and easy to understand. If tracking and organizing a team's time isn't your strong suit, then Harvest is a great app to help you get the job done.

Everyone on your team can install and use as many instances of Harvest as they like, including the desktop app, mobile app, and browser extension. The apps work offline, allowing you and your teammates to record time on task no matter where you are. As team members run their personal timekeeping clocks, all the information flows into the administrator's Harvest account, where it's presented in both summary and detail. Harvest can automatically remind team members to submit their timesheets if you like, and the business owner always has the capability to edit, review, and approve team timesheets.

Additionally, Harvest integrates with a long list of apps. Some of the supported apps let you track your working hours directly from them (Asana, Basecamp, Slack, Trello, to name a few) and send the results to Harvest. Others are for invoicing and accounting, in case you choose not to use Harvest's own invoicing tools. Harvest also has its own employee scheduling app called Forecast (sold separately) that tightly integrates with the core app. If you need to connect Harvest to a tool that isn't supported natively, you can make your own Harvest integrations using Zapier.

If you need to manage a team's hours worked but you also need to run your business and focus on tasks where you excel, Harvest is an ideal time tracking app. It doesn't require any special knowledge to get started; the app makes tracking your team's time simple.

Price: $12/month per person


HourStack (Android, iOS, web)

Best time tracker for visualizing time differently

HourStack time tracking app

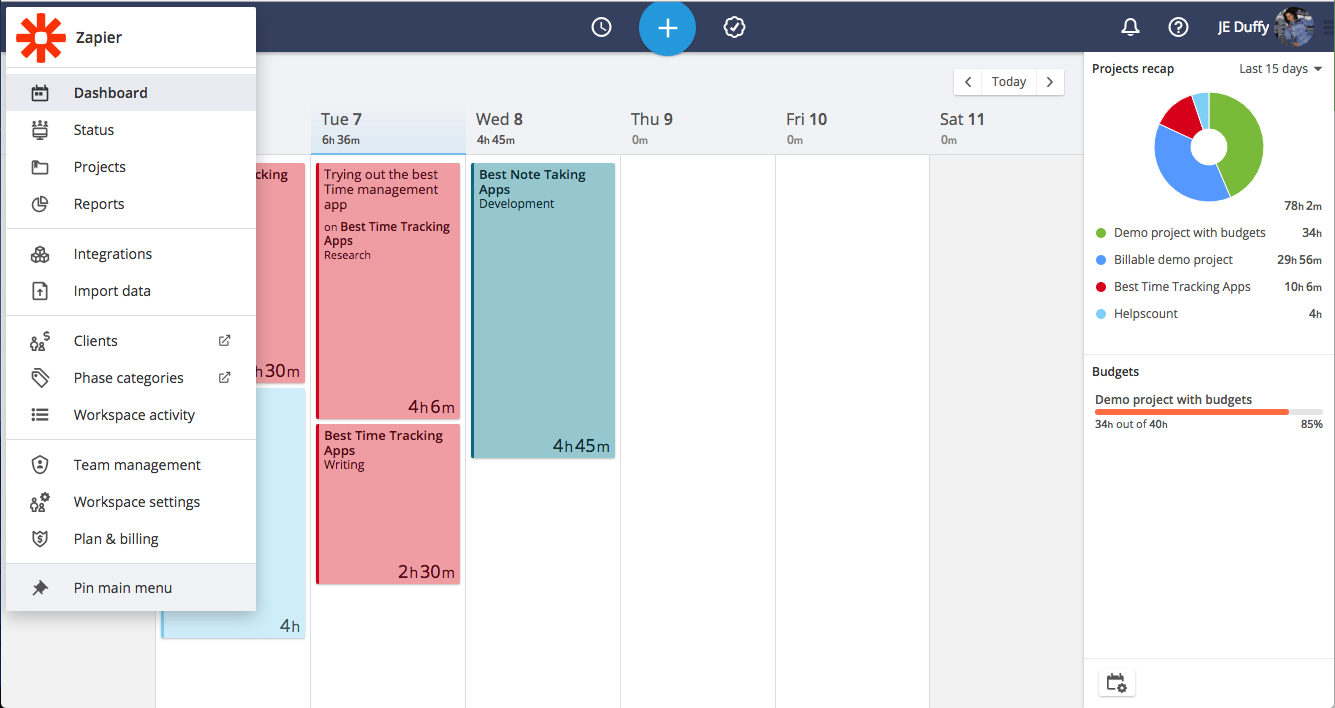
HourStack is a collaborative time tracking tool that looks different from many other time tracking apps. It shows time in blocks, as if the time it takes you to work on a task were an event on your calendar. It's not the only app that lays out your time in this fashion (Timeneye does it, too), but it does emphasize planning your time before you start working more than other apps. For example, you can allocate blocks of time on your calendar for tasks you intend to work on later in the week. You can indicate that you think the task will take one hour, or that you want to spend no more than an hour on it. Once you launch the timer, HourStack will keep an eye on the clock for you to help you stay within the expectations you set.

As with other time tracking apps, HourStack lets you create projects and tasks, which you can visualize using color-coding. Additionally, you can add labels to tasks to differentiate between types of tasks, such as business development and communication, and you can color-code them well. (The color options for labels are the same as for projects, however, which can get confusing.) Another helpful feature is a time limit that you can set for each day. Let's say you only want to work seven hours on Friday. HourStack can warn you when you go into overtime by showing your total time worked for the day in red at the bottom of the screen, and via notification from the mobile app.

HourStack integrates with several productivity tools, but you don't get the option to start a timer from these other apps. Rather, you can sync tasks or calendar entries from one app into HourStack, or export and import datasets, and so forth. Integration options include Asana, BitBucket, GitHub, Google Calendar, Google Sheets, Hubspot, Microsoft Office 365, Slack, Todoist, and Trello. If you need to connect to an app that isn't supported natively, you can likely get to it via Zapier, which lets you create HourStack integrations with a wide variety of apps and services.

HourStack doesn't include invoicing, although it does offer decent reports, and you can export data to Excel, CSV, and PDF format. The price is in line with what other time tracking apps charge. It's best suited for people who get value out of seeing their time spent on tasks laid out graphically.

Price: Plans from $7/month


OfficeTime (iOS, macOS, Windows)

Best time tracker for fully offline use and a one-time fee

OfficeTime downloadable time tracking software

You can skip the subscription payments with OfficeTime. This downloadable software for macOS, Windows, and iOS costs a flat $49, and because the software is installed locally, you're reassured it will always work offline. The app does include syncing functionality, but it's optional. If you need to keep your time tracking details offline for security or any other reason, OfficeTime is the best app you can buy.

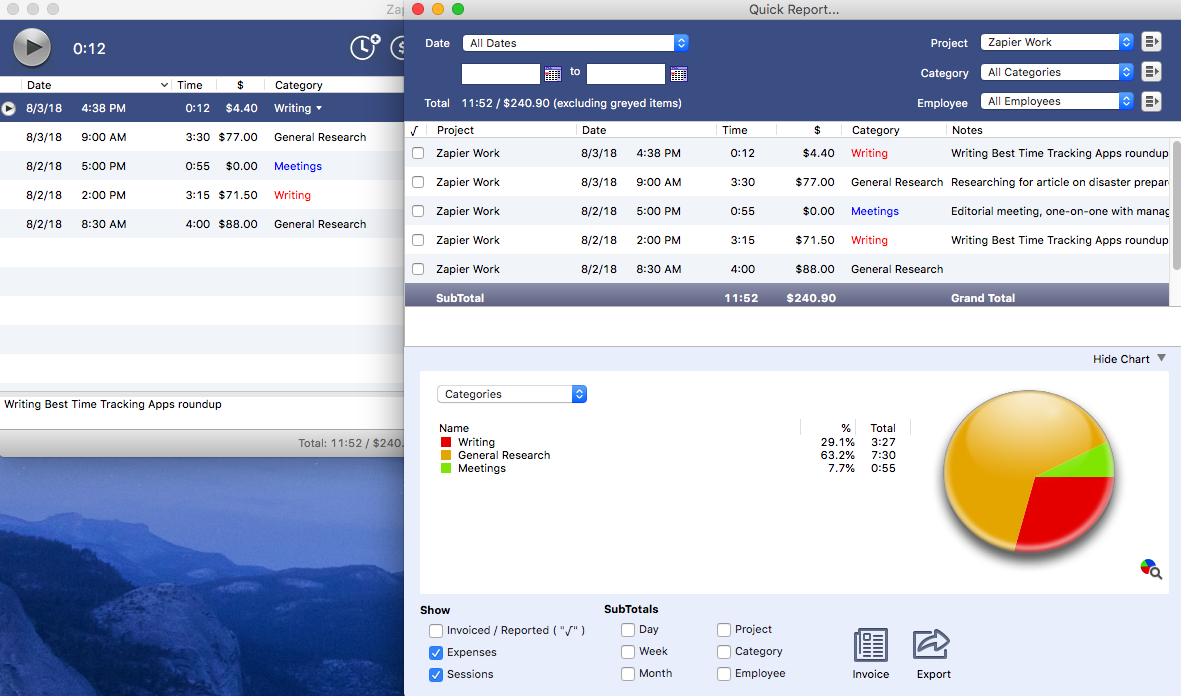
OfficeTime has everything you'd expect in time tracking software. It shows a running timer while you work, and lets you categorize time tracked by client and project. An idle detection feature helps you subtract time from your recordings when you weren't actually working, such as when you're pulled away from the task at hand unexpectedly by a call, a colleague, or a cat (you know who you are). You can add details to your timed sessions as well, including the type of work you're doing and its hourly rate. If you didn't track time spent on a task while you were actively doing it, you can always add it manually later.

OfficeTime also provides expense tracking, reporting, and basic invoicing options as well. There aren't as many settings in the invoicing section compared to what you get with Harvest or FreshBooks, but the options are more than adequate for small businesses with uncomplicated needs, such as billing in one currency.

OfficeTime is likely the best time-tracking software for you if you don't want to get caught up in recurring subscription fees and you prefer offline apps to web-based apps.

Price: $49 per license


PayDirt (web, browser extension)

Best time tracker for forgetful freelancers who need help with invoicing

PayDirt time tracking and invoicing app

Paydirt is an online time tracking app that's similar to Harvest in that it includes full invoicing and expensing functionality. It differs from Harvest in a few ways, however. For one, it costs less, starting at just $8 per month or $80 per year. Second, Paydirt doesn't have any mobile apps or offline capabilities, while Harvest does. That makes Paydirt suitable for people who work exclusively on a computer while connected to the internet. Third, Harvest offers integration with a long list of other apps and services, but Paydirt only has a few.

Paydirt does have some notable features. My favorite is one you'll love if you're forgetful. It's a button in the timer tool that lets you jump back in time. Let's say you begin working on a task but forget to launch your timer. Most other apps would require you to create a separate manual time entry for those few minutes you neglected to include. Paydirt instead lets you simply backup the timer to start a few minutes in the past. Another unique feature that I've never seen in any other time tracking app is that you can enter some keywords about your clients, and the browser extension will alert you whenever it spots them on a page and ask you if you should be timing the current work session. Paydirt also makes it easy for your clients to pay you by offering connectivity to Stripe and PayPal. When you use those integrations, clients can pay you by clicking an option directly from your digital invoice.

Paydirt supports collaboration among small teams, although those plans cost a bit more, starting at $29 per month for a group of three. The collaborative tiers of service are priced fairly compared with other similar apps, while the solo plans are more of a bargain. For freelancers and solo entrepreneurs who are a bit forgetful in tracking their time and don't need offline functionality, Paydirt is a wonderful time tracker and invoicing system.

Price: Solo plans from $80/year; team plans starting at $290/year


Timely (Android, iOS, macOS, web, Windows)

Best time tracker for using your calendar while tracking time

Timely time tracking and time management app

Some business owners use a calendar to carve out blocks of time to work on different projects. If that's how you like to work, then Timely might be the ideal time tracker for you. Timely combines scheduling and time tracking into one app, similar to HourStack and Timeneye, giving you a calendar-like view of time spent on tasks. You can log a manual entry, run a timer, and plan in advance how much time you expect to work on different projects.

The app has drag-and-drop capabilities, letting you move around the dedicated blocks of time on your calendar. At the bottom of each day, you can see your total time worked. At the top of the screen, Timely shows you how much you've earned, based on hourly rates you plug in for different tasks, and your projected earnings if you stick to the weekly plan you've created. Timely integrates with most calendars, so all your meetings and planned events automatically appear on the calendar layout. It also supports collaboration, meaning everyone on a small team can track their time and all the logs will sync to the central admin account for consolidation. One value-add feature, called Memory Tracker, is a downloadable desktop app (macOS, Windows) that automatically watches which programs you use and for how long to generate a true timeline of how you spend your computing time. This additional app and its features are included in the price of all Timely subscriptions.

While the app offers reports, it doesn't have any invoicing tools or expense-tracking features. The app can also be a little fickle with its input mechanism. In my testing, a tiny finger movement on my mouse would push a three-hour time block to suddenly max out at 24 hours. It's still a great service for people who like to visually plan out their time and don't need invoicing or expensing tools.

Price: plans from $8/month or $84/year


Timeneye (Android, iOS, web, and in other web apps via integration)

Best time tracker with light project management tools

Timeneye time tracking app

Timeneye works well for small teams that are more concerned with tracking time spent on projects than with invoicing and accounting management. This time tracking app uses a calendar layout, similar to HourStack and Timely, and includes light project management features. It doesn't offer invoicing or expensing, however.

Timeneye has more options than many other time tracking apps for categorizing and organizing your work. You can create clients, projects, and tasks, as per usual, as well as project phases, such as initial consultation, ideation, development, execution, and delivery.

Reports in Timeneye let you see how much time was spent working on different projects, in different project phases, or how many hours each team member logged. You can also view a report of billable hours recorded, which you can export to a PDF, although you cannot generate an invoice directly from the app. A companion Android app, called Timeneye Call, suggests that you run a timer whenever you have a phone call, helping make sure you never forget to bill for consultation time.

A feature called Suggestions, which you can optionally turn off, allows the app to suggest tasks you might record next based on your history as well as other data found in connected apps. Timeneye connects to productivity apps such as Asana, Basecamp, some G Suite apps, Outlook Calendar, Pivotal Tracker, Todoist, Trello, and others. When you're logged into Timeneye and you browse the list of integration options, Timeneye tells you explicitly what you can get out of the connectivity, such as whether you'll see a browser widget for tracking time in the app or suggestions for time blocks coming from Google Calendar. This transparency goes a long way toward helping you know what to expect.

Timeneye is ideal for teams working on project schedules who need to track time but not necessarily bill for it.

Price: free for solo members; team accounts from $15/month for two people


TMetric (Android, iOS, Linux, macOS, Windows, and web)

Best inexpensive time tracker with lightweight invoicing

TMetric time tracking app

TMetric is low-cost a time tracking app that lets you track time via a web app, desktop apps, and mobile apps. It includes reports and lightweight invoicing tools, and it supports collaboration. It's best suited for freelancers and small businesses that need to track time spent on tasks but don't have rigorous invoicing needs.

When you use TMetric to track your time, you can account for every minute of the day by logging not only the time you work, but also your breaks. A linear timeline for the day fills in with color as you progress, with break times appearing as white.

As mentioned, lightweight invoicing tools are included, but only for paying members. You can generate an invoice for a client from your time logs, and you can customize what shows up as line items. You can also mark invoices as sent, but you can't actually send the invoice from the app. You have to export it and send it some other way.

TMetric offers a wide range of integrations with other services, such as Asana, Basecamp, Bitbucket, Freshdesk, GitHub, Pipedrive, Taiga, Teamwork Projects, Todoist, Trello, Wrike, and several others. You can also use Zapier to create other TMetric integrations if you need to connect to another app that's not supported natively.

TMetric has a good free plan that supports teams of up to five people. It includes time tracking, reports, and the ability to create integrations, but it doesn't include billable rates, invoicing, or task management tools. Paid plans add invoicing, billable rates, task management, and at higher tiers of service, additional features. If you're a freelancer or small business on a budget and with only simple invoicing needs, TMetric is a great option.

Price: free for teams of 5; paid plans from $48/year


Toggl (Android, iOS, Linux, macOS, Windows, web and browser extension)

Best free time tracker that's easy to use

Toggl time tracking app

If you need a time tracking app and but can't pay for one, you should use Toggl. The time tracking tool has a generous free tier of service that gives you access to all its apps (Android, iOS, Linux, macOS, Windows, web and browser extension) and includes all the core functionality you'd expect in a time-tracking app. Free account members can't collaborate with other team members, however, and they get minimal reporting tools. Those limitations aside, if you need to track your time across different projects easily, simply, reliably, and for free, Toggl is the app to use.

One reason Toggl works effortlessly is it doesn't ask much of you when you start timing a task. With many time tracking apps, you have to have a client, project, and task entered into your account before the app will let you track time. If you don't, you have to set your task aside for the time being and enter them. Toggl doesn't play by the same rules. With Toggl, you can track your time now and worry about the details later. Additionally, when you use Toggl via the browser extension, a Toggl timer button shows up in just about every web app you could imagine, from Google Docs and other G Suite apps to Help Scout. Because you always see a little red Toggl button while you're working, you have a continual reminder to track your time. Plus, when you create Toggle integrations using Zapier, you can connect Toggl to hundreds of other online apps and services.

Toggl has some of the most detailed options I've seen in a time tracking app. For example, in the Toggl Chrome extension, you can set a time of day when Toggl should automatically stop recording time on task, effectively making sure you never accidentally keep a timer running overnight. It also has excellent idle detection, which helps you maintain high accuracy across your records. When the app detects your computer has been idle but a timer is still running, it offers ways to correct the recorded block of time. That way, if you're interrupted while working and get sucked into a 20-minute conversation, Toggl can knock out those 20 minutes from your record. Toggl even has a Pomodoro Technique setting, so that you can work for a set amount of time on a project that requires your focus and then take a short break, all with simple stopwatch-like reminders.

Toggl is one of the best time-tracking apps because it's so easy to use, comes packed with excellent features, and has a generous free tier of service.

Price: free with limitations; paid plans from $108/year


What are the major considerations when choosing the right time tracking tool? Most freelancers and small businesses should ask the following questions:

  • Am I working alone or with a team of people whose time I also need to track?
  • Will I be tracking time worked offline?
  • How likely am I to forget I have a timer running? Do I want a time tracking app with idle detection, or one that makes a running timer visible no matter which app or website I'm using?
  • Do I need thorough invoicing and expense-tracking tools included? Will I use a separate invoicing system, and if so, which time-tracking apps integrate with it?
  • Can I get by with a free time-tracking tool or do I need to pay for a more thorough feature set, and if so, what's my budget?

By answering these questions and reading the descriptions of the best time tracking apps above, you should be able to at least narrow down your options to two or so apps that will meet your needs.

Image Credits: Timer photo by Nicolas Will via Flickr.


source https://zapier.com/blog/best-time-tracking-apps/