Ever wished you could have Siri do your job for you? With iOS 12 and the new Shortcuts app, you can finally customize Siri. Set up a workflow, then tell Siri what to do, and it can send emails and save contacts and more for you automatically. It's the first time you can teach Siri how to do whatever you want.
Siri Shortcuts can also work with Zapier workflows (called Zaps) to connect your iPhone or iPad with over 1,300 business apps. Here’s how to make your first Siri-powered Zaps to build even more powerful Shortcuts workflows.
What Are Siri Shortcuts?
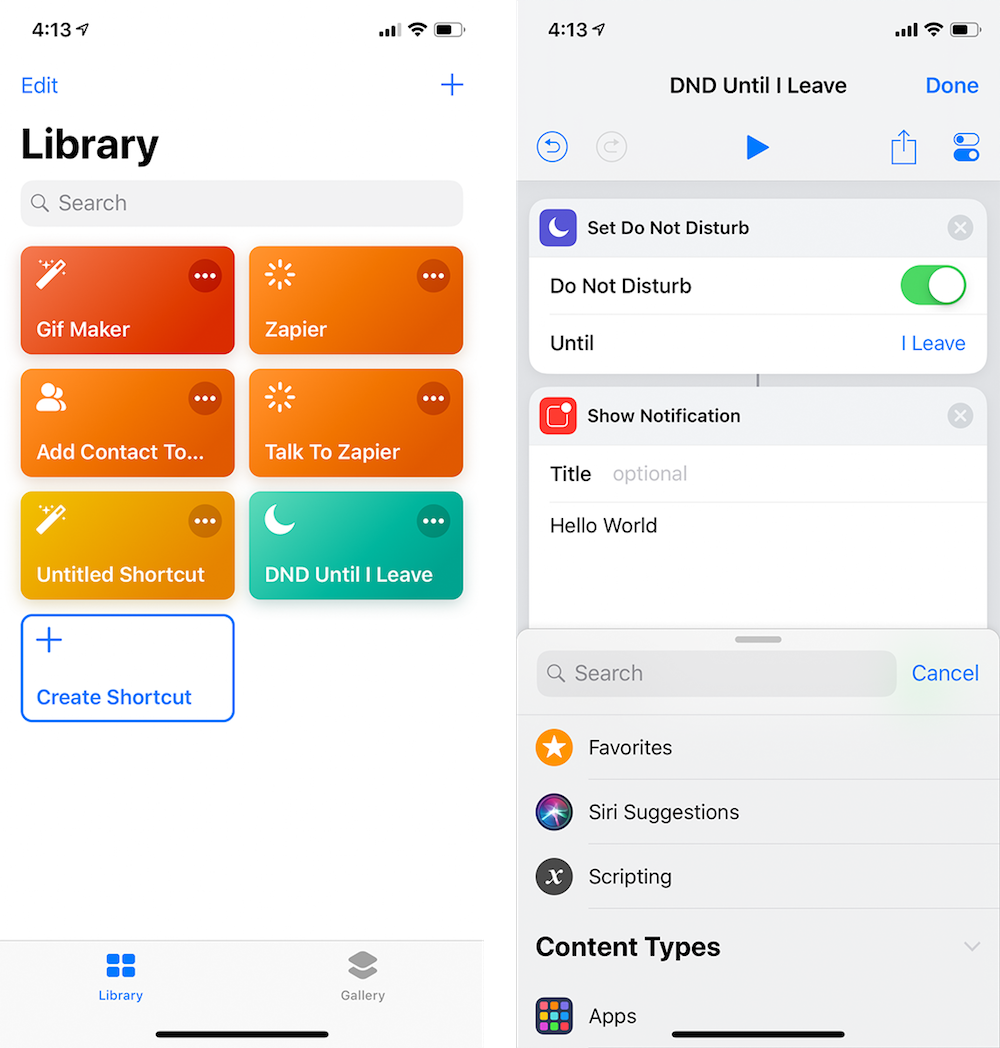
In 2014—three years after Apple added Siri to the iPhone—a group of developers built an automation app for iOS: Workflow. Working on your phone often means switching between apps, carefully copying and pasting the data you want from one into another. Workflow was designed to move data and automate tasks for you. It copies data from one app—a new screenshot in Photos, a new contact in Contacts, or even your location from Maps—then runs actions on it. It could turn your videos into GIFs, copy your to-dos into a notebook, and more.
That app has been redesigned as Shortcuts, now an Apple app tied it deeply into iOS. Shortcuts today can grab your location, turn Do Not Disturb mode on or off, and run workflows from Siri.
Many iOS apps—including Evernote, Bear, GoodReader, Ulysses, Skype, and Overcast—work with the new Shortcuts app. And, you can add Zapier to Shortcuts to connect your phone to over 1,000 of the most popular online work apps. While Zapier doesn’t have an iOS app, it does include a Webhooks trigger. Combine it with Shortcuts’ Get Contents of URL actions, and you can copy anything from your iPhone or iPad and send it to your Zap.
If you don’t have it already, make sure your iPhone or iPad is running iOS 12 or later, and download the free Shortcuts app from the App Store. Then, it’s time to set up your first Zapier Shortcuts workflows.
How to Make a Zapier iOS Shortcut
1. Make a New Shortcut with Dictation, Input, Clipboard, or an App
Typically, you want Shortcuts to copy some text—a new task, note, contact, project, location, or anything else—and send it to Zapier. And then from there, Zapier can send that data to other apps you use. To build a Zapier Shortcuts workflow, first open the Shortcuts app on your iPhone or iPad, and click Create Shortcut.
The first thing your Shortcut needs is an action that will get the text or other info you want to send to Zapier. There are four actions that do that in Shortcuts:
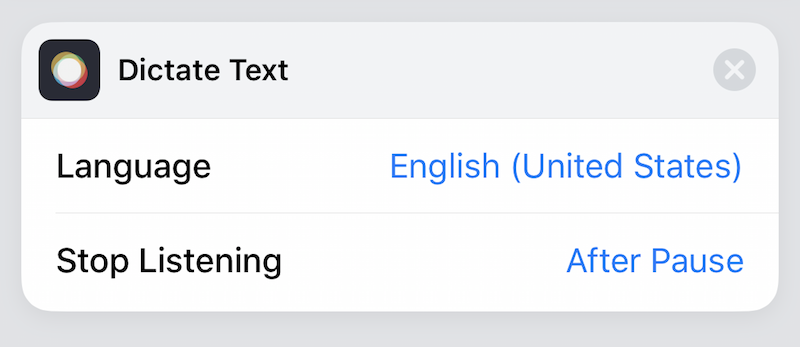
Dictate Text. Want to use Siri both to start the workflow and to add text to Zapier with your voice? Dictate Text is the option to choose. It lets you dictate a single note to Siri after a short pause. You can set a preferred language or have Shortcuts ask you every time.
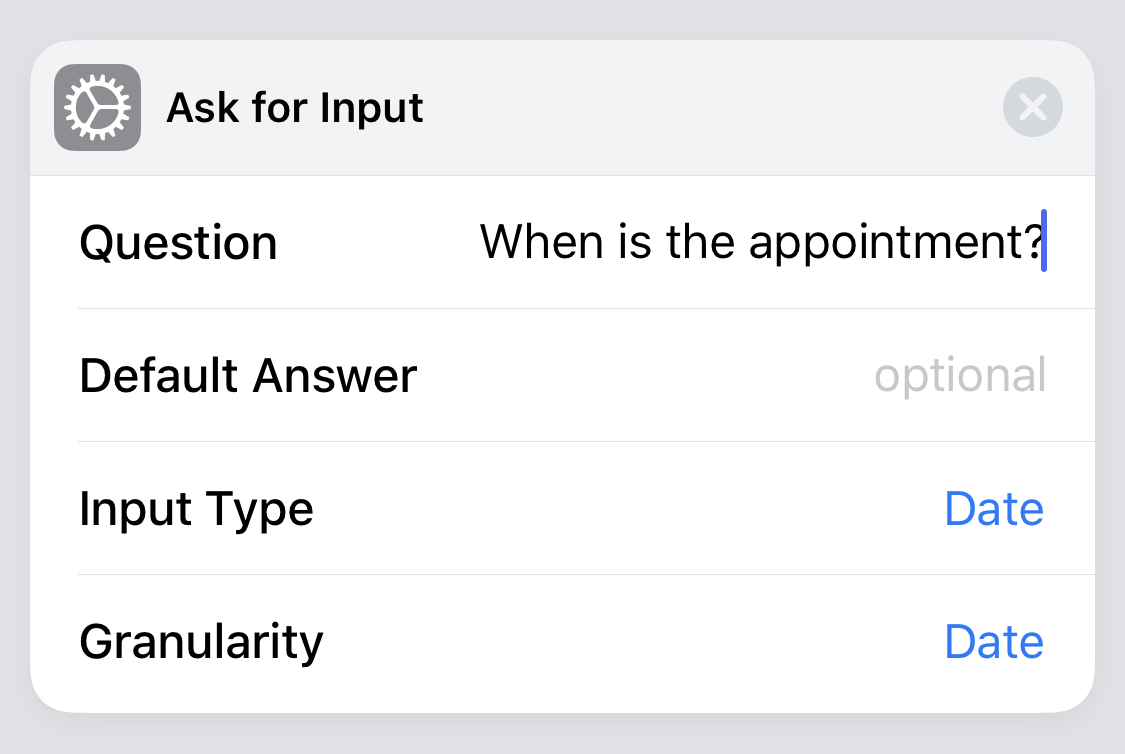
Ask for Input. Want to type detailed info to send to Zapier, perhaps info about a project or a new contact’s full details? Shortcuts’ Ask for Input shows a text box where you type or paste in text. Add multiple Ask for Input actions with questions to add detailed info, with options to type text, select dates, and enter numbers.

Get Clipboard. This is the simplest option—it grabs whatever you most recently copied. It’s perfect to, say, copy links and send them to Zapier.
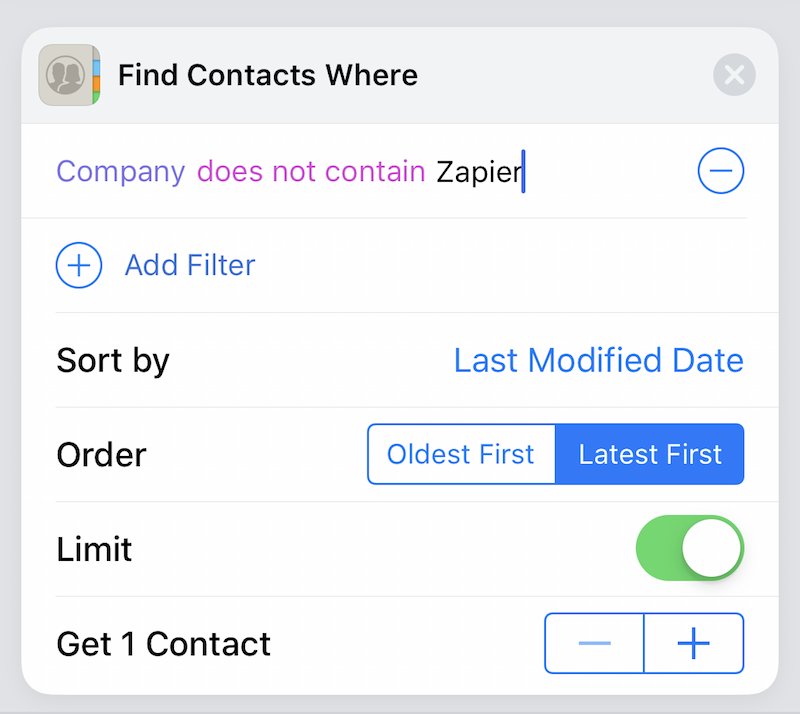
Get, Search, or Find Actions from apps. Want to add data from other apps to Zapier? Search the action options in Shortcuts for actions that start with Get, Search, or Find, choose the app you want, then set its details to find the info you want from the app
Or get creative. Want Siri to trigger a Zap without any input? Perhaps you want Zapier to make a new project with default tasks or create a new Google Drive folder with today’s date. You could start those workflows in Shortcuts without any input and skip to step 2.
2. Add a URL Action with a Zapier Webhooks URL
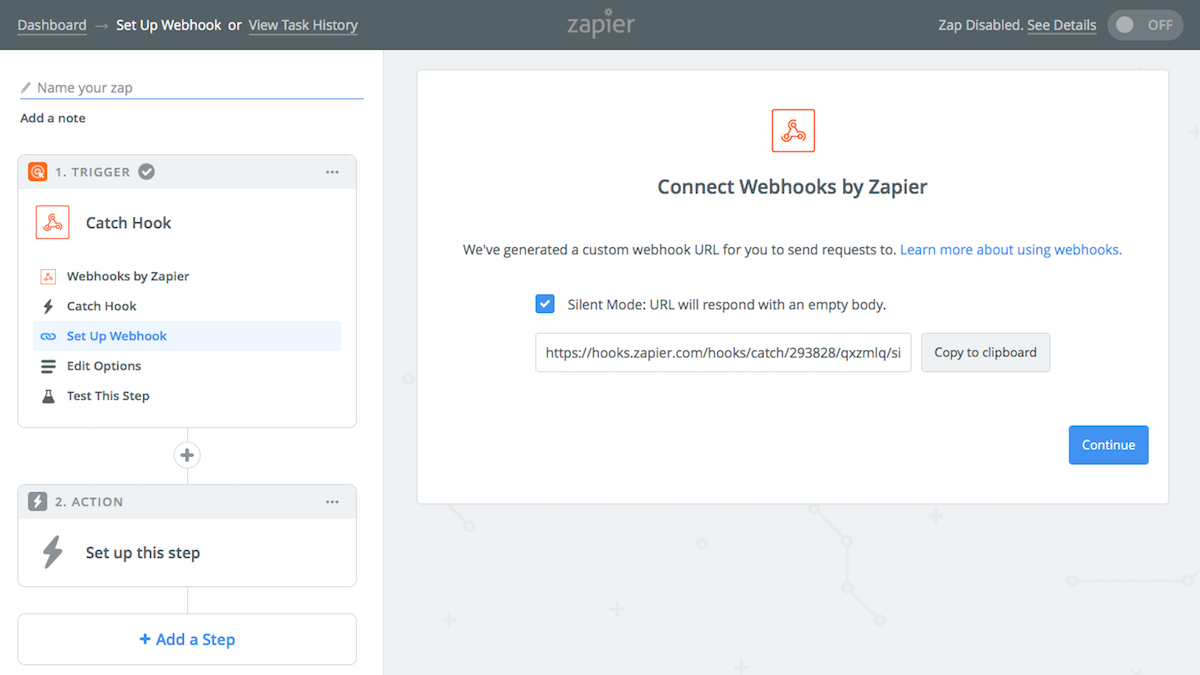
Now you need to switch gears and open Zapier. Make a new Zap, and choose the Webhooks app and its Catch Hook trigger. When prompted, copy the Webhooks link from Zapier either using the Copy to Clipboard button or manually. Shortcuts needs that link to send your text from step 1 to Zapier.
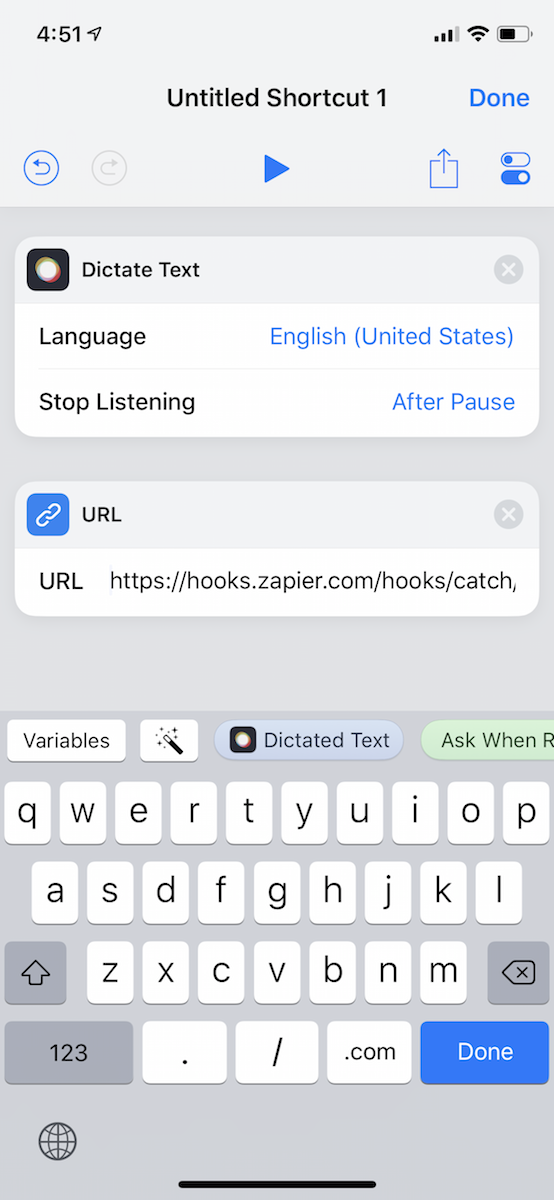
Go back to the Shortcuts app on your iPhone or iPad. In the action search pane on the bottom, search for URL and tap the URL option. Paste your Zapier Webhooks URL into that box, then tap Done.
3. Add a Get Contents of URL Action to Send Info to Zapier
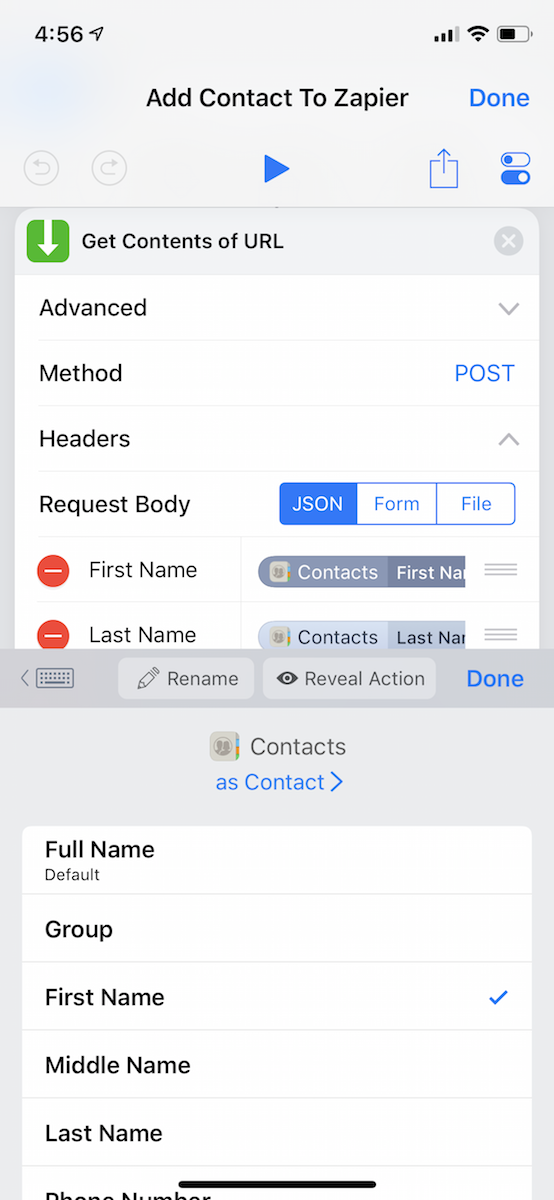
Now let's add the data you want to send to Zapier. In the Action search pane at the bottom of Shortcuts, search for Get Contents of URL. This action copies the text from your Shortcut’s first step and sends it to the Zapier link you added in the second step.
Once you add a Get Contents of URL action, tap the Advanced button and select Method. ChoosePOST from the options. Finally, tap Headers.
If you used a dictate, clipboard, or a single Ask for Input dialog as your first step, add one Header with a field name (perhaps “Notes”) on the left. Then tap the field on the right and select the Dictated Text or Clipboard or whatever other option shows up from your first step at the top of your clipboard.
Or, if you used multiple Ask for Input dialogs or are copying data from another app, you can add as many headers as you want to copy all that info to Zapier. In the screenshot above, I started with a new contact as the first step in the workflow, then added headers for the first and last name and email. Then, on the right side of the headers, I tapped the Contacts button above the keyboard, and Shortcuts let me select the specific detail I wanted from the app.
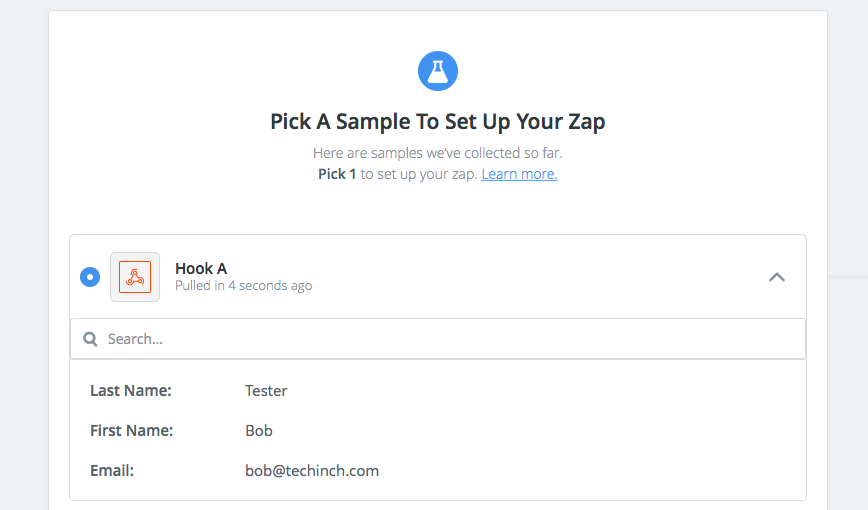
Want to test and make sure everything’s working? Press the play button at the top of the workflow, enter or speak text if prompted, then check your Zap in Zapier. It should pull the details in on the Webhooks step.
4. Finish Your Zapier Workflow

Now that you’re back in Zapier, finish setting up the Zapier side of your workflow. In this step, you tell Zapier what to do with the information it collected from Shortcuts. For example, you might want to create a new note with the text you dictated to Siri. Or perhaps paste the information into a spreadsheet like Google Sheets or Excel to log data, or a CRM like HubSpot CRM or Salesforce to save contacts..
Select the app and action you want, then in each of the fields, click the + icon on the right to select info from your iPhone or iPad to add to that app. You’ll only have one field if you used a Dictate, Clipboard, or single Ask for Input option in Shortcuts. If you added detailed data from an app or multiple Ask for Input options, you can copy each of those into another app in Zapier.
Zapier includes a few extra built-in apps to customize your Zap if you’d like:
- Filter: Have Zapier watch for specific details—dates that aren’t weekends or contacts that don’t include your company’s name, for instance.
- Delay: Have Zapier wait to do something until the time you want—perfect to send an email tomorrow morning, say.
- Formatter: Have Zapier reformat your text, replace words, change date formats, pick items from a list, remove HTML formatting, and much more.
- Multi-Steps: Add more steps to your Zap to carry out as many actionsas you want at once.
When finished, test your Zap and turn it on, and Zapier’s all ready for you to run your Shortcut from Siri.
5. Add Your Shortcut to Siri
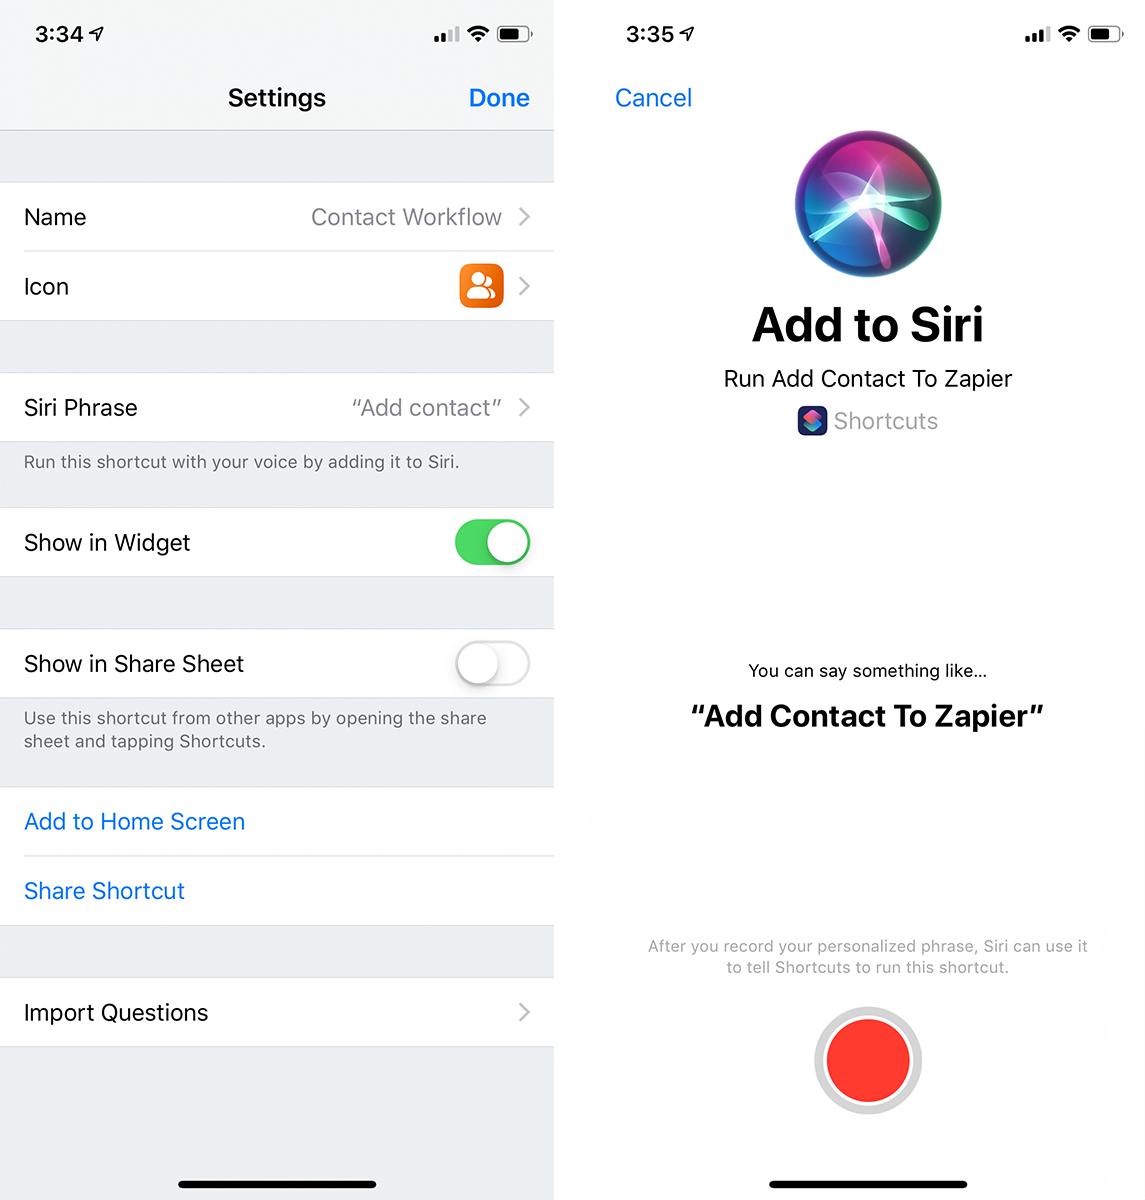
There’s one final step: Add your shortcut to Siri. Back in the Shortcuts app, tap the settings icon in the top right corner (looks like two blue settings sliders). You can add a name and custom icon to your shortcut to make it easy to recognize on the Settings app home screen. Additionally, you can tap Add to Home Screen to add this shortcut as a new app icon that you can run from your iPhone or iPad’s home screen (more on that later).
The easiest way to use your Shortcut is from Siri, though, so tap the Siri Phrase button to add it. On the next screen, tap the record button then say the phrase you want to run the workflow—something simple that you’ll remember like “New Contact” or “Run Zap.”
And you’re done. Now, whenever you run this shortcut, it will grab the text you dictated or typed or copied from an app and send it to your Zap where Zapier will run it through your workflow.
How to Run a Zapier iOS Shortcut
Now that you’ve made your iOS Shortcut with Zapier, you’ll want to use it whenever you need to run that Zap. There are three ways you can use your Shortcut:
With Siri
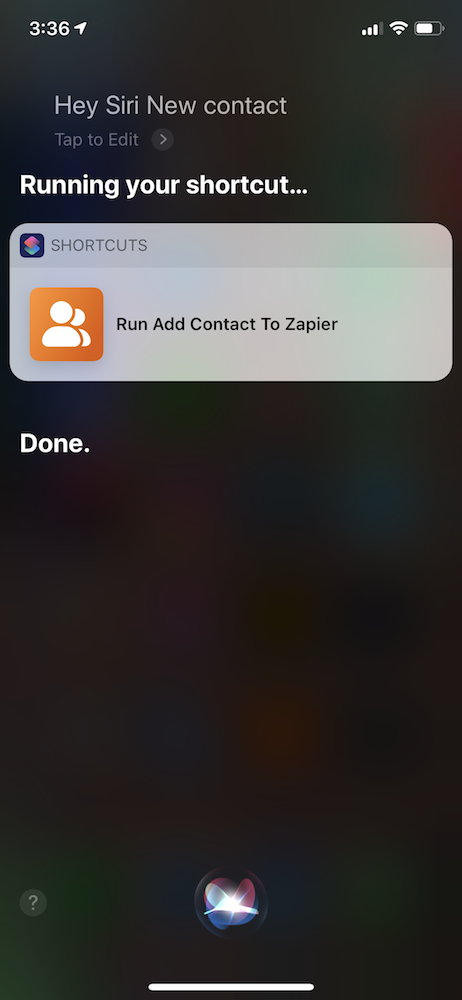
Say Hey, Siri! to your phone or press-and-hold the home button or the power button on an iPhone X-series phone. Then say the Siri Phrase you added to your shortcut. Siri will run the shortcut then say Done so you'll know it’s finished.
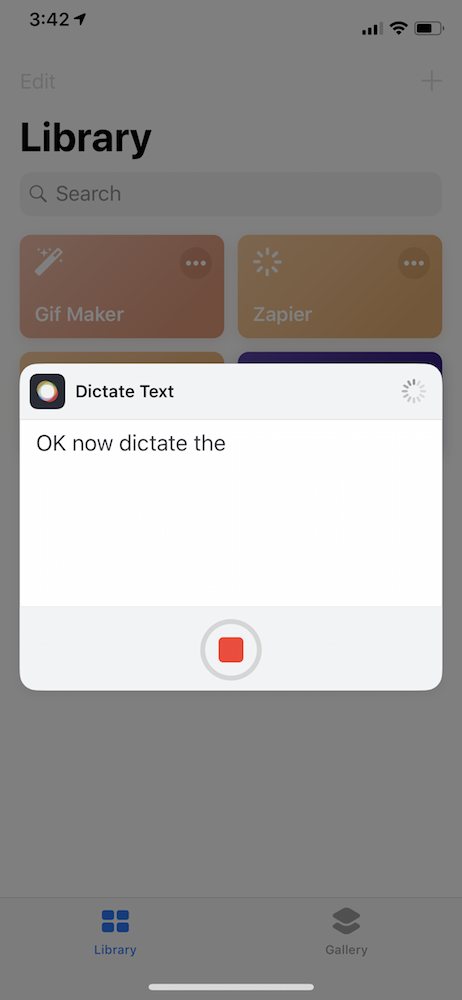
If your workflow includes a Dictate or Input Text option, Siri opens the Shortcuts app and displays a box to enter your text. With Dictate, you’ll hear another ping sound, then you can start talking and Siri will dictate whatever you say. With Input Text, Siri displays your question and you write an answer into the Shortcuts dialog box. Then Siri runs the remainder of the workflow for you.
From the Shortcuts App
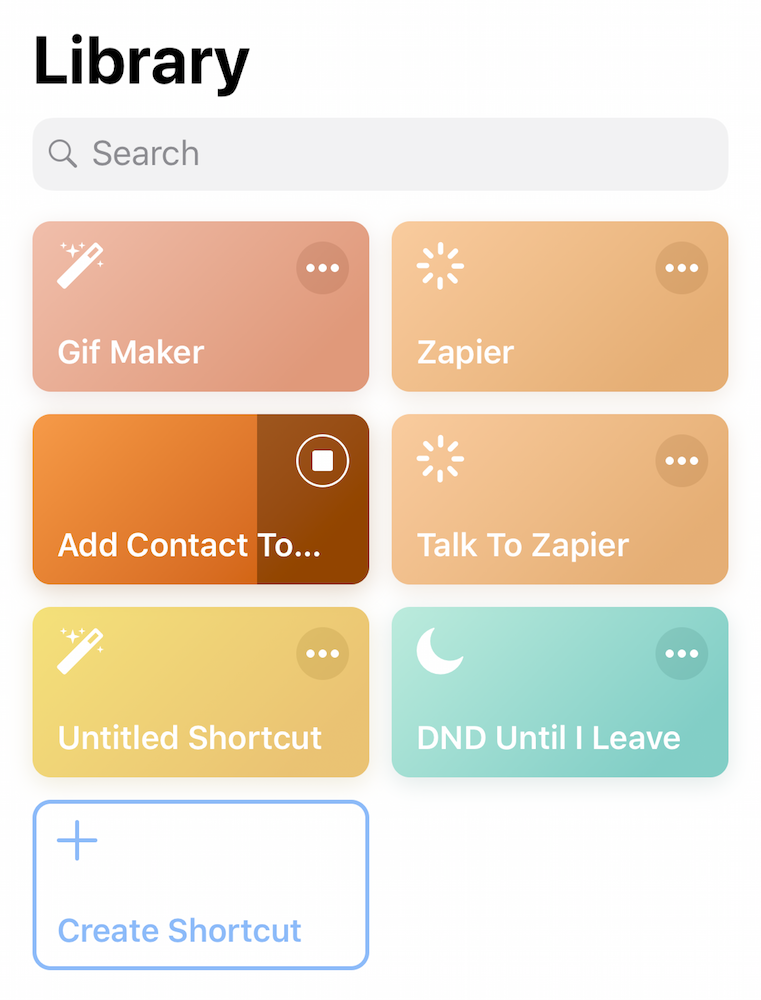
Prefer to use your phone silently? Open the Shortcuts app and tap your Zap-powered Shortcut to run it without saying anything to Siri. It opens the Dictation or Input Text dialogs just the same—and shows a progress bar on the Shortcut’s icon as the workflow runs.
From Your iOS Home Screen
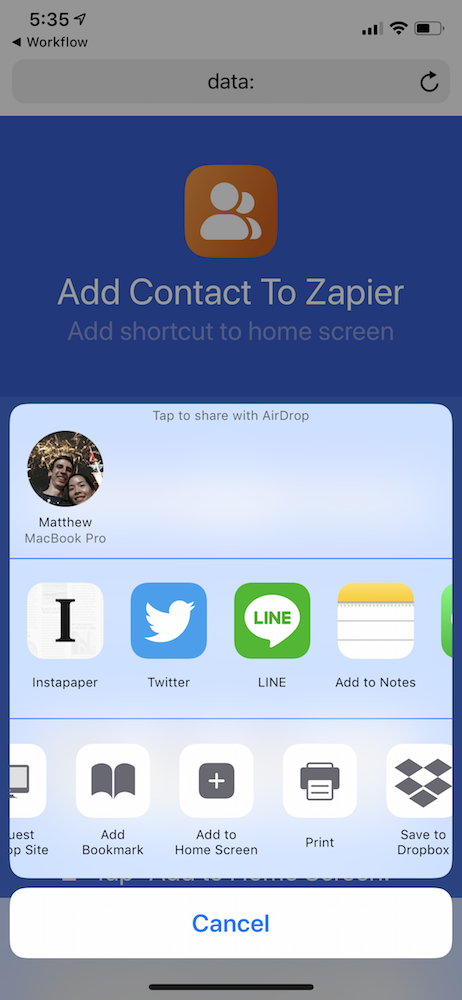
You can also add the Shortcut to your iPhone or iPad’s home screen, like any other app icon. To add the Shortcut to your home screen, click the Share icon in the Shortcut and select Add to Home Screen. That opens a page in Safari, where you again need to click Share and then Add to Home Screen..
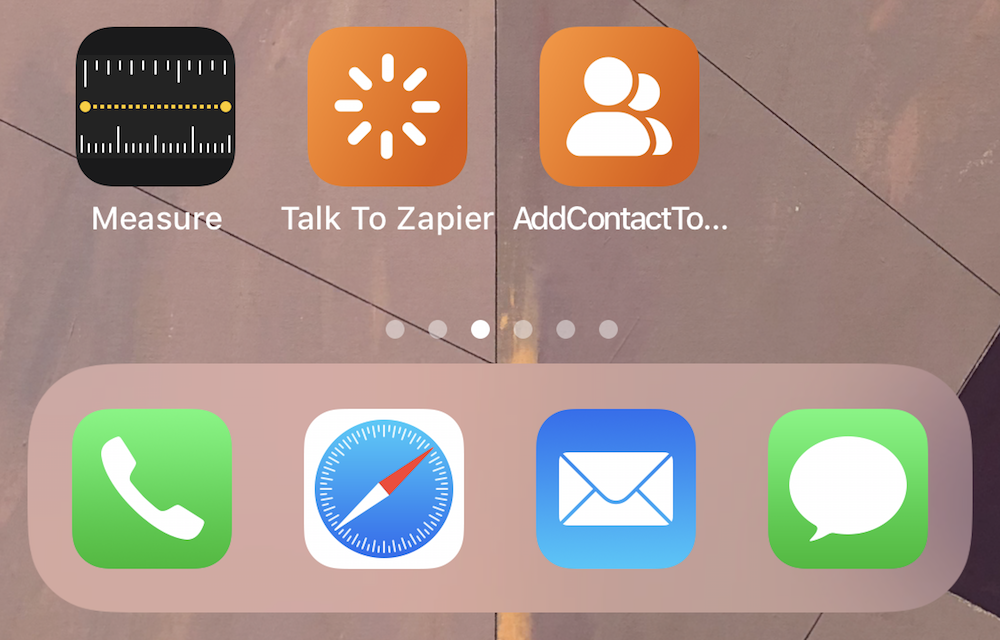
Then, whenever you want to run the Shortcut, tap its icon to open the Shortcuts app and run that Shortcut directly.
Use Siri to Automate Your Work
Now, it’s time to get creative. What work tasks have you wished you could do more easily on the go? What could you tell Siri—or copy from an app on your iPhone—that would then be useful in your favorite work apps? What routine emails and tasks could you automate? Zapier could create new projects for you, add contacts to a CRM, log receipts and accounting details while you’re out, send emails to new contacts right after you meet them, and much more.
Here are some ideas to get started:
Log Data
Adding text to spreadsheets and databases is tough from your phone—so let Siri Shortcuts add them instead.
Save Contact Details
Whenever you add new people to your address book, Siri could add them to your email list or CRM automatically.
Send Messages
Need to text from a work number or want to send an email or Slack message without getting distracted by all the unread messages in your inbox? Siri can send the message for you.
Create Tasks
Think of something to do or come across a bug that needs to be fixed while you’re out? Tell Siri, and Zapier can add it to your list.
The new Siri Shortcuts app is the best way to customize your iPhone. You can make new Shortcuts to add new contacts, projects, notes, and more in your work apps. You can even add Zapier to other workflows to log data and build more powerful tools than you could in Shortcuts alone. Say you have a workflow that shows today’s weather, stock price, or sports scores. Add Zapier to it, and you could log those items to a spreadsheet. Or maybe you have a workflow to add new contacts to your address book—add Zapier to the end to automatically back up the contacts to a spreadsheet or add them to your CRM as well. Have a workflow to remind you to do a task when you get to work? Add Zapier to the end of the workflow to also add that task to your to-do list to make sure you don’t forget it.
Check out Zapier’s Automation Inspiration Guide for hundreds of ideas on ways to use Zapier—then combine those with new Siri Shortcuts for a powerful way to get work done from anywhere.
Connect Zapier to Your Other Devices
Siri’s not the only way to use Zapier outside of your work apps. Here are other ways to speed up your work from the tools you use most:
- Use Zapier’s Chrome Extension to start Zaps from your browser
- Use Zapier for Alfred to run Zaps from your Mac’s search pane
- Use Zapier for Drafts for another way to run Zaps from your phone
source https://zapier.com/blog/zapier-siri-shortcuts/

No comments:
Post a Comment