
Let’s start with the bad news: there’s no fully automated way to merge two or more Google accounts into one. If you have a G Suite at school or at work that’s going to be deleted and want to move the data to a different account first, need to use multiple accounts but hate switching between them, or if you just don’t want your email address to be sk8trgrrrl04@gmail.com anymore—there’s no quick and easy solution.
Merging Google accounts is a manual process. You have to transfer data out of and into every individual Google product you use—Gmail, Google Calendar, Google Drive, and so on. Although this process is hardly painless, we've got the step-by-step instructions—along with a few helpful automated workflows—to help you accomplish the feat in less time and with fewer headaches than you might think.
Here's how to combine multiple Gmail accounts into one, and get all of your email, calendar events, and contacts in one place.
- How to Merge Gmail Accounts
- How to Notify People of Your New Email Address
- How to Merge Google Contacts Accounts
- How to Merge Google Calendar Accounts
How to Merge Gmail Accounts
There are two ways to merge Gmail accounts.
The first method is adding your old Gmail account to your new one, where you can send and receive emails from both accounts inside your new Gmail account. It’s ideal because it will automatically pull all of the archived emails from your old account into the new or main account, and it will allow you to send and receive email from both your old and new accounts.
Unfortunately, Google’s security measures make the first approach prone to error, so while it’s ideal, it may require a lot of troubleshooting.
The second method—moving your old emails to your new address and switching to only use the new account—requires less troubleshooting but isn’t as straightforward. While you’ll be able to receive emails from your old account in the new one, you'll need to use another email app to copy over your email archive and won’t be able to send emails from your old account’s email address.
Pick your poison, and follow the instructions below.
Option 1: Add Your Old Gmail Account to Your New Gmail Account
Want to use both of your Gmail accounts through your new account? This is the option for you—and if it works, it's the best way to move to a new Gmail account. I recommend trying this approach first. If you run into a wall, abandon it and try option two. Here’s how to do it:
1) First you need to set your old Gmail account to allow other apps to access your emails. To do that, log into Gmail with your old account.
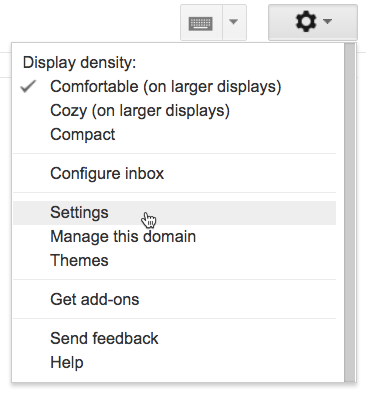
2) Click the gear icon, then select Settings.
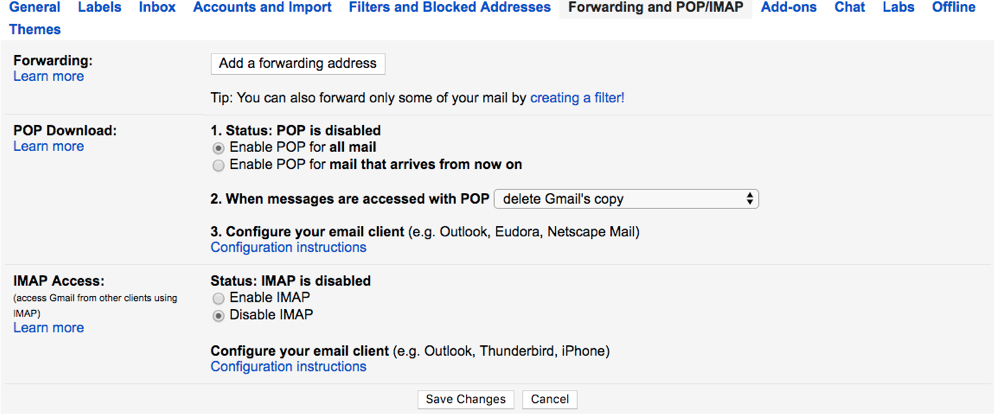
3) Click the Forwarding and POP/IMAP tab, then select the Enable POP for all mail button in the POP Download section.
4) Then click the When messages are accessed with POP dropdown and select either archive Gmail’s copy to keep a copy of all emails in the old account, or
delete Gmail’s copy to have emails in the old account deleted when they’re sent to your new account. (We strongly recommend the first option just in case—unless you're almost out of storage in the old account, which could cause issues when forwarding.)
5) Save your changes.
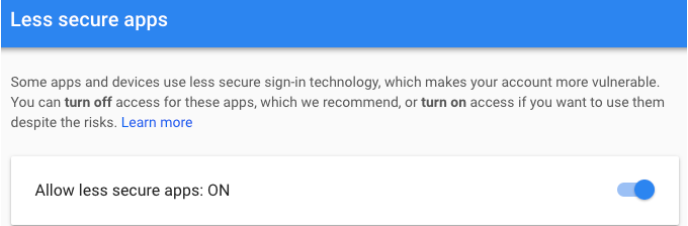
6) Now that you've enabled POP access, you'll need to set your Google account to let POP apps connect to your Gmail account. That requires a slight tweak in your account's security settings. Open your Google My Account settings and navigate to the less secure apps page.
7) Click the slider to turn on the Allow less secure apps setting.
8) You're finished with your old account—time to get this account added to your new Gmail account. Log out of your old Google account—or open a different browser—then log into Gmail with your new Google account.
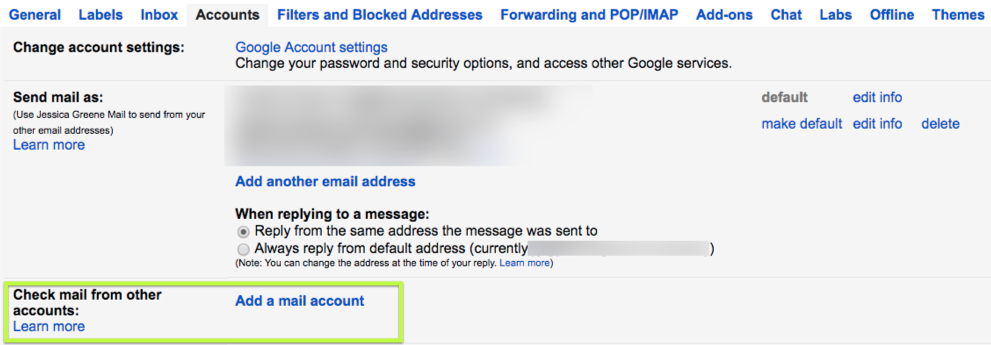
9) Click the gear icon, then click Settings as before.
10) Click the Accounts tab, then click Add a mail account link beside the Check mail from other accounts label.
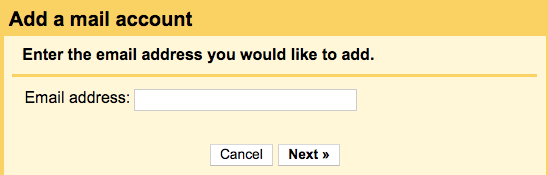
11) Enter the email address for your old account in the pop-over, then click Next.
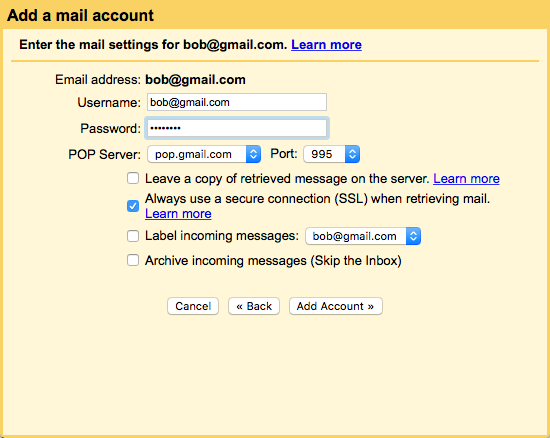
12) That'll open a new window that shows the email address you entered and asks for login details. Enter your entire old Gmail address—including the @[domain].com extension—in the username section, and type in your old account's password.
13) Use the default settings for POP Server (pop.gmail.com) and Port (995).
14) Check the box next to Always use a secure connection (SSL) when retrieving mail.
15) Check the box next to Label incoming messages. You’ll use this label later to create reminders to update your email address. Use the default label, or click the dropdown to create a new label.
16) Finally, click Add Account to combine the two accounts in Gmail. If everything work, jump ahead to the next steps below—if not, the troubleshooting tips below should help.
Connect Old Gmail Account with Two-Factor Authentication
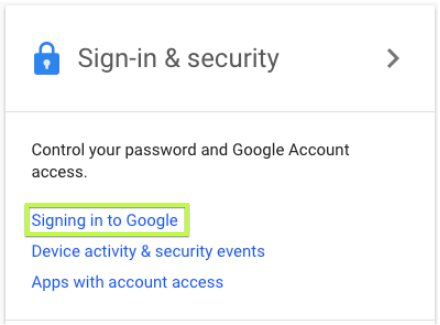
1) Open an incognito window (on Chrome, that's under File > New Incognito Window)—or open another browser like Safari or Microsoft Edge—so you don’t impact your current session. Then navigate to your Google My Account page and sign in with your old Gmail account.
2) Click the Signing in to Google link under the Sign-in & security section.
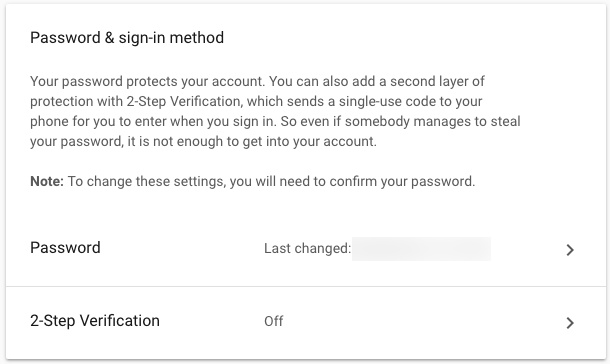
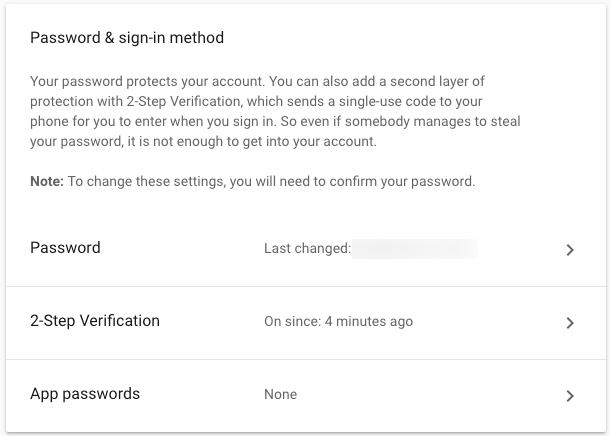
3) If you have already enabled 2-Step Verification on your account, skip ahead to the steps below to create a unique App Password for your old Gmail account. Otherwise, to set up two-step verification, click the 2-Step Verification section under Password & sign-in method.
4) Click the Get Started button, and verify the password for your Google account.
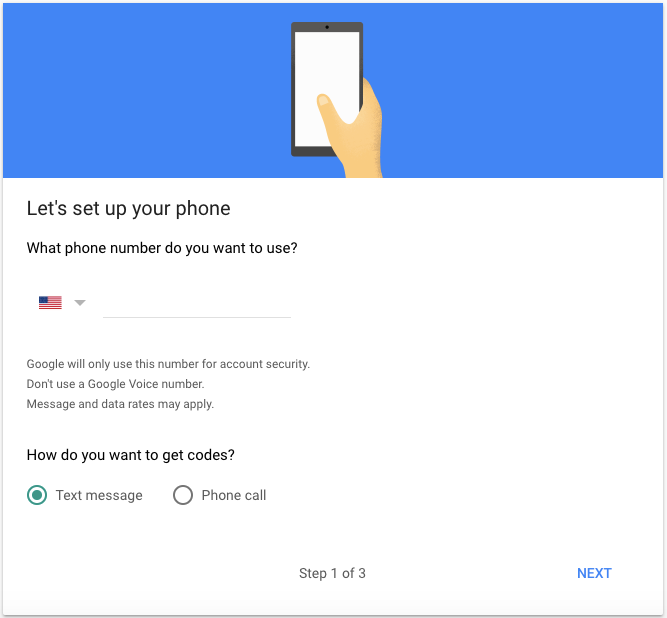
5) Add your phone number, and select if you want to receive the verification code via SMS or phone call.
6) Once Google sends you a verification code, enter the code and click Next.
7) Click the Turn On link to enable two-step verification for that account.
Now that you have two-step verification enabled, you need to create an app password to use instead of your general login credentials.
1) Return to the Google My Account page.
2) Click the Signing in to Google link under Sign-in & security as before.
3) Click App passwords in the Password & sign-in method section.
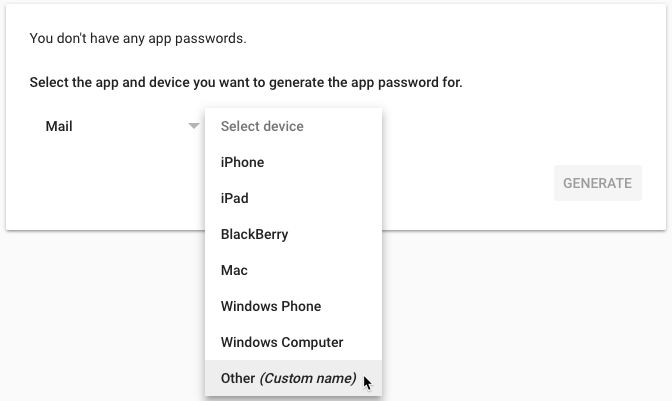
4) Choose Mail in the Select app dropdown, and select Other (Custom name) in the Select device dropdown. We're connecting your new Gmail account, so perhaps name the password New Gmail then click the Generate button.
5) Copy the password.
Now, return to your new Gmail account's Add a mail account window. This time, paste the app password into the password field instead of your Google account password. Click Add Account and this time everything should work.
With your two Gmail accounts connected, there are just a few final steps to set everything up:
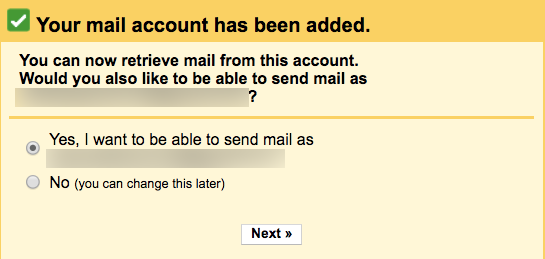
17) Once you successfully add the password to your old Gmail account, select Yes in the window that asks whether or not you want to be able to send mail from your old email account.
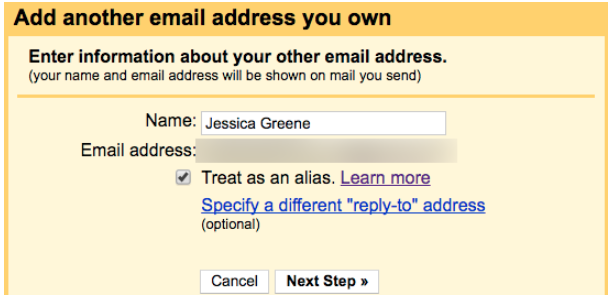
18) Enter your name (or the name you want to show up when people receive email from your old Gmail address), and check Treat as an alias.
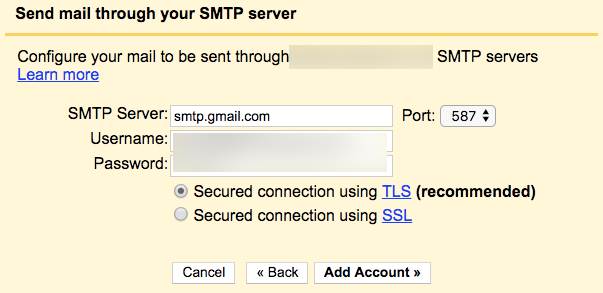
19) Leave the SMTP Server (smtp.gmail.com) and Port (587) fields unchanged, and enter your username—including the @[domain].com extension.
20) Paste either your Google account password or app password into the password field, depending on which you used in the last section.
21) Select the Secured connection using TLS button, and click Add Account.
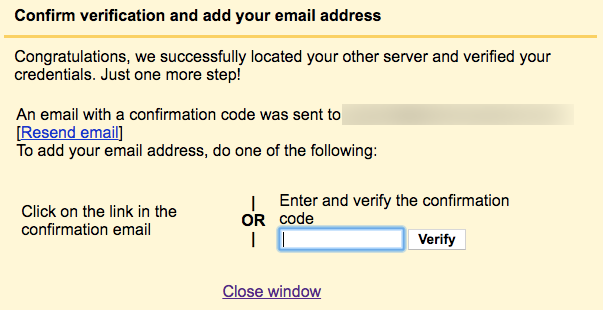
22) There's only one final step. Gmail will send a confirmation code to your old email address. Open your old Gmail account again, find the confirmation email from Google, and copy the confirmation code—then switch back to your new Gmail account and paste it into the verification window.
You did it! You can now send and receive email from your old Gmail account in your new one. Click the Compose button in Gmail, and you can now choose to send emails from your old or your new Gmail address. And when you return to new Gmail account's inbox, you’ll see all of the email messages from your old account are being imported into your new account—which could take quite some time if you have a lot of archived emails.
Don't want all of those old emails to fill up your inbox? You can set up a Gmail filter to automatically move those messages to a Gmail label where you can still easily find them when you need them. Wait a bit and make sure all your old emails are in Gmail, then here's how to filter them:
Add a Filter to Move and Archive Old Gmail Emails
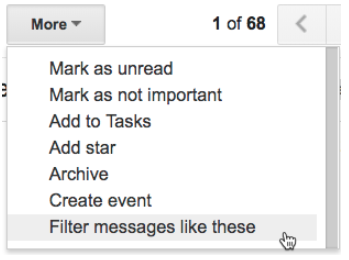
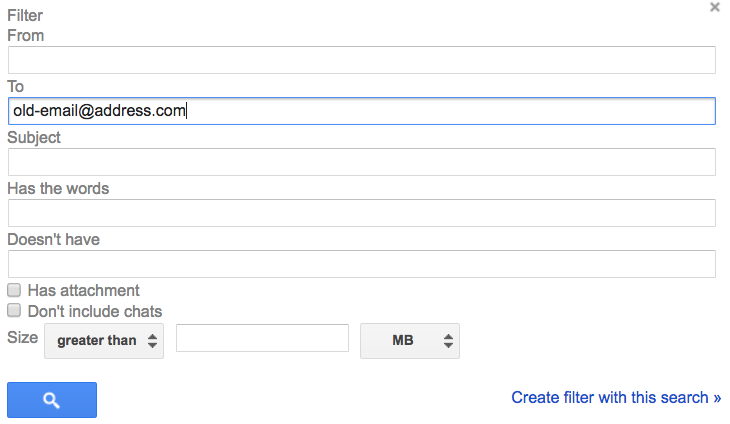
1) Let Google finish its import, then open one of the emails from your old account. Click the More dropdown, and click Filter messages like these.
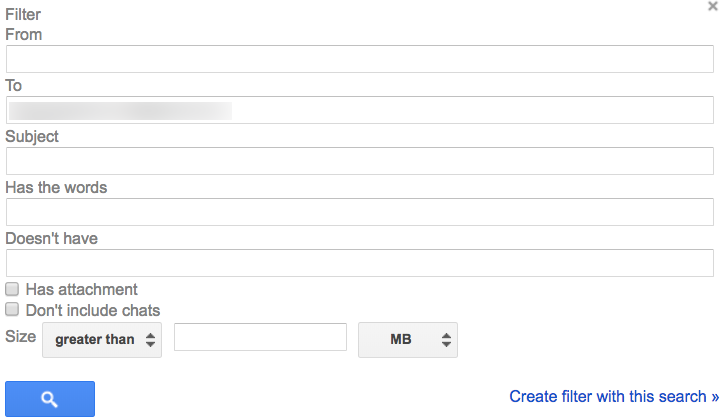
2) Delete the text in the From text field, and add your old email address to the To text box. Then, click Create filter with this search.
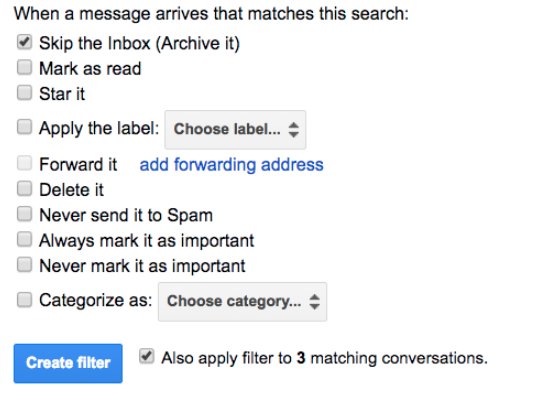
3) Check the box next to Skip the Inbox (Archive it) and the box next to Also apply filter to matching conversations. This will archive all of the old emails that are now in your inbox so that you don’t have to do it manually. Optionally, add a label to move these messages to a new label if you want—though each of your imported messages are already tagged with the new label you created earlier.

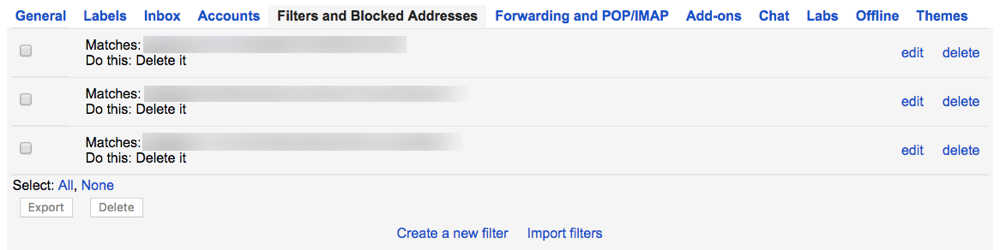
Now, when new messages come into your old account, you won't want those to get automatically archived too. So now you have to delete the filter you just created. This way any new email to your old account will arrive in your inbox.
Go ahead and click the gear icon again in your Gmail inbox view, and select Settings. Click the Filters and Blocked Addresses tab, find the filter you just created, and click the delete link to delete it.
Tada! You now have access to all of your old account’s archived emails in your new account, and you can send and receive emails in the new account for both your new and old accounts. Now, you just need to work on updating your email address—jump ahead to the next section if so.
Or perhaps not. If that didn't work for you, it's on to option 2 where you can forward emails from your old account to the new one.
Option 2: Forward Emails From Your Old Gmail Account to Your New One
If option one didn’t work for you, it’s not a total loss. With far fewer steps and permissions, you can have your old Gmail account forward all new emails to your new Gmail account. Here's how:
1) Log in to Gmail with your old account.
2) Click the gear icon, then click Settings.

3) Click the Forwarding and POP/IMAP tab, then click the Add a forwarding address button.
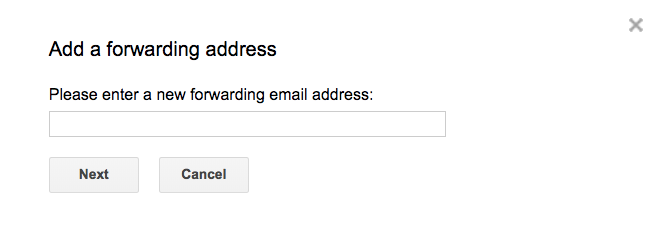
4) Enter your new email address, and click Next.
5) Gmail will open a new window confirming that you want to forward email to that address—click Proceed, then click Ok in the next window.
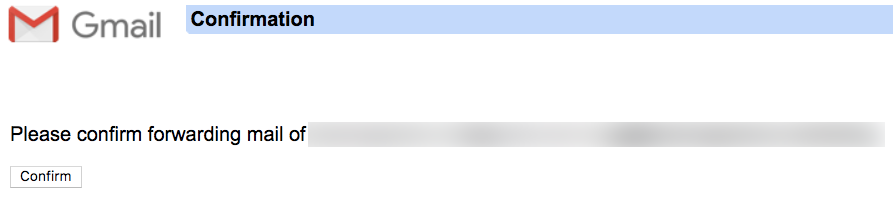
6) Gmail will then send a confirmation to your new email account that you want to receive emails from this account. Log in to your new Gmail account, open the confirmation email, and click the confirmation link to initiate forwarding. On the confirmation page, click Confirm.
Now all new emails sent to your old email address will be automatically forwarded to your new email address. You’ll have to manually change your email address for each place/person still using it, but there are some ways to make that easier listed in the section below.
Backup and Move Your Old Gmail Emails
Keep in mind that this only forwards new emails your old Gmail account receives—not archived emails you received in the past. If your old account is going to be deleted but you need to have access to its archive, use Google Takeout to download an email archive. In fact, this may be the only step you need to take if your email account will be deleted anyhow. Here's how:
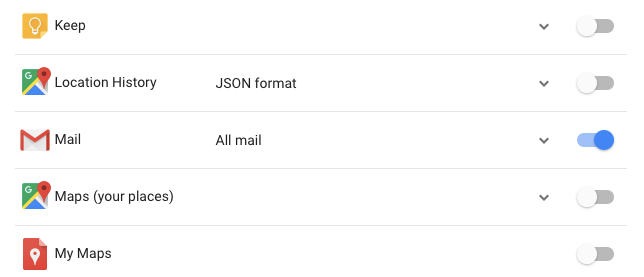
- By default, Google Takeout will let you download a backup of your entire Google account—but we only want the old emails. So, on the Google Takeout landing page, click Select All to unselect everything that Google already chose, then click the slider beside Mail to get just a Mail archive.
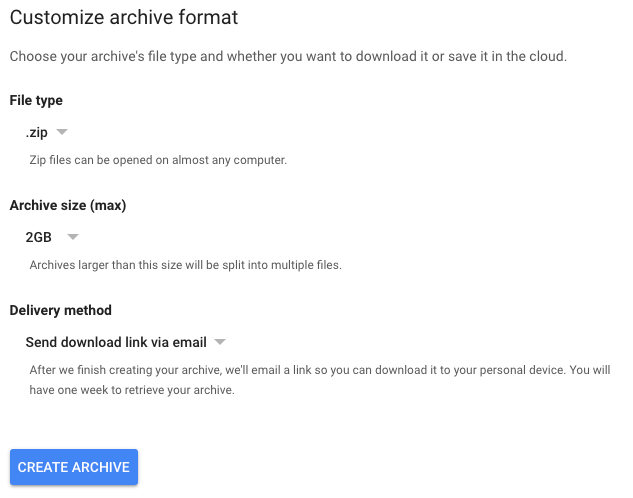
2) Click Next, then select your preferred file type, archive size, and delivery method—the defaults are usually perfect—and click Create Archive.
3) Depending on how large your mailbox is, this could take a few hours—or even a few days—to complete. Once it’s complete, though, Gmail will email you with a link to download your email archive.
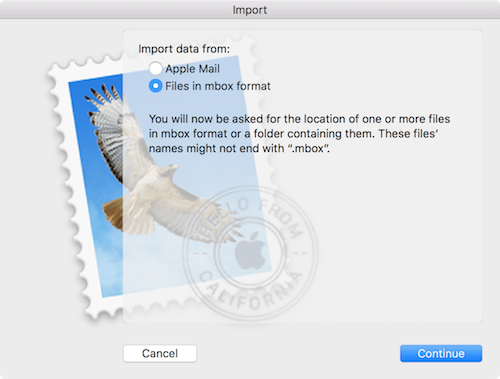
4) Next, you need to use an email app like Thunderbird, Apple Mail, or Microsoft Outlook to view and import your archive to your new Gmail account. Typically, you'll first login to your new Gmail account in the email app, then import the email archive and add it to the Gmail label you want. Wait for that to sync and you'll have all of your old emails in your new Gmail account. Here's detailed instructions to import Gmail emails in Thunderbird, Mail, and Outlook.
Notify People About Your New Gmail Address
Before losing access to your old Google account, you need to everyone you email know your new email address. One of the best ways is to add a Zapier automated workflow that will automatically create a new task whenever someone emails your old address and reminds you to let them know about your old address. Or, you could have Zapier automatically email the contact and let them know your new address without you needing to do anything.
First, make sure all emails sent to your old email address get a unique label when they’re received. If you followed all of the instructions in option one, this should be set up already. If you used the instructions in option two, create a rule to automatically label email sent to your old account:
1) Log in to Gmail with your new account.
2) Click the gear icon, then click Settings.
3) Click the Filters and Blocked Addresses tab, then click Create a new filter.
4) Enter your old email address in the To text field, then click Create filter with this search.
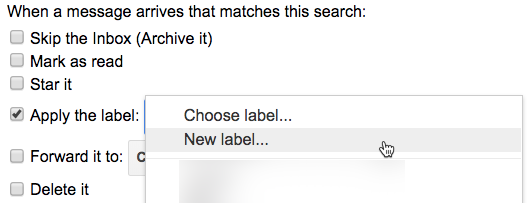
5) Check the box next to Apply the label, then click the Choose label dropdown and select New label.
6) Give your new label a name, and click Create, then click the _Create filter button.
Now, each email sent to your old email address will automatically get a label when it lands in your inbox. Next, you can set up a Zapier automated workflow—or a Zap as we call them—to add a task to your to-do list when an incoming email gets that label, reminding you to update your email address with the sending individual/company.
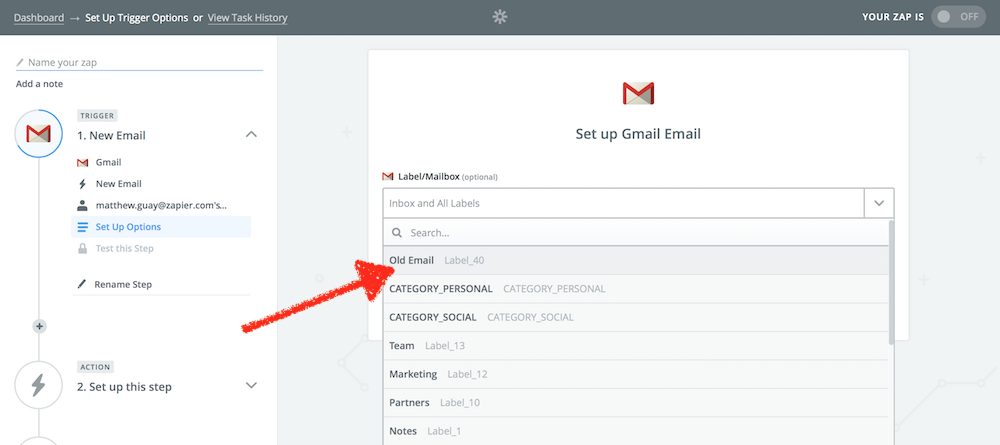
Open Zapier, and click the orange Make a Zap button in the top right corner. Select the Gmail app and the _New Email trigger, then connect it to your new Gmail account. Zapier then lets you select the label you want to watch for new emails. Select the new label you just made here.
You can then select your favorite to-do list app next, and have Zapier add a new task for you every time you get a new email to your old email address. That'll help you remember to let each person know they should start emailing your new address. Or, here are some pre-made Zaps to help you set that up faster.
Want Zapier to let them know automatically instead? Add a Gmail action to your Zap and have Zapier send the sender an email—or use this Zap to speed things up:
How to Merge Google Contacts Accounts
Unfortunately, the above steps don’t migrate your contacts—just your email. But you'll want your old Gmail contacts in the new Gmail account, too. Here's how to migrate contacts from your old Gmail account to the new one:

1) Login to Gmail with your old Google account.
2) Click the Mail dropdown, and select Contacts—or, just open contacts.google.com directly.
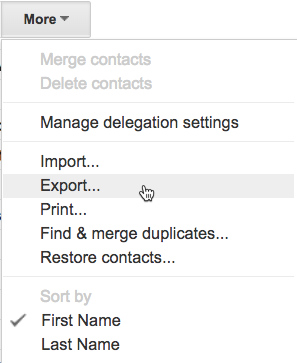
3) Click the More dropdown, and select Export. (Note: this only works in Google Contacts' old design; if you've upgraded to the new one, click the Switch to the Old Google Contacts button in the left first to see this menu).
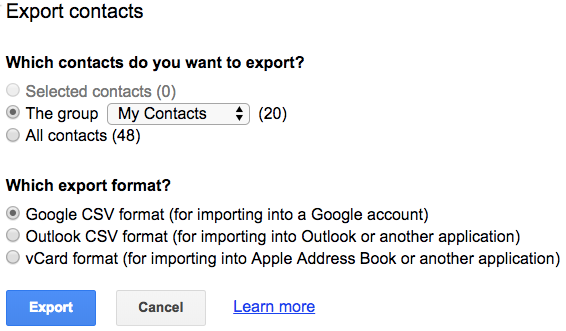
4) Select the contacts group you want to bring to your new account—or select All contacts to get everything—then click the button next to Google CSV format and click Export.
5) Log out of your old Gmail account, and log back in with your new Gmail account.
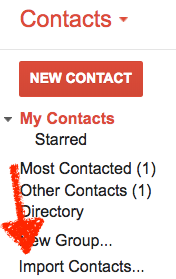
6) Switch back to the contacts view, and click Import Contacts in the menu on the left (and, again, if you're using the new Google Contacts design, click Switch to the Old Google Contacts first).

7) Select the CSV file, then click Import.
Now all of your contacts from your old account should be in your new Gmail account so you can easily email everyone you've stayed in touch with over the years.
How to Merge Google Calendar Accounts
If there's one other thing most closely linked to your Gmail account, it's your Google Calendar. Whenever you get an event invite in Gmail, it'll get added to your Google Calendar—as do upcoming flights, event tickets, and more. You'll want to take your old calendar along for the move as well.
To merge data from an old Google Calendar account to a new Google Calendar account, you'll need to export your old calendar, then import it into your new calendar. Here's how:
1) Log into Google Calendar with your old account.
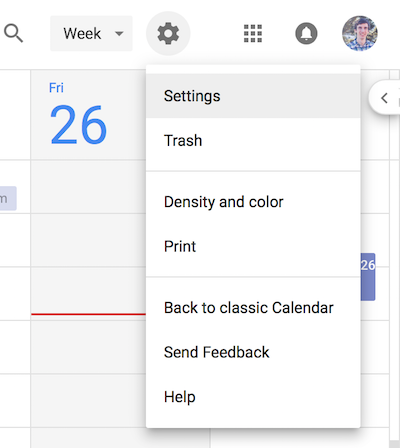
2) Click the gear icon, then click Settings much like in Gmail.
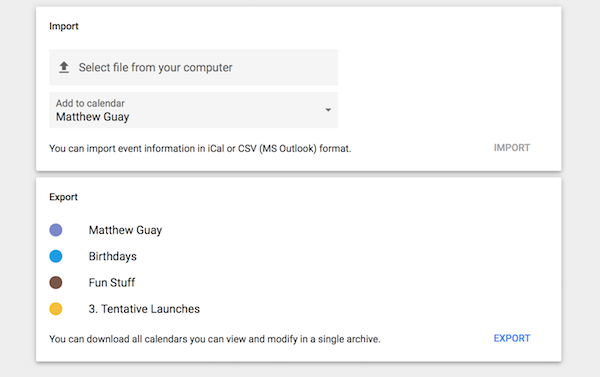
3) Click the Import & Export button on the left, then click the Export link on the bottom. Or, if you're still using the older Google Calendar interface, click the Calendars, then click Export calendars.
4) Find the ical.zip file in your Downloads folder and open it. Then, copy the .ics file to your desktop.
5) Log out of your old Google Calendar account, and log back in with your new Google account.
6) Click the gear icon, Settings and Import & Export (or the Calendars tab in the old Google Calendar). This time, click the Select file from your computer button under Import.
7) Select the .ics file you just downloaded from your old Google account. All of your existing meetings and events should now appear on your new account’s Google Calendar.
If you think there’s a chance that you’ll continue to receive new meeting invitations on your old account, turn on this Zapier workflow to automatically copy new events created in your old Google Calendar to your new Google Calendar:
And with that, you're done. All of your email, contacts, and calendar appointments are in one place—your new Gmail account—and you'll still get any messages or appointment reminders that come in to your old account. It's the best of both worlds.
Image Credits: Title photo by Rawpixel via Canva.
source https://zapier.com/blog/combine-gmail-accounts/
No comments:
Post a Comment