
Odds are you learned how to address an envelope as a child, perhaps as a school exercise to send your parents a postcard. It's simple enough.
Until you need to address 50 packages a day. That's when you'll start looking for a simpler solution.
You could type up your labels in a word processor to save time—but we have some better tricks. Here are 3 ways to automate your shipping label process, from simple tricks that take a couple steps each time to a fully automated workflow.
- Make Shipping Labels Automatically in Google Docs
- Create Plain Text Shipping Labels From Dropbox
- Automatically Make and Print Shipping Labels With Zapier
Make Shipping Labels Automatically in Google Docs
Let's start with the simplest option: Making shipping labels in Google Docs using the Avery Label Merge add-on. If you have a spreadsheet with addresses, it can turn them into ready-to-print labels in seconds.
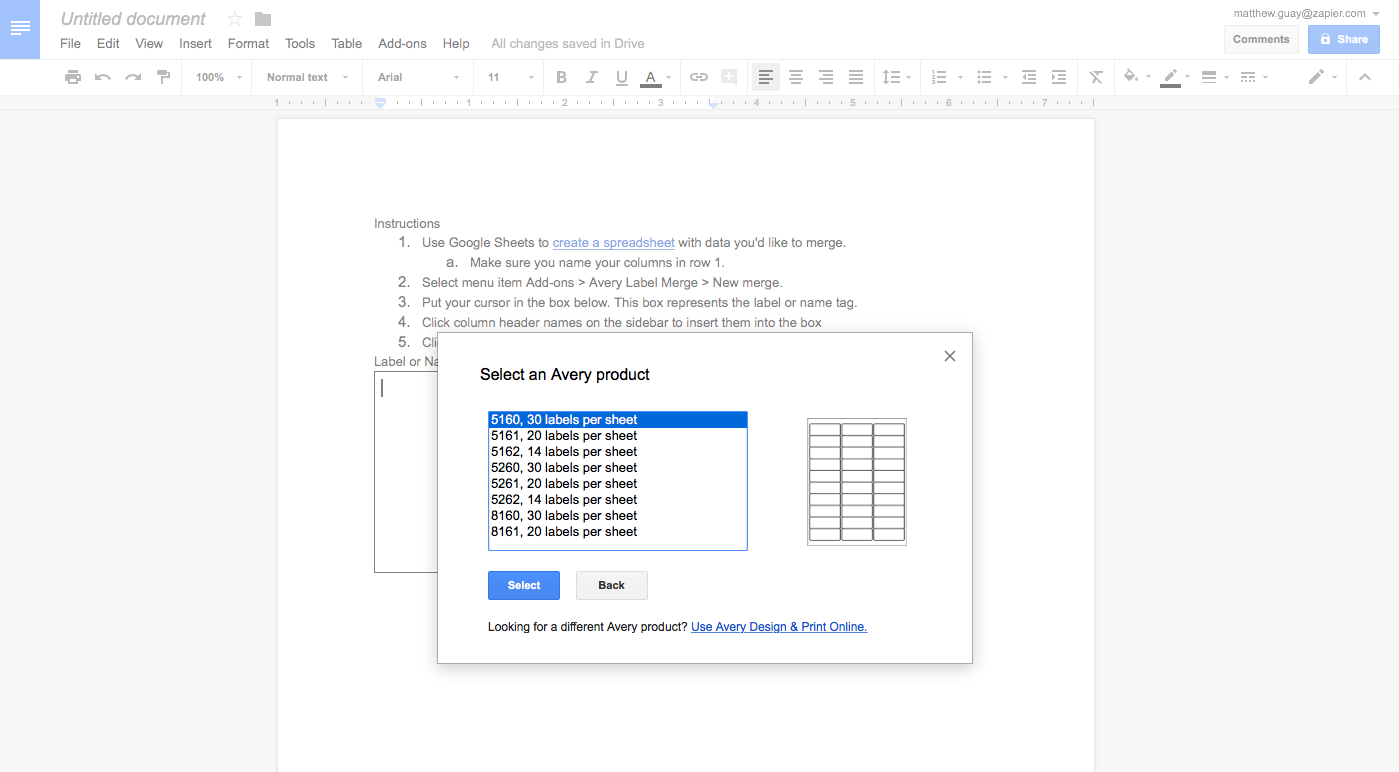
First, open Google Docs, and install the Avery Label Merge add-on from that link or via the Add-ons -> Get Add-ons… menu. Once it's installed, click Add-ons -> Avery Label Merge -> New merge to start making labels. That'll open a popover where you can choose which type of label and the size of label paper you'd like to use.
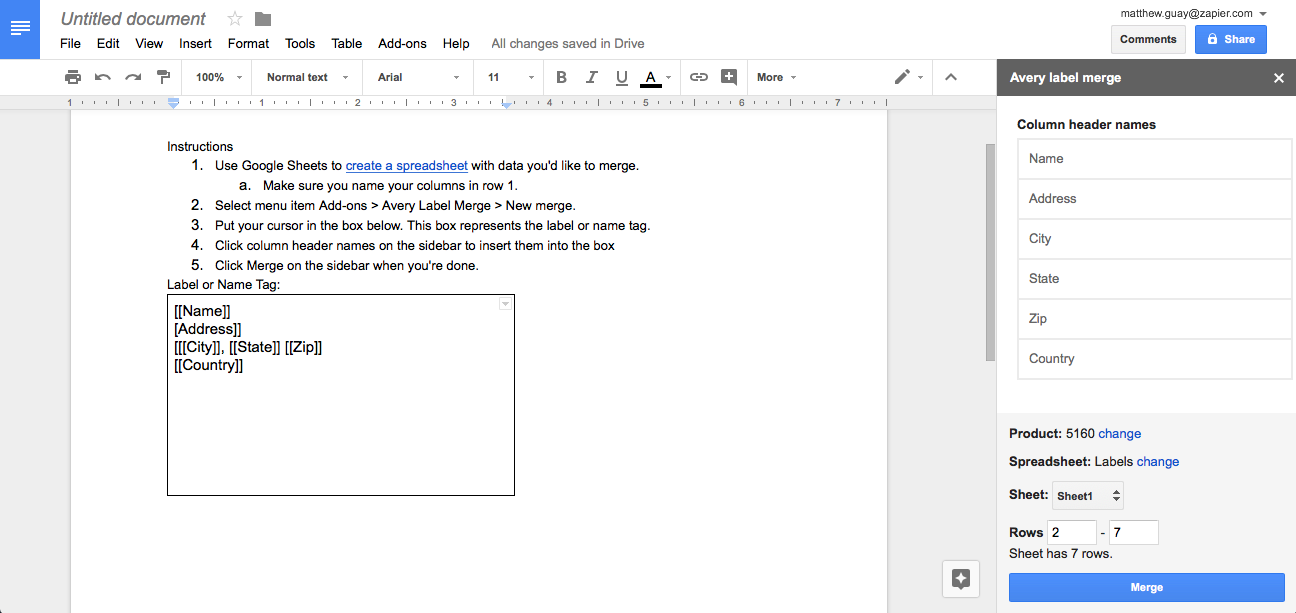
Avery Label Merge needs a spreadsheet with the addresses you want to use in labels—and for that, it relies on Google Sheets, the spreadsheet sidekick to Google Docs. Make sure you have a spreadsheet with those names and addresses, then in the Avery Label Merge add-on in Google Docs, choose the Google Sheets spreadsheet that has your addresses. The Avery add-on will then add a square to your document—and open a sidebar on the right. Click in the square first, then click the fields from your spreadsheet you'd like to add to your label. Press your return key to add new lines, as normal, and type any extra characters you want on the label.
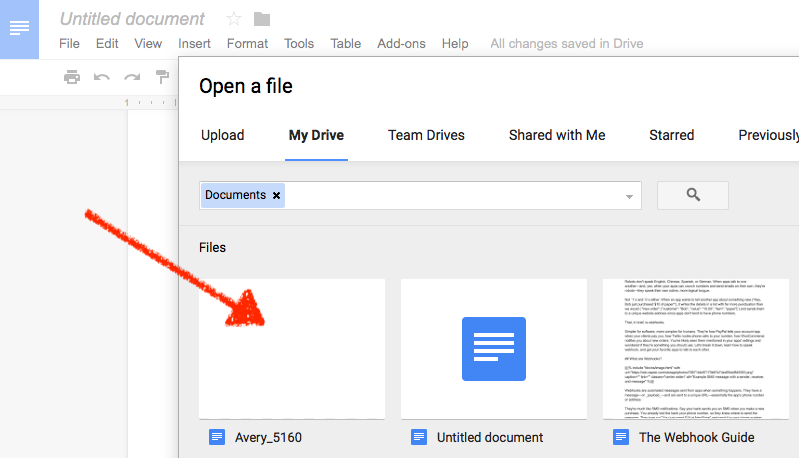
Once you're finished, click the Merge button, and Avery Label Merge will make a new Google Docs document with your finished labels. Click File -> Open and select the newest document in the list—with the name of your label size, such as Avery_5160—to see your completed labels. You can then tweak the font and color of your labels, if you'd like, or print them directly.

Want to automate things? Anytime you get a new order in your eCommerce store, or save a new contact to Google Contacts or your CRM—or do anything else where you'd need a shipping label—automation platform Zapier can save the address to your spreadsheet automatically.
Just open zapier.com, click Make a Zap, and select the trigger app you want—the app that has the new addresses you need. Then, select Google Sheets as the action app, and choose the Create Spreadsheet Row action. Choose the spreadsheet where you're storing addresses for labels, and click the + button beside each field to add data from your store or CRM or other app to the spreadsheet.
Turn on the Zap, and every time a new contact or order or other item is added to your trigger app, Zapier will copy it to your spreadsheet. And when you're ready to print labels, open Google Docs and run the Avery Label Merge like before.
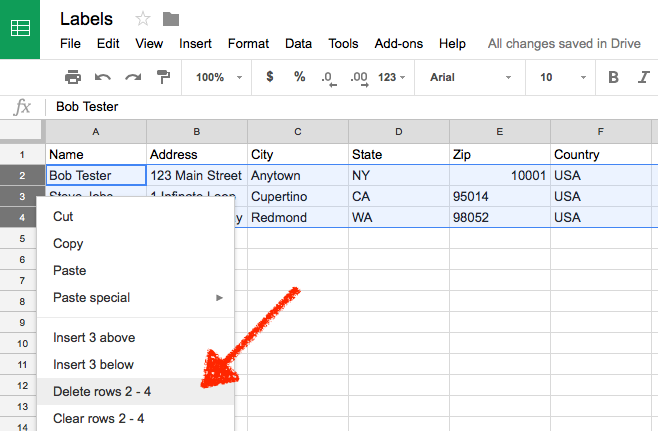
You likely only want to print these labels once, so to start out with a clean slate next time, open your spreadsheet after you've made your labels. Select each row with addresses on the left of the spreadsheet, then right-click and click Delete Rows.
The next time you get a new order or contact, Zapier will start over and add it as the first address—and when you to go print labels, you'll only get the addresses you want.
Ready to automate your own labels? Here are some pre-made Zaps to help you get started adding addresses to your spreadsheet automatically:
Create Plain Text Shipping Labels From Dropbox
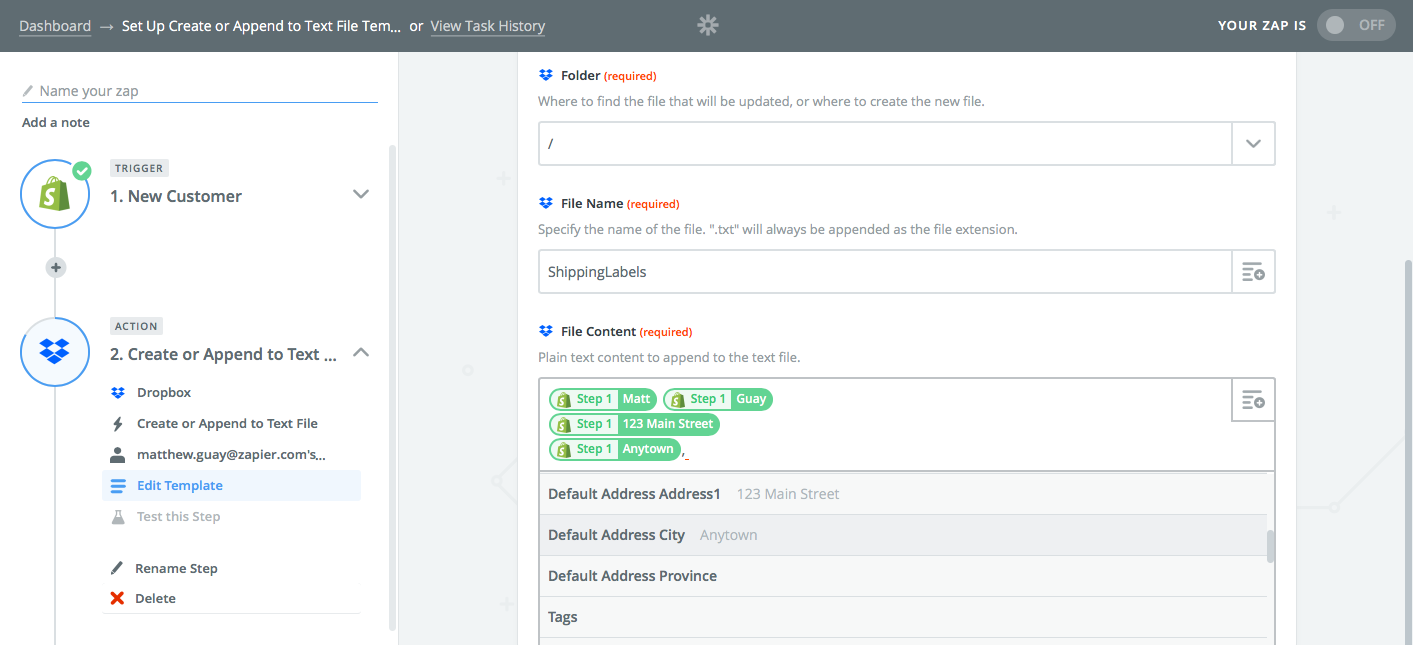
Want to automatically make labels on your own with the formatting you want? Another great option is using Zapier's Dropbox integration. Zapier can add each new address to a plain text file in Dropbox, where you can then print out the page or format the labels the way you want.
Make a new Zap and choose your trigger app that'll have the new addresses as in the steps above, then choose Dropbox as the action app. Select the Create or Append to Text File action, then choose the Dropbox folder where you want to save your label file, and give the file a name.
In the File Content box, click the + icon on the right and select the address parts you want to add to the document. Add spaces, commas, and other text you want included in the labels—and include a few blank lines below the address for a gap between this and the next label. Turn on the Zap when you're finished.
Now every time a new address comes in, Zapier will add it to your text file. When you want to print labels, open that file from Dropbox on your computer and print it for a list of labels.
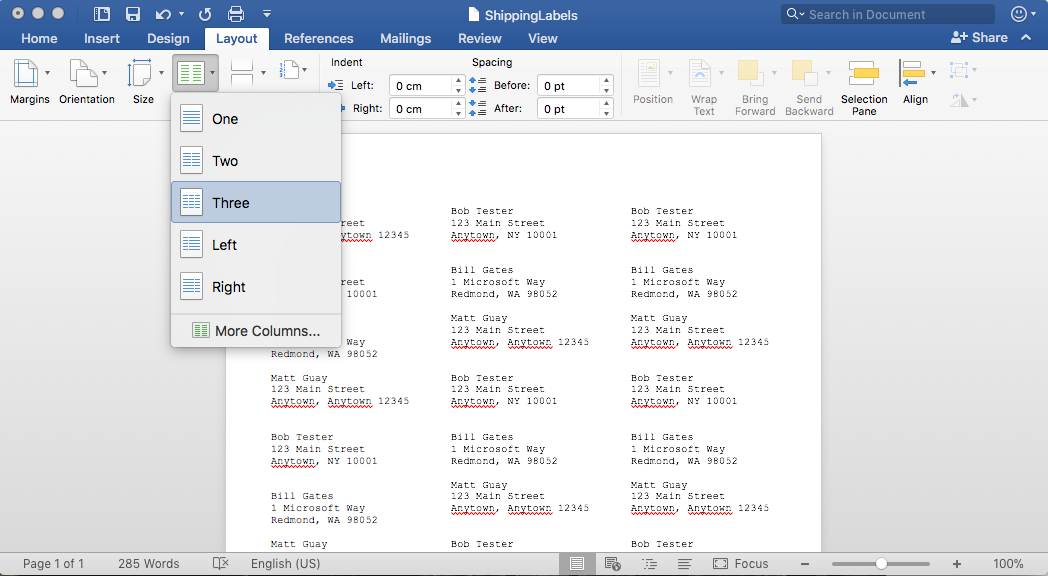
Or, better yet, open it in a word processor like Microsoft Word, and add multiple columns. In Word, select the Layout tab, then click Columns and choose how many columns you need (3 tends to work well for labels). Now print the page, and you'll have all your labels ready to go.
Once the labels are printed, delete all the text in the document, and Zapier will start over adding your next new orders and contacts to the blank sheet.
Automatically Make and Print Shipping Labels With Zapier
The first two options automate away 90% of the label making work—and are quite simple to set up. But there is one more option if you have around 15 minutes to build a more advanced Zapier automation. And this time, your labels will automatically print themselves every time, without you ever needing to click anything.
Here's how it works: You'll have Zapier watch for new addresses, and save them for later. When you have enough addresses to fill a sheet of paper, Zapier adds all of them to a document template, then will print the labels automatically.
Let's give that a try.
1. Make a Shipping Label Template Document
Before you get started, you need to make a template shipping label document that Zapier can fill in. The best way to do that is with WebMerge, an app designed for automatically filling in template documents.
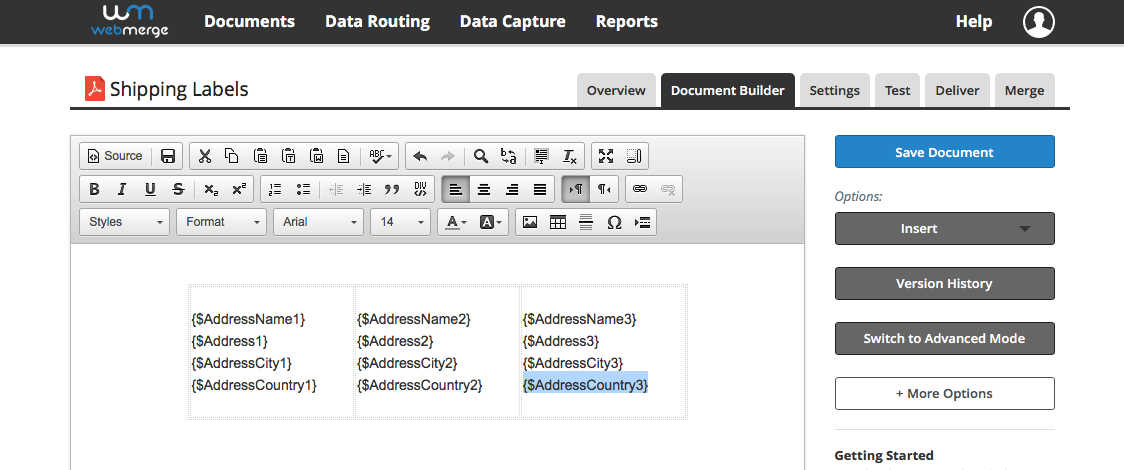
Open WebMerge, click New Document, give your document a name, then select Build Your Own. That'll open the document builder where you can add any text and formatting you want to your document. For shipping labels, you'll likely want to add a 3-column table with as many rows as you want for your addresses. In this example, we're only making one row—but you can fill out the page with as many rows as you want.
In each cell, add the address fields you want Zapier to fill in with curly brackets and a dollar symbol before the field name, like {$AddressName1} for the first address name field. Repeat that for each field—and then add the same text to the next rows and cells, changing the number so each cell has its own unique set of name and address fields, like the following:
{$AddressName1}
{$Address1}
{$AddressCity1}
{$AddressCountry1}
Click the floppy icon in the toolbar to save your document as you're working—and once you're finished, click the blue Save Document button to save the full template.
2. Count Each New Address
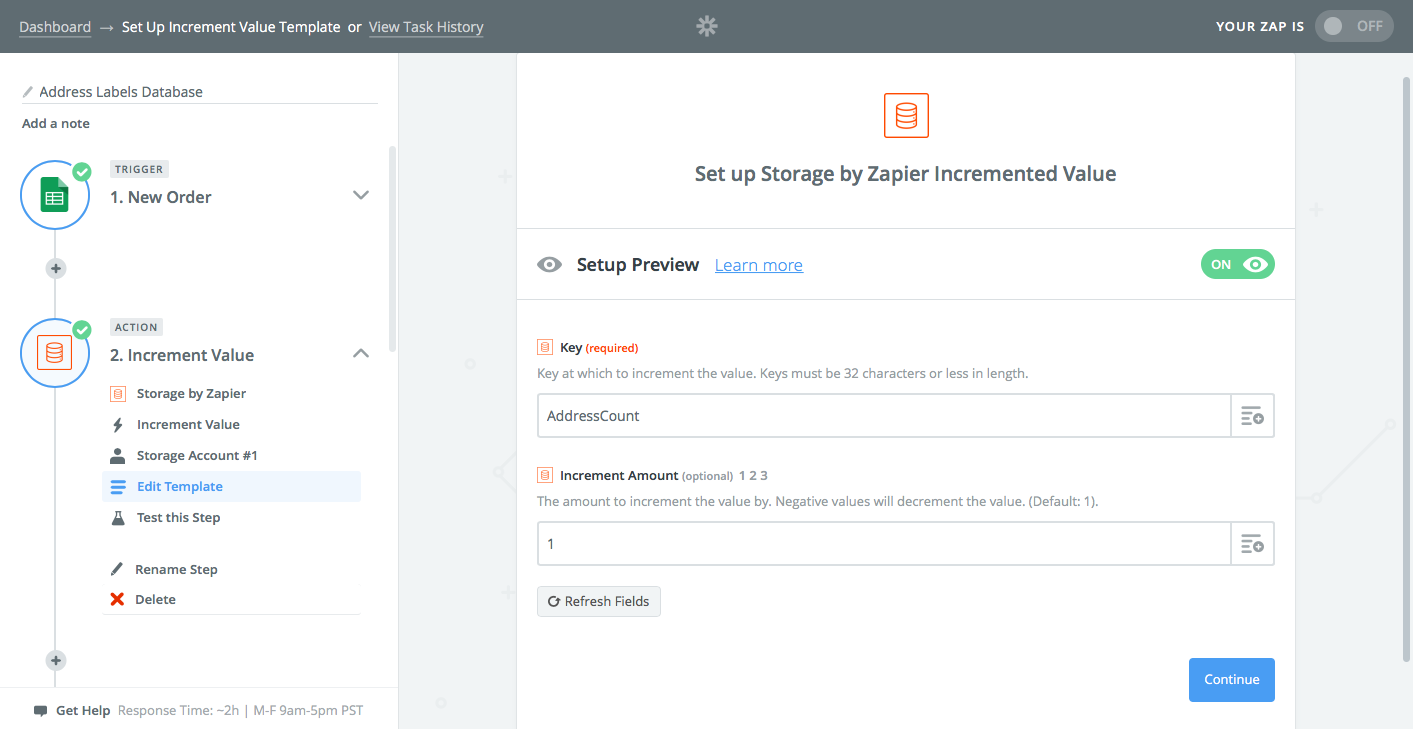
You're now ready to make your Zap. As before, you'll start by adding the trigger app that will have new addresses—your store, payments app, CRM, even a spreadsheet. Then we'll add a counter to keep track of how many addresses Zapier has found—that's important so we know when to print a full sheet of labels.
For that, add a Storage by Zapier action as your Zap's second step. Select the Increment Value action, then add a unique name that's easy to remember (we used AddressCount) and add 1 to the Increment Amount box.
This will add 1 to the count every time Zapier gets a new address.
3. Save Each Address
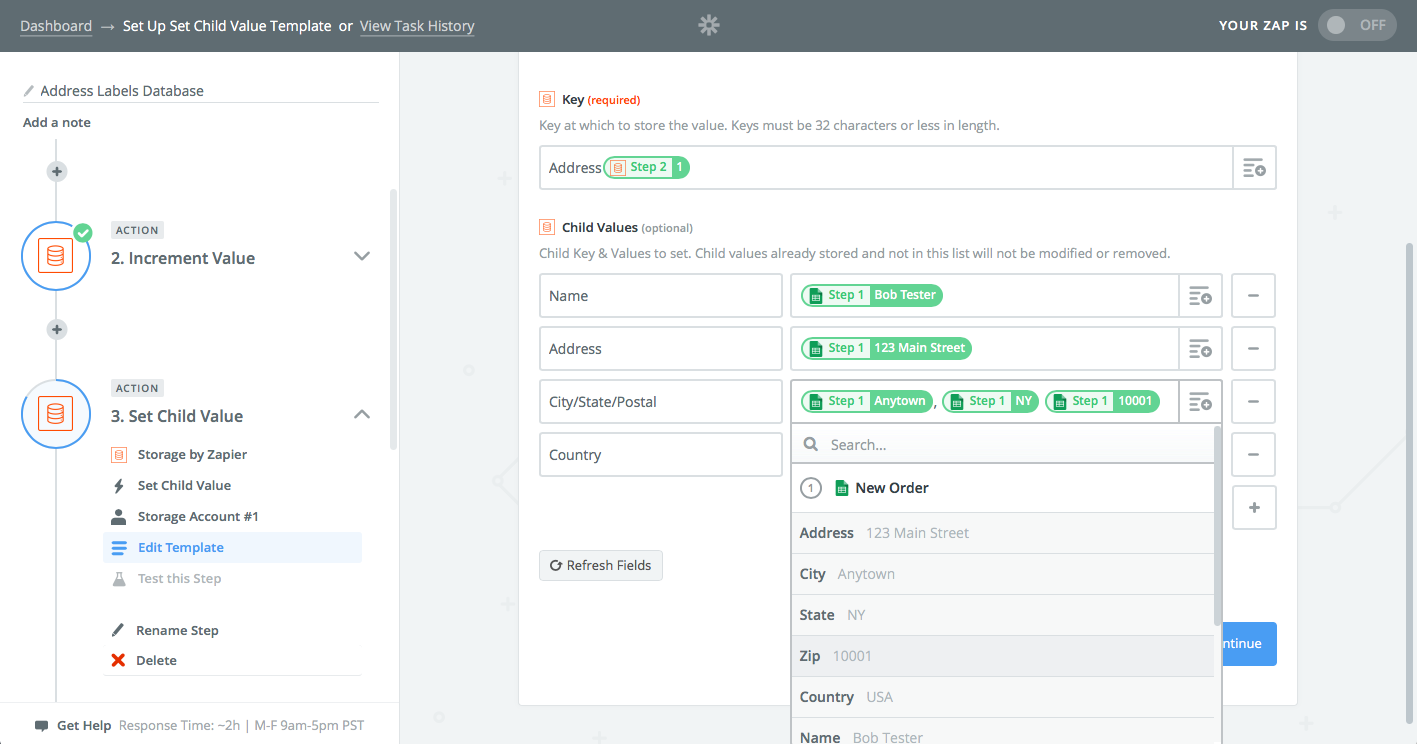
We'll then have Zapier save the address. Add a third step to your Zap, choose the Storage app again, and this time use the Set Child Value action.
We need the key to be unique for each address, so for the Key field, this time type a name (we used Address) then click the + button on the right and select the Value field from step 2. That will have Zapier save this address as Address1, then the next as Address2, and so on.
Now, add a name for each part of your address and select its corresponding field from the + button under the Child Values. We added a Name field and selected the name from our trigger app, an Address field for the address, and then for the City field we filled in the full City, State Zip style data to have everything in one line.
4. Wait Until You Have Enough Labels With a Filter
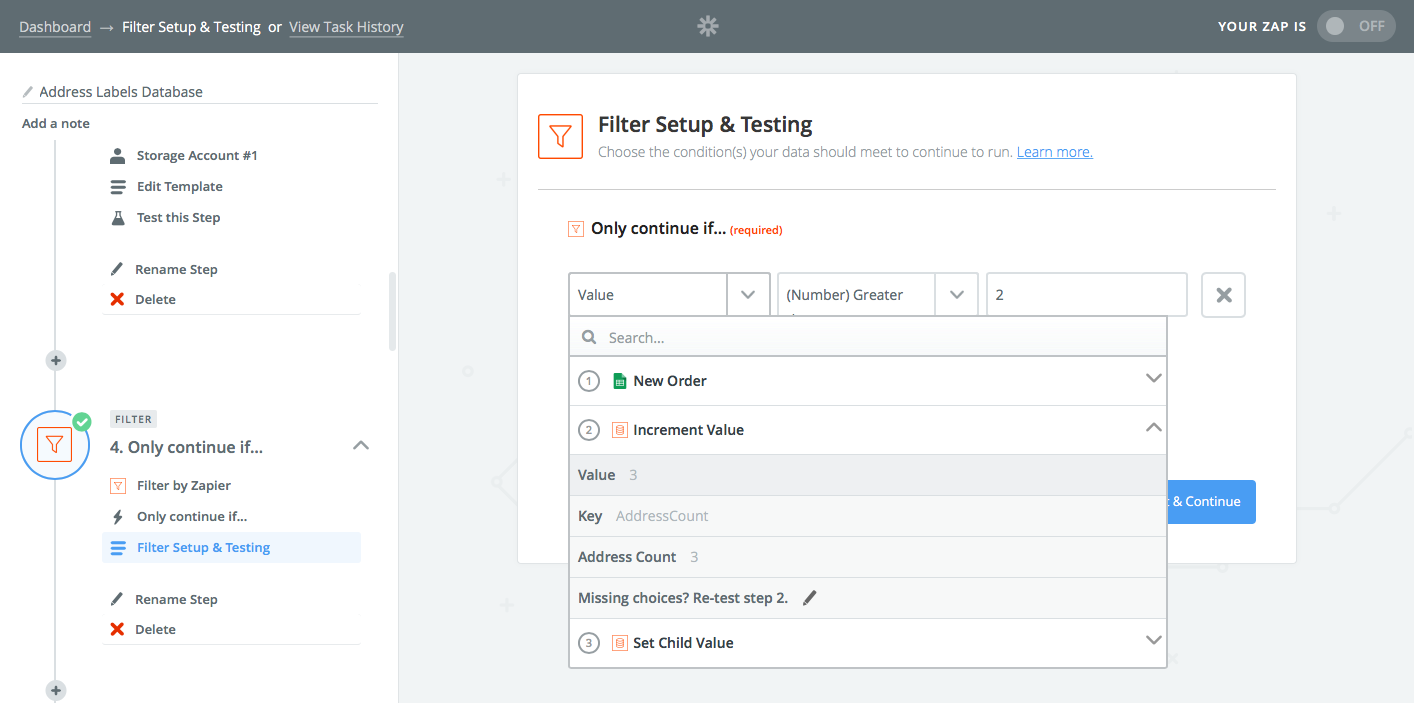
You don't want to waste your label paper—so Zapier can wait to print until you have enough addresses to fill up a sheet. Do note: the steps below are a bit tedious if you wait for a lot of addresses, so it might be best to print a row or two each time instead. Just think through how many addresses you'd like to print at once.
Add another step to your Zap and choose the Filter by Zapier action. Under the Only continue if header, click the down arrow on the left and select the Value field from your Zap's second step that's counting the addresses. In the center menu, select (Number) Greater than, and in the text field on the right, enter a number that's one less than the number of labels you want to print. For instance, we entered 2 since we want to print 3 labels.
This filter will now watch the counter, and if there are 3 labels ready, it will proceed to the next steps. Otherwise, the Zap will keep waiting for more addresses.
5. Grab Each Address Zapier Saved
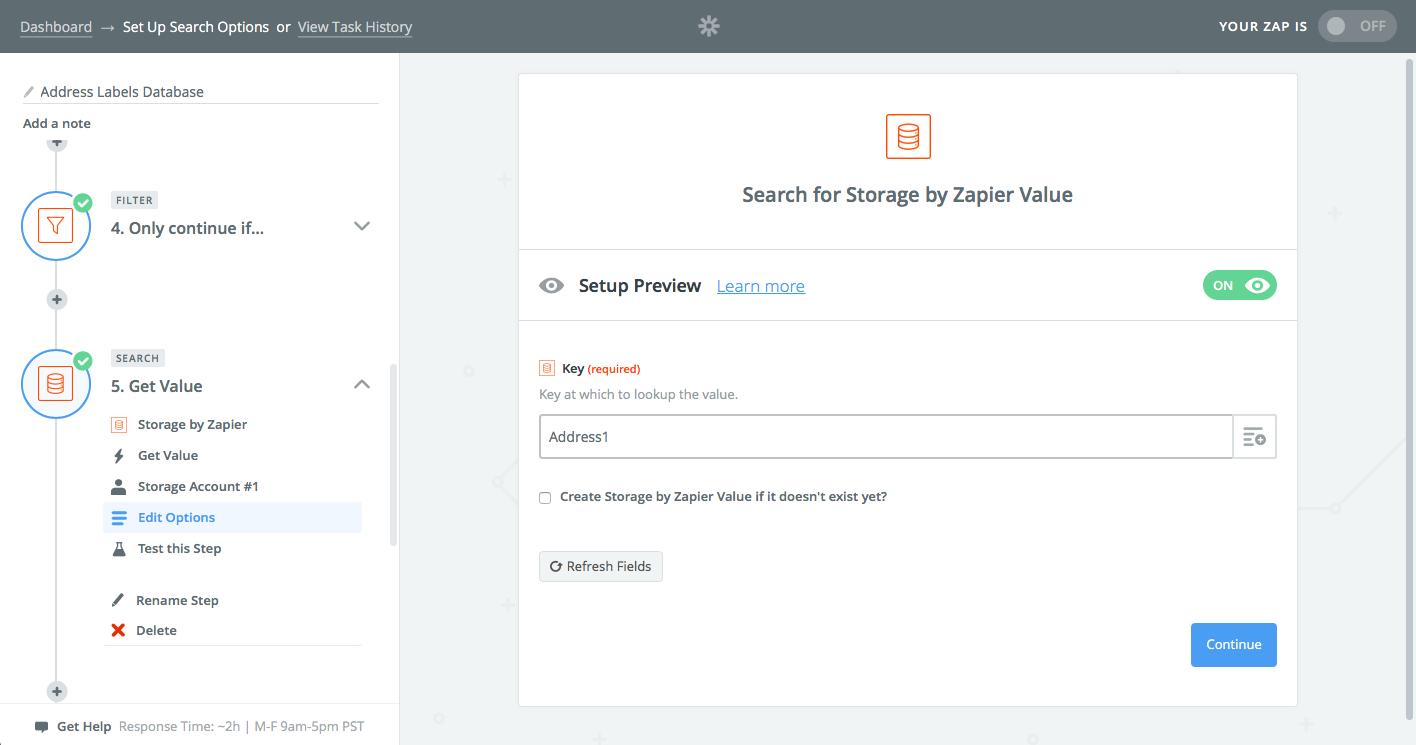
It's time to have Zapier pull up all the addresses it saved. To do so, add a Storage action again, and this time choose the Get Value trigger. In the Key field, enter the name you used for addresses in step 3 with a 1 after it—which would be Address1 if you did the same as us.
That will grab the first address—we still need to get the other ones, too. So, add one more step for each of the addresses you're saving, and add the correct key for each (aka Address2 for the second one, Address3 for the third, and so on).
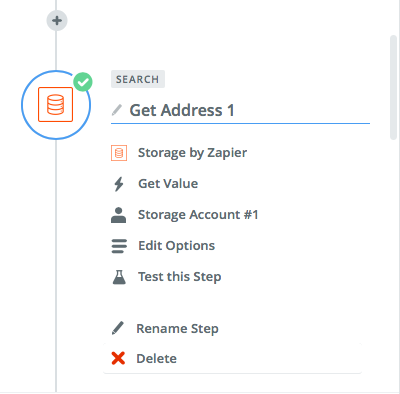
In this example, we added 3 Storage Get Value actions since our Zap is waiting until we have 3 addresses until it prints. If you want to print 6 addresses at once, you'll need to add 6 Storage Get Value actions.
To make sure you don't get confused, click the Rename Step link at the end of each of these steps and give them a unique name so you'll know which step has which address.
6. Add the Addresses to Your Shipping Label
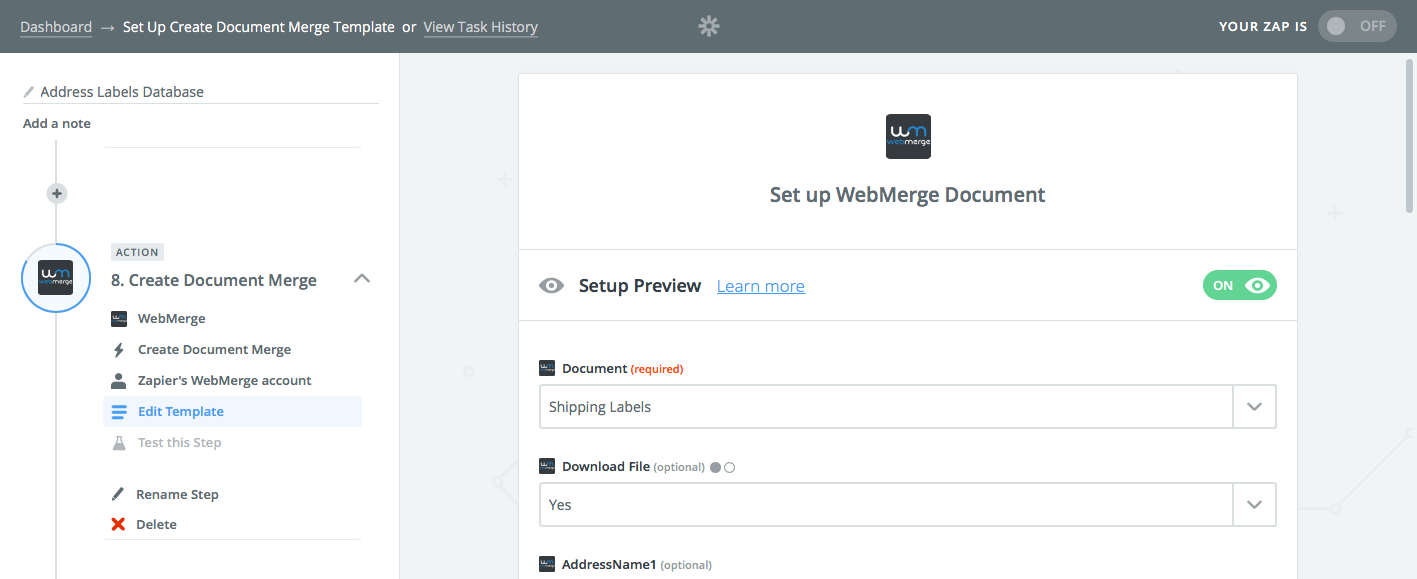
It's finally time to add the addresses to your shipping labels. Add a new action to your Zap, select WebMerge, and pick the Create Document Merge action. Pick the template you made before from the Document menu, and select Yes under Download File so Zapier will get a PDF copy of your labels to print out.
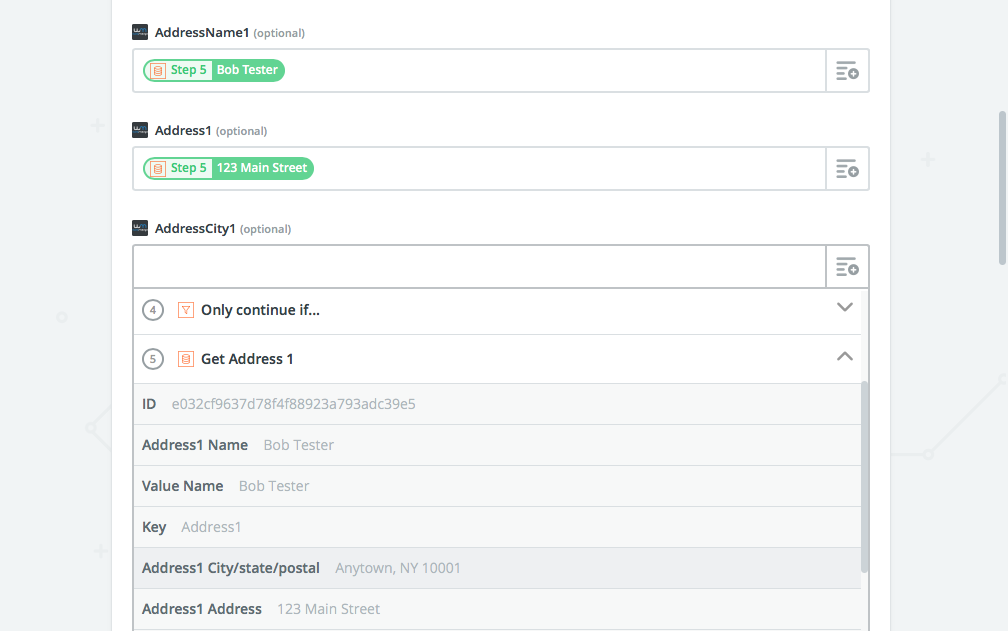
Then you need to add each address part to the correct address field from WebMerge—and yes, this is tedious. Start out with the first row—AddressName1 in our screenshot—and click the + button on the right, then select the Get Address 1 action and click the Name field from it. Repeat that for each Address1 field—then switch to the Get Address 2 action when you get to Address2 fields, and so on.
In a few minutes, you'll get it all filled in, and will have each of your saved addresses mapped to the correct WebMerge fields. Whenever Zapier has enough addresses in the counter, it'll copy each and add them to the correct template fields, just like you want.
7. Reset the Counter
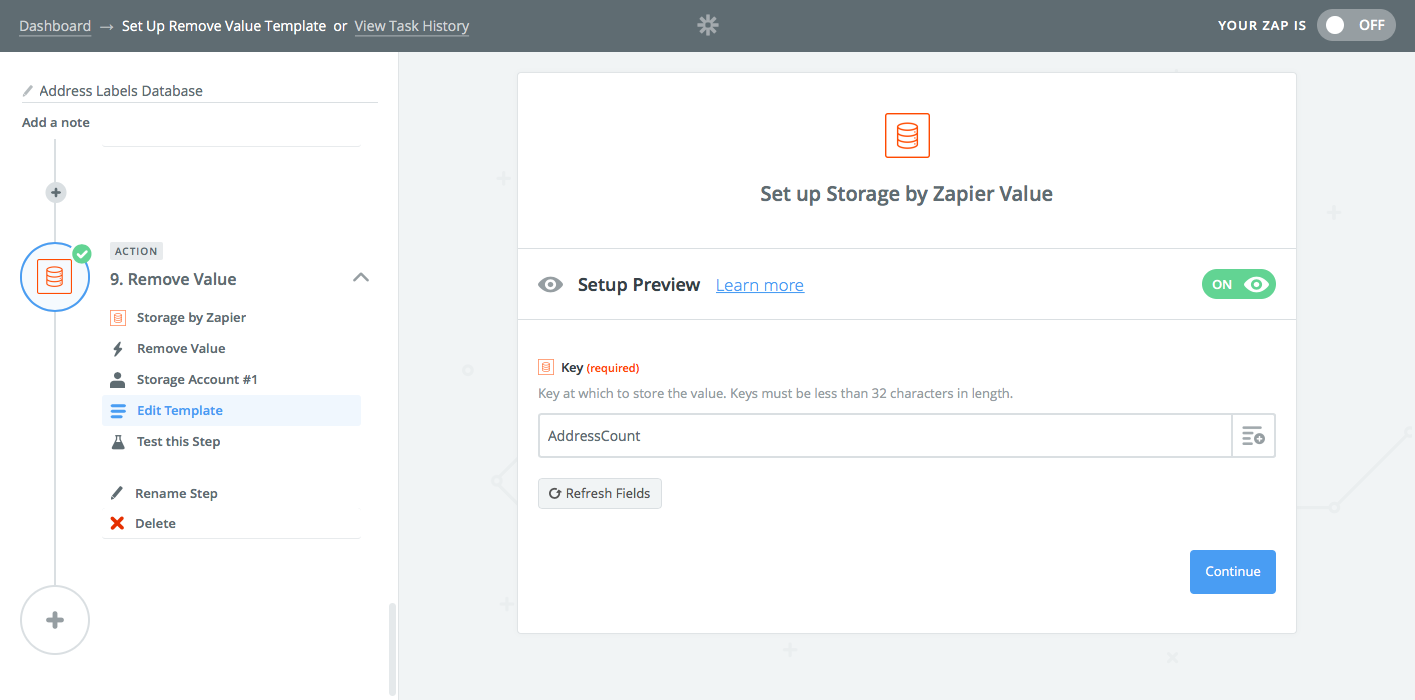
You're almost done—but we don't want our Zap to miss any labels. So as soon as Zapier makes the template document in WebMerge, we want to reset the counter back to zero so Zapier can start saving new addresses when they come in.
Add another Storage action to your Zap and this time choose the Remove Value action. Enter the name of your counter—AddressCount, if you used the same name as us—and Zapier will switch the count back to 0.
8. Print Your Labels Automatically with Google Cloud Print
Now for the most fun step: Printing the labels automatically. Using Zapier's Google Cloud Print integration, you can have your labels printed out on paper automatically.
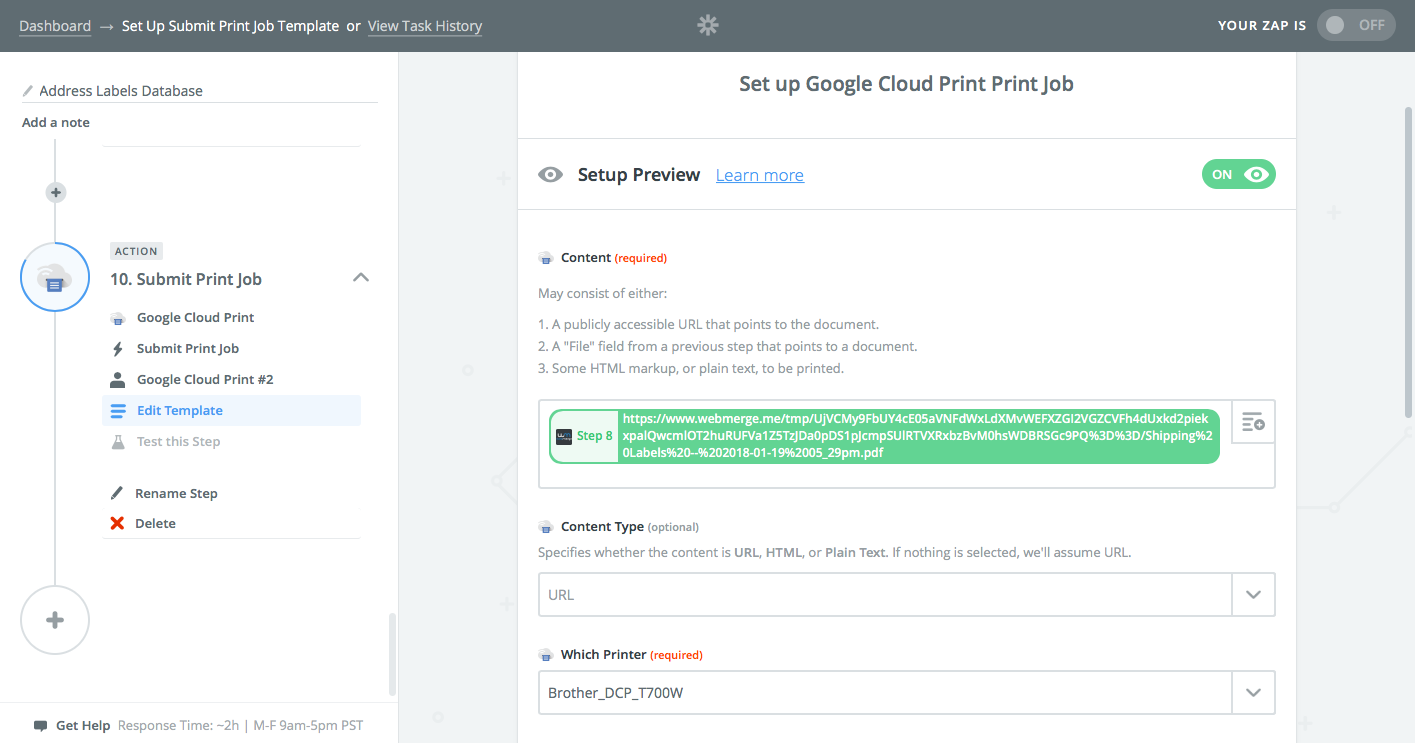
You'll need a Wi-Fi printer or one connected to your computer that's set up with Google Cloud Print—here's how if you haven't added it already. To print the labels, add a final step to your Zap and select the Google Cloud Print app.
Click the + box beside the Content field, and select the URL item from the WebMerge step—that contains a link to a PDF copy of your finished labels. Now choose the printer you want to use and test the step, and seconds later your labels should print out automatically.
Turn on the Zap, and you're finally done (yay!). The next time you get an order or have a new address saved, Zapier will copy it, wait until it has enough, then print out your labels automatically when it's ready.
Want to manually print out labels when you want, even if there aren't quite enough yet? Zapier's Chrome extension is the perfect way to do it. That, paired with Zapier's Push integration, lets you push a button in Chrome to run your Zpa whenever you want. Install the Chrome extension, then go to your Zapier dashboard, click the down arrow beside that printing Zap you just built, and select Copy. Open that new Zap, and change the trigger app to be Zapier's Push app.
Remove steps 2, 3, and 4 from your Zap, as this time you're not adding new addresses. Turn the new Zap on, and name it something easy to remember—perhaps Print Label. Now whenever you want the labels that are ready, click the Zap's button in Zapier's Chrome extension, and Zapier will print the labels out for you right then (though note, you might get some duplicates of older labels as well).
You've done it—you've automated the hard work of making labels, and the next time something needs to be shipped, you'll have a paper label ready to stick on the envelope in a few clicks, or none.
Printers still jam and run out of ink at the worst times, and your customers are still apt to mistype their address or forget to include a postal code every now and then. But this should automate away most of your label making frustration, saving you time and helping you focus on your customers.
Continue Reading: Automate Your eCommerce Store With Zapier
Need those shipping labels for your online store? Those are far from the only routine task you'll want to automate. You'll need tools to help you list products on every marketplace you want to sell, workflows to reach out to customers and thank them for their purchase automatically, tips on how to keep everything organized and documented correctly.
We've got a book for you. In Zapier's Ultimate Guide to eCommerce Software, you'll find the apps, tips, and workflows you need to streamline your online business. And, it's free. Download your copy today to have the tips you need as you run your new eCommerce store.
Header image by Bench Accounting via Unsplash
source https://zapier.com/blog/print-shipping-labels/
No comments:
Post a Comment