Facebook ads put your product or service in front of billions of people on the social network. But what happens when those people see your ads and then become customers outside Facebook—whether it's on your site, at your brick-and-mortar store, or at some other point of sale? Facebook will let you connect the dots to measure the success of your campaign with Facebook Offline Conversions.
Facebook Offline Conversions provide a way to match events like store visits, email opens, and webinar signups to your Facebook ads. By connecting those "offline" events with data on who's seen your ads, you'll be able to gauge the success of your social advertising campaigns and optimize based on performance.
- Get Started with Facebook Lead Ads
- Automate Your Facebook Lead Ads
- Track Ad Success with Facebook Offline Conversions
- Automate Your Workflows for Facebook Offline Conversions
Get Started with Facebook Lead Ads
Facebook Offline Conversions can capture info from any app where you store customer data and send it back to Facebook to determine how your customers found you. Here, we'll walk you through the process of connecting your conversions specifically to your Facebook Lead Ads. While a Facebook Lead Ad may look like any other social media ad at first glance, it includes a sign-up button and lead form, which allows users to interact with your company without ever leaving Facebook.
After clicking the ad's button, Facebook users complete a form that already includes pre-populated information from their Facebook profile. No need for your potential customers to visit a website landing page: Facebook Lead Ads simplifies the lead submission process to just one click, cutting down on friction—especially for mobile users.
Here's how to set up Facebook Lead Ads:
- Go to the Facebook Ads Manager, select your ad account, and click "Create Ad." Be sure to pick "Lead generation" as the marketing objective.
- Select the Facebook Page you'd like to promote, and then define the audience for your ad.
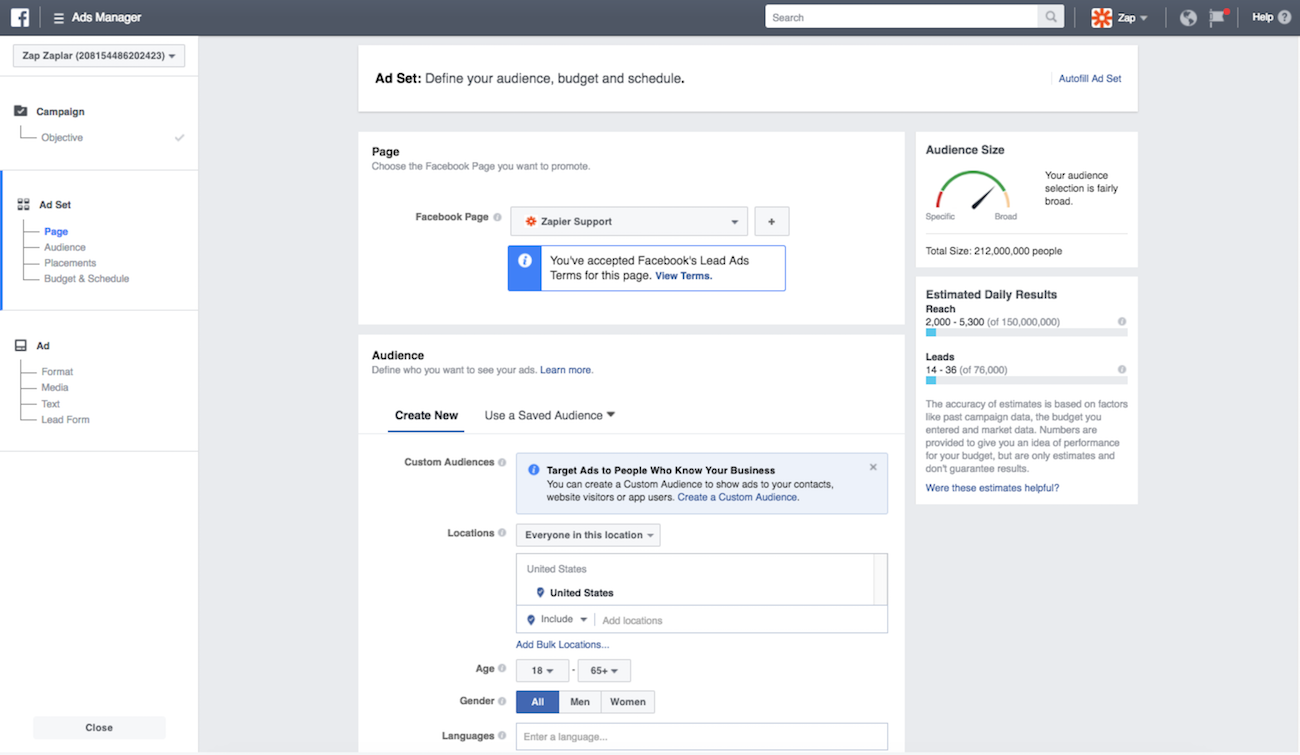
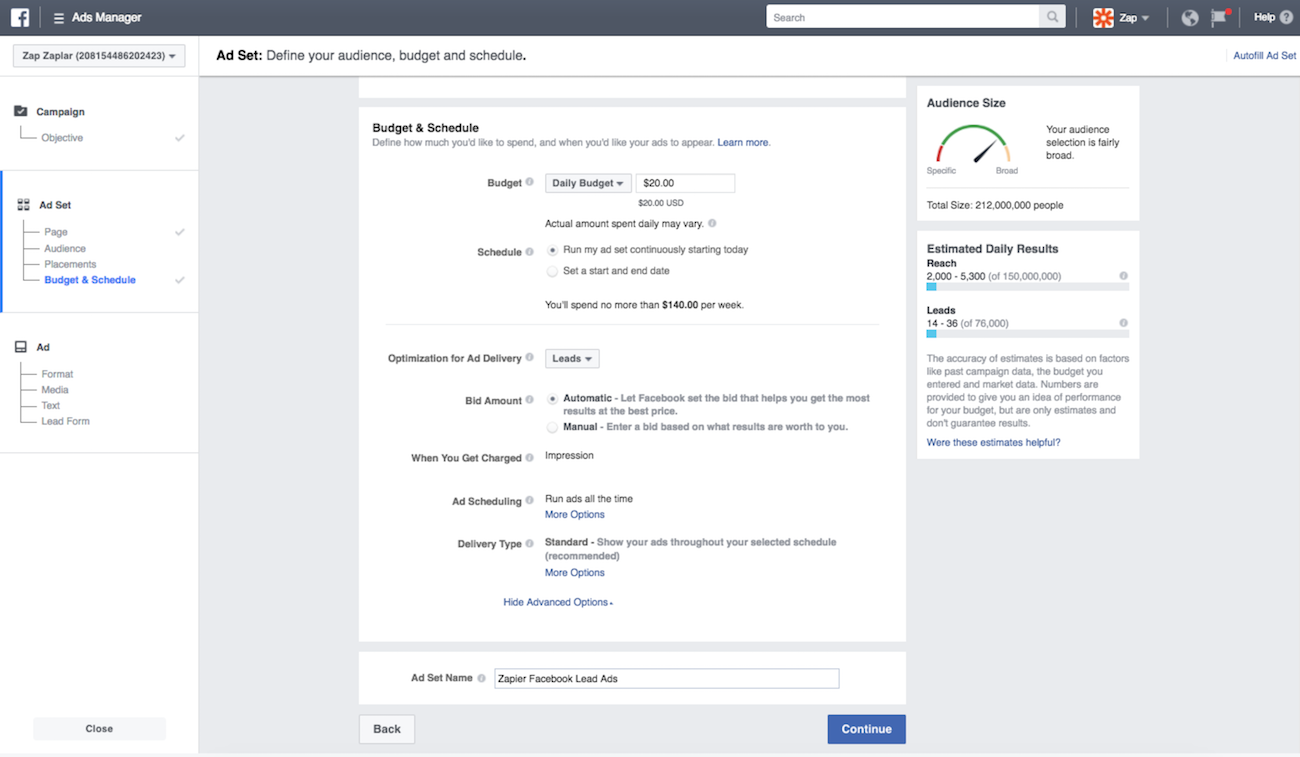
- Scroll down to decide where and when you'd like your ads to show across Facebook and Instagram, and finalize the budget.
- Create the ad, choosing the format that will best support the call to action (CTA): scrollable carousel of images or videos, single image, single video, or slideshow. Write headlines and text to craft your message, and finish by picking a CTA button.
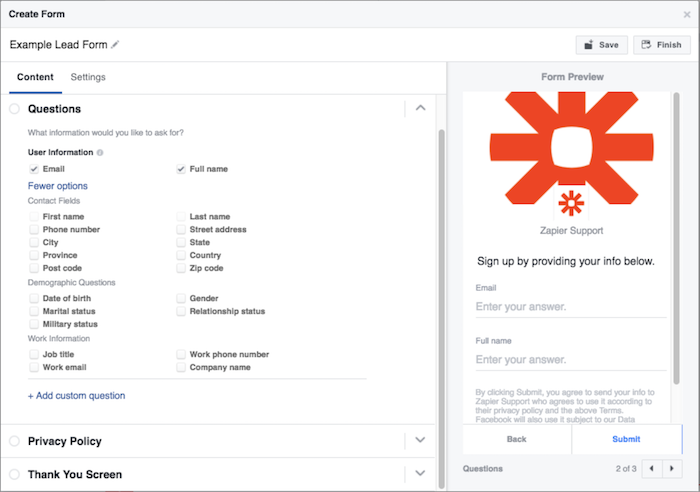
- Finally, create the lead form: the screen that your prospects will see after clicking the CTA button.
Automate Your Facebook Lead Ads
Once you've set up your Facebook Lead Ad, you'll want to automate your account so you're not manually uploading leads to other services. Depending on the apps you use to keep track of customers and sales, you have several choices for how to connect Facebook Lead Ads to your other web tools.
- Direct integration with Facebook, if your customer tools offer it. Go to your Facebook Page as an admin and click "Publishing Tools." Look for "Lead Ad Forms" in the menu on the left, then click "Leads Setup" and type in the name of the CRM you'd like to connect. If your CRM offers a native integration, Facebook will provide a link to its website where you can follow the setup directions.
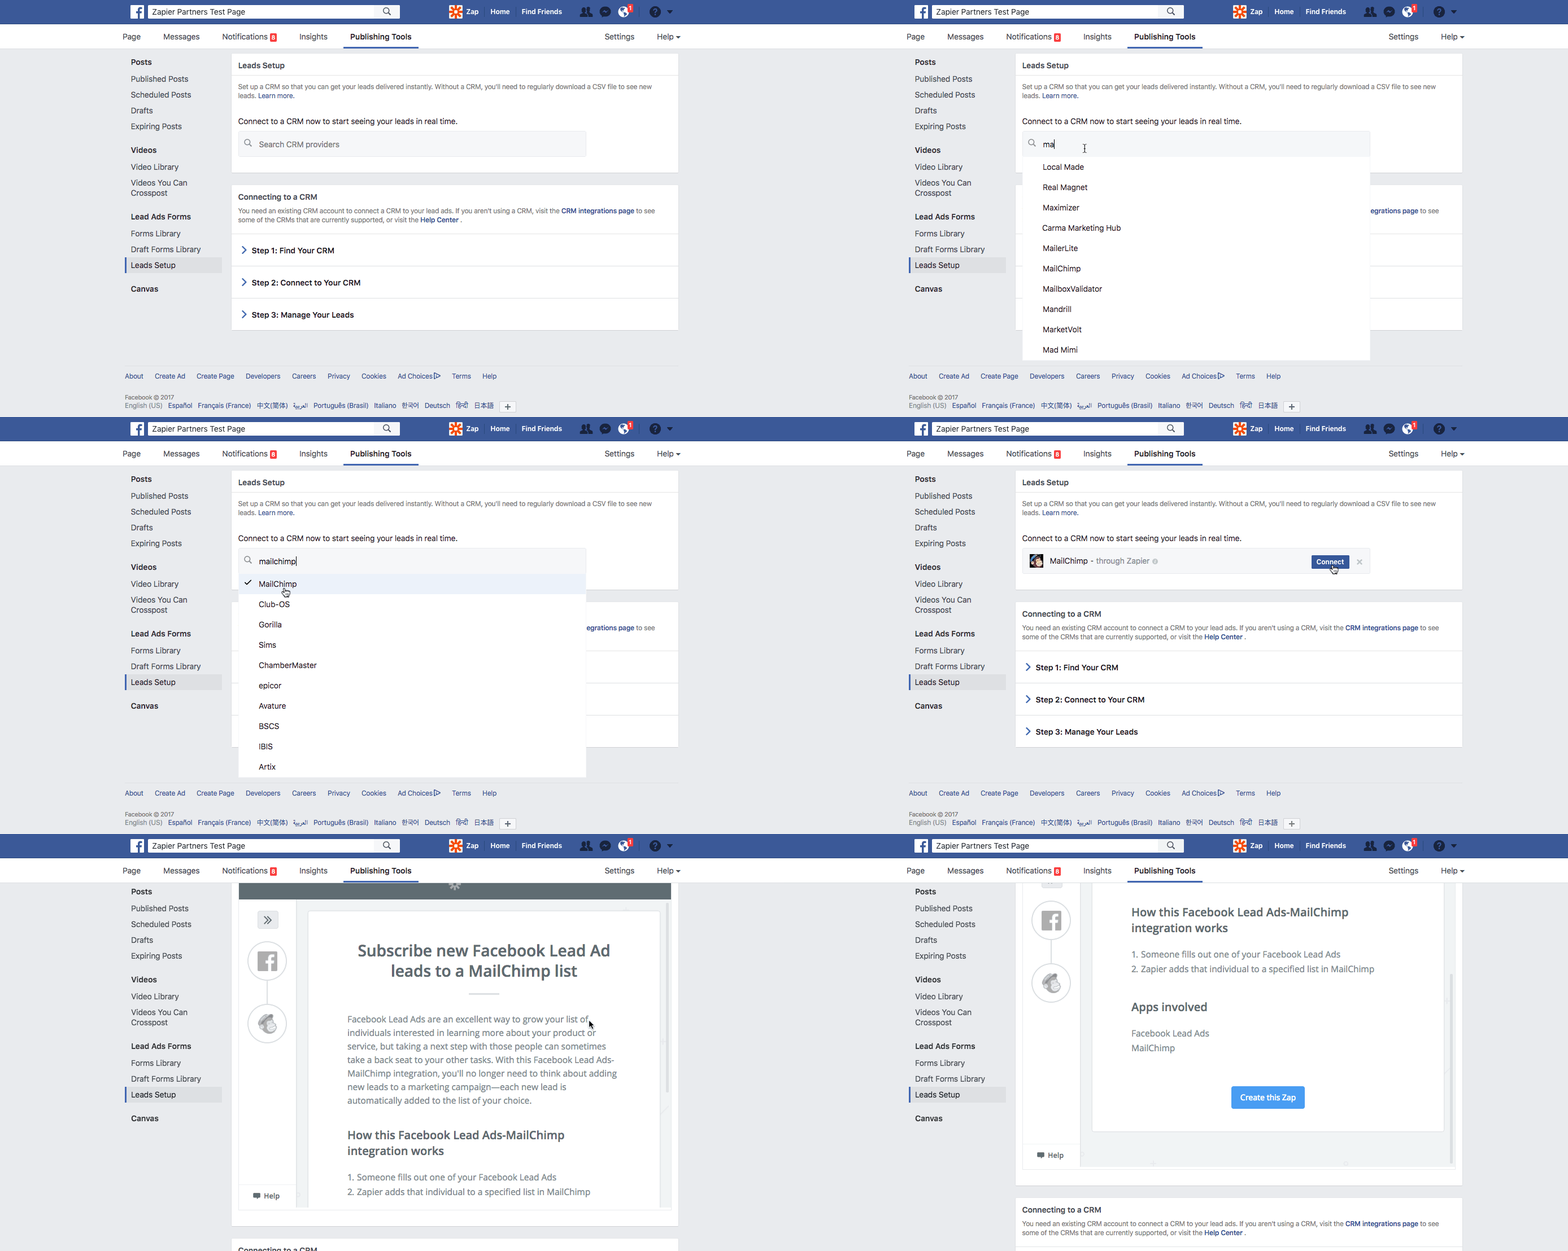
- Integration via Zapier from inside Facebook Publishing Tools. Within Publishing Tools, just click "Connect," and a window will prompt you to either create a Zapier account or log in to your existing one. After that, you should be all set to automatically log your leads from Facebook.
- Integration via custom Zapier workflows. If it isn't possible to connect to your CRM from within Facebook using one of the first two options—or if you'd like to integrate with other tools in your business workflows—you can use Zapier to automatically send leads to over 1,000 apps.
Try some of these Facebook Lead Ads + Zapier workflow templates, or get started making your own.
Track Ad Success with Facebook Offline Conversions
To go from a potential customer to a customer, a user needs to convert. That means they see your Facebook ad, and because of it, they decide to use your product or service. Of course, most conversions don't happen directly through Facebook: Everything from email clicks to webinar signups to items added to a shopping cart can signify a conversion for you.
Eyeballing the metrics for trends and making assumptions about those conversions could cost you time and money. Facebook Offline Conversions gives you precise data even when the user isn't on facebook.com or in the Facebook app—which helps you make informed decisions. It's able to connect to any app where you capture customer information at a point of sale and then send your offline conversion data back to Facebook. That way, you'll be able to analyze and fine tune the performance of your ads based on those non-Facebook activities.
Here's how to set up Facebook Offline Conversions to be sure you're capturing all conversions from Facebook Lead Ads:
- Create an offline event data set that will track your ad account and ensure that your conversions match up properly with the people who saw your ads.
Let's say you want to track sales in your brick-and-mortar store, attendance at an event, or even meetings you've scheduled. You can upload a .csv with data like customer name, contact info, and date of purchase, and Facebook will be able to match that data with your Facebook Lead Ads account to track which customers converted due to one of your ads.
Head to Offline Events in Facebook Business Manager and click the green button that says, "Create Offline Event Set." Accept the terms and conditions if you're OK with them, and then add a name and description for your Offline Event Set.

- Select the ad accounts to pair up with the Offline Event Set. If you use more than one to promote your business, it's fine to choose them all.

- Make sure auto-tracking is enabled because only tracked ad impressions and clicks will be considered for offline attribution down the road. Then click "Done" to complete the creation process.
Automate Your Workflows for Facebook Offline Conversions
Of course, you need to be sure that your offline conversion data will make it into your new Offline Event Set. It's possible to upload offline purchase files directly to Facebook with information about customers and purchased products by clicking "Upload Offline Events." But you'll save time and cut down on manual tasks and development work by automating the process.
Some CRMs and point-of-sale platforms provide direct integrations with Facebook Offline Conversions to automate the process. But if you don't use tools that provide direct connections to Facebook Offline Conversions—or you're looking for more elaborate workflows with your leads and conversions—you can create automations using Zapier.
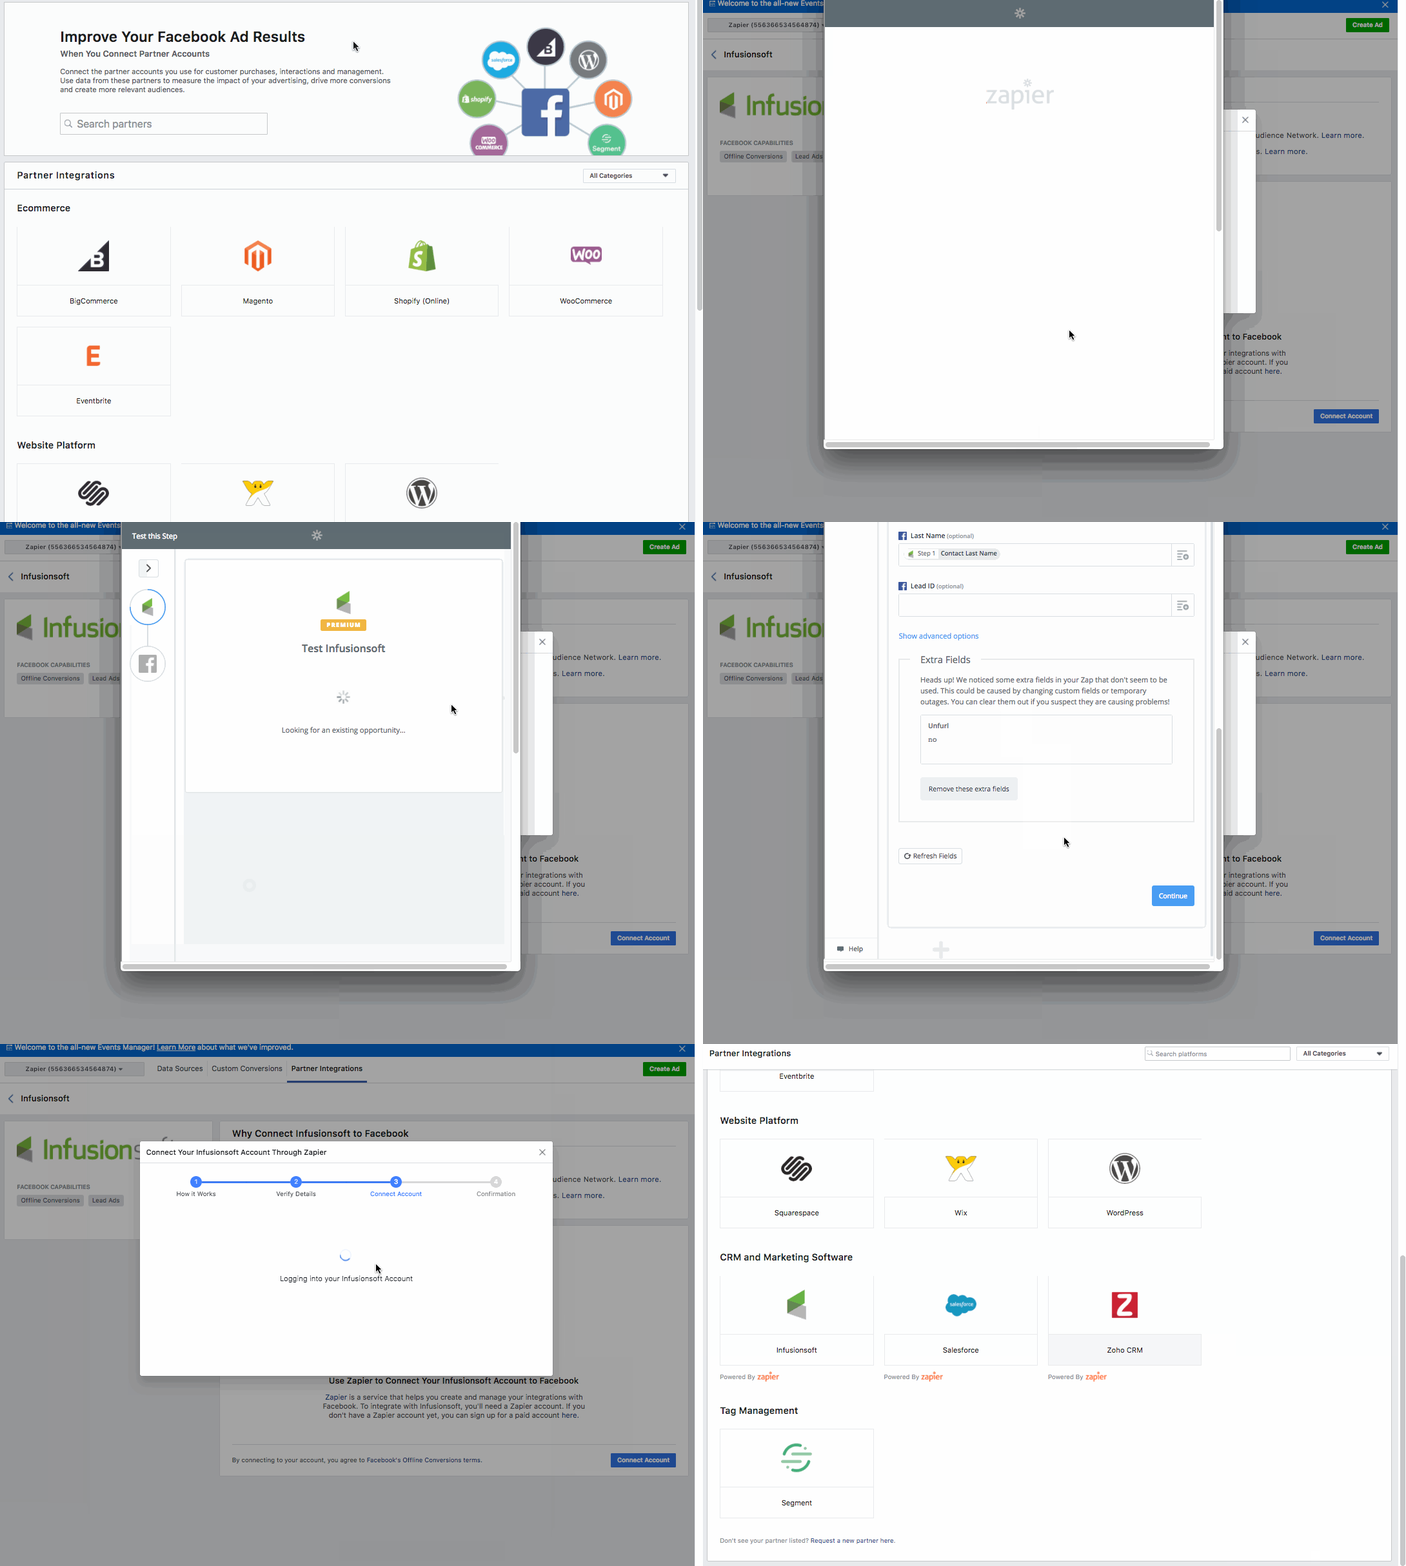
Zapier allows you to add offline conversion events to Facebook from new paid orders in Shopify, new sales in PayPal, new deals in HubSpot CRM, and more. Here are a few Zapier workflow templates to give you some automation inspiration, but you can create your own to integrate Facebook Offline Conversions with over 1,000 different web tools.
Once you've turned on your Zap, you can focus on other tasks while all your offline conversions are automatically sent back to Facebook.
You've set up your ad, connected Facebook Lead Ads to your other points of conversion, and sent data back through Facebook Offline Conversions. All that's left to do now is set your campaign live and watch as your seamless sales process automatically logs leads, records sales, and measures your campaign's success.
source https://zapier.com/blog/facebook-offline-conversions/

No comments:
Post a Comment