
The best video conferencing apps can do more than merely enable a virtual face-to-face meeting. They let you show what's on your screen to everyone else on the call, seamlessly pass control of the meeting to another person, and record the call as a video.
Web conferencing service Zoom offers these features and more, some of them hidden options in advanced menus. The tricks and tips below will show you how to use the app better to work, learn, and communicate with others virtually.
1. Create Recurring Meetings With Saved Settings and One URL
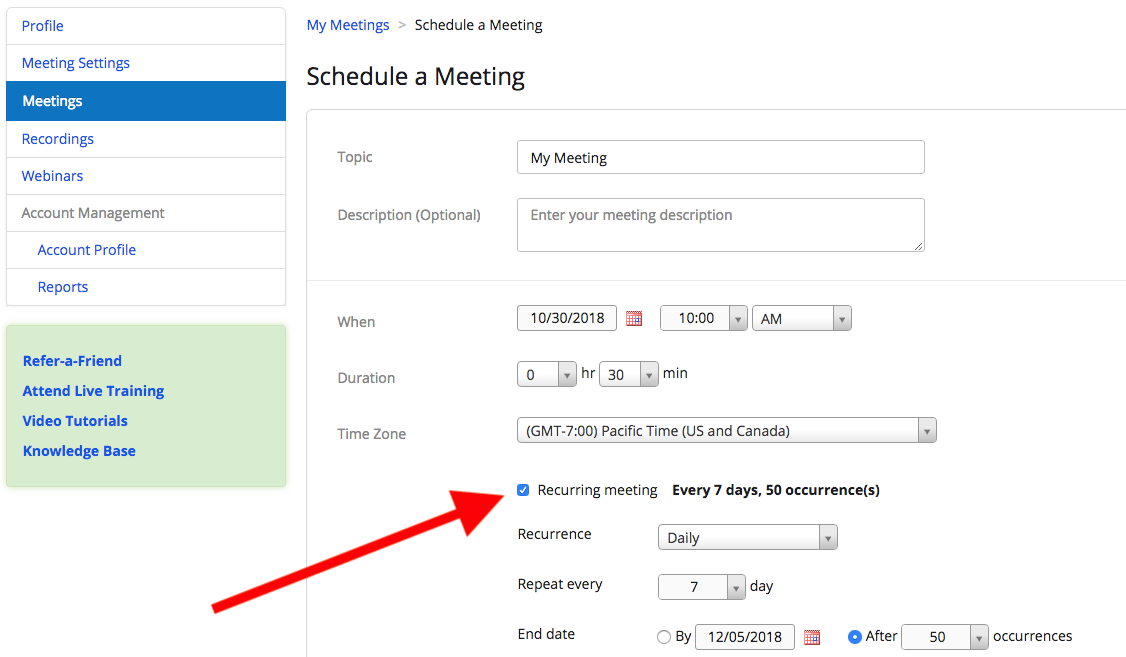
For weekly meetings, monthly check-ins, and other regularly-scheduled calls, Zoom lets you create a recurring meeting. There are two benefits to using this setting. First, it lets you lock in all the call settings you want once and have them be in place every time you meet. Second, recurring calls use the same join URL each time, so you never have to send a fresh one to attendees.
Additionally, if you meet with the same group regularly but not on a regular schedule, you can choose an option called No Fixed Time, which lets you use the same settings and meeting ID over and over with the same group, no matter when you get together. This option is popular with educational groups who use Zoom as their virtual classroom.
2. Record the Call as a Video
Zoom lets you record your web conferencing calls as videos, a handy feature for sharing the meeting with people who may have missed it or for reviewing what was said.
When you record, you must choose whether to use to the local or cloud option. Local means you store the video file yourself, whether locally on your computer or in another storage space that you provide. With Cloud, which is for paying members only, Zoom stores the video for you in its cloud storage (paying accounts come with 1GB per person or room for storage, except Education accounts, which get 0.5GB per person). One convenience of the cloud option is that people can stream the video in a web browser once it's ready.
When creating a video from a conference call, it makes a big difference in the final quality to optimize a few settings in advance. For example, some calls might be broadcast-style, where only the host appears on screen. In that case, set Zoom to only record the audio and video of the host. Other calls might be in the style of a collaborative meeting, in which case you want to record everyone. Be sure to explore Zoom's settings at least a few minutes before recording a call.
Requirements: To record videos, you need Zoom on macOS, Windows, or Linux. If you don't see the option to record, check your settings in the web app (under My Meeting Settings) or have your account administrator enable it.
3. Have a Collaborative Annotation Session
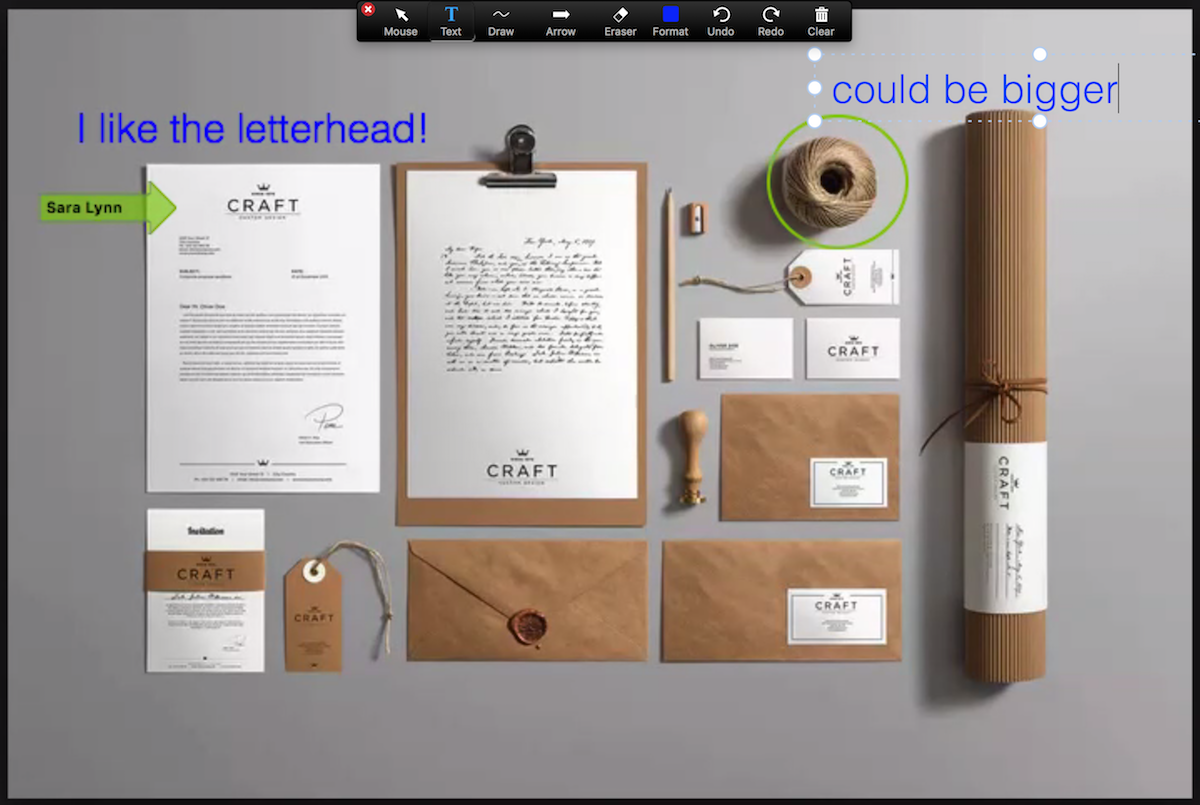
Screen sharing allows the host of a call to display whatever's on their screen to everyone else on the call. Annotation tools let all the meeting participants draw and highlight what's on screen, which can be immensely helpful when discussing visual materials, such as mockups, graphic designs, and so forth.
To annotate while viewing someone else's shared screen, select View Options from the top of the Zoom window, and then choose Annotate. A toolbar appears with all your options for annotating, including text, draw, arrow, and so forth. The presenter can use the save button on the toolbar to capture the complete image with annotations as a screenshot. You can also disable attendee annotation altogether.
4. Co-host Calls
Meetings can have more than one person at the helm. A PR rep might want to cooperatively control a meeting alongside an executive, or a team with more than one lead may prefer to let the each co-host rather than choose one person over the other. Whatever your circumstances, you can start a Zoom call and have more than one person be in charge.
To use co-hosting tools, you first must enable it in Zoom's Meeting Settings. Look for the Meeting tab and choose the Co-host option. Then, when you start a meeting, wait for your co-host to join, and add the person by clicking the three dots that appear when you hover over their video box. Alternatively, you can go to the Participants window, choose Manage Participants, hover over the co-host's name, and select More to find the Make Co-Host option.
Requirements: To use co-hosting, you need a Pro, Business, Education or API Partner account with Zoom, and you need to run on macOS, Windows, Android, or iOS (not Linux or web). If the option doesn't appear, ask your account administrator to enable the settings in the Meeting tab for co-hosting privileges.
5. Give Attendees a Waiting Room
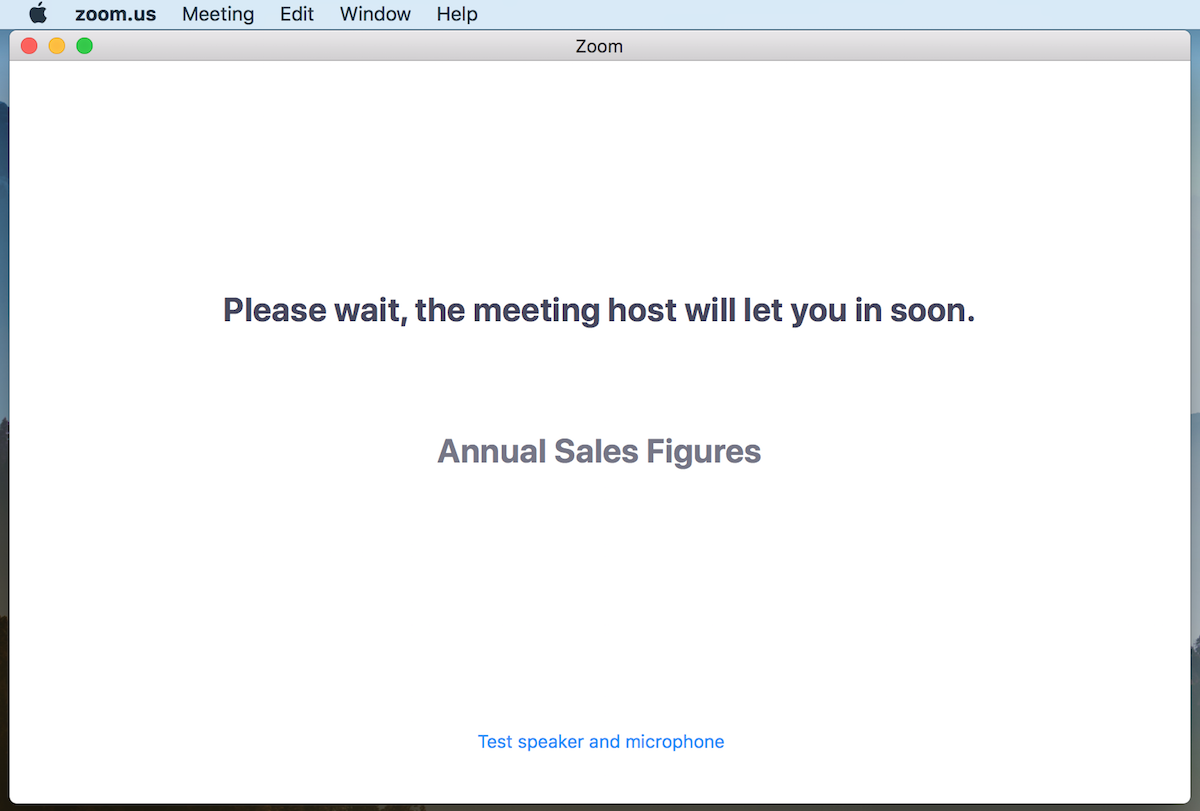
Zoom lets attendees get into a video call with or without the host being present. Small groups sometimes like this option because they can have a few minutes to chit-chat before the meeting officially kicks off. In some situations, however, it could be in poor form to have attendees in a virtual room together, waiting for you to start. A better solution is to create a virtual waiting room, where attendees remain on hold until you let them in all at the same time or one by one.
Precisely how you enable a waiting room depends on the type of account you have. When you set one up, however, you can customize what the attendees see while they await your grand entrance.
6. See Who Attended
Say you're using Zoom to hold a press conference or university lecture. You probably want to know who attends. You can get that information from a report once the meeting is finished.
The attendee list for all meetings lives in the Zoom Meetings tab in the Reports section. You'll see a list of both previous and upcoming meetings, which you can filter by time range or meeting ID. When you find the meeting or meetings you want, click Generate and then select Registration.
Requirements: To generate an attendee list, you need to be the 1) the host of the meeting, 2) in a role with Usage Reports enabled, or 3) an account administrator or owner. You also need a Pro, API Partner, Business or Education plan.
7. Collect Information From Attendees
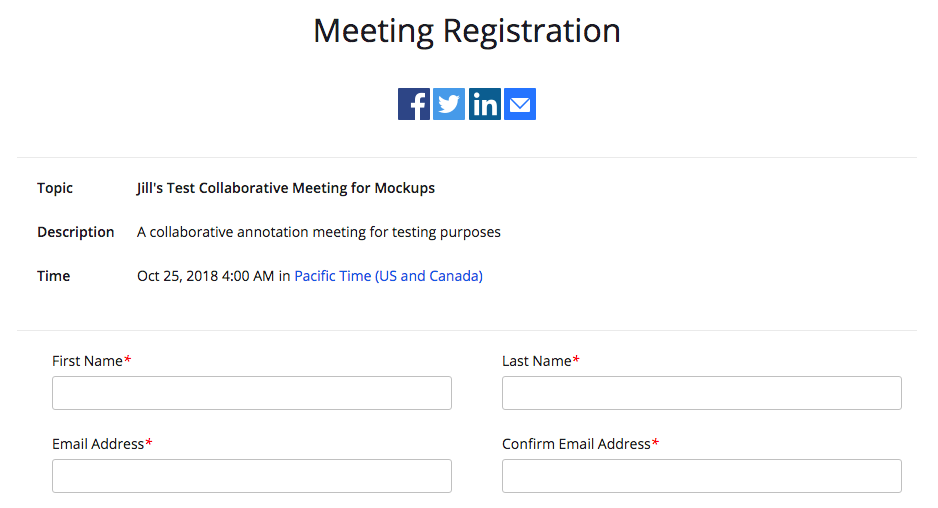
In addition to getting an attendance sheet, you can also gather information from meeting attendees about themselves before they join the call. For example, you might want to require that attendees provide their name, company affiliation, or industry.
To set collect this information, first you need to require Registration, an option found in the My Meetings tab of the Zoom web app. Then, you can set up a form that attendees must fill out before they can join the meeting.
For the registration form, Zoom provides standard fields, such as name and company affiliation, that you add using checkboxes. To add new questions or fields, jump over to the tab called Custom Questions.
Requirements: To require attendee information, the host must have a Pro account. Additionally, the meeting cannot be your Personal Meeting ID.
8. Let Someone Else Schedule Your Meetings
People who work with an assistant will love this option in Zoom that gives scheduling privileges to someone else. Whoever manages your calendar can now schedule Zoom calls for you.
To set up the scheduling assistant privilege, log into Zoom, open Meeting Settings, and look under Other. You'll see a plus sign next to Assign Scheduling Privilege. Add your scheduling assistants by typing their email addresses and finish by clicking Assign.
After you add your scheduling assistants, they must log out of Zoom and log back in for the feature to take effect. From this point on, assistants can create meetings for others by using the Schedule tool. Look for Advanced Options or Meeting Options (depending on which version of Zoom you use), and follow the prompts to create a new meeting.
Requirements: The primary Zoom account holder and everyone who receives scheduling privileges must all have Pro or Corp licenses. And for webinars, both account holder and scheduler must have webinar licenses.
9. Automatically Post Zoom Meeting Links in Slack

Here's a tip we use at Zapier to reduce the amount of work needed for team meetings. We have a Zapier automation (also called a Zap) set up so that any time a new team meeting in Zoom kicks off, the Zoom link gets posted to the appropriate channel in Slack automatically.
Requirements: To set up integrations between Zoom and Zapier, you need a paid Zoom account. Free account holders don't have access to the Zoom API.
10. Learn a Few Essential Keyboard Shortcuts
If you use Zoom more than once a week, there are a couple of keyboard shortcuts worth learning to save you oodles of time.
I is for invite. Press Cmd+I (macOS) or Alt+I (Windows) to jump to the Invite window, where you can grab the link to the meeting or send invitations to others via email.
M is for mute. Press Cmd+Ctrl+M (macOS) or Alt+M (Windows) when you are the meeting host and want to mute everyone else on the line.
S is for share. Press Cmd+Shift+S (macOS) or Alt+Shift+S (Windows) to share your screen.
For more inspiration on how to use Zoom more efficiently, explore more Zaps you can create with Zoom and Zapier.
source https://zapier.com/blog/zoom-tips/
No comments:
Post a Comment