Trello is a powerful tool that can work as a personal to do list or a powerful project management system to coordinate and assign tasks to everyone in your company. It can make light work of organizing your projects, but it can take a little bit to get up to speed. We're here to walk you through how to use it.
Trello is roughly inspired by the Kanban project management system, which uses lists and cards to organize your tasks into a coherent workflow. In Kanban, each list is a phase of your workflow, and tasks move left to right through the lists as they progress through each step.
Of course, you can use Trello however it makes the most sense for you. For example, you can use it to organize your projects around the house by which room they're in, sort recipes by what goes into them, or manage all the pieces of a Dungeons & Dragons campaign. There's virtually no limit to what you can do with Trello.
In this guide, we'll walk through Trello-specific terms and then show you how to use each of the app's basic features.
Glossary of Trello Terms
For the most part, Trello uses common terms that you'd recognize from any other productivity suite. But there are a few terms that we'll define and explain before we dive in.
- Kanban: Kanban is a project management system invented by Toyota engineer Taiichi Ohno. In Kanban, each list is a phase of production. A simplified version might be a To Do, Doing, and Done list. However, you can customize this to any workflow. For example, if you're producing a video, you could have Research, Writing, Shooting, and Editing lists for each video in a series to move through. You can make your boards as simple or as complex as you like. Trello doesn't require a Kanban-style approach—you can use the app for simple, unrelated lists if you prefer—but Trello lends itself to the Kanban system very well, so it's worth considering.
- Boards: Trello organizes all of your projects into separate groups called boards. Each board can contain multiple lists, each of which has a set of tasks. For example, you could have a board for the books you want to read and are reading, or a board to manage the content you're planning for a blog. You can see multiple lists within a board all at once, but you can only view one board at a time. It makes the most sense to create new boards for separate projects.
- Lists: Within a board, you can create an unlimited number of lists that you can fill with cards for specific tasks. For example, you could have a board for creating a website, with separate lists for designing the home page, building features, or writing copy. You can also use lists to organize tasks by person they're assigned to. Or, lists can work as phases of a Kanban system. Tasks you're working on move left to right from one list to the next as pieces of a project move through the pipeline.
- Cards: Cards are individual items on a list. You can think of these like supercharged to do list items. These should be specific and actionable. You can add descriptions of a task, comment and discuss it with other users, or assign it to a member of your team. If it's a complex task, you can even add a checklist of sub-tasks or attach files to the card.
- Teams: Within Trello, you can create groups of people called Teams that you can assign to boards. This is helpful in large organizations where you have smaller groups of people who need access to certain lists or cards. Create a team of a few people, and you can then add that team to a board with just a couple clicks.
- Power-Ups: In Trello's lexicon, add-ons are called Power-Ups. With the free plan, you can add one Power-Up per board, but the Business Class plan ($9.99/user/month) removes that limit. Power-ups can add useful features like a calendar view to see when your cards are due, integration with Slack, or connecting to Zapier to automate your tasks.
With all those in mind, let's go over a few of the basic tasks you need to get started. For our instructions, we'll focus on the web version of Trello, but the steps will be similar across other platforms.
How to Use Trello
- Create a New Board and Add Team Members
- Create Your Lists
- Add Cards to Your Lists
- Assign Cards and Give Them Due Dates
- Add Labels to Your Cards
- Search Your Cards With Shortcuts
- View Your Tasks On a Calendar (Or Use Other Power-Ups)
How to Create a Board in Trello
Nothing happens in Trello unless it's on a board. So to get started, you'll need to make one. Open Trello in your web browser, and either create an account or log in with your Google account.
To create a board, follow these steps:
- Under Personal Boards, click the box that says Create new board…
- Give the board a title. You can also choose a background color or pattern here, which you can change later.
- If you have multiple teams, select which team you want to give access to the board.

Your new board will now show up on your Trello home page alongside any others you may have. They'll be sorted by teams if you're part of multiple teams on the same account.
If you don't have a team set up already, you can add members to your board one at a time. To do that, follow these steps:
- Open the board from your Trello home page. Along the top of the board on the left side of the page, click the Share button.
- Find users by entering their email address or Trello username. You can also create a shareable link to send to someone if you don't know either of those pieces of information.
- Once you've entered all the names of members you want to add, click Send Invitation.
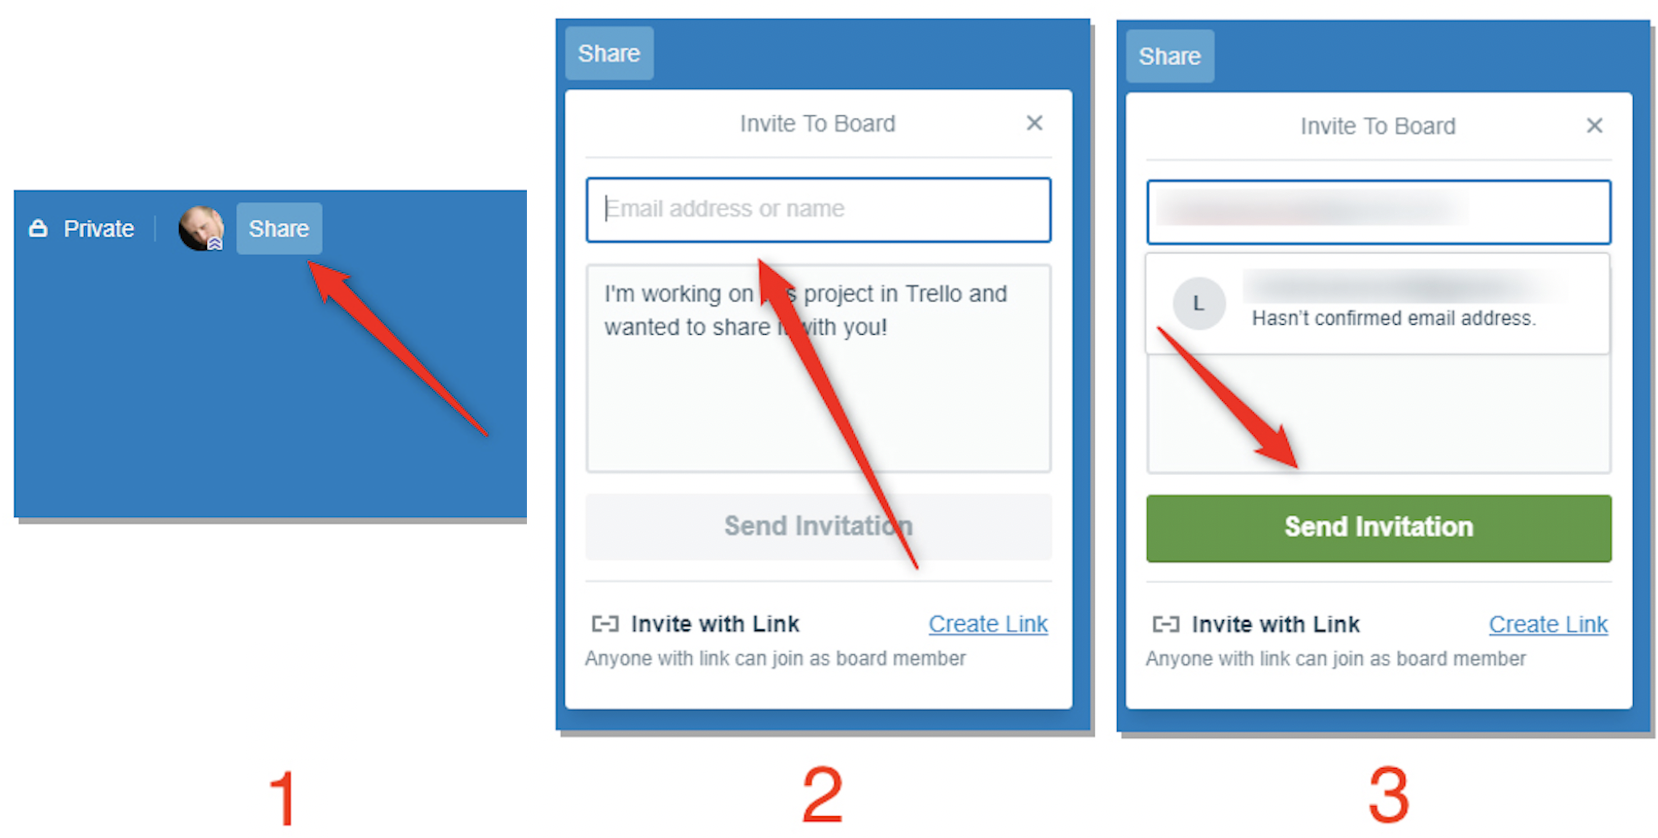
With members on your board, you'll be able to assign tasks and have conversations in the comment threads of cards.
How to Create Lists in Trello
Now that you've got your boards set up and team members added, you'll need to start organizing your tasks. Lists give you a lot of flexibility to organize your tasks. For example, you might have three lists: To Do, In Progress, and Done. Or, you could have a list for each member of your team to see which tasks each person has on their plate. Creating a list is simple:
- Open the board where you want to create a new list. To the right of your lists (or under the name of the board if you have no lists yet), click Add a list.
- Give your list a name, and click Add List.
- At the bottom of your lists, you'll now have a button to add cards.

How to Create Cards in Trello
Next, you'll need to add some cards to your list. You have a lot of options on cards, so we're just going to cover the basics.
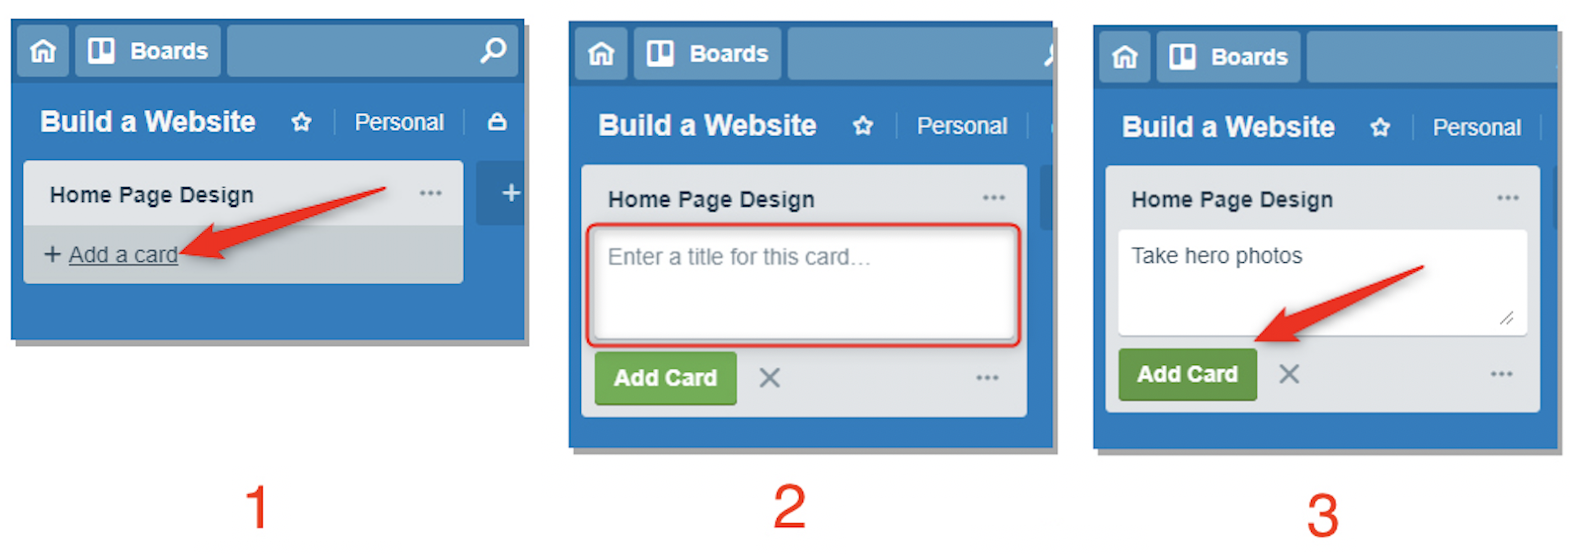
- At the bottom of your list, click Add a card.
- Enter a title for the card.
- Click Add Card.
When you click on a card, you can add a description or comments that everyone on your team can see.
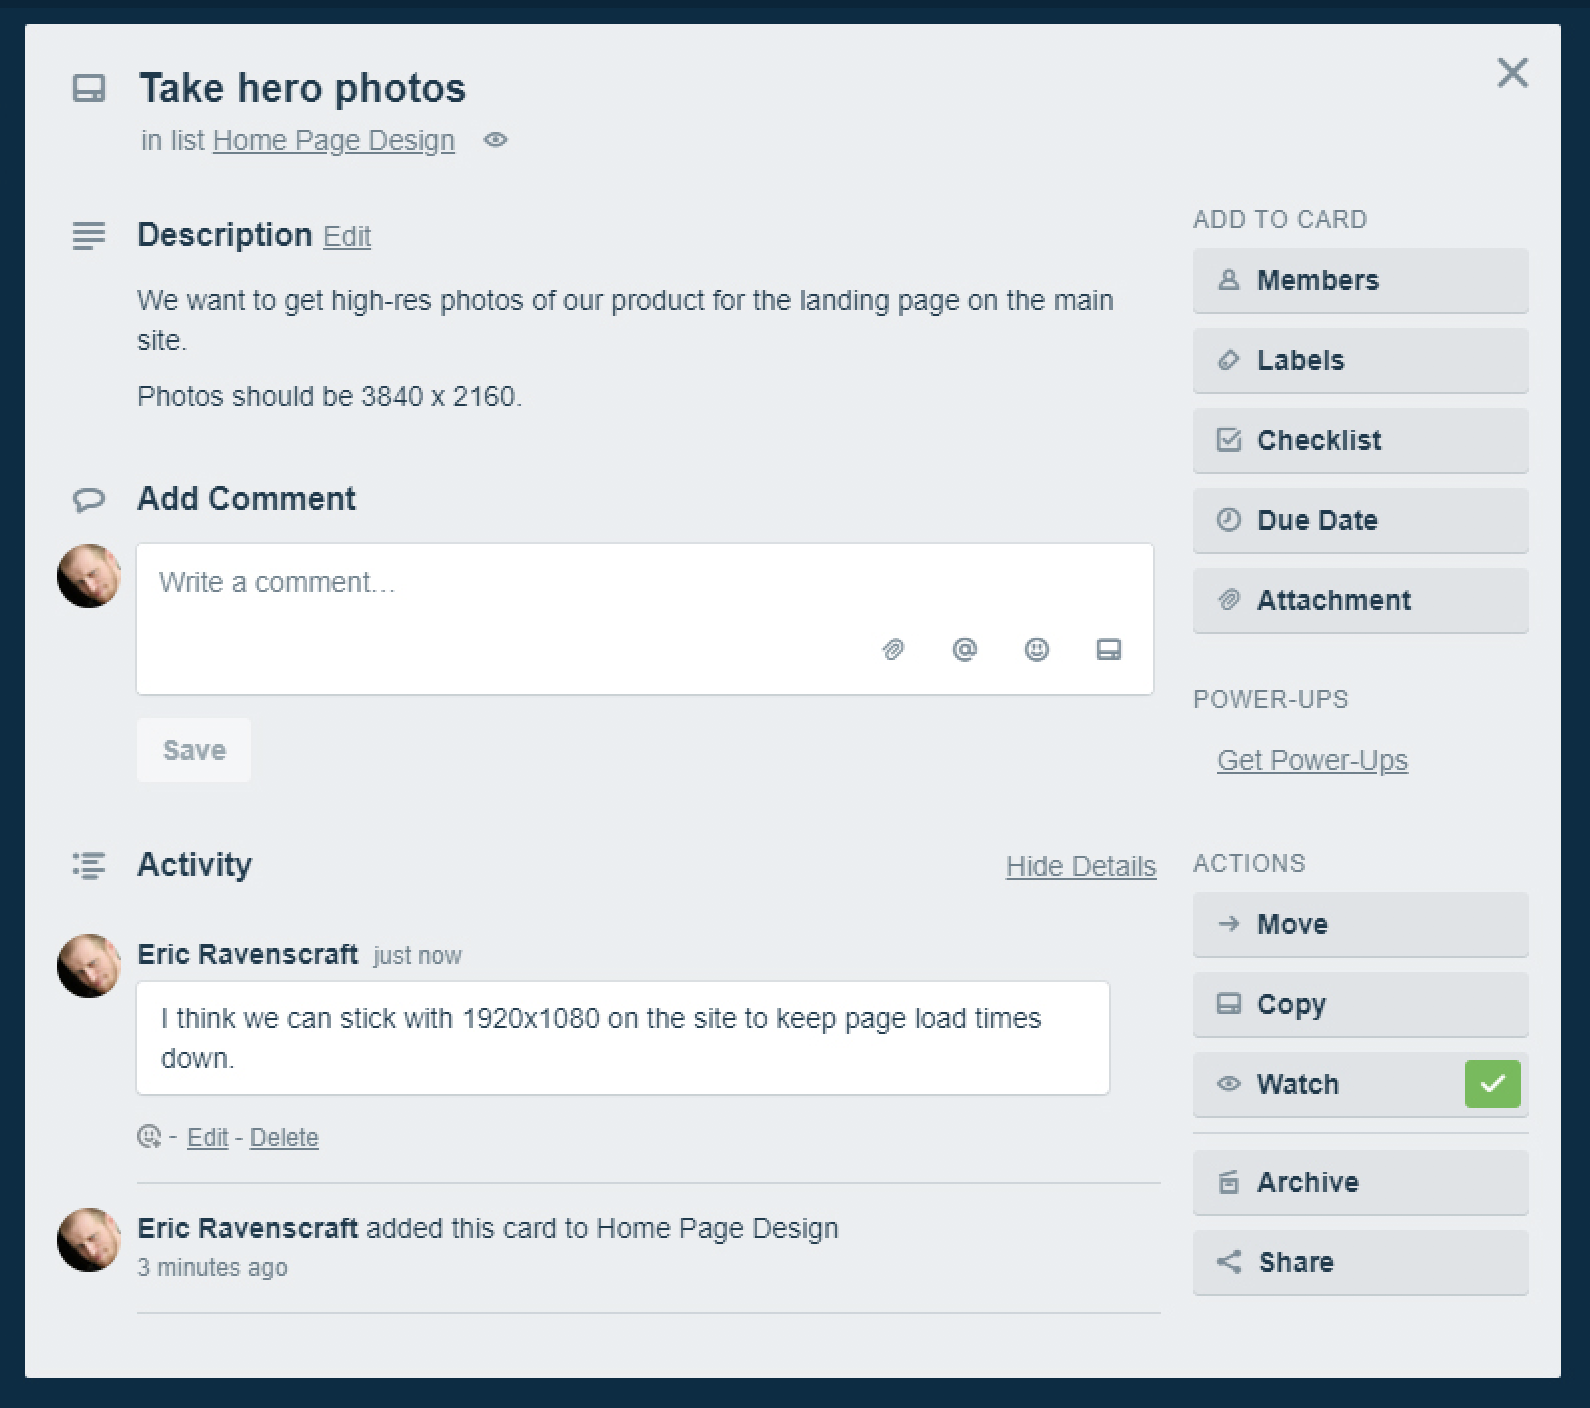
You can also add a checklist, labels, and attachments from this screen. It's worth exploring what cards can do when organizing the tasks for your projects.
How to Assign Cards in Trello and Give Them Due Dates
Trello cards come with a lot of features, but two of the most useful are adding members and due dates. If you're working with a team, you'll want to know who's working on a task or make sure the relevant people are informed of updates. Even if you use Trello on your own, due dates can help you keep track of when things need to be done.
Trello doesn't use "assignments" in the traditional sense, but you can add one or more users—referred to as members—to a given card. If you only assign one person to a card, this is a useful shorthand for who a task has been assigned to. This only really works if you stick to one member per card. However, you can add multiple members to a card so that everyone gets updates on a specific task. All members of a card will get notifications when someone comments on a card, a due date is approaching, a card is moved or archived, or attachments are added to a card.
To add someone to a card, follow these steps:
- Click on the card you want to assign users to.
- On the right side of the card, click the Members button.
- Search for users on your team, and click each one to add them.
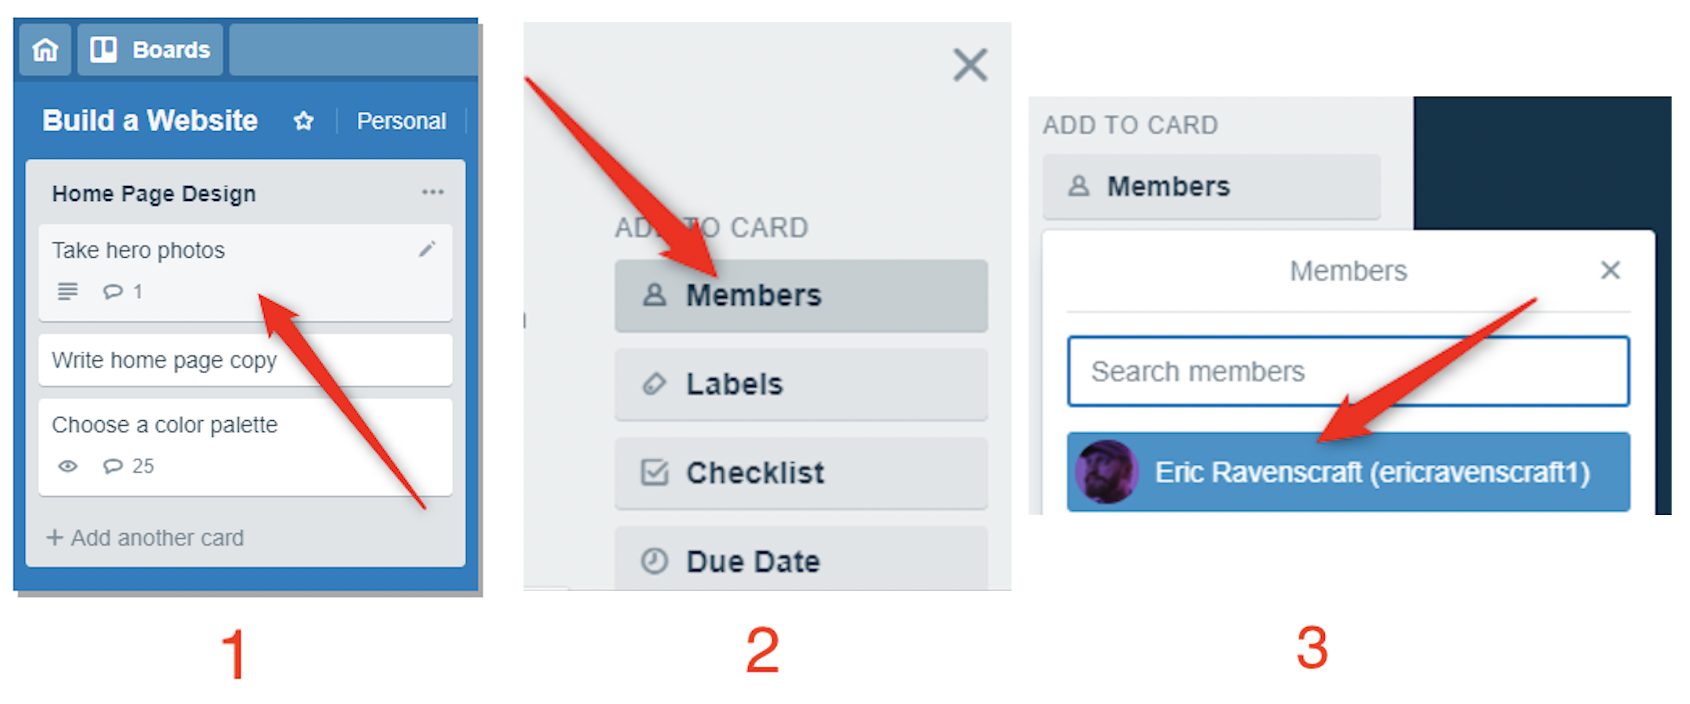
You'll be able to see the profile icon of anyone you've added to a card right in the list, which is a handy shorthand to see who's doing what. Next, you'll want to add due dates to keep everyone on track. To add a due date, follow these steps:
- Click on the card you want to add a due date to.
- On the right side of the card, click Due Date.
- Select a due date from the calendar tool, add a time, and click Save.
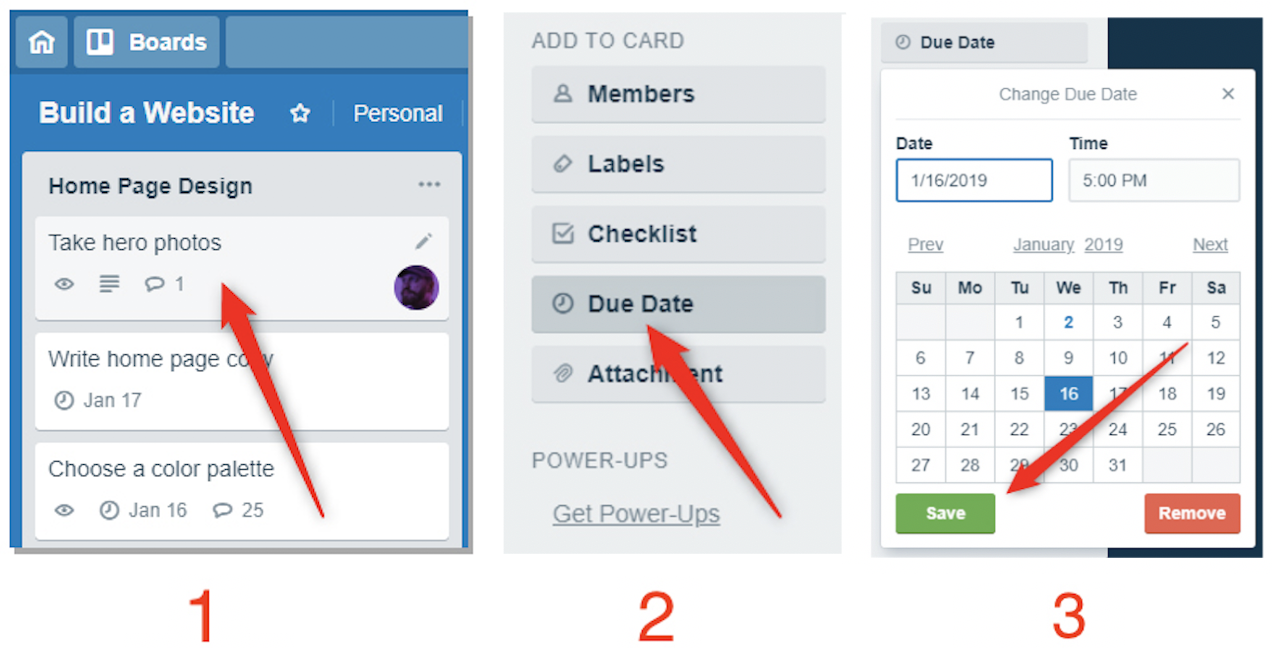
Like card members, due dates will show up on cards in your lists. Due dates that are less than 24 hours away will get a handy yellow label so you don't miss it. Cards that are past due will show up in red.
How to Add Labels to Cards in Trello
Gray cards on slightly darker gray lists can become something of a visual mess. But Trello lets you add colored labels to cards, which can help you identify what type of task a card is, or what group it belongs to, even when you move it from one list to another. You can give each label a color, a name, or both.
To add labels to a card, follow these steps:
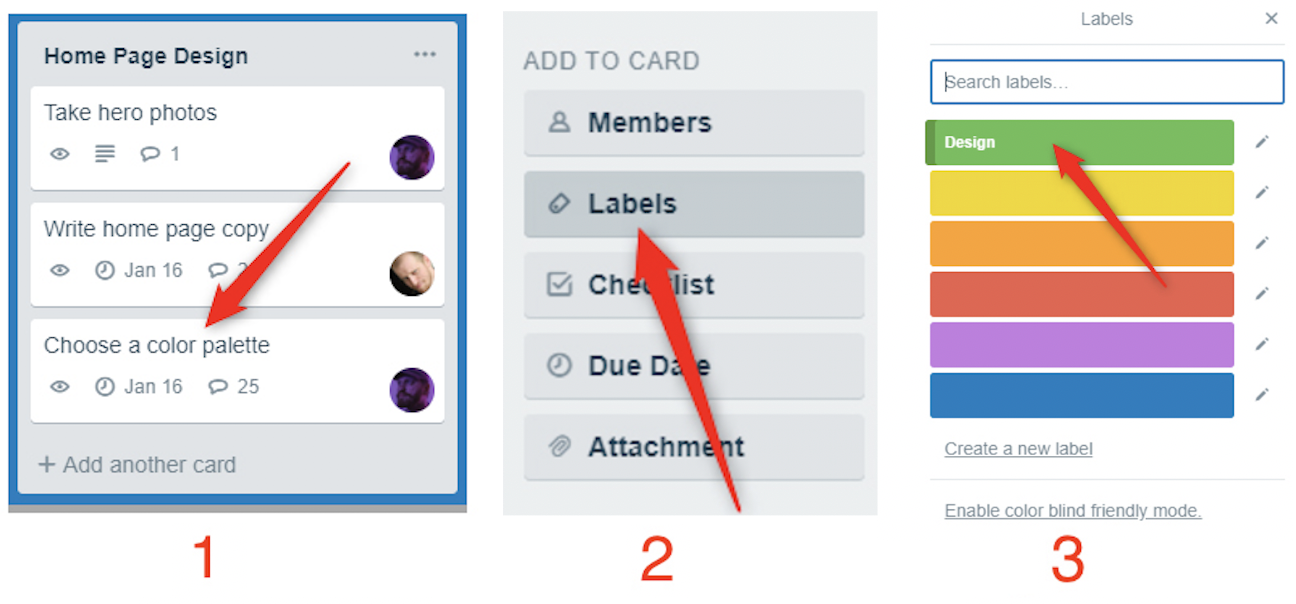
- Click on the card you want to add a label to.
- On the right-hand side, click Labels.
- Select a label from your list of available labels. By default, this will include several pre-chosen colors. Click the edit icon next to a label to add a title, if you prefer.
Once you've added labels to your cards, you'll see a small dash of color on the card when you're looking at your lists. At a glance, it'll look something like this.
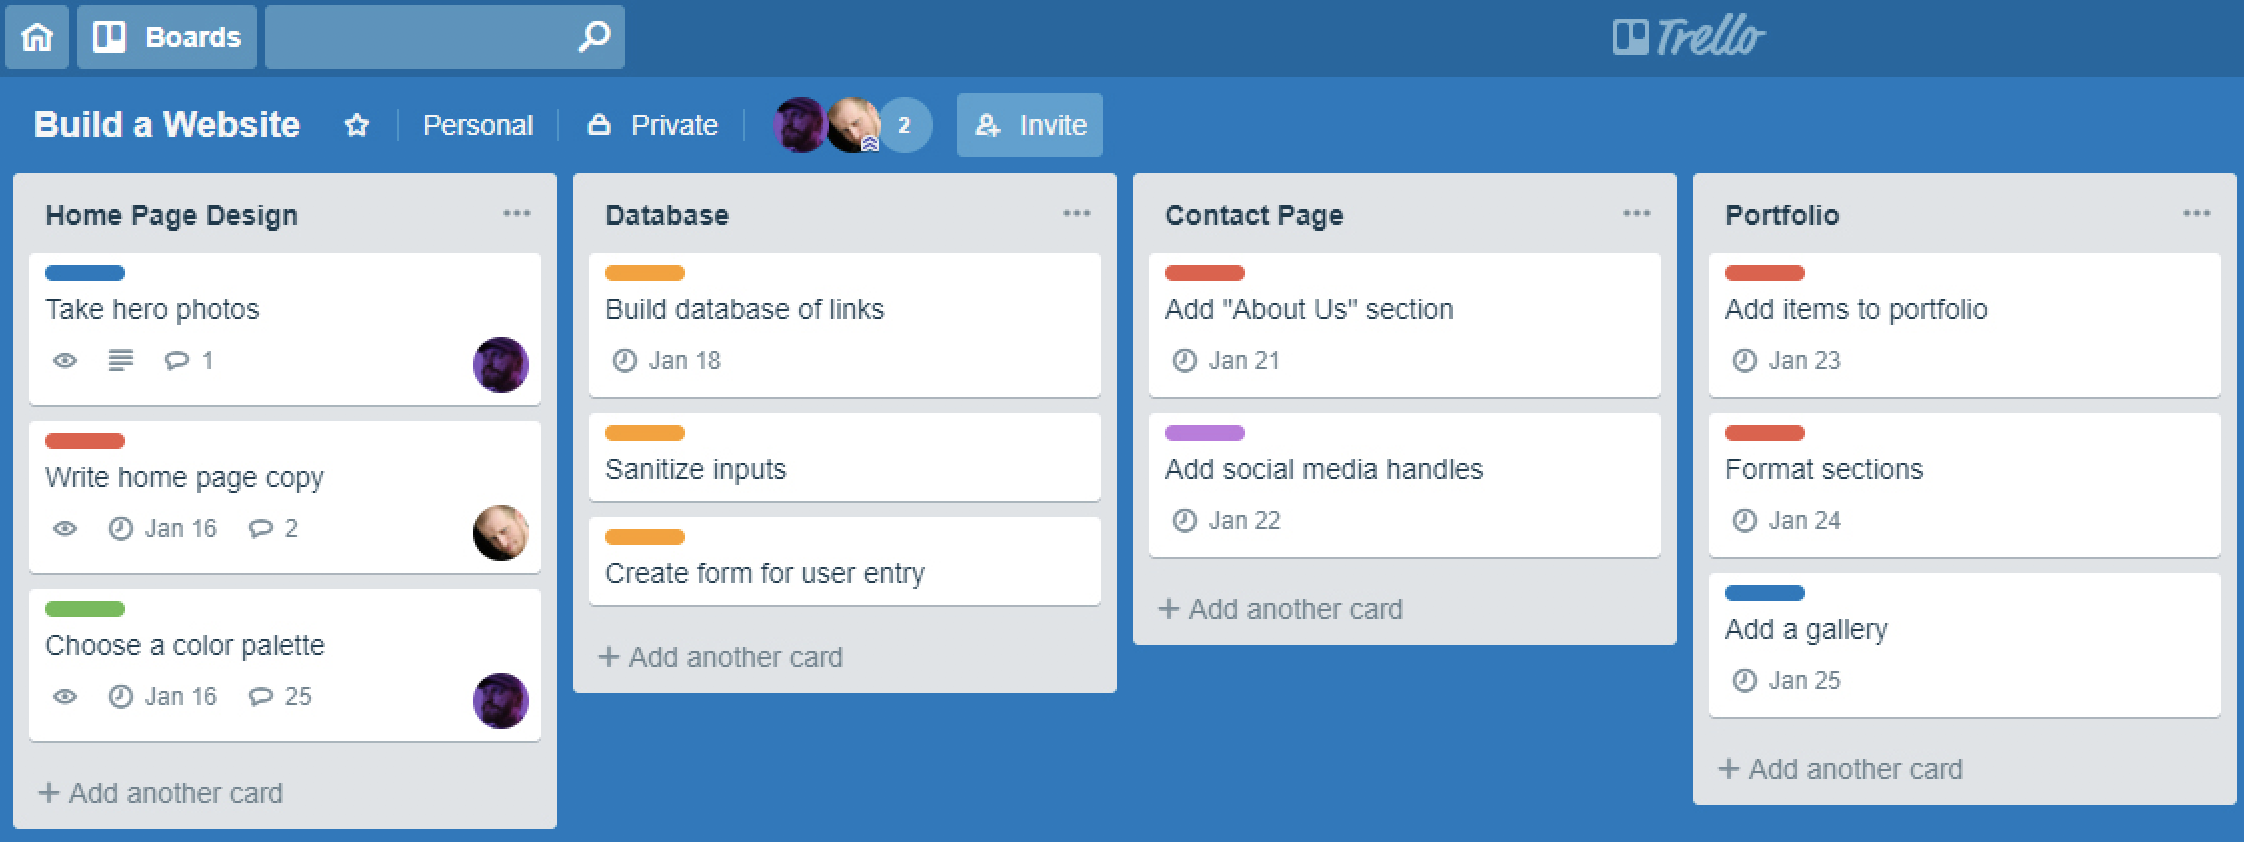
You can even add multiple labels to a single card. By default, you'll only see the colors for each label, but if you click on the labels, you'll be able to see the titles for those labels as well.
How to Search in Trello with Shortcuts
For a small, personal board, it might be relatively easy to see everything at a glance, but the bigger your lists get—and especially when you're on a big team project—you're going to need to start searching. For that, there are a number of useful keyboard shortcuts that can help you find what you're looking for.
- B: Opens the Boards menu. From here you can search for and switch between your various boards.
- /: Opens the search box. From here you can search your cards and lists to jump straight to the card you want.
- F: Opens the filter dialog box. From here you can filter out cards by keywords, labels, members, or due date. Anything that doesn't match your criteria will be hidden until you remove the filters.
There are other useful keyboard shortcuts that you can use to do everything from adding due dates and labels to moving or editing cards. Some of them only save a click or two, but the search shortcuts will be the most valuable. You can find a full list of Trello's keyboard shortcuts here.
View Your Trello Tasks On a Calendar (Or Use Other Power-Ups)
Seeing due dates on your cards is useful, but you might also want to see them in a calendar view. By default, Trello doesn't offer this feature, but you can add it with a Power-Up, so this is a good time to introduce those. The free version of Trello allows you to enable one Power-Up, and the calendar view is one of the more useful ones.
To enable the calendar Power-Up (or any other Power-Up), follow these steps:
- On the far right side of the screen, under your profile icon, click Show Menu.
- Click Power-Ups.
- Search for "Calendar" and add the Calendar Power-Up from Trello.

After this, you'll see a new button along the top of your board, next to the Menu button, labeled Calendar. Click this button to open the calendar view. Any cards you have with due dates attached will appear here.
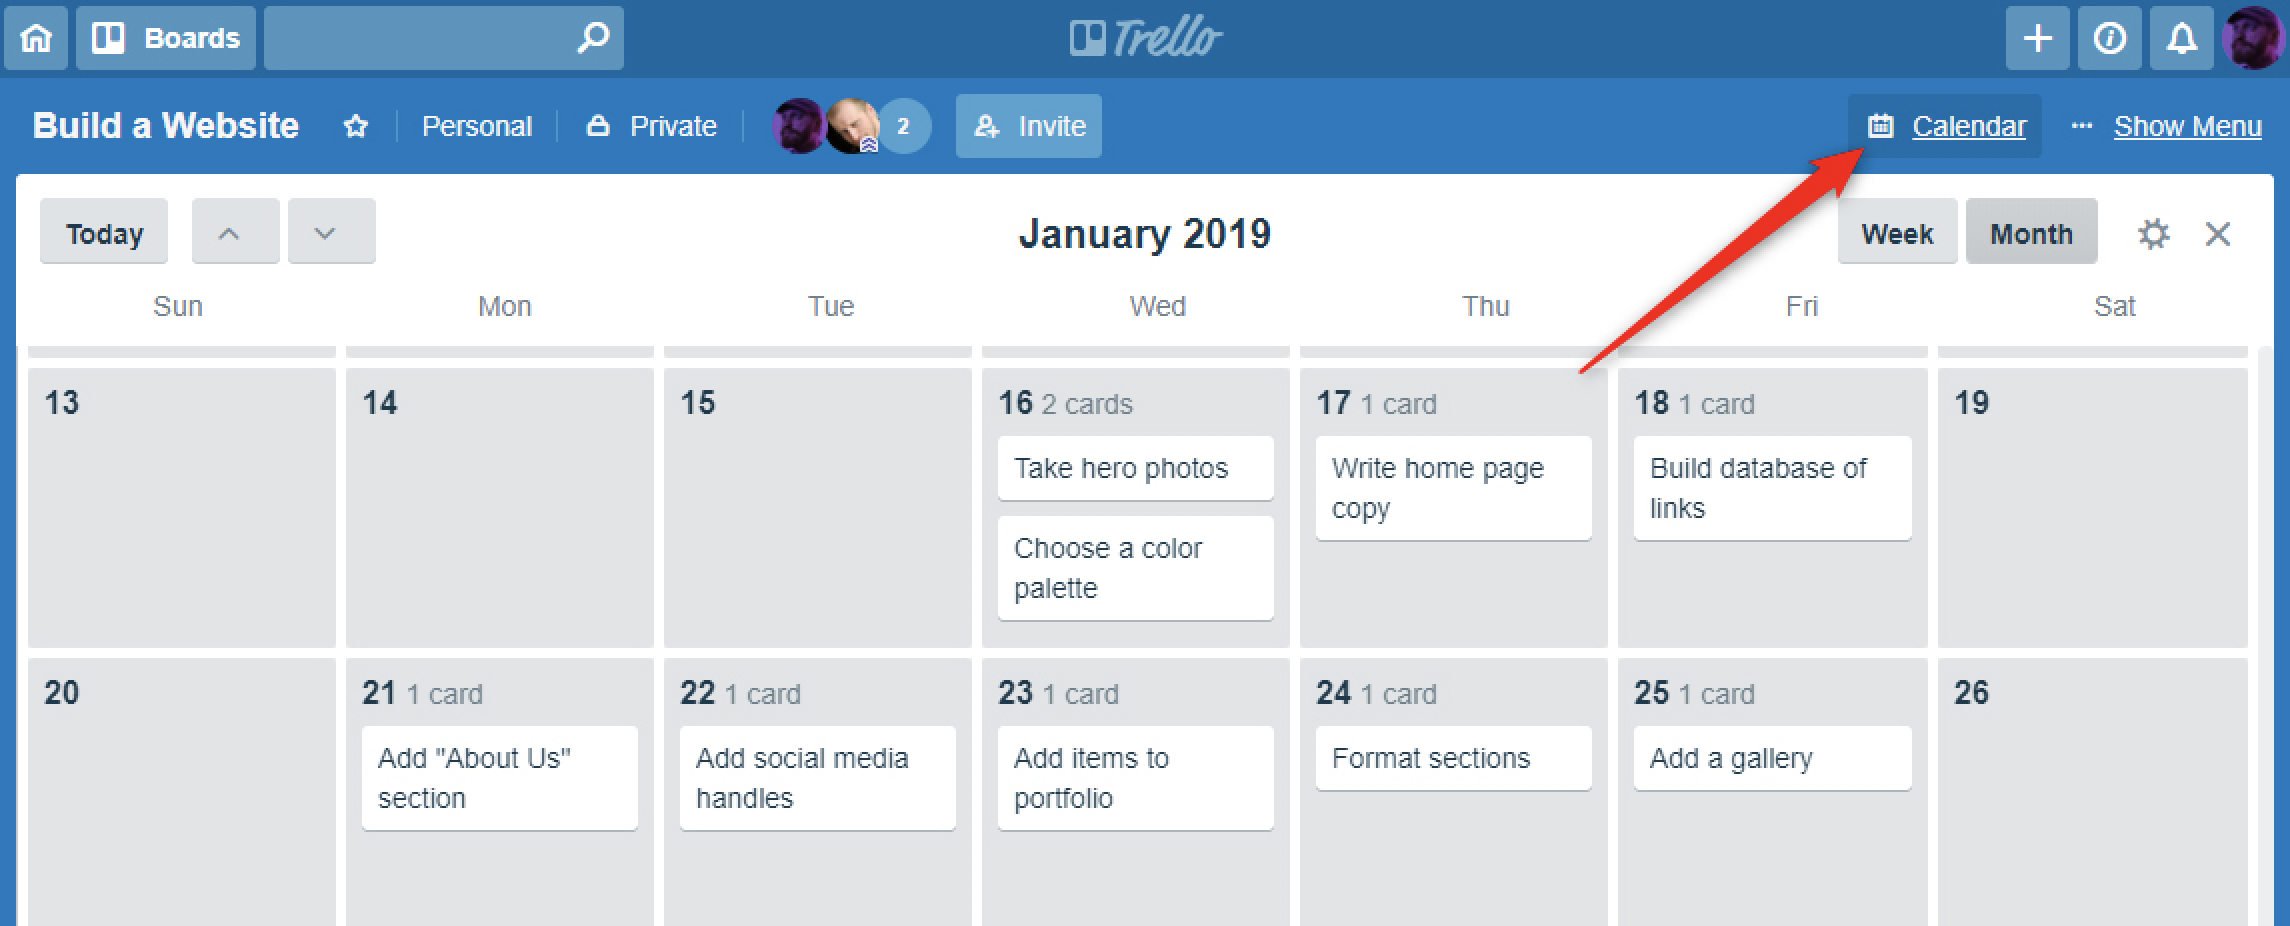
The Calendar view is one of the simpler Power-Ups, but you can add other, much more powerful ones as well. For example, you can use the Zapier Power-Up to automatically add cards to your Google Calendar, add to do list items to your Trello lists, and more.
Trello's strength is in its flexibility. You can use it as a simple collection of to do lists, or an entire Kanban productivity system. Once you've mastered the basics, you'll be able to bend it to whatever system works best for you. Read on for more specific ways to use Trello:
- Trello Everything: 28 Ways to Maximize Your Work with the Visual Task Management Tool
- 20 Creative Ways to Use Trello and Organize Everything
source https://zapier.com/blog/trello-tutorial/

No comments:
Post a Comment