
I use Google Sheets as my to do list.
Feels good to get that off my chest. I've tried countless to do list apps—Trello, Reminders, Todoist, Asana, the list goes on—and the only one that hasn't either underwhelmed me or, worse, overwhelmed me is Google Tasks. And that does the trick for personal stuff: It's plenty to remind me to do laundry, call my dentist, or schedule a vet appointment for my pup. But at work, it won't cut it. It's not customizable enough and there aren't enough distinct fields for inevitably complex work tasks. Google Sheets fixes that.
No, it's not a to do list app, but that's why I love it. It's an app I already use. It's extremely customizable. And it requires way fewer clicks than most other options. And let's face it: Nobody has time for extra clicks—you just want to get work done, not manage the work you need to get done.
Here's how to use a spreadsheet as your to do list.
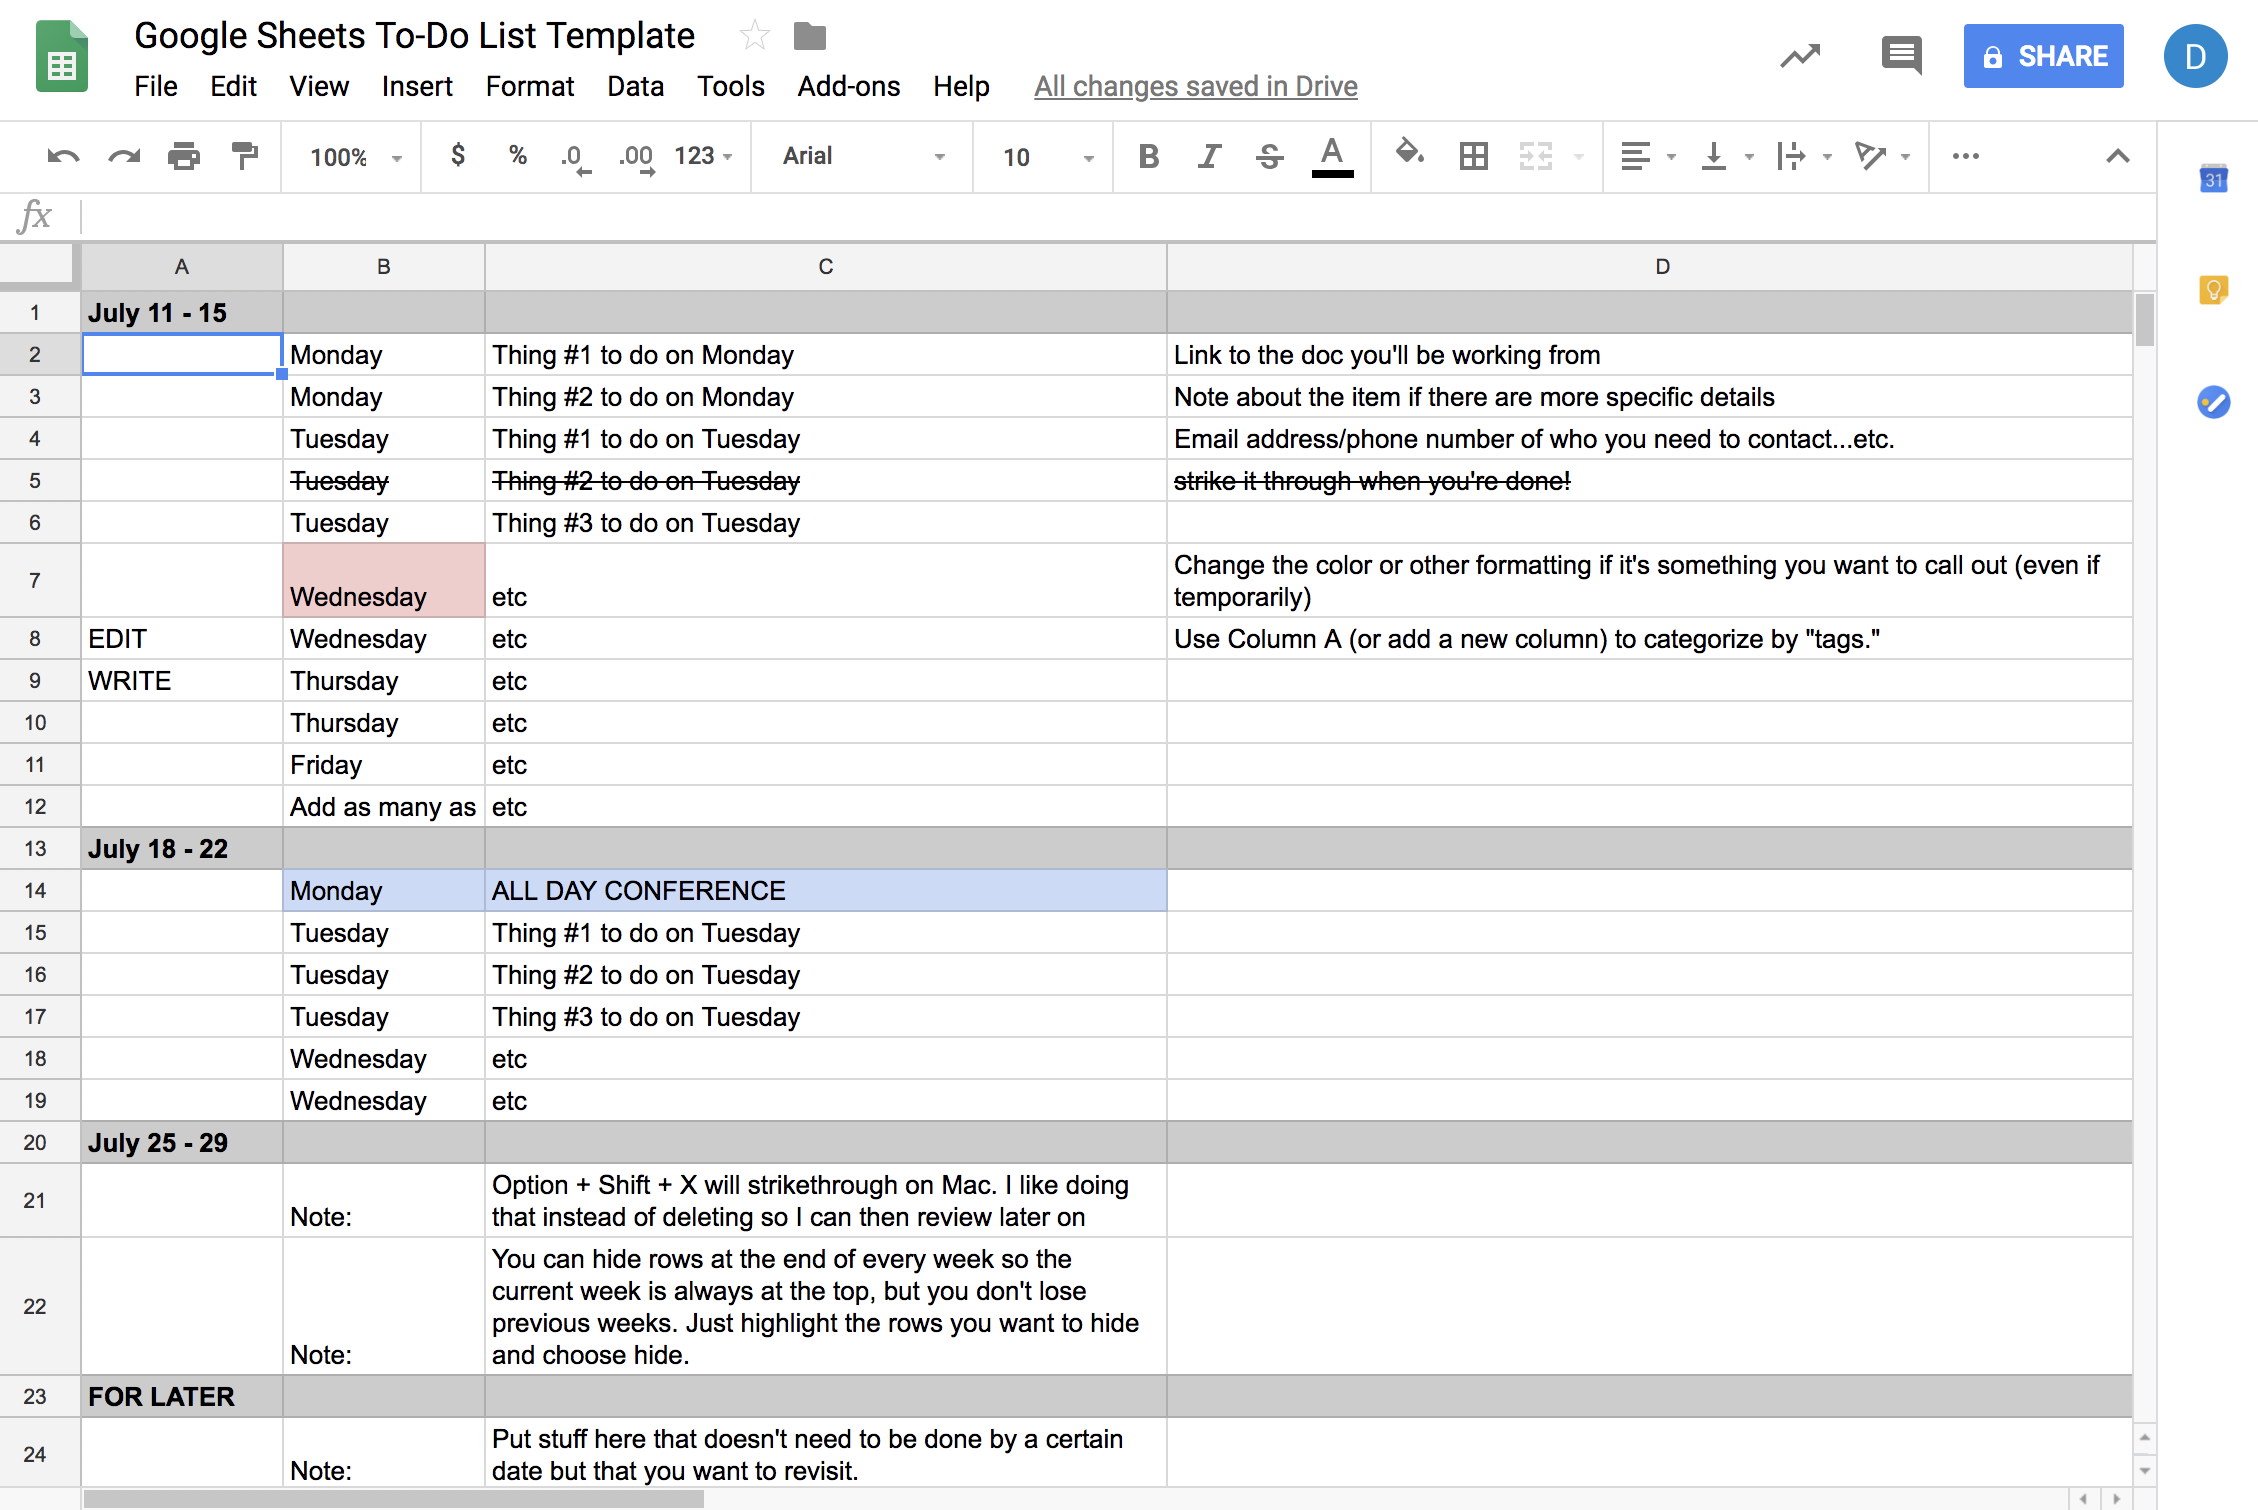
Google Sheets To Do List Template
Really all you need to get started using Google Sheets as your to do list is make a copy of this template. It's far from an advanced system, and I have some notes in there about how to customize and adapt it. So if you want to take matters into your own hands, you can stop right here and get to making the sheet your own. But for a walkthrough, keep reading.
The Basic Setup
When it comes to work tasks, there are usually two critical things you need to keep track of—what to do and when to do it—and then…other stuff. So those are the three main columns you'll see on the spreadsheet:
- Day and Time
- Tasks
- Other Stuff: Notes/Links
Of course, you can always customize those columns or add new ones.
For example, while I schedule my weeks day by day, maybe you don't use your to do list as a schedule, so you wouldn't have a column for Day.
Or maybe you want to add some sort of tags to your task. Just add another column for tag.
If you're consistent with your tags, you can then sort or filter your spreadsheet by that column to group similar tasks. If you're not consistent—I am 100% not—you get complete flexibility. Your tags can vary week to week and just serve as quick reminders of what's on your plate.
Sometimes it's beneficial to have a sense of how long a task might take. You can have a Time estimate column and drop the estimated number of hours in there. I recommend using half hour increments (i.e., .5, 1, 1.5, and so on) so you don't end up with battling timeframes. If you do lots of smaller tasks, you could go with 15-minute increments (i.e., .25, .5., .75, and so on). Tracking your time is particularly helpful if you want to be sure you have enough time to get everything done. Highlight those cells for the week, and be sure they don't add up to more than 40.
You get the point—this is just a template, and it's yours for the customizing.
The final key component is breaking the sheet down into weeks. I use a solid gray bar with the dates in the left-most column to visually separate weeks, and I tend to have about a month's worth of weeks ready to drop tasks into. And then I add a section at the bottom for things that are for further down the road: the "eventually" tasks. That way, I can still do a quick scroll to see what's coming up, but it keeps my focus on the here and now.
Formatting Your To Do List
The beauty of using Google Sheets or another spreadsheet tool for your to do list is that you have so many formatting options. Sometimes I change the color of a cell to indicate that it's high priority. Other times I bold it. And other times I just write IMPORTANT in front of it. Whatever works.
But if you like to be more consistent, you can choose colors to indicate specific things: priority, level of effort, type of tasks, or anything else you want to be able to see at a glance. For example, I always highlight a row in blue if I'm going to be out of the office. That way, I don't overschedule the week. And I highlight a row in red if it's a non-negotiable—something I have to do the day it's scheduled because of an external deadline.
And because you have text formatting options—which many to do lists don't—you can make your formatting as granular as you'd like. Bold certain types of tasks, italicize others, or even add a border around cells. Whatever stands out to you visually, go with that. You can even use conditional formatting to automatically format rows that contain specific text, like if you always want to highlight rows with a specific person's name—say, an important client or your boss.
The Process
Every week, you'll add tasks as they come up. Add a row, drop the task in, and add any other information or labeling you want. Because moving tasks around is as easy as dragging a row to a new location, you can easily re-prioritize without jumping between views or clicking twelve times to get where you need to go. Other than adding tasks, the process is simple.
1. Strike through the text when you complete the task. You can use keyboard shortcuts to do this. On a Mac, it's command+shift+X and on a PC, it's Alt+Shift+5.
2. At the end of the week, hide the previous week's rows so your current week is always at the top. To do this, highlight the rows you want to hide, then right click and select Hide rows [numbers of selected rows].
Unsurprisingly, I use Zapier to automate my to do list. My absolute favorite Zap (our word for an automated workflow between apps) is a simple one: Send any message I star in Slack to my Google Sheets to do list. We live in Slack at Zapier, so most of my tasks come either from there or from my brain.
I send the message to the Task column and the link to the Slack thread to the Notes/Links column. That way, I can look back at the thread if I need more information when it's time to complete the task.
I also have specific Zaps set up for some of my recurring to do list workflows. For example, every time our Partnerships team requests content, I get notified in Slack with the same message. Instead of copying that over to my to do list each time, I let Zapier do it automatically. My Zap looks for any Slack message that contains the text new partner marketing content request and instantly sends it over to my to do list.
It goes to the bottom of my to do list, and whenever I have downtime, I head over to my to do list and see what's new from Slack—and then drag it to its appropriate spot.
Of course, if you live in email, you can set up the same system: For example, you could send all emails with a specific label to your spreadsheet.
FAQs
I get a lot of questions about this system, and sometimes, the answer is just "nope, it can't do that." But my version is pretty simple, and there are plenty of ways you could complicate—er, improve—the system. So here are a handful of FAQs as you decide if the Google Sheets to do list might work for you.
Doesn't it get cluttered?
If you hide your previous weeks' tasks, it's usually pretty manageable. But if you feel like your "eventually" section is getting long or you have a whole category of items that don't really fit, you can always add a new worksheet. For example, I've added a worksheet for To read to keep a work-related reading list. I can visit this worksheet to find an article whenever I have some downtime.
You can even automate that read-it-later worksheet by sending all new Pocket articles to it.
Strikethrough is ugly. Can I use checkboxes?
Yep. For me, strikethrough is a more obvious visual indication that something is done, but checking a box is certainly satisfying.
Highlight the column you want to use as your checkbox column, and click Insert > Checkbox. Now the whole row will be yours for the checking off.
What about reminders for due dates?
Once again, Zapier to the rescue. Google Sheets won't send you reminders—although you could set up a conditional formatting formula to make a cell change colors when something's due. But with Zapier, you can get reminders in whatever way works best for you: email, SMS, Slack, whatever.
Add a column for due date, and then every time you add a task with a due date, Zapier will read it and notify you however much time before that date as you want. The trigger event (what will start this workflow or Zap) is adding the due date to the spreadsheet (Create Spreadsheet Row). Then you'll add a Delay step (Delay Until) and delay the action until your chosen amount of time before the due date. Finally, select your action app—where you want to get notified of the upcoming task, for example, email or text message or Slack—and the message you want to send yourself to be reminded of your task.
Another option: Just glance at your schedule once a day to see if anything is due.
Does Google Sheets work as a collaborative to do app?
I'd say it's best as a personal to do list, but you can definitely share it like you would any other spreadsheet and turn it into a team app. Because of the detailed revision history, you don't have to worry about losing something because a coworker accidentally changed it.
Any fancy spreadsheet things you can do with it?
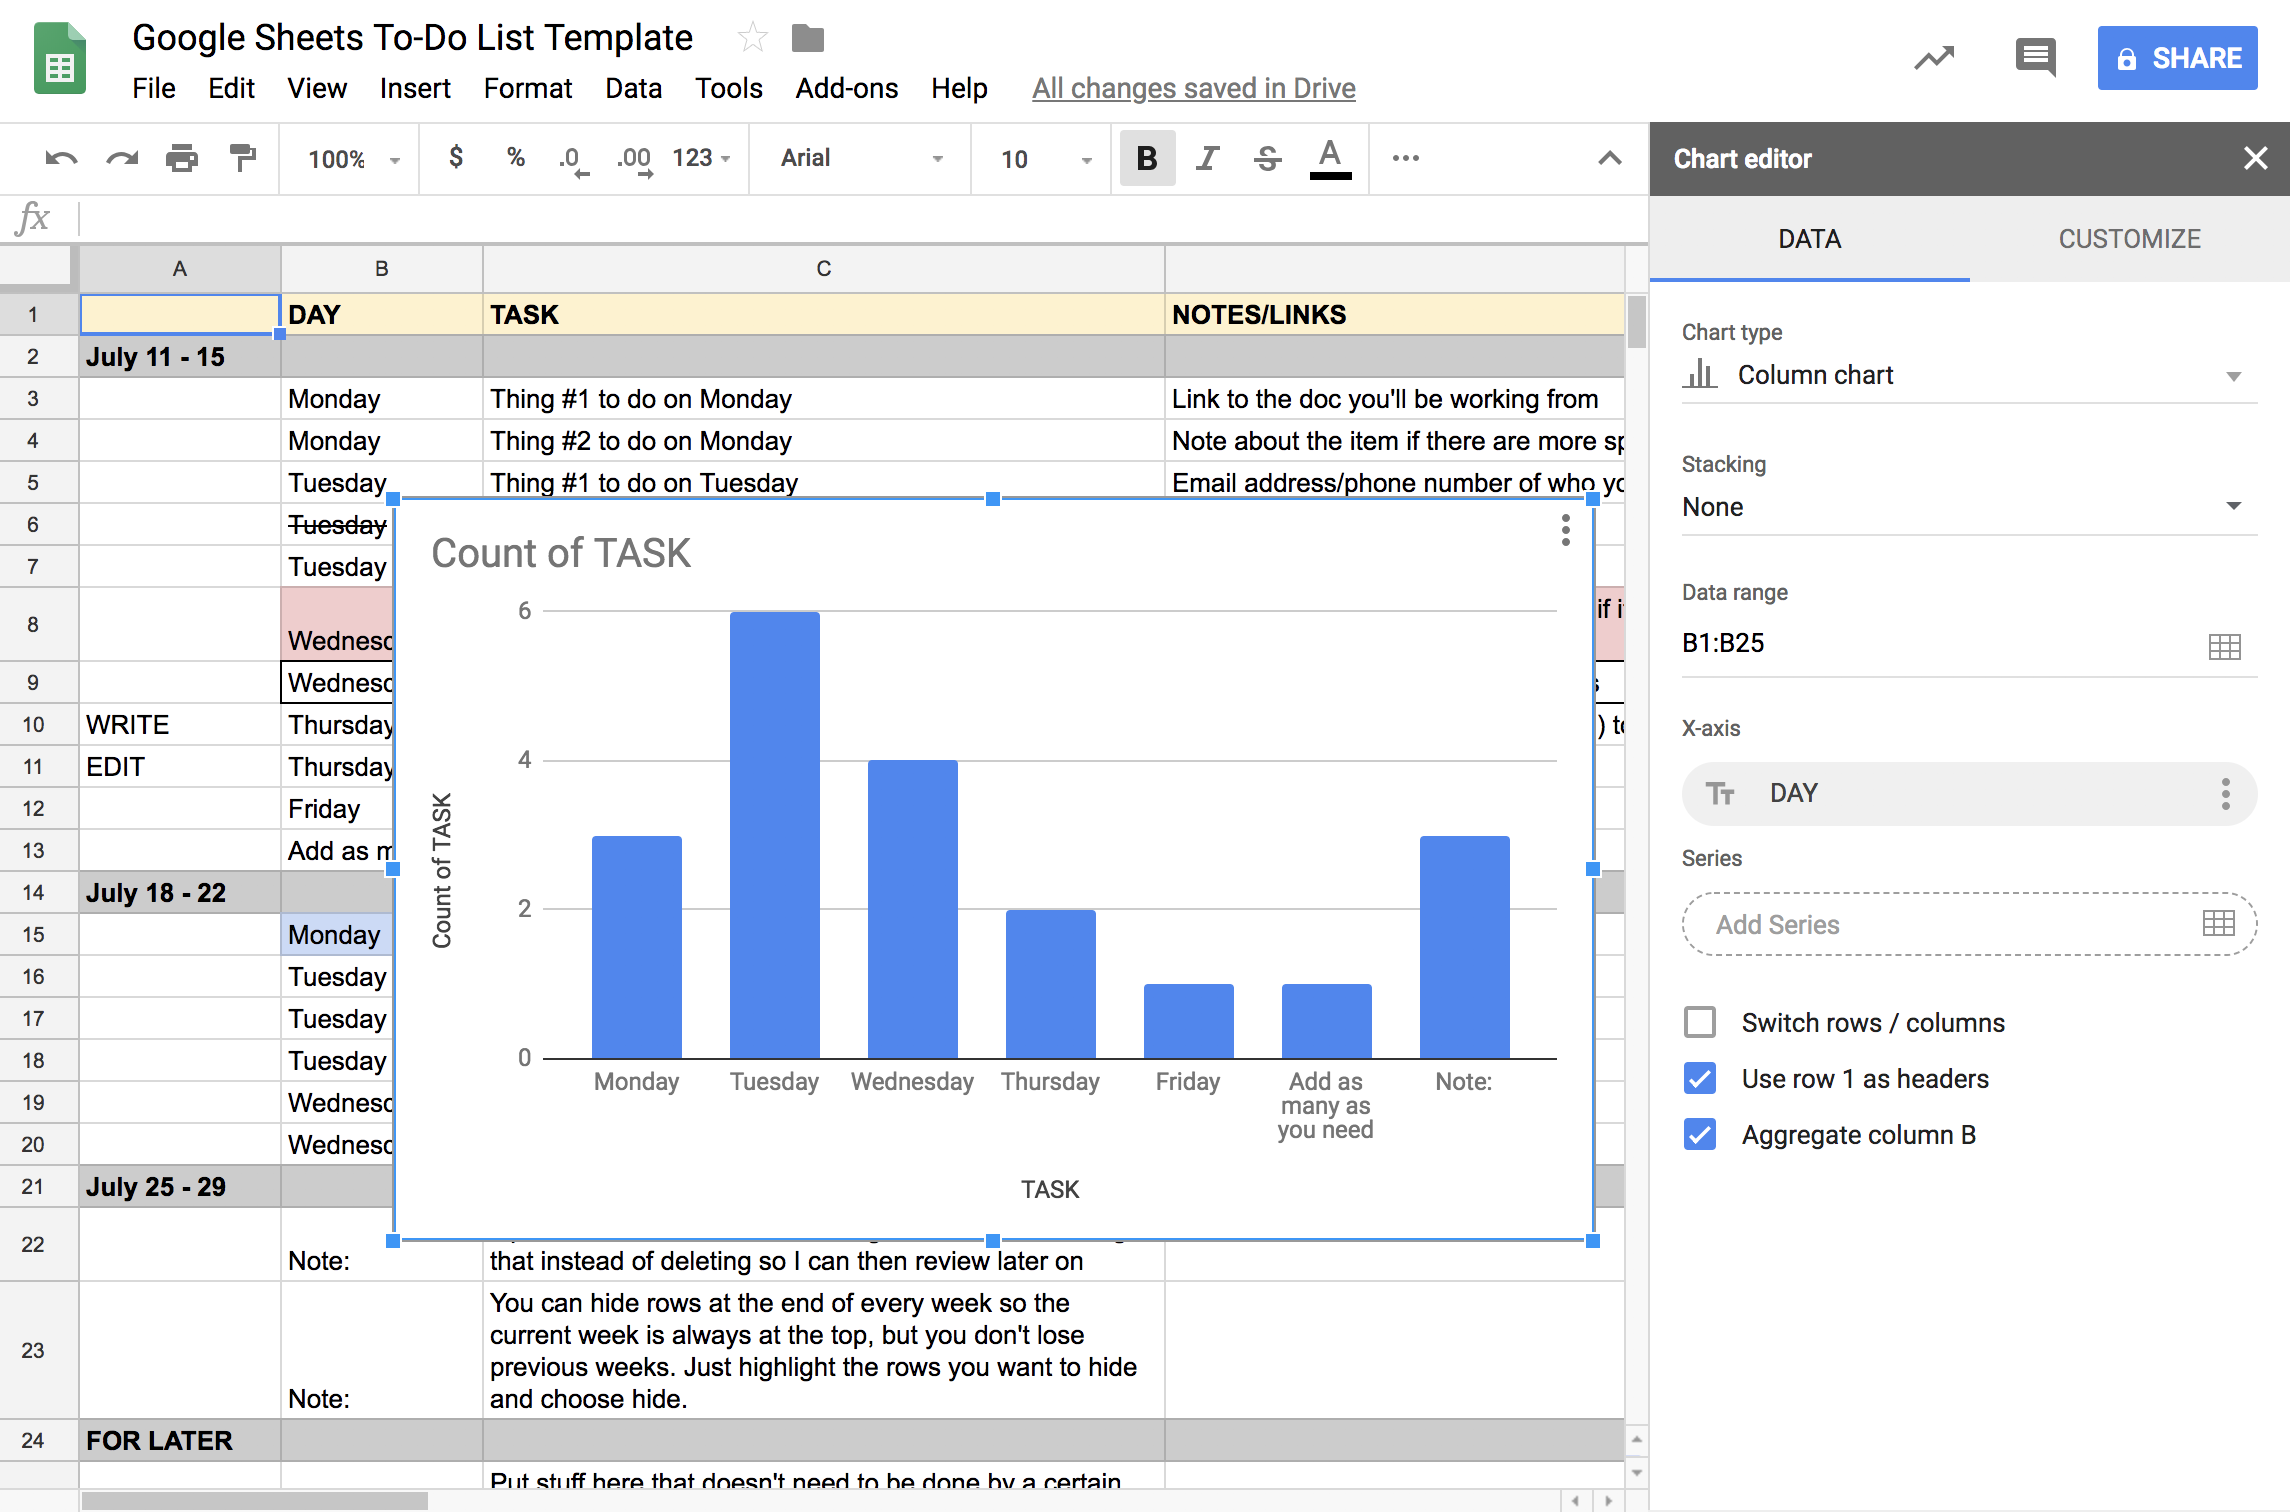
Glad you asked! Yes. You can create a chart with one click (using the chart icon in the toolbar). You'll get some sort of default analysis of your data, and you can play with the range and other factors to create a nice graph of, for example, what days tend to have the most tasks.
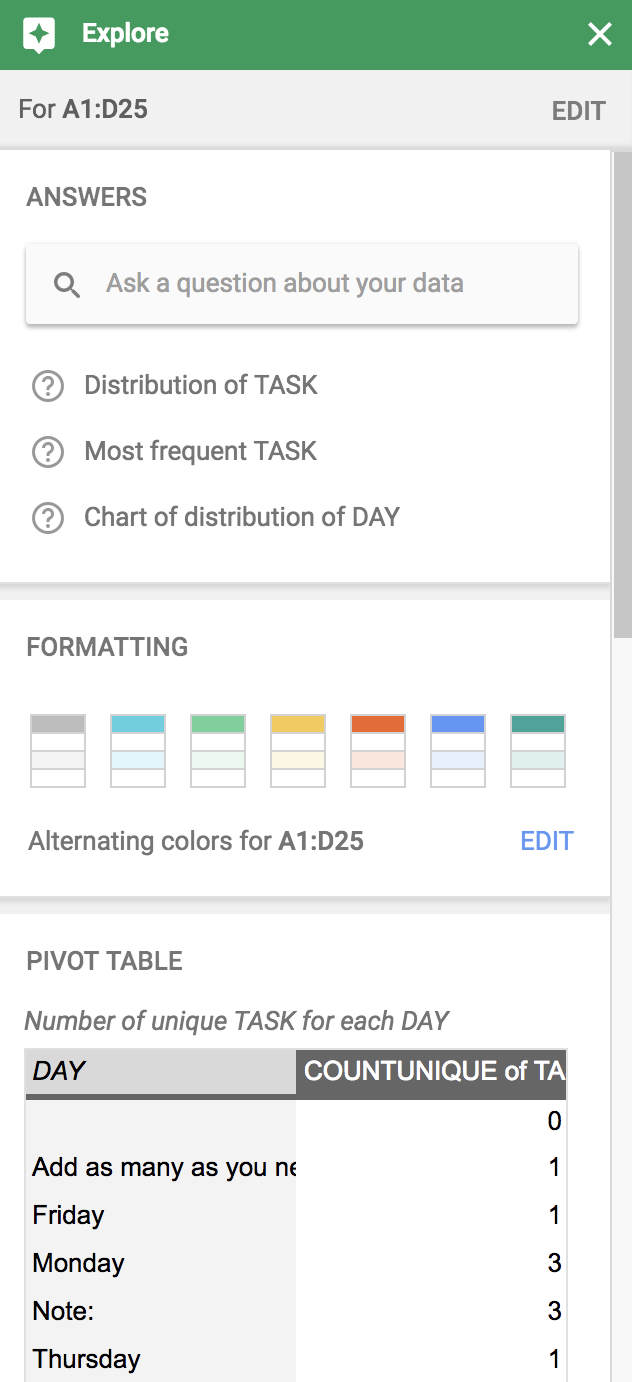
Alternatively, you can use the Explore function to ask Google Sheets any number of questions about your to do list. It'll give you suggestions like "Most frequent Task" or "What percentage of Tag is [tag name]" and so on. This can give you insight into what you're working on the most and how you're spending your time, which can help you plan your workdays more productively.
There's no shame in going old school with your to do list. Here at Zapier, we have people who use email, .txt files, and even pen and paper (the horror!). So if you can't find a to do list app that meets all your needs, try Google Sheets for a week, and see if it sticks.
source https://zapier.com/blog/google-sheets-to-do-list/
No comments:
Post a Comment