If I asked you where your digital photos are, what would you say?
My guess is that you would probably name your smartphone and maybe even throw in a cloud account or two. Perhaps you’d also mention your computer and then remember that you have an active Facebook feed and an Instagram account that you post to occasionally. Then you’d say that there might be some photos on a tablet at home or an old PC you forgot to transfer photos off of when you upgraded to a new laptop. Then, just as you think you’ve named all possible places, it dawns on you that you have a few flash drives and photo CDs in a box somewhere.
Sound familiar?
As a Certified Photo Organizer, I can tell you that this is not an uncommon scenario. The modern photo collection is scattered across countless devices, social media sites, and cloud storage accounts. Who knows what’s where anymore? This is becoming a real head scratcher and source of anxiety for a lot of people, many of whom suffer from digital photo overwhelm.
The good news is you can redefine your photo workflow so that all of your photos are organized—automatically and with little effort on your part—so that your precious memories are all in one place, easily retrievable, backed up instantly, and always there for posterity.
Digital Photo Overwhelm Is a Very Real Problem
When photo app Mylio announced their world digital photo forecast last year, it showed that 1.7 trillion photos would be taken in 2017, a staggering 9% growth over the previous year. This trend shows no signs of slowing down and yet, somehow, we look at our photos less and less.
Why? We can’t find them.
Every year, millions of photos are at risk of getting getting lost, deleted, or forgotten because they’re not backed up. That’s a problem. The reality is that we can’t back up our photos if we don’t have them organized in a specific place. If we fix that, backups are all of a sudden more likely to happen.
Sure, it takes time to set up, but if you think about it, what matters more than your memories? You probably wouldn't blink an eye if you lost an ATM receipt or accidentally deleted an email newsletter or office memo. But if you lost irreplaceable photos of your child growing up or the only photos of someone you love before they passed away? That's the heartbreaking part—and why a photo workflow to preserve these memories is so important.
Redefine Your Photo Workflow
Organizing your photos is a constant battle with time. It involves ongoing maintenance to stay on top of all the memory streams that flow towards you. Fortunately, there are steps you can take to manage this constant influx of photos, so that you don’t have to spend hours and hours downloading every single photo from every single place.
I would like to introduce you to a surefire way of minimizing the time you spend shuttling images from one place to another: photo funnels.
In this post, I’ll show you how to:
- Define a digital photo hub
- Rethink your photo management workflow
- Automate your photo streams, a.k.a. your “photo funnels”
Establishing automatic photo funnels will help you consolidate your photos into one place, so that you can focus more on what’s important—keeping those memories safe.
As it turns out, you don’t have to be a photographer to have an impeccable photo workflow!
Your Digital Photo Hub (DPH)
Good organizing teaches us to keep “like with like” and to create safe “homes” for our things, so that we always know where they go. Photo organizing is no different. When you have photos scattered in multiple places, you can easily lose track of where they are or, worse, you might lose them. To combat this problem, you need to establish a “home” for your photos to live. This is what’s referred to as your DPH (digital photo hub).
Your digital photo hub is the one place where all of your memories can live safely. This is base camp for your workflow. Every photo you have, no matter where it originates, should pass through your DPH at some point. It’s the place you go to look for a photo to print or share, and it’s the place you back up regularly. If there is one thing you can do to help ensure that your photos stay protected, it getting all of them into one place. Consistency is key.
Defining Your Digital Photo Hub (DPH)
Over the last few years, I have troubleshooted many clients' digital dilemmas and I have come to the conclusion that, ideally, your DPH should be a folder on your main computer or a dedicated external hard drive. I have also developed a set of criteria that guides me in choosing the best solution for each client. Let this same set of criteria guide you.
When choosing a digital photo hub, the ideal solution should be:
1. Dedicated
Your digital photo hub should be dedicated to memories only. This can include photos, home movies, letters, and other memorabilia, but don’t mix in your work documents or your music library. Disorganization often starts with clutter, which is a direct result of bending the “like with like” rule, so I like to stay strict on this. When you have a digital photo hub that’s dedicated, there’s no question about where to look for your photos. Keeping it labeled adds another layer of protection.
2. Intentional
The digital photo hub should be a place that you selected specifically for your memories, not a place that “just happened” to be available. Have you ever thought about why you are storing files in certain spots? It is just because it’s the most convenient option, or is it because you don’t know where else to put them? Did you actually select this place with your photos in mind?
So often I find that clients store files in “temporary” places because they haven’t figured out the one place that makes the most sense to them. You want to put some thought into this, and invest in something reliable, so do a little research and find the best match for your needs.
3. Accessible at all times
You shouldn’t have to pay to access your own photos. Your original photo library should be available when you need it and where you need it. This is why I never recommend that cloud storage is your digital photo hub: If you can't access the internet, you can't get to your photos. Cloud storage is a wonderful backup solution, but it’s not the ideal place to keep your originals. Your DPH should be a local solution.
4. High capacity
Your digital photo hub should be high capacity because it has to fit everything in one place. That’s the whole idea behind it. It should have plenty of room for your current photo collection as well as any printed photos that you have yet to scan. You also want to take into account the memories that will come into your life within the foreseeable future.
The size of your digital photo hub will depend on many different variables, especially your file formats, but a good rule of thumb is to look up the current size of your collection and double that number. We take so many photos and videos nowadays that a high-capacity hub is a must. Digital storage is affordable, so there’s no reason to skimp on it.
5. Durable
All technology has a limited lifespan, there’s no way around that, but you can rest easier knowing that you have picked a somewhat durable digital photo hub. If it’s your computer, does it need to be upgraded? If it’s an external hard drive, how old is it?
If you are planning on purchasing an external hard drive to use, I would recommend one that is waterproof, shockproof, and scratch-proof. If it’s fire-proof, even better. It should be able to withstand smaller household accidents, including kids or pets getting hold of it. No matter what you choose, make sure it’ll last for a while.
A good rule of thumb for external hard drives is to look for drives with longer warranties (3+ years)—the longer the better. (Backblaze offers a hard drive reliability study in case you're curious about specific drives to use for your photo storage.) And remember that all drives fail—it's not a matter of if, but when. Build in redundancy to your backup plan for the inevitable crash.
6. Predictable
Technology is sometimes unpredictable, but when it comes to your digital photo hub, look for the most predictable place you can find. I get asked all the time why cloud storage isn’t the optimum place to keep a photo collection. Why is this not the ideal DPH? After all, it syncs to most (if not all) devices, and it’s extremely convenient.
I agree that on the surface cloud storage certainly looks to be the best option, but even if you get over the potential accessibility issue, predictability is where it falls apart. What if the service goes out of business? What if the terms of service agreement changes? What if they don’t let you download more than one photo at a time? What if someone deletes a shared folder from the account? The list goes on. When you designate a local DPH, you cut the unpredictability factor in half. Cloud storage is great, but it’s best used as a backup, not for storing your precious originals.
Given the criteria above, the best Digital Photo Hub for most people would likely be a folder on a local or external hard drive that is backed up regularly to other drives and destinations, including off-site in the cloud. Your "Photos" folder on your computer, external hard drive, or network attached storage device is one that you can depend on for finding any photo you've ever captured.
Action steps:
-
Tally the storage space needed for all of your photos scattered across your computer, tablet, phone, social media, etc.
-
Then double that storage space estimate and either dedicate or reallocate space on your hard drive or purchase a new drive to be your digital photo hub.
Figuring Out Your Photo Workflow
Once you have a safe and secure digital photo hub ready, start documenting where your photos are coming from, so that you can funnel them into their new home with as little effort as possible. You also have to figure out where they are going after the fact. What are you doing with these photos? Sharing them with family members? Uploading them someplace to create photo books?
I like to use a workflow template with my clients to help them visualize how their photos move from one stage to another. Your workflow will vary depending on what devices you have and what services you use, but the overall idea is the same. When you have clearly defined inputs and outputs, you can begin looking at how to improve and automate the process.
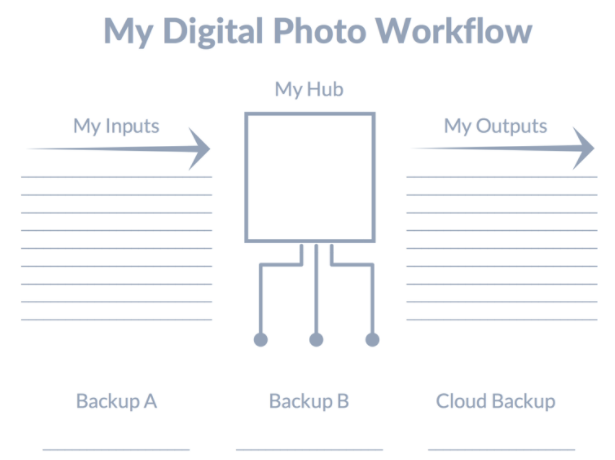
Defining Your Inputs
The first thing to look at is your “inputs.” On a monthly basis, where do your photos come from?
A vast majority of people will name their smartphone as the main source, but you might have a different place. Remember regular cameras? They still exist. You might also have photos coming from social media or email accounts. I know that my overseas family members email me photos all the time, and they also post photos that I would like to have in my own collection to Facebook. You probably have a similar scenario in your life, so the question becomes: how do these photos get to your DPH with as little work as possible?
Action step:
- List the sources from which your photos most often originate.
Defining Your Outputs
Before you start making decisions on how to simplify your importing, also look at your outputs. If you think about your exporting process, where do your photos end up?
Think about what you do with your photos once you have them in your collection. Do you share them with others? If so, whom do you share them with, how, and when? Do you create photo books? Do you upload them somewhere to order prints? Identify your outputs the same way you identified your inputs—by analyzing where they go once you have taken them.
How can you get them to go where they need to go in as few steps as possible?
If you can’t answer this question, that’s OK. It’s very common to not have any outputs. The simple reason is the problem I’m addressing in this post—the fact that many photos are so scattered that it’s simply to hard to do anything with them. There are too many of them, everywhere, and it becomes overwhelming.
Photos are meant to be enjoyed, so if you don’t have any outputs, consider it a problem. However, that part of the equation can be fixed once your photos are organized on your digital photo hub. When you know where you photos are, it’s much easier to share and enjoy them.
Action step:
- List the sites or social networks where you most often share your photos.
Set Up an Automatic Workflow
When you understand exactly where your photos are coming from and where they’re going, you can simplify the whole process by setting up some automation rules. I like to use Zapier for this because of the extensive list of services that integrates with it.
What’s the Common Denominator?
Let’s say that you have figured out that your main sources of photos are:
- Smartphone
- Gmail
How would you automate a workflow to help you funnel these photos?
The key is to find the lowest common denominator. In other words, you need to figure out the shortest (and least complicated) route for your photos to travel. This is all about minimizing the time you spend looking for your photos in various places, and, more importantly, it’s meant to take some of that manual work off your busy schedule.
On occasion, especially if the DPH you have selected is a folder on your computer, there may not be a direct way for you to get the photos there. You may have to corral them into a cloud storage account (such as Dropbox) first, which in this case is a good idea. That gets them into one place automatically, and you can then download and import them manually to your DPH from there.
Move Photos from Your Smartphone to Your DPH
If your digital photo hub is on your computer, the quickest way from A to B is to import your photos directly. You can do this by connecting your phone to your computer wirelessly, with a USB cord, or by using a cloud storage app's importing program — Dropbox, Google Drive, and OneDrive all offer options to automatically copy photos from your connected phone to these online storage spaces. As an example, I have my camera roll set to automatically upload to my Forever account, which is a service I use frequently and highly recommend.
Action steps:
-
Find out if your preferred cloud storage solution offers an app (most of them do).
-
Look in the settings for an “auto-sync over Wi-Fi” option, and give the app permission to access your camera roll.
-
Open the app to sync your photos. The auto-sync feature will automatically copy them to your cloud storage account.
Get Photos from Your Apps to Your Camera Roll
If you have photos coming in from apps like Snapchat or Whatsapp, you can go into these apps' settings and choose to have those photos automatically saved to your camera roll as well. Once those photos are in your camera roll, they move alongside the “regular” photos that were taken with your phone. Whatsapp is a big source of family photos for me (third in terms of photo volume), so I make sure it saves everything to my camera roll.
Transfer Photos from Facebook to Dropbox
Facebook is another big source of photos for me, second only to my iPhone in terms of volume, so it’s crucial for me to have an automation rule to save some time.
In my case, I’m a member of a few family history groups, which includes distant family members who post photos of common ancestors. These are often photos I would like to save on my DPH. Are they the best quality available? No, perhaps not, but I’d rather have them saved than not. If there is a photo I absolutely fall in love with, I request a better resolution version, but short of emailing my distant cousins, this is a quick way to get the job done. Sometimes, “good enough” is perfect.
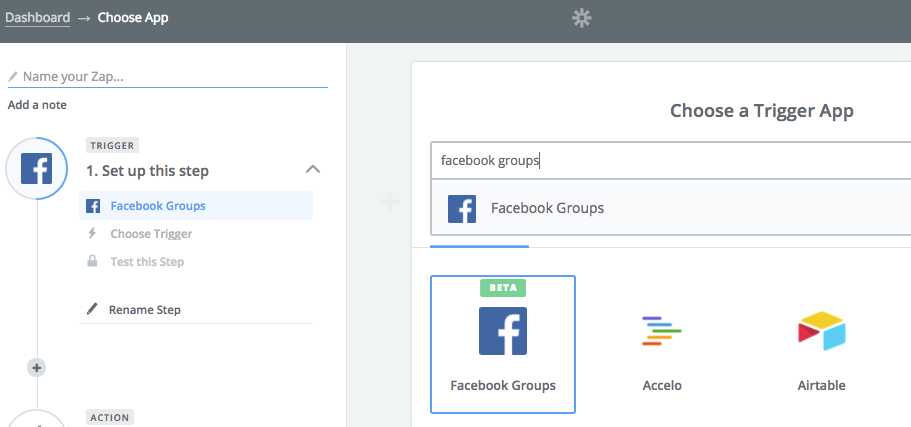
I use a Zapier workflow that automatically copies photos from a Facebook Group to a folder in Dropbox. To set this up yourself, log into or sign up for your Zapier account and then follow these steps for making a Zap:
Step 1. Choose "Facebook Groups" as the trigger app.
Step 2. In the next screen, click "show less common options" and then select "New Photo" as the trigger.
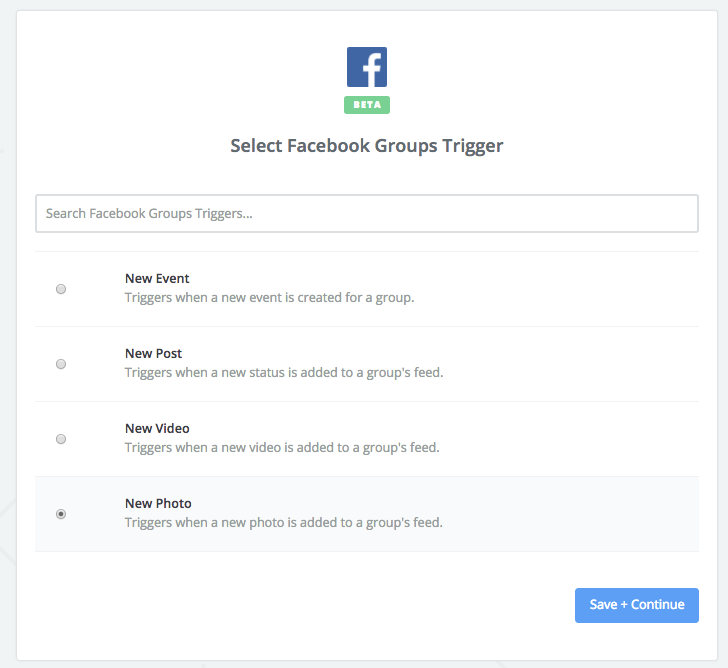
Step 3. Connect your Facebook Groups account.
Step 4. Select the Facebook Group you want to watch for new photos. Note that you need to be an admin of the group to select it.
Step 5. Follow the prompts to test the trigger step. You should have at least one recent photo added to the Facebook Group for this to work.
Step 6. Next, select Dropbox as the action app.
Step 7. Choose Upload file for the action.
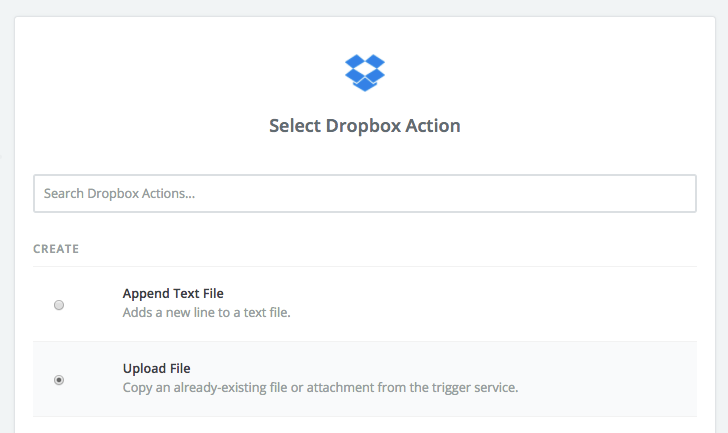
Step 8. Connect your Dropbox account.
Step 9. Set up the template by choosing the folder you want to save the photos to (note that this folder should already exist in Dropbox). For the file, click on the plus (+) sign at the right of the field and select Picture from Step 1:
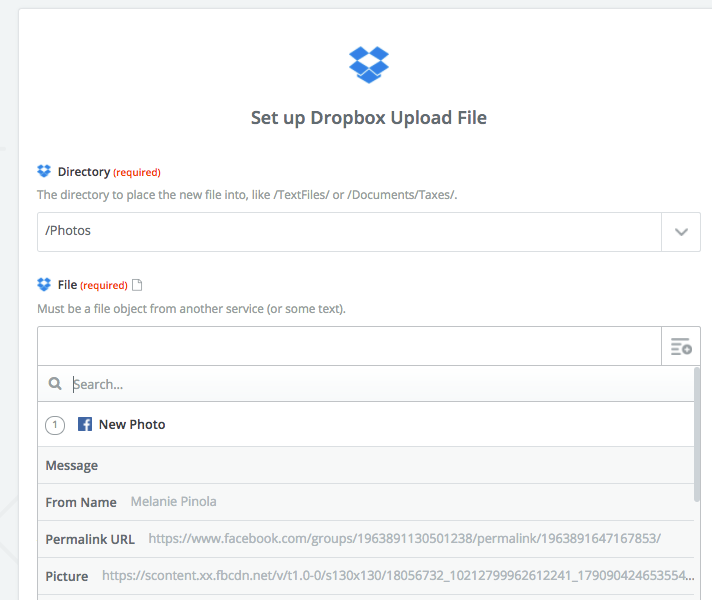
Leave the other default settings.
Step 10. After clicking continue and testing this step, you can save and name your Zap.
That's it. From now on, new photos pasted to your group will be saved automatically to your Dropbox folder. You could also do this with Google Drive instead, if that's your preferred cloud storage service.
Transfer Photos from Instagram to Dropbox
If you’re a heavy Instagram user, you can create a Zap to funnel all of your new Instagram photos to your Dropbox account, so you never have to first download the photo from Instagram itself and then re-upload. Similarly to Facebook, Instagram can easily be connected to Dropbox to save all of your photos in one place as they post. For even better results, create a search string condition to look for specific hashtags.
Gmail Attachments to Dropbox
If you get a lot of photos from friends and family members via email, you can automatically save those photos to Dropbox instead of downloading and moving each photo individually.
If you use Gmail, one way to do this is to set up a Zap that funnels all of your attachments into a specific folder in Dropbox. You can set the Zap search string to specifically look for file extensions (like JPEGs) or labels such as “family photos.” That way, as soon as something arrives in your inbox, it gets uploaded to your Dropbox account automatically.
The Software Alternative
If your computer is your Digital Photo Hub and you would prefer to have a direct way to funnel all of your photos to the same place, an alternative is to find a photo organizing program with syncing capabilities. This may not solve all of your photo consolidating needs, but it can certainly simplify and streamline many of them.
There are many options on the market, but I can highly recommend Mylio, which is a program you can use to sync photos to and from multiple devices, including your phone. Mylio gives you the option of bringing in your own cloud and importing photos from your Facebook account. It’s my go-to solution for clients who need a cross-platform solution that is highly customizable, and it’s the only photo organizing software I know of that allows you import your high-resolution photos from your phone while at the same time syncing low-resolution versions back out. This means that you can carry your entire photo library with you and only use up a fraction of the storage space it would otherwise occupy, making it an ideal solution for those on the go.
Can You Consolidate Your Photo Streams?
As you can see, figuring out your photo funnels isn’t the easiest thing to do, but once you do it, it saves you a lot of time. Using automation rules won’t eliminate the need for editing and organizing, but it will help you gather everything in one place, which is a big source of frustration for many photo enthusiasts.
It’s also important to note that your workflow may change over time as you introduce new devices or change accounts, but it’s always a good idea to have your photo funnels in the back of your mind because they allow you to efficiently import your photos to your digital photo hub on a regular basis.
No matter what your photo workflow looks like or where your memories are coming from, set aside some time in your calendar to get your photos into your digital photo hub. And while you’re at it, ask yourself: Can I consolidate my photo streams better?
Title photo by picjumbo.com via Pexels.
source https://zapier.com/blog/photographs-workflow/

No comments:
Post a Comment