
Screenshots are the simplest way to show off your new program, point out a bug, and save that picture on Facebook to your camera roll. They're the easiest way to save anything on your screen. And they're so integral to the way we work, every operating system comes equipped with a screenshot tool.
But screenshots aren't always simple. If you aren't careful, screenshots can accidentally expose private information or obscure the part of a website you need to share. Built-in screen capture tools often hide behind cryptic keyboard shortcuts. And when a picture alone won't cut it, you'll need to make a video or GIF to show what's happening on your screen.
Here's the guide you need to take the best screenshots everywhere.
- Why Take Screenshots?
- How to Take High-Quality Screenshots
- Keyboard Shortcuts to Take Screenshots: Windows, OS X, Ubuntu, Chrome OS, iOS, Android, The Web, Watches, eReaders, Game Consoles and More
- Apps to Take Screenshots
Why Take Screenshots?

Why should you care about taking high-quality screenshots? Because now, more than ever, we speak through pictures.
Photography used to be a time-consuming, expensive endeavor. You'd try hard to make each picture count. No one ever took photos of their parking spot to keep from losing their car, or of a price tag in a store just to comparison shop.
Smartphones changed that. Now everyone carries a camera, and pictures are for more than special occasions. Sure, we take pictures of sunsets and babies, but also of receipts, our refrigerators, street signs, and ourselves (lots of pictures of ourselves).
Screenshots are the perfect way to save a picture of anything on your screen.
We're visual communicators. And like your writing, your visual communication needs to be clear, concise, and to-the-point.
Screenshot tools let you do that with your digital life. You might photograph something to remember or share it—and you'll screenshot for the same reason. Screenshots are the simplest way to share your screen with anyone, anywhere. Whether it's a cute Facebook photo, a tricky bug, or a quickly-deleted Tweet from a politician, everyone has reasons to take screenshots.
But you still need to take quality screenshots—especially if you're using them at work, or for your customers. Here are some quick tips on grabbing superior screenshots. Then, we'll dive into the nuts and bolts.
How to Take High-Quality Screenshots
Screenshots are more than just pictures of software—they're pictures of your workspace, with all the info you might see right now. That's why you shouldn't just snap a random screenshot.
Think carefully about what's on your screen and why you're shooting it, to make sure your screenshots are perfect for their intended purpose. Here are a few pointers:
- Consider what the screenshot is for. Making a software tutorial? You'll want to show the entire app, and perhaps add an arrow to point out features and guide your readers. Bug reports might need to show the broken part of the app. And just-for-fun screenshots should be double-checked to make sure they only have the info you want to share.
- Never share private info. Our devices brim with private info, from phone numbers and email addresses to more sensitive data including ID and credit card numbers. They're usually secure on your device, but if you take a screenshot and share it, anyone can see whatever was on your device when you took the screenshot. Be sure the app you're screen capturing doesn't show private data—and if it does, either crop or blur that part out.
- Be careful with auto-upload. Some third-party screenshot tools like Droplr can automatically upload screenshots. That's handy to share a Google Analytics graph with team members quickly, but be careful about sharing sensitive items. When it comes to your privacy, the convenience might not be worth the risk.
- Don't show too much. Trying to point out a bug in an app? Don't share a full-screen screenshot. Instead, crop the screenshot to show just the app—then perhaps add an arrow to point out the problem.
- Don't show too little, either. A screenshot of only the bug might not give enough context, though. Typically, it's best to share a screenshot of the full app or at least the main parts of the app.

Say I'm writing a blog post about how to edit documents in Google Docs. I'll take a screenshot of my full browser, with an article I'm editing open in Google Docs. Then, I open the screenshot in Apple Preview on my Mac (or perhaps in Microsoft Paint on a PC), delete the email address from the top corner if I hadn't already removed it via Inspect Element, and perhaps add an arrow to point out the New Changes button to show readers how to see previous versions of their work. I'll finally crop the image to show only the essential parts before adding it to our blog post.
There's a reason for everyone to take screenshots today—and tools to capture them on almost every device. Here are steps for taking screenshots on most modern computers, smartphones, and more.
How to Take Screenshots on Windows

Windows PCs make it so easy to capture screenshots, there's a dedicated key on your keyboard for it: PrtScn (or Print Screen or PrtSc, depending on your keyboard). Tap that key, and Windows will copy a screenshot of your entire screen to your clipboard, which you can then paste into a document or blank Paint canvas to save.
For more specific screenshots, Windows has built-in keyboard shortcuts for screenshots:
- Copy full screen screenshot to clipboard:
PrtScn - Save full screen screenshot:
Windows Key+PrtScn(or Windows Key + Volume Down on a tablet) - Copy screenshot of single window:
Alt+PrtScn - Save screenshot of single window:
Windows Key+Alt+PrtScn
Have a Microsoft Surface tablet or laptop? Instead of the PrtScn key, here are the keyboard shortcuts to use:
- Copy full screen screenshot to clipboard:
Fn+Space - Copy screenshot of single window:
Fn+Alt+Space - Save full screen screenshot:
Fn+Windows Key+Space
How to Take Screenshots on Mac

Macs don't come with a screenshot button, but you can still capture anything on your screen with the default Mac screenshot keyboard shortcuts:
- Save fullscreen screenshot:
Command+Shift+3 - Save screenshot of single window:
Command+Shift+4, press theSpacekey, then click on the window you want to capture - Save screenshot of selection:
Command+Shift+4, then select the area you want to capture with your mouse cursor.
How to Take Screenshots on Ubuntu

Taking screenshots in Ubuntu—one of the most popular Linux desktop distributions—works almost the same as on a Windows PC. You'll likely use a standard Windows keyboard with Ubuntu, so the PrtScn key is still the easiest way to take a screenshot. The only difference is, on Ubuntu, PrtScn will capture a screenshot, then show a dialog where you can choose to copy the screenshot to the clipboard or save it to your computer.
Here are the default Ubuntu screenshot keyboard shortcuts:
- Full screen screenshot:
PrtScn - Screenshot of current window:
Alt+PrtScn - Screenshot of selection:
Shift+PrtScn
The selection tool will change your mouse cursor to a crosshair, which you can use to select a rectangle of your screen to capture.
Ubuntu also includes a Screenshot app, which works much like the Snipping Tool in Windows. It can capture a specific window or just a section of the screen—and can also show or hide the mouse cursor and window interface.
How to Take Screenshots on Chrome OS

When you only need web apps, Chromebooks are a great—and cheap—alternative to traditional laptops. And they, too, let you take keyboard shortcuts, using the window switcher key like the one in the icon above or the F5 key on traditional keyboards.
Here are the default Chrome OS screenshot keyboard shortcuts:
- Full screen screenshot:
Ctrl+Window Switcher Key - Screenshot of selection:
Ctrl+Shift+Window Switcher Key, then click and drag over the area you want to capture
Chrome OS saves the screenshot to your download folder by default. Also, it shows a notification after you've captured a screenshot—click it to copy the screenshot to your clipboard.
How to Take Screenshots on iOS
One of the reasons screenshots are so popular today is that they're easy to capture and share your phone. On an iPhone or iPad, press the home button and the power button at the same time, and iOS will save a full-screen screenshot to your Photos app. Screenshots are automatically saved to the Screenshots album, so you can see all screenshots in the same place. In newer versions of iOS, you'll see a preview of your screenshot as soon as you take it—tap that to annotate and share the screenshot directly.
You can also record a video of your iPhone or iPad screen. Add the Screen Recording widget from your iPhone or iPad's Control Center settings, then tap Record from that new widget in Control Center to save a video to your camera roll. If you have a Mac, you can also record a screencast from your iPhone or iPad with QuickTime. Just connect your phone to your Mac with the USB cable, select New Movie Recording in QuickTime on your Mac, then click the down arrow beside the record button and select your iPhone or iPad. Now click the red record button, use your device to showcase what you want, then save the video in QuickTime.
How to Take Screenshots on Android
For screenshots, at least, Android and iPhone are pretty similar. On Android, press the power and volume down button at the same time for a moment to save a screenshot to your Photos app under Screenshots.
That's the default on Android, and should work on any Google Pixel device and many other Android phones and tablets. But since there are many Android variations out there, your specific device may have customized shortcuts for screenshots; Samsung Galaxy devices, for example, have you press the home and power button to capture screenshots, as on an iPhone.
To capture a screencast on Android, use the YouTube Gaming app—much like you'd use the Xbox app on PCs. Install YouTube Gaming, click the Go Live button, tweak the video settings, then use your device as usual and it'll capture a screencast in the background and let you share it on YouTube or save it to your Photos app.
How to Take Better Web Screenshots

Need to take a screenshot of a webpage? The default screenshot tools on your computer should be plenty in most cases. The only problem is, most web apps show your name or email address in the top right corner, along with other private info you might not like to share.
You could blur the sensitive info in Photoshop, but a cleaner, more professional option is to use Inspect Element. Just right-click on a webpage, click Inspect, then click the selector tool and click on the part of the webpage you want to change. You can then replace the text on the web page, perhaps with a generic email address instead of your real address. It's a simple way to hack the web, for a good cause.
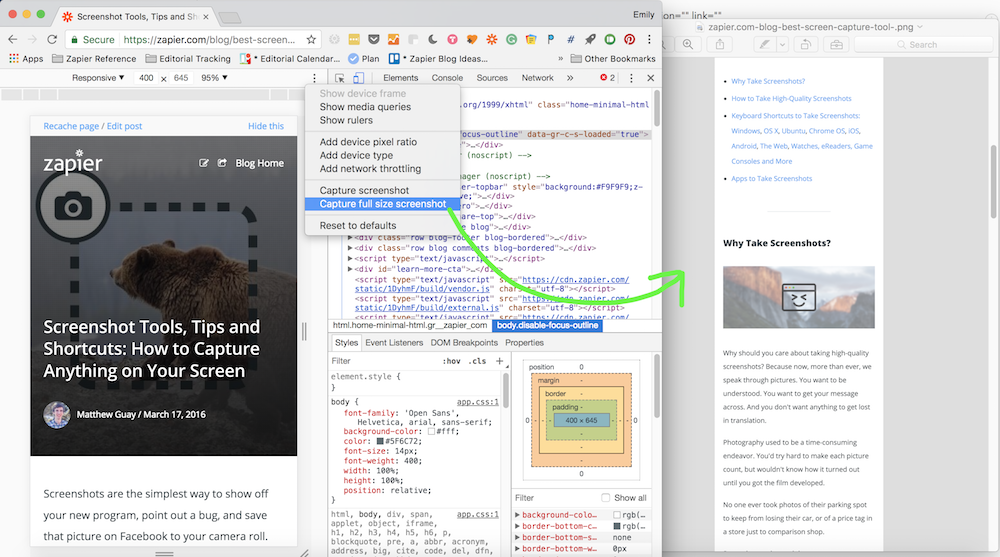
Need to capture a full-page screenshot of a website? You can do that from Chrome's Developer Tools as well.
Just open the Developer Tools by pressing Alt + Command + I on a Mac, or Ctrl + Shift + C on Windows. click the mobile device icon in the far left corner, then click the 3-dot button and select Capture full-size screenshot.

Or, if you'd like to annotate a screenshot with arrows and highlights, the Evernote Web Clipper is a handy tool. Click it, then select Screenshot and drag your mouse over the part of the page you want to save. You can then add annotations, and save or share your tweaked screenshot.
How to Take Screenshots on Other Devices

Want to take a screenshot on your eReader, gaming device, watch, or car? Here are some tips on how grabbing the display from almost any smart device you can imagine:
- Kindle: Tap the upper left and lower right corners of the screen at the same time, and Kindle will save an image of the screen. Connect the Kindle to your computer via USB to copy the image from the Kindle.
- Nook: Press Nook button and volume down button at the same time.
- Kobo: Press volume down and power buttons at the same time.
- Microsoft Surface: Press
Fn+Spaceto copy a screenshot to your clipboard. - Apple Watch: Enable screenshots from your Apple Watch settings on your iPhone, then to take a screenshot, press and hold the side button and Digital Crown at the same time, and Apple Watch will save a screenshot to your iPhone's Photos app.
- Samsung Galaxy Gear: Press the home button and swipe right on screen at the same time. Screenshots will be saved to the watch's Gallery app.
- Android Wear: Open the Android Wear app on your phone, tap the 3 dot menu button, and select Take wearable screenshot. Either tap the notification to see and share the screenshot, or find them in your standard pictures app.
- Pebble: Enable Developer Connection in the Pebble iOS or Android app, enter the IP address in the Pebble Command Line Tools to connect to your watch, then enter
pebble screenshotto capture a screenshot. - Raspberry Pi: Install the Scrot app via Terminal, then to take a screenshot just type scrot in Terminal and it'll save an image to your
/home/pifolder. - TI-83/89 Calculators: Install the TI-Navigator app, connect the calculator to your computer, then use the Screen Capture tool to save a screenshot.
- Google Glass: Tap touchpad, then say Make Vignette to take a photo of what you currently see overlaid with a screenshot of the Google Glass UI.
- Nintendo Switch: Press the Capture button on your left Joy-Con to save a screenshot. To view screenshots, open the Album app from your Home menu.
- Xbox One: Either say "Xbox, take a screenshot", or double-tap the Xbox button then press the Y button. Screenshots are saved to to the Game DVR app.
- Playstation 4: Press the Share button for a second, and a screenshot will be saved to the Capture Gallery app. Or, press Share button, then select Share to save a screenshot and share it directly.
- Apple TV: Connect Apple TV to Mac with a USB-C cable, open QuickTime on your Mac, then take a screenshot or record a screencast with QuickTime's Capture Video tool.
- PlayStation Vita: Press the PS and Start buttons at the same time, and the screenshot will be saved to the Photos app.
- Nintendo 3DS: Open the game you want to screenshot, then open the Miiverse community for the game you wish to screenshot, and you can share the current image from the game there.
- Tesla Vehicles: Press both bottom steering wheel buttons for a moment to save a screenshot. Unfortunately, only Tesla service centers can access the screenshots, though you can send them to Tesla by saying Report to report an issue.
For everything else—smart fridges, thermostats, TVs and more—you'll likely need to use the old take a photo of the screen trick.
12 of the Best Screenshot Apps
Want more from your screenshots—perhaps a quick way to share screenshots instantly or add annotations? Here are some of the best tools to take great screenshots on your computer:
| App | Icon: | Best for: | Price | Supports: |
|---|---|---|---|---|
| Lightscreen | For quickly sharing screenshots, Lightscreen is a great option. Press its shortcut to snap a customizable area, and Lightscreen will instantly upload your shot to Imgur for quick sharing. Just make sure you don't snap anything private. | Free | Windows, Linux | |
| Skitch | Skitch makes it simple to grab a timed screenshot on your Mac, add quick annotations to the shot on your Mac or iOS device, and share the file just by dragging-and-dropping it. And, with its web sidekick in the Evernote Web Clipper, you can use the same tools to annotate webpages, too. | Free | Mac, iOS, Web (via Evernote Web Clipper) | |
| CloudApp | Designed for quick file sharing from your system tray, CloudApp also includes screenshot tools. Press Shift + Command + 5—or a customized shortcut of your choice—to snap a screenshot, record a video, or make a GIF of anything on your screen and share it instantly with a private link. |
Free for sharing 25 screenshots and 15 second screen recordings per month; from $10/mo. Pro plan for unlimited screen recordings and custom branding | Web, iOS, Android, Mac, Windows | |
| Droplr | Need to share more details? Droplr's Draw option can help. Press Alt + Shift + 3, select the area of your screen you want to capture, then mark it up in Droplr's simple editor. Droplr will autoamtically upload the screenshot and copy a link to your clipboard so you can directly share it. |
Free to share screenshots with watermarks; from $3/mo. Pro plan for unlimited shares with custom branding. | Windows, Mac, Chrome, iOS, Android | |
| Jing | Snap screenshots or screencasts of up to 5 minutes with Jing, then annotate them with arrows, text, or captions and share them immediately. It's a quick way to point out problems or create tutorials. | Free | Windows, Mac | |
| Snagit | The original professional screenshot tool, Snagit lets you capture anything on your screen easily. Make profiles of the areas you want to snap, capture full-length scrolling screenshots, make detailed screencasts and tutorials, and more. Then annotate screenshots, manage them all in one library, and share them to Google Drive. | $49.95 | Windows, Mac | |
| PicPick | If you're taking screenshots for development work, PicPick includes a screen ruler, color picker, protractor and more to measure anything on your screen. It can also take any screenshot you need—including scrolling shots—and save them to popular cloud storage services. | $24.99 | Windows | |
| Tailor | You can't snap full-length webpages and chat conversations on your iPhone by default, but you could snap pictures of each section. Then, open them in Tailor, and it'll stitch them together into a seamless full-length screenshot in seconds. | Free; $2.99 without ads | iOS | |
| Blipshot | Back on your computer, Blipshot is a simple way to snap a full page screenshot of any website. Tap its button, and Blipshot opens a preview image of your screenshot over the page, which you can then drag-and-drop to any other app to quickly share the screenshot. | Free | Chrome (Windows, Mac, Linux) | |
| Pinpoint | A new version of the Bugshot tool, Pinpoint imports your iOS screenshots and lets you mark them up with arrows, boxes, and text to show exactly what you're talking about—with a blur tool to get rid of sensitive info, too. | Free; from $0.99 for markup tools | iOS | |
| Napkin | Making a tutorial with your screenshots? Napkin lets you pull screenshots together on a virtual sheet of paper, blur sensitive info, add callouts, and export images in a variety of formats. | $39.99 | Mac | |
| Licecap | Want to make a quick GIF of your screen? Licecap is a simple, free way to whip one up. Just run Licecap, select the area to record, pause or stop recording, and share the finished GIF. | Free | Windows, Mac |
How to Edit Screenshots
There are a few tools in common photo editing apps you should keep handy when editing screenshots:
- Crop: Screenshots can be rather large—especially if you have a device with a retina display, or a 29" 4K monitor. Crop images to show just what needs shown, and perhaps resize the image to save space.
- Blur or Delete: Does your screenshot contain sensitive info that you couldn't remove with Inspect Element? Use the Blur tool to make that text unreadable, or just delete it entirely. If you then fill the area with the same color as the app's background, the removed text may not even be noticeable.
- Annotations: Need to point stuff out in your screenshot? Add an arrow, circle, or other shapes to highlight important areas. And perhaps add text to describe what your screenshot shows—though make sure the text is a different color or size from the text in the app, to make it stand out.
- Export: Mac screenshots are saved in
.pngformat by default, which makes them clear and readable, but also takes up more space. You might want to save them in.jpgformat before adding them to your blog, or use a tool like ImgOptim to compress them.
Put Your Screenshots to Work
Now that you can capture professional-grade screenshots, it's time to use them for more than just saving funny images from Facebook. Here are some ideas for putting your screenshots to work, inspired by how we use them at Zapier.
- Want to show your work-in-progress to a team member? No need to export a full copy; just snap a screenshot, then share it in your team chat app.
- Keep up with your screenshots in a notes app to reference important data, or to see how an app or site changes over time.
- Write tutorial blog posts in Markdown, and use your screenshots to showcase each part of the app or workflow.
- Turn those blog posts into books, using LeanPub and the other tools Zapier uses to publish books.
- Write effective documentation for your products, using screenshots to show steps and point out specific parts of your tools.
- Need help using an app? Before you email a support team, take a screenshot and add annotations to point out exactly where you're having trouble. Chances are, you'll get much more effective help—and you won't have to email back and forth to explain your problems.
Have a favorite screenshot app or trick? We'd love to hear about it in the comments below!
source https://zapier.com/blog/best-screen-capture-tool/
No comments:
Post a Comment