Wednesday 28 February 2018

Everything You Need to Know About the New Google Hangouts Chat

Google’s where work starts. It’s the first thing you open when researching a new idea—and for every other part of your project, there’s a G Suite app to help.

You email partners, contractors, and colleagues in Gmail. You crunch numbers in Google Sheets, write reports in Google Docs, and start Hangouts video calls to get everyone on the same page.

What’s missing is connections between each item. Trapped in emails and search history and sheets and notes, the project is something only you can make sense of. That’s the best reason to use the new Google Hangouts Chat.

A sidekick to Google Hangouts Meet video calls, Hangouts Chat is G Suite’s new business-focused chat tool. Much like classic Google Talk text chat and Hangouts video calls, the new Hangouts Chat is an easy way to discuss ideas with others. This time, the whole team’s invited.

Here’s a quick guide to using it—and the best hidden tips we’ve found to make Hangouts Chat a productive place to discuss your work and push projects forward.


Using Google Hangouts Chat Conversations

Google Hangouts Chat
Google Hangouts Chat brings a conversation focus to team chat

Getting started is easy—all you need is your company’s G Suite account, as everyone on your team’s already invited. Hangouts Chat is included with every paid G Suite account, so if your company's using Gmail for your company email, odds are you can already use Hangouts Chat.

The first time you open Google Hangouts Chat at chat.google.com and sign in with your company’s G Suite account, you’ll instantly see any chat rooms you’ve been invited to. You can reply to conversations, say something new, or directly message anyone else on the team (if they haven’t logged in yet, they’ll get an invite email—or if they already use Hangouts video chat, they’ll get the direct message there or in Gmail).

The first thing you’ll notice about Google Hangouts Chat is its focus on conversations. Slack and older chat apps like AOL Instant Messenger and Google Talk focus on messages, the individual things we say in chat. You think of something to say, open a chat room, then type it in a new message. Perhaps the thought is related to something you discussed with your colleagues yesterday—no matter, it still goes in a new message that shows up first since it was posted today, preceded by everything else your group’s chatted about over time.

With Google Hangouts Chat’s conversations, though, only new ideas go in new conversations. Everything else is replies on older conversations. You’ll always have the whole threaded conversation together in one place.

Hangouts Chat keeps some things the same. Chats are organized in rooms, the same as chat rooms in older chat apps or channels in Slack. And when you want to talk to someone specific, you’ll send them a direct message or DM in a private, message-focused conversation.

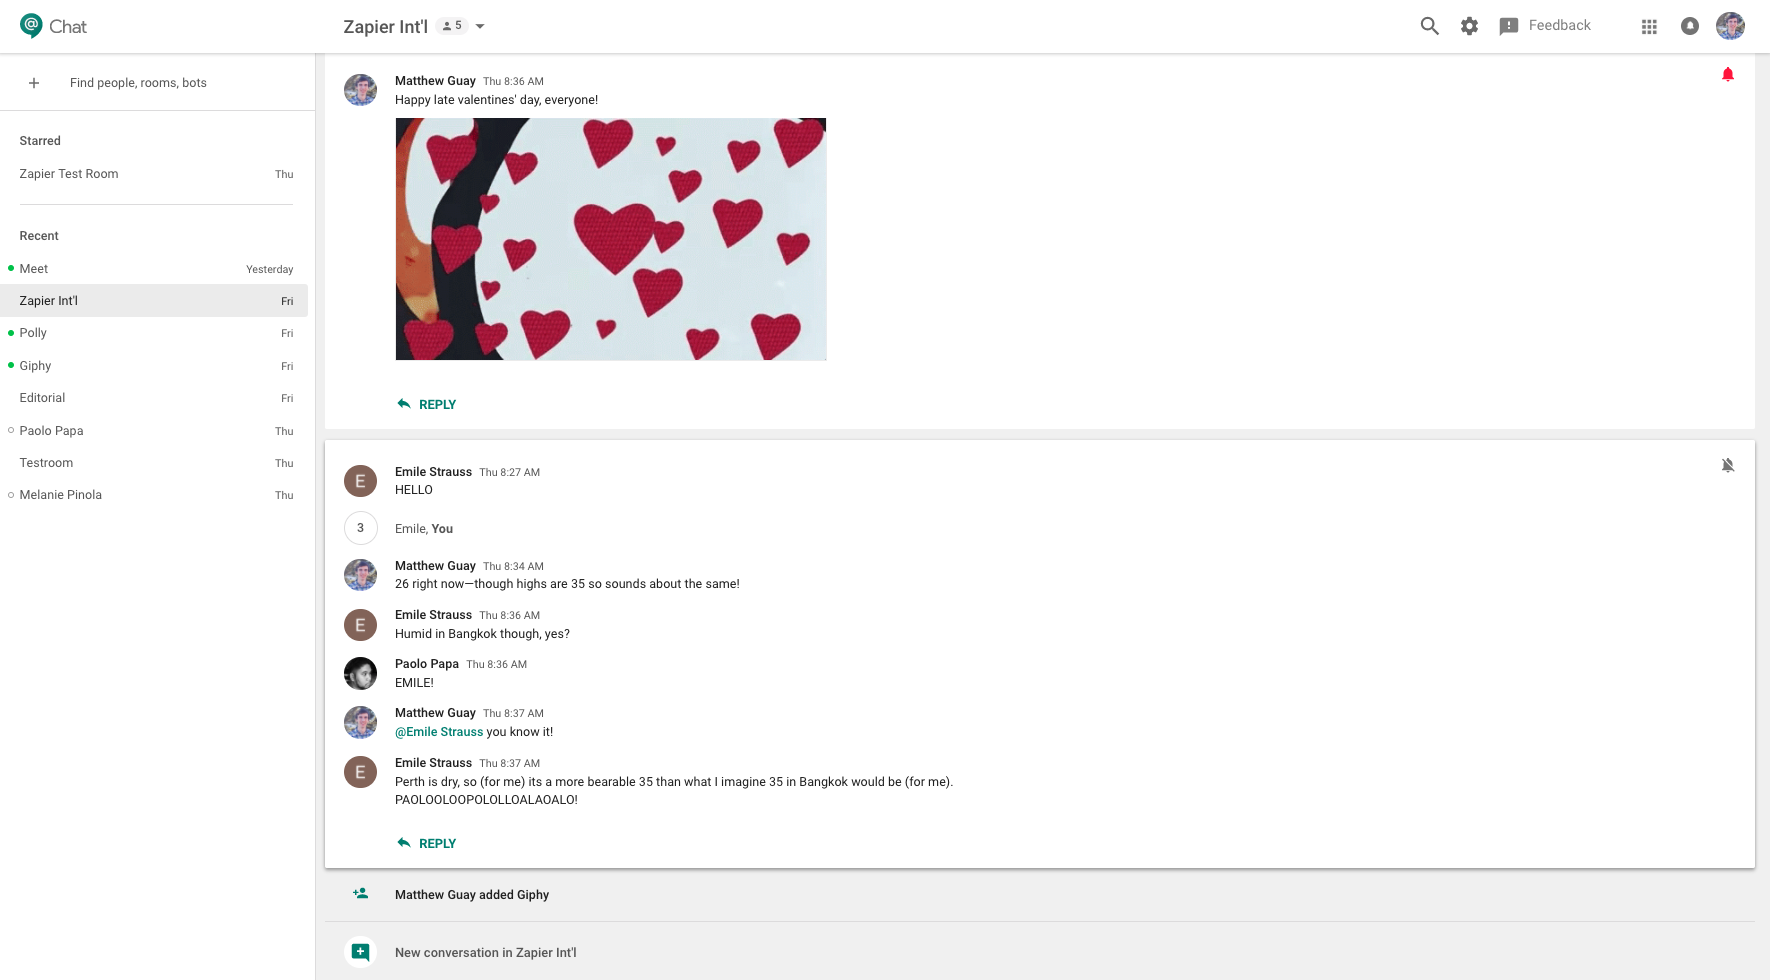
In rooms, though, the focus on conversations changes the way you chat a bit. If you want to share something new—an idea you’ve been thinking about, a document you just completed, a video you came across this morning—you open the chat room you want, click the New Conversation button on the bottom center, and post your new message. But if you just came up with the solution to a problem your team was discussing yesterday—or thought of a witty reply to your friend’s joke from last week—you’ll want to pull up the old conversation and add the reply directly.

Google Hangouts Chat Search
Search shows you the full conversation for context

That’s easier than it sounds. Google Hangouts Chat automatically brings conversations with the most recent replies down to the bottom of your chat list. Whenever you open a room, you’ll see the conversations with the most recent replies first—so if someone started a new conversation 10 minutes ago and someone else replied to a week-old conversation 5 minutes ago, you’ll see them both when you first open a chat room.

If you need something older, search is your friend—and in Hangouts Chat, it’s conversation focused, too. Click the search icon in the top of Hangouts Chat—or press Alt+/ on a PC or Option+/ on a Mac—to look through your older conversations. The search will check the current room first; select All rooms and direct messages on the left sidebar to look through everything. Then search for what you want—and Hangouts Chat will show the full conversation for context, with a Reply button so you can jump back in and re-start the discussion.

Whether you’re replying to an old conversation or starting a new one, sometimes text isn’t enough. You might rather jump on a call. Hangouts Meet video conferencing comes built into Hangouts Chat as well. To start a call with everyone in a room, click the Meet button (the icon with a chat bubble and video camera) in any Reply or New Conversation box—or to call just one person, open a direct message with them and click the Meet button there.

Share Google Docs, Sheets, Slides, and Drive Files

Select Document from Google Drive

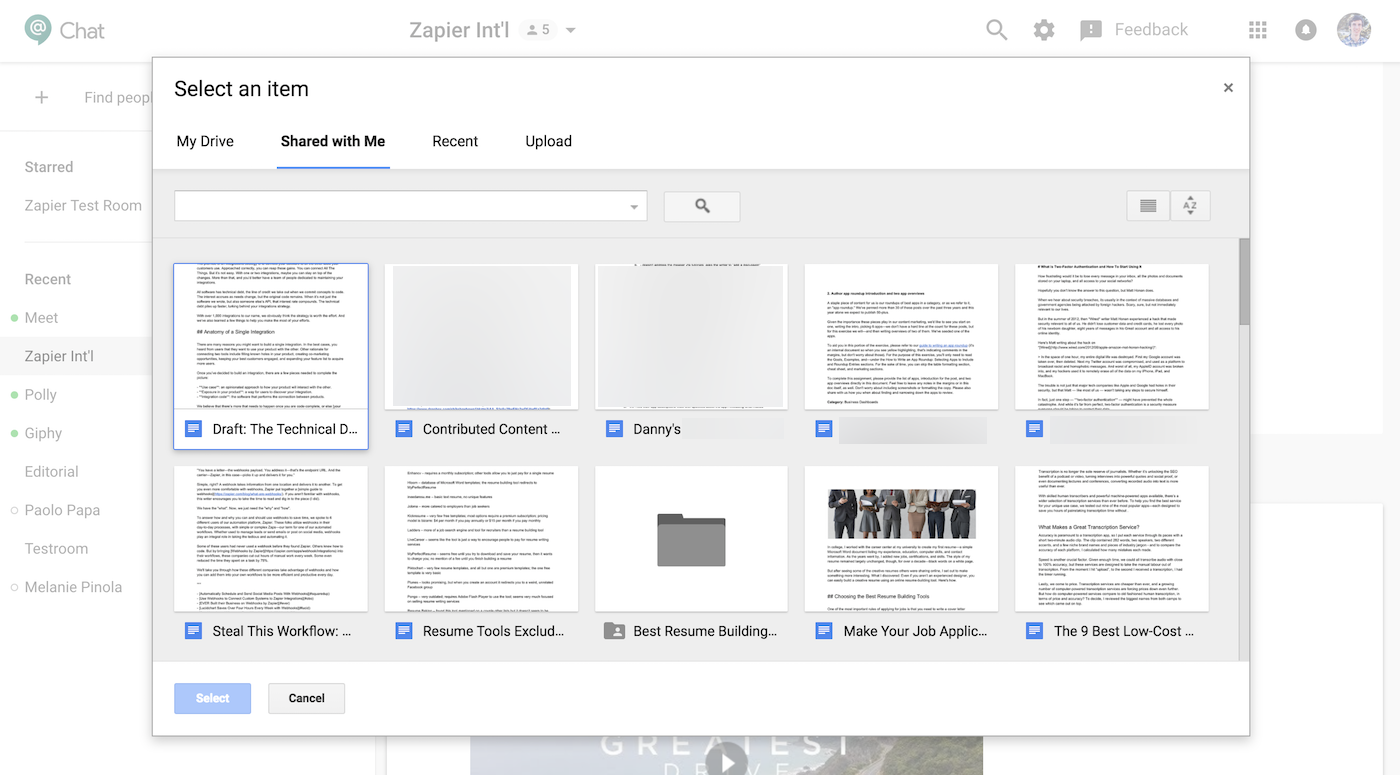
Google Hangouts Chat is designed for work—so it’s no surprise that it’s best with Google’s other work apps. There’s an ever-present Google Drive icon in the New Conversation and Reply boxes. Click it to see the document selection window you’ve used before in Google Drive and Sheets. You can select recent files or search through your entire Google Drive account to find any file you need.

Or, if you already have the link to a Google Docs, Sheets, Slides, or Drive file you want to share, just paste it in the thread or reply box to instantly preview it.

Share Documents in Google Hangouts Chat

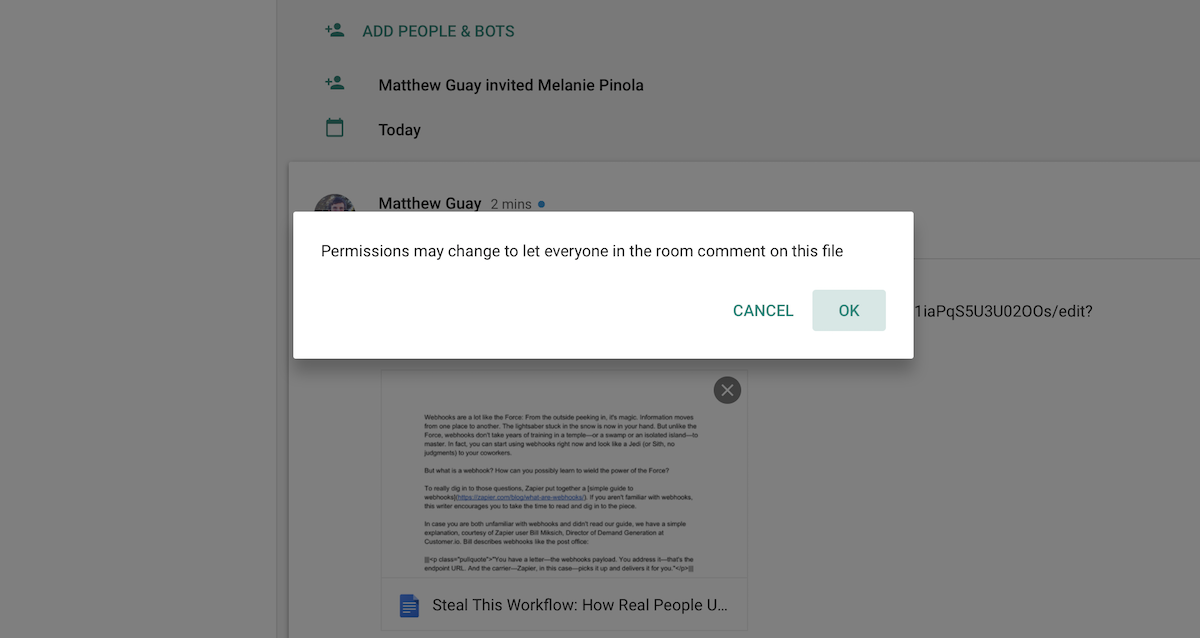
The fun thing is, that’s all you need to do to share a Google Docs or Drive file with others in Hangouts Chat. Whenever you share a file, Google will automatically add everyone in that room with viewing and commenting permission so they can see the thing you shared. You’ll never have to wait to view a document because someone forgot to turn on sharing in Google Docs again.

Find Google Docs documents with Hangouts search

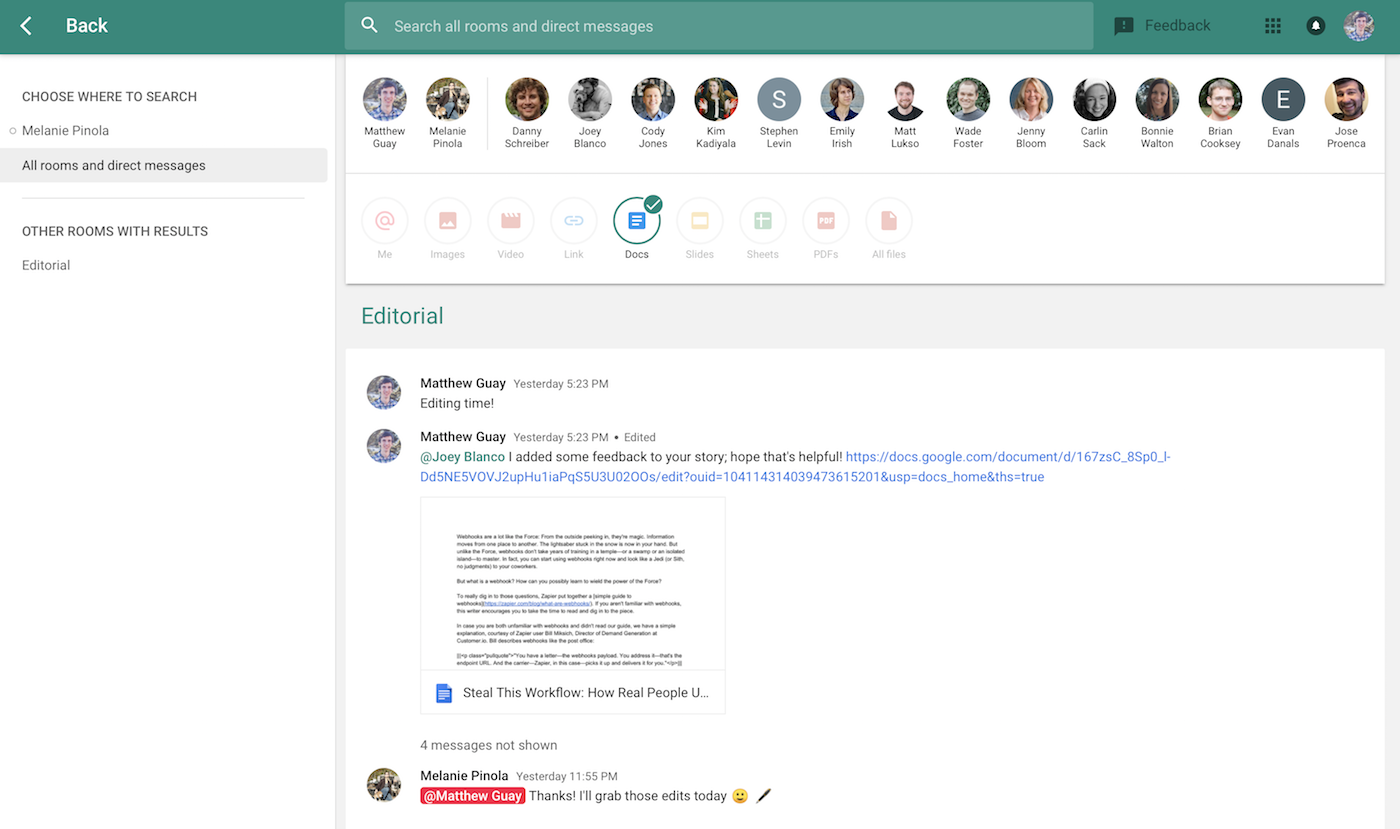
It’s also easy to find any documents your team is working on. Hangouts Chat’s search lets you look for any conversation—and then you can filter for Google Docs, Sheets, Slides, PDFs, or other files. That shows the file in question along with the conversation about it, so you’ll know right where to pick up the work.

Stay Focused with Hangouts Chat Notifications

Google Hangouts Chat Notifications

Team chat’s one of the best ways to talk with everyone on your team—but it’s also one of the most distracting apps you could use. With conversations going on about everything all the time, it’s easy to get pulled into far too many discussions and never get the actual work done.

Hangouts Chat tries to calm the storm a bit in a number of ways. First, the bell. Odds are, when you start a new conversation, you’ll want to get notified about it. So, Hangouts Chat shows a bell in the top corner of every conversation—and it’ll be red by default on every conversation you post. Click the bell to turn off notifications from that conversation (or, click the grey bell on any other conversation to get notified about its replies, if you want). And, if anyone mentions you or sends you a direct message, you’ll get notified about that, too.

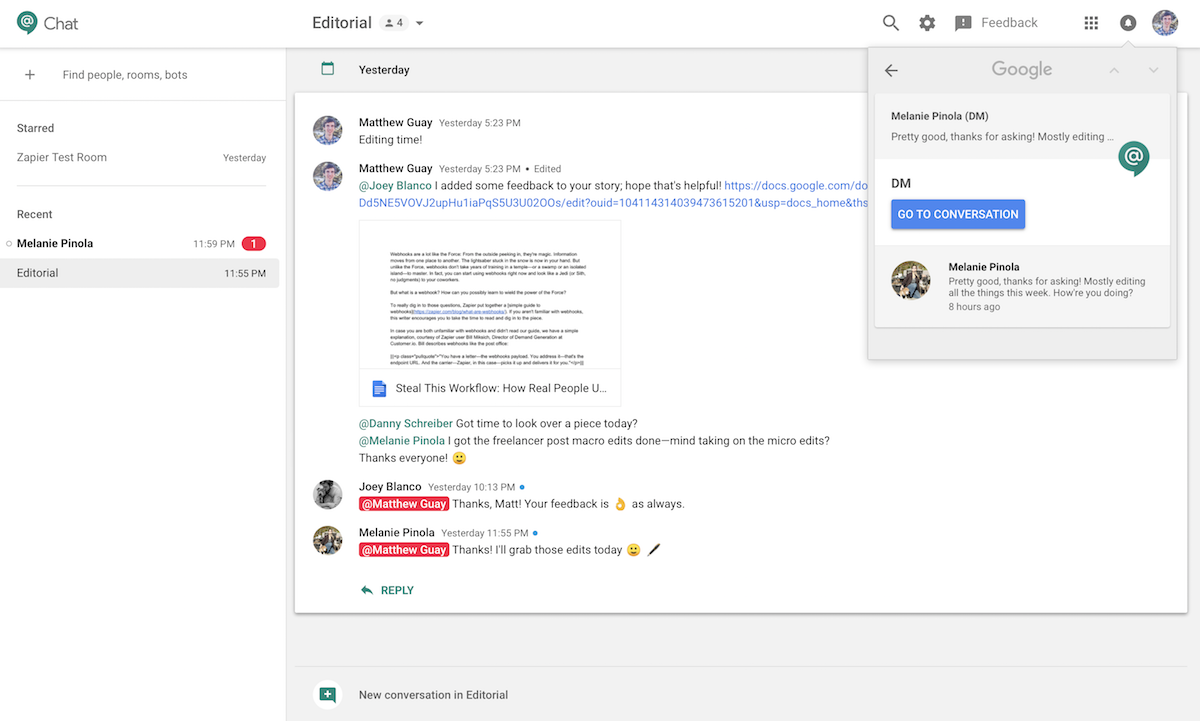
Those notifications will show up in the top right corner of Google Hangouts Chat and other newer G Suite apps, including Google Photos. Click a notification to see the message and jump right into the conversation—or click the back arrow to clear the notification.

Set Google Hangouts Notifications

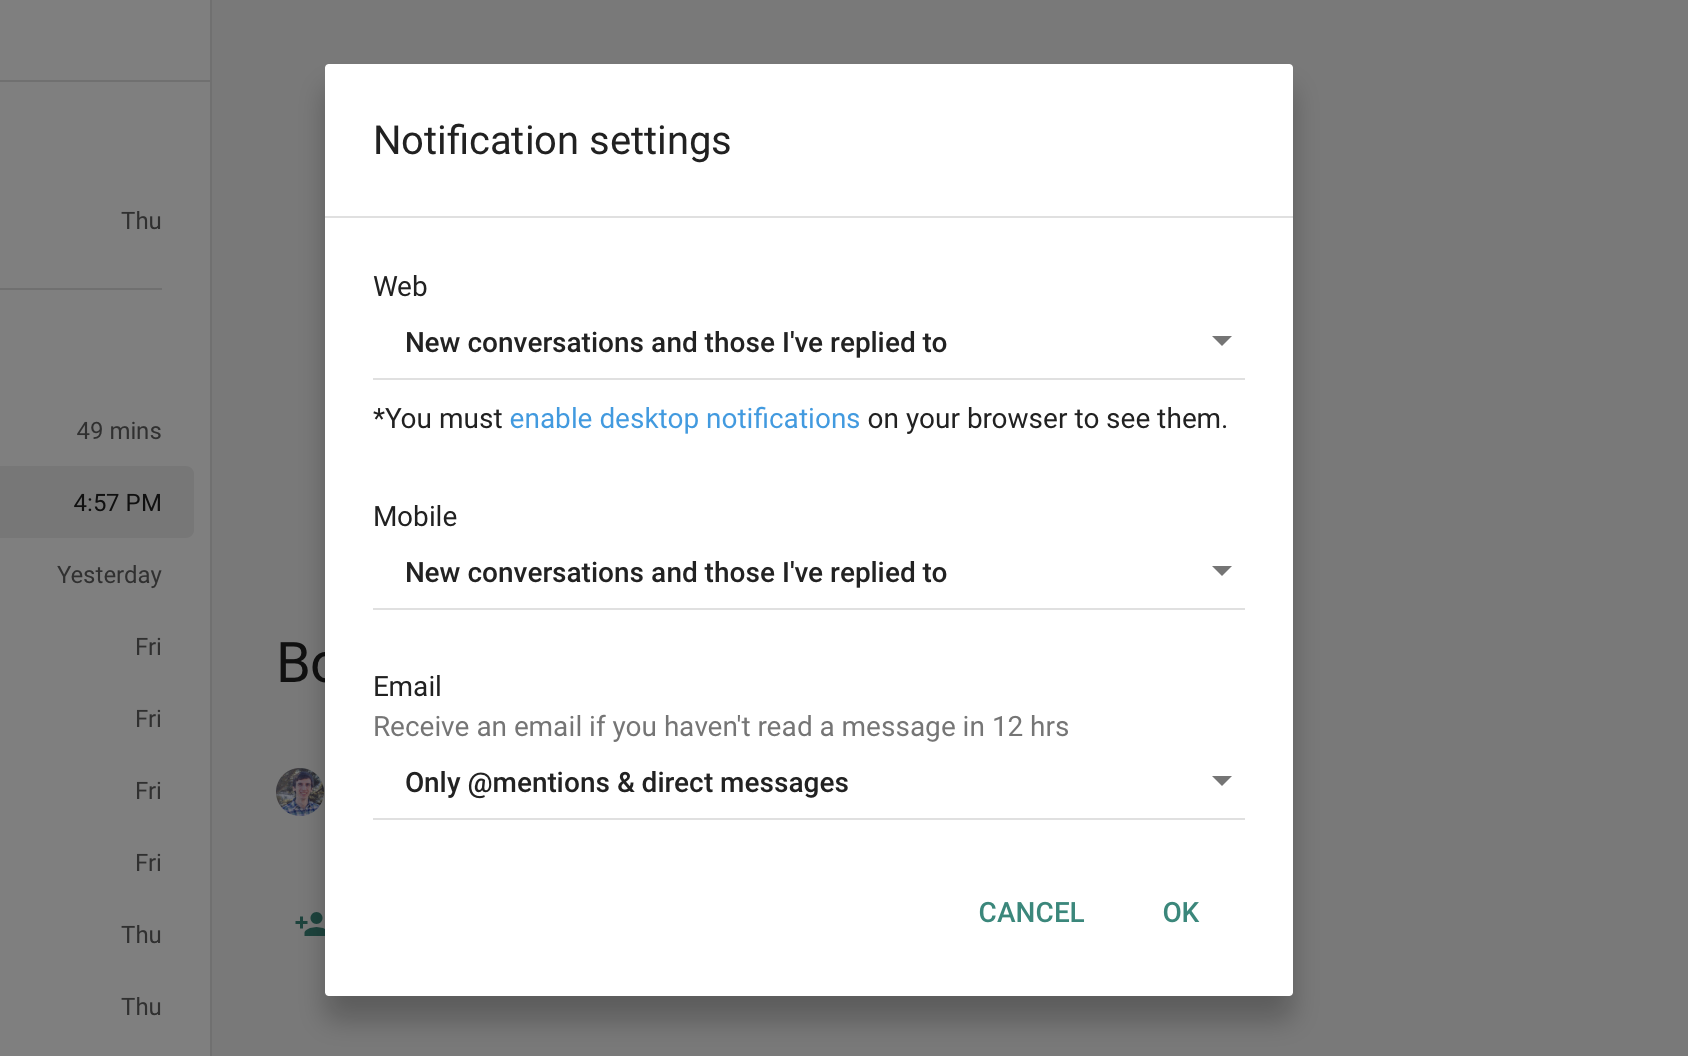
You can make things even calmer if you want. By default, Hangouts Chat will notify you on web and mobile—and will send you an email of all your notifications if you haven’t opened either app in over 12 hours. If you don’t want to be notified about conversations, or want to turn off all notifications, click the gear icon in the top right corner of Hangouts Chat and select Notification Settings to option options for your web, mobile, and email notifications.

Or, if one room is particularly chatty, click its menu and select Turn off notifications. That’ll let you get notifications for mentions, along with conversations from other rooms, but will keep that room from distracting you. It’s a calmer approach to chat.

Do More With Hangouts Chat Hidden Features

Once you’re used to chatting with your team in conversations, sharing Google Docs files to get work done, and taming your notifications, using Hangouts Chats will be second nature. But with a few more minutes to study, you can get a lot more out of it.

Here are the best extra features we’ve found in Google Hangouts Chat, and how to get the most out of them:

Format Hangouts Chat Messages

Google Hangouts Chat Formatting

If you’ve ever used Google Talk and Slack, you’ll find both experiences combined in some ways in Google Hangouts Chat. First, formatting. You can’t add much formatting to messages, but you can add italics just as in Google Talk and Google Docs comments.

To add italics to a Hangouts Chat message, add underscores around the word or phrase like _this example_.

Then, to add emoji to your Hangouts Chat messages, type a : then start typing the name of your emoji (as you would in Slack). Hangouts will start filtering through the emoji options; when you find the one you want, press Enter to add it to your message or just type its full name and add a colon on the other end.

Mention people in Google Hangouts Chat

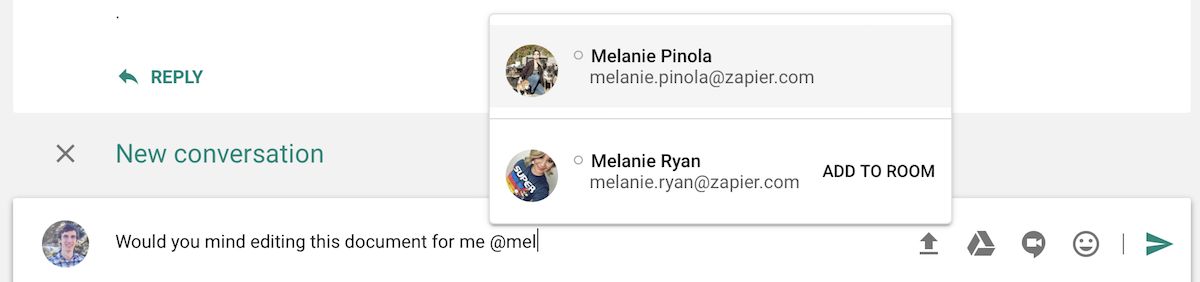
Mentioning people in your message works like Google Docs comments and Slack: type an @ followed by the name of the person you want to mention. Hangouts Chat will start filtering through the names of people in your company, with those in this room on the top and others you could invite on the bottom. Press Enter to select the person you want.

Add photos and links to Google Hangouts Chat

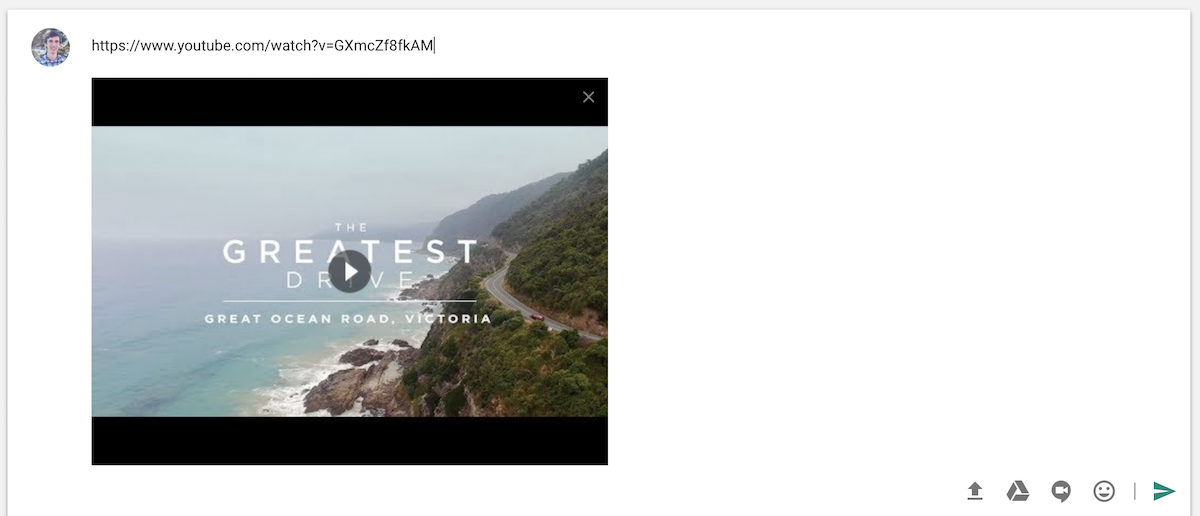
Sharing stuff is easy too. Paste links in a new conversation or reply box, and most of the time Hangouts Chat will automatically show a preview of the image or a description of the article you shared. It’s best with Google links—paste a YouTube video and it’ll embed a playable video, or add a Google Maps link and you’ll get an image preview of the overall route. Links to GIFs don’t play right now—but you can upload your GIFs to play them in Hangouts Chat, or upload any other file you want to share.

Add Bots to Hangouts Chat Rooms

Add bots to Google Hangouts Chat

Google Hangouts Chat isn’t just for talking to people—it’s also a great place to chat with your apps, too. They can help you book meetings, find flights, poll your team, check your calendar, request time off, and much more—and are more interactive and powerful than bots in many other chat apps.

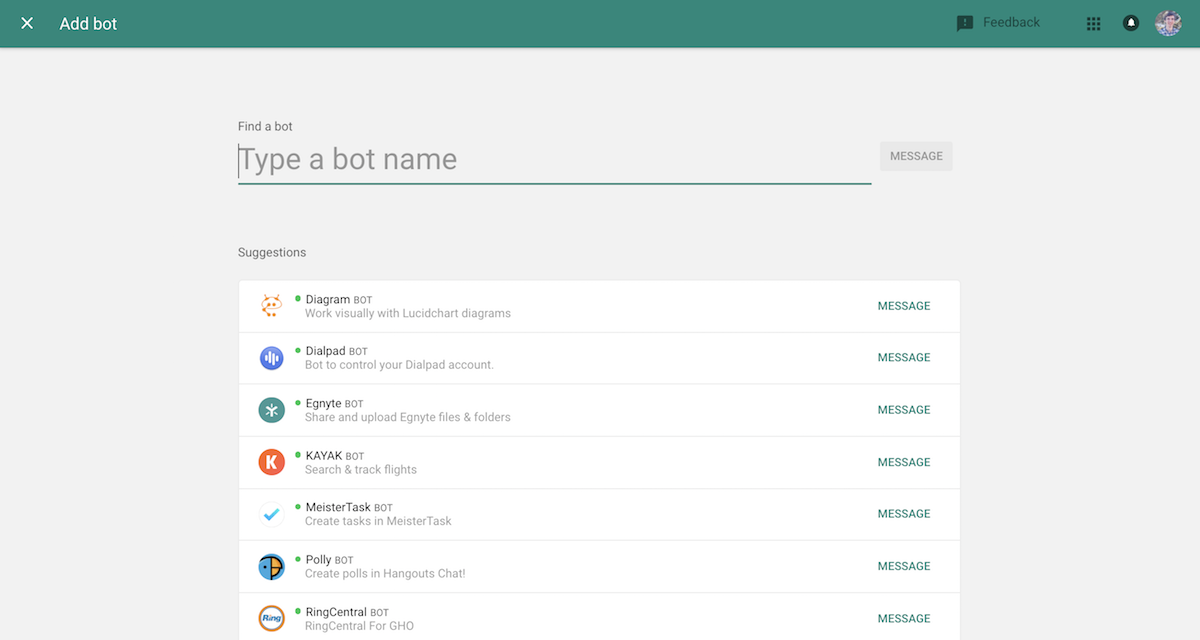
In Hangouts Chat, you can add bots to a specific room, or you can chat with them directly on your own. There are a handful of bots already built for Hangouts Chat today, including ones for Giphy, MeisterTask, Wrike, Zenefits, Dialpad, Kayak, and more. To find bots, click the Find Rooms button in the top left corner, then select Message a Bot. That will show a number of popular bots where you can search through them. Select one to message it privately.

Book plane tickets from Hangouts Chat

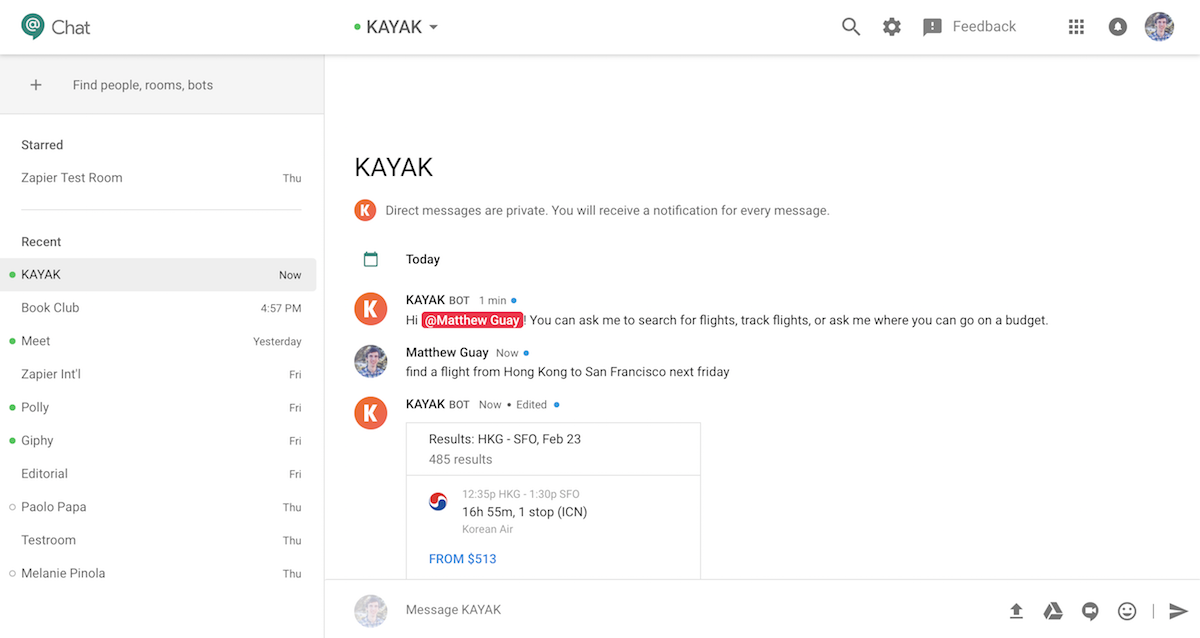
Chatting privately with a bot is a great way to get work done in other apps while you're using Hangouts Chat. Say you’re planning a trip. The Kayak bot lets you ask about flights for an upcoming trip in real language, and it mostly gets things right. You can browse through the offerings, then click a flight that looks good and book it from Kayak’s site.

Google’s own Meet bot does something similar for meetings. You can ask it to check your Google Calendar or book a meeting with someone else on your team.

Add bot to room

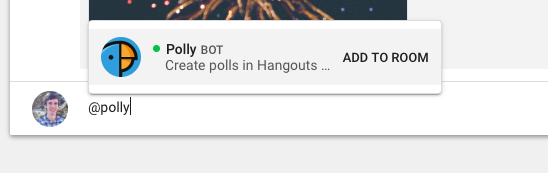
Other bots, like the Giphy one to find GIFS or the Polly poll bot, are better in rooms. To add a bot to a room, type @ followed by the bot’s name in a new conversation or reply. The bot will then typically give you a quick description of how to use it, then will be ready whenever your team wants to mention it.

Using Polly bot in Google Hangouts Chat

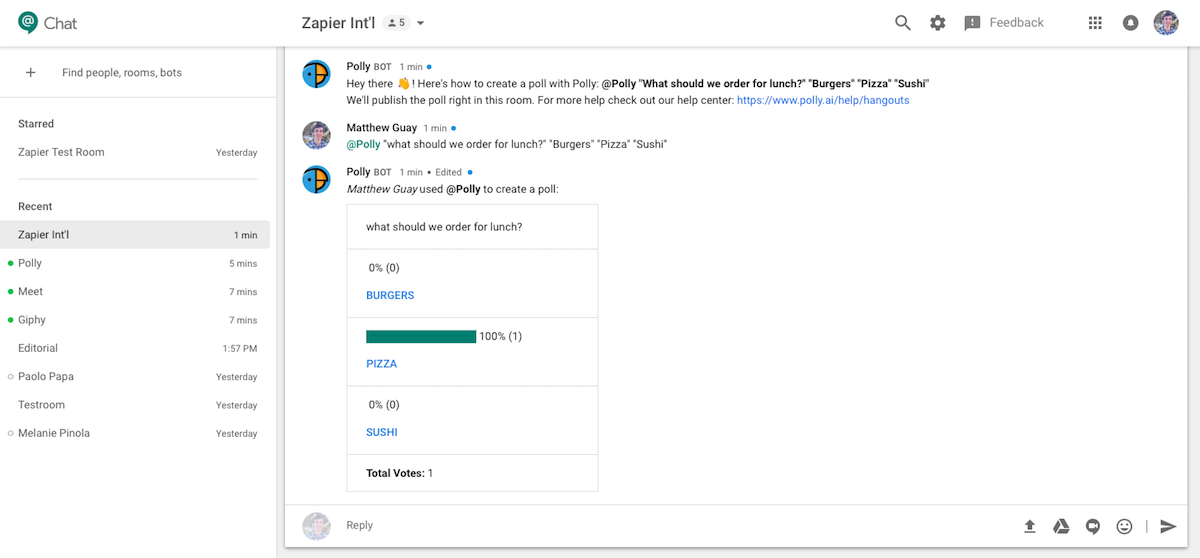
Say you want to poll your team about what to eat for lunch. Add the Polly bot to your room, then mention it in a conversation, and it’ll turn your message into a poll. Or, liven things up with a GIF by replying @giphy fireworks.

Add webhooks to Hangouts Chat

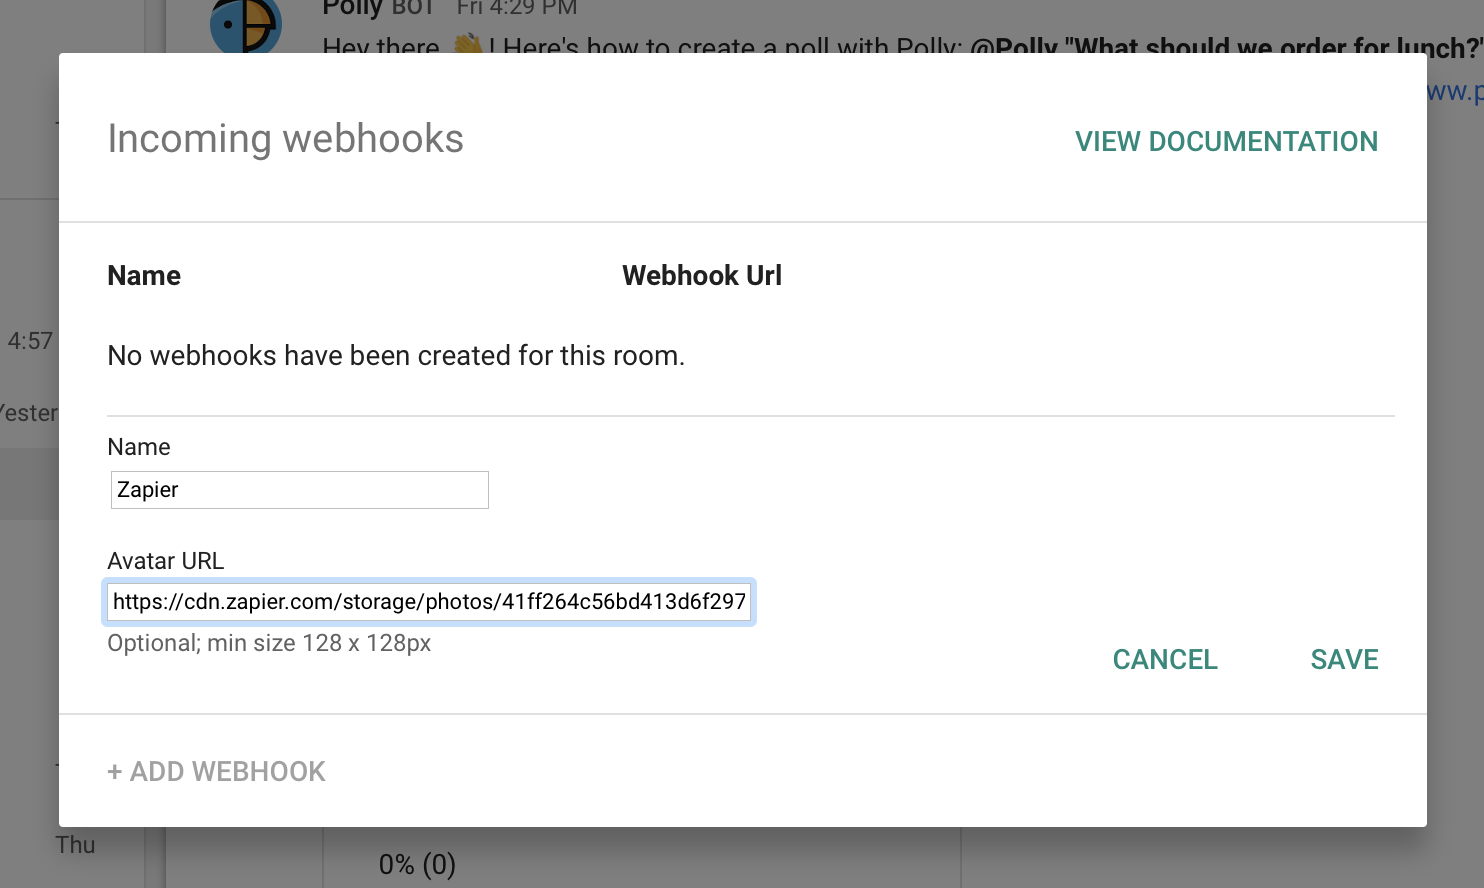
You can build your own Hangouts Chat bots, too—or, for an easier option, you can add webhooks integrations to any room. Webhooks are a way to get notifications from many web apps, so you can use them to update your room when you get a new sale, close a deal, start a new project, and more. To do that, click the room’s menu and select Configure Webhooks, then add a name and optionally an icon for your webhook.

Copy webhooks URL from Hangouts Chat

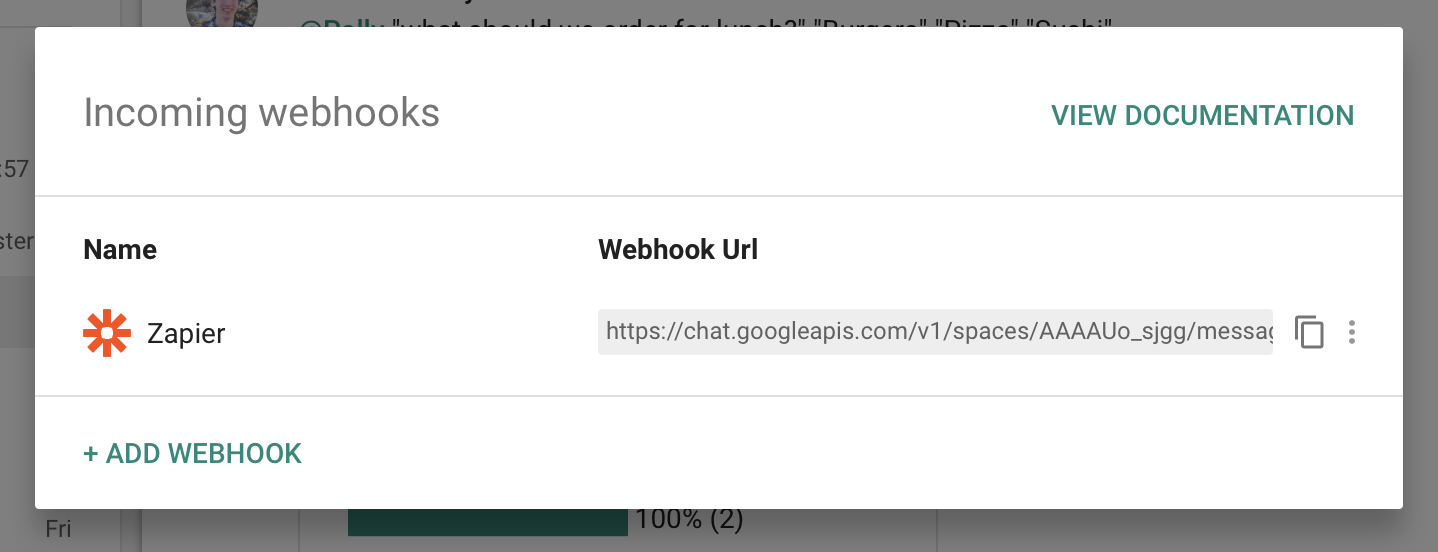
Hangouts Chat will then give you a unique webhooks URL for your chat room. Copy that and add the link to another app like Zapier to send notifications into your Hangouts Chat room. And speaking of Zapier, there's a full Google Hangouts Chat Zapier integration coming soon.

Manage Hangouts Chat Rooms

Add new rooms to Hangouts Chat

You’ll likely start using Google Hangouts Chat when a colleague or manager invites you to a new Hangouts Chat room, perhaps for a new project or to keep track of your team’s work.

Hangouts Chat is unique from most team chat apps in that its rooms are private—you have to be invited to them in order to start chatting. That keeps things focused, though it also might mean you need to ask others to add you to rooms when you join a project.

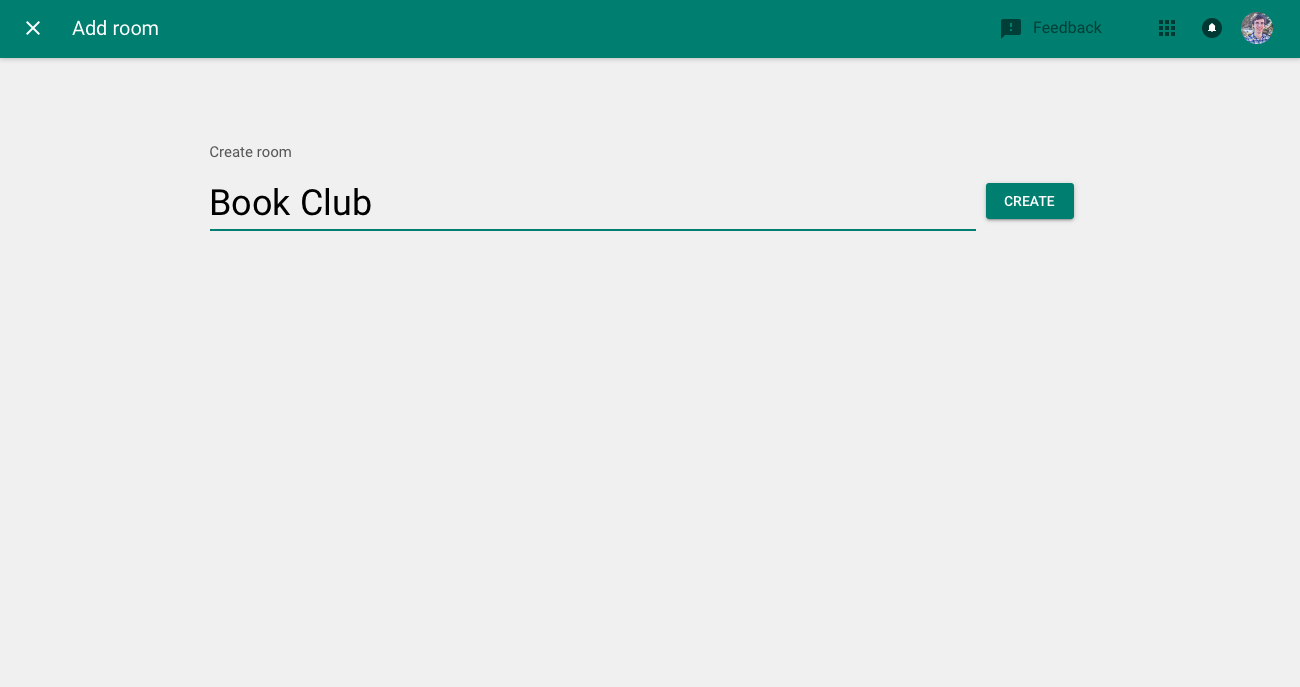
Or, if you're the one starting a project, you can make your own room. Click the + button in the top left corner of Hangouts Chat, select Create Room, then type in the name of your new room.

Add people to Hangouts Chat room

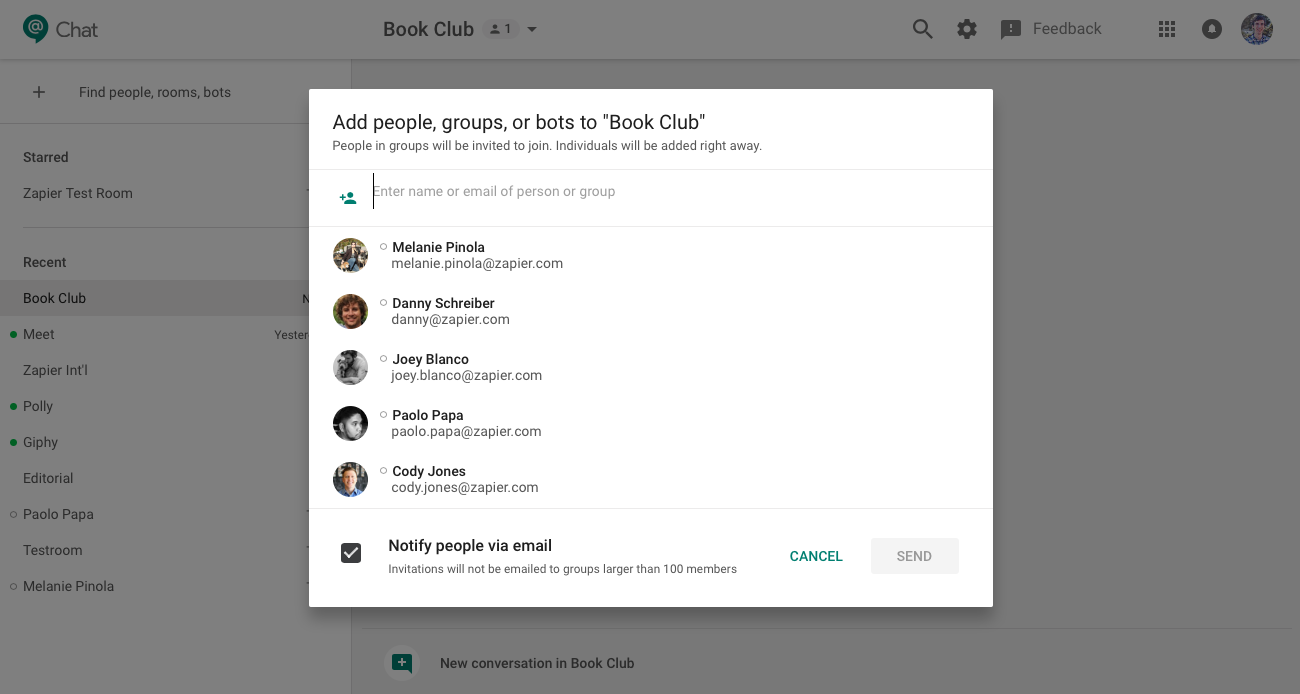
Hangouts Chat will then ask you to add people to your new room. Select anyone you want—or type their name or email to search through the list. You can add bots at the same time, to bring your favorite apps into the conversation, too.

Ever need to add more people? Just mention them in a chat message, and Hangouts Chat will offer to invite them to the room.

Mange Hangouts Chat members

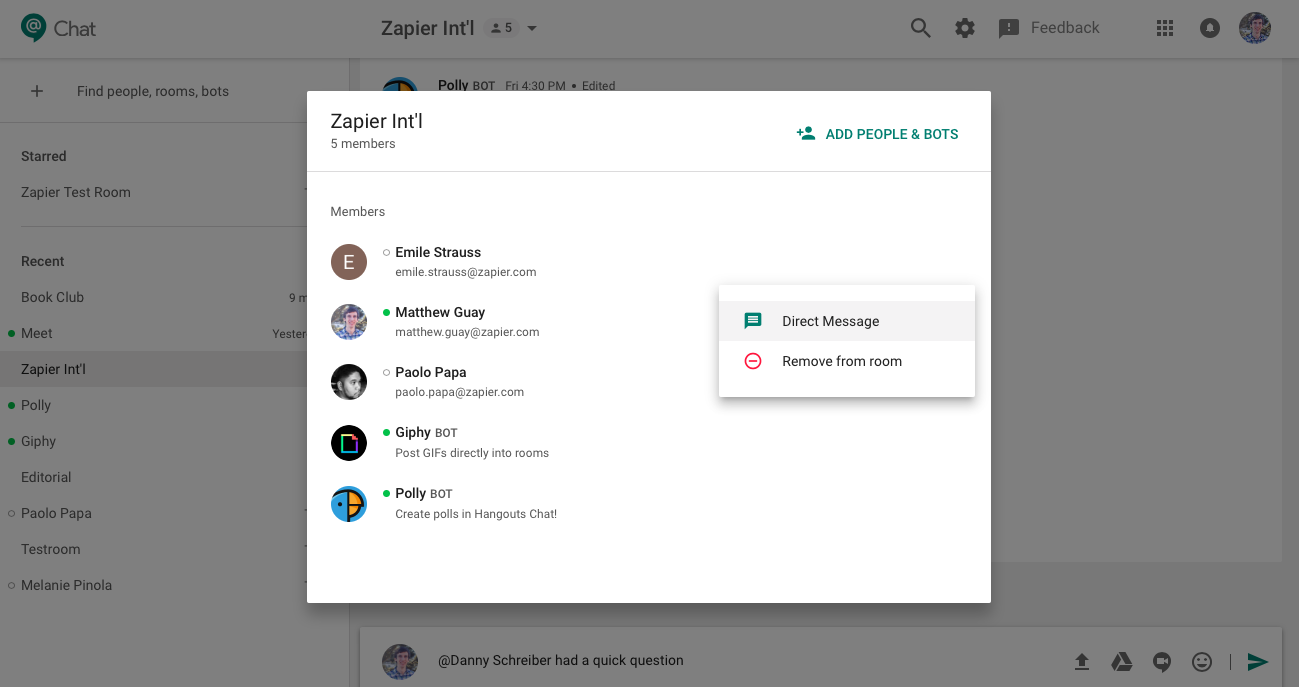
Or, click the room’s name in Hangouts Chat’s menu, and select View Members to see everyone who’s in a room—including bots. That’s an easy way to directly message someone, remove bots your team no longer uses, or to delete someone from a room if needed.

Over time, you’ll likely end up in too many rooms. But it’s not Hotel California. You can leave anytime. From that same menu in the header, select Leave to jump out of a room. If you ever want to come back, you’ll find it in the Browse Rooms menu, where you can join in again without needing a new invite.

Navigate Hangouts Chat With Keyboard Shortcuts

One of Google Hangouts Chat’s best features are its wide range of keyboard shortcuts. Much like how you can navigate your Gmail inbox and organize email without ever touching a mouse, you can do the same with your chat conversations in Google Hangouts Chat.

Say you’re looking at a chat room and haven’t clicked anything yet. Press the arrow on your keyboard to go to previous conversations, or the arrow to see newer conversations. Find something interesting? Press the arrow or Enter to select that conversations, then use arrows to go up and down through the conversation.

Hangouts Chat combines messages sent around the same time to save space—but if you want to see them, just click down until you come to a numbered message and press Enter to expand all the messages.

Replying is easy, too. If you’ve selected a conversation or a message inside a conversation, press your r key and start typing to add a new reply, then press Enter to send it. Make a mistake? Press the arrow anytime to edit your last message in a conversation. Or, to start a new conversation, select a recent conversation and press Tab a few times until the New Conversation button is selected.

Done in this conversation and want to switch rooms? Press the arrow to switch to the sidebar, the press your up and down arrows to switch between chat rooms and direct messages, and the arrow or Enter key to select that room. Pretty quickly, you’ll get used to using arrows to move around Hangouts Chat rooms and conversations naturally without ever needing your mouse.

Or, for a quicker way to switch rooms: Press Ctrl+K on a PC or CMD+K on a Mac to open the Find people, rooms, bots menu, and type in the room or person you want to chat with. That’s the quickest way to jump into a conversation.

Need to find stuff? Alt+/ on a PC or Option+/ on a Mac opens Hangouts Chat’s search where you can look through chat conversations, documents, files, and more.


You’ve done it—you’ve mastered the newest G Suite app and found new ways to communicate with your team without letting team chat be so distracting. Hangouts Chat is an exciting new way to keep things focused on conversations, share your work more easily, and work faster with a fully keyboard shortcut focused interface. And over the coming months, it’ll be exciting to see the new powerful bots that come out for it, tools that let you do even more directly from chat.


source https://zapier.com/blog/google-hangouts-chat-guide/

Thursday 22 February 2018

The 7 Traits of Millionaires (and 45 Apps to Help You Save Money and Build Wealth)

When you imagine a millionaire, whom do you picture? Is it your favorite celebrity, a professional athlete, or a born-wealthy hotel heiress?

Most millionaires are none of these things.

Researchers and authors Thomas J. Stanley and William D. Danko spent decades studying millionaires through surveys, interviews, and focus groups. What they discovered: Millionaires are more likely to clip coupons than eat caviar, more likely to live in modest homes in places with a low cost of living than in expensive cities, and more likely to drive ordinary cars than to park their luxury vehicles in the garages of their mansions.

Stanley and Danko compiled everything they’d learned about millionaires into their book, The Millionaire Next Door: The Surprising Secrets of America's Wealthy. It describes the unglamorous lifestyle of the typical millionaire and provides practical advice on how anyone can grow their wealth to seven figures or more.

Each chapter of the book describes a common trait that most millionaires share. Below, we’ve summarized the findings presented in each chapter of the book—the seven fundamental principles to building wealth—along with 45 apps you can use to start your journey toward millionairedom.


1. Most Millionaires Are Frugal
2. Most Millionaires Spend a Lot of Time Planning and Budgeting
3. Most Millionaires Don’t Care About Showing Off Their Wealth
4 & 5. Most Millionaires Didn’t Get Financial Assistance from Their Parents, and They Don’t Provide Financial Assistance to Their Children
6. Most Millionaires Know How to Identify Promising Opportunities
7. Most Millionaires Choose the Right Occupations with Growth Opportunities


1. Most Millionaires Are Frugal

Many people think that the best way to become a millionaire is to make a lot of money. But the truth is that you can grow your wealth no matter how much you earn. Becoming wealthy is less about how much you make than it is about what you do with what you make.

According to Stanley and Danko, "being frugal is the cornerstone of wealth-building." Too many people with high incomes suffer from “the more you make, the more you spend” syndrome. They apply their earnings to ever-more expensive houses, cars, clothes, and vacations.

Millionaires, on the other hand, continue living as though their incomes and wealth have never increased. After all, if you can get by making $40,000 a year, why should your spending habits change when your income doubles to $80,000 a year?

The authors highlight this common millionaire trait with the story of a man who gave his wife a present of $8 million worth of stock. According to her husband, she smiled, said thank you, and continued to clip coupons from newspaper inserts.

To become a millionaire, live below your means. Maybe you don’t need to clip coupons, but you should do it anyway. To grow your wealth, worry less about how much money you make, and focus on making the most of the money you have.

Use the following apps to save on your everyday expenses:

Save on groceries and toiletries

Coupon apps

Favado (Web, iOS, Android)
Use Favado to find out which local store has the best price on the groceries, items, and toiletries you need to buy. The app showcases the best deals for stores like Target, Costco, Rite Aid, Whole Foods, Safeway, and Dollar Tree. Plus, you can see at a glance if the items on your grocery list have digital or print coupons available.
Price: Free

CouponMom (Web)
CouponMom helps you find the best deals at grocery and drug stores by pairing sales, coupons, rebates, and loyalty rewards in a central view. Deals for each store display in spreadsheet format, making it simple to sort by product names or final prices. Occasionally, the suggested combination of discounts helps you get the things you need for free.
Price: Free

Ibotta (Web, iOS, Android)
Ibotta is a rebate app. Browse through a list of offers from your favorite grocery and drug stores, and select the ones you’re interested in. Then, take a picture of your receipt to claim your refunds. Once your account hits $20, Ibotta deposits your earnings to PayPal, Venmo, or a gift card. The best part is the app frequently offers "any" rebates. For example: get $0.50 off your purchase of any milk, eggs, bread, etc.
Price: Free

Walmart’s Savings Catcher (Free)
Savings Catcher is a feature of the Walmart app that allows you to scan your receipts from recent purchases at the store. When you’ve bought something that’s priced lower elsewhere, Walmart automatically credits a gift card with the difference.
Price: Free

Save on transportation

Transportation savings apps

GasBuddy (Web, iOS, Android)
Use GasBuddy to locate the gas station on your route with the cheapest prices, and get notifications when gas prices are about to jump so you can fill up at the lowest cost.
Price: Free

Waze (Web, iOS, Android)
Check the price of gas at local gas stations, and get real-time updates on road closures and traffic—things that could increase the amount of gas you use commuting. Waze Carpool also matches you with riders with similar commutes, allowing you to share the cost of commuting with others.
Price: Free

BestParking (Web, iOS, Android, BlackBerry OS)
Find the best parking rates near your home, work, or an event you’re going to. Input the city, neighborhood, type (daily or monthly parking), and arrival and departure times, and BestParking populates all of the costs for parking lots and garages in that area in an easy-to-scan view.
Price: Free

Save on shopping

Shopping Discount Apps

RetailMeNot (Web, iOS, Android)
Find a list of available promo codes for hundreds of online stores. Users vote on which promo codes do and don’t work, allowing you to see at a glance which discounts are worth trying.
Price: Free

Cently (Chrome)
If you don’t want to search for coupon codes yourself, add the Cently extension to your browser. Cently searches for available coupon codes when you’re shopping on a site, automatically tries each coupon code, and applies the best deal it finds to your cart.
Price: Free

Dosh (iOS, Android)
Connect your credit/debit cards, and Dosh automatically applies any relevant coupons to the things you buy after you make the purchase, returning the savings to you. No coupons or promo codes are needed.
Price: Free

Slice (Web, iOS, Android)
Sign up and link your inbox to Slice, and the app will monitor price reductions for everything you buy online. If an item you purchased goes on sale shortly after you buy it, Slice alerts you and provides a pre-populated email you can use to request a refund. The app also offers package tracking, alerts when anything you buy has been recalled, and a place to see all your receipts.
Price: Free

Paribus (Web, iOS)
Like Slice, Paribus notifies you when an item you purchase goes on sale after you buy it. The big difference is that Paribus has partnerships with certain retailers—Target, Home Depot, Walmart, and more—allowing you to receive a refund on the purchase price automatically. You don’t even have to file a claim. If you shop frequently with one or more of its retail partners, Paribus could save you a lot of time and money.
Price: Free

CamelCamelCamel (Chrome, Firefox)
Set up an alert for a product you’re interested in purchasing from Amazon to receive notifications when the price drops. Use the browser extension to see the historical high and low prices for products on Amazon so you know whether or not it’s a good time to buy.
Price: Free

Pricepirates (Windows, Mac, iOS, Android)
Compare prices on things you’re planning to buy. See what the item you’re interested in is selling for across thousands of online stores, including Amazon and eBay.
Price: Free

ShopSavvy (iOS, Android)
Use ShopSavvy to scan a barcode when shopping in a store and see if there’s a better price at another store nearby or online.
Price: Free

Save on entertainment

Entertainment savings apps

Yipit (Web)
Groupon, LivingSocial, and Yelp are great sites for buying discounted vouchers for pretty much anything you can think of—from oil changes and teeth whitening to massages and dining out. Yipit aggregates the deals from all three sites—as well as other daily deals sites—so you only have to scour one database to find the best deals.
Price: Free

Cinepop (iOS, Android)
If you love seeing the newest flicks on the big screen, use Cinepop to find deals and discounts at local movie theaters.
Price: Free

Goldstar (Web, iOS, Android)
If live shows are more your thing—concerts, plays, operas, comedy shows, sporting events, etc.—use Goldstar to find tickets for as much as half-off the regular price.
Price: Free

Save on prescriptions

GoodRx screenshot

GoodRx (Web, iOS, Android)
Compare prescription prices at local pharmacies to find out which has the lowest cost, and access a large database of available prescription coupons.
Price: Free

Save on travel

Save on travel

Hopper (iOS, Android)
Before booking a flight for an upcoming trip, input your planned travel dates into Hopper. The app will tell you when to buy your tickets to get the cheapest rate.
Price: Free

Hitlist (iOS, Android)
Choose where you want to vacation, and Hitlist shows you the cheapest dates to travel there. It’s a great app if you know where you want to go but have flexibility in your travel schedule.
Price: Free

AutoSlash (Web)
Need to rent a car for your trip? Use AutoSlash to compare prices from multiple rental car companies, find discount codes, and apply membership discounts. The best part is that if the price drops before your trip, AutoSlash’s agents will rebook the reservation for you so you get the better rate.
Price: Free

2. Most Millionaires Spend a Lot of Time Planning and Budgeting

Becoming wealthy starts with using your money more wisely, but cutting costs and using coupons is just the starting point. It doesn’t matter how much you save if you’re spending more than you should, and the only way to know how much you should spend is by creating and following a budget.

Stanley and Danko assert that most millionaires grow—and maintain—their wealthy status by budgeting their money and controlling their expenses. They create weekly, monthly, yearly, and lifetime budgets and goals, and they know exactly how much they can spend on every expense they’ll incur.

To become a millionaire, create a budget and stick to it. Track exactly how much you spend on food, drinks, clothing, housing, gas, utilities, and entertainment. Calculate how much you’re spending on each category per month, then reduce that amount by 15 percent. That’s your new budget; find ways to stick to it.

Most millionaires spend a little more than eight hours a month planning and budgeting, but you can reduce the time commitment by adopting the right budgeting app. Below are some options to consider:

Simple budgeting apps

Budgeting apps

Mint (Web, iOS, Android)
Connect all of your accounts to Mint—checking, savings, and credit cards—to automatically populate all of your spending in the system. Then, Mint will categorize each charge to help you see where you’re overspending. Create budgets for monthly spending, and track your progress toward staying within your budget.
Price: Free

You Need a Budget (Web, iOS, Android, watchOS, Alexa)
You Need a Budget (YNAB) offers many of the same features as Mint—connecting accounts, creating budgets, and categorizing spending—but it also includes a feature that provides advice and tips on paying down/off debts. YNAB isn’t free like Mint, but it also doesn’t display ads for credit cards and financial products in the interface.
Price: $6.99 per month

Mvelopes (Web, iOS, Android)
Mvelopes allows you to use Dave Ramsey’s envelope system digitally—no more withdrawing cash from the bank or trading in change at the Coinstar machine. In the system, you account for every dollar of income into different "envelopes" by category, such as groceries or savings. So you know where all of your money is going.
Price: $4.00 per month

Clarity Money (Web, iOS, Android)
This budgeting app uses data analytics to suggest possible saving opportunities, such as discounted services you’re entitled to, wasteful unused subscriptions, and credit cards with better terms, rates, and rewards.
Price: Free

Tip Yourself (iOS, Android)
Tip yourself isn’t necessarily a budgeting app, but it can help you adopt better behaviors with a reward-based system. Say you want to save for a trip: Tip Yourself lets you add a small amount of money into your travel fund when you engage in behaviors you’re trying to adopt—such as clipping coupons, creating a budget, or making lunch instead of eating out.
Price: Free

3. Most Millionaires Don’t Care About Showing Off Their Wealth

If you won the lottery, what would you buy: a beachfront mansion, a Porsche, your own private island? Most millionaires wouldn’t buy any of those luxuries. In fact, millionaires typically live in average-sized homes in modest neighborhoods and drive older-model cars that they buy used.

Millionaires don’t care about brand names or status symbols. They stay in the homes they bought early in their careers, even after their wealth grows to seven-digits. Most have lived in the same house for more than 20 years, and few take out mortgages that are more than twice their annual household income.

When they buy cars, they buy them used because a vehicle’s value sees the steepest decline in the first three years of its life. Then, they either keep the car until it’s impractical to drive it anymore, or they sell it to someone else years later for nearly what they paid for it.

They can do this because they conduct a lot of research before buying a car. They’re very familiar with the quality, durability, and average cost of the models they’re interested in, and they never rush into a purchase. They’re willing to spend months looking for a good deal if necessary.

To become a millionaire, carefully consider every major purchase you make. Don’t impulse buy, and don’t buy houses and cars that do little more than show off your wealth. Find inexpensive alternatives. For example, consider how much could you save if you moved to a city with a low cost of living and found a remote job.

Here are some apps that will help you find money-saving opportunities on life’s biggest purchases:

Save on major purchases

Save on buying a car or home

TrueCar (Web, iOS, Android)
Find and compare prices on new and used cars in your area, and see what others have paid for similar purchases. Use this information to negotiate discounts at car dealerships.
Price: Free

Carfax (Web, iOS, Android)
Carfax provides all of the information you need to conduct a thorough investigation before buying a used car. Read expert reviews of models you’re interested in, and get a car history report to make sure the car you’re buying hasn’t been in a wreck, flooded, or recalled. If the car does have an unfavorable history, use the information to negotiate a discount.
Price: Free report with used car search; $39.99 for standalone Carfax report

FuelEconomy.gov (Web)
Buying a new car costs more than the upfront price. Make sure to consider the cost of gas for different models as well. FuelEconmy.gov provides a gas cost calculator that estimates how much you’ll spend on gas over a car’s lifetime. Use it to compare different cars to see which will be the cheapest in terms of gas costs over the long run.
Price: Free

SmartAsset (Web)
Use SmartAsset’s cost of living calculator to calculate how much you could potentially save by moving to an area with a lower cost of living. Find out which U.S. cities boast the lowest cost of living, best purchasing power, and highest median incomes.
Price: Free

Zillow (Web, iOS, Android)
Browse real estate listings, find current mortgage rates, and determine what you should do before buying—save for a higher down payment, improve your credit score, etc.—to get the best interest rate on your mortgage.
Price: Free

4 & 5. Most Millionaires Didn’t Get Financial Assistance from Their Parents, and They Don’t Provide Financial Assistance to Their Children

According to Stanley and Danko, the idea that most rich people are born into rich families is false: "80 percent of America’s millionaires are first-generation rich." Few millionaires grow their wealth as a result of cash gifts from their parents.

In fact, Stanley and Danko found that the children of wealthy parents who receive monetary gifts from their parents are much less likely to grow wealth for themselves. Instead, they often get caught on the consumerism treadmill and spend all of their money rather than saving and investing it.

If you want your kids to become millionaires, teach them how to budget, save, and invest. If you do want to invest in their futures, invest in their education. Most millionaires are more than willing to help their adult children pay for college, but they’re very unlikely to buy their kids homes or businesses—or supply them with large cash allowances.

Teach your kids how to become millionaires on their own by showing them how to save, plan, and invest. The following apps help kids learn these concepts from a young age:

Budgeting apps for kids

Budgeting apps for kids

Allowance & Chores Bot (iOS, Android)
Teach kids what it’s like to work for a living. Add chores they’re responsible for, and provide automatic allowance payments when they complete their required chores. Add charges when kids spend their money so they can see how their purchases impact their savings.
Price: One-time app purchase of $2.99

BusyKid (Android)
BusyKid offers the same budgeting features as the Allowance & Chores Bot, but it stands out because it also allows kids to actually choose to invest their money in real stocks.
Price: $14.95 per year, per family

6. Most Millionaires Know How to Identify Promising Opportunities

If you make $50,000 a year, spend nothing, and save every dollar in a safe, it would take you 20 years to accumulate a million dollars. It doesn’t seem possible, then, that you could accumulate seven-figure wealth in your lifetime at that salary.

But people do exactly that, and they do it by investing. Most millionaires pay themselves before they spend any of their income, diverting 15-20 percent of their income into investments. They invest in things that grow their wealth but don’t lead to realized income, which minimizes their tax burdens.

How do they decide what to invest in and understand what investments will reduce the amount of taxes they’re responsible for paying? They either:

  • Pay for the highest quality financial, legal, and accounting advice they can find, or
  • Conduct thorough research into investment opportunities on their own

Additionally, when millionaires invest, they invest long-term. Few day trade; they’re much more likely to hold their investments for six years or more.

To become a millionaire, invest a reasonable percentage of your income. Imagine that instead of hiding all of your $50,000 salary in a safe, you lived off of $30,000 and invested $20,000 in stocks and bonds with an average return rate of 7 percent.

It would take only 23 years to grow those investments to seven figures, you’ll earn more than twice as much interest as your investment, and you won’t pay tax on any of that until you withdraw the funds.

The best way to get started investing is to work with a financial advisor, but the following apps also provide a decent starting point:

Investment and investing education apps for beginners

Investing apps

Acorns (Web, iOS, Android)
Use Acorns to automatically invest the leftover change from your purchases in stocks and bonds. While you won’t invest significant amounts of money this way, it’s a simple way to get started investing if you don’t have a lot of income to set aside for investing.
Price: $1.00 per month for accounts under $5,000; 0.25% per year for accounts over $5,000

Stash (Web, iOS, Android)
Stash enables hands-free investing. Start an account with as little as $5.00, choose from 40 exchange-traded funds (ETFs) to invest in, and either invest occasionally when you can or set up recurring investments that debit directly from your checking account.
Price: $1.00 per month for accounts under $5,000; 0.25% per year for accounts over $5,000

Robinhood (iOS, Android)
Designed for beginners, this stock investment app allows you to buy and trade stocks for free, avoiding high brokerage fees. It also helps you discover new stocks you may want to invest in, and learn more about those opportunities before investing.
Price: Free, but some commissions and fees may apply in certain scenarios

Bloomberg (Web, iOS, Android)
If you want to educate yourself on investing, Bloomburg is a great place to do it. Read financial news, receive market updates, and create an investment portfolio to receive news that’s relevant to your investments.
Price: Free

WiseBanyan (Web, iOS, Android)
If you don't know which investments to choose that are best for your particular scenario or don't want to have to regularly rebalance your investment portfolio, you need a financial advisor. But most don't come cheap. While there are "robo advisors" you can use to automatically invest your money in low-cost index funds, such as Betterment and Wealthfront, they still take a portion of your investment as a service fee. WiseBanyan is different because it's completely free. The service will invest your money for you in a mix of funds based on your goals and risk tolerance and also balance your portfolio. If that sounds shady to you, read how they make money—tldr; via selling additional a la carte services.
Price: Free

7. Most Millionaires Choose Occupations with Growth Opportunities

Most millionaires are self-employed business owners, but you don’t have to start a business to become a millionaire. The most important thing is choosing the right career—regardless of whether that means you work for yourself or someone else.

In fact, a lot of millionaire business owners got started in their business by working for someone else. Their experience as employees of other companies gave them the knowledge they needed to generate solid business ideas.

To become a millionaire, conduct serious research before choosing a career. Take personality tests to find out what careers your best suited for. Read as much as you can about the salary and growth opportunities in your chosen field. Find a mentor who can provide insight into what you need to do to succeed, and to help you determine if the career you’re considering is a good fit.

The following tools will help you research possible careers and find the right occupation:

Tools for choosing the right career

Careeer assessment tools

Career Aptitude Test (Web)
This test by Rasmussen College allows you to input your skill level in seven different areas, and when you’re finished, the system will suggest careers based on your skills. You can also filter suggested careers by salary, expected growth in the field, and amount of education needed.
Price: Free

Myers-Briggs Type Indicator Assessment (Web)
The Myers-Briggs Type Indicator assessment asks 93 questions and uses your answers to place you into one of 16 personality types. Once you know your personality type, find all sorts of resources online about careers where other individuals who share your personality type thrive.
Price: $49.95

Holland Occupational Themes Test (Web)
This personality test asks you to rate how well you like performing 48 different tasks on a scale of “dislike” to “enjoy.” Based on your answers, you’ll fall into one of six typologies that each correspond to a group of careers you may thrive in.
Price: Free

SCORE (Web)
SCORE connects aspiring entrepreneurs with volunteer mentors who have created successful small businesses. If you’re considering opening a small business but aren’t sure if it’s the right decision—or are unsure how to move forward—partnering with someone from the SCORE program may provide the guidance and advice you need.
Price: Free

AngelList (Web)
Looking for seed money, venture capitalists, or angel investors for your startup idea? Create a company profile on AngelList to get your idea in front of people who are looking to invest in startups.
Price: Free

Or, if you do want to start your own business, learn what it takes to start your own company, whether it's a business of one or you plan on having employees.


Sure, you might win the lottery, make an early investment in an altcoin that skyrockets, or win the World Series of Poker. These are all possible ways to instantly become a millionaire—but highly unlikely ones.

According to Stanley and Danko, "wealth is more often the result of a lifestyle of hard work, perseverance, planning, and, most of all, self-discipline."

Stop hoping for a quick fix for your financial problems, and start planning for the future. Clipping coupons, searching for deals, creating budgets, and researching investments aren’t what most people would consider exciting tasks. But these tasks will set you up on the right road to wealth.

Title photo by nattanan23 via Pixabay.


source https://zapier.com/blog/millionaires-money-saving-apps/

Monday 19 February 2018

How to Merge Multiple Google Drive and Google Photos Accounts

Do you have more than one Google account, perhaps one for work or school and one for personal use? Tired of switching between them or just want to consolidate those accounts into one? While there's no dead simple way to merge Google accounts, the steps below will help you get your files from Google Drive and photos from Google Photos into the account you want to use primarily.

How to Merge Google Drive Accounts

To merge the files from an old Google Drive account to a new one, you first need to sync your Google Drive with your computer. If your files are already synced, you can skip to step two.

Step 1: Sync Google Drive to your computer

To sync the files from your old Google Drive account to your computer:

  1. Download the Google Drive Backup and Sync app.

  2. After the application has downloaded, click Get Started.

  3. Sign in using your old Google account credentials.

  4. Uncheck all folders, and click Next.

Back up to Google Drive
  1. Check Sync My Drive to this computer, and select the radio button next to Sync everything in My Drive. Finally, click Start.

Depending on how many files you have in your old Google Drive account, the syncing process could take some time. Wait until it’s complete, then move on to step two.

Step 2: Merge your old Google Drive files to your new account

To merge the files from an old Google Drive account to a new one, navigate to the Backup and Sync control panel on your computer. It’s typically in your icon shortcuts (near the Wi-Fi icon) and looks like this:

Google Drive Sync icon
  1. Click the Backup and Sync Icon, click the settings icon (three vertical dots), then click Preferences.

  2. Click Settings, then click Disconnect Account.

  3. After disconnecting, click the Backup and Sync logo again, and sign in with your new Google account login.

  4. Decide which local folders to backup to Google Drive, or uncheck all folders to simply merge your old Google Drive files to your new Google Drive. Click Next.

  5. Check Sync My Drive to this computer, and select the files and folders you want to merge from your old Google Drive account. Then click Start.

Sync Google Drive
  1. Click Continue in the Merge with My Drive popup. This allows Google to merge the files from your old account to the new account.

  2. Click Continue in the Continue merge popup. If you have a lot of files, it may take a while for everything to sync.

Now you just have to wait for everything to sync. When it’s finished, all of the files from your old account will be available both online and locally in your new Google Drive account.

If you think there’s a chance that you’ll add new files to your old Google Drive before deleting or losing access to that account, make sure to set up this Zap to automatically copy any new files added to your old Google Drive account to your new Google Drive account.

How to Merge Google Photos Accounts

The simplest way to transfer all of the photos from your old Google Photos account to a new one is to set your new account as a "partner account." This allows you to copy all of your photos to your new account without having to download and upload all of your photos.

To set up your new account as a partner account and copy all of the photos to it:

  1. Log in to Google Photos with your old account.

  2. Open the menu, and select Settings.

  3. Click Shared libraries.

Google Photos shared libraries

Troubleshooting:

If you’re already sharing your photos with someone else using the partner account feature, remove that partner first by clicking the Remove Partner link. You can add them as a partner again after you finish transferring all of your photos to your new account.


  1. Click Get Started.

  2. Type in the email address for your new Google account.

  3. Select the All photos radio button, make sure Only show photos since this day is set to Off, and click the Next button.

Google Photos settings
  1. Click Send Invitation to confirm the partner link, and re-enter your password—if needed—to finalize the change.

  2. Log out of your old Google account.

  3. Open your email application for your new Google account and look for the invitation email. Click the Open Google Photos button in the email, and—if needed—sign in with your new Google account.

Google Photos invitation email
  1. Accept the shared library invitation.

  2. Click the Get Started button in the Save to your library notification to copy all of the shared photos to your new Google Photos account.

  3. Select the All photos radio button, and click Done.

That's it! Google will then save all of the shared photos to your new account.

Even if you delete all of the photos in your old account—or if the old account itself is deleted—the photos will still be available in the new Google Photos account. But test it out first by deleting a photo in your old account, and make sure it’s still available in your new account before making sweeping changes.

If you deleted a partner from your old Google Photos account at the beginning of this process, follow steps 2-7 using your new Google Photos account to re-establish that partner account.


Most of these processes take time to complete. For that reason, it’s best to set aside an entire day to transfer everything. And while that may seem like a lot of time to dedicate to the process, it will save you a lot of time in the future because you’ll avoid the overhead of having to manage multiple Google accounts. And you can get all your files and photos in one place.

Want to keep all of your Google accounts and automatically copy any new files and data between them? You can do that with Zapier. For example, automatically send new emails from one Gmail account to another or copy new files from one Google Drive to another.


source https://zapier.com/blog/merge-google-drive-google-photos/

Thursday 15 February 2018

Steal This Workflow: How a Digital Marketing Consultant Converts More and Automates Onboarding

When you run your own small or solo business, every decision you make that takes up your time and money is critical. What really needs your attention and what can you hand off? Do you need to spend the money and hire part-time or even full-time help? Adding employees is an expensive proposition, especially for a small business.

You could also just automate those time-consuming tasks yourself. Automation keeps costs low and lets you focus on bigger, more important items, like marketing or selling, saving the work that requires human brain power for the humans.

Julie Stoian, digital marketing consultant and tech coach at ClickFunnels and owner of Create Your Laptop Life (CYLL), chose automation as she built her businesses.

"There were so many manual steps when it came to running my course and coaching business," Julie explains.

"I didn't want to keep hiring people for small jobs when I knew with a process and some automation, it could all happen seamlessly."Julie Stoian, Owner, Create Your Laptop Life

That manual work meant Julie either spent less time on her clients and businesses or she had to hire staff to help manage tasks. In wanting to keep costs low, Julie turned to automation. "I knew with a process and some automation, it could all happen seamlessly," she says.

Thanks to a fellow entrepreneur, Julie learned about app automation tool Zapier. Since that conversation, she's taken automating her workflows to the next level: "I currently have 25 Zaps running," explains Julie. "Most of them are helping me with onboarding new clients."

Zaps bridge different applications together. So when a new purchase is made on Julie's site through ClickFunnels, Zapier sends the clients information to any number of apps, like Trello, Slack, and more.

Central to her Zaps and workflows is ClickFunnels. With ClickFunnels, Julie and the CYLL team can build different funnels into their website, drawing potential clients to fill out a form for more information and hopefully, make a purchase.

An inside look at a ClickFunnels Dashboard.

With Zaps connecting these tools and a lot more, Julie and her team don't have to export leads and import them into a new system or manually send Slack messages for each new Google Forms response.

Zapier automatically handles Slack messages, lead creation, and more for Julie's coaching business and CYLL.

Onboarding new clients takes a lot of time. You could dedicate every morning to it and still have more to do. Especially if your onboarding process has multiple steps, like Julie's businesses. Julie's online courses live in Teachable, so every new customer needs to be enrolled in multiple courses. An average client works their way through four courses in one of Julie's programs. Before Zapier, Julie or a teammate would add a client to each course manually.

Plus, they also created Trello cards for every client, with information from ClickFunnels and Teachable—and a checklist.

They'd send a Slack message to the team, too.

As the businesses grew, onboarding became a major timesink. To free up time for herself and her staff, Julie built a few Zaps to ease the burden of onboarding. Now, when a client purchases a course through one of their ClickFunnels, Zapier automatically enrolls the client in four separate courses in Teachable.

With Zapier, Julie can copy similar Zaps and only have to change the templates.

Once enrolled, Zapier sends a message in Slack, letting the team know about the new client and which funnel they came in from. Finally, Zapier creates a card in Trello for the client and instantly adds a checklist.

To make Julie's workflow easy to implement into your own, we broke the multi-step Zap down into its component parts:


Julie during one of her live sessions on Facebook.

What used to take every morning for Julie and her crew now happens in an instant. They aren't spending more money on superfluous staff and their time is placed where it matters: With their clients.

"That's the point of automation," she says. "It's not about connecting with your audience less, it's about using automation so you have time to authentically connect to your audience more."

All images courtesy of Julie Stoian and Create Your Laptop Life.


source https://zapier.com/blog/convert-clients-clickfunnels/

The 8 Best Proposal Apps to Win Projects and Land New Clients

Every new client needs slightly tweaked copies of documents you've sent before. You could make new ones every time, but that takes up so much time. Copy old documents, though, and you run the risk of forgetting to remove a former client's details or to include crucial terms of service or non-disclosure agreements.

Your time would be much better spent on your projects and clients. You need something that will help you put your best foot forward every time you start working with someone new, something that will help you land more projects with less work.

You need a proposal app. Here's why—and the best apps you could use to streamline your proposal process.

What's the Difference Between a Proposal and a Quote or Estimate?

Perhaps the best document in a project is the invoice—followed by the new digits in your bank account when you've wrapped up a new client project.

But not so fast. The project's just started. No time to think about invoices yet.

First you'll need a quote, estimate, bid, or proposal. The former three are focused on the price of your products or service—with the latter focused on the details.

A quote is a simple document with the direct price of a product or service—not too much different from the pricing page on a website or the prices in a menu. If a client wants to know how much you charge to design a website based on one of your default site templates, you want a quote.

Estimates go a bit further. If the customer wants a unique website design with a custom typeface and blog layout, you might not know exactly how long the project will take or the final cost—but you can estimate. So an estimate is a quote that describes what the project will likely cost based on current assumptions, and is subject to change.

Bids are quotes for competitive projects. Say three agencies are all trying to land the website design project—you'd submit a quote and try to win the project, competing on cost or your team's unique skills perhaps. You'll include a more specific price—there's less flexibility than with a open-ended proposal, after all—along with more details to sell the potential client on your offering.

Then you have proposals, the most detailed of them all. Proposals take the detail of a bid and the open-ended nature of an estimate then wrap them with a pitch on why your company would be great at this task and your standard terms. Proposals are everything in one place to pitch a potential client on what your team offers them—your best chance to get hired for the job.

Proposals, bids, estimates, and quotes all share similar elements—and unsurprisingly, you can typically make them all in the same apps. The main part is info about your product or service offerings and the price—everything else is details and nuance. We'll focus on proposals here, but if you need to make a quote, estimate, or bid, these same tools can still be great for the job.

What Makes a Great Proposal App?

Proposal in Google Docs
If you just need a quick, one-off proposal, a word processor might fit the bill

Odds are, you regularly use an app that could make great proposals for free. Google Docs, Apple Pages, and Microsoft Word all include proposal templates that you can quickly customize into a new project proposal for your clients. So why use another app?

  • Speed. The best proposal apps make it faster to create proposals. Instead of a word processor document where you need to find what to fill in, they include form fields to quickly add details—or they fill in the details for you automatically with saved content blocks you can reuse in each new proposal. Then they often help you style your proposal, turn it into a PDF document, and send the finished proposal to clients. They speed up your workflow so you spend less time on the documents and more time on the work.
  • Accuracy. It's easy to forget important information your proposals need. That's perhaps the best part of the saved content and customized templates in proposal apps. You can add your most important info once, and trust it'll be included in every new proposal without any extra effort.
  • Automation. Sending a proposal from a word processor takes at least a half-dozen steps. Proposal apps usually only take a couple clicks to send your proposal—and they typically can notify you when clients view and sign the proposal online so you don't have worry about misplacing those signed PDF scan clients used to send you. Some even include integrations to create a proposal automatically, say, when you add a new client to the Interested stage in your CRM.

Those three themes are what we watched for while testing over fifteen proposal apps to find the best tools. Some include other features—say invoice and billing tools tools or web content embeds—but at the very least they nail the core features you'll want from a proposal app.

The 8 Best Proposal Apps

  • Qwilr for saving reusable document sections as you build new proposals
  • Proppy for writing proposals quickly with keyboard shortcuts
  • Proposify for creating proposals with detailed page layouts
  • Bidsketch for making customized proposals from document sections
  • Nusii for tweaking saved document sections into custom proposals
  • Bonsai for managing proposals, invoices, and clients together
  • PandaDoc for quickly filling in template proposal document fields
  • WebMerge for automatically creating proposals from existing Word and PDF document templates

Qwilr

for saving reusable document sections as you build new proposals

Qwilr Screenshot

In a rush to build a new proposal, but don't want to duplicate your effort next time? Qwilr can help you get both jobs done at once. It's a surprisingly simple app, just a list of your proposals and a button to start a new one. Click that to make a proposal using a Qwilr template.

Instead of the normal 12pt Times New Roman text and small graphics, Qwilr's templates include full-width images and large typography. Add any text and graphics you want with Qwilr's simple text editing tools that are similar to the ones in Medium's blog editor. Click the + button to add a new section with text, a video embed, source code to embed content from almost any other website, or a quote to include pricing and details for your services. Once you've added something that you'll use again, click the pencil icon on the left side of the section, choose the blue save tab icon, and add a name for that block.

Next time you make a proposal, when you click the + button, all of the sections you saved will be a tap away, ready for you to add them to your document and customize them again. And if you want to make a proposal similar to one you've sent before, click the Clone button beside any of your existing proposals.

Qwilr includes brand settings where you can customize your company's info and choose a typeface and colors for your brand—and an API to automatically make proposals with its enterprise plans. For the most part, though, it's focused on the documents. You might need to add client info manually most times, but it'll be quicker than ever to add beautifully formatted sections with every other detail you need.

  • Qwilr Pricing: from $29/month Pro plan for 1 user, unlimited projects, and core features
  • For a deeper look at Qwilr's features and pricing, check out our Qwilr review.
  • Connect Qwilr with over 1,000 apps and build a proposal workflow with Zapier's Qwilr integrations:

Proppy

for writing proposals quickly with keyboard shortcuts

Proppy Screenshot

You just got off a call with a client and have exactly what they need in mind. All you need is to write that down and turn the ideas into a quick proposal. Proppy's perhaps the fastest way to do that.

It's almost more of a writing app. Start a new proposal, and you'll get a page that's reminiscent of a blog post editor with a large header image, logo, and proposal name at the top. You can add a client name and tag, both to help organize proposals (though neither let you save extra details to automatically fill in future proposals). Below that, there's blank space for you to type you thoughts—and that's it at first glance.

Press your return key to start a new paragraph, though, and you'll notice a small + icon on the left. Click that—or type a /—for a world of extra proposal-focused features. Type to sort through the options, where you can insert a header, image, video embed, price table, signature, list, and more. And at the end is Proppy's best feature: Import Section. Select that and enter some text you'd used in another proposal, then click the item you want to insert into your new proposal. Instead of needing to think about sections and save them separately, Proppy lets you write proposals like you would in Word and then easily reuse sections from them in the future. It's less automated than many other proposal tools, but can speed you up while still letting you quickly type up new ideas for each client proposal.

  • Proppy Pricing: from $20/month Basic plan for 5 active proposals and unlimited users

Proposify

for creating proposals with detailed page layouts

Proposify Screenshot

Proposal apps can help you build a new proposal in a few minutes—at least once you've set the apps up and added your default content sections. But for the most part, they make standard looking proposals with a single column of text, perhaps accented with pictures and nice typography but without any of the detail you could add from a word processor.

Proposify brings that back with its detailed page layout editor. You can add background color sections, sidebars, tables, and text boxes exactly in the area of the page you want. Want a landscape document to showcase your past work with a magazine-style layout, or need to drag page 12 to the beginning of the proposal like you could in PowerPoint? Proposify's the app for you.

Your first proposals will take a bit longer to put together. But once you've made a proposal with all the content sections you want, it's far easier to build the next one. Instead of copying and pasting data, select the Content Library tab in the sidebar to pull in any section from previous proposals. It makes it as simple to reuse content as Proppy, only here with richly formatted pages that'll sell your brand to clients.

  • Proposify Pricing: from $30/month Tall plan for 5 active proposals, 1 user, and core features
  • For a deeper look at Proposify's features and pricing, check out our Proposify review.
  • Connect Proposify with over 1,000 apps and build a proposal workflow with Zapier's Proposify integrations:

Bidsketch

for making customized proposals from document sections

Bidsketch Screenshot

Bidsketch works best when you take time to set it up before making proposals. Unlike other proposal apps that let you build a proposal from scratch every time if you want, Bidsketch requires you to first save sections, or pre-made document parts that you'll use in proposals.

From the Sections tool in Bidsketch, you can add opening and closing sections with details about your services, previous projects, terms of service, team info, and more. Format each with Bidsketch's rich text editor, and include images, variables in curly quotes, detail tables, or even video embeds if you'd like. Tag each section with its category, and give it a name that'll be each to find in the app later. Then open the Fees tab and add details about each of your products and services with a similar text editor tool that lets you include a price and fee type. Finally add your contact info to the Clients section for everything your proposal need saved in one place.

Want to make full templates for your most common proposals? Bidsketch's main templates are content templates where you select the sections and fees you want for each proposal type. Or, just make a new blank proposal for a client, and Bidsketch will have you select the content sections that proposal needs and the client, and turn them into a polished proposal in seconds. It's a bit harder to style your proposals—you'll need HTML and CSS skills to customize fonts and colors in Bidsketch—but Bidsketch's focus on reusable text ensures you won't duplicate effort.

  • Bidsketch Pricing: from $29/month Solo plan for 1 user, unlimited proposals, and core features
  • For a deeper look at Bidsketch's features and pricing, check out our Bidsketch review.
  • Connect Bidsketch with over 1,000 apps and build a proposal workflow with Zapier's Bidsketch integrations:

Nusii

for tweaking saved document sections into custom proposals

Nusii Screenshot

Premade document sections are a great way to always include the same terms of service and quotes from former clients—but if you need to change something for this client, they're suddenly a bit less useful. Nusii simplifies things with a focus on both sections and editing.

Much like Bidsketch, Nusii works best if you save your most-used document sections first. Add them from the Sections tab, with options to save text or price sections with the details and formatting you want. It's easy to make sure things will be automatically customized, too, with Nusii's menu of default client variables including name and email so you don't have to remember the text tag to include.

You can then combine these sections into a new template—here, again, with templates that are simply groups of the sections you want to include. Then when you make a proposal, it'll include the template sections, with buttons to add any other sections you want—and an editor in each section so you can tweak the text for that client. And for a bit of extra design, Nusii also includes a custom header image editor with each proposal where you can add a photo and overlay it with a color and blur for an artistic proposal in seconds.

  • Nusii Pricing: from $29/month Freelancer plan for 5 active proposals and 1 user

Bonsai

for managing proposals, invoices, and clients together

Bonsai Screenshot

If you're a freelancer, you don't just need proposals—you also need a way to track clients, time, and expenses while working. And you need a way to get paid once you're done. The fewer apps, the better. Bonsai's designed for just that.

It's a simpler proposal builder in a suite of tools designed around freelance work. Start by listing clients and the projects you're working on (or hoping to work on) with them. Then add proposals, which in Bonsai are simple documents with an overview and timeline of the project, additional text sections that can describe your ideas for the proposal, and file attachments to include your existing contract or portfolio. Finish the proposal with a Fee Summary which lets you offer multiple packages to your clients so they can choose the offer that fits them best without having to make a new proposal for every new offering.

Then you can get to work, tracking your time and expenses in Bonsai as the project progresses. When everything's done, you can send invoices that combine your original proposal package along with additional expenses for clients to pay via Stripe or PayPal. Since Bonsai's dashboard gives you a heads-up display of how your business is going, it's everything you need to manage the financial side of your existing and new projects from one place.

  • Bonsai Pricing: Free for 1 active project; from $24/month Plus plan for unlimited projects
  • Bonsai Zapier integration coming soon

PandaDoc

for quickly filling in template proposal document fields

PandaDoc Screenshot

You've got your new client's info ready, and need to quickly add it to a new document. PandaDoc— formerly Quote Roller—might be the quickest way to do it. A tool for building template documents of any type, it's a great way to quickly send any info you need to clients along with your proposals.

PandaDoc is built around templates and a content library. You'll build templates for the proposals and other types of documents you need to make, complete with images and formatted copy. Everywhere you need to customize the document for clients, PandaDoc has you add tokens or field names in square brackets to simplify filling them in later. And for the content you might want to include depending on the project—say, terms of service or example work from other projects—you can save them in your content library for easy reference.

When it's time to make a new proposal, create a new document in PandaDoc, select your template, and it'll tell you how many tokens you need to fill in with a list of the fields in the sidebar. Add the correct text to each one to customize the document, and PandaDoc will update the document preview automatically. Then drag in any extra content blocks you want and send off the document for your client to sign. It's a quick way to fill in document templates for anything you need to send to clients.

  • PandaDoc Pricing: from $19/month paid annually Professional plan for 5 templates, unlimited documents and signatures, and core features
  • Connect PandaDoc with over 1,000 apps and build a proposal workflow with Zapier's PandaDoc integrations (currently in beta).

WebMerge

for automatically creating proposals from existing Word and PDF document templates

WebMerge Screenshot

Perhaps you don't really want another app. You've made proposals for years in Word, and you'd like to find a way to make that simpler—but still want to use your tried-and-tested proposal template. WebMerge's the app you need.

It's not just a proposal app. WebMerge is a tool to automatically create new documents from your PDF, Word, and Excel document templates—which makes it great for proposals, terms of service, agreements, and more. You'll open your existing document templates, replace any text that you need to change for each new client with variable fields like {$name} (changing name with a unique name for each variable your documents need). Upload the file to WebMerge, then add a WebMerge form to your document or connect to WebMerge's Zapier integrations to automatically make new documents for every new client from your template.

When you need to make new documents, you can use WebMerge's HTML rich text editor for a simpler version of Word's standard editing tools to build new template documents. It's not as fancy as the other proposal apps—but it's perhaps even faster to use and can automate your entire document workflow for proposals and more.

  • WebMerge Pricing: from $29/month Micro plan for 30 documents per month
  • For a deeper look at WebMerge's features and pricing, check out our WebMerge review.
  • Connect WebMerge with over 1,000 apps and build a proposal workflow with Zapier's WebMerge integrations:

You might want to focus on your proposal's design to catch potential clients' eye, or you could prefer to save time on your content and make it easy to mix-and-match sections for detailed proposals. Maybe you want to fill in new proposal details each time, or would rather automate everything with one proposal template that tweaked for every new client. Either way, there's a proposal app for you—one that can speed up your proposal workflow and help you spend more time on the projects you love.

Header image by Helloquence via Unsplash


source https://zapier.com/blog/best-proposal-software/

Tuesday 13 February 2018

How to Merge Multiple Gmail, Google Calendar, or Google Contacts Accounts

Let’s start with the bad news: there’s no fully automated way to merge two or more Google accounts into one. If you have a G Suite at school or at work that’s going to be deleted and want to move the data to a different account first, need to use multiple accounts but hate switching between them, or if you just don’t want your email address to be sk8trgrrrl04@gmail.com anymore—there’s no quick and easy solution.

Merging Google accounts is a manual process. You have to transfer data out of and into every individual Google product you use—Gmail, Google Calendar, Google Drive, and so on. Although this process is hardly painless, we've got the step-by-step instructions—along with a few helpful automated workflows—to help you accomplish the feat in less time and with fewer headaches than you might think.

Here's how to combine multiple Gmail accounts into one, and get all of your email, calendar events, and contacts in one place.

How to Merge Gmail Accounts

There are two ways to merge Gmail accounts.

The first method is adding your old Gmail account to your new one, where you can send and receive emails from both accounts inside your new Gmail account. It’s ideal because it will automatically pull all of the archived emails from your old account into the new or main account, and it will allow you to send and receive email from both your old and new accounts.

Unfortunately, Google’s security measures make the first approach prone to error, so while it’s ideal, it may require a lot of troubleshooting.

The second method—moving your old emails to your new address and switching to only use the new account—requires less troubleshooting but isn’t as straightforward. While you’ll be able to receive emails from your old account in the new one, you'll need to use another email app to copy over your email archive and won’t be able to send emails from your old account’s email address.

Pick your poison, and follow the instructions below.

Option 1: Add Your Old Gmail Account to Your New Gmail Account

Want to use both of your Gmail accounts through your new account? This is the option for you—and if it works, it's the best way to move to a new Gmail account. I recommend trying this approach first. If you run into a wall, abandon it and try option two. Here’s how to do it:

Open Gmail settings

1) First you need to set your old Gmail account to allow other apps to access your emails. To do that, log into Gmail with your old account.
2) Click the gear icon, then select Settings.

Gmail save or delete options

3) Click the Forwarding and POP/IMAP tab, then select the Enable POP for all mail button in the POP Download section.
4) Then click the When messages are accessed with POP dropdown and select either archive Gmail’s copy to keep a copy of all emails in the old account, or
delete Gmail’s copy to have emails in the old account deleted when they’re sent to your new account. (We strongly recommend the first option just in case—unless you're almost out of storage in the old account, which could cause issues when forwarding.)
5) Save your changes.

Google allow less secure apps setting

6) Now that you've enabled POP access, you'll need to set your Google account to let POP apps connect to your Gmail account. That requires a slight tweak in your account's security settings. Open your Google My Account settings and navigate to the less secure apps page.
7) Click the slider to turn on the Allow less secure apps setting.

Add a new Gmail account to an existing account

8) You're finished with your old account—time to get this account added to your new Gmail account. Log out of your old Google account—or open a different browser—then log into Gmail with your new Google account.
9) Click the gear icon, then click Settings as before.
10) Click the Accounts tab, then click Add a mail account link beside the Check mail from other accounts label.

Add old Gmail addresss to new account

11) Enter the email address for your old account in the pop-over, then click Next.

Add details about old Gmail account

12) That'll open a new window that shows the email address you entered and asks for login details. Enter your entire old Gmail address—including the @[domain].com extension—in the username section, and type in your old account's password.
13) Use the default settings for POP Server (pop.gmail.com) and Port (995).
14) Check the box next to Always use a secure connection (SSL) when retrieving mail.
15) Check the box next to Label incoming messages. You’ll use this label later to create reminders to update your email address. Use the default label, or click the dropdown to create a new label.
16) Finally, click Add Account to combine the two accounts in Gmail. If everything work, jump ahead to the next steps below—if not, the troubleshooting tips below should help.


Connect Old Gmail Account with Two-Factor Authentication

Signing into Google

1) Open an incognito window (on Chrome, that's under File > New Incognito Window)—or open another browser like Safari or Microsoft Edge—so you don’t impact your current session. Then navigate to your Google My Account page and sign in with your old Gmail account.

2) Click the Signing in to Google link under the Sign-in & security section.

Set Gmail 2-factor settings

3) If you have already enabled 2-Step Verification on your account, skip ahead to the steps below to create a unique App Password for your old Gmail account. Otherwise, to set up two-step verification, click the 2-Step Verification section under Password & sign-in method.
4) Click the Get Started button, and verify the password for your Google account.

Add phone number to Google

5) Add your phone number, and select if you want to receive the verification code via SMS or phone call.
6) Once Google sends you a verification code, enter the code and click Next.
7) Click the Turn On link to enable two-step verification for that account.

Now that you have two-step verification enabled, you need to create an app password to use instead of your general login credentials.


Create an App Password:

Gmail 2-factor settings

1) Return to the Google My Account page.
2) Click the Signing in to Google link under Sign-in & security as before.
3) Click App passwords in the Password & sign-in method section.

Add new App Password for old Gmail account

4) Choose Mail in the Select app dropdown, and select Other (Custom name) in the Select device dropdown. We're connecting your new Gmail account, so perhaps name the password New Gmail then click the Generate button.
5) Copy the password.

Now, return to your new Gmail account's Add a mail account window. This time, paste the app password into the password field instead of your Google account password. Click Add Account and this time everything should work.


Enable Send Mail As other address in Gmail

With your two Gmail accounts connected, there are just a few final steps to set everything up:

17) Once you successfully add the password to your old Gmail account, select Yes in the window that asks whether or not you want to be able to send mail from your old email account.

Gmail alias

18) Enter your name (or the name you want to show up when people receive email from your old Gmail address), and check Treat as an alias.

Add settings to send email from Gmail alias

19) Leave the SMTP Server (smtp.gmail.com) and Port (587) fields unchanged, and enter your username—including the @[domain].com extension.
20) Paste either your Google account password or app password into the password field, depending on which you used in the last section.
21) Select the Secured connection using TLS button, and click Add Account.

Verify old Gmail account

22) There's only one final step. Gmail will send a confirmation code to your old email address. Open your old Gmail account again, find the confirmation email from Google, and copy the confirmation code—then switch back to your new Gmail account and paste it into the verification window.

You did it! You can now send and receive email from your old Gmail account in your new one. Click the Compose button in Gmail, and you can now choose to send emails from your old or your new Gmail address. And when you return to new Gmail account's inbox, you’ll see all of the email messages from your old account are being imported into your new account—which could take quite some time if you have a lot of archived emails.

Don't want all of those old emails to fill up your inbox? You can set up a Gmail filter to automatically move those messages to a Gmail label where you can still easily find them when you need them. Wait a bit and make sure all your old emails are in Gmail, then here's how to filter them:

Add a Filter to Move and Archive Old Gmail Emails

Filter Gmail messages

1) Let Google finish its import, then open one of the emails from your old account. Click the More dropdown, and click Filter messages like these.

Create filter from existing Gmail message

2) Delete the text in the From text field, and add your old email address to the To text box. Then, click Create filter with this search.

Skip the Inbox and apply filter

3) Check the box next to Skip the Inbox (Archive it) and the box next to Also apply filter to matching conversations. This will archive all of the old emails that are now in your inbox so that you don’t have to do it manually. Optionally, add a label to move these messages to a new label if you want—though each of your imported messages are already tagged with the new label you created earlier.

Delete Gmail filter

Now, when new messages come into your old account, you won't want those to get automatically archived too. So now you have to delete the filter you just created. This way any new email to your old account will arrive in your inbox.

Go ahead and click the gear icon again in your Gmail inbox view, and select Settings. Click the Filters and Blocked Addresses tab, find the filter you just created, and click the delete link to delete it.


Tada! You now have access to all of your old account’s archived emails in your new account, and you can send and receive emails in the new account for both your new and old accounts. Now, you just need to work on updating your email address—jump ahead to the next section if so.

Or perhaps not. If that didn't work for you, it's on to option 2 where you can forward emails from your old account to the new one.

Option 2: Forward Emails From Your Old Gmail Account to Your New One

If option one didn’t work for you, it’s not a total loss. With far fewer steps and permissions, you can have your old Gmail account forward all new emails to your new Gmail account. Here's how:

Open Gmail settings

1) Log in to Gmail with your old account.
2) Click the gear icon, then click Settings.

Add forwarding address to Gmail

3) Click the Forwarding and POP/IMAP tab, then click the Add a forwarding address button.

Enter forwarding address

4) Enter your new email address, and click Next.
5) Gmail will open a new window confirming that you want to forward email to that address—click Proceed, then click Ok in the next window.

Confirm Gmail forwarding

6) Gmail will then send a confirmation to your new email account that you want to receive emails from this account. Log in to your new Gmail account, open the confirmation email, and click the confirmation link to initiate forwarding. On the confirmation page, click Confirm.

Now all new emails sent to your old email address will be automatically forwarded to your new email address. You’ll have to manually change your email address for each place/person still using it, but there are some ways to make that easier listed in the section below.

Backup and Move Your Old Gmail Emails

Keep in mind that this only forwards new emails your old Gmail account receives—not archived emails you received in the past. If your old account is going to be deleted but you need to have access to its archive, use Google Takeout to download an email archive. In fact, this may be the only step you need to take if your email account will be deleted anyhow. Here's how:

Google Takeout
  1. By default, Google Takeout will let you download a backup of your entire Google account—but we only want the old emails. So, on the Google Takeout landing page, click Select All to unselect everything that Google already chose, then click the slider beside Mail to get just a Mail archive.
Download Gmail archive from Google

2) Click Next, then select your preferred file type, archive size, and delivery method—the defaults are usually perfect—and click Create Archive.
3) Depending on how large your mailbox is, this could take a few hours—or even a few days—to complete. Once it’s complete, though, Gmail will email you with a link to download your email archive.

Import Email archive

4) Next, you need to use an email app like Thunderbird, Apple Mail, or Microsoft Outlook to view and import your archive to your new Gmail account. Typically, you'll first login to your new Gmail account in the email app, then import the email archive and add it to the Gmail label you want. Wait for that to sync and you'll have all of your old emails in your new Gmail account. Here's detailed instructions to import Gmail emails in Thunderbird, Mail, and Outlook.


Notify People About Your New Gmail Address

Before losing access to your old Google account, you need to everyone you email know your new email address. One of the best ways is to add a Zapier automated workflow that will automatically create a new task whenever someone emails your old address and reminds you to let them know about your old address. Or, you could have Zapier automatically email the contact and let them know your new address without you needing to do anything.

First, make sure all emails sent to your old email address get a unique label when they’re received. If you followed all of the instructions in option one, this should be set up already. If you used the instructions in option two, create a rule to automatically label email sent to your old account:

Add filter to Gmail

1) Log in to Gmail with your new account.
2) Click the gear icon, then click Settings.
3) Click the Filters and Blocked Addresses tab, then click Create a new filter.

Add filter for old Gmail address

4) Enter your old email address in the To text field, then click Create filter with this search.

Create label in Gmail

5) Check the box next to Apply the label, then click the Choose label dropdown and select New label.
6) Give your new label a name, and click Create, then click the _Create filter button.

Now, each email sent to your old email address will automatically get a label when it lands in your inbox. Next, you can set up a Zapier automated workflow—or a Zap as we call them—to add a task to your to-do list when an incoming email gets that label, reminding you to update your email address with the sending individual/company.

Zapier Gmail

Open Zapier, and click the orange Make a Zap button in the top right corner. Select the Gmail app and the _New Email trigger, then connect it to your new Gmail account. Zapier then lets you select the label you want to watch for new emails. Select the new label you just made here.

You can then select your favorite to-do list app next, and have Zapier add a new task for you every time you get a new email to your old email address. That'll help you remember to let each person know they should start emailing your new address. Or, here are some pre-made Zaps to help you set that up faster.

Want Zapier to let them know automatically instead? Add a Gmail action to your Zap and have Zapier send the sender an email—or use this Zap to speed things up:

How to Merge Google Contacts Accounts

Unfortunately, the above steps don’t migrate your contacts—just your email. But you'll want your old Gmail contacts in the new Gmail account, too. Here's how to migrate contacts from your old Gmail account to the new one:

Switch to Google Contacts

1) Login to Gmail with your old Google account.
2) Click the Mail dropdown, and select Contacts—or, just open contacts.google.com directly.

Export Google Contacts menu

3) Click the More dropdown, and select Export. (Note: this only works in Google Contacts' old design; if you've upgraded to the new one, click the Switch to the Old Google Contacts button in the left first to see this menu).

Select which Google Contacts to export

4) Select the contacts group you want to bring to your new account—or select All contacts to get everything—then click the button next to Google CSV format and click Export.

Import Google Contacts

5) Log out of your old Gmail account, and log back in with your new Gmail account.
6) Switch back to the contacts view, and click Import Contacts in the menu on the left (and, again, if you're using the new Google Contacts design, click Switch to the Old Google Contacts first).

import Gogole Contacts export

7) Select the CSV file, then click Import.

Now all of your contacts from your old account should be in your new Gmail account so you can easily email everyone you've stayed in touch with over the years.

How to Merge Google Calendar Accounts

If there's one other thing most closely linked to your Gmail account, it's your Google Calendar. Whenever you get an event invite in Gmail, it'll get added to your Google Calendar—as do upcoming flights, event tickets, and more. You'll want to take your old calendar along for the move as well.

To merge data from an old Google Calendar account to a new Google Calendar account, you'll need to export your old calendar, then import it into your new calendar. Here's how:

Google Calendar settings menu

1) Log into Google Calendar with your old account.
2) Click the gear icon, then click Settings much like in Gmail.

Export Google Calendar

3) Click the Import & Export button on the left, then click the Export link on the bottom. Or, if you're still using the older Google Calendar interface, click the Calendars, then click Export calendars.
4) Find the ical.zip file in your Downloads folder and open it. Then, copy the .ics file to your desktop.
5) Log out of your old Google Calendar account, and log back in with your new Google account.
6) Click the gear icon, Settings and Import & Export (or the Calendars tab in the old Google Calendar). This time, click the Select file from your computer button under Import.
7) Select the .ics file you just downloaded from your old Google account. All of your existing meetings and events should now appear on your new account’s Google Calendar.

If you think there’s a chance that you’ll continue to receive new meeting invitations on your old account, turn on this Zapier workflow to automatically copy new events created in your old Google Calendar to your new Google Calendar:


And with that, you're done. All of your email, contacts, and calendar appointments are in one place—your new Gmail account—and you'll still get any messages or appointment reminders that come in to your old account. It's the best of both worlds.

Image Credits: Title photo by Rawpixel via Canva.


source https://zapier.com/blog/combine-gmail-accounts/