Thursday 28 June 2018

Be More Assertive With This Tech Trick

Do your word choices inhibit your ability to be effective at your job? Do your friends and family think you're wishy-washy? Being assertive through language doesn't come naturally to everyone. Unassertive people often rely on hedging words and phrases that make what they say less definitive and less direct. Instead of saying, "The solution is…" you might soften the sentence to "I think the solution is… ." Instead of affirming "I will do X," you might say you'll "try" to do it.

Kristie Wirth is an associate data scientist at Zapier. Soon after she joined the company, she took a workplace assessment and scored 10 out of 99 on assertiveness. She decided to do something about it.

"Being new to Zapier, I felt vulnerable with that score," she said. "This is an awesome place to work. I'm moving up, career-wise, and I want the way I communicate reflect that."

She's also the only woman on her team, and she suspects she might be the youngest as well. All those factors led Kristie to start brainstorming ways she could make her language more assertive.

Her solution was to set up the Mac productivity app Alfred to automatically delete or rewrite non-assertive words and phrases when she types them to make her word choices more assertive. It not only made everything she wrote more direct, but also helped her spot where she could write with more authority and confidence. She calls the final product "assertiveness snippets."

She took inspiration from a Chrome plugin called Just Not Sorry. It underlines words and phrases in Gmail that potentially diminish the message you're writing.

But Kristie didn't want to be limited to Gmail. "I wanted something more comprehensive," she said.

"I'm moving up, career-wise, and I want the way I communicate reflect that."-Kristie Wirth

Hacking a Text Expander

The Mac app Kristie uses, Alfred, has a number of features for working more efficiently, one of them being that it can automatically insert predefined text when you make a few keystrokes, a.k.a., text expansion. Typically, people use text expanders to auto-type long strings of text that they commonly use, such as company boilerplate. Or, you can set it up so that if you type "my contact info," it replaces that text with your name, email address, and phone number. It's fully customizable.

In Kristie's case, she uses Alfred's text expander function to automatically change or delete certain words and phrases that she finds undermine her assertiveness. A few examples are:

  • Does that make sense? becomes Let me know your thoughts!
  • I will try becomes I will
  • stupid question becomes question
  • In my opinion is deleted
  • sort of is deleted

After creating these snippets, Kristie learned that language isn't cut and dry, and it took some trial and error to get her snippets to work the way she wanted them to. For example, "sort of" could make Kristie sound unassertive in some contexts, but in others, it's a necessary phrase that doesn't diminish her authority at all. Similarly, she originally had the phrase "I think" in her snippets, because she wanted to avoid writing, "I think I know the answer" and instead use more assertive phrases such as "I expect" or "I suspect." But sometimes, she really is thinking about a matter and needs to communicate that action.

She's revised her snippets to now flag some of the phrases rather than automatically replacing or deleting them. So, when she types "I think," Alfred now adds a question mark next to it. It flags the language as potentially unassertive, which still brings it to Kristie's attention, and that's the result she wanted.

Spread the Love

Kristie came up with her assertiveness project for herself, but she ultimately chose to share them with a women's Slack channel at Zapier. That's where I learned about it.

"My original thought was this could be useful for anyone, but it especially rings true that women tend to use undermining language and struggle more with assertiveness," she said. "The women's channel at Zapier is an awesome place for discussing these kinds of issues and helping each other out. I thought, hey, if at least one person finds this interesting, then I bet people in this channel would love it." (I should note, too, that the women's channel doesn't exclude men.)

Below are instructions for using Alfred to make your writing more assertive. You can use the snippets Kristie created, create your own, or riff on the idea to suit your needs.


How to Install and Use Assertiveness Snippets

To use this particular setup, you must first install the Mac productivity app Alfred 3 (free) and have the Power Pack upgrade (£19 for a single license, which is roughly US$26). Alfred serves a variety of functions, from giving you the power to customize hotkeys to offering text expansion, which is what Kirstie uses to write more assertively. As mentioned, you can replicate a similar setup using any text expander of your choice; for example, if you use Windows, PhraseExpress is a decent option.

Once you have Alfred installed and the Power Pack license activated, download the snippet set. Alternatively, you can create your own.

Alfred preferences

Step 1. Open Alfred's Preferences from the menu bar.

Alfred features

Step 2. In the Preferences panel top menu, choose Features.

Alfred snippets

Step 3. Along the left side, choose Snippets.

Alfred install snippets

Step 4. Drag the assertiveness-snippets file into the field for Collections. Alternatively, to make your own snippet collection, press the plus sign at the bottom of the Collections area.

Alfred expand snippets

Step 5. Check the box Automatically expand snippets by keyword. Alfred pops up a dialog box that helps you enable this feature at the OS level.

Alfred access

Step 6. Follow the prompts, which will bring you to your Mac's System Preferences, Security and Privacy section. Here, click on the lock icon in the lower left corner. Enter the password for your computer, and now add a checkmark next to Alfred Text Services.

Alfred enable snippets

Step 7. Back in the Collection panel, enable the phrases you want to catch yourself writing by adding a checkmark next to each box.


Anyone can improve their writing by using text expanders, auto-correct, or macros to become more conscious of language use. If nothing else, using a text expander in this way makes you more aware of how often you use hedging language, which in itself can help improve your writing and assertiveness.

Top image: Background image created by Jannoon028 - Freepik.com.


source https://zapier.com/blog/tech-trick-to-write-assertively/

Wednesday 27 June 2018

How the Bootstrapped Dollar Flight Club Uses Zapier to Manage Leads

As a small and scrappy remote startup, Dollar Flight Club likes to keep everyone productive. When you bootstrap your business into existence, like Dollar Flight Club, there's a bit of responsibility overlap, at least at first. An engineer you hire to build an app might wind up creating a few custom reports or connections for the sales and marketing folks.

"Zapier has been absolutely game changing."Kyle Maltz, director of sales and partnerships, Dollar Flight Club

As engineering demands pile up, it becomes harder to grab those resources for one-off projects on other teams. But the resourceful team at Dollar Flight Club found a way to leave the engineers alone while also doing more work and saving time: App automator Zapier.

"Zapier makes it easy to execute on large problems," says Kyle Maltz, director of sales and partnerships at Dollar Flight Club. "No more relying on a developer's time to solve these problems—the developer can just focus on the product instead!"

About Dollar Flight Club

Traveling costs a lot, especially if you find yourself flying across the globe. Dollar Flight Club founder Jesse Neugarten spent a lot of time racking up miles, standing in airport lines, and in the air. The hacks and tips he learned during years of travel Jesse now shares with Dollar Flight Club's 500,000+ subscribers.

Dollar Flight Club's founder, Jesse, with director of sales and partnerships, Kyle

When the Dollar Flight Club team finds a deal, they email their subscribers. On average, these emails save subscribers $550 per ticket. Whether it's travel hacks or clever workflows, Dollar Flight Club was built on the notion of working smarter.

Manage HubSpot Contacts and Deals with Automation

Every business needs leads—but there's no one right way to collect and manage them. It comes down to what makes the most sense for the business. One of Dollar Flight Club's main uses of Zapier is for lead collection, but not just any leads:

"We specifically use it for new lead generation on the advertising side of our business," Kyle explains. "We get our advertising leads to fill out a media request or advertising request form."

This is where Zapier will come in: With a few Zaps—our term for automatic workflows—Kyle designed a process that adds the advertising leads to a customer relationship manager (CRM). From there, the team can monitor the status, create deals, and move the lead through their advertising workflow.

While Dollar Flight Club's leads are oriented towards advertising in this case, these tools and Zaps will work wonders for any type of lead you need to collect and manage.

Dollar Flight Club's Tools

App Icon:  Used For:
Typeform Typeform Lead generation; press & partner inquiries
HubSpot HubSpot Contact creation & management
HubSpot CRM APPNAME Deal creation & management
Slack Slack Team chat

The Workflows

With just three simple Zaps, Kyle and the Dollar Flight Club team created workflows that they could manage themselves—no need to pull the developers off their projects. Plus, the Zaps save the team "an unmeasurable amount of time," as Kyle puts it.

First, there are two Zaps that take leads from the form to a CRM. Dollar Flight Club uses Typeform and embeds the form on their site.

Once someone interested in Dollar Flight Club fills out that form, Zapier takes the information and sends it along to both HubSpot—where the Zap creates a contact—and HubSpot CRM—to create a deal.

Once the deal and contact are created, another Zap runs. This one sends the lead to Dollar Flight Club's chat tool of choice, Slack.

"These Zaps allow us to funnel new leads into our pipeline and clearly communicate in real-time that they're being added to the funnel," Kyle says. "It gives us the correct information to efficiently execute on them."

Dollar Flight Club uses these Zaps to work smarter and you can too:


With Zapier supporting them, the Dollar Flight Club team focuses on their customers and their product—the two most important things for any business. No more wasted time on manual tasks or having an engineer build a connection. Kyle and the team can do it all themselves with Zapier.

"Things just work the way we invision them working," Kyle says. "That used to be so hard to accomplish and I can't say it enough: Zapier has changed everything."

Want things to work smoothly and give your engineers their time back? Give Zapier a try for free.

All images courtesy of Dollar Flight Club.


source https://zapier.com/blog/create-hubspot-leads-typeform/

Tuesday 26 June 2018

Make Productivity a Habit with Zen to Done

There's a reason New Year's Resolutions are so hard to keep: Reinventing the way you live overnight requires a willpower that most of us don't have. And yet—many popular productivity systems ask you to uproot your work in just that way. Changing a single habit is hard enough, but changing them all at once? Nearly impossible.

Zen to Done offers a solution: It shows you how to develop the habits you need one by one to succeed with a multi-step productivity system.

What is Zen to Done?

Zen to Done marketing image

Zen to Done (ZTD) is a productivity system created by Leo Babauta of Zen Habits. Its goal: Help people build individual habits, step by step, as they work through a workflow management system. ZTD teaches you how to take a simple approach to improving your productivity by encouraging you to focus on forming one habit at a time.

Makes the whole thing feel a lot more doable.

All together, Zen to Done suggests forming 10 productivity-boosting habits. But Babauta has boiled it all down to what he calls Minimalist ZTD, and it involves just the four core habits of the system:

  • Collect: Get ideas and to-dos out of your brain and onto a list.
  • Process: Review your list daily and decide how to act on each item.
  • Plan: Pick a few high priority items to accomplish each week and every day.
  • Do: Schedule time to accomplish your selected to-dos without interruptions.

Babauta recommends picking whichever one of the four Minimalist ZTD habits that appeals to you the most and focusing on it for 30 days. By the end of those 30 days, he argues, you'll be in the habit of processing your work using that method. After that, move on to the next habit. Within four months (one for each of the core habits), you'll form all of the habits you need to stay on top of your to-do list and get more done.

If the Minimalist ZTD approach works for you, grab a copy of Zen To Done: The Simple Productivity E-Book to learn more about the other six recommended habits. Pricing: $9.50 for the eBook or $6.99 for the Kindle edition.

The Collect Habit

notepad to-do list

One of the best ways to clear your mind and improve your focus is to get ideas and to-dos out of your mind and onto a list. That's the goal of ZTD's collect habit: Train yourself to stop and document every single thing you need to do as soon as you realize you need to do it. Babauta also recommends collecting all of those to-dos in a central system.

"Every place you have to go to check your messages or to read your incoming information is an inbox, and the more you have, the harder it is to manage everything. Cut the number of inboxes you have down to the smallest number possible for you to still function in the ways you need to."

Documenting to-dos in the moment keeps your mind clear, lessens the likelihood that you'll forget to do something, and gives you a master list of to-dos to reference when you're trying to decide where to focus your time and attention.

How to begin ZTD with the collect habit

If you want to start your ZTD journey by developing the collect habit, you just need to do two things:

  1. Choose a place to collect all of your to-dos.
  2. Document those to-dos as soon as they're assigned.

Here are a few examples of places to keep your master to-do list:

  • Notebook: Simply writing things down is one of the quickest and easiest ways to document to-dos. Of course, if you have a lot of to-dos—or just some sloppy handwriting—a notebook can get messy quickly.

  • Memo app: If you carry your phone with you everywhere you go, keep a cleaner to-do list by documenting tasks in a memo app. Take a look at our suggestions for the 14 best memo apps—most are accessible on both your phone and the web.

  • Email: Send yourself an email when a to-do pops into your mind or is assigned to you in person.

  • Task management system: If you already use a kanban tool or project management tool to manage to-dos, download that program's app onto your phone, and add your tasks there.

The tool you use isn't terribly important—just pick whatever feels natural for you. The key is making sure you have your selected tool with you all the time so you can always document tasks immediately.

Example workflow for mastering the collect habit

Twitter notifications

Documenting your to-dos is a true habit. It's a simple matter of getting incoming tasks onto a list—even when you're busy or just don't feel like it. Eventually, you'll be so used to it that you'll do it without even thinking about it as a task.

Of course, diverting all of your "inboxes" to a single master list requires more effort. And depending on the number of inboxes you manage, you may want to start by taking 30 days to consolidate them all. Then you can begin documenting to-dos.

Step 1: Take time to identify all of your inboxes. Here are a few common examples:

  • Emails (from one or more accounts)
  • Social media notifications
  • Assignments from a project management tool
  • Chat messages
  • Text messages
  • Snail mail
  • Voicemail

Step 2: Next, adjust your settings or use a Zap to divert as many of your inboxes as possible to the tool you selected for your master list.

Personally, I use my email inbox as my master list because that's where the bulk of my to-dos are assigned. Here's what I did to get incoming to-dos from other systems into my master list:

  • I consolidated my personal and business Gmail accounts so I can access and respond to all my emails from a single email inbox.
  • I adjusted my notification settings on each social media site I use to request emails for the notifications I'm interested in receiving. Then I deleted each app's shortcut from my phone's home screen so I'm not enticed to visit those inboxes when a notification icon appears.
  • I adjusted my settings in Trello to request an email notification for all new assignments.
  • I used this Zap to automatically send incoming tasks from Slack to my email account.
  • I enrolled in paperless bill pay for all my bills.
  • I downloaded the YouMail app to have new voicemails automatically forwarded to my email. YouMail offers a free plan that includes voicemail to email forwarding and robocall blocking.

Of course, not all tasks get assigned electronically. You'll still have to-dos pop into your mind randomly, assigned in person, or delivered in hard copy form. There's no way to get those tasks on your list automatically, so focus on building the collect habit and adding them to your list manually.

The Process Habit

Outlook email inbox
Processing your inbox every day helps you avoid the stress of having 500+ unread emails (potential to-dos) in your inbox

The first step was collecting all of your to-dos and getting them on a master list. Now it's time to process them. That is, you need to decide what action to take on each item.

Every morning, before starting on any new tasks, go through your to-dos one by one. Start at the top and work your way down to the bottom, taking one of the following actions on each one:

  • Do: If the task takes less than two minutes to complete, do it immediately and get it off your list. A good example of a "do" task is an email you received that only requires a brief reply. 120 seconds and you're done with it.

  • Defer: If the task takes longer than two minutes to complete, set it aside for later. Leave it on your list for now, or put it in a separate to-do queue/folder. At this point, you want to focus on processing your list, so don't let yourself get distracted by time-consuming to-dos.

  • Delegate: If someone else should do the task, send it to that person right away. A good example of a "delegate" task is an invoice you received that you need to forward to someone in accounting. Delegate as you process to-do items—unless the act of delegating requires more than a couple minutes. Time-consuming delegation tasks go into your deferred tasks list.

  • Delete: If the task doesn't require any action, delete it immediately to get it off your list. A good example of a "delete" task is a question someone emailed you that you'd since answered in a meeting.

  • File: If you just need to file the item for reference, put it where it needs to go right away. Don't let things pile up with plans to file them later.

Processing your to-do list daily has two big benefits: it keeps the tasks you need to take care of at the top of your mind, and it keeps your to-do list cleaner and more manageable.

How to begin ZTD with the process habit

If you want to skip the collect habit and begin your ZTD journey with the process habit, you can start by processing your email inbox every morning. If you receive a lot of emails, your email inbox functions as a kind of to-do list, and it's an effective replacement for your master list if you haven't yet formed the collect habit.

When you open your email each morning, start at the top of the list, and process each email you've received.

  • Do: If acting on/replying to the email will take less than two minutes, do it right away. When you're finished, delete the original email or file it for reference.

  • Defer: Leave deferred tasks in your inbox as read. You'll return to take care of them after processing all of your other unread emails.

  • Delegate: If delegating is just a matter of forwarding an email with a quick heads-up note, do it right away—then delete or file the original. If delegating will take longer than two minutes, leave it in your inbox as read and come back to it after processing your other emails.

  • Delete: Move spam emails, unneeded receipts, unwanted marketing emails, and things that require no further action to the trash.

  • File: Create a reference folder (Outlook), label (Gmail), or mailbox (Apple Mail) for filing emails you might need to access one day in the future. Add child folders/labels/mailboxes if you want a more organized filing system.

Example workflow for mastering the process habit

Gmail inbox

When using email as a master task list, you'll need to create two queues for processed tasks:

  • To do: for "defer" tasks from the process step
  • Reference: for "file" tasks from the process step

You may also want to create child queues for more organization. As you can see in the screenshot of my inbox above, I have two to-do labels—"To Do" and "Bills"—and three reference labels: "Clients," "Tax Receipts," and "Former Clients."

You may also want to consider creating a "someday" queue for things you want to defer indefinitely (e.g., a newsletter you want to read one day when you have nothing else to do).

When processing your to-dos every day, move deferred tasks into your to-do queue, and move items that need to be filed into your reference queue. When you're finished processing your list, you'll have achieved inbox zero. All of your outstanding tasks are now in your to-do folder.

The Plan Habit

Calendar with big rocks

Now you're left with a list of items you've deferred—the things that didn't fall into the do, delegate, delete, or file buckets. Obviously, you can't defer them indefinitely, so you need a plan for deciding how to tackle the tasks.

ZTD's plan habit offers a method of prioritizing deferred to-dos so you're always working on your most important or most pressing tasks: your big rocks.

Big rocks is a concept taken from Stephen R. Covey's The 7 Habits of Highly Effective People. Imagine that you have a jar, a few big rocks, and hundreds of little rocks. If you start filling the jar by putting the little rocks in first, you won't be able to get the big rocks in at the end. Your calendar works the same way. If you don't block time to work on your big rocks—high priority to-dos or tasks with a looming deadline—a lot of little tasks will fill your time and prevent you from getting around to your most important work.

Here's how to save space for your big rocks:

Step 1: At the very beginning of the week, review your task list and choose between four and six big rocks to focus on that week.

Step 2: Next, block time on your calendar to work on those big rocks. Book time on any day that works best for you, but try to find time early in the day. As the day/week progresses, more unexpected tasks and surprise meetings will pop up.

Step 3: Then, first thing each morning—ideally after processing your to-do list—select between one and three additional big rocks for the day. These can be smaller, more time-sensitive, or surprise to-dos you couldn't have planned for at the beginning of the week.

As the day/week rolls on, you're more likely to get assigned new tasks that prevent you from focusing on and completing your big rocks. But if you've already booked quiet time for them on your calendar, it's less likely that the time you planned will get overbooked.

How to begin ZTD with the plan habit

Even if you haven't already started collecting your to-dos and processing them, you can still form the plan habit. Just select a few priorities at the beginning of each week and start of every day, and schedule time for them on your calendar. Since you don't yet have a master to-do or deferred task list, just use whatever system you've been using—the to-dos in your mind or inbox.

When it comes down to it, you're just selecting priorities and scheduling time to work on them. Sure, it's not all that different from the natural prioritization method we tend to use. But giving the natural method a bit more structure—prioritizing intentionally instead of reactively—will help you form the habit you'll need to plan and prioritize all of your tasks once you've added the other habits into your workflow.

Example workflow for mastering the plan habit

ZTD Trello board

Email is a great place to collect all of your to-dos, but a long list of deferred items with no more context than a subject line just isn't very…zen. A kanban app like Trello offers a cleaner view of all of your outstanding tasks, and it lets you

  • add lanes for different priorities.
  • label tasks as personal or business.
  • add due dates.
  • drag and drop tasks into priority order.
  • archive completed tasks.
  • add others who you need to collaborate with (e.g., coworkers).

You could just send all of your tasks to Trello in the first place—as your master inbox—but Trello tends to work best when used only for the plan and do habits. Think about it: Many of the emails you receive just require quick responses, and trying to manage those in Trello requires an unproductive amount of switching back and forth between programs for very small tasks.

To get started, create your own board, and add lanes to separate

  • deferred to dos that haven't been prioritized ("To Do").
  • your big rocks for the week ("This Week").
  • your big rocks for the day ("Today").

You may also want to add a "Blocked" lane for things you need to do but can't at the moment, and a "Someday" lane for things that aren't important but that you don't want to forget about.

Finally, create a Zap that adds a new card to Trello when you perform a specific action on an email:

  • If you use Gmail, use this Zap to create a new Trello card when you label an email as to-do.
  • If you use Outlook, use this Zap to create a new Trello card when you move an email to your to-do folder.
  • If you use another email client, create a new Trello card by forwarding an email to your Zapier address.

Now all of your deferred to-dos are accessible on your ZTD Trello board. So after processing your inbox each morning, you can visit Trello to plan your priorities for the week or day.

The Do Habit

Do Not Disturb

The do habit says that when working on big rocks, you need to minimize distractions as much as possible:

The point: You're more likely to complete small tasks in a single working session, and more likely to make better progress on big tasks/projects that you need to work on over multiple sessions.

While this is the simplest ZTD habit in terms of execution—all you have to do is focus on a single task—it's one of the most difficult habits to build. Incoming email notifications, text messages, and desk drop-bys compel your attention away from your big rocks and damage your productivity.

How to begin ZTD with the do habit

Even without a to-do list or priorities, you can build the do habit. Pick a task—anything you need to do—and focus on it exclusively. Take steps to eliminate all possible distractions. If you can't do that, train yourself to ignore them.

In some cases, it takes more than Babauta's recommended 30 days to break a multitasking habit. Give yourself as much time as you need to master this habit, and consider using gamification or another reward-based system to boost your chances of success.

Coffee doesn't hurt either.

Example workflow for mastering the do habit

Zaps for to do habit

By this point, you should have a master list (collect) of deferred to-dos (process) that you've prioritized for both the week and the day (plan). Now you're ready to block time on your schedule to focus on completing your big rocks (do).

You can manually add time to your calendar—or you can use a Zap to automatically schedule time on your calendar without ever leaving your to-do list:

Creating a Zap

You shouldn't try to stop eating dairy, start exercising five days a week, and stop drinking wine all at the same time. Chances are you won't succeed.

Changing your entire workflow all at once is no different. Instead, make major changes one at a time—take a step-by-step approach—and you'll be much more likely to succeed in the end.

Related reading:

Zen to Done Kindle Edition cover art from Amazon. Handwritten to-do list from StockSnap via Pixabay. Do not disturb sign from geralt via Pixabay.


source https://zapier.com/blog/zen-to-done-productivity/

Thursday 21 June 2018

Track Sales More Effectively with Facebook Offline Conversions

Facebook ads put your product or service in front of billions of people on the social network. But what happens when those people see your ads and then become customers outside Facebook—whether it's on your site, at your brick-and-mortar store, or at some other point of sale? Facebook will let you connect the dots to measure the success of your campaign with Facebook Offline Conversions.

Facebook Offline Conversions provide a way to match events like store visits, email opens, and webinar signups to your Facebook ads. By connecting those "offline" events with data on who's seen your ads, you'll be able to gauge the success of your social advertising campaigns and optimize based on performance.

Get Started with Facebook Lead Ads

Facebook Offline Conversions can capture info from any app where you store customer data and send it back to Facebook to determine how your customers found you. Here, we'll walk you through the process of connecting your conversions specifically to your Facebook Lead Ads. While a Facebook Lead Ad may look like any other social media ad at first glance, it includes a sign-up button and lead form, which allows users to interact with your company without ever leaving Facebook.

After clicking the ad's button, Facebook users complete a form that already includes pre-populated information from their Facebook profile. No need for your potential customers to visit a website landing page: Facebook Lead Ads simplifies the lead submission process to just one click, cutting down on friction—especially for mobile users.

Here's how to set up Facebook Lead Ads:

  1. Go to the Facebook Ads Manager, select your ad account, and click "Create Ad." Be sure to pick "Lead generation" as the marketing objective.
  2. Select the Facebook Page you'd like to promote, and then define the audience for your ad.
    Define audience, budget, and schedule for Facebook Lead Ad
  3. Scroll down to decide where and when you'd like your ads to show across Facebook and Instagram, and finalize the budget.
    Set budget for Facebook Lead Ad
  4. Create the ad, choosing the format that will best support the call to action (CTA): scrollable carousel of images or videos, single image, single video, or slideshow. Write headlines and text to craft your message, and finish by picking a CTA button.
  5. Finally, create the lead form: the screen that your prospects will see after clicking the CTA button.
    Form design for Facebook Lead Ad

Automate Your Facebook Lead Ads

Once you've set up your Facebook Lead Ad, you'll want to automate your account so you're not manually uploading leads to other services. Depending on the apps you use to keep track of customers and sales, you have several choices for how to connect Facebook Lead Ads to your other web tools.

  1. Direct integration with Facebook, if your customer tools offer it. Go to your Facebook Page as an admin and click "Publishing Tools." Look for "Lead Ad Forms" in the menu on the left, then click "Leads Setup" and type in the name of the CRM you'd like to connect. If your CRM offers a native integration, Facebook will provide a link to its website where you can follow the setup directions.
    CRM connection within Facebook
  2. Integration via Zapier from inside Facebook Publishing Tools. Within Publishing Tools, just click "Connect," and a window will prompt you to either create a Zapier account or log in to your existing one. After that, you should be all set to automatically log your leads from Facebook.
  3. Integration via custom Zapier workflows. If it isn't possible to connect to your CRM from within Facebook using one of the first two options—or if you'd like to integrate with other tools in your business workflows—you can use Zapier to automatically send leads to over 1,000 apps.

Try some of these Facebook Lead Ads + Zapier workflow templates, or get started making your own.

Track Ad Success with Facebook Offline Conversions

To go from a potential customer to a customer, a user needs to convert. That means they see your Facebook ad, and because of it, they decide to use your product or service. Of course, most conversions don't happen directly through Facebook: Everything from email clicks to webinar signups to items added to a shopping cart can signify a conversion for you.

Eyeballing the metrics for trends and making assumptions about those conversions could cost you time and money. Facebook Offline Conversions gives you precise data even when the user isn't on facebook.com or in the Facebook app—which helps you make informed decisions. It's able to connect to any app where you capture customer information at a point of sale and then send your offline conversion data back to Facebook. That way, you'll be able to analyze and fine tune the performance of your ads based on those non-Facebook activities.

Here's how to set up Facebook Offline Conversions to be sure you're capturing all conversions from Facebook Lead Ads:

  1. Create an offline event data set that will track your ad account and ensure that your conversions match up properly with the people who saw your ads.

    Let's say you want to track sales in your brick-and-mortar store, attendance at an event, or even meetings you've scheduled. You can upload a .csv with data like customer name, contact info, and date of purchase, and Facebook will be able to match that data with your Facebook Lead Ads account to track which customers converted due to one of your ads.

    Head to Offline Events in Facebook Business Manager and click the green button that says, "Create Offline Event Set." Accept the terms and conditions if you're OK with them, and then add a name and description for your Offline Event Set.

    Create offline event data set
  2. Select the ad accounts to pair up with the Offline Event Set. If you use more than one to promote your business, it's fine to choose them all.
    Select ad accounts to pair
  3. Make sure auto-tracking is enabled because only tracked ad impressions and clicks will be considered for offline attribution down the road. Then click "Done" to complete the creation process.

Automate Your Workflows for Facebook Offline Conversions

Of course, you need to be sure that your offline conversion data will make it into your new Offline Event Set. It's possible to upload offline purchase files directly to Facebook with information about customers and purchased products by clicking "Upload Offline Events." But you'll save time and cut down on manual tasks and development work by automating the process.

Some CRMs and point-of-sale platforms provide direct integrations with Facebook Offline Conversions to automate the process. But if you don't use tools that provide direct connections to Facebook Offline Conversions—or you're looking for more elaborate workflows with your leads and conversions—you can create automations using Zapier.

Zapier integrations with FBOC set-up

Zapier allows you to add offline conversion events to Facebook from new paid orders in Shopify, new sales in PayPal, new deals in HubSpot CRM, and more. Here are a few Zapier workflow templates to give you some automation inspiration, but you can create your own to integrate Facebook Offline Conversions with over 1,000 different web tools.

Once you've turned on your Zap, you can focus on other tasks while all your offline conversions are automatically sent back to Facebook.


You've set up your ad, connected Facebook Lead Ads to your other points of conversion, and sent data back through Facebook Offline Conversions. All that's left to do now is set your campaign live and watch as your seamless sales process automatically logs leads, records sales, and measures your campaign's success.


source https://zapier.com/blog/facebook-offline-conversions/

Wednesday 20 June 2018

How a Dog Friendly Business Creates Contacts with Automation

Who doesn't like to share success? When your work or business does well, sharing the love with your coworkers and employees boosts morale. Plus, it gives your team something to talk about and shows them how their hard work pays off.

The most efficient way to celebrate wins? Automate them. Not the wins themselves, but the sharing. All you have to do is figure out what a win is for your business and then use the tools at your disposal to share it. Easy, right? First you need a definition for those little victories. For DogSpot, a heated and air-conditioned dog house for when you're out and about, new leads are their wins.

Sharing new leads with the company spreads a bit of joy across the team:

"There's something about this real time feedback from interested users that's so encouraging throughout the work day," says Alex Tosti, co-founder and chief design officer at DogSpot.

With Zapier's automation, the DogSpot team connects apps and celebrates new leads as they sign up.

About DogSpot

Leaving a dog (or any pet) in the car isn't a safe option—temperatures rise and fall dramatically in the confines of a car, even with cracked windows. And leasing a dog outside a shop can be dangerous, too, if the dog unties itself or if someone nefarious comes along.

But no one adopts a dog to leave them at home all the time. For some dog parents, running around town and checking errands off a list is all the more fun when you're accompanied by your four-legged friend. That's how DogSpot came to be.

Co-founders Chelsea Brownridge and Todd Schechter created a dog house away from home, where participating members use can reserve a DogSpot nearby their destinations. Complete with heat, AC, a comfy bed, a doggy cam, and bacteria-killing UV light, DogSpot has everything a pup needs to stay safe while you run inside a shop.

"I believe people and their dogs are happier when they can be together," Chelsea says. Happiness is built into the DogSpot team so it's no wonder they share wins with the entire team.

Automatically Share New Leads and Create CRM Contacts

For DogSpot, Zapier helps them share wins and create contacts in their customer relationship manager (CRM), which cuts hours of manual work from their week. With Zaps—our word for automated workflows that bridge different apps—both of these tasks automatically happen.

"There are certain things, like contact management, that are easy but not time efficient—Zapier makes those processes really fast."Alex Tosti, co-founder & Chief Design Officer at DogSpot

By pairing lead generating forms on their website with a CRM and a chat tool, the DogSpot team created simple but powerful workflows that shaved hours off each week.

DogSpot's Tools

The Workflows

Before DogSpot's Zaps can share new leads, the leads have to be collected. For this, the team uses Squarespace's forms.

Once the lead submits the form, two Zaps trigger. First, Zapier sends the responses from the Squarespace form to HubSpot, where the DogSpot team manages all their leads. After Zapier creates a contact in HubSpot, DogSpot can market to its leads through emails and texts.

The second Zap pulls out pertinent information from the form—like name and city—and sends a message in Slack to the whole team.

"It’s good for the whole company—not just marketing—to see how actively we receive inbound traffic," Alex explains.

Give these Zaps a try, and check out a few of the most popular Squarespace Zaps, too:


These simple Zaps save the DogSpot team at least three hours each week. But more than that, Zapier helps them keep morale high and spread good vibes throughout the entire company.

Want to share good news as it happens? Give Zapier a try for free.

All images courtesy of DogSpot.


source https://zapier.com/blog/squarespace-forms-hubspot-contacts/

Our Favorite Zaps This Month: Leverage Your Calendar

A well-maintained calendar guides you through your day, your week, and your life. Are you smart about how you use what's in your calendar and how you use it, or do you forget to review it? (It's okay. We all do.) With a little help using Zapier, you can eliminate the need to review your calendar by automating some of the tasks from it, whether it's wishing someone a happy birthday or consistently scheduling meetings at project milestones.

These Zaps (Zapier's term for the automated workflows you create with the tool) make your life easier and more efficient by leveraging the rich information in your calendar.

Beginner Level: Get SMS Reminders of Google Calendar Appointments

Note: SMS notifications only work with phone numbers registered in the U.S. and U.K.

Are you more likely to check your incoming text messages than your reminders? If the answer is yes, then trick yourself into looking at your upcoming Google Calendar appointments by automating an SMS message notification. Google once supported SMS reminders natively, but it killed off the function a few years ago. With Zapier, you can still do it, though.

Enhance it: By adding a filter, you can create criteria that give you finer control over which appointments trigger an SMS. For example, you can get notifications for events in a particular calendar or events that have a specific word in the summary, such as "interview" or "call."

Beginner Level: Get SMS Notifications of Scheduled or Canceled Calendly Appointments

Calendly is an app that lets other people request appointments with you based on your schedule. Just as you can get an SMS notification to remind you of any upcoming appointment in Google Calendar, you can also get a message when someone schedules an appointment with you via Calendly. Not everyone keeps their appointments, however, therefore it's equally useful to get an immediate SMS when they cancel, too, which you can also do by modifying the trigger (step 1) in this Zap.

Beginner Level: Email People on Their Birthdays

Remember everyone on their birthday by setting up a birthday calendar and Zap that automatically sends an email wishing people a happy birthday on their special day. This particular setup uses Google Calendar and Gmail, although you can easily swap out Gmail for the email app of your choice by using Email by Zapier. You can do the same with anniversaries and other special occasions, though you'll want to write a different email message for each type.

Intermediate Level: Create Meetings Whenever Your Team Has Milestones

People who manage projects like to have check-in meetings at major milestones. This Zap works with any work management tool in Zapier's network, but let's use Trello as an example. For every card created that contains the word "milestone" in the title or description, the Zap makes a Google Calendar event for the same date, which can become your next progress meeting. If you have a shared team calendar, be sure to specify it in the Zap. That way, your meeting not only creates itself, but also populates in all your teammates' calendars. You can add another step, too, that reminds your teammates about the meeting via Slack, email, or the communication app of your choice.

Intermediate Level: Use Your Calendar to Schedule Time for Important Tasks

This next Zap comes from Emily Irish, who wrote an article sharing how she plans her week to make it productive. One part of the system she follows involves blocking off time on her calendar to get certain kinds of tasks done. Let's say you tend to focus well in the morning between 9:30 a.m. and 11:30 a.m. You can create appointment slots on your calendar during that time and name each one "Open Focus Slot". As important tasks fall on your plate, the Zap will assign them to the next available appointment.

The Zap starts with your task-management app. Emily's example uses Wunderlist, but it works with any to-do app supported by Zapier, including Todoist, Things 3, and Remember the Milk. Create a dedicated project or list for "Focus Work". Whenever you enter a new task to that list, the Zap will check Google Calendar for an open slot and assign the task to be done then.

Google Calendar with focus slots

[view larger image]

You could copy and edit the Zap to make a similar one for aspirational weekend projects, those odd jobs that you'd like to do but rarely are on a deadline to do. Simply create open appointment slots whenever you have time off work, start a new list or project in your task-management app, and automatically assign these aspirational tasks a dedicated time when you'll do them.


Look for new lists of Our Favorite Zaps every month.


source https://zapier.com/blog/favorite-zaps-leverage-your-calendar/

Tuesday 19 June 2018

Jumpstart New Projects with Mind Maps

Most projects start with a goal: Build a new website, create a roadmap, or write an employee handbook. Goals are easy to define. Figuring out how to reach the goal—that's the hard part.

Mind maps make it easier to break down big goals into actionable tasks. They jumpstart your creativity, help you generate and capture ideas, and let you weigh multiple options so you can make the best possible decisions. And with the right setup, you can take the ideas captured in your mind map and turn them into tasks and project plans in your project management system.

Using Mind Maps for Better Brainstorming

Mind map example

Has anyone ever asked you the question "What made you think of that?" It's a hard question to answer. How we arrive at a thought is usually a long tale of random associations, spanning a lifetime of thoughts and memories, each connected by our minds in a quick sequence:

  • I want a glass of milk.
  • There was a kid in middle school who used to chug his milk every day.
  • That kid moved to Florida in 8th grade.
  • I bought my daughter a unicorn globe in Florida last year.
  • There are unicorn monsters in Diablo III.
  • "Do you remember Whimsydale?"

By using associations, our minds create a path between two wholly unrelated ideas, like a glass of milk and a video game map.

Mind mapping is a brainstorming technique that mimics this natural inclination to create associations. You start with a central concept and let your mind wander where it wants to. Along the way, you collect each new idea in an unstructured diagram—that diagram is the mind map.

Mind mapping is an effective brainstorming technique because ideas are reproductive. Associations lead to more associations, each eliciting new ideas, questions, problems, and potential solutions to capture and consider. During a mind mapping session, you're free to capture every idea that comes to mind. Ideas aren't judged at this point—everything gets documented—allowing you to capture ideas you might otherwise dismiss.

By collecting all of these ideas and associations in a mind map—brainstorming at a high-level instead of focusing on granular details, and reserving judgment to encourage fearless sharing—it's easier to transform your biggest projects and goals into actionable plans.

How to Create a Mind Map

Creating a mind map is pretty simple: Just start with a circle and a central topic, then branch out from the center with any ideas that come to mind. Include as many subtopics, branches, and connections as you need.

While you can capture your mind map on paper or a whiteboard, those mediums aren't perfect. They're limited by size, and it's impossible to move things around late in the exercise to connect related ideas. If you try a mind map on paper, you're likely to end up with a scribbled, squished monster that you inevitably have to redraw.

A tool like MindMeister makes mind mapping simpler:

  • It doesn't have size limitations, so you're free to capture as many ideas as you come up with.
  • It lets you drag and drop bubbles and sections onto different areas of the map—or drop them onto other topics—making it easy to connect related ideas at any point during the exercise.
  • It lets you attach files and link out to other sources to provide more context when needed.
  • It works on all major platforms: Windows, Mac, Linux, Android, and iOS.

And while MindMeister is a great tool for creating mind maps on your own, it's even more useful when you want to brainstorm with others:

  • Invite as many participants as you want.
  • Collaborate on mind maps whether you're working in the same room or halfway around the world.
  • Make updates that display to all collaborators in real time.
  • Vote on ideas, add comments, and communicate via in-tool chat.

And when you're finished, just click a couple buttons to share your mind map with your team, client, boss—anyone you want—as an image, PDF, or presentation.

MindMeister Pricing: Free for the Basic plan, which includes up to three mind maps and real-time collaboration. From $4.99/month for the Personal plan, which includes unlimited mind maps, file attachments, and PDF exports.

What Types of Projects Benefit from Mind Maps?

Almost all projects, both personal and professional, benefit from mind mapping in their early stages. But the exercise is especially useful when you have a goal but no plan for how to achieve it—or when you need to collaborate and collect ideas from multiple people.

If you want to create mind maps with a team, here's how to do it:

  1. Put one person in charge of documenting ideas, comments, questions, and resources in the mind map during the brainstorming session.

  2. Start with a central idea—a goal, problem, topic, or project name—in a bubble in the center of the map.

  3. Ask your team for ideas and feedback. Document each idea in its own bubble, and use connecting lines to create couplings and associations. Sub-ideas of a main idea are always connected, but main ideas can also be connected if they're related.

  4. Feel free to drag and drop ideas onto different areas of the map—or onto new topics—as things shift.

After finishing the mind mapping session, there are a number of ways to evaluate and use the ideas you collected:

  • Have your team, clients, leaders, or project sponsors vote on or prioritize ideas.
  • Expand on collected ideas with comments, attachments, or links.
  • Publish your mind map as an image or presentation to share it with others.
  • Use the ideas to create a project plan or tasks in your project management system.
  • Reference the original mind map later when looking for new/replacement ideas.

Now that you know how to create mind maps—and why you should—let's take a look at nine example projects that benefit from mind mapping.

1. Defining project requirements

Perfect for UX designers, business analysts, and development teams

Project requirements mind map

You have a goal. It could be to build a new website, develop a new feature, or refine the user experience to decrease abandonment rates. Now you need to define how to achieve that goal.

Lots of people have ideas for what you need to do. Project sponsors want specific features, designers have ideas for improving the current user experience, and developers want to upgrade to new services.

Mind mapping together lets you capture all of these ideas. It gives everyone a voice in the direction of the project, which may help you form great ideas that sponsors would have never considered on their own. Plus, it elicits questions and concerns early in the project lifecycle, which helps you resolve impediments before they become major issues.

2. Creating a product roadmap

Perfect for product managers

Product roadmap mind map

While mind maps can help with specific project requirements, they also work well for high-level product roadmapping.

Product managers may be in charge of creating product roadmaps, but they're by no means the sole source of ideas. Stakeholders, customer service reps, sales reps, and customers also have valuable input on what direction a product should take in the future. Collaborative mind mapping lets you gather input from multiple groups and consider it all when creating a new roadmap.

Plus, someone will certainly come to you later and say: "Why aren't we adding X feature this year?" All you have to do is open the mind map, show all of the possible features you considered, and explain why that one wasn't as high of a priority as the others. Seeing everything in a single visual makes your reasoning clear and your decision difficult to refute.

3. Developing and refining a marketing strategy

Perfect for CMOs, content marketing managers, and other marketing teams

Marketing strategy mind map

Mind mapping helps teams collect and refine ideas for all types of strategic planning, but it's particularly useful for marketing teams because there are so many possible strategies and tactics to consider. Creating a mind map that considers all options makes putting together a strategy less overwhelming—and seeing all ideas together makes it easier to select the best one.

Mind mapping lets you collect everyone's ideas for major strategies to consider, channels to target, and specific tactics to try. You'll collect more ideas, and you'll also create a list of fallback ideas to consider later if one your selected strategies fails. This helps you shift tactics faster, which is always necessary in marketing.

4. Defining team goals and priorities

Perfect for managers

Goal defining mind map

Years ago, I worked for a company where our annual goals rolled down from the top of the organization. We had to take those goals—things like "increase self-servicing by 25 percent"—and determine ways our department could support the organization in meeting those goals. Often, what we came up with was a stretch, but it wasn't an optional exercise.

Mind mapping is a great way to come up with specific individual/department goals. Work together to review organizational goals, or suggest goals you'd like to target as a team. Add any high-level goals to your mind map, then think of specific, SMART ways to meet those goals.

Finally, have your team vote on which goals they find the most compelling. If you're using MindMeister, they can vote on ideas in the mind map itself. This ensures that everyone gets a voice in deciding what goals your team works toward in the coming year.

5. Defining workflows and processes

Perfect for project managers

Workflow mind map

In a small organization, processes are simpler: A writer writes content, and an editor reviews and publishes it; a CEO works directly with a developer to add a new feature to the website. But in large organizations, processes are more complex. A CEO's idea might need to work its way through 30 different teams before a new feature launches to the public.

Documenting those processes and workflows tells the people in charge of shepherding initiatives exactly what steps to take, in what order, and who to involve at different stages to make sure no one's left out of the loop.

Bring together managers and leaders from across the organization for a mind mapping session to solicit input on who needs to be involved—and at what stage to involve them. Once you've collected all of the bubbles, organize the mind map into a detailed, step-by-step flowchart.

6. Onboarding new software

Perfect for IT support

New software mind map

Onboarding new software is no small task. You not only have to install the software and migrate data from any existing systems, but you also have to train users on how to use the software, encourage adoption, and provide support to people struggling with unfamiliar systems.

Mind mapping for software onboarding is an easy way to identify problems you're likely to encounter. Bringing everyone together to discuss their biggest worries is not only cathartic, but it also lets you predict—and find solutions for—all possible issues and impediments before other departments start using unfamiliar programs.

7. Planning an event

Perfect for event planners, marketers, and administrators

Event planning mind map

Few things are as complex as trying to plan an event—whether it's an industry conference or a small office holiday party. Not only are there a lot of moving parts, but it's hard to even come up with a list of everything you need to consider. And nothing dampens an event quite like forgetting to rent chairs or neglecting to provide gluten-free food options.

Mind mapping gives you an opportunity to focus many minds on the event at once while still keeping things organized. And the more minds you have focused on thinking through everything, the less likely you'll be to forget something crucial (or remember it at the last possible minute).

8. Creating an editorial calendar

Perfect for writers, editors, and content managers

Editorial calendar mind map

It's almost impossible to generate ideas while staring at a blank screen. But if you're reading things other people have written, ideas pop into your brain with very little effort.

Brainstorming with your content team to put together an editorial calendar is an excellent way to generate ideas. As you discuss ideas, people make associations and generate more ideas. After the exercise, you'll have more ideas than you have space for on your editorial calendar. Work together as a team to select the best ideas, voting from within your mind mapping app. Add them to your editorial calendar to keep your team from suffering in front of a blank page every time they need to write a new post.

9. Capturing ideas for personal projects

Perfect for…everyone

Personal projects mind map

As you can see by now, mind maps helps teams brainstorm and collect ideas for all kinds of work projects. But mind maps are helpful for personal projects as well.

Need to relocate, renovate your house, find a new job, or write a book? Jumpstart the project with a mind map. Just set aside at least 15 minutes for focused thinking about your project, and document your ideas as fast as you can write/type. Don't worry about making it pretty at first, and feel free to invite a friend, child, spouse, or roommate to brainstorm with you.

When you're finished, take time to clean up your notes. Use the completed mind map to come up with a detailed plan for your project, including timelines and due dates.

My husband and I used MindMeister to organize our guest list for the wedding and to keep track of the huge list of related tasks (restaurant, DJ, photographer, etc.). We took advantage of MindMeister's coloring and icon features to have a clear overview of who we'd invited, who had confirmed, and how long they were staying. (Our wedding was three days long and we needed to organize accommodation for everyone attending!) As a result, it was really helpful to have everything in one place: all the links to the external services that we needed, their price, as well as how much we'd already paid and how much we still needed to pay at the end." - Laura Bârlădeanu, Tech Lead of MindMeister

Moving from Ideas to Actions

Project management mind map

Once you've finished brainstorming, it's time to decide which ideas to move forward with, prioritize those ideas, and form an action plan. You could manually transcribe all ideas and tasks from your mind map to a project management program, but it's much simpler if you use the built-in MindMeister integration with MeisterTask.

MeisterTask is a simple kanban-style task management app that lets you collect and assign tasks, set due dates, track progress to completion, and build and access reports—and it's wholly integrated with MindMeister. Once you've completed your mind map in MindMeister and are ready to start working on your project, just drag and drop a task onto a user in MindMeister to create a task in MeisterTask and assign it to that user:

Once you've done that, navigate to MeisterTask to set due dates or add comments. The best part is that both systems sync in real-time, so changes you make in either system reflect in both your mind map and project board.

MeisterTask Pricing: Free for the Basic plan, which includes unlimited boards and unlimited team members. From $8.25/month for the Pro plan, which includes project groups, reporting, and priority support.

Putting Your Plan into Action with MeisterTask and Zapier

You started your project with a mind mapping exercise in MindMeister, used your completed mind map to create project tasks in MeisterTask, and now you're ready to get to work on the project.

Zapier can help you take things one step further by automating the process of tracking progress and consolidating all project discussions and to-dos in a single system.

  • If your team is used to receiving their to-dos in Slack, use these Zaps to send them Slack messages when you add them to MeisterTask projects or assign them tasks:
  • If your team members need to bill their time to specific tasks and projects, use these Zaps to automatically recreate MeisterTask projects and tasks in your time-tracking system:
  • MeisterTask sends emails to let you know when tasks are completed. But if you don't want to fill your inbox with these notifications, use the following Zaps to get the notices in your preferred messaging program instead:
  • If you need to create spreadsheets and custom reports for your clients or leadership team, use these Zaps to automatically log completed project tasks to your preferred spreadsheet program:

The hardest part of any project is getting started. Mind maps are an easy way to brainstorm, jumpstart your project, collect ideas, and inspire yourself and others to get to work.

If you know exactly what you want to do with a project—and exactly how you intend to do it—you might not need a formal brainstorming session. But for most big goals and major work projects, brainstorming bridges the gap between hopes and dreams and actionable plans.


source https://zapier.com/blog/mind-maps-project-management/

Monday 18 June 2018

The 13 Best Presentation Apps in 2018

From classrooms to product launches, slideshow presentations are the standard accompaniment to lectures and speeches. You can't give a talk without one.

You'll want to drive your key points home—and while a picture's worth a thousand words, event attendees are more likely to be able to write down your ideas if they're written on a slide. A good slideshow can make your speech more impactful. What's not fun is spending hours in PowerPoint or Keynote, time that would be better spent preparing for your actual presentation instead.

You need a simpler presentation app. That's the aim of a wave of new presentation software, including simpler online versions of PowerPoint and Keynote themselves. These new tools are easier to use, give you the ability to collaborate with others—sometimes in real-time—and allow you to edit your presentation on any internet-connected computer.


What Makes a Great Presentation App?

10/20/30: Ten slides, twenty minutes, and 30 point font. That's what early Apple employee Guy Kawasaki recommends for great presentations.

You might need a few more—or fewer—slides, but the basic idea stands. The best presentations make the best out of a handful of large graphics and text. You want everyone in the crowd to easily read your slides and to focus mainly on your talk itself. A handful of slides, each with a clear, concise statement, is your best bet.

And you need software to turn that into reality. Something simple focused on making it easy to put some quotes and images together into slides that are easy to present. Something that won't take more than a few minutes to build your slideshow. Something to keep your audience's attention.

The latest versions of PowerPoint and Keynote are better than before, while a number of new, smaller presentation tools let you make more unique presentations in less time. Here are the best to try.


The Best Presentation Software


Google Slides

For collaborating on presentations

Google Slides

Google Slides—part of the G Suite family of apps—is a traditional presentation app designed around collaboration. It works much like PowerPoint and other presentation apps you've used in the past, only Google Slides runs in your browser, for free. Select a theme for the slideshow, then add standard slide layouts and insert text, graphics, and slide transitions from the menus. The new Explore sidebar can suggest layouts that fit the content of your slide, for an easy way to polish your presentation. You can then present from any browser or Google Slides' mobile apps.

Google Slides really shines when it comes to collaboration. Share a link to your presentation, and anyone you want can add details to your slides, write presentation notes, and anything else you want in your presentation. Add comments as in Google Docs to share feedback, then check back to see what was changed with Google Slides' detailed revision log. It's one of the best ways to collaborate on a presentation.

Google Slides Price: Free; from $5/month per user G Suite basic plan for custom domain and business branding

Zoho Show

For built-in broadcasting tools to stream presentations

Zoho Show

The newly redesigned Zoho Show is a clean take on traditional presentation apps. Slides on the left, tools on the right, and the slide you're working on in the center. You can add new slides with standard layouts, move text and images around on slides, and keep your style consistent with themes. You can collaborate with your team, with comments added to a sidebar for each slide.

When you're ready to show your presentation, you can flip through your slides in any browser as normal. You can also share a link to your slides so any attendees can download a copy for themselves. Or, you can broadcast the slideshow, streaming your slides online with live chat to talk with participants. It's an easy way to present your ideas online or in person with the same presentation.

Zoho Show Price: Free; from $30/month per user Zoho One for all Zoho apps for your business

Slides

For sharing team presentation assets

Slides

You know your boss gave a presentation about your blog stats last year, and the same presentation would work this year if you could just drop in your company's new logo and this year's stats. Slides is designed to let everyone in your team build from each others' presentations. You can save a shared library of designs, graphics, logos, and more to include in presentations, and can search through everyone's completed slide decks to find the details you want to reuse.

Then, when you go to design new slides, Slides editor makes it easier to keep things aligned with its built-in grid. Drag images, text, and more, and the editor will make sure your presentation doesn't come out messy. It's a bit more like a website editor than your standard presentation too—you can even customize your slide template with CSS, and present your slides online.

Slides Price: Free for public presentations; from $5/month Lite plan for unlimited private presentations, offline presentations, and PDF export

Prezi

For animated, non-linear presentations

Prezi

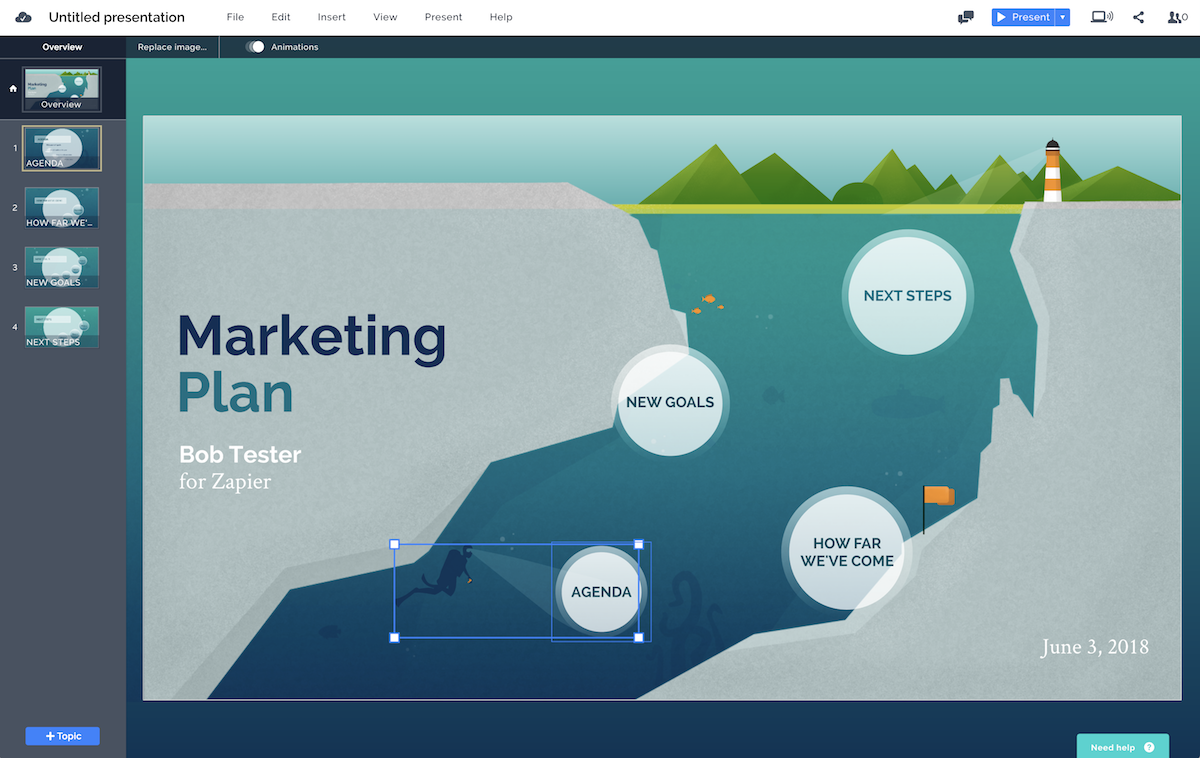
Tired of standard slideshows? Prezi is anything but that. It's more like a mindmap, with a large canvas that contains your entire presentation. You can have large graphics that connect everything—perhaps a galaxy, city map, ocean ecosystem, or detailed graph—with your points and graphics nested inside. The presentation starts zoomed out to give the big picture, then Prezi will zoom in to focus on the details as you go through your presentation, zooming out and back into a different point as you move on (which you can see in Prezi's demo presentations.

Editing slideshows in Prezi takes a bit more work than in a traditional slide-based presentation app. You'll first add new sections to your main slide, then edit the details inside a zoomed in part of that section—complete with text, video, and more subsections to zoom in further if you want. It's a fractal turned into a presentation.

Prezi Price: Free for public presentations; from $5/month Standard plan for privacy controls with unlimited presentations

Microsoft Sway

For quickly changing your presentation style

Microsoft Sway

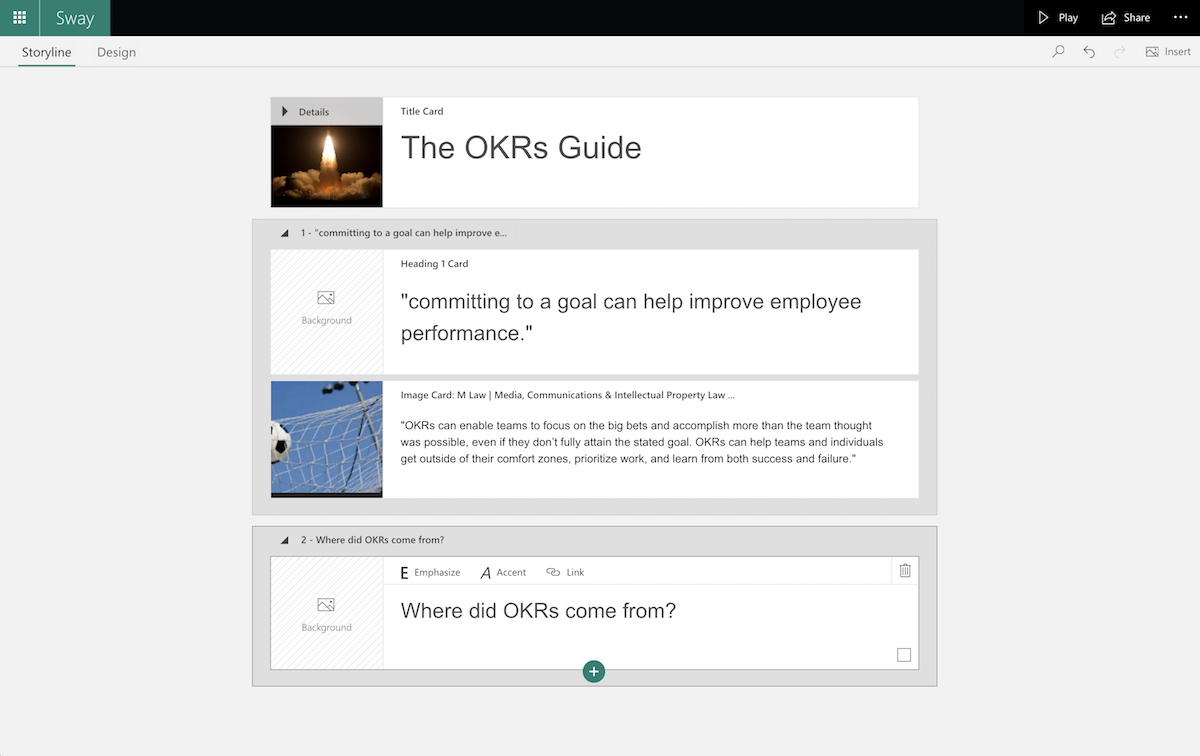
PowerPoint's detailed tools make it powerful—and distracting. You can build almost anything in PowerPoint, from a data-filled slide to a brochure for your business. But that flexibility also means it can be hard to get a basic presentation text and images lined up nicely. The new Microsoft Sway app helps by focusing on your content instead.

Start out by adding details to a Storyline or outline that can include text, images, links, and more with simple formatting options. Then, choose if you want your presentation to use standard slides or a more magazine-like right-to-left scrolling layout, and pick one of the built-in themes to format your content. It's an easy way to turn a handful of notes and images into a unique presentation where everything isn't forced into individual slides.

Microsoft Sway Price: Free; from $6.99/month with Office 365 Home for full Office

Canva

For design focused presentations

Canva

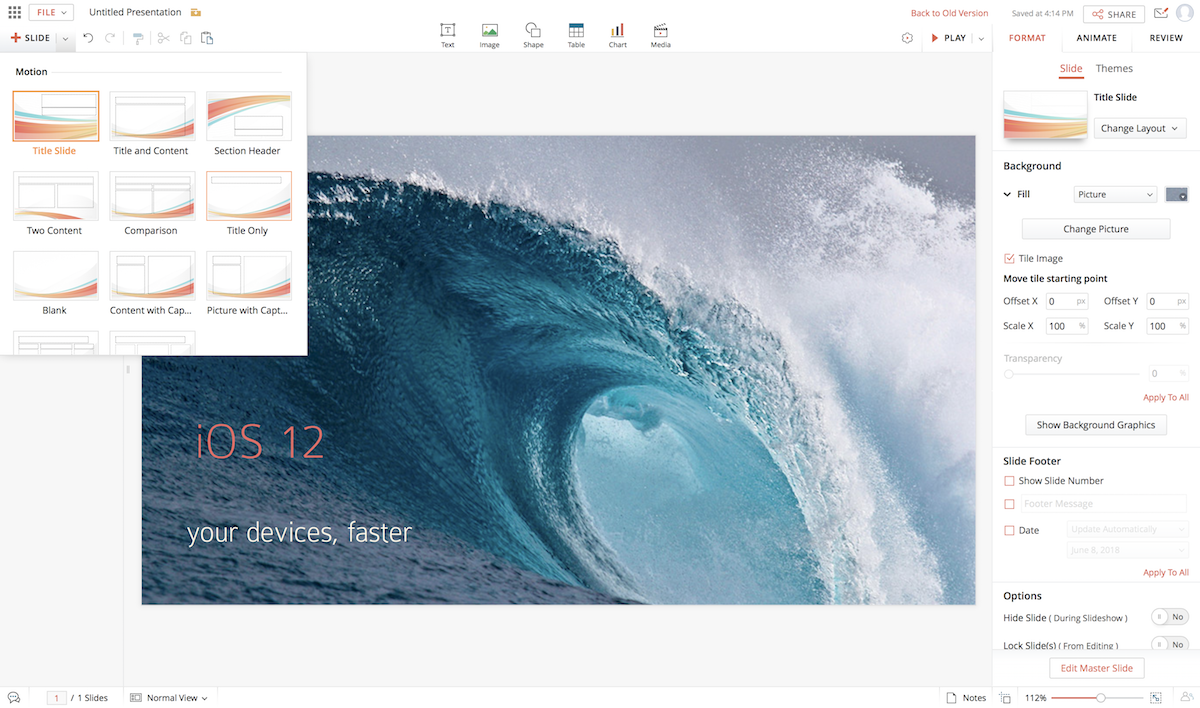
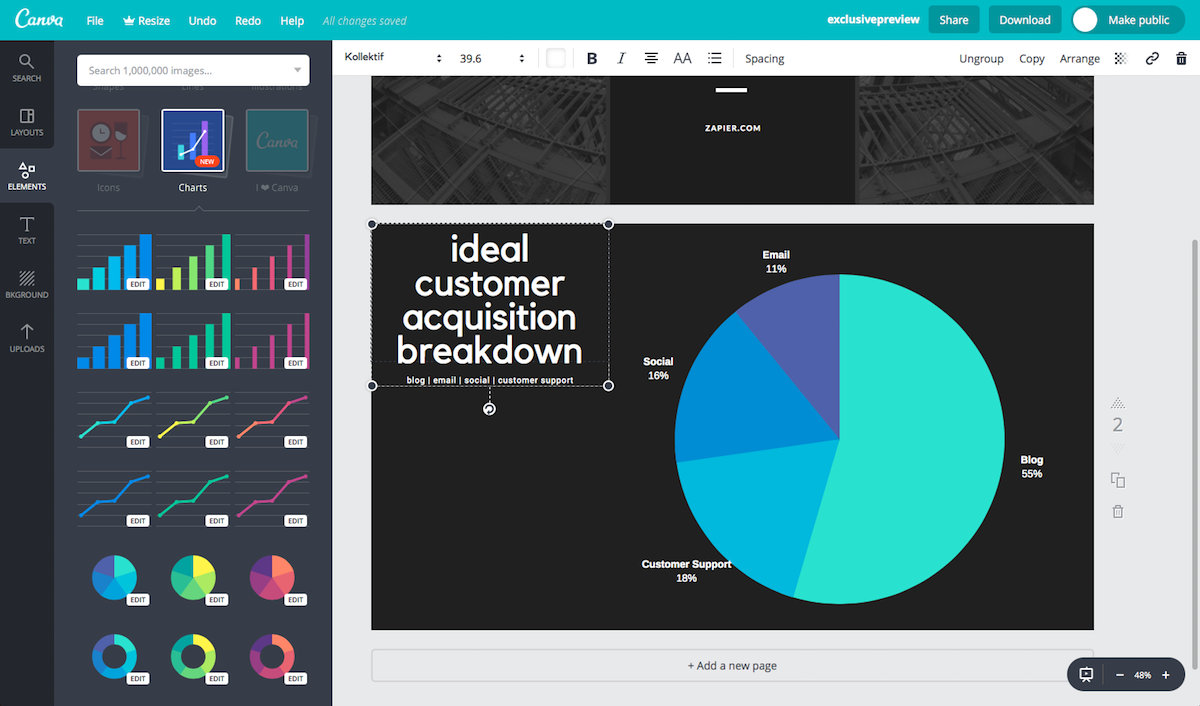
Want more customized slides, without having to create graphics on your own in Photoshop? Canva is designed for to make all types of design-focused documents: book covers, menus, magazine covers, posters, resumes, and more. Tucked among those options is a Presentation format complete with a tool to present your finished presentation right from the design app.

Canva is built around its included stock images, backgrounds, and specially formatted text boxes and page layouts that help you make polished, image-focused slides. Graphs are easy to customize, too, with premade layouts where you can add labels and numbers in a table to tweak the graph for your data. Search for any item you need then drag it into your slide or document, then click on that item to tweak its options from the menu in the top of the page. You can then share the presentation publically or present it right from Canva.

Canva Price: Free, with paid images and layouts starting at $1; $12.95/month per user Canva for Work for team plans

Adobe Spark

For turning presentations into video

Adobe Spark

Presentations don't have to be individual slides you click through one at a time. They could be animated video—and Adobe Spark makes that as simple as building a PowerPoint. Designed to build graphics, web pages, and video stories, it's the latter tool that's a handy way to make a presentation, especially if you want one that runs itself.

Each slide is built around a graphic, which you can upload or find online via Spark's integration with Unsplash and other popular free stock photo sites. You can tweak the image's design with filters, then add text over the images and set how long that slide should be displayed in your presentation. Add each of your other slides, then in a few clicks you'll have a presentation video ready to auto-play during your talk.

Adobe Spark Price: Free for core features; from $9.99/month Individual plan for custom branding, personalized themes, and support

Swipe

For Markdown-powered interactive presentations

swipe

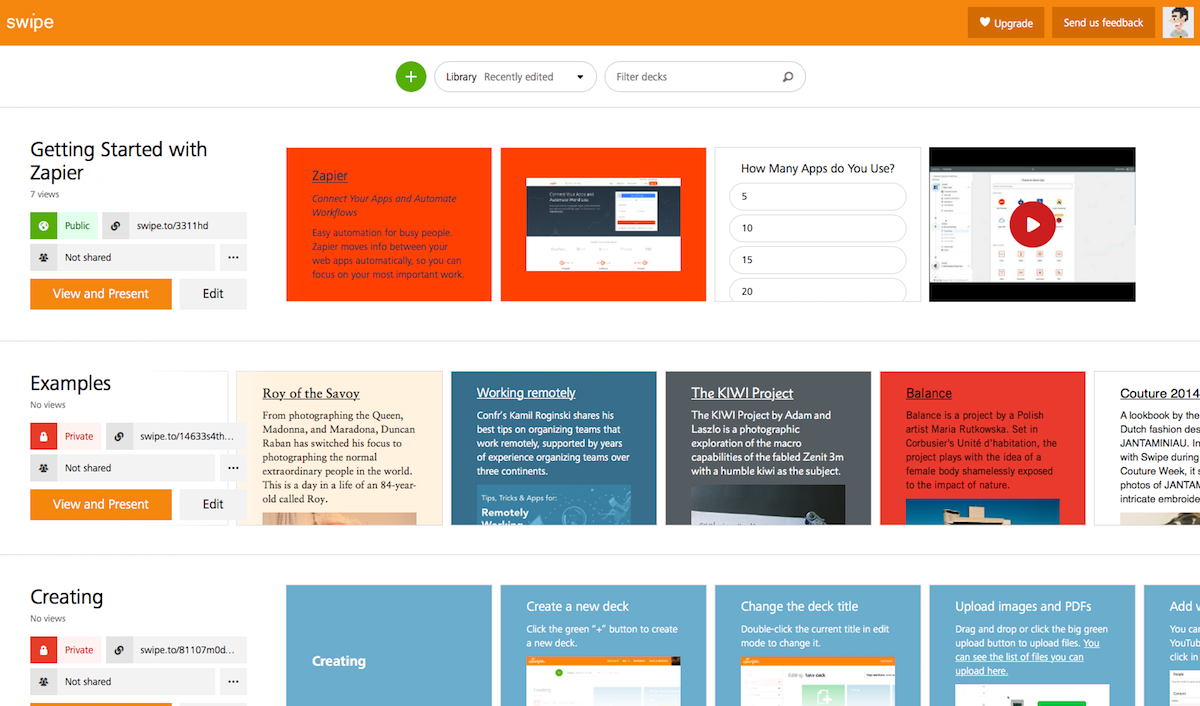
Already have things you want to put into your presentation—a PDF report, YouTube or Vimeo video, image, GIF, or a text outline? Swipe can turn those into a presentation in seconds. Drag your files into the editor and Swipe will add each to their own slide. Add a Markdown-formatted text file—or add a new Markdown slide manually and type in your text—for a quick way to turn your lecture notes into slides. It's not as customizable as other presentation apps, but Swipe makes it so fast to turn existing files into a presentation, it's worth the simplicity.

Then, you can add a Poll slide with multiple choice questions for a quick way to get audience feedback. Share a link to your presentation at the beginning of your talk, and attendees can scroll through PDF files, watch videos, and look at everything else in your presentation as you talk. They can also tap their response in your poll slides, with the answers showing up in real-time on the big screen.

Swipe Price: Free for 5 presentations; from $20/mo Pro plan for unlimited presentations, analytics, password protection, and secret links

Evernote Presentation Mode

For turning notes into a presentation

Evernote Presentation Mode

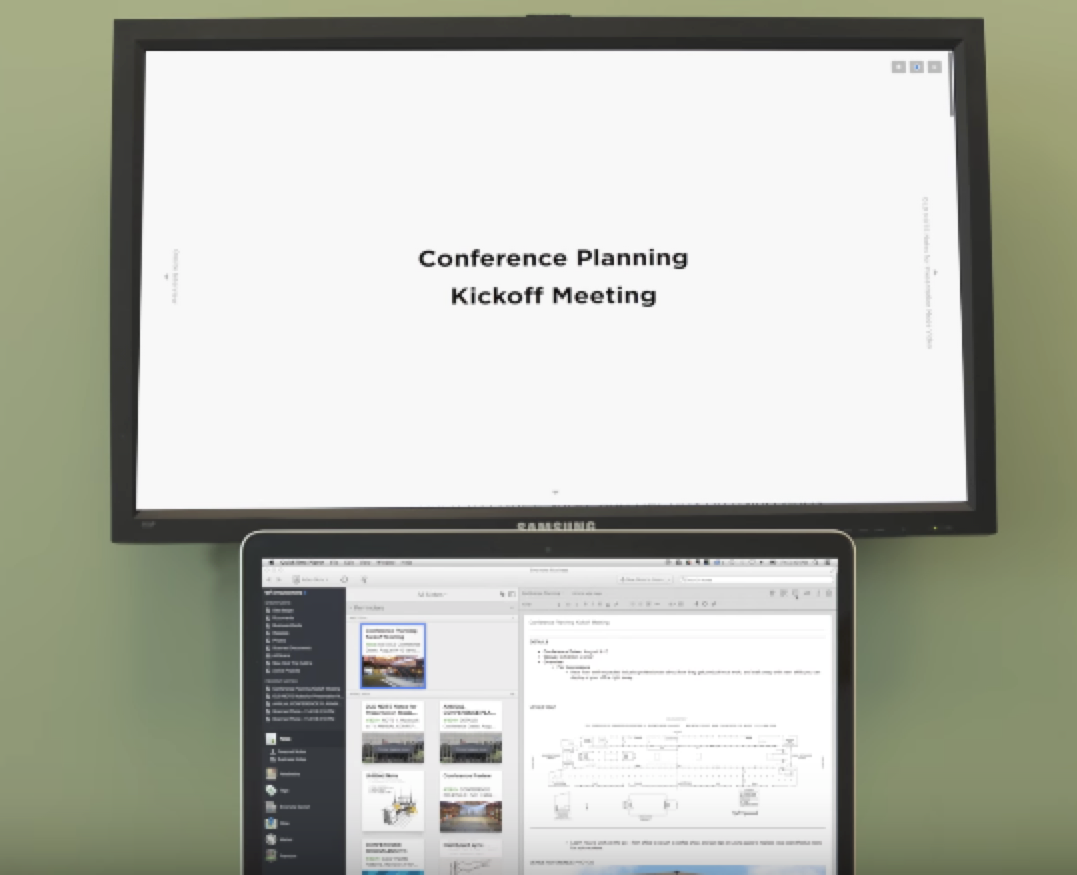
There's another even simpler way to presents your notes: Presentation Mode in Evernote. Just write your thoughts in Evernote, complete with lists, attached files, and formatted text. Add images and PDFs to their own notes, or to the end of your main note.

When it's time to present, select the note or notes you want to present, click the projection screen icon, and Evernote will automatically make a table of contents for your presentation sections. It'll turn your notes into full-screen slides that, while not as simple as the slides from most other presentations, are typically easy enough to read from anywhere in the room. There are no transitions or animations, but Evernote does include a virtual laser pointer so you can point out the most important stuff.

Evernote Price: from $69.99/year Evernote Premium for presentation mode and advanced Evernote features

Slidebean

For automatically making slides from an outline

SlideBean

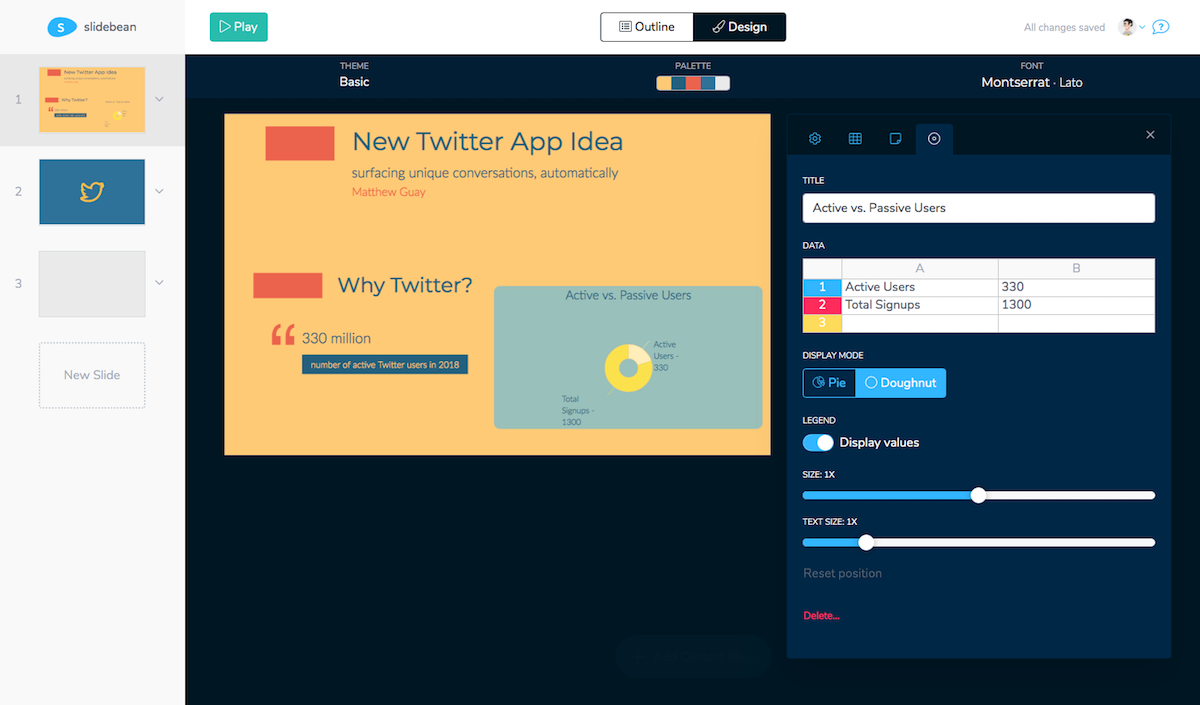
If you want to skip the tedious process of formatting slides, but want to build detailed presentations that combine multiple items on each slide, Slidebean is right up your alley. All you have to do is write an outline of sorts, typing in headings, uploading images, and entering details for graphs. Then, select a theme and Slidebean will create a presentation for you, complete with formatting.

Slidebeam's automated slides will try to arrange everything on slides for you, or you can rearrange the elements, dragging them around on the grid. Click an item to edit it if you need—or go back to the Outline mode to add more details. It's an effective way both to make presentations more quickly and include more data on each slide than you could easily in most other presentation apps.

Slidebean Price: from $8/month for unlimited presentations

Deckset

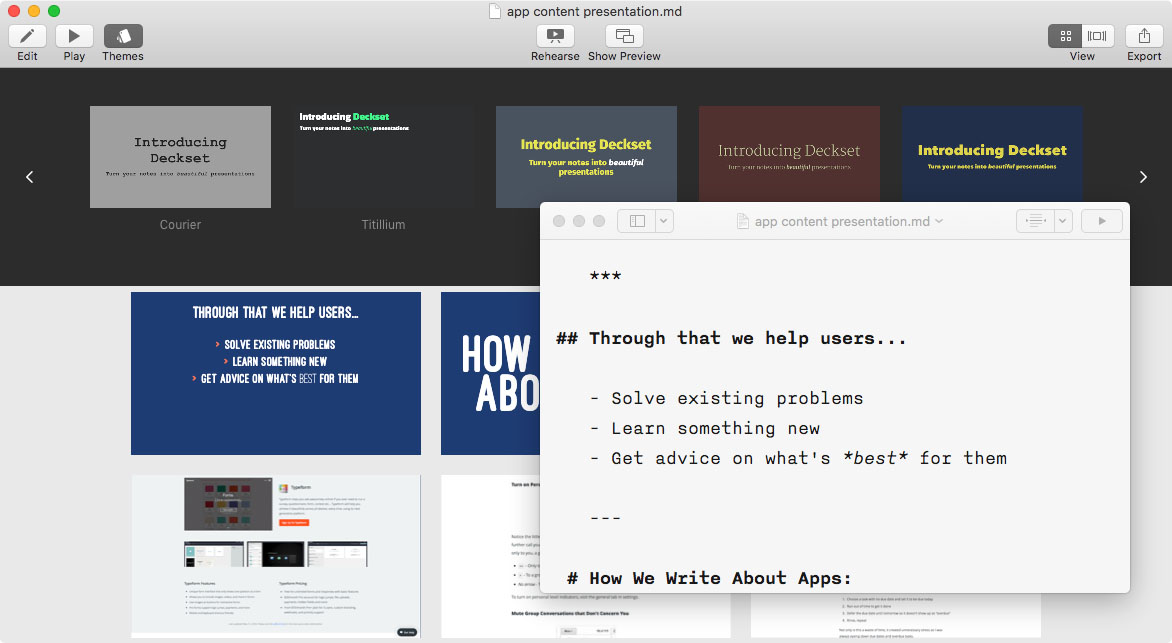
For quick Markdown-powered presentations

Deckset

Most presentation apps help you design your slides. Deckset is built to help you write them. Write your ideas in any writing app with Markdown formatting, and add a line break (three dashes or asterisks) between each slide. You can include images, links, video embeds, and more—with text commands to arrange items as you like.

Then, open that text file in Deckset and it'll turn it into a presentation automatically. You can pick from its built-in themes, or customize your own custom code-powered themes in the latest version. It's one of the quickest ways to turn your ideas into a presentation.

Deckset Price: $29

Apple Keynote

For beautiful animations

Keynote for iCloud

Ever wanted to make a presentation that looks exactly like one Steve Jobs gave? Keynote's the answer. Apple's presentation app comes free with every new Apple device and is much like a simplified PowerPoint packed with beautiful templates and typography. You can even use it online at iCloud.com to make presentations in Keynote even on a PC then share them with anyone else for feedback.

Keynote's best known for its smooth animations, with enough options that you can mockup a new app in Keynote and make it almost feel like you're actually using the app instead of looking at a demo in a presentation. When you're ready to present, you can use an iPhone to remote control your presentation from your Mac, or can present online for free with Keynote Live's presentation streaming.

Keynote for iCloud Price: Free with an iCloud account, available with any new Mac, iPad, or iPhone
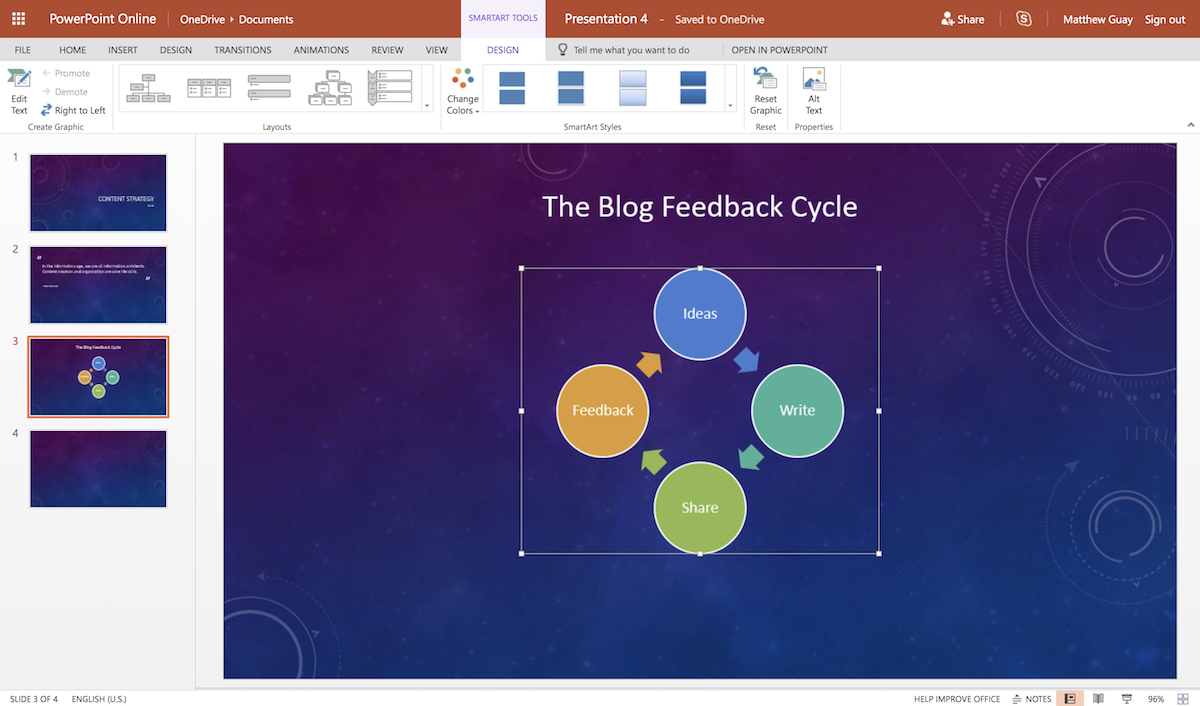
PowerPoint Online

for simplified PowerPoint in your browser

PowerPoint Online

Or, you could use PowerPoint. The latest versions of PowerPoint are easier to use, especially the free PowerPoint Online app. It can open any PowerPoint file in your browser, and includes tools to make new presentations with core text, formatting, image, and chart tools. It's everything you need to make a presentation in a more streamlined app.

PowerPoint runs everywhere today, with iOS and Android apps along with the traditional Microsoft Office for Mac and Windows. And they all work together. Build a presentation in PowerPoint Online, then edit it on your work PC, share it with your team so they can add feedback or edits in any PowerPoint app, then look over it on your phone on the way to the meeting, and share a link to it with everyone in the audience. The original presentation app might still be the one you need.

PowerPoint Online Price: Free online and with limited features in mobile apps; from $6.99/month with Office 365 Home for full PowerPoint


Next time you need to give a presentation, don't panic. Outline the things you'll talk about, write your lecture notes, and pull together resources. Then check this roundup again for the best app for your presentation. Perhaps you'll want to include a poll, and will go with Slides. Maybe the notes are enough, and Evernote or Deckset is the best option. You might need more design work, making Sway, Canva, and Slidebeam better options. Or if you need to present online, Keynote or Zoho Show might be your pick.

Then build your slides—and you'll likely find that the task takes only a few minutes. You'll have much more time to practice and prepare instead of spending all your time on slides.

And once that's done, check our roundup of the best apps to share your presentation to get your slides in front of the largest audience possible.

Get more apps for your modern office with Zapier's other app roundups:

  • Looking for a better way to write? Check out our guide to Data-Driven Document apps for writing apps that let you crunch numbers with spreadsheets right inside your documents. Or, work with your team on a document with our favorite collaborative writing apps.
  • Spreadsheets are some of the most powerful apps most of us use, so compare the best in our roundup of the best spreadsheet apps.
  • Keep notes on everything you do with our roundup of the best notes apps, with tools for everything from plain text notes to hand-drawn sketches.

Editor's Note: This post was originally published October 28, 2014, and updated most recently on June 7, 2018 to include new presentation apps Spark and Sway, along with updated details about other presentation apps. Zapier marketers Danny Schreiber and Matthew Guay contributed to this post.

Header photo by Teemu Paananen via Unsplash.


source https://zapier.com/blog/best-powerpoint-alternatives/