Wednesday 30 May 2018

Vienna Greeters Reduces Errors and Hours with Automated Workflows

Every company strives to have a seamless web experience for their online visitors. The goal is to have your brand and your mission apparent on each page and piece of content, from your blog to contact forms. But with a plethora of plugins and apps to add to your site, sometimes that customer experience breaks. It might even be subtle, like a contact form that doesn't quite match the rest of your branding.

So what's a business to do when one of their tools doesn't cut it? You find better tools. Vienna Greeters, Vienna, Austria's branch of the Global Greeter Network, wanted a better contact form, one with more robust fields and customization. They use contact forms in two areas of their site: A simple, two field contact form, and a second, more thorough form to request a Greeter, detailing arrival times, party size, and more.

Vienna Greeters chose Cognito Forms for its customization, user-friendly design, and ease of integrating forms on websites.

With an upgraded form app, Vienna Greeters now needed to send their form responses to Google Docs, where they house and share collected responses. Jonathan Irons, co-founder and chairman of Vienna Greeters, found their solution: App automator Zapier.

About Vienna Greeters

One of the Global Greeter Networks' branches, Vienna Greeters was formed by a few Vienna, Austria locals who wanted to show off their home to visitors. Offering free walking tours, they strive to share Vienna as locals see it, taking visitors to favorite coffee shops, quiet bookstores, and offering an inside look at the city.

Completely free—but accepting donations—Vienna Greeters is now one of over 100 Greeters all over the world.

How to Save Hours and Prevent Errors with Zapier

Jonathan discovered Zapier when looking for a way to automatically send form responses to Google Docs. There wasn't a direct connection between the apps. which would have meant downloading responses and copying them into Google Docs. But with Zapier, Jonathan built a Zap—an automated workflow—that sent the content of each form response to a Google Doc.

Of particular importance, Jonathan needed to organize and attach volunteers to each group of visitors. Their form to request a Greeter details everything from arrival time to party size to language spoken. This vital information helps Jonathan assign the right volunteer to the right group every time.

Within Google Docs, Vienna Greeters built a veritable library of their form responses, where, with a few more Zaps, they can group by trip date and arrival time, making life easier for the Greeters' volunteers. And with visitors from all over the world, that organization became key.

With responses in Google Docs, Jonathan added connections to Trello, creating cards his team groups within Trello by date. As these cards are moved to different lists, another Zap triggers an email through Gmail, notifying volunteers and clients of upcoming walking tours.

"Zapier literally saves us many hours every week—but more importantly, it practically removed the chance for errors and inconsistencies."Jonathan Irons, Co-Founder & Chairman, Vienna Greeters

All it took was a few Zaps to reduce the time Jonathan and the Greeters volunteers spent managing new requests. Try these for yourself and see how many hours you save:

Check out some of our favorite Zaps, featuring Trello, Gmail, Cognito Forms, and Google Docs:


Now that Zaps handle Vienna Greeters' lists and form responses, the team puts their energy where it matters:

"We get to spend more time engaging with our volunteers and spending less time on lists," Jonathan says.

Don't worry if you're new to Zapier, either. Jonathan has some excellent advice for those getting started.

"Get a piece of paper and write down what you would actually like to do, in plain English. There's definitely a Zap for that. We keep discovering new things we'd like to automate with Zapier."

All images courtesy of Vienna Greeters.


source https://zapier.com/blog/send-forms-to-google-docs/

VPNs Don't Make You Anonymous, But Use One Anyway

When you use Wi-Fi networks that aren't in your control, such as those at a coffee shop, hotel, or airport, you instantly become low-hanging fruit for perpetrators—unless you use a VPN. VPN stands for "virtual private network," and you should be using one pretty much all the time on all your devices, not only for the added security it provides from snoops, but also to keep data private from internet service providers (ISPs), mask your location, as well as other reasons.

There's a lot of confusion about what VPNs are, what they do, and what they don't do. VPNs add a layer of protection to your online activities, but which data do they protect and how do they do it?

What Is a VPN?

The clearest and most common analogy used to explain how a VPN works is to call it a private tunnel.

Imagine the internet as a highway. The highway allows information to travel among servers and devices all over the world. Let's call the information packets. Now think of VPN as a tunnel. Instead of using the open roads to send and receive items, your packets travel in a private tunnel. Additionally, you never send or receive packets directly, choosing instead to route them via a third party; that third party is the VPN provider's servers. So you send a packet through a private tunnel to a VPN provider server (let's call it VPN Wakanda, for argument's sake), and VPN Wakanda delivers it to its final destination. Similarly, when receiving packets, you never get them directly because they also go to VPN Wakanda first. That way, anyone sending you a packet thinks you receive it at VPN Wakanda and has no idea where you actually are.

Liz Kintzele, VP of revenue at VPN provider Golden Frog, maker of VyprVPN, uses a simpler analogy that indicates what the services do and don't do:

We liken using a VPN service to the curtains on your windows at home. Curtains significantly improve privacy for your residence despite the house address being public.

Why Use a VPN?

While there are many reasons to use a VPN, the two most common for personal use are 1) enhancing privacy and security and 2) bypassing geographic restrictions or censorship. For business use, VPNs are used commonly to give employees remote and secure access to private company servers, where they might keep shared drives and host other non-public data. In that use case, the organization and employees still get the same enhanced privacy benefits.

Enhance Privacy and Security

Enhanced privacy isn't the same as total privacy, but it's still important. Using a VPN does not make you anonymous online, which is one of the biggest myths people believe about these services. Rather, a VPN specifically protects your internet traffic in transit by encrypting it. So for example, without a VPN, when you fill out a form on a web page and hit enter, you are then sending the information to the person who runs the website, and while that information is moving from your computer to theirs, other people can intercept it and may be able to read it.

When you use a VPN, however, "people using the same network as you will only see military-grade encrypted data if they look at your connection," according to Caleb Chen, director of external communication for the VPN service PrivateInternetAccess. That means that even if someone intercepts your data, they won't be able to read it.

Privacy concerns apply to your Internet Service Provider (ISP) as well. In the U.S., ISPs can collect, share, and sell your browsing data and other information without your consent. Using a VPN limits how much information ISPs can collect. Your ISP will see you sending packets to VPN Wakanda, but it won't see where the packets go after that. Vice versa, it'll see you receiving packets from VPN Wakanda, but it won't know their true origin.

When you don't use a VPN, someone snooping on the same open, unencrypted network as you can see your IP address (which may indicate your physical location), the device you're using and its operating system, the domains you visit, and, for sites not using HTTPS, the specific web pages you visit. Depending on other factors, a perpetrator could see additional information as well, up to and including everything you type if the web page itself doesn't encrypt your data (sites that use HTTPS use encryption; that's why it's important to look for that 'S').

"With a VPN service running, people using the same network as you will only see military-grade encrypted data if they look at your connection"- Caleb Chen

When you do use a VPN, someone on the same network who wants to get your data would not be able to see the details of what you're doing online. Instead of seeing the domains you visit and everything else, they only see an encrypted packet.

VPNs give you enhanced privacy from not just would-be hackers, but also websites you visit and other services you use online. People running the websites and services cannot see your IP address but instead see the IP address of the VPN server you're using.

Still, even when you have a VPN running, a local snoop can see your local device's IP address, Chen said, as well as when devices are actively online and which operating systems they run. There's a lot of other data still available for someone to scoop up. Remember, VPN offers enhanced privacy but not anonymity.

Bypass Geographic Restrictions or Censorship

Internet censorship map
Image from Golden Frog

Because of the routing described earlier (passing your packets through VPN Wakanda), the websites you visit and online services you use can't tell where you physically are. If you connect to VPN Wakanda, any website you visit thinks you're in Wakanda, which means you can access sites or services that are only visible to people in Wakanda.

Conversely, if you're in a region with online restrictions or censorship, often you can get around them by connecting to a VPN server in a country that isn't restricted. If you're traveling and want to continue watching your favorite series on Netflix, you may need a VPN to get the Netflix catalog for your home country. As another example, the Great Firewall of China famously blocks anyone in the country from accessing Facebook, Twitter, YouTube, Snapchat, and other sites. A VPN service connected to, say, Ottawa lets you bypass this restriction…at least in theory. Governments that censor internet access often try to block VPN services, as do streaming sites such as Netflix. The list of VPN services that successfully keep up with their efforts changes all the time. (That's a long way of saying don't purchase any old VPN before your next trip to Guangzhou and expect it to work—you have to research what's currently effective for different locations and services.)

Using a VPN to bypass a geographic restriction comes in handy in more cases than trying to watch YouTube from China. If you try to access a financial account from certain foreign countries with high cyber crimes rates, the bank will likely lock you out. Using a VPN to mask your location might prevent problems, although, that said, financial institutions and governments are pretty savvy at detecting VPN usage. Even if they can't see the encrypted material, they may block you from taking certain actions online if they notice you're using a VPN. The reason is to protect their own security. You wouldn't want hackers in another country who got their hands on your banking details to be able to use a VPN to make it look like they're in your region and start wiring money out of your account. I spend a lot of time abroad and often hit roadblocks when trying to open new financial accounts or access my taxpayer information in my home country, with or without a VPN.

VPNs Don't Protect Against Other Threats

I asked Bogdan Botezatu, senior e-threat analyst at security software maker Bitdefender, what myths people believe about VPNs. He said:

One of the most frequently encountered misconceptions is the fact that people associate VPNs with security. They perceive the VPN connection as a 'filter' that renders the computer or phone immune to web-borne malware since the connection is 'secure.'

But VPNs don't screen the data coming to your computer, phone, tablet, or any other internet-connected device you use. Whatever you ask for, you get. Using a VPN doesn't stop suspicious links from showing up in your email either, and it doesn't prevent you from being tracked via GPS.

Since the VPN solution only encrypts the information sent over the Internet, it is not effective against any other attack avenues except for data snooping over the network. For instance, if mobile applications or the operating system itself collects telemetry data, that information will flow freely to the developer's servers.

In other words, VPNs are not a complete security solution or a replacement for other security software, such as antivirus or antimalware software.

How to Choose a VPN Service Provider

Before you can start using a VPN, you need to find a provider you trust. While Zapier hasn't run VPN services through the ringer, Wirecutter's recommended VPN services may be a good place to start.

Building trust is tricky business among VPN providers. You might assume you want a to use a provider that logs absolutely no information from you, but the issue of what your VPN service provider knows and keeps track about you is more complicated.

Is logging good or bad?

"VPN providers have different service level agreements for their services," Botezatu explained. "Some providers offer full anonymity in that they do not keep connection logs, so they won't be able to hand over these logs to law enforcement even if subpoenaed. Other VPN vendors do keep logs but will only allow law enforcement access to them in case of abuse (child pornography, online fraud, or other misuses of the VPN service). Last, there are VPN vendors who not only keep logs, but also process the traffic in an anonymized way to better 'understand the user,' which defeats the whole purpose of using a VPN."

Kintzele, howevers, argues that logging doesn't necessarily compromise your security. "Not all logging is bad. Managing an extensive network of VPN servers means some degree of logging is necessary to realistically maintain that network," she said. "A VPN service typically references two types of logs: connection logs and usage logs. Connection logs track times connected and amounts of data transferred, though not the content of the transfer. Usage logs, on the other hand, track online activity throughout your session. Chances are most VPN providers keep connection logs for use in maintaining the quality of their service, even if their marketing claims they are a 'no logging' provider."

"If you don't pay for a product, you are the product. Free VPNs will often serve you ads or monitor and potentially sell your online activity."-Caleb Chen

Look for a solid history and beware the free providers

Knowing a company has been in business for several years and has a solid reputation are two more signs in the right direction. Charging a reasonable market rate—generally in the range of $75 per year, with much better rates when paying for multiple years at a time—is another good indicator.

While several VPN providers offer a free service, be wary of them and read all the fine print to make sure you know what you're getting. Chen put it this way, "As some people say, 'If you don't pay for a product, you are the product.' Free VPNs will often serve you ads, or monitor and potentially sell your online activity. Paid VPNs shouldn't need to do that to make money but the potential for that same type of traffic snooping exists, which is why trust is so important in this space."

Bad actors certainly exist. A 2016 research paper on Android apps that use the VPN permission found that 38 percent of the 283 apps included in the study injected malware of one kind or another onto people's devices. And 18 percent didn't even encrypt data.

Kintzele also noted that a VPN provider that owns and operates its own servers is another big plus. If the servers are in their control, then so are the privacy and security policies that govern those servers.

There are plenty of other factors to consider, too, such as the clarity and transparency of the company's instructions, documentation, and privacy policies. You might want a provider that offers additional features, such as an ad blocker. Some customers also care about the jurisdiction of the service provider for legal reasons.

PrivateInternetAccess mobile app
PrivateInternetAccess' mobile VPN app

How to Get a VPN and Use It

Not every VPN service works the same, but the biggest players more or less follow the same setup, activation, and connection process.

Once you find a reputable VPN provider, you typically download an app to your computers and mobile devices. Then you pay a subscription fee to use the service and sign into the app with your account. Setting up access to a business VPN is slightly more complicated and involves changing the network settings on your device. You'll need instructions from your administrator that include specific details about the configuration and access credentials.

Any decent VPN provider has apps for computers as well as mobile devices, and you want both. It's just as important to protect your mobile data as your computer's data.

Next, you launch the app and connect to a server. The server you choose depends on which location you want to use. If you're only using VPN for privacy, you might want to pick a server in your home country to keep your internet search results local, keep all your browsing in your preferred language, and not get redirected to international versions of sites.

Some VPN providers help you pick a server by showing their speeds. They can get bogged down with heavy traffic. Others simply let you choose a country or city, and then they automatically connect you to one of the servers in that place.

You can disconnect the VPN at any time. Be sure to check the connection and make it active again if you reboot your computer or wake it up after it's been idle, though most VPN services will push a notification letting you know the connection has dropped and asking if you want to reconnect.


VPNs Don't Make You Anonymous, But Use One Anyway

People lock their our doors not because locks provide total protection, but because they offer a layer of security and deter intruders from breaking into our private spaces. People also sometimes have security cameras, a gate around their home, guards at their building, a private garage for their cars, and so forth.

On the one hand, you don't necessarily need to run a VPN all the time. When you're on your password-protected network, for example, you probably are safe from snoops. On the other hand, it doesn't hurt you to leave the VPN on either, and it might help you develop the habit of remembering to use it. But do use a VPN when on unsecured public networks, such as those in airports, hotels, parks, public transit, coffee shops, and so forth.

Security should be multilayered. Think of VPNs as providing one of the essential layers, as well as providing other services, too, such as masking your location. A VPN doesn't protect you against every cyber threat, but it goes a long way to deterring perpetrators from accessing your internet traffic in transit.

Top Image: Elaine333 via Shutterstock. Inline graphic from Golden Frog. Mobile app screenshot courtesy of PrivateInternetAccess.


source https://zapier.com/blog/what-is-VPN/

Tuesday 29 May 2018

Build a Master Contact Database From Google Contacts, LinkedIn, Outlook, and More

As a marketing intern in college, I was tasked with the glamorous job of building a 5,000-person database. The vice president of sales didn’t care how I did it. He simply said, “Get me 5,000 emails. You have until the end of summer to do it.”

With no knowledge of any tool outside the Microsoft Office suite, I did the one thing that made sense: I cold called. Over three months, I called just south of 5,000 companies (unless I scored a “big win” and landed two contacts within the same firm). It was brutal.

Good news, though: You don’t need to sacrifice hours on the phone or hunt for emails online to build a contact list. Existing business relationships are all around us; they tend to be spread across multiple apps and services. Even if you have a contact list in your address book, chances are you have contacts outside of it that should join the others in one place. You can use this contact database for:

  • Marketing, to invite people to your webinar
  • Company announcements, like the launch of a new product or service
  • Customer relationships, such as sending a client 'Thank You'
  • Events, like hosting a book signing or meetup
  • Sales, to give your sales team a list of leads

It takes a little grunt work at the beginning, but after the initial setup, you can automatically add new contacts to your list as they come. But first, let’s compile your existing contacts into one, centralized location.


How to Export Contacts from Google Contacts

The easiest place to find existing contacts is your email inbox. Your vendors, clients, potential clients, and even old job applicants are stored there, making it a great starting point for any database.

Every person you ever contacted via email is stored within your address book. Your job is to export them from your inbox into Excel, clean up the list, and store your database in another app, where you can better manage the contacts. Here's how to do it:

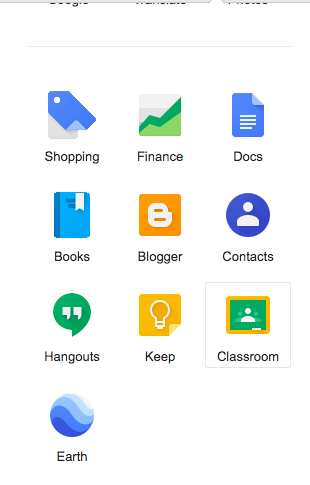
1. Navigate to Google Contacts

If you have a G Suite account (business addresses, or those with a custom domain), you can access contacts through Gmail or your Google account. Otherwise, select the Google apps icon toward the top right corner of your screen, and select Contacts.

Contacts in Google

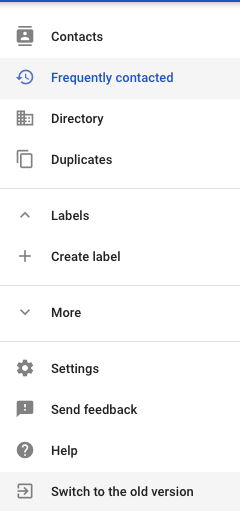
2. Ensure You Use the Old Version of Google Contacts

For the next step, you'll need to use the old version of Google Contacts, since exporting isn't supported yet in the new version of Google Contacts. Not sure which version you’re using? Look at the left-side panel of the page. If you see Switch to the Old Version at the bottom, you’re on the latest version. Click to revert to the old version of Google Contacts (don't worry—you can switch back after exporting your contacts).

Google Contacts old version

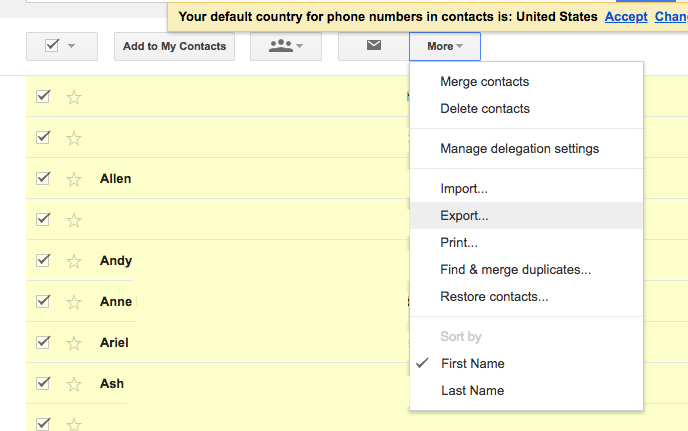
3. Export Everyone You Ever Emailed

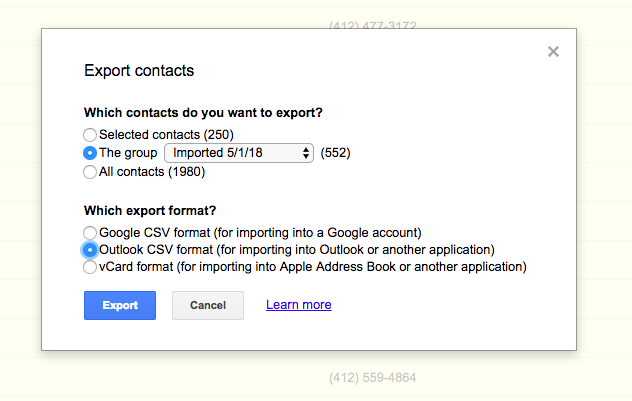
Click More, then select Export from the dropdown menu. On the pop-up screen, under Which contacts do you want to export?, select All contacts.

Exporting Google Contacts

The number in parentheses tells you how many people this entails. Chances are it’s in the thousands. There are bound to be a few people you don’t want to contact, but we’ll clean this list up before importing into a different app.

Select contacts in Gmail

4. Export Contacts into an Excel CSV file

When it asks you "Which export format?" Select Outlook CSV. Although you’re exporting out of Google Contacts, the purpose is to import into another service. CSV stands for comma separated values—the format you’ll need to import your list into a spreadsheet.

How to Export Contacts Out of Outlook or Microsoft 365

If you have a work or personal email through Outlook or a Microsoft 365 subscription, you can follow a similar process to export contacts associated with your account.

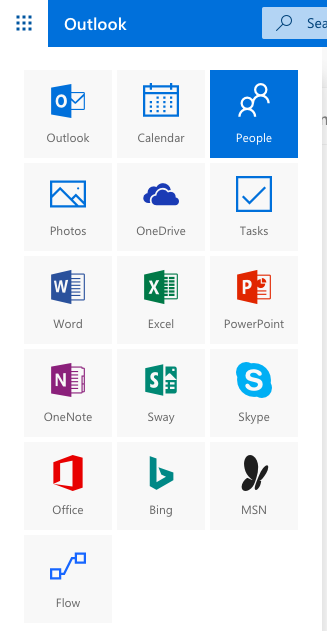
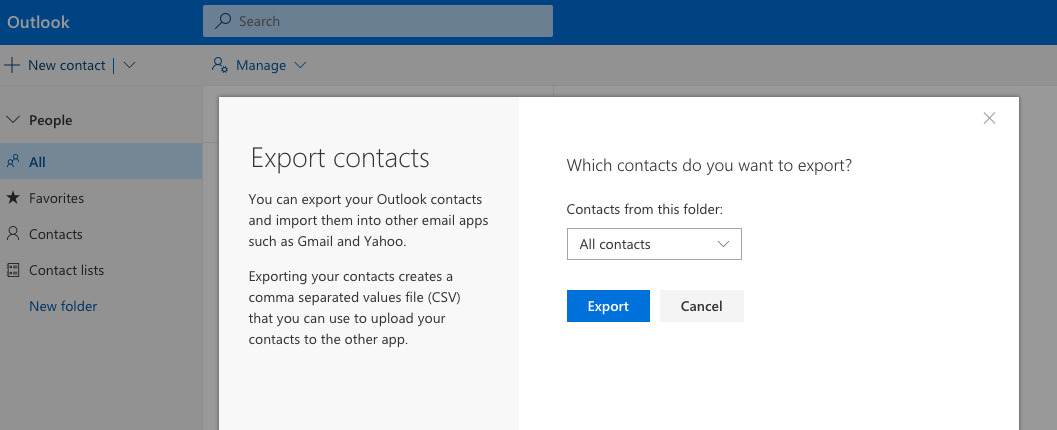
1. Navigate to People Inside Outlook

If you’re already logged in to Outlook, you can do so by clicking here. Otherwise, log in, then navigate to the People app in the top left corner of your screen.

Outlook's contacts live under the People section.

2. Click Manage, then Export Contacts

On the pop-up screen, the default option should be to export All Contacts. Click the Export button, and a CSV file is automatically downloaded to your computer.

Export contacts from Outlook.

How to Export Clients and Vendors from QuickBooks Online

Perhaps you’ve been invoicing clients and keeping tabs on vendors through your online accounting software, such as QuickBooks. This is an excellent place to find contact phone numbers, addresses, and other demographic data to add to the database you’re compiling.

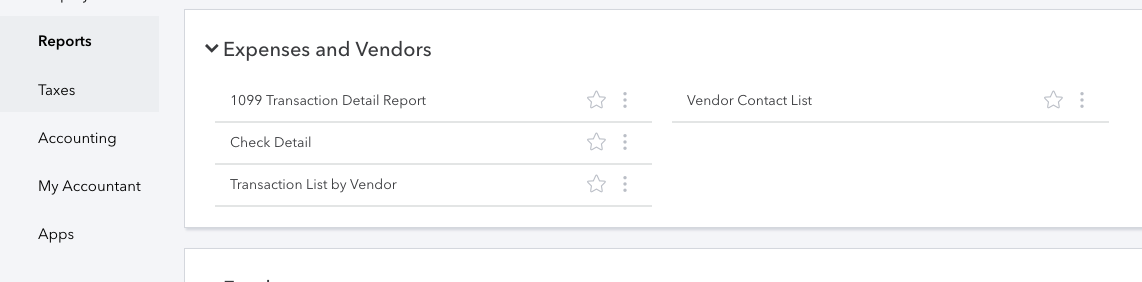
While there are several approaches to exporting contacts from QuickBooks, the easiest way is to use the Reports tab. With QuickBooks Online Simple Start, Essentials, and Plus plans (sorry, fellow freelancers!) you are automatically given vendor, clients, and employee contact lists with your subscription. Here’s how to access them:

1. Navigate Directly to your Contact List of Choice

Already signed into QuickBooks Online? Great. This will be incredibly easy. Just click the links below to go straight to the following lists:

Otherwise, log in to QuickBooks Online, navigate to Reports on the left side bar, and choose your preferred list from the list of options.

You can select lists from QuickBooks under Reports.

2. Select the Data You Wish To Export

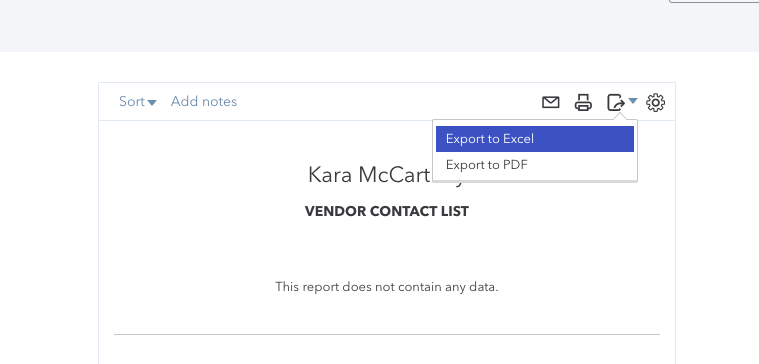
Click the Customize button in the top right corner of the screen. Use the various checkboxes to select which data you wish to export, from contact names and addresses to tax IDs.

Customize your QuickBooks contact list for exporting.

Once you’re happy with your selections, click Run Report. On your new report screen, select the export icon, then Export to Excel from the dropdown menu.

Export your contacts from QuickBooks to Excel.

How to Export Connections Out of LinkedIn

All right, so, you exported everyone from your inbox. What about people you connect with on social media?

There’s no easy way to extract email addresses from Instagram or Facebook (where contact info is kept more private) but there is one social platform which allows you to easily export your connections into Excel: LinkedIn.

In LinkedIn, you can export your connections’ full name, email address, current employer, and job title. It even tells you when your connection with that particular individual began. That’s the foundation for an excellent database—one you can later segment by company, industry (if you know the companies well enough), or position level.

Ready to export out of LinkedIn? Here’s what you do:

1. Access Your Connections in LinkedIn

Navigate to My Network at the top of your LinkedIn. Once inside your network, click My Connections on the left side bar.

Your LinkedIn contacts live under My Network.

2. Manage Your Contacts

Click Manage Synced and Imported Contacts on the right side of your screen. This one is almost hidden. You’ll find it in light grey, which is a little hard to read.

Almost hidden, you'll find contacts to the upper right.

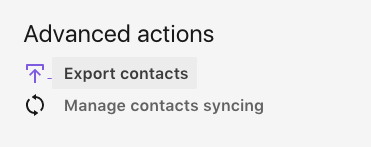
3. Export Your Contacts

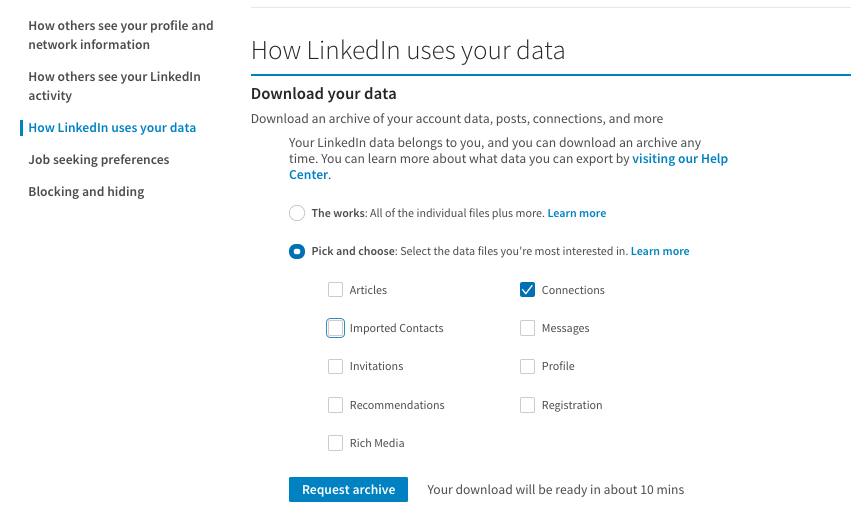
Under Advanced Actions on the right, click Export Contacts.

Under Advanced actions, Export contacts.

Under How LinkedIn uses your data, select Connections, then click Request Archive. You may need to re-enter your email address to download your contacts. Just a heads up, it may take a minute to receive your connections.

How LinkedIn uses your data, choose who you want to export.

How to Easily Add Phone Numbers to Your List

Want to know the most common missing piece of data within any database? Phone numbers. At this point, you probably have several Excel files available with a healthy list of emails. But what about phone numbers?

For both Android and iPhones, we'll cover:

  • How to sync your contacts in your mobile device to an email address for both iPhone and Android
  • How to export contacts from your phone (Apple users, only)
  • And finally, how to import mobile phone contacts into you email and re-export as a CSV file

How to Sync Contacts from iPhone and Android to an Email Address

Both iPhone and Android have built-in contact systems. The easiest way to get contacts from your phone and into a master database is to sync your contacts from your iPhone to iCloud, or your Android to Google contacts.

Apple Users: How to Sync iPhone Contacts to iCloud

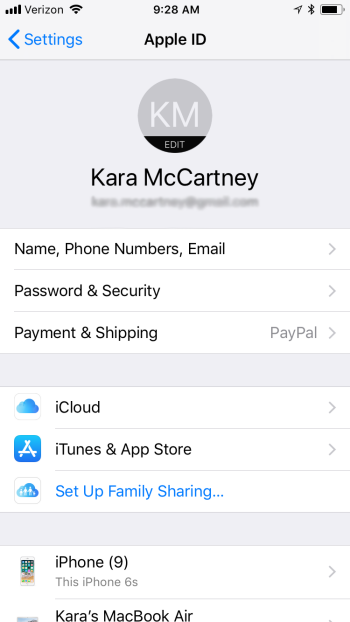
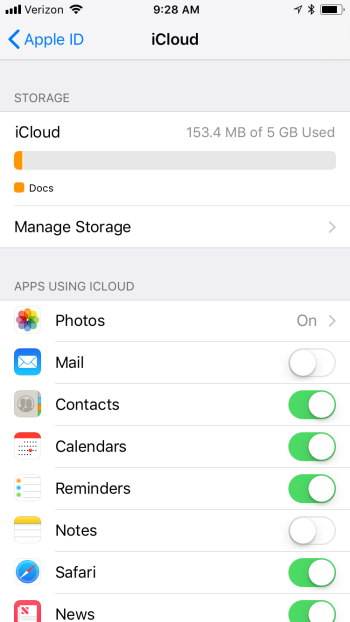
  • Go to Settings > Your Name > iCloud.
Find your Apple contacts under iCloud.

- Make sure Contacts is turned on.

Contacts has to be turned on under iCloud.
  • When you're asked if you want to Merge or Cancel, tap Merge.
  • Now, all your contacts on your phone are uploaded to iCloud, so you can access your contacts from any device.**

Apple Users: How to Sync iPhone Contacts to Google Contacts

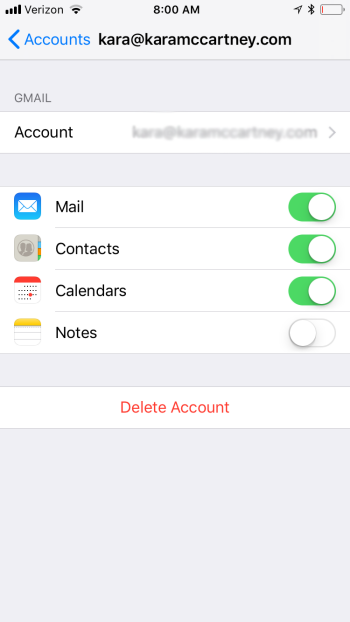
Alternatively, if you want to sync your contacts between your phone and an associated email address, do the following:
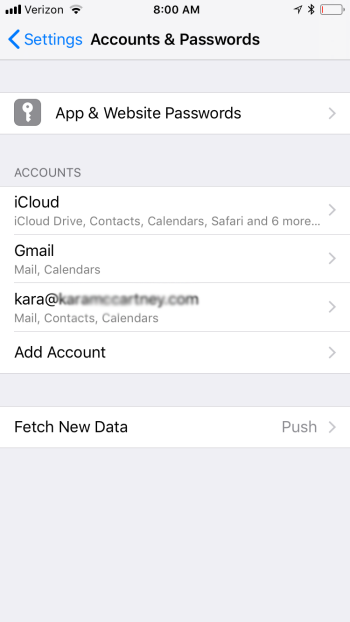
  • Open Settings
  • Tap Accounts & Passwords
  • Select the email address you wish to sync
If you have multiple accounts on your iPhone, select the email you want to sync.

- Ensure Contacts is turned on

Turn on Contacts for this account.

Android Users: How To Sync Contacts to Google Contacts

On most Android devices, your contacts automatically sync when you turn on your phone and sign in to your Google Account for the first time.

That means you don't need to export from Android—you only need to ensure your Android contacts are still syncing to Google Contacts. Just sync your contacts to your Google Contacts account and export from Google Contacts.

Here's how to double-check your contact sync:

  1. Open Settings
  2. Open Accounts and Sync
  3. Tap your Google account
  4. Slide the "Contacts" button to the "On" position
  5. Press Sync Now

Now when you sign into Google Contacts, you should see your Android contacts stored. To export them, follow the steps listed above on How to Export Contacts from Google Contacts.

Apple/iPhone Users: How To Export Contacts from Your iCloud

If you have a Mac or iPhone, the simplest way to export your contacts is online through iCloud.

  • Sign into iCloud.com. If you’re already signed-in on your computer, skip to step two
  • Navigate to Contacts
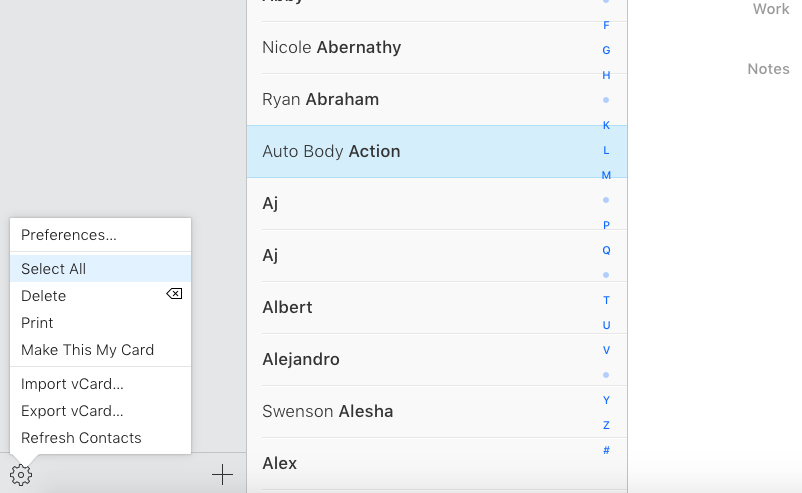
  • In the bottom left corner, click the settings icon
  • Click on Select All from the dropdown
Select all your iCloud contacts.
  • Once all contacts are selected, select Export vCard
  • Save your .VCF file on your computer

Apple Users: How to Import iCloud Contacts into Gmail

While you can export your contacts from these lists, they’re not exported as a CSV file. Instead, each contact is exported as a “vCard.” The simplest way to convert VCF to CSV is to simply import them into your email, then export them back out as CSV.

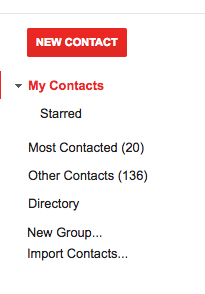
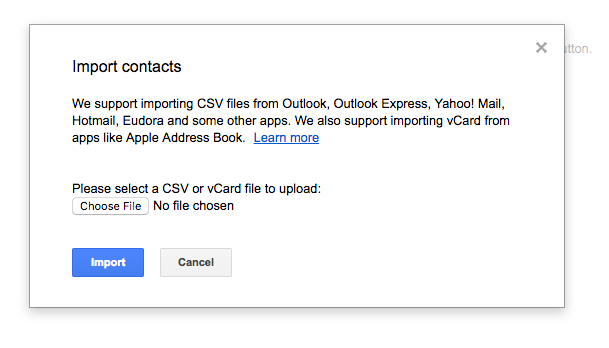
  • Open Google Contacts
  • Select Import Contacts on the left side bar
Import Contacts into Gmail easily.
  • Select your .VCF file from your computer
Select your file and Import those contacts.
  • Click Import

Then, repeat the export process by selecting the group you just imported, instead of All Contacts, like before.

Select the group you imported and get those exported for use in Excel.

Determine How You Want to Segment Your Database

All right, you now have multiple lists of contacts stored in Excel. Phone numbers have been added. Now we just need to combine and import them, right?

Hold up.

You only want to do this once. Meaning, you should be strategic about who you import into your app of choice. You should also consider how you want each person represented within your database.

Before we do anything drastic, let’s think strategically about how you want segment your list.

If something sparked your interest in creating a database—an event, new hire, or new sales strategy—ask yourself: What other events might prove this list useful in the future? The various scenarios running through your head can provide excellent guidance when segmenting a list for the first time.

Not everyone on your list is going to be a prospective client. Period. That doesn’t mean those individuals don’t have a purpose in your business.

Who will make the guest list to this year’s office Christmas party? Who adores and respects you enough to rate n’ review you on iTunes when you launch your podcast? Who do you respect in your industry—enough to recruit them when you land that round of funding?

You might come up with a few handfuls of names—perhaps a few dozen—for each of the above situations. Meanwhile, your list of contacts from Google Contacts and LinkedIn is currently sitting in the thousands. How will you find these individuals amidst the four-digit rows you now have going within Excel?

That’s where segmentation comes in, and why we need to divvy up these contacts before we import them into a more permanent tool.

Remember: You cannot find, sort, or report on information if it doesn’t exist.

Basic Data to Segment Your List

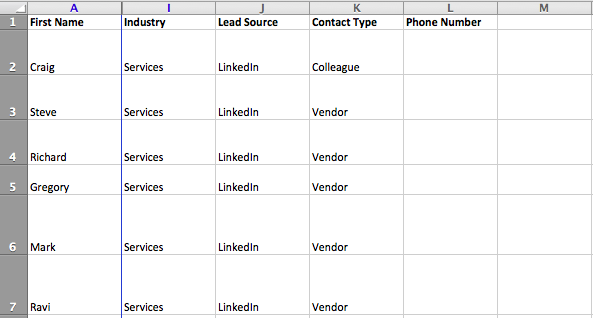
Consider adding the following columns to your file(s):

  • Lead Source: Where did the contact come from? For simplicity sake, you can simply write “Google Contacts” or “LinkedIn,” or type something more specific.
  • Industry: For your LinkedIn connections, you at least know each contact’s employer. Can you sort by your Employer column and add their industry? This might help send out targeted collateral or industry-specific blog posts in the future.
  • Contact Type: Again, not everyone’s going to be a potential prospect, and that’s ok. Consider dividing your list up by friends, vendors, recruits, or media personnel. Who’s left? What other categories can you assign?
  • Other contact info: Do you have phone numbers, Twitter handles, or an alternate email address saved somewhere? If you can dump this information easily into Excel, it’s well worth your time to add those columns.
These columns are a great start for your contacts database

Adding these three to four columns is the bare minimum you might consider starting with. Now, with your segmentation strategy in mind let’s clean-up this list.

Hacks to Clean-Up Your Contact List in Excel or Google Sheets

Before you import your list into another app, let’s clean it up. This will decrease headaches later on, and prevent you from importing your ex-boyfriend into your company database (I’ve seen it happen).

Note: While the following steps are explained using Excel, the same formula will work for Google Sheets. It will simply add one more step to your process. When you first export your CSV file from Google Contacts or other platform, save the file on your computer. To edit your contact list in Google Sheets, simply open a blank sheet, then click File > Import > Upload to upload the CSV file from your computer.

Here are a few Excel tricks that might come in handy.

Run an Index-Match to Consolidate Multiple Sheets Into One

If you have half-populated databases strewn all over your desktop and need to combine them into one, Index-Match will be your favorite (and certainly most-used) formula. For example, let’s say your old business mentor, Gary, is in both your Google Contacts and LinkedIn lists. In the first file, you have his phone number, cell, and business address; in the second, you have his company and job title.

Two Excel files, both with valuable information. Rather than copy-paste your life away, run an Index-Match to bring information from one sheet to the other.

In the first sheet, add columns for his company and job title (Columns E and F). To pull company into Column E, type =INDEX(**click the company column in your other sheet**),MATCH(D2,**click the email column in your other sheet**,0)).

Your formula should look like this. Hover over the bottom right corner of the cell with your formula (in this case, E2) until a (+) sign appears. Double-click it to drag the formula to the end of your sheet.

Your Excel formula and sheet should look like this.

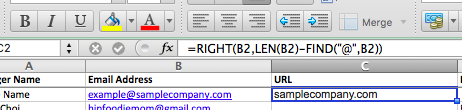
Extract URLs from contact email addresses

Not sure which company a contact works for? Run this formula, where B2 is the column with email addresses:
=RIGHT(B2,LEN(B2)-FIND("@",B2))

The formula returns the domain name for each of the email addresses in your list (Hey! Another column you can add.)

Pull out the domain from email addresses to create a new Domain column.

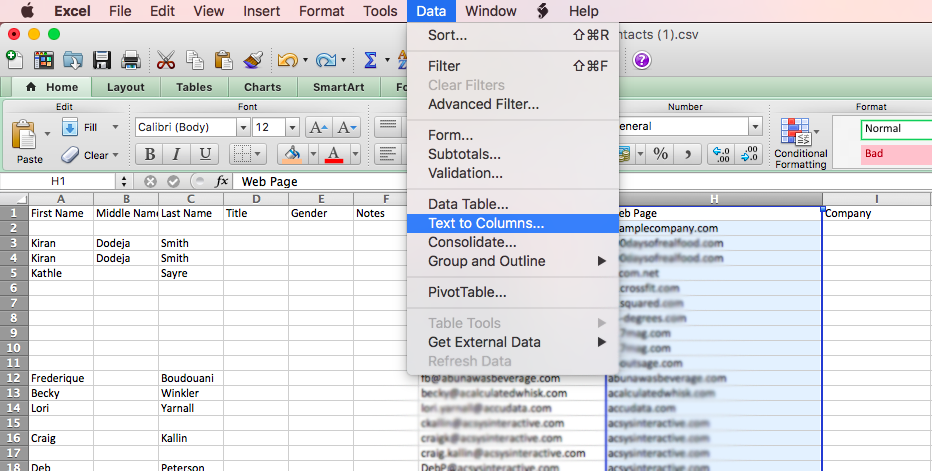
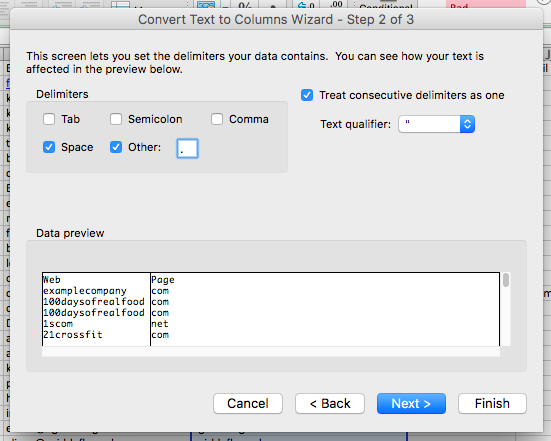
Use Text-to-Columns to Separate Names, Addresses, and Companies

Now that you have the domain URL, use text-to-columns to separate “.com” from the rest of the domain, hopefully resulting in the company name (or something very similar). You can run the same formula to separate first name from last name, or street, city, and state into three distinct columns.

To do this:

  • Select the column you wish to divide into two. For example, in column H in the Excel sheet below, I have extracted the domain from the individual’s email address. I would like to divide this into two columns, separating the company name from “.com”.
  • Insert a new column(s) to the right of that column. Since I am dividing one column into two, I only need to add one column. If you are dividing an Address column into Street Address, City, State, and Zip Code, you will have to insert three columns.

Tip: I always add an extra column for rare circumstances, like an individual having two last names. You can always delete it later.

  • Highlight the original column. In my case, this is column H.
  • Click Data then Text to Columns from the dropdown.
Date, then Text to Columns to separate names, address, and companies.
  • Click Next.
  • Select the barrier for which to separate your column. For example, a space significies the separation between a first and last name. However, a comma might separate the space between city and state within an address column.
Select the barrier for the separater to operate on.
  • Click Next.
  • Click Finish.

Import Your Compiled Contact List into Another App

Depending on your needs and the type of business you have, you can store and develop your list within any number of apps. You can keep your database in a:
- CRM system: Great for logging information between customers and prospects.
- Email automation software: Ideal for one-to-many communication, such as invitations, automated birthday emails, or sending client surveys. Note: If you plan to email these individuals, be sure to use a double-opt so you don’t go against any anti-spam laws.
- Spreadsheet app: Which is a digital, automated version of Excel. Tools like Airtable and Smartsheet can be customized to the point of developing your own CRM system within a spreadsheet.

Now that your initial list is compiled, cleaned up, and imported into an app, you can use Zapier so you (almost) never repeat this process.

The few times you might find yourself returning to this tutorial is with the expansion of your team. If you hire a new business development rep because of his or her connections, then ideally you want those connections added to your database. Likewise, if a team member parts ways with your company, you may want to ensure their connections remain with your firm.

From now on, you can add new contacts as they come in—without returning to Excel.

Automatically Add New Contacts to Your CRM System

Automatically Add New Contacts to Email List

Automatically Add New Contacts to Your Spreadsheet App

Want to learn more?

The Beginner’s Guide to CRM: Customer Relationship Management
Spreadsheets, Simplified: Ditch Data Entry with Excel and Zapier
How to Segment Emails Lists For More Opens, Click-Throughs, and Conversions


source https://zapier.com/blog/consolidate-contacts-one-list/

Monday 28 May 2018

The Best Way to Record Calls and Transcribe Them Quickly

Something funny happened as our phones turned into pocket computers: The phone part quit being as important. Our phones aren’t glued to our ears anymore. For many of us, phone calls are something we plan—they’re important conversations about detailed subjects, not random calls to check something quick. The latter have been taken over by text messaging and a plethora of chat apps.

Those important phone conversations aren’t just so you can talk to someone. They’re where you make decisions, get detailed questions answered, and find out things you’d like to remember. If only they were written down. Or just recorded—after all, a phone call (perhaps through an app instead of the phone system) is one of the better ways to collaborate on a podcast episode or audio interview, too.

Here’s how to record any call on any device and turn your audio into text minutes later.

Record a Call Using a Video Conferencing App

Zoom Record Call Mac
The easiest option is to make the call on an app with built-in recording (Zoom pictured).

If you make a call with Zoom, GoToMeeting, Join.me, or Cisco WebEx—among other popular business video conferencing and audio call apps—you can record the call directly in the app. Start the call, and once everyone joins, ask if they’re ok if you record the meeting, then click the Record button. Once you hang up, the app will typically save a recording to your computer (with Zoom or GoToMeeting) or to the app’s online service (with Join.me or WebEx) where you can download it to listen to later. That works on computers and mobile devices on most services, too. (GoToMeeting currently records calls only on computers.) Be sure to check your favorite call or video conferencing app’s options to see if it can record calls first.

That’s the best option. Record the call using an app's built-in features, and you’re done.

How to Record a Phone Call on Your Computer

That’s not always possible, though. Sometimes it’s easier to make a call on Skype, Google Hangouts, or to a traditional phone number. Maybe your contact needs to use a specific app like Messenger for the call, or perhaps your company already uses a team chat app like Appear.in that doesn't record calls.

In that case, you need to pick the best device to record the call: a computer. Mobile devices—including phones and tablets—might be designed for calls, but they’re also more locked down and more difficult to record calls on.

Case in point: Make a call on an iPhone, put it on speakerphone, and open the built-in Voice Memos app. It’ll tell you to hang up the phone call first if you want to record audio. There are other options on Android devices, with 3rd party apps that can record audio—but Pixel phones don’t work with them, and you’ll need to test the app on your device to see if they work.

On a Mac or PC, as long as you have the right apps, you can always record calls from any app. It just takes a bit of setup—and you’ll need to use an app like Skype or FaceTime’s handoff feature to make a phone call from your computer.

Here’s how to set up your computer to record calls with free and paid software:

The Easiest Way to Record Calls on Mac and PC: Screencasting Software

Screenflow record
Screencasting software can typically record your computer and mic audio (ScreenFlow pictured)

If you record calls often, and especially if you want to record a full video of the call, use a screencasting app like ScreenFlow ($129) on a Mac, Camtasia ($249) on a PC, or Snagit ($49) on either. Each is a powerful tool to record your screen, computer audio, microphone, camera, and more, then edit them into polished videos. If you already own a copy—or a similar app—they’re the easiest way to record calls on your computer (and worth the investment if you’ll record calls and screencasts often).

Before the call, open your screencasting app and select both your system audio and your microphone. If you don’t want to record video, un-check the Record Desktop in ScreenFlow or similar options in other apps. Then start the call on your computer, and once the people you’re talking to say they’re ok with the recording, press the Record button in your app.

When you’re finished, hang up the call then stop the recording. You can then trim and edit the audio before saving it to your computer.

If you don't need all the bells and whistles from a screencasting app, don't need to record video, or just don't want to spend money on an app to record your calls, there are free options available too:

Record Calls for Free on Windows With Audacity

Windows sound recording settings
Windows can play your mic through your speakers

Windows 10’s built-in Sound Recorder app can only record your microphone, but with one setting change and a free download, you can record your system audio and mic together in Windows.

First, open your computer’s Sound settings, select the Recording tab, then double-click your microphone. There, click the Listen tab, then check the Listen to this device box and click Ok.

Audacity
Audacity can record your mic and call audio together with Windows WASAPI

Next, install the free audio editing app Audacity if you haven’t already, and open it. In the recording toolbar, first select Windows WASAPI in the menu on the far left. Beside that and the mic icon, select the speaker or headphones that you’re currently using to listen to audio. Since Windows is playing your mic through your speaker or headphones, that option will get both the audio from anything playing on your computer (including a call) and your mic.

Now, start your call and confirm you can record, then click the red round record button in Audacity. Press the black square stop button when you’re done, and you can edit the audio or save it from Audacity.

Record Calls for Free on Mac With Soundflower and QuickTime

macOS security settings
You'll need to allow the program to install

Recording calls on macOS for free is a bit trickier—but works similarly. First, download the free Soundflower app, and install it on your Mac. On newer versions of macOS, you’ll need to open your Security & Privacy settings from your system preferences and click Allow as in the screenshot above to install the tool.

Audio Midi Setup
Audio Setup plus Soundflower let you combine your mic and Mac audio

Then, open the Audio Midi Setup app on your Mac (which is easiest to find by opening Spotlight or Alfred and searching for it). Click the + icon in the lower right corner and select Create Aggregate Device first. Check the box beside Built-in Microphone and Soundflower (2ch) to combine your system and mic audio. Now, the + icon again and select Create Multi-Output Device and this time check Built-in Output and Soundflower (2ch).

Mac sound options
Set your Mac to use the new combined audio

Now you need to switch your Mac to use the new combined audio you made. Open your Sound options in System Preferences and select Multi-Output Device under the Output tab. Be careful if you’re wearing headphones; you can’t change your Mac’s audio after you select that device. If it’s too loud, switch back to your default speaker or headphones, lower the volume, then select Multi-Output Device again.

QuickTime Record Audio
QuickTime is a handy way to record audio

You’re finally ready to record. You could use Audacity if you have it installed, or just use QuickTime Player, which comes with your Mac. In QuickTime, select File -> New Audio Recording, then click the down arrow beside the red record button and select Aggregate Device as the recording device.

Start your call, and when you’re ready to record, click the red record button. Click it again to stop, then you can trim the audio and save it from QuickTime.

Switch your sound settings back to your default speaker or headphones when you’re done. Then the next time you need to record a call, just select Multi-Output Device in the Sound settings again—and record as before in QuickTime.

Special thanks to user495470 on StackExchange Super User for their detailed directions on using Soundflower.

Record Calls on iOS and Android With Twilio

There are three ways to record calls on mobile—and all of them take a workaround. The most straightforward option on an Android phone is a call recorder app; How-to Geek recommends the free Call Recorder ACR app, and you’ll find a handful of others on the Play store. However, they won’t work on all devices; Call Recorder ACR’s team says it doesn’t work on Nexus or Pixel devices, for instance.

The next best is the most hacky: Use two devices. Start your call on one phone, put it on speakerphone or connect a audio-to-audio cable to your phone and another device phone or voice recorder device, and record the call through the second device. You can easily do it—albeit with poor audio quality—with any two phones. You could even open a transcribe app like Otter or a notes app like OneNote to record the audio and turn it into text at once on the second device.

The clearest option—though also the most difficult—is to make a group call where one of the participants is an app that will record the call. There are a number of such apps on the App Store and Play Store that offer their own number to join a conference call. Or, for one of the cheapest options, you can make your own with phone API service Twilio.

Make Twimlet URL
Twilio Twimlets can record and forward the call at once

First, if you don’t already have one, open a Twilio account and add a phone number (which typically will cost $1/month). Then, copy the following code, replacing +12345678900 with the person you want to call:

<Response><Dial record="true">+12345678900</Dial></Response>

Paste that into the Twimlets generator link as in the screenshot above, and copy the code.

Twilio Settings
Twilio's call settings let you add extra features via Twimlets

Now, open your phone number’s settings in Twilio, select Configure beside your number, then paste that URL in the A Call Comes In setting. Save that.

To record a call, call your Twilio number, and Twilio will call your other contact and record the call—though be sure to let them know the call is recorded and hang up if they’re not ok with that.

You’ll need to update the Twimlet every time you place a call. Alternately, you could have the Twimlet use your cell phone number as the forward number—and have the caller call your Twilio number to start the conversation. You could also just call your contact normally, and add the Twilio number as an extra participant in the call as long as you have another phone you can have Twilio forward the call to.

Twilio Call recording

Once you’re done, you can download your call or listen to it online from Twilio’s Programmable Voice Recordings tab. Or, using Zapier, you could have Twilio’s call recording saved to Dropbox or sent to a transcription service automatically (more on that later).

Special thanks to Marko Sulamägi on StackOverflow for their example twimlet XML code.

Record Calls on a Landline Phone

Making a call on a landline or office phone? Some of the same tricks that work on mobile phones can work here, too. The Twilio number trick works equally well on any phone, mobile or landline, and will record your call online just the same.

The speakerphone trick could work too. Put your call on speakerphone, then record it on your personal cellphone's recording app.

Or, check for a headphone jack. Many office phones and cordless phones include a headphone connector that you could then connect to a voice recorder device like this popular one. That's how our managing editor, Melanie Pinola, still records calls today. It's an effective mainstay of journalists that might still be the easiest way to record calls today—and newer models save mp3 files automatically, so no need to worry about tapes.

How to Transcribe Your Phone Call

Rev
Transcription services can turn your call into easy-to-browse text (Rev pictured)

You’ve made the call, and have turned it into an mp3 file. You could listen to it—but that’d take as long as the original call, and you don’t have time for that. Instead, the best option is to get it transcribed.

There are a number of services online to transcribe your calls, including automated apps and human-powered transcription services for higher accuracy. You can create an account, upload your audio, and then minutes or hours later get an email with the text of your conversation.

Or, you could speed things up as Zapier storyteller Joey Blanco and others on our team do. Joey saves his recordings to Google Drive, then has a Zapier automation that watches for Customer_Story in the file name and sends the audio to Rev. Once Rev transcribes it, Zapier copies the text and saves it to Google Drive automatically. All he has to do is record the call—and everything else magically happens in the background.

You can do the same with your Rev and CastingWords, no matter which file storage service you use.

Here’s the resources you need from Zapier to turn your calls into text:


Taking notes during calls is difficult, and distracts you from what you’re talking about. Don’t do that. With these tips, you can record any call from a phone number or app—then turn it into text with far less effort than it’d take to transcribe the call in real-time.

Header photo by Eduardo Sánchez via Unsplash.


source https://zapier.com/blog/call-recording-mac-pc-ios-android/

BuildASign.com Saves 5 Hours Every Week By Automating Contact & Lead Gen

Marketers always have something to request from the team's developers. Typically, it's to connect apps that don't have native integrations or build a custom report or search tool. But devs are hard to spare at most companies. You might have a lone engineer for marketing needs, but that dev probably shares their time with the support and sales teams, too.

So what's a marketer to do when a dev isn't around to help build tools and connections? Well, that's when marketers get crafty. Ashita Patel, BuildASign.com's strategic growth manager, got crafty with automation tools.

The first step in automating? Finding the right tools. For their marketing automation and emailing, where their contacts and leads wind up, the team at BuildASign.com relies on ActiveCampaign. So while that takes care of emails and lists, Ashita still needed to get her leads and contacts into ActiveCampaign before magic could happen.

For a time, that meant moving leads and contacts from the generator to a customer relationship manager (CRM) or ActiveCampaign or both. This kept dev resources where BuildASign.com needed them, but meant more menial work for the marketing team.

That's when BuildASign.com turned to app automator Zapier.

About BuildASign.com

BuildASign.com wasn't founded in 2005 to download and import contacts from one app to another. No, it was founded to simplify the world of custom signage. Whether it's a party banner or a magnet, vinyl decals or sandwich boards, BuildASign.com wanted to make customizing signage easy for anyone.

Since then, the company has grown to over 350 employees with a clientele to match. Their workload grew too, especially their leads. It reached a breaking point and Ashita and the team had to find a smarter way to work.

How to Save 5 Hours Every Week

A bit of manual work is fine for most growing companies. Sure, it takes time but you're only uploading contacts and leads once a week. Until it's twice a week…and then every day. And twice a day. And then it's overwhelming, annoying, and pulling people resources away from the work that matters.

"Zapier saves us five hours every week by automatically pushing leads and contacts into the right systems."Ashita Patel, Strategic Growth Manager, BuildASign.com

When BuildASign.com started to use Zapier, it was simply to save resources. By connecting their lead generators to ActiveCampaign with Zaps—our word for automated workflows—their team didn't have to pull engineers from their day-to-day work and these marketers saved themselves hours every week.

Their workflows are simple and effective, as the best Zaps are: To generate leads, BuildASign.com uses two apps: Cognito Forms and Unbounce. When potential customers fill out a form on BuildASign.com, they're triggering Zaps. Once the form has been filled out, Zapier sends the information to ActiveCampaign, creating a contact and adding them to a list.

Inside Google Sheets, BuildASign.com created an orders review database. Once an order gets to a certain stage, the team reviews the design to make sure it matches the customer's request. When someone updates a row in that spreadsheet, Zapier adds that customer to a "reviews" list in ActiveCampaign, with all the information their team needs.

Simple and effective time savers. These Zaps give Ashita and the BuildASign.com team five hours back every week. Give them a try yourself and see how much time you save:

If you don't use all these apps together, no worries—we have plenty more featuring ActiveCampaign, Google Sheets, Unbounce, and Cognito Forms:


The more work Zapier does for BuildASign.com, the less their dev team has to dedicate resources away from their priorities. The time and money saved with automation makes it easier for BuildASign.com to provide free banners and signs for returning United States veterans and discounted rates for non-profits. It means BuildASign.com lives up to their mission every day, to simplify signs.

For anyone thinking about or new to Zapier, Ashita offers this: "Spend some time just exploring the apps that work with Zapier. Some of my favorite tools were found just looking through the app list."

All images courtesy of BuildASign.com.


source https://zapier.com/blog/automate-activecampaign-leads/

Thursday 24 May 2018

How to Automate Google Sheets With Macros—No Coding Required

Far too often, it goes like this: You download data from your apps—your PayPal transaction data, say, or an exported email list from your old newsletter app—and open it in a spreadsheet. Then you move data around, resize columns, format text, delete rows, add headers, and finally add formulas and graphs to actually use the data and make it understandable.

Spreadsheets are powerful tools—and they're also tedious, frustrating nightmares of confusing formulas, hidden features, and messy data. Excel has long included a macro tool to automate those tedious tasks away—and now, with Google Sheets' new macro tool, you can build your own automations in Google's online spreadsheet app, too.

By recording your steps into a macro, you can teach Google Sheets how to do them at the click of a button, and never have to manually do it again. And as a bonus, if you want to add a custom keyboard shortcut for any one menu item in Google Sheets, you can now do that in Google Sheets with a quick macro.

Here's how to use macros in Google Sheets.

How to Make a Macro in Google Sheets

Google Sheets Macros

Macros are spreadsheet functions that can automatically do anything in your spreadsheet, faster. They can remove or add formatting, insert extra rows and columns, fill in tricky functions, clean up data, and more. As long as there's a button or menu option for something, a macro can run that along with anything else you want. You just have to teach your spreadsheet what you want it to do, then press the button or keyboard shortcut to run the macro.

Macros are handy to speed up your own work, and even more useful when you need to hand off work to someone else. Instead of needing to tell them exactly how to set up the spreadsheet and which functions to add, tell them to run your macro and the spreadsheet can do it for you.

All you need to do is first build the macro. In Google Sheets, open your spreadsheet, then click Tools → Macros → Record Macro.

Google Sheets Macro Recorder Tool

That will open a small Recording New Macro box in the bottom of your spreadsheet. Whatever you click or type in Google Sheets now will be recorded—and done again in that same order when you run that macro.

There’s one option to note. On the bottom of the dialog, you can choose to Use absolute references or Use relative references. The former will record the exact cell, column, and row you click—so if you click cell A1 and then click the Bold button, that Macro will always make cell A1 bold. The latter will record the relative direction of the work you do in the spreadsheet. Say cell B1 is selected in the spreadsheet when you start recording, then you click cell A1 and then click Bold. A relative macro will note to select the cell to the left—not precisely cell A1, but the cell to the left of the one selected when you start the macro—then make it bold.

Save Google Sheets Macro

Once you’ve done everything you want this macro to repeat for you in the future, click Save. You can then add a name to the macro along with a number, for easy access to up to 10 macros. Then, every time you want to run that macro, you’ll press Ctrl+Alt+Shift+your number on a PC, and Command+Option+Shift+your number on a Mac. (Unfortunately, macros don’t work on Google Sheets’ iOS and Android apps yet).

Google Sheets Macro Gif

Let’s pull it all together. Say you regularly get a contact list with names combined in one cell, along with the contact’s email—and you’d like to get their first and last name in their own columns along with their company name. A few Insert Rows and Split Text functions later, and you can teach Google Sheets how to clean up that spreadsheet. Then the next time you get a similar contact sheet, run the macro and it will do the cleanup work for you.

With Google Sheets Macros you can:

  • Use any Google Sheets formatting tools
  • Use any feature in a Google Sheets toolbar, menu, or right-click menu
  • Use any Google Sheets function
  • Select any cell, row, or column
  • Use Google Sheets standard keyboard shortcuts
  • Type any text into a spreadsheet

Anything you routinely do in Google Sheets, you can have a Macro do in a fraction of the time, on its own.

Add Custom Keyboard Shortcuts for Any Google Sheets Feature

Google Sheets add custom shortcut

Often what makes spreadsheets difficult to use is that the one feature we need is hidden in some menu, and we never seem to remember where it is when we need it. That’s how the Split Text tool is for me—I need it just rarely enough that I always forget where it lives.

You can’t add custom keyboard shortcuts in Google Sheets—or at least, there wasn't an obvious way to do this before Macros give you a workaround.

Just start the macro recorder, and record you clicking that one Google Sheets feature you need—and perhaps selecting the option you need in it as well (as in the Split Text animation above). Then save and add a custom keyboard shortcut for that macro.

Macro keyboard shortcuts

The next time you need that feature, press its keyboard shortcut—which is always Control+Alt+Shift+number on a PC, or Command+Option+Shift+number on a Mac. You can also see the macros' keyboard shortcuts in the Tools → Macros menu, or can edit them anytime from the Manage macros button there.

Add Macros to New Spreadsheets

Edit Google Sheets Macro

There’s only one problem: Google Sheets Macros only work on the spreadsheet where you make them. You’ll need to recreate them on other spreadsheets if you want to use them elsewhere.

Or, you could copy them over. To do that, first open the spreadsheet with your macro, click Tools → Macros → Manage Macros, then click the menu beside the macro you want to copy, and select Edit Script.

Each macro is powered by a Google Apps Script that you can copy over to use in any other spreadsheet. All you need to do is copy this script and use it in the other spreadsheet. So, select all the text in the editor, and copy it.

Now, open your new spreadsheet, record a macro, and save it—only here, you can literally start the macro recorder and click save without doing anything else as all we need is a blank, placeholder macro. Repeat the steps above to edit this new macro, and this time select all the text in the Google Apps Script editor and paste in your copied macro script from the first spreadsheet instead.

Go back to your new spreadsheet and run the macro, and you’ll have the same features from your first spreadsheet without all the work of remaking it.


And that’s how to use Google Sheets Macros to teach Google Sheets how to do your hard work for you. It’s a handy way to do routine tasks in your spreadsheet without needing to click a dozen times.

Do More With Google Sheets

Or, use Zapier’s Google Sheets Integrations to get your spreadsheet to do work for you, even while you’re sleeping. Want your new contacts or orders automatically added to a spreadsheet as they come in, or want to create a new project spreadsheet every Monday morning? You can do that and more with Zapier’s Google Sheets integrations that connect over 1000 apps to your spreadsheet. Here are some of the most popular to try:


source https://zapier.com/blog/google-sheets-macros/