Thursday 30 August 2018

How to Use Asana for GTD

If you follow the GTD productivity method and are looking for an app to use with it that's also collaborative, Asana might be the right option for you. Asana and GTD go together best for people who collaborate regularly and are willing to pay for a subscription, as some key features for GTD are restricted to the Premium tier of service. What makes Asana different from other GTD apps is that it lets you manage a variety of work, from office projects, to household chores, to your personal reading list, in different ways. In other words, you can manage your reading list completely differently from how you manage your household chores list.

GTD stands for Getting Things Done, which is both the name of a productivity methodology and the title of the book that describes it, written by David Allen. The book was first published in 2001, and the original implementation uses pencil, paper, folders, and a filing cabinet.

Since those days of pen and paper, a whole marketplace of apps for GTD has evolved. Some apps match the language and mechanics of GTD precisely, while others, including Asana, weren't explicitly designed with GTD in mind but can be co-opted for it.

There's no one right way to use Asana for GTD. Here you'll find examples and suggestions rather than strict rules. Borrow from them liberally and customize the setup to best suit your needs. But before we get started, here's a little bit of background about both GTD and Asana.

How to Use GTD With Asana

What Is GTD?

As mentioned, GTD is a style of working first described in a book of the same name. It's a set of rules for organizing, prioritizing, and tackling tasks. It includes other recommendations for staying organized and productive, too, such as immediately writing down anything significant that pops into your mind so that your thoughts don't distract you from the task at hand. People who use the method typically say it helps them curb procrastination and focus on tasks that matter.

GTD boils down to a five-step process:

  1. Write down everything you need or want to do
  2. Decide whether each item on your list is actionable, necessary, something you can delegate, or something you can discard
  3. Organize these items into lists
  4. Choose tasks to work on based on your context (for example, I'm home after a long day and not prepared to tackle any difficult and time-consuming tasks, but I still want to get something done)
  5. Review your progress: How well did you focus on and complete the appropriate tasks today or this week?

If you prefer explicit rules regarding what you should and should not do to be productive, then GTD is right up your alley. Its clarity is undeniably part of the appeal.

What is Asana? Why Is Asana Well Suited for GTD?

There are three characteristics of Asana that make it well suited for GTD. 1) It's flexible in the sense that you can manage different types of work with it. 2) It gives you multiple options for how to view and organize your work. 3) It's collaborative.

First, Asana is a work management app. People sometimes refer to it as a project management app, but the term work management is more accurate because it covers both project work and non-project work. So, what's the difference between a project and non-project work?

Projects have a start date, end date, and final product or deliverable, and they always comprise multiple tasks. They also typically have dependencies among the tasks. For example, building a house is project, and one dependency is that you must first complete the architectural drawing before you can start construction.

Non-project work is essentially any other type of work. It can be a series of tasks that have no specific end date, such as answering support phone calls, to a single chore, like preparing for a weekly meeting.

Asana handles both project work and non-project work with ease.

To the second point, Asana includes the option to create any to-do list of your choosing as a list or as a kanban board. Kanban is another methodology for managing work that tends to appeal to people who latch onto visuals. Kanban and GTD are compatible, so including kanban as an option in Asana gives you more possibilities for how you can view and manage your work.

Finally, Asana does an admirable job of supporting collaboration. If your idea of getting things done involves delegating tasks and following their activity as they progress, then Asana is one of the best tools you can choose.

How to GTD With Asana

To apply the GTD method to Asana, you first need an Asana account. You can create one for free, and it will remain free as long as you collaborate with no more than 14 other people. For $119.88 per year, you can upgrade to invite more people to your workspace and get a few extra perks, notably task dependencies and the ability to add start dates to tasks.

Once you've created an account, you can begin putting in a structure for GTD and adding your tasks.

Create Projects (or Lists)

Projects are the primary way to organize work in Asana. They are the buckets that hold tasks. You can create Projects for both project work and non-project work, which makes the language a little confusing. No matter what you call them, they're merely lists. (Even if you view them as kanban boards; they're still lists.)

You create Projects using a plus sign in the left rail.

How to Use GTD With Asana - Projects

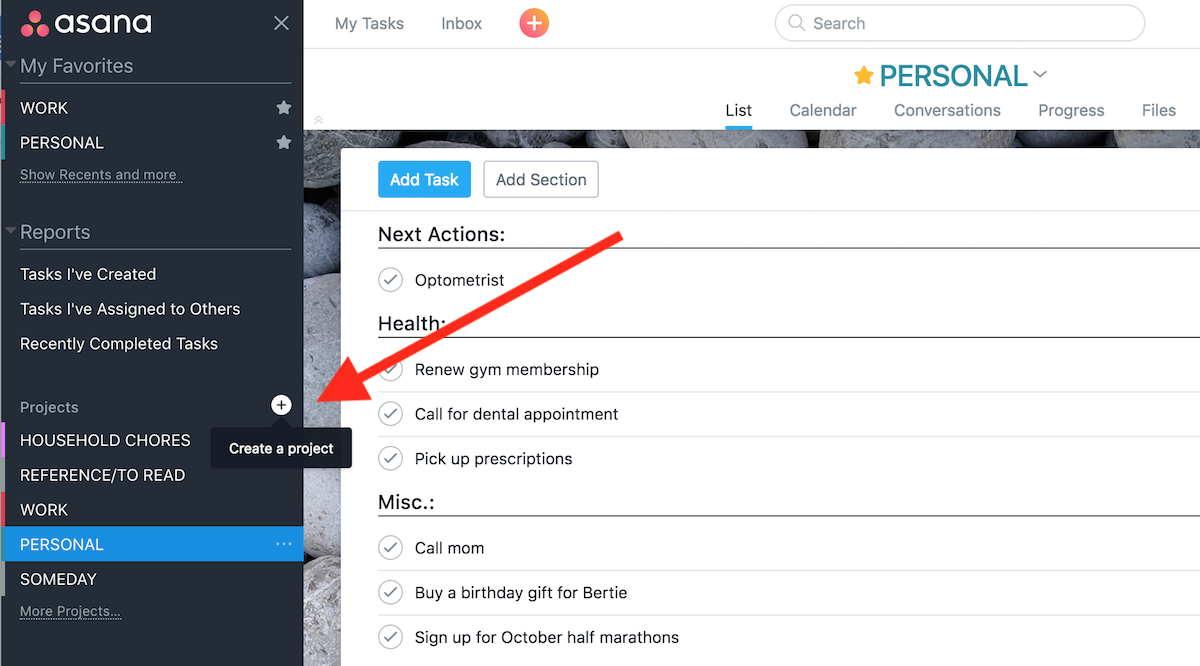
When you create a new Project, you can make it a list or a kanban board. Note, however, that once you choose, you can't change it.

You can create whatever lists you want, although for GTD, I recommend starting out with something along these lines:

  • New (explained below)
  • Work
  • Personal
  • Household
  • Reference
  • Someday

If you're well versed in GTD, you might wonder why there's no Inbox. The New folder is what GTD would typically call the Inbox, the place where you capture anything that comes to mind. We won't use the name Inbox because Asana already gives you a different space called Inbox, which shows all activity on tasks assigned to you or that you follow. So, to avoid confusion, call this list New or Capture—anything other than Inbox.

As you create Projects, Asana asks you whether you want to share each one or keep it private.

You can change the privacy setting of a Project at any time from the upper right corner of the screen whenever you're viewing it. The options are private (only you can see it), private to members (only people you invite can see it), and public to people on a specific team. In all likelihood, some of your Projects should be private, such as your personal to-do list. Team settings are useful when you intend to create many Projects over time and want to grant access to the same group of individuals over and over. It comes up frequently when you use Asana for work, but it might also be a useful tool if you have many different Projects for the people in your household or other teams, such as a parenting group or neighborhood association.

Invite collaborators, set up teams

Next, invite your collaborators and set up teams. You may have already done this step in the process of creating each Project, but if you need to adjust your list of collaborators, you can add and subtract people from a Project or team at any time.

How to Use GTD With Asana - collaborate

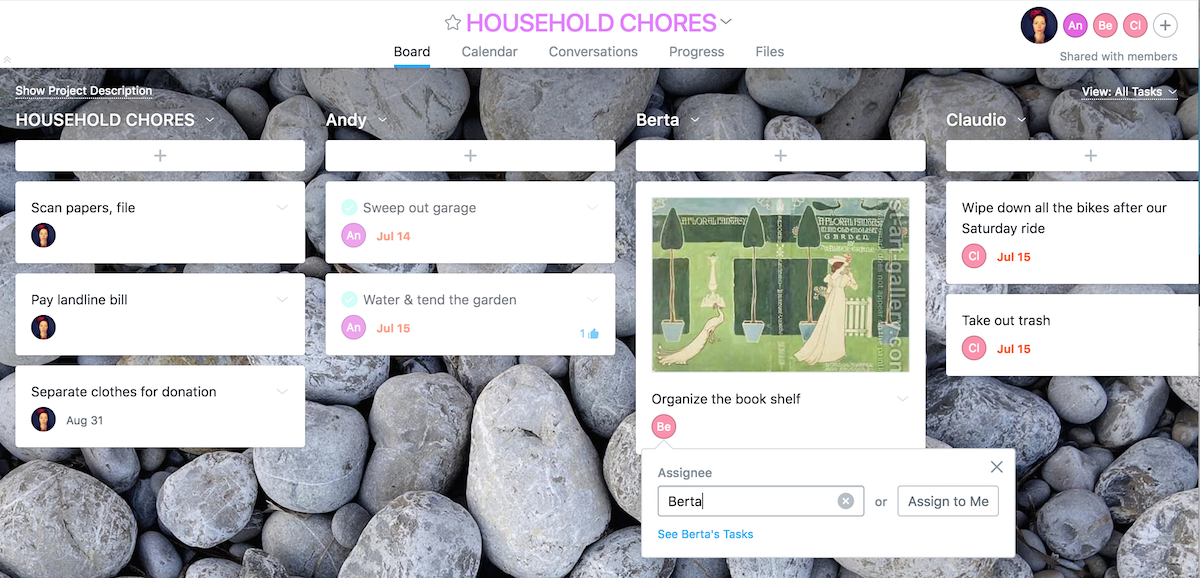
In the image, you can see both collaboration (delegating tasks to others) and the kanban board view.

The people you invite receive an invitation by email. They must accept it and sign up for an Asana account (or use an existing one) to join you.

Populate Projects with tasks, subtasks, and ideas

If you're migrating from an existing GTD setup, copy all your incomplete and pending tasks into the appropriate Asana Project, keeping in mind that you might restructure them slightly to take advantage of all Asana has to offer.

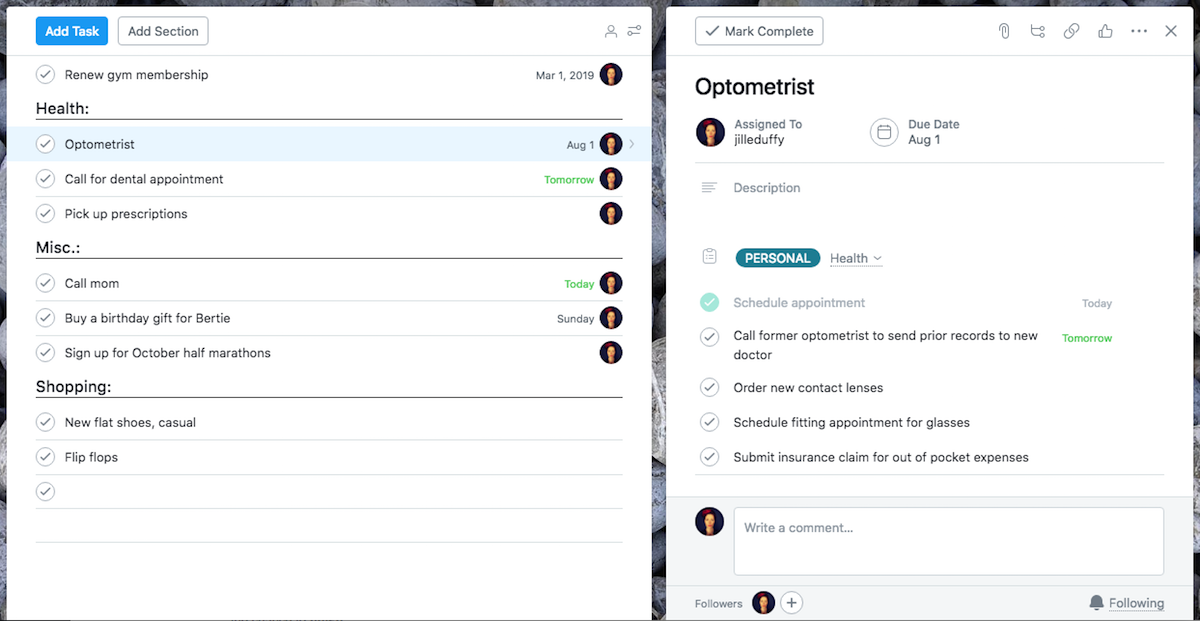
In Asana, both tasks and subtasks are exceedingly easy to see and manage. You can change their order by dragging and dropping them, which is useful for GTD because you can arrange tasks in descending order of importance or when you'll do them. Every task opens as a card in a right-side pane where you find additional detail, such as due date, assignee, description, comments, links, attachments, subtasks, and if you have a Premium account, even more than that. Subtasks get the whole kit and kaboodle: Everything you can do with a task you can also do with a subtask. Because subtasks are so robust, Asana works exceptionally well for managing tasks that have multiple parts.

How to GTD With Asana - subtasks

Keep in mind that every Project doesn't need to contain tasks. In the GTD way of thinking, you might have a space for keeping track of reference material or a list of books and articles you want to read. With Asana, it's simple enough to use any Project space for an ordinary list.

Be sure to add any other necessary detail to your tasks, especially deadlines and assignees. For lists that are private to you, do you need to add yourself as the assignee? It depends whether you want those tasks to show up in your Asana Inbox. Tasks assigned to you will turn up in the Inbox, but tasks assigned to no one will not.

Add sections

Sections in Asana are headers that help you break up lists into different parts. You can add these dividers using a button, or you can type your Section name in the same place you add new tasks and place a colon (:) after it; press enter, and the Section automatically appears.

Once these visual dividers are in place, you can drag and drop the relevant tasks to appear under the appropriate heading.

How to GTD With Asana - sections within lists

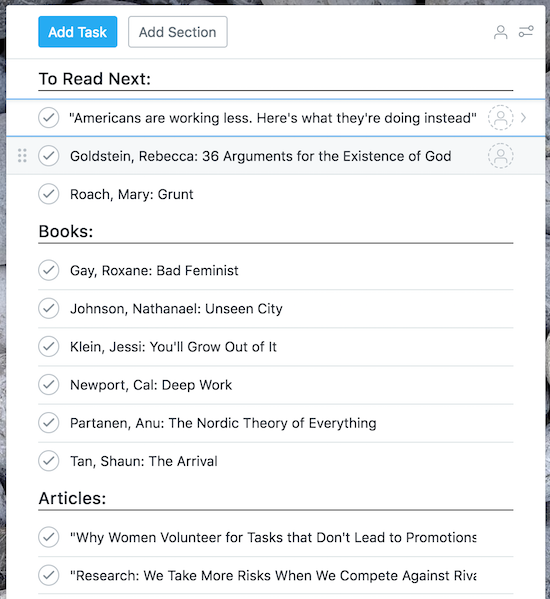
Sections can make long lists seem more manageable. Instead of having a never-ending list of content to read, I might break up my Reading list with Sections for books, articles, and two or three items I intend to read next. Another idea is to create a Section called Someday in each Project for tasks that are not urgent. Doing so would mean not creating a separate list called Someday, which is the typical GTD way to do it. The benefit is you can more easily move tasks into and out of the Someday area without losing track of whether they are also personal tasks, work tasks, household chores, and so forth.

I don't recommend creating a Section called Next Actions (GTD says to mark actions you're committed to doing next as "next actions") unless you are using a free Asana account. The reason is tags work better for this purpose (more below), but they're restricted to paying members only.

Use tags to filter

The ability to add tags to your tasks and subtasks is a Premium-only feature, but for GTD, it's a highly desirable one to have because it lets you filter your tasks by context. One tenet of GTD is that you should see only tasks that are relevant based on your context. For example, if you're home, you don't want to look at your to-do list and see tasks that can only be done at work. Or if you're out running errands, you don't want to even consider tasks that require being in front of a computer. Similarly, if it's the end of the day and you have low energy, you're not in the right frame of mind to start a task that requires high energy. In Asana, we can use tags to add context and then filter our task view to see what's relevant in different moments.

To add tags in Asana, select a task or subtask so that you can see its card on the right side. Select the button showing three stacked dots and choose Tags. Create tags for your context, such as home, next-actions, or phone-call (no spaces allowed with tags), and assign each one a color. You might also have tags for energy rating, meaning whether a task requires low, medium, or high energy to complete. Additionally, you could use tags to show a task's priority rating (such as low, medium, or high priority), although in Asana, people generally prefer to use custom fields instead. The choice is yours. Once created, color-coded tags show up in your lists.

How to GTD With Asana - tags

Any time you click on a tag, Asana shows a view filtered for all tasks with that tag. To save the view, click the star at the top of the page. Now, this filtered view will always show up under My Favorites in the left rail.

Become a follower

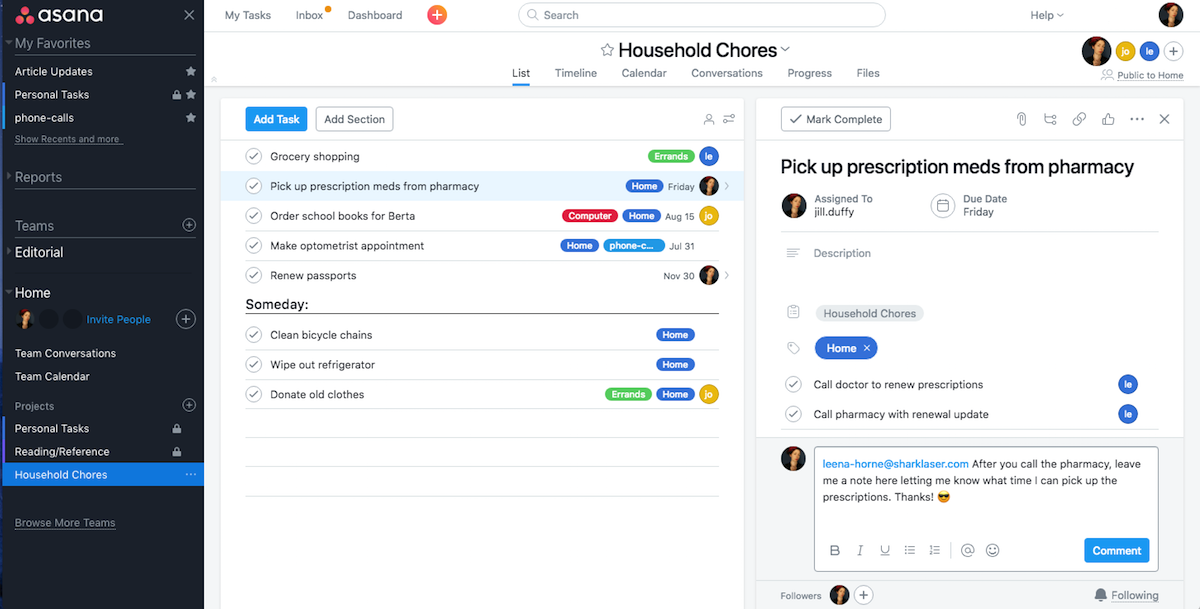
When you delegate a task to someone else, Asana automatically adds you as a follower, meaning you get updates about the progress and activities related to that task. GTD doesn't have any specific recommendations for how to follow up on tasks after you delegate them, so it's kind of a bonus that Asana gives you options.

You can add yourself as a follower to any task, even if you're not the person who create it or delegated it, and likewise you can remove yourself as a follower whenever you don't want notifications about a task's activity.

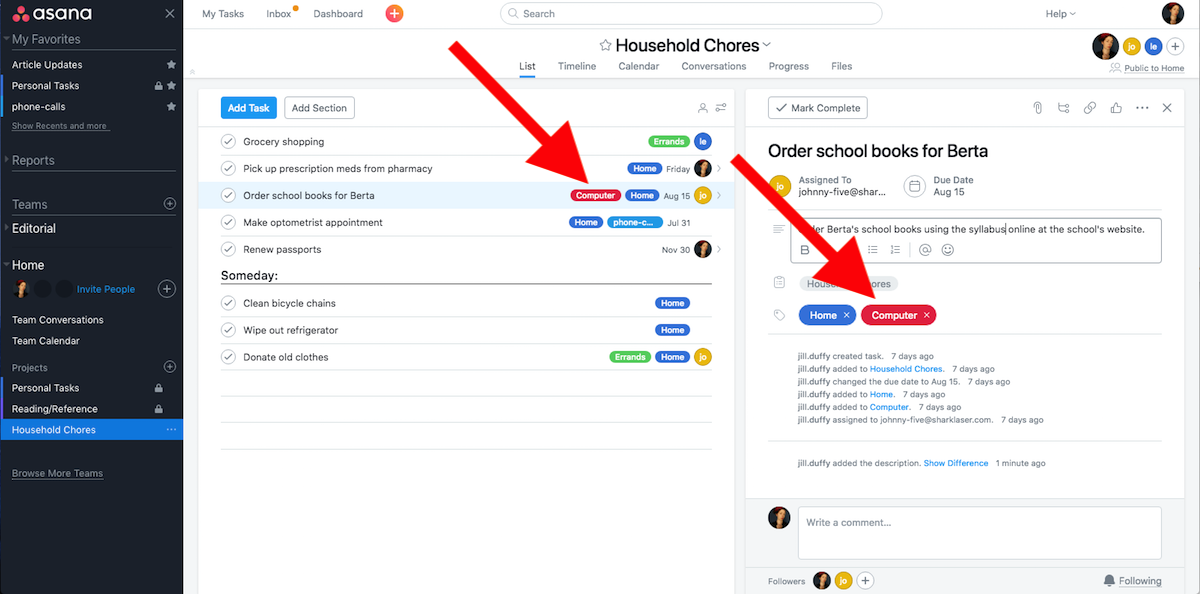
Let's say you use Asana to manage household chores, and you've assigned someone to pick up prescription medication. By adding yourself as a follower on that task, you receive an alert when the person marks it done or takes any other action, such as adding a comment. If the assignee writes, "The pharmacy said the prescriptions are expired," you would know right away and could, say, add a subtask to "Call the doctor and get the prescriptions renewed."

Followers on each task or subtask appear at the very bottom of the task card. You can add and remove yourself and others as followers at any time.

Triage from the Inbox

If you use Asana collaboratively, you will likely have moments when your Inbox fills with messages. Use the Inbox to triage critical items. As with any inbox, you ideally want to keep it free and clear of all material. In the GTD world, an empty inbox is a sign you're on top of your productivity.

When notifications in the Inbox do little more than update you about the status of a task, dismiss them to clear them out immediately.

Review from My Tasks

Next to the Inbox that Asana provides is a section called My Tasks, which is where you find all new and upcoming tasks assigned to you.

How to GTD With Asana - My Tasks

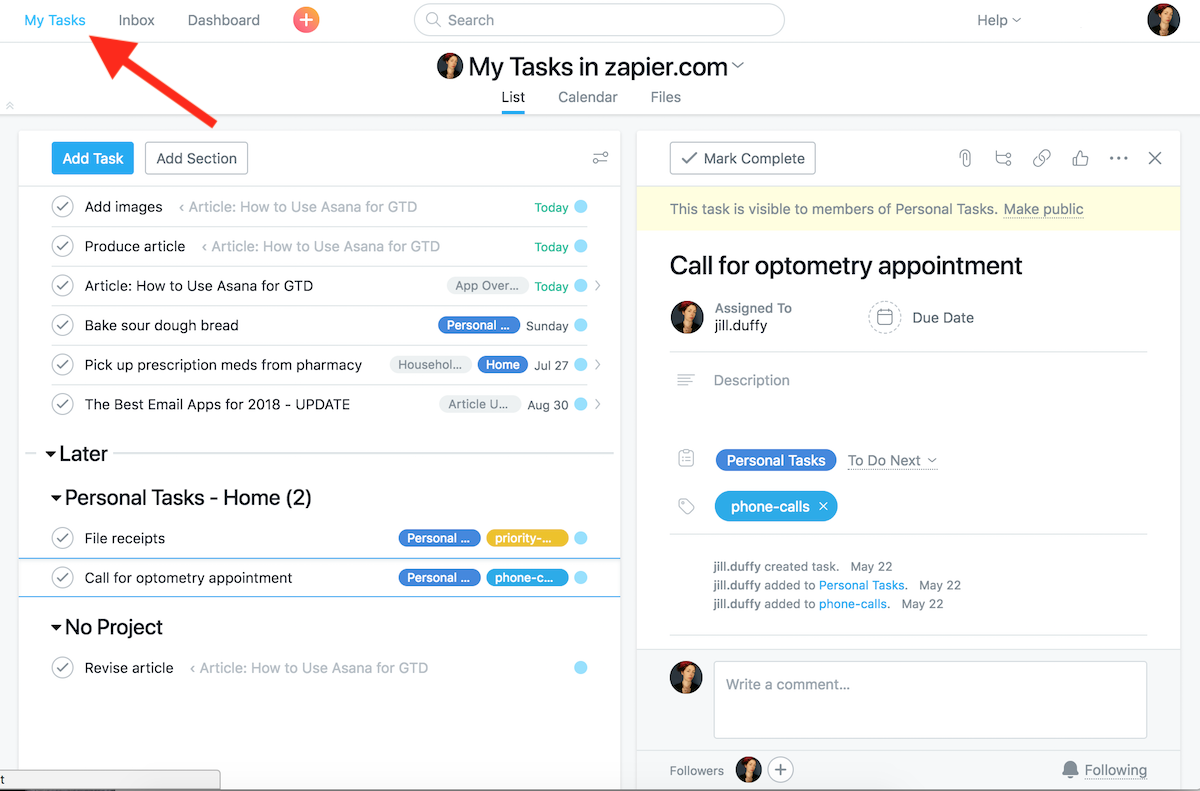
For GTD, I recommend reviewing My Tasks at the beginning of each day, in the same way you might review whatever is upcoming on your calendar each morning. Are you trying to take on too much? Should you defer or delegate some of the tasks on your plate? Similarly, you might review My Tasks at the end of the week to get an idea of what you'll be facing at the start of the following week.


Go Collaborative or Go Home

Asana stands out from other to-do apps and work management apps in how it facilitates collaboration. When you work on a team, whether it's a group of colleagues or your housemates, Asana gives everyone clear updates and information about your tasks. At a glance, it's easy to see what has been done, what needs to get done, who's responsible, and so forth. The collaboration features are what make it shine.

If you're not actively collaborating with other people, however, Asana may feel somewhat ordinary because you won't experience the very features that set it apart. Odds are you won't assign tasks to yourself if you use it solo (because all the tasks are yours), and that renders the Inbox and My Tasks views moot.

Regardless, Asana is incredibly flexible. You still have options for setting up your tasks as a list or on a kanban board, and you can see a calendar view of your assigned tasks. But I would only choose it for GTD if I were collaborating with others.

More Asana for GTD Resources

Asana (the company) produced a video about how to use Asana for GTD in conjunction with a business that uses the app for this purpose. The 50-minute video goes into rich detail about both the setup and the philosophy behind it, which may give you more ideas.

If you don't need to store something in your head, don't. The GTD method encourages you to get ideas out of your mind and put them somewhere safe for later. Automating simple tasks is another way to minimize the amount of information you have to remember. For more inspiration, explore Zapier integrations for Asana.

Title image remixed from an original by Freepik


source https://zapier.com/blog/how-to-use-asana-for-GTD/

Wednesday 29 August 2018

About Us

As writers on the Zapier blog, we cover everything from the best productivity apps to how to get to Inbox Zero to why you should use a VPN to salary negotiation tips: tips and tricks to help you be more productive at work and get more done.

Matthew Guay, Senior Staff Writer

Matthew Guay

Matthew started writing about tech to document tips and workarounds so he wouldn't have to re-discover them again later. Nearly a decade later, he's written extensively for Envato's AppStorm and Tuts+ networks, Metalab, How-To Geek, Digital Inspiration, Smashing Magazine, and more. As Senior Writer at Zapier, Matthew focuses on writing content that helps people learn how to use Zapier successfully in their work. When he's not doing that, he's reading or exploring some new part of town, looking for something to photograph or great new street food to try. Follow Matthew on Twitter @maguay. A few of Matthew's articles:

Jill Duffy, Staff Writer

Jill Duffy

Jill Duffy has been covering technology since the early 2000s. Formerly she was a contributing editor at PCMag.com, where she covered software and consumer fitness devices and wrote a weekly column called Get Organized. Her first book, Get Organized: How to Clean Up Your Messy Digital Life, published in 2013. Her work has also appeared in Vogue India, Popular Science, The Ritz-Carlton Magazine, Prevention, as well as other magazines and websites. Follow Jill on Twitter @jilleduffy. A few of Jill's articles:

Joey Blanco, Customer Storyteller

Joey Blanco

Like all good stories, Joey Blanco's starts with dinosaurs. Jurassic Park opened his eyes to the power of a good narrative, setting him on a path that led not to cloning extinct species, but instead to sharing customer journeys. As Zapier's Customer Storyteller, Joey chats with Zapier's user base, learning about their efficiencies, tips, and tricks—and then shares them wide in a story. If he's not writing a story, odds are Joey's playing bass, defending the semi-colon, or corralling his two dogs. A few of Joey's articles:

Jessica Greene, Contributing Writer

Jessica Greene

During a decade-long career in digital marketing, Jessica discovered three things she's passionate about: writing, teaching, and finding creative ways to streamline day-to-day tasks. Today, she combines those passions as a professional writer, writing blog posts that teach people how to boost their productivity in both business and life. When she’s not writing, she's usually playing video games with her family or singing a silly song to one of her cats. A few of Jessica's articles:

Melanie Pinola, Managing Editor

Melanie Pinola

Melanie has been writing about technology and productivity for over a decade, and her work has been featured in outlets like The New York Times, Popular Mechanics, Lifehacker, and The Wirecutter. As managing editor at Zapier, Melanie oversees the content that goes up on the blog. When she's not doing that, she's playing video games with her family and trying new food recipes. Follow Melanie on Twitter @melaniepinola. A few of Melanie's articles:

Deborah Tennen, Contributed Content Manager

Deborah Tennen

Deb is an ex-academic turned editor. Her publication record includes McSweeney's, People Magazine (letter to the editor), and everyone's favorite quarterly, Renaissance Studies. As Zapier’s Contributed Content Manager, Deb manages and edits all content from freelancers and guest posters. When she’s not working, she's either watching television or showing someone a picture of her dog. A few of Deborah's articles:

Danny Schreiber, Editorial Team Manager

Danny Schreiber

Danny is a tech enthusiast with a belief that content rules the web. In his role as team manager, he collaborates closely with Melanie and Deb to build a team of writers who teach everyone to be more productive at work. He also leads Editorial's involvement across other areas of the organization, including product, employer branding, and internal communications. Before Zapier, he served as founding editor of a Midwest tech blog. Follow Danny on Twitter @dannyaway. A few of Danny's articles:


source https://zapier.com/blog/authors/

Tuesday 28 August 2018

Ruler Analytics Uses Automation to Democratize Data with Customers

"As different problems arise, I often find Zapier has a solution."Ian Leadbetter, Directer, Ruler Analytics


Data matters. It's how you can tell if your marketing campaigns pay off, and which ones offer the most return on your investment and where to focus next time. But if that data lives in one system, secluded from the other tools in your stack, what's it doing for you? Importing and exporting that information from system to system takes time and can be error prone.

Ian Leadbetter used to try and directly connect his tools to each other. Time and again, he found these integrations lacking: Some needed fields weren't present, certain information wasn't exposed to the API, and on and on the problems piled up.

When he signed up for app automation tool Zapier, though, Ian found flexibility and nearly limitless options for how he and the Ruler Analytics team could manage their information.

About Ruler Analytics

Marketing pioneer John Wanamaker is attributed as saying, "Half the money I spend on advertising is wasted; the trouble is I don't know which half." Enter Ruler Analytics, a tool for marketers to track ROI across campaigns,. Founded in 2015, Ruler Analytics closes the loop between marketing and sales, matching customer contact to specific marketing campaigns and keywords, so businesses know which half of the money does the most work.

Thorough communication and information sharing between apps is essential to the work the Ruler Analytics team does every day. It's no wonder Ian uses Zapier to make that sharing as smooth as possible.

Ruler Analytics Automatically Sends Data to CRMs with Zaps

Customers like control, especially when it involves their own data. So while some tools make it difficult for customers to manage their data, the team at Ruler Analytics takes a different approach. Their dashboard provides clients with data around campaign ROI, but Ian and his team also support and encourage their clients to use Zapier to send data from Ruler Analytics to their CRMs of choice.

"We know our retention improves when our customers use Zapier, as it brings our data into their processes where they can make use of it properly," explains Ian.

The automation doesn't stop there: Internally, Ian and the team cut out hours of copying leads into mailing lists and marketing automation. Instead of copying data, they let Zapier's automated workflows, called Zaps, do the heavy lifting on what used to be many manual tasks.

Ruler Analytics' Tools

Icon: App: Used For:
Ruler Analytics Ruler Analytics Conversion tracking
Google Sheets Google Sheets Database
ActiveCampaign ActiveCampaign Marketing automation
MailChimp MailChimp Email marketing
Pipedrive Pipedrive Customer relationship manager (CRM)

The Workflows

To democratize the data their app provides, the team at Ruler Analytics recommends their clients build out a simple Zap to automatically create leads in apps like Salesforce, Pipedrive, and Zoho CRM.

With one of these recommended Zaps, Zapier automatically creates a new lead whenever Ruler Analytics tracks a new conversion.

"We realised people liked our dashboard but wanted to see their marketing data in the tools they were already using, like a CRM," Ian says, explaining why they encourage clients to create Zaps.

Internally, the team uses Zapier to automate most of their lead generation process. Like their clients, they also rely on the Ruler Analytics app to generate leads, which a Zap sends to Pipedrive, creating a deal.

From there, another Zap will add the information from Pipedrive to a campaign in ActiveCampaign. For those potential clients who haven't converted yet but did sign up for more information, another Zap sends the contact information from MailChimp to a nurturing campaign in ActiveCampaign.


For Ian and Ruler Analytics, the main benefit they get from Zapier isn't the sheer amount of time saved—although that's a part of it. For them, Zapier enables Ruler Analytics to connect their customers with all the tools and data they need to make informed decisions around marketing campaigns.

Want to democratize your data, too? Give Zapier a try for free.

All images courtesy of Ruler Analytics.

Our stories explore how Zapier's users solve common problems. From marketers to CEOs, educators to real estate agents, millions use Zapier to automate their most tedious tasks. If you haven't yet, try Zapier for free to see what we're all about.


source https://zapier.com/blog/automate-marketing-data-ruler-analytics/

The 8 Best PDF Editors

When you need a document that will look the same everywhere, no matter which app opens the file, you need a PDF. They’re the closest thing we have to digital paper. PDF files are ubiquitous for detailed forms, eBooks, whitepapers, and anything else where you don’t want text and fields to move around depending on your device and window size.

And they’re easy to use. On Windows, macOS, iOS, and Android today, you can view PDF files with built-in tools. You can often highlight text, fill out forms, and even add basic annotations—but want to edit the text or replace an image in a PDF? That’s where things get tricky.

We’ve tested fifteen PDF editors to find the best apps to both view and edit PDFs. Here are the apps to use the next time you need to tweak a PDF—along with tips to turn anything into a PDF.

How to Save Any File as a PDF

Windows Print to PDF

Want to make a PDF? That’s easy from any app, on any device today. First check if your app includes a PDF export option, as Microsoft Office and other professional software often do. Those export tools will often let you set your PDF quality, secure PDFs with a password, and set other document options.

Otherwise, press the default print button—or tap Ctrl+P on a PC—as that’s the easiest way to make a PDF document. In Windows 10, you can select the Print to PDF printer to save the document as a PDF instead of printing it.

PDF options macOS

In macOS, there are a number of PDF options inside the default Print dialog. Press the print button in your app or use the CMD+P keyboard shortcut, and in the lower left corner of the print dialog click the PDF menu. You can choose to save the PDF file, open it in Preview, or add the PDF to supported apps on your Mac.

iOS Print as PDF

Android and iOS include similar options. In Android, open the Print option from an app’s menu, then select Save as PDF from the Save to or Printer menu. In iOS, tap the Share button and select Print, then force touch or tap-and-hold on the print preview to open a PDF copy. Tap Share again to save the PDF or add it to another app.


Now, want to edit the PDF you just made—or another PDF on your computer? Here are the apps to use:

The Best PDF Editors

  • Preview (Mac) to rearrange pages, sign documents, and mark up PDFs for free
  • Xodo (Web, Android, iOS, Windows) to annotate and collaborate on PDFs anywhere
  • Sejda (Web, Windows, Mac, Linux) to edit text and create PDF forms for free
  • CloudConvert (Web) to turn PDF files into editable Word documents
  • PDF Expert (iOS, Mac) to quickly edit PDF text and images
  • PDFelement (Android, iOS,Windows, Mac) to edit PDFs and add forms in an Office-like editor
  • Foxit (Web, Android, iOS, Windows, Mac) to edit PDFs everywhere
  • Adobe Acrobat (Windows, Mac) to create detailed PDFs and forms

Preview (Mac)

To rearrange pages, sign documents, and mark up PDFs for free on the Mac

Preview for Mac

Preview is the Mac’s hidden gem. Double-click a PDF, image, or almost any other type of file on your Mac, and they’ll open in Preview to, well, preview them. Preview can also crop and resize images, and let you tweak brightness and more with its editing tools. And with PDFs, you can use those same tools to annotate your PDF documents.

Some of Preview’s PDF editing features are a bit hidden. There’s a highlighter tool in the toolbar by default—then click the pen button to open the Markup toolbar to add callouts and text annotations, notes, and freehand drawings. You can add a signature with your trackpad—or sign a piece of paper and hold it up to your camera to copy your real ink signature. Then, if the page thumbnail sidebar is open, you can drag-and-drop pages to rearrange them—or open another PDF in Preview and you can drag-and-drop pages from one PDF into another, or drag an entire new PDF into the sidebar to merge two documents. You can also save individual pages from your PDF as images from Preview’s Export options.

Preview can't edit the original text and images in your PDF files, or add new form fields. For everything else, though, it’s a handy set of tools for core PDF edits.

Preview Price: Free with macOS

Xodo (Web, Android, iOS, Windows)

To annotate and collaborate on PDFs anywhere

Xodo PDF

Want Preview-style markup features that work everywhere? Xodo is the PDF editor to use. Open xodo.com/app, drag-and-drop in a PDF file, and seconds later it’ll open in your browser with all of Xodo’s markup features (without needing to make an account). You can fill out PDF forms, search through documents and bookmark pages, highlight or strikethrough text, and add images, text boxes, shapes, signatures, and other annotations. You can’t edit existing text and photos in PDFs—but you can add almost anything else you want to a PDF. Or, from the app’s front page, you can select to merge PDF documents or rearrange pages as well—or turn a Word document or photo into a PDF with Xodo’s mobile apps.

Xodo is also designed for collaboration. You could add standard annotations and text notes, then download the PDF and send it to your team as with most PDF editors. Or, you can work from the same online document together. Once you’ve signed up for an account, you can invite others via email or copy a link to your document. Then, add annotations and collaborate around comments on your PDF, like you do in Google Docs.

Xodo Price: Free

Sejda (Web, Windows, Mac, Linux)

To edit text and create PDF forms for free

Sejda

Need to edit text in a PDF? Sejda is the rare free PDF editor that can edit text or add form fields to a PDF. It’s designed around a set of tools to rearrange pages in PDFs, merge documents, crop or rotate pages, add headers and footers with page numbers, recognize text with OCR, split PDFs into smaller documents, and more. Among those single-purpose tools is a surprisingly feature-filled PDF Editor that, yes, lets you edit text and add form fields for free.

It’s not perfect. Sejda struggles more with editing text using custom fonts than other PDF editors (as you can see with the italics text above). So if your PDF uses an uncommon font, your best strategy is to select the text, switch to a similar font included with Sejda, and then make your edits. Also, it adds the same formatting to all text in one text box, so you can’t italicize or bold one word in a paragraph—instead, create a blank space, then add a new text box for the formatted word and drag it in. You can also start from scratch with a blank document, perfect to make a new PDF form. Sejda packs an impressive suite of features into an easy-to-use editor that’s ideal for your one-off PDF edits.

Sejda Price: Free to edit 3 documents per day including up to 200 pages each; from $5/week for Web Pro or $69.95 perpetual desktop license for unlimited edits and batch processing

CloudConvert (Web)

To turn PDF files into editable Word documents

CloudConvert

It’s not a PDF editor, per se. But if you want to turn your PDF back into a document and edit everything in it, CloudConvert is one of your best options. It’s a conversion app that can turn over 200 different file types into the file you want. Add a PDF, and it can turn it into a Word document, plain text file, HTML webpage, ePub eBook, or individual images.

The Word document (.doc or .docx) option is the most useful. It extracts the text and images, replaces fonts with standard ones that are on most computers, and preserves as much formatting as possible. It’s not perfect—but it does quite a good job of making a document that’s similar to your original PDF. CloudConvert can even be automated with Zapier—have Zapier watch a Dropbox or Google Drive folder for new PDFs, and CloudConvert can automatically turn them into Word documents and save them back to the original folder. You can then customize the documents further in Word or another word processor—before perhaps turning the finished document back into a PDF.

CloudConvert Price: Free for up to 1GB files and 25 conversion minutes per day; from $8 per 500 conversion minutes with unlimited file size

Learn more in our CloudConvert overview, or build your own Zaps to convert PDFs automatically with Zapier’s CloudConvert integrations.

PDF Expert (iOS, Mac)

To quickly edit PDF text and images

PDF Expert

At first glance, PDF Expert doesn’t look like a full PDF editor. It’s more focused on reading, with a clean interface that focuses on your documents. With options to view two PDFs side-by-side along with a zoomed out view to see every page in your document at once, it’s a great way to read through even the longest PDFs. It organizes and syncs PDFs on iPad, and lists recently viewed PDFs on Mac to jump back in where you left off. And when you need to change something, its nearly-hidden tools are waiting in the slim toolbar.

You’ll see annotation tools to highlight or underline text, add signatures, and insert shapes and notes in the default Annotate view. Open the zoomed out view that shows all pages at once, and you can drag-and-drop pages into the order you want, rotate pages, add new pages, or extract a section of your document into a new PDF. Then, in the Edit tab, you can click any text to edit it (using the document’s original font for any letters that are contained in that section, and system fonts for any other characters). You can also add links to text and images, or insert new images into your documents. It doesn’t include OCR tools or options to add form fields—but is great for editing text, images, and formatting in PDFs.

PDF Expert Price: $59.99 for Mac; $9.99 for iOS, plus additional $9.99 Pro in-app purchase for PDF editing tools

PDFelement (Android, iOS, Windows, Mac)

To edit PDFs and add forms in an Office-like editor

PDFelement

PDFelement has a PDF editor app for everyone. Only need to add occasional edits to PDFs on the go? Its free PDF app for iOS and Android lets you read, annotate, and even edit text in PDF documents as long as you register for a free account. Then, on Mac, PDFelement Express includes simplified tools to annotate PDFs and edit text without needing the full app.

Or, you can get the full PDFelement app for a Microsoft Office-style editor to tweak anything in your PDF documents. The Standard version includes full editing features, while the Pro version uses OCR to recognize text in images and can add form fields to your PDF documents. It can even recognize form-style sections in your documents and turn them into fillable PDF forms automatically if you want. With its large icons and clear labels, it keeps things from feeling complicated while still including a wide range of tools in its apps.

PDFelement Price: Free on iOS and Android; $39.95 PDFelement Express for Mac with simplified editing tools; $59.99 PDFelement Standard for Mac or Windows with core editing tools; $99.95 PDFelement Pro for Mac or Windows with OCR tools

Foxit (Web, Android, iOS, Windows, Mac)

For a full-featured PDF editor web app

Foxit Online

Want a full-featured PDF editor on your tablet, in your browser, and on your laptop? Foxit offers them all, with advanced mobile, web, and desktop apps for editing PDF files with one subscription—along with free apps to view and add annotations to PDFs.

Foxit’s has a bit more trouble with editing text in custom fonts—the online app misses some capitalizations and formatting like Word’s PDF conversion, and its desktop app was a bit better but still had some issues. It makes up for that, though, with powerful PDF tools to extract data from filled forms and add them to spreadsheet files, turn a page of your PDF into a template for new documents, and a tool to pull all your PDF comments into a new summary PDF document.

Foxit Price: Free Foxit Online or Foxit Reader for desktop to read and sign PDFs; from $7.99/month Standard for online and mobile editing features and full desktop apps including OCR tools; from $129 one-time purchase for desktop

Adobe Acrobat (Windows, Mac—plus reader for Android, iOS, and Linux)

To create detailed PDFs and forms

Adobe Acrobat

Adobe Acrobat is the original PDF editor, the app that started it all in 1993. Today, it’s to documents what Photoshop is to photos. The ubiquitous Acrobat Reader is great to view PDFs, add highlights and notes to annotate PDFs, and fill out forms—especially complicated ones like government forms that might not open well in other apps. For anything else, you need the full Adobe Acrobat which is part of Adobe’s Creative Cloud or as an individual app subscription.

The latest versions of Acrobat are packed with features but feel surprisingly easy to use. It hides most of the tools by default, so you can read PDFs and fill in forms without editing them if you want. Click the Edit PDF button in the sidebar to edit text, images, links and more—with editing tools that tend to keep the PDF file looking as it did originally more than other PDF editors. Acrobat will only use fonts you have installed when editing the PDF—though it includes more font editing options to ensure spacing looks correct in your edited text.

Acrobat can also create new PDF documents from scratch with its basic word processor, or can convert other files and merge them together into PDFs. From the Tools page, you can also use OCR to recognize scanned text, merge or split PDFs, redact data, and build detailed forms that can summarize typed text into a barcode to easily copy it to another device or app. You can connect Adobe Acrobat forms to databases, build mini-apps inside your PDF documents with JavaScript, and build action wizards to automatically process PDFs. It’s more than you’d need to edit text in the occasional PDF document—but if you work with PDF files daily, Adobe Acrobat is still the industry leader with the most advanced PDF editing and creation tools.

Adobe Acrobat Price: Free Adobe Reader to view PDFs, add highlights and basic annotations, and fill out PDF forms; $24.99/month (or $14.99/month if paid annually) Adobe Acrobat Pro DC to edit PDFs, compare changes, use OCR on scanned documents, and more; from $299 one-time purchase


The next time you open a PDF and wish you could change something—you can. Grab one of these apps, and you’ll be able to tweak text, add a new image, highlight your favorite things, and build your own PDF forms in minutes.

Keep Reading:


source https://zapier.com/blog/best-pdf-editor-apps/

Monday 27 August 2018

The 10 Best Website Builders for Freelancers and Small Businesses

Most small businesses don't have the budget to spend thousands of dollars on a developer to create a website for them. At $61-$80/hour (and often much more), the costs are downright prohibitive. That's where website builders come in: These tools give individuals and small businesses the ability to build an internet presence without breaking the bank. They do the heavy lifting for you—both the back-end and the front-end—and you just make a few choices along the way.

If you're looking to build a complex website or an interactive application, you'll want to hire a programmer. But if you're building a blog, a portfolio, or a website to market a small business, a site builder is the right choice.

What Makes a Great Website Builder?

Here, we've gathered 10 of the best website builders available. Every app on this list meets the following criteria:

  • Security. Paid tools that don't include HTTPS / SSL services as part of their service weren't considered. Security for users of your website—and for you—is non-negotiable.
  • Reliability. You need a site builder that will work every time you use it, and one that you can trust to create a site that will work for your customers 24/7.
  • Ease of use. Features are fantastic, but if a website builder is too complex, it defeats the purpose. The goal is for you to be able to create a website using the builder tools without any programming experience.

The 10 Best Website Builders

Best Free Website Builders

  • Jimdo Dolphin for an assisted site builder
  • Site123 for site-building extras like form builders
  • Weebly for a balance of simplicity and customization
  • Wix for built-in membership features like bookings and reservations

Best Premium Website Builders

Best WordPress Add-on Website Builders

  • BoldGrid for a visual site builder
  • Divi for a modular site builder

Best Free Website Builders

Many website builders offer free plans, but only a handful of them are robust enough to give you the results you want. Of course, a free plan won't be fully featured, but if you're looking to create a simple site without many advanced features, you have several solid options.

Jimdo Dolphin

Best for an assisted site builder

Jimdo Dolphin assisted site maker screenshot

Jimdo Dolphin uses intelligent decision-making technology to generate a site for you within minutes. As you get started, it asks for information about your business. It asks for the name of your business (which it then searches on Google and asks you to verify) and what type of business you run, and it asks you to connect your business's social media accounts. All of this information allows it to prepopulate business information, contact information, and potentially some copy and images on the page as well.

Once Jimdo Dolphin has done as much of the legwork as possible, you take the wheel. And it'll be an easy drive: Click into text boxes, images, and other content fields and replace Jimdo Dolphin's pre-filled content as you see fit.

So if you're looking for the quickest route to a functioning website, Jimdo Dolphin will get you there. You're putting your trust in a robot, but it's a pretty crafty robot—and you can always make tweaks if V1 isn't what you'd hoped for.

Jimdo Dolphin price: Free; paid plans start at $90/year.

Site123

Best for site-building extras like form builders

Site123 screenshot

Most website builders offer themes, design aesthetics, and layouts that are consistent throughout your entire website. Site123 takes a different approach: It offers a series of different design choices and layout arrangements for each piece of your page. For example, if your site's overall vibe is clean and simple but you want a splash of flair to call out a specific feature, you can do that with no problem.

Of course, the abundance of choices could be overwhelming, but Site123 does a nice job simplifying by offering a default to work from. In the end, Site123 achieves that much-needed balance between doing the work for you and offering plenty of customization.

The most standout feature of Site123 is the quality of its site-building extras. These features, like form builders and video embeds, are fairly common in site builders, but Site123 integrates these extra elements into the page layout process. With a simple click, you can add contact forms, videos, terms or privacy policies, a "cookies warning", or social media links. Instead of making you weigh the value of putting in effort to get those extras in there, Site123 makes it feel effortless.

Site123 price: Free; paid plans start at $129.60/year.

Weebly

Best for a balance of simplicity and customization

Weebly page builder screenshot

Weebly starts you out with a choice of several dozen themes, broken into categories—like Business and Portfolio—so you begin the process with a page that already resembles the finished look you're hoping for.

Once you've picked a theme, you'll have an editor in front of you with drag-and-drop choices on the sidebar. You can quickly add all kinds of content blocks, including maps, buttons, forms, images, text, and more. You can even include your own custom HTML/JavaScript, which is essential if you're looking to include specific elements but don't have the skillset to create a website from scratch.

If you intend to integrate your site with a lot of outside services—like analytics tools, marketing services, advertisers, or other embedded content—the ability to trade out pieces of the prebuilt theme with your own scripts will be crucial. And with Weebly, it's a cinch.

Weebly price: Free; paid plans start at $48/year.

See Weebly integrations on Zapier

Wix

Best for built-in membership features like bookings and reservations

Wix page builder screenshot

Wix is full of contact and member management features. On the scheduling side, an integrated appointment booking system and calendar make it a top choice for individuals and small businesses who have a heavy load of appointments, such as stylists, auto shops, or restaurants. And for customer relationship management, Wix has a built-in CRM tool, which is fairly uncommon for a website builder.

The website builder that Wix offers is nothing to ignore, either. It's a classic visual builder, which displays a minified version of the website while you toggle through a variety of options such as theme, title, and images. Between the fully realized site builder and the extra features for member and contact management, Wix is lined up to be a real powerhouse for anyone who needs to book appointments or reservations or who spends time managing clients or vendors.

Wix price: Free; paid plans start at $60/year.

Premium Website Builders

If you're looking for more features—or simply want to add a custom domain or remove the site builder's branding—it's time to upgrade to a premium plan.

WordPress.com

Best for simple ad revenue options

WordPress page builder screenshot

First, a quick distinction. There are two WordPress sites: wordpress.com and wordpress.org. With wordpress.org, you'll to download the WordPress package; pay for a separate hosting service, like GoDaddy or HostGator; and take care of patches and upgrades yourself (or pay more for managed hosting where they do it for you). WordPress.com, which we're suggesting here, is the cloud version, which includes domain hosting. The tradeoff is less flexibility and fewer available plugins and themes, but the convenience of cloud web building is worth it.

WordPress.com does offer a free plan, but you'll need a premium version to capitalize on its best feature: easy monetization of your site. There are a lot of options for monetizing a WordPress site, but here are the most common:

  • Advertising from WordAds, cloud WordPress's custom ad placement platform. Different ad sources, such as Google, AOL, Yahoo, and AdX, bid on ad placement on the platform, and your site gets revenue from ads that are seen or clicked by your users.

  • Sponsored content and affiliate linking are allowed on cloud WordPress as well—athough they take more effort on your part than WordAds. This means other people can pay you to feature their product or service on your site (sponsored content), and you can link to products or services on other sites and earn a commission if someone makes a purchase (affiliate linking).

  • You can add PayPal buttons to your site to accept payments or donations via the "Simple Payments" system—just add the button right from the page builder.

Paid plans also give you access to a seemingly infinite number of themes and customization features—almost to the point of decision fatigue. But the potential for monetization in itself is a reason to choose WordPress.com.

WordPress.com price: Paid plans that allow you to monetize start at $96/year.

See WordPress integrations on Zapier

Squarespace

Best for its streamlined process to create an appealing site

Squarespace page builder screenshot

You may have heard about Squarespace from its advertisements on your favorite podcast or YouTube channel—and it's a rising star in the website builder space.

Squarespace's focus is on streamlining the website creation process. As you click through their setup process, you make choices and have customization options, but unlike with a builder like WordPress.com, there's no sense of decision fatigue. Once you pick a theme, the editor is simple and polished: You click into a block (e.g., a text box), get a few options (in the case of text, a small bar of font styling choices), make your changes, and you're done. It doesn't have the expansive set of options that many other services have, but you won't have to navigate through various menus to get your finished product.

Squarespace price: From $144/year for traditional sites; from $312/year for online stores.

See Squarespace integrations on Zapier

uKit

Best for SEO and promotion readiness tools

uKit promotion readiness tool screenshot

The initial uKit setup wizard is a little clunky, but once you get into the editor, it's full of all of the standard blocks and options; and if you spring for the eCommerce plan, you'll get access to shopping cart and checkout tools. uKit also has a unique preview feature—what they call an "Adaptive Site View," which lets you easily click to preview the site on mobile or tablet.

But what makes uKit stand out is a tool that analyzes your site for "promotion readiness." Once you've created your pages in the site builder, the readiness tool analyzes your site and tells you if you're missing anything important for search engine optimization (SEO)—things like relevant text and images, page descriptions, and contact details. Google visibility can make or break your business, and uKit makes sure you optimize before going live.

uKit price: From $42/year.

Shopify

Best for eCommerce

Shopify page builder screenshot

Shopify is laser-focused on building eCommerce websites: sites that sell a product or a service online. These kinds of online stores require more specific features than a traditional website: things like user accounts, shopping carts, inventory systems, and payment processing—to name a few.

The Shopify site builder doesn't have a drag-and-drop interface, but it does offer a visual representation of your site as you modify the content in each of your theme's blocks using the sidebar. All the basics are there, but what sets it apart are its eCommerce-specific features.

Shopify has various tools to ensure that your customers have a seamless experience on your site and that your store runs smoothly. For example, there's an abandoned cart recovery service, which saves shopping carts for customers who leave the site with items in their cart before checking out. That way, when a user returns to your site, their cart is exactly as they left it. Shopify also offers fraud analysis services, which help you catch fraudulent orders as they happen, or soon afterwards, mitigating the hassle and frustration of dealing with chargebacks and refunds—or worse.

While many of the site builders on this list have eCommerce features, Shopify is tailor made for this purpose. We experienced some signup and setup issues in other eCommerce solutions, but Shopify allowed us to get our site up and running with minimal time investment and offered all the bells and whistles required from an eCommerce site builder.

Shopify price: From $348/year.

See Shopify integrations on Zapier

WordPress Add-on Website Builders

Because WordPress powers almost a third of all websites, we've included a final section to highlight what we found to be the best WordPress add-on site builders. While WordPress can function as a site builder in its own right, you can layer other site builders on top of it, offering a more visual site building experience—something that WordPress itself is lacking.

BoldGrid

Best for a visual site builder

BoldGrid page builder screenshot

BoldGrid is a visual site builder, which—like Wix and Shopify—allows you to see the pages of your site as it would appear to a visitor, then click into any section and edit it. The difference, of course, is that BoldGrid allows you to build and edit this way with an existing WordPress site. Essentially, it capitalizes on the content management system (CMS) part of WordPress, helping you build the site where that content lives.

BoldGrid also includes a suite of plugins within the site builder to assist with things like contact forms and eCommerce features, as well as features like offering SEO recommendations and the creation of staging or testing versions of your site. These options take WordPress to another level and make up for many of the areas in which it's lacking on its own.

BoldGrid price: $60/year; allows the use of BoldGrid for any number of WordPress sites.

Divi

Best for a modular site builder

Divi modular site builder screenshot

Divi is a WordPress plugin that can be used as a site builder alongside your existing WordPress theme. But it also comes as an all-inclusive theme (with the page builder included), which makes it easier to use Divi to customize your site.

The site builder part of Divi started as a modular page builder with a grid system—and that's still its most standout feature. Instead of feeling like you're in a word processor or a page of code like you would in WordPress, you'll have much more control of the structure with Divi. It's up to you to create sections, add rows and columns, and create your own layout. Once the structure is in place, you can add your text, sliders, forms, images, videos, and so on.

Divi price: $89/year or $249/forever (for unlimited WordPress sites).


In the end, the decision of which website builder to use will depend on a whole slew of factors. Do you need a fully featured builder? Do you want a custom domain? Is time your most precious resource, or do you value customization? Are you looking for a quick marketing website, or are you launching an online store?

All of these questions—and many more—will help you narrow down your choices. And if you have the time, we suggest getting yourself a free trial of a your top choices and diving right in. That's the best way to know if a website builder will work for you.

Title image by Freepik


source https://zapier.com/blog/best-website-builders/

Payment Processor Showdown: Stripe vs. PayPal

Online business all starts with a simple transaction.

Back in the day, in order to complete that transaction, you needed a merchant account—a special bank account that allows you to accept credit card payments—and loads of cumbersome equipment. Today, all you need is a standard checking account and an online service that accepts payments and transfers them to your bank account. Those online services are called payment processors or payment gateways.

Image via Square

Here, we're going to examine two of the most popular payment processor options out there: Stripe and PayPal. Both have distinct advantages and disadvantages, so let's see how they stack up.

Common Features and What We Looked For

PayPal and Stripe each carry unique benefits and challenges. How hard is it to set up for your website? Can you take payments in person? What about using your mobile phone to accept payments? What if you have to type in a credit card number by hand? Is it secure? These are all questions you should be asking before kicking off the decision-making process.

Here are the 10 factors we considered in our showdown. Click on the section that matters most to your business, or jump to the end to see our complete comparison table.

Cost

Stripe has a slight edge on international orders

Stripe and PayPal both allow you to start with no monthly fees. That means that if you aren't selling anything, then you aren't paying anything. This is hugely important for micro-businesses that might not be able to foot even a tiny monthly bill for a payment processor.

They also both have similar pricing structures beyond that:

Sales within the U.S. for both processors are 2.9 percent per transaction plus $0.30. So, if you made a sale for $10.00, you'd pay $3.20 to Stripe or PayPal. This likely isn't a coincidence and demonstrates just how competitive the two companies are with each other.

For international sales, the transaction fee goes up to 4.4 percent for PayPal but only 3.9 percent for Stripe, which gives Stripe an advantage if you're doing a lot of international business. And one other note: If you use the PayPal Here card reader from your phone, you'll get away with a 2.7 percent transaction cost, which is a slight advantage over online sales.

Bottom line: The pricing is pretty similar, so this isn't a make-or-break category.

For complete pricing, see PayPal's and Stripe's pricing pages.

Transactions

PayPal is easier unless you use a third-party shopping cart

PayPal Button Wizard

If you're selling a product or service online, you need at least two pieces to make it work:

  1. The payment processor
  2. A shopping cart application

To get that shopping cart application, you have a couple options. First, you could integrate with a third-party service; e.g., the website builder you used to make your website. Stripe and PayPal both integrate with all the big eCommerce website builders like Shopify, WooCommerce, BigCommerce, Wix, and Squarespace. Sometimes it's as simple as logging in to both accounts, and other times you need to get an API key from Stripe or PayPal. But either way, If you go that route, it's equally as easy to connect either payment processor with whatever shopping cart you use.

But if you've built your own website from scratch and you want to embed the shopping cart using only PayPal or Stripe, that's where PayPal starts to pull into the lead. PayPal offers a shopping cart solution that you use on any website where you can paste HTML code. Just click on the Business Setup link from your dashboard and choose "On your website." Then follow the prompts to get a block of code that will render as a button that directs users to a shopping cart. Stripe, on the other hand, requires some JavaScript and HTML experience to get the job done. There's a decent amount of sample code available in the documentation, but without some basic coding knowledge, you might feel lost.

So if you're not working with a third-party solution and you're a coding newbie, PayPal is probably your best bet.

Testing Your Website

Stripe and PayPal both offer robust testing options

Adding a checkout solution to your site, flipping the switch, and getting paid sounds tempting—but don't get ahead of yourself. Especially when there's money involved, you don't want want any "oops" moments. So first, you need to test.

But how do you test a payment system without using real money? The solution is what's called a sandbox, i.e., a testing site that mirrors your actual site. Much like the childhood image evokes, the sandbox is a place to play around. In this case, you're playing around with your site, testing different features to be sure that everything works before making it live to your customers.

PayPal allows testing through sandbox accounts that can be accessed through their developer site. Once you've created your sandbox account, you can log in to a sandbox version of PayPal and experiment. Create checkout buttons and use test credit card numbers provided by PayPal (or the sample buyer PayPal account that comes with the sandbox) to check that everything works from initial click through to purchase.

For the same purpose, Stripe offers a test API key alongside the live API key, and any transactions made using the test key are considered dummy transactions. They also provide sample credit card numbers, along with a suggested series of tests to be sure that any errors are handled properly before taking your site live. As you test, full logs are kept so you can review any errors; and while some errors require development knowledge to understand at a glance, there are thorough explanations available in the documentation. Plus, the dashboard can be switched to view test or live data with a toggle button on the left pane at any time. This is in contrast to PayPal, where it's necessary to log in to a completely separate sandbox site in order to test.

Stripe and PayPal both provide a robust set of tools to check that your site's payment system is working well before you let real customers at it. They go about it a bit differently, but they offer sufficient ways to test your site without using any real data.

Security

PayPal handles Payment Card Industry (PCI) compliance internally

When conducting business of any kind online, trust plays a huge role. How do you show that you are a trustworthy seller, and how do you know that your buyers are protected?

Both Stripe and PayPal offer standard user protections like two-factor authentication. The major difference between the two is how they address Payment Card Industry (PCI) compliance. Launched in 2006, the Payment Card Industry Data Security Standards (PCI DSS) are basically a checklist for you to follow that ensures that you perform regular security checks, handle transmission of payment data securely, and don't store credit card data. They're not legally binding, but following these practices keeps your buyers safe—and that's good for business.

PayPal, in general, handles PCI compliance internally as long as you use their own checkout button solution. You give up a little bit of freedom in how it looks, but you're spared the headache of ensuring that buyer credit card information is being handled appropriately.

Stripe is also a PCI DSS compliant organization, but as they point out, it's is a shared responsibility between you and them. They provide a thorough guide—including a self-assessment—to help you confirm that your organization and software are PCI compliant. So if you manage the transactions directly, Stripe requires you to place some additional emphasis on your own security based on the PCI guidelines.

If you're looking for the easiest route to security and compliance without a third-party checkout solution, PayPal takes care of the heavy lifting for you.

Subscriptions and Recurring Billing

PayPal has everything you need

PayPal Subscriptions

Many online stores are selling a service (like Zapier), not a product (like Amazon). When that's the case, you're much more likely to need recurring billing, i.e., you need to be able to charge your customers on a regular basis. That also means you need to be able to handle different subscription periods, renewals, and cancellations.

If you use PayPal's button wizard—the same one you used to set up the shopping cart—setting up and managing subscriptions is a breeze. You define a few pieces: what the subscription is for, the billing frequency, and the pricing; and you can add a dropdown menu if you offer multiple subscription options. If you want, you can assign a unique identifier to the subscription to make it easier to track. Users can manage and cancel their own subscriptions from within their PayPal account, but you can also easily create cancellation buttons for them.

In Stripe, on the other hand, you need to manually subscribe users to your services through the dashboard. When subscribing users, you'll define the customer record by entering their personal information, a product, pricing, and terms up front. Because you're handling all this personal information, you risk not being PCI compliant. And if you want users to be able to subscribe and manage the subscription without your intervention, you'll need to invest in some third-party applications that support subscription management—or build your own.

Virtual Terminal

PayPal has a complete but pricey solution

You know when you swipe/insert your credit card at the grocery store? The thing you're swiping the card through is called a terminal. So a virtual terminal is the same thing—but without the physical aspect. It's a spot where you can manually enter credit card numbers in order to process a sale. It's not common practice for eCommerce—since usually customers are entering their own credit card information—but if you take orders over the phone or through the mail, you'll need a virtual terminal. And if you do, both Stripe and PayPal have you covered, but in different ways and with different payment structures.

PayPal's virtual terminal is simple and easy to use. You enter order details including the buyer's name, address, and credit card information, and the items or services being purchased. Then you can print any related receipts, shipping labels, or packing slips for the customer. It's actually quite reminiscent of working at a cash register in a brick-and-mortar store. The catch? It requires signing up for PayPal Payments Pro, which has a $30/month fee, whether or not you make any money.

Stripe doesn't offer a virtual terminal application, but there are various third-party services available, each of which carries its own charges and requirements.

Bottom line: You can potentially get a cost advantage by looking for third-party options with Stripe, but PayPal has a solution ready to go.

Invoicing

Stripe has the better interface

Stripe Invoicing

If you're selling a product or a subscription, your customers will usually pay upfront. But many consultants, freelancers, and other service-oriented businesses don't charge clients up front. In some cases, the cost of the work isn't even clear until the project is complete. That's where invoices come in: They're essentially bills that you send to your customers to let them know how much they owe you. Most accounting software takes care of this for you, but both Stripe and PayPal also have built-in solutions.

PayPal's invoicing system covers all the bases. It's easy to establish payment terms and line items and specify a purchase order number if appropriate. You can attach a file to an invoice and you can even bill multiple customers at once. An especially nice touch is that you can customize the invoice by adding a company logo. Plus, customer records don't need to be added in advance: You'll need an email address for your customer, at minimum, but you can fill out their name, phone number, address, and other important items with a simple popup.

Stripe requires you to create your customer records in advance with all of their contact details, but once they're in the system, it's a simple process to send them an invoice via email. It's one of the few instances where Stripe doesn't rely on third-party services and applications to get the job done, and it's extremely well designed. There are also lots of places to select triggers for emails at various stages of payment; for example, you can receive notifications when there are successful payments or refunds. Unlike PayPal, Stripe doesn't allow for file attachments or the ability to bill multiple customers at once, but you can customize a few basic items such as color and logo.

When it comes down to it, both services offer a simple and effective method of sending invoices, but Stripe's UI is just a bit friendlier.

Disputes, Refunds, and Chargebacks

It depends who you want to decide the outcome

PayPal Resolution Center

PayPal is a fairly comprehensive online payment system—not just a payment processor. People keep money in PayPal, can pay directly from their PayPal balance, and so on. For that reason, PayPal deals with disputes, refunds, and chargebacks internally. And PayPal is notorious for their refund policy. Refunds can be requested by buyers up to 180 days after the sale is made, regardless of the seller's own individual refund policy. Even if you as the seller decline the refund, PayPal anecdotally tends to rule in favor of the buyer if they use the Resolution Center to dispute your refund decision. Having said that, PayPal makes the process easy for you. Whenever there's an action for you to take, you'll receive an email with a link. Just follow the link and the prompts in the resolution center, and PayPal handles the rest.

Stripe, on the other hand, is primarily a payment processor, which means you can't store money there: It's just there in a holding pattern until it ultimately goes to your bank. As such, it doesn't have a refund policy of its own and doesn't decide the outcome of disputes. If someone wants a refund and you don't provide it, the buyer has to go to their credit card company to dispute it directly.

Although Stripe doesn't make any decisions, it does capture and facilitate the arbitration conducted by the credit card company. If a dispute occurs, it can be accessed from the dashboard under Payments and Disputes, and you can submit evidence to the credit card company through that Stripe interface. But be careful when refusing refunds: If the dispute doesn't fall in your favor, you're on the hook for a $15 dispute charge.

In the end, both Stripe and PayPal offer an easy way to manage and resolve disputes. Which one you choose will depend on who you want rendering verdicts: the payment processor or the credit card company.

Mobile Payment Processing

PayPal has its own app and card reader

PayPal Here

When it comes to payment processors, a combination of app, hardware, and service puts a credit card terminal in your pocket. Mobile payment processing gives you the ability to conduct in-person sales with only a card reader and your mobile phone or tablet. It's like a virtual terminal but without the added expense.

PayPal has a mobile app called PayPal Here that's supported on iOS and Android, and once you sign in, you'll get an easy-to-use card reader shipped to you. Stripe, on the other hand, doesn't have their own app, but they do recommend a number of third-party alternatives. Many of them are competitive with the PayPal app, but you'll likely spend a fair amount of time finding the one that works for you—and paying extra for it.

Tracking and Reporting

PayPal has a wider range of accounting reports

Stripe Dashboard

For tracking and reporting, we're looking at two questions:

  • How easy is it to find and download data?
  • How much additional work does it take to get common accounting reports?

Stripe has the definite edge in terms of ease-of-use. Simply navigate to the Payments and Customers section to download a list of transactions in a certain date range. Finding records is similarly straightforward thanks to the freeform search box. And if you need to be a bit more formal, there's a filter button with some common items to search for, such as the created date or whether it was a delinquent charge. There's also a sophisticated customer-specific page: It only takes a few seconds to pull up a customer, check to see if they had any recent orders, or verify their personal information.

PayPal also has a robust method of searching transactions through their Activity view. While the search bar isn't quite as freeform, you can still find what you need between that and a dropdown that tells the system the kind of information you're looking for. You can also look at customer-specific information, but unlike in Stripe, customer details are typically tied to a PayPal account that you can't edit, so it's only for reference.

In terms of formal reporting, PayPal has a plethora of accounting reports that'll make you feel confident that come tax time or quarterly review. Stripe, on the other hand, doesn't offer any formal accounting reports.

Which App Should I Use?

The good news: Choosing between Stripe and PayPal is a win-win. They're both reliable and scalable payment processors. The main difference: In certain areas, Stripe is dependent on other applications, which can be a barrier to sellers who are just getting started. PayPal, on the other hand, is a more complete solution on its own.

Our final recommendation? If you're looking to get into business online without any fuss or extra software, it's hard to go wrong with PayPal. If you're already well established and don't mind using third-party services to tie up loose ends, Stripe is a robust and smart choice.

Finally, here's an at-a-glance feature comparison.

Stripe PayPal
Cost 2.9% per transaction plus $0.30 2.9% per transaction plus $0.30
Transactions Requires a third-party shopping cart Simple checkout buttons that can be used on any website
Website testing Alternate between test and live mode via toggle Complete sandbox buyer and seller account
Security Relies on third-party compliance, but provides guidance Handles PCI compliance internally if you use their checkout solution
Recurring billing Subscriptions can be entered manually, but otherwise requires a third-party tool Subscription controls can be defined as buttons for any website
Virtual terminal Requires a third-party solution Provides a complete but pricey solution
Invoicing Provides a modern interface with fewer options than PayPal Provides a complete solution with a dated interface
Disputes, refunds, and chargebacks Buyer's credit card company decides outcomes based on evidence provided through dispute section PayPal decides outcomes through resolution center
Mobile payment processing Provides the service, but requires third-party hardware and app Provides a complete app and credit card scanner for a mobile device
Tracking and reporting Easy-to-use customer and sale tracking, but lacks full accounting reports Easy-to-use customer and tracking features with full accounting reports
Customer Service 24/7 phone and chat support Business hours, seven days a week

Automate Stripe and PayPal

Whichever payment processor you choose, save yourself time by automating all your workflows related to that software.

Mitchell Parsons, Operations Manager at Atlanta nonprofit Midtown Assistance Center, automates the transfer of data from PayPal to Salesforce when accepting donations. He says, "It automates the records and creates or updates the contact and opportunity records. It is a great time saver in helping us generate our thank you letters and receipts."

Here are some other ways you can automate your workflows with Stripe and PayPal:

  • Keep your team in the loop. Zapier will automatically notify you via email or Slack whenever a new payment is processed:
  • Don't miss a beat on your bookkeeping. Send all new charges to your recordkeeping app of choice:
  • Add customers who use your payment processor to your CRM or email list:

Don't see the workflow you're looking for? Create your own with our Zap editor.


source https://zapier.com/blog/stripe-vs-paypal/