Thursday 29 March 2018

What Are Webhooks?

You might have seen webhooks mentioned in your apps' settings and wondered if they're something you should use. The answer, in a nutshell, is probably yes.

Webhooks are one way that apps can send automated messages or information to other apps. It's how PayPal tells your accounting app when your clients pay you, how Twilio routes phone calls to your number, and how WooCommerce can notify you about new orders in Slack.

They're a simple way your online accounts can "speak" to each other and get notified automatically when something new happens. In many cases, you'll need to know how to use webhooks if you want to automatically push data from one app to another.

Let's break it down, learn how to speak webhook, and get your favorite apps to talk to each other.

What Are Webhooks?

Example SMS message with a sender, receiver, and message

There are two ways your apps can communicate with each other to share information: polling and webhooks. As one of our customer champion's friends has explained it: Polling is like knocking on your friend’s door and asking if they have any sugar. Webhooks are like someone tossing a bag of sugar at your house whenever they buy some.

Webhooks are automated messages sent from apps when something happens. They have a message—or payload—and are sent to a unique URL—essentially the app's phone number or address.

They're much like SMS notifications. Say your bank sends you an SMS when you make a new purchase. You already told the bank your phone number, so they knew where to send the message. They type out "You just spent $10 at NewStore" and send it to your phone number +1-234-567-8900. Something happened at your bank, and you got a message about it. All is well.

Webhooks work the same way.

Example webhook data

Take another look at our example message about a new order. Bob opened your store's website, added $10 of paper to his shopping cart, and checked out. Boom, something happened, and the app needs to tell you. Time for the webhook.

Wait: who's the app gonna call? For webhooks, you first need to tell the first app—your eCommerce store, in this case—the webhook URL of the app that needs the data.

Say you want to make an invoice for this new order. You'd first open your invoice app, make an invoice template, and copy its webhook URL—something like yourapp.com/data/12345. Then open your eCommerce store app, and add that URL to its webhook settings. That URL is your app's phone number, essentially. If another app pings that URL (or if you enter the URL in your browser's address bar), the app will notice.

Ok. Back to the order. Your eCommerce store got the order and knows it needs to send the details to yourapp.com/data/12345. It then writes the order in a serialization format. The simplest is form-encoded, and your customer's order would look something like this:

Customer=bob&value=10.00&item=paper

Now you need to send the message. The simplest way to send data to a webhooks URL is with an HTTP GET request. Literally, that means to add the data to the URL and ping the URL (or enter it in your browser's address bar). The same way you can open Zapier's about page by typing /about after zapier.com, your apps can send messages to each other by tagging extra text with a question mark on the end of a website address. Here's the full GET request for our order:

https://yourapp.com/data/12345?Customer=bob&value=10.00&item=paper

Deep inside your invoice app, something dings and says "You've got mail!" and the app gets to work, making a new invoice for Bob's $10 paper order. That's webhooks in action.

Remember when you had to check your email to see if you had new messages—and how freeing push email was? That's what webhooks are for your apps. They don't have to check for new info anymore. Instead, when something happens, they can push the data to each other and not waste their time checking and waiting.


That's the simple version. Technically, webhooks are "user-defined callbacks made with HTTP" according to Jeff Lindsay, one of the first people to conceptualize webhooks. Webhooks are data and executable commands sent from one app to another over HTTP instead of through the command line in your computer, formatted in XML, JSON, or form-encoded serialization. They're called webhooks since they're software hooks—or functions that run when something happens—that work over the web. And they're typically secured through obscurity—each user of an application gets a unique, random URL to send webhook data to—though they can optionally be secured with a key or signature.

Webhooks typically are used to connect two different applications. When an event happens on the trigger application, it serializes data about that event and sends it to a webhook URL from the action application—the one you want to do something based on the data from the first application. The action application can then send a callback message, often with an HTTP status code like 302 to let the trigger application know if the data was received successfully or 404 if not.

Webhooks are similar to API—but simpler. An API is a full language for an app with functions or calls to add, edit, and retrieve data. The difference is, with an API, you have to do the work yourself. If you build an application that connects to another with an API, your application will need to have ways to ask the other app for new data when it needs it. Webhooks, on the other hand, are for one specific part of an app, and they're automated. You might have a webhook just for new contacts—and whenever a new contact is added, the application will push the data to the other application's webhooks URL automatically. It's a simple, one-to-one connection that runs automatically.

How to Use Webhooks

You know the lingo, understand how apps can message each other with webhooks, and can even figure out what the serialized data means. You speak webhook.

It's time to use it. The best way to make sure you understand how webhooks work is to test it out, try making your own webhooks, and see if they work. Or, you can jump ahead and just drop your webhook URL into an app to share data—after all, you don't have to know how to make webhooks to use them.

Here are the resources you need.

Test Webhooks with RequestBin and Hurl.it

The quickest way to learn is to experiment—and it's best to experiment with something you can't break. With webhooks, there are two great tools for that: RequestBin and Hurl.it.
RequestBin
Get a unique RequestBin URL and try sending data to it

RequestBin lets you create a webhooks URL and send data to it to see how it's recognized. Unfortunately, the original web app has been taken down, but you can install your own copy on Heroku in a few clicks or install the open source version of RequestBin on your own server. Or, you can run a copy of RequestBin from FullContact, or try a similar tool like Hookbin.

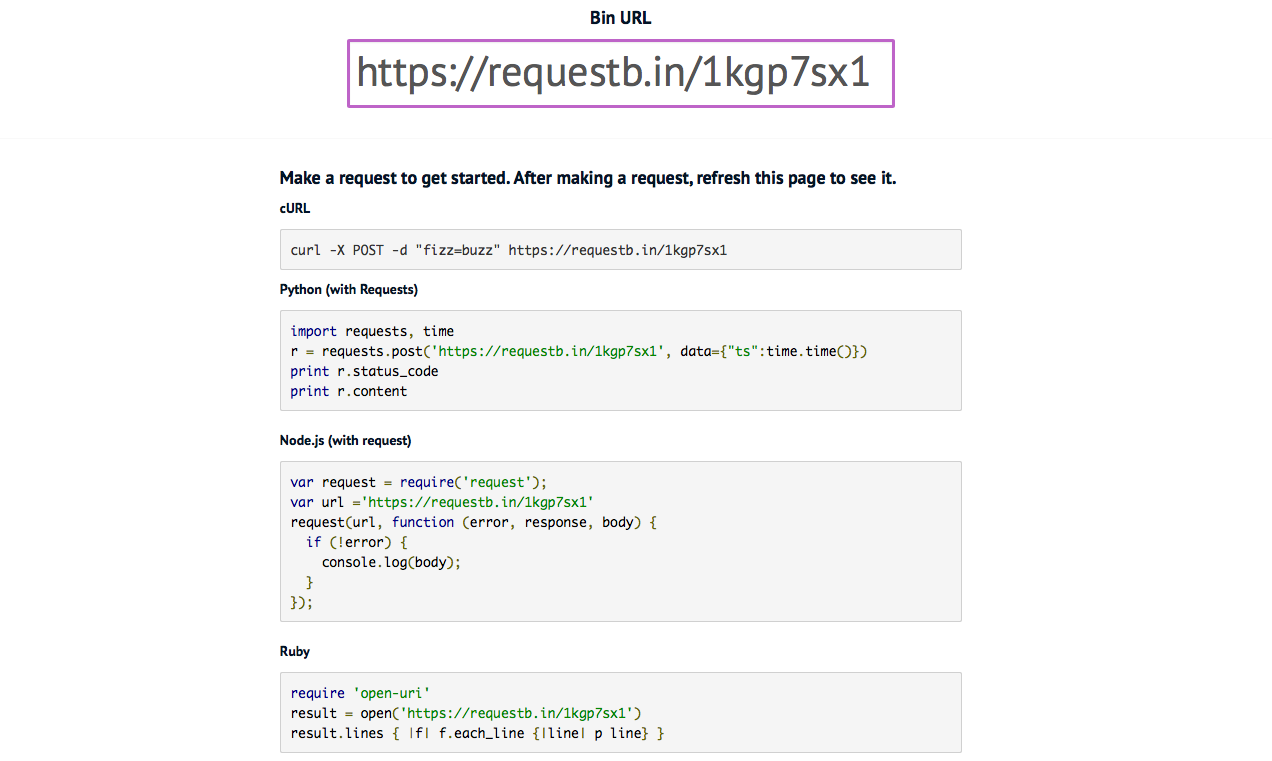
If you're using RequestBin, open the app and click Create a RequestBin, then copy the URL it gives you.

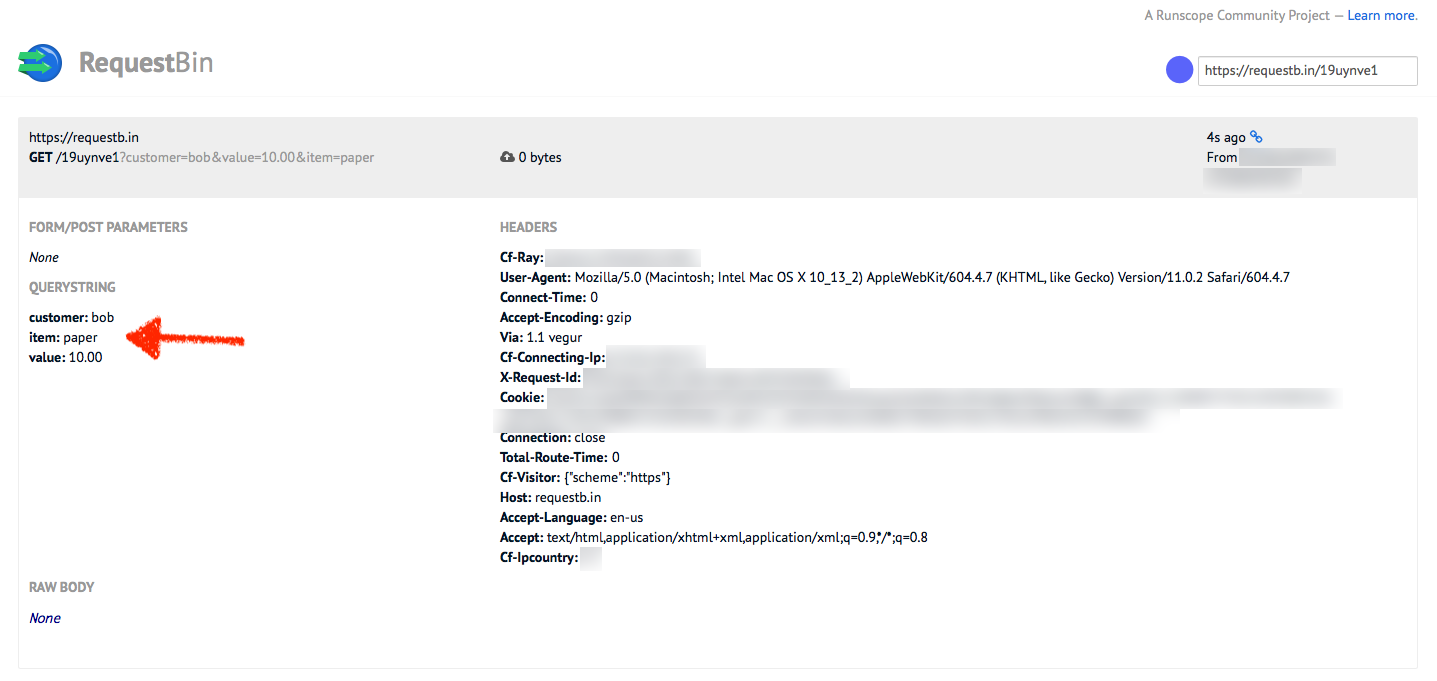
Now, serialize some data in form encoded style—or copy our example form copy above. Open a new tab, paste your RequestBin URL, add a ? to the end, then paste your serialized data. You'll end up with something like this:

https://yourdomain.com/19uynve1?customer=bob&value=10.00&item=paper

Press enter in your browser's address bar, and you'll get a simple message back: ok. Refresh your RequestBin tab, and you'll see the data listed on the left as in the screenshot above.
RequestBin options

You can then try sending POST requests in Terminal or from your own app's code, if you'd like, using RequestBin's sample code. That's a bit more complex—but gives you a way to play with JSON or XML encoding, too.
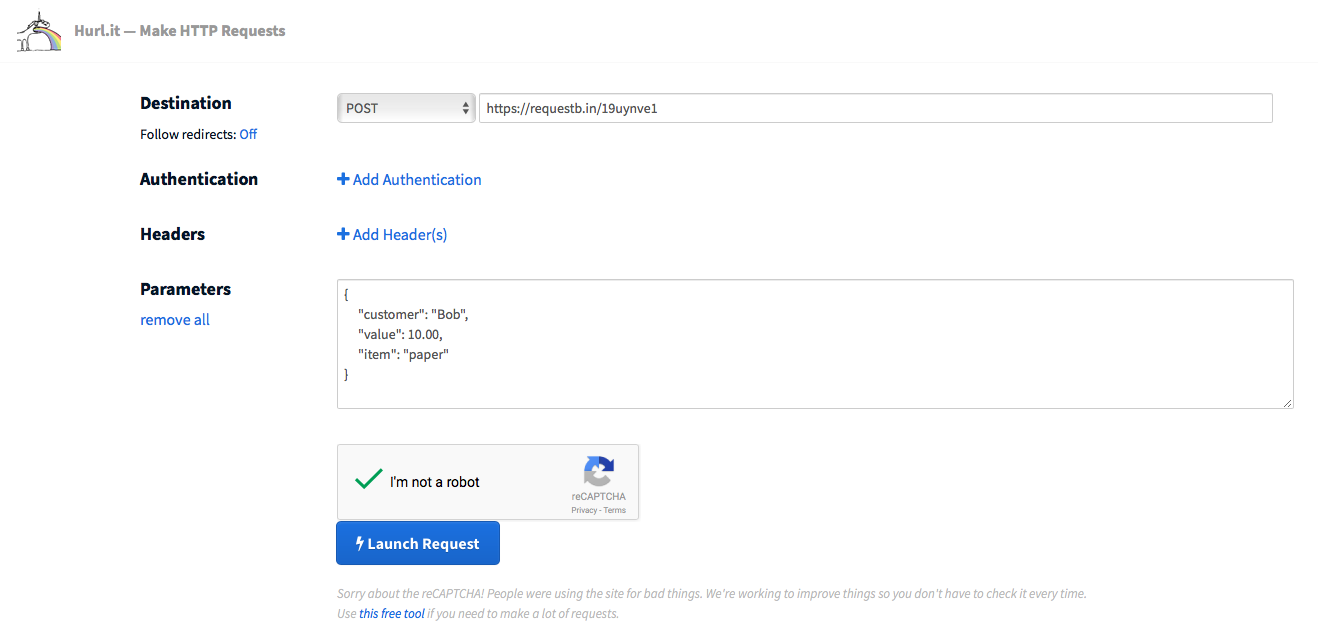
Hurl.it to test webhook
Use Hurl.it to try sending data to a webhook URL

Or, use another app for that. RequestBin's companion app, Hurl.it, lets you make custom HTTP requests for an easy way to send customized data to a webhooks URL. Enter the URL, then choose the HTTP request method you want to use, and add the body data. That'll let you send far more detailed requests to your webhook URL without having to use more code.

Add Webhooks to Your Apps

Testing webhooks and serializing data by hand is tricky—as is copying and pasting data from your apps. Let's skip both, and just get our apps talking to each other.

We're using WordPress-powered form tool Gravity Forms and document template-builder app WebMerge as the examples here—but the same general idea works in most other apps that support webhooks. Here's essentially what you need to do:
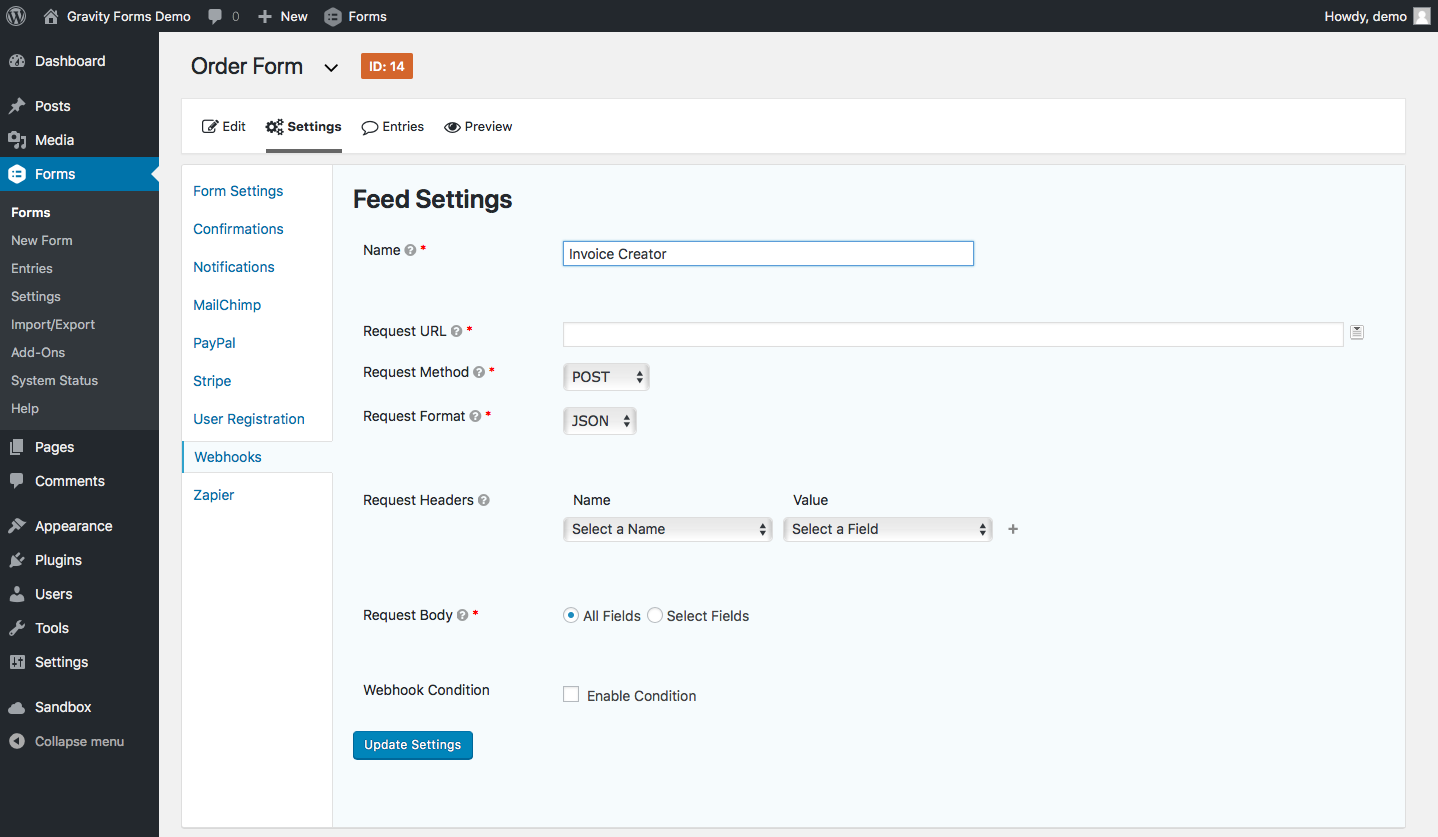
Gravity Forms Webhook data
Open your form's Webhook settings in Gravity Forms

First, enable webhooks in your app if they're not already and open the webhooks settings (in Gravity Forms, for instance, you need to install an add-on; in Active Campaign or WooCommerce, you'll find webhooks under the app's default settings). Your app might have one set of webhook settings for the entire app—or, often, it'll have a specific webhook for each form, document, or other items the app maintains.

In Gravity Forms, we'll open the Webhooks settings under the form we want to use. That gives us a URL field and options to specify the webhook HTTP request method.
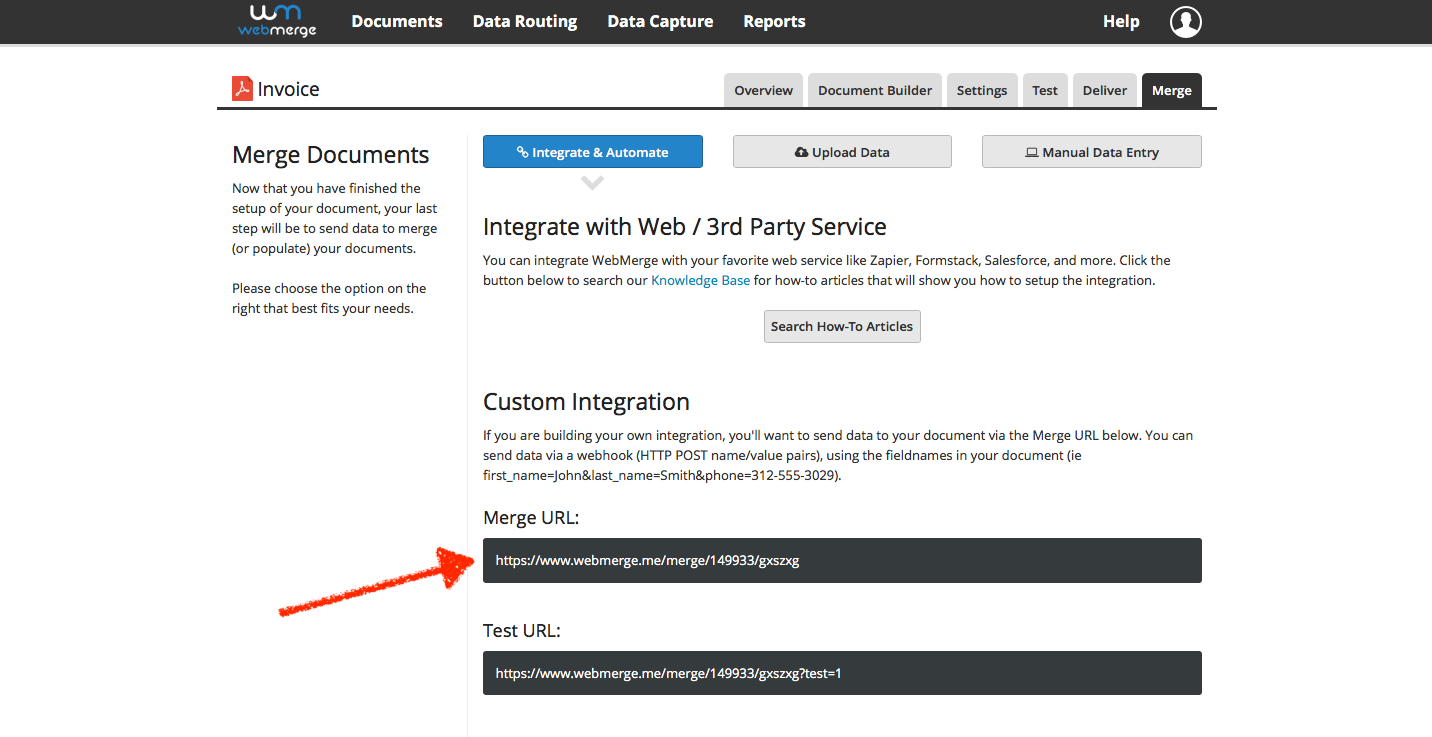
WebMerge webhook
Each WebMerge document template has a unique webhook URL

Now let's get that URL from the app that will receive the data—WebMerge, in this case. In WebMerge, each document has its own "merge URL"—and it wants the data in form encoded serialization, as you can tell from the ampersands in the example data. Copy the merge URL—or whatever URL your app offers, as it may have a different name.
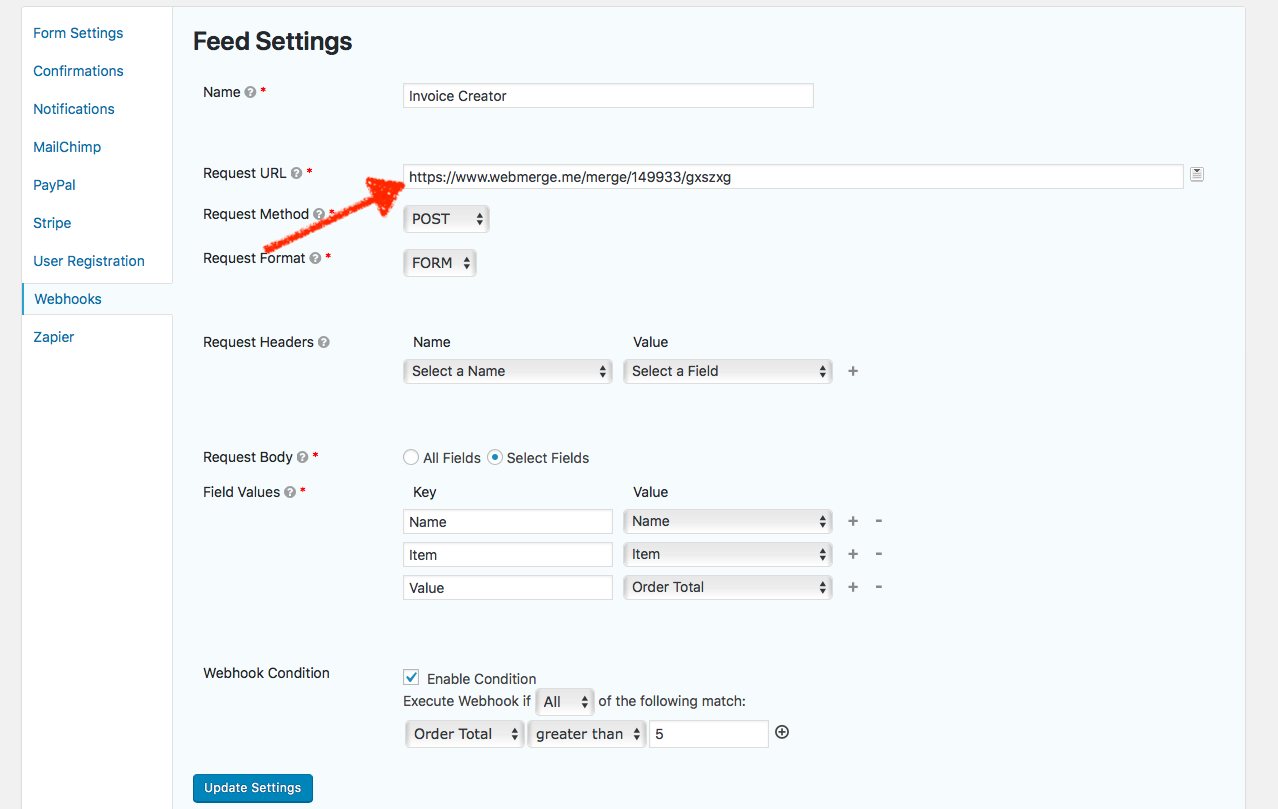
Add webhooks URL to Gravity Forms
Add the webhooks URL to your trigger app so it can share data when something happens

Finally, go back to your trigger app—Gravity Forms in our case—and paste the webhook URL in Gravity Forms' URL field. You may also be able to set the correct request method and the specific field values to ensure only the data you want is sent, and is shared with the same variable names as the receiving app uses. Save the settings, and you're good to go.

The next time someone fills out our form that Bob ordered 10.00 of paper, Gravity Forms will send the data to WebMerge's URL as https://www.webmerge.me/merge/149933/gxszxg?Name=Bob&Item=Paper&Value=10.00 and WebMerge will turn that into a complete invoice.

PayPal IPN
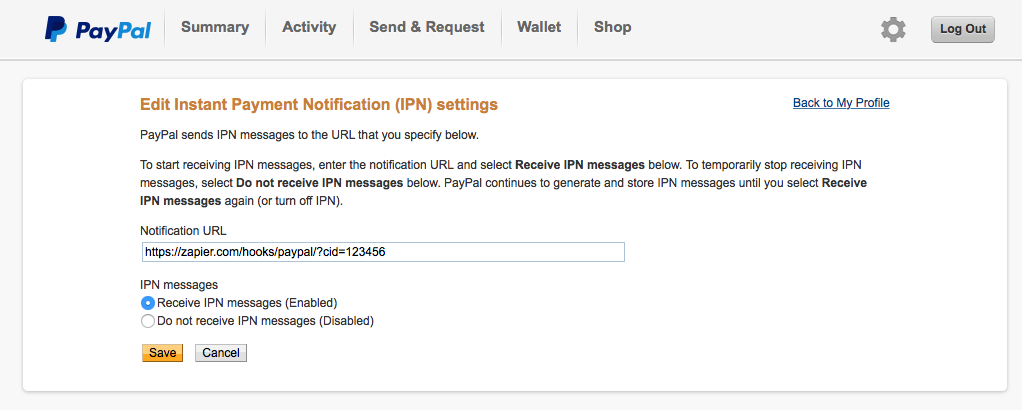
PayPal IPN is very similar to webhooks—and you can add a webhook URL to PayPal to get payment notifications

Once you start using webhooks, you'll notice them (or similar links) everywhere, in places you never thought they'd show up. PayPal, for instance, uses Instant Payment Notifications or IPNs to send notifications whenever you receive a payment. Have an app that you'd like to do something whenever you get a PayPal payment? Add its webhooks URL to PayPal's IPN settings and that app will get a message the next time you get money.

Or take Twimlets, Twilio's simple apps to forward calls, record voicemail messages, start a conference call, and more. To, say, forward a call, you'll add a familiar, webhook-style Twimlet address like http://twimlets.com/forward?PhoneNumber=415-555-1212 to your Twilio phone number settings. Want to build your own phone-powered app, or notify another app when a new call comes in? Put your webhook URL in Twilio's settings instead.

They might go by different names, but once you notice places where apps offer to send notifications to a unique link, you'll often have found somewhere else webhooks can work. Now that you know how to use webhooks, you can use them to make software do whatever you want.

Use Webhooks in Any App with Zapier

Have an app that can send or receive data with webhooks, and want to connect it to another app that doesn't seem to work with webhooks? Zapier can help. With over a thousand connected apps, there's a good chance the app you want to use works with Zapier. You can then have Zapier handle the webhooks part to connect both of your apps.
Zapier Webhooks
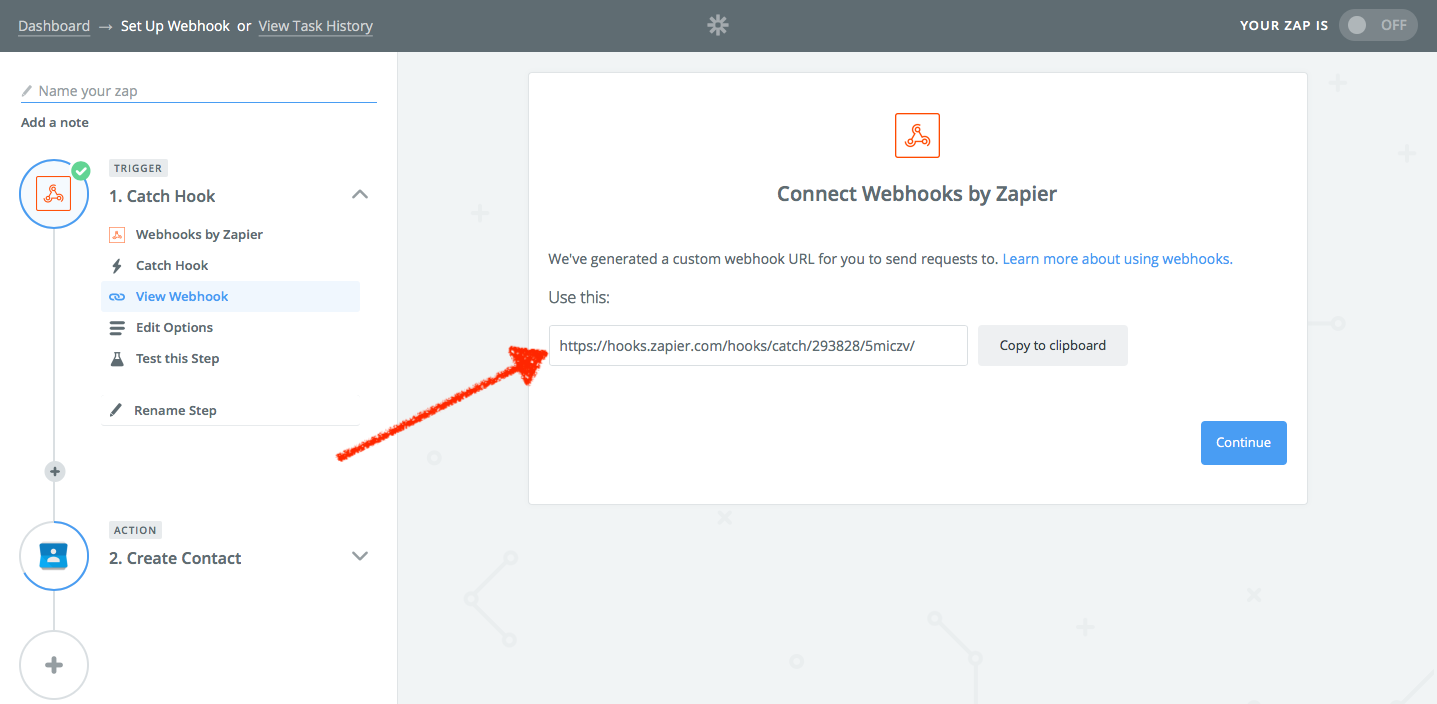
Zapier's Webhook integration gives you a webhook URL to add to your app

Say you have an app that can share data to a webhooks URL. To connect it to other apps, you'll make a new Zap—what we call Zapier's automated app workflows—and choose Zapier's Webhooks app as the trigger app. Select Catch Hook, which can receive a GET, POST, or PUT request from another app. Zapier will give you a unique webhooks URL—copy that, then add it to your app's webhooks URL field in its settings.
Test webhooks in Zapier
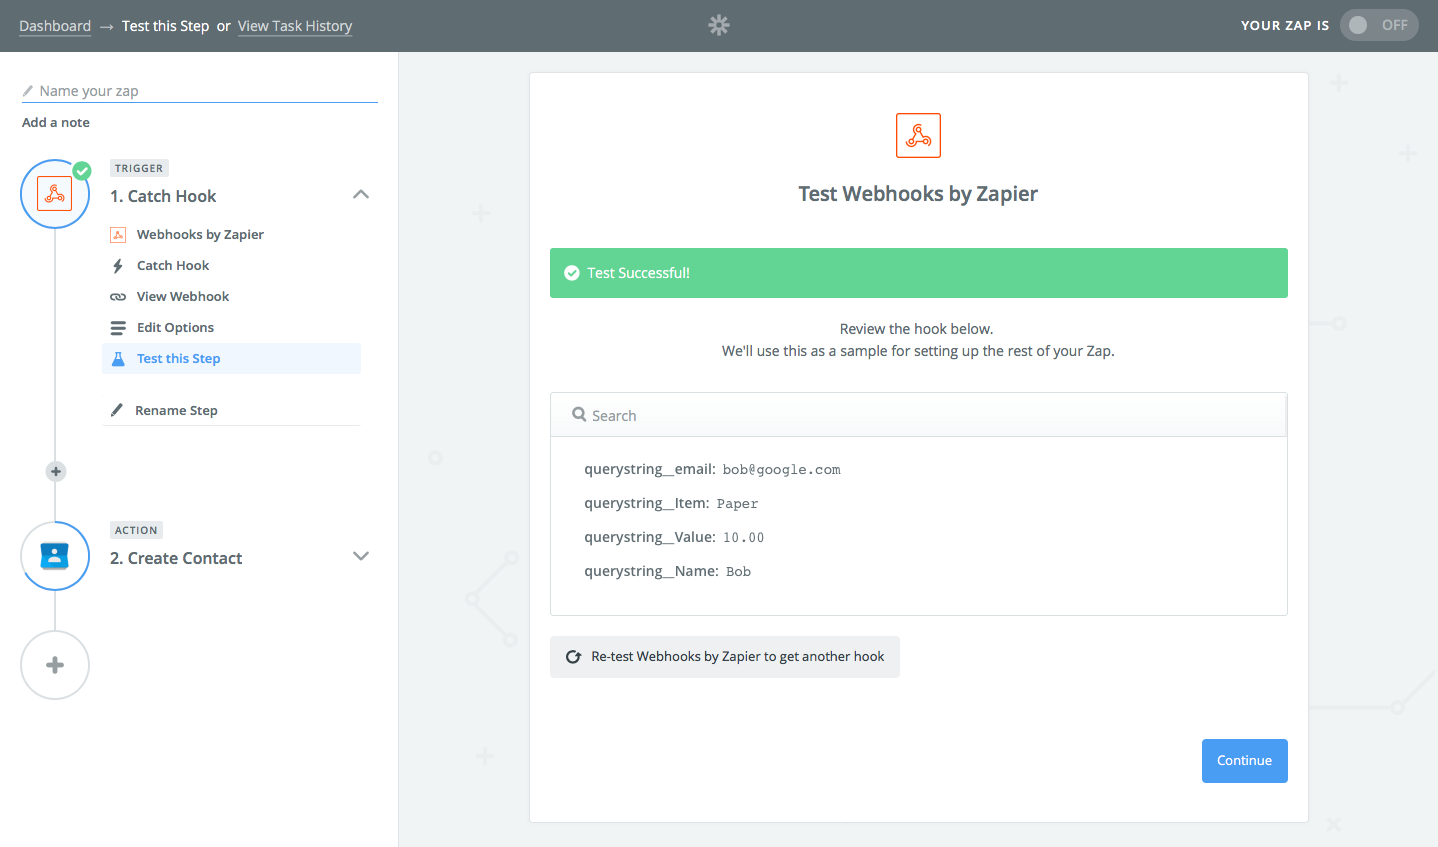
Zapier will parse each serialized item from your webhook data

Then have your app test the URL, or perhaps just add a new item (a new form entry, contact, or whatever thing your app makes) to have your app send the data to the webhook. Test the webhook in Zapier, and you'll see data from the webhook listed in Zapier.
Use webhooks in action app in Zapier
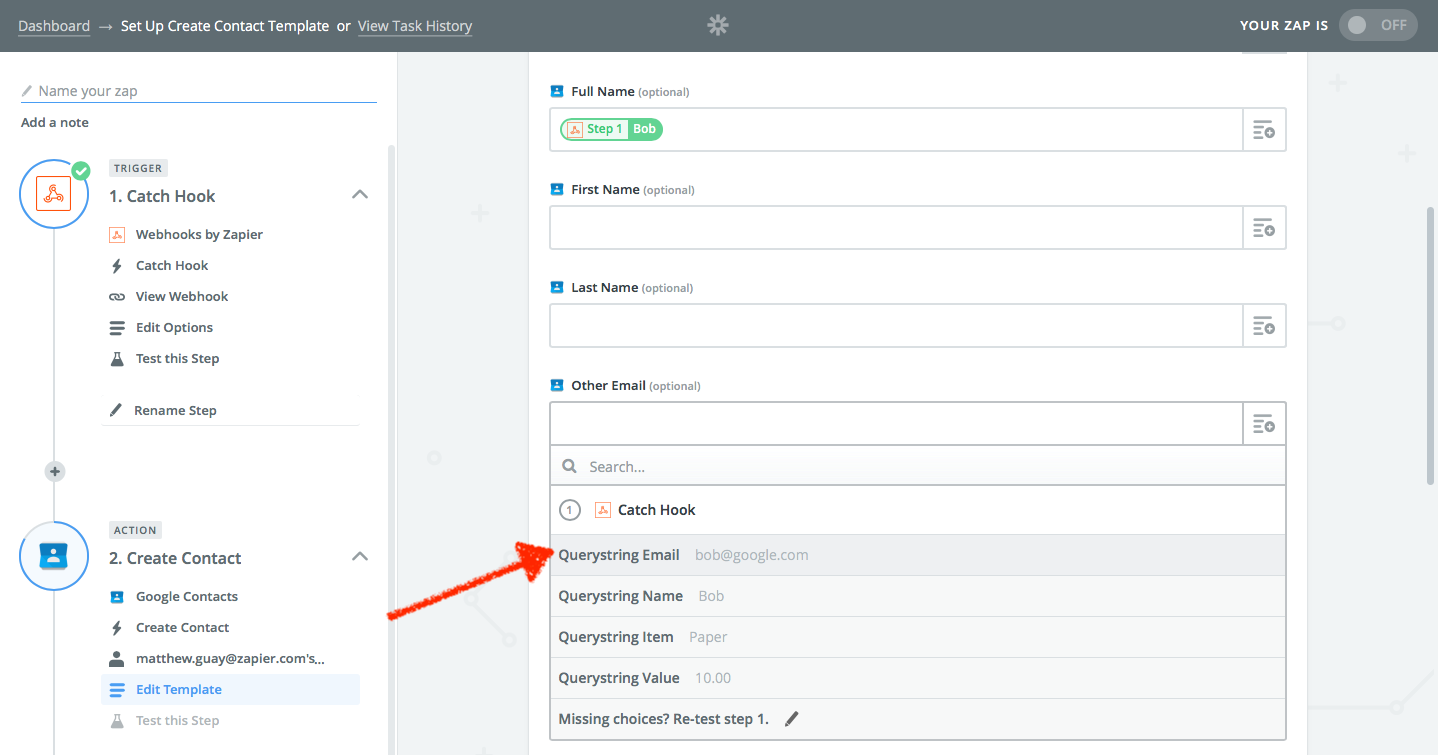
You can add each data item from your webhook to another app in Zapier

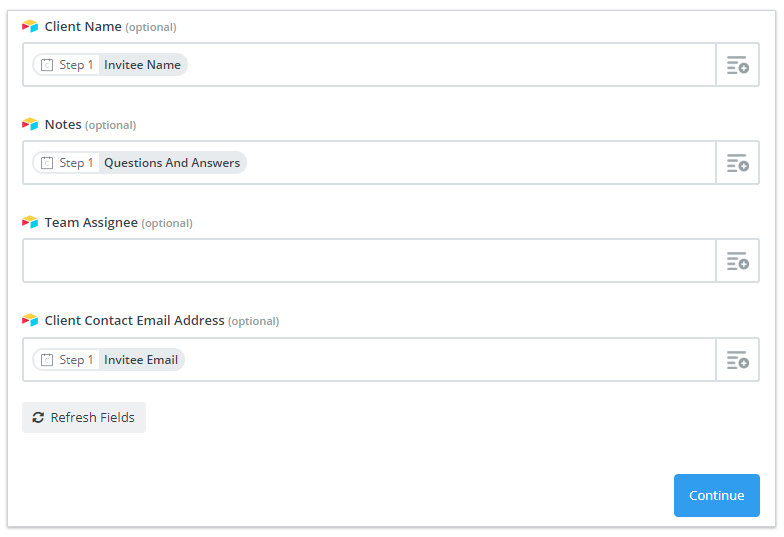
Now you can use that in another app. Select the action app—the app you want to send data to. You'll see form fields to add data to that app. Click the + icon on the right to select the data from your webhook you want to send to the other app. Test and turn on the Zap, and next time your trigger app sends data to the webhook, Zapier will automatically add it to the action app you selected.
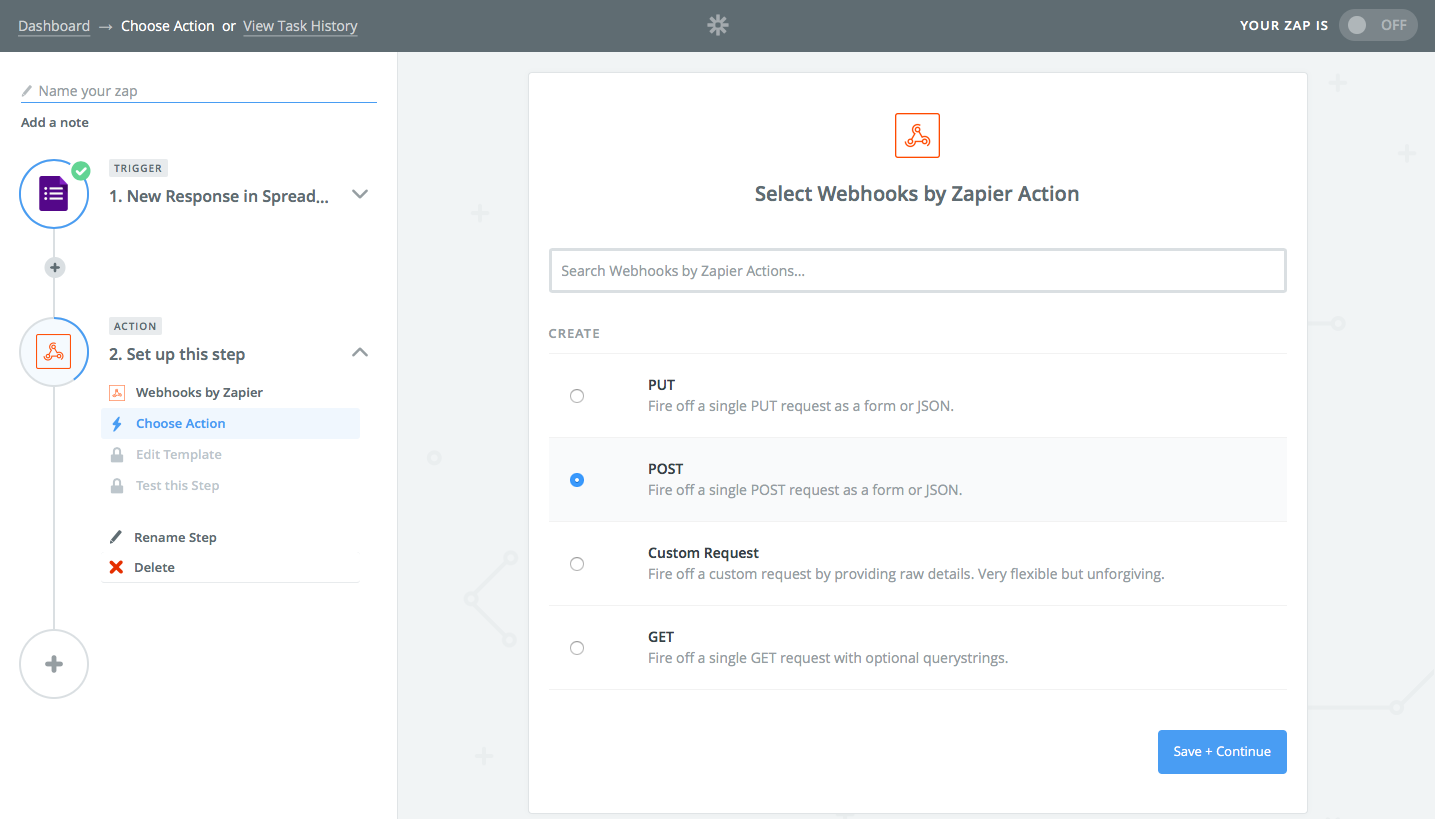

Zapier webhook action
Zapier can send any data you want to a webhooks URL

The reverse works as well. Want to send data from one app to another via webhooks? Zapier can turn the data from the trigger app into a serialized list and send it to any webhooks URL you want.

First, select the trigger app you want to send data from, and set it up in Zapier as normal. Then select Webhooks as the action app, and choose how you want to send the data (POST is typically the best option for most webhook integrations).
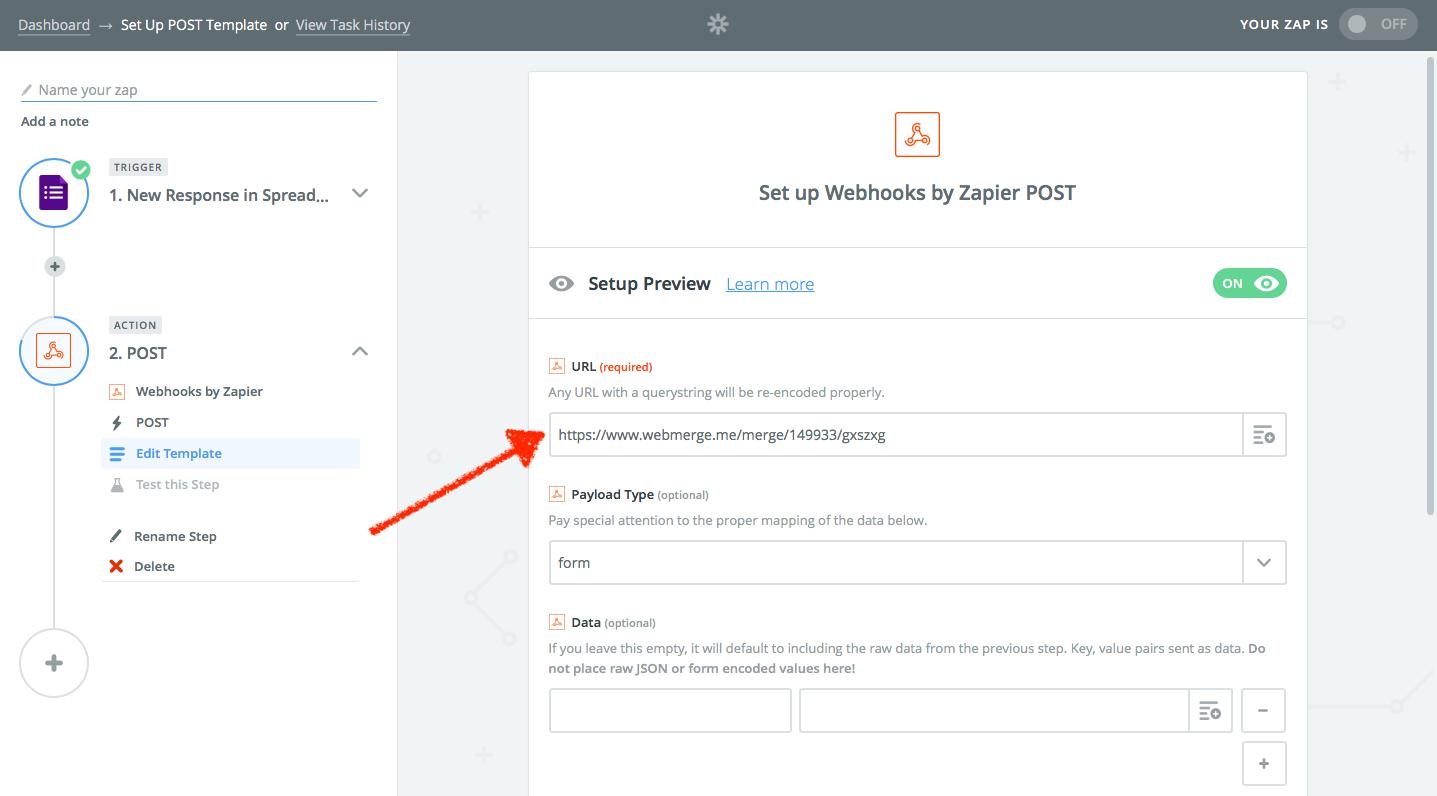
Zapier send data to webhook URL
You can specify how Zapier serializes your data and choose the specific data it sends to your webhook

Finally, paste the webhooks URL from the app you want to receive the data into the URL field in Zapier's webhook settings. You can choose how to serialize the data (form or JSON are typically best). Zapier will then automatically send all of the data from your trigger app to the webhook—or you can set the specific data variables from the Data fields below.

Turn on the Zap, and whenever something new happens in your trigger app, Zapier will copy the data and send it to your other app's webhooks URL.


Ready to automate your webhook work with Zapier? Check out Zapier's webhook integrations or use one of these popular Zap templates to get started quickly:


Time to Start Using Webhooks

Ok, you've got this. Armed with your newfound knowledge about webhooks and their confusing terminology, you're ready to start using them in your work. Poke around your favorite web apps' advanced settings and see if any of them support webhooks. Think through how you could use them—then give it a shot.

Or, check out our How Real People Use Webhooks guide for stories from four teams who use Webhooks with Zapier to manage projects, store data, schedule social media, connect in-house apps, and more. They're great inspiration for ways you can put webhooks to work for you.

And bookmark this article. Next time you read something about a GET request needing to make an HTTP callback, or see a URL with ?name=bob&value=10 and such at the end, you'll know what it actually means.


Webhooks Glossary: Common Terms and Definitions

  • Webhook: A serialized message sent from one application to another's unique URL over the web.
  • Webhook URL: The link where an application will receive webhook data from another app.
  • HTTP: Hypertext Transfer Protocol, the communication standard that enables computers to transfer data; the protocol that powers the world wide web.
  • Hook: A software function that runs when a specific event happens.
  • Response or Callback: The data sent from the receiving application back to the sending application, often including HTTP status codes to let the application know the data was received.
  • Pipe: A Unix command line method to route data from one application to another; the closest desktop equivalent to webhooks.
  • Ping: To contact a computer over a network, see if it's active, and optionally send data to it.
  • GET: An HTTP request to ask for data from a computer—what your browser uses to ask for a webpage when you enter an address in your browser. GET requests are the simplest way to send data to a webhook URL by appending the data to the end of the URL in form encoded serialization.
  • POST: An HTTP request to submit data to a computer—what your browser uses to send text you type in a form back to a website. POST requests are the most common way software send data to a webhook URL, and POST requests can transfer far more data than a GET request.
  • PUT: An HTTP request to submit data to a computer for a specific resource, typically used to update data. PUT requests can be used to send data to a webhook URL, though the data will need to include the name or location of the resource to be added or updated (so a POST request is best to add a new contact to an address book app, say; a PUT request would be used to update the contact as long as you know the existing contact's info).
  • Serialized: Data organized in a list, typically separated by commas.
  • Form Encoded: The most way basic to serialize data used with GET HTTP requests to send form data back to a server; data is separated with ampersands. Example: Customer=bob&value=10.00&item=paper
  • JSON: JavaScript Object Notation, a standard to serialize data with commas, groups with curly brackets to simplify sharing multiple values at once. The most common way to serialize webhook data, especially with POST requests. Example: {"customer": "Bob", "value": 10.00, "item": "paper"}
  • XML: eXtensible Markup Language, the data formatting standard that forms the basis behind HTML and other common online documents, with data separated by tags designated by greater than and less than symbols. Example: <data><customer>Bob</customer><value>10.00</value><item>paper</item></data>
  • Catch: To listen for new data sent to a webhook URL, typically then to process and use the data in the receiving app.
  • Poll: To ping a URL and ask for new data, similar to refreshing a page in your browser. The older way applications would get data from each other before webhooks.
  • Payload or Body: The data sent from one application to a webhook URL for another application to catch, typically in serialized format. Can also include HTTP headers for authentication with POST and PUT requests.
  • Header: Additional data included with an HTTP request to identify the sender and their location, include authentication data or security signatures, and other related data.


source https://zapier.com/blog/what-are-webhooks/

Steal This Workflow: How to Save Hours Every Week with Webhooks

You’ve seen them hiding in your app’s settings, promising to send notifications, sync data, and connect to other software you use. Webhooks. They’re the mysterious extra in so many apps. But what are they, how do they work—and why do they have such long, confusing URLs?

Zapier user Bill Miksich, Director of Demand Generation at Customer.io, describes webhooks like the post office:

You have a letter—the webhooks payload. You address it—that's the endpoint URL. And the carrier—Zapier, in this case—picks it up and delivers it for you.

Simple, right?

A webhook takes information from one app and sends it to another. They look complicated, with long confusing URLs and cryptic descriptions, but they're basically a quick way to send contacts, tasks, notes, and more information between apps.

To get you even more comfortable with webhooks, we've put together a simple guide to webhooks. If you aren't familiar with webhooks, this writer encourages you to take the time to read and dig in to the piece (I did).

We have the "what." Now, we just need the "why" and "how."

To answer that, we spoke to four users of our automation platform, Zapier. These folks use webhooks in their day-to-day processes, with simple or complex Zaps—our term for one of our automated workflows. Whether to manage leads or send emails or post on social media, webhooks play an integral role in automating the tedious.

Some of these users had never used a webhook before they found Zapier. Others knew how to code and had used them in custom apps. But by bringing Webhooks by Zapier into their workflows, these companies cut out hours of manual work every week. Some even reduced the time they spent on a task by 75%.

We'll take you through how these different companies take advantage of webhooks and how you can add them into your own workflows to be more efficient and productive every day.


Manage Projects and Notifications with Trello, Slack, and Webhooks

Sometimes, every possible feature in an app—big or small—isn't available through the app's integration or API (the tool that links apps together). You might've guessed by now, but this is one situation where webhooks save the day.

Mobile messenger and marketing automator MOBIT ran into a few instances where the feature they wanted wasn't accessible from the API. Most of the time, that's just an annoyance, something to work around. But for MOBIT, it was more than that:

"We have about sixty active Zaps that automate all aspects of our business," explains Liam McDonald, CPO and Automation Engineer at MOBIT. "They touch all points of our work."

"It would be impossible to manually complete the tasks that Zapier and webhooks automate for me."Liam McDonald, CPO and Automation Engineer. MOBIT

With MOBIT's custom-built forms and Zapier integrated into MOBIT's foundation so thoroughly, webhooks became more of a necessity for the team.

When a customer fills out a contact form or request for a demo, one of Zapier's webhooks catches the response and feeds it into Trello, creating a new card for the client. Once a meeting is booked, another webhook Zap finds and updates that card in Trello with meeting details.

Webhooks help manage their customers, too. When a customer decides on an annual or monthly subscription, MOBIT uses Zapier to alert the entire team on Slack. A webhook sends the new subscriber's contact information into a specific channel in Slack, where the team can celebrate another client with a gif party.

MOBIT uses this simple webhooks-to-Slack Zap for other tasks, too: When a client responds to a text message, or when a potential client reaches out for a pricing quote, or when a new affiliate signs up, those and more are all shared to Slack via webhooks.

"It would be impossible to manually complete the tasks that Zapier and webhooks automate for me," Liam says.

Give MOBIT's workflows a try and then explore and see how else webhooks can help you. With webhooks and Zapier, your custom systems have over 1,000 integrations ready and waiting.

Send Leads and More to a Data Warehouse via Webhooks

Try as we might to partner with every business app on the internet, the truth is there will be some apps Zapier doesn't integrate with (yet). But is anything truly out of reach? As long as those apps have webhooks, not really.

App engagement platform Customer.io helps automate messages to customers for marketing and growth teams. While they use apps like Facebook Lead Ads, FormKeep, and Livestorm, some of the tools they rely on don't have direct integrations with Zapier.

For instance, Customer.io uses Segment for their reporting and analytics. It doesn't yet have a Zapier integration, but it does support webhooks.

"As our data practices grew in sophistication, we started using webhooks to send event data like downloads, newsletter subscriptions, and event attendance to our data warehouse," explains Bill Miksich, Director of Demand Generation at Customer.io.

So when Customer.io receives a new lead from Facebook, Zapier takes the information and sends it to Customer.io's platform and then, with webhooks, on to Segment.

"By using this model, we can almost always use one Zap per channel to handle all the inbound traffic coming from each point solution," Bill says. "Zapier's webhooks save me at least eight to twelve hours every month by automating our top of funnel data collection and routing."

Customer.io bringing everyone together at one of their retreats.

They use the same Zap—but with FormKeep and Livestorm instead of Facebook Lead Ads—whenever a potential customer fills out a form on their website or signs up for a webinar.

"Zapier's webhooks save me at least eight to twelve hours every month by automating our top of funnel data collection and routing."Bill Miksich, Director of Demand Generation, Customer.io

"The flexibility of the webhook appeals most to me," Bill says. "Being able to send data from point A to point B—whether or not a Zapier integration exists—is magical."

If you're using an application that doesn't yet integrate with Zapier, give any of these Zaps a try or build your own and create your own magic.

Automatically Send and Schedule Social Media Posts

Sharing is caring, right? But if you ask any marketing team about their most tedious tasks, sharing new blogs and content to social media will be at the top of that list. You have to find the best time to post, make sure you aren't posting too close to anything else, choose or create images for the social share, and write the copy. Now repeat and repeat and repeat (and repeat).

So how do you consistently share your content without also losing your mind to repetition?

For Squared Up, an application monitoring solution, the answer is in automation. Squared Up's team uses Zapier and webhooks not just to automate time-consuming tasks (like social media posts), but also to relieve their developers from mundane tasks—and to encourage other teams to build out their own processes without relying on developers.

"As a small team with big ambitions, we’ve relied heavily on automation to help us rapidly grow and expand our business," says Dave Clark, a lead developer at Squared Up. "Automation is always a focal point when we’re discussing new processes."

Some of those processes involve Squared Up's custom content management system (CMS). With a custom CMS, Squared Up can't use a typical Zap linking, say, WordPress to Twitter or Tumblr to Facebook. Instead, they use Zapier's webhooks to connect their content to social media.

Squared Up's team at their offices. Pay special attention to the collection of Nerf guns in the background.

So when Squared Up's marketing team needed a more efficient way to post new blogs and content across social media channels, Dave knew where to start.

"When one of our content editors publishes a blog on our website, a webhook fires which Zapier catches and processes," Dave explains. In short, the blog sends a notification to Zapier with the blog's title and link—and Zapier then posts that to Facebook, Twitter, and LinkedIn. And with Delay by Zapier added to their Zaps, Zapier automatically reposts their content three days later, a week later, a month later, too—all within one Zap.

Webhooks help Squared Up automatically update their internal content library, too. They built a custom app in Podio for all their content. Then, when a new blog is published, it sends a webhook notification to Zapier, and Zapier adds it as a new item in Podio. That way, the marketing team can see what's been published recently and can decide if they need to post anything additional.

"Automating with Zapier and webhooks cuts the time we spend publishing content by 75 percent," says Dave. "Now, we just author in one place and know the same content will be distributed everywhere by Zapier, as if by magic!"

Webhooks may not be actual magic, but with the way Squared Up uses them, they're close enough.

Give their social posting webhooks a try and give yourself back some time:

Connect Custom Systems to Zapier Integrations With Webhooks

For some companies, building a custom customer relationship manager (CRM) makes sense early on. It provides more control over your customers' information, your team is in charge of it, and there's no monthly cost.

But as these businesses grow, maintaining their code and API can become an afterthought as developer resources are pulled in other directions. After all, if it works, it works, right? In truth, some of these companies wind up spending more time fixing problems and pulling reports and information that should be a click or two away.

"A lot of these larger companies we're working with built custom software," explains Doug Puccetti, Business Solutions Analyst at obo. Agency. When that software needs a hand, Doug and obo. Agency jump in.

As an account-based marketing firm marketing and sales consulting firm, obo. Agency works with their clients to create connections between custom systems and applications like Salesforce and HubSpot.

One of the obo. Agency team members planning and plotting.

Custom platforms stand on their own: Since they're built internally for that specific company, integrations with tools like Zapier aren't readily available. But that doesn't mean moving data from one system to another is impossible. It just means that Doug and obo have to be creative.

That creativity sometimes means Doug will add webhooks to an API if the API isn't already equipped with them. Once a client's homebrewed API has webhooks, it's ready for a bit of magic.

With webhooks, Zapier intercepts new contacts for obo's clients. When a client generates a new lead, one of Zapier's webhooks catches the new customer and sends it to a Salesforce or HubSpot. Then, Zapier creates a contact, lead, or event in the corresponding app.

Now, thanks to a few handy Zaps, obo's clients have easy access to customer information and data, and can transition to the CRM that meets their needs.

"Zapier makes learning and utilizing webhooks simple and easy," Doug says. "If you're planning on getting into webhooks, definitely start with Zapier."

Want to try sending leads to Salesforce and HubSpot with webhooks? Give these Zaps a try:


There you have it: Webhooks are magic. With them, you can forge connections and build trails where previously, they didn't exist.

Have any apps you’d love to automate—maybe a custom form on your website or an older CRM that doesn’t connect to newer apps? Webhooks might be the answer. Check your app’s settings and documentation, and search for webhooks. If you find an option to enable them, copy the webhooks URL then check out our guide to using webhooks to start using them to automate your most tedious tasks.

All images courtesy of Squared Up, obo. Agency, Customer.io, and MOBIT.


source https://zapier.com/blog/how-real-people-use-webhooks/
Tuesday 27 March 2018

5 Things Customer Support Reps Wish You Knew

We are the people you never want to talk to.

We know that when you’re contacting customer support, something is likely frustrating you. Something is broken, something is confusing, something is just…not working. Your guard is up, and you just want to get back to work without having to spend 20 minutes debugging with customer support reps. You might be a bit grumpy.

And that’s okay. That’s what we signed up for. In fact, part of the challenge and the reward of our job is turning upset users into enthusiastically satisfied customers.

But there are a few things we’ve been keeping quiet on. We want you to know more about the people you’re communicating with via phone, chat, or email. Here are five things we think you should know so you can get better customer support every time:

1. Calling Us Isn’t Always the Best Way to Get Support

Talking on the phone is comforting. You pick up the phone, dial a number, and we’re right there for you!

But it’s not always the best way to get help.

The last Zap (what we call an automated workflow between apps at Zapier) I created was a somewhat complicated workflow designed to push PagerDuty alerts and updates into JIRA for further investigation. But, as much as I played around with it, I couldn’t get the JIRA issue to format quickly. It was a complicated question, and I wanted an instant answer.

So I sent a quick screenshot, along with details, to Zapier support via email. They tried out the Zap to see what was going wrong, based on that information. I got back detailed steps on how to fix the problem, which I could go through in my own time. It worked!

If I had picked up the phone and called support, I would have likely sat on hold for a few minutes before trying to explain my issue to a helpful agent. I would have had to read out the Zap step by step, in painful detail. They might have put me on hold while they tried it on their side. Eventually, we’d walk through the solution, slowly, together.

That’s a ton of wasted time for me and the agent. Time is money when it comes to staffing a contact center. Forrester estimates that providing phone support can cost a business about $12 per call. Compare that to $5 per chat contact or even less for email support.

These are some of the reasons companies like Squarespace have moved away from offering phone support. Not only is it cheaper for companies to offer, chat and email support is often a better experience for the customers in the long run. Also, having a written thread of conversations about an issue gives both you and customer support reps something to refer back to later, so you don't have to try to remember everything in the conversation.

So instead of searching for a customer support phone number, head to the company’s Help Center. We usually publicize it on our home page. Not only does the Help Center contain helpful information about the best way to get in touch, it also has a full knowledge base of common questions and issues, so you can possibly help yourself and be back to work that much faster! And if you don't find what you're looking for in the help docs, we'll happily answer your questions over email.

2. How to Take a Proper Screenshot

Screenshot of a screenshot

It might be surprising that this is at the top of many customer support reps' wish lists, but we do wish more people knew how to take a screenshot. Screenshots are such a big part of our day that we want to make sure everyone knows how to take a good one.

These images of what's on your screen while you're using the product are incredibly helpful for troubleshooting, so we often ask for them. A picture is worth a thousand words, right? We can see exactly what you’re seeing, which helps us start our investigation in the right place.

However, we know most people don’t take a lot of screenshots in their daily tasks, so here’s what we like to see:

Don’t:

  • Send us a Word or Google document with screenshots copied and pasted in. Often support reps don’t have Microsoft Word installed on their computer, so it’s difficult for us to open the file and, more importantly, the embedded images tend to be small and hard to read.

  • Take a picture of your computer screen with your phone. This causes a lot of interference and quality loss on the image, making it difficult for us to see.

Do:

  • Attach image files directly to the email. JPG, PNG, and GIF images are all displayed nicely within the software we use to answer emails. Or share a link to the images hosted on a cloud storage service like Dropbox or Google Drive.

  • Highlight what we should be looking at. If you can draw our attention to the button that isn’t responsive, or the error message you’re seeing, it can really help.

Here’s how we take screenshots:

  • On a Mac: On your keyboard, press Command + Shift + 4, all at the same time, then drag your cursor over the area you want to capture.

  • On a PC: Open Snipping Tool, click New, then drag your cursor over the area you want to capture.

Dedicated screenshot apps give you more control, with options to annotate or mark up screenshots. Here are our favorite screenshot apps you can use not just for customer support but possibly your other work as well.

3. We Really Love GIFs, Especially of Cats

Cats GIF
Actual footage of a day working in customer support

Making us smile makes our day better, which can also make your day better.

Our job revolves around making you happy and helping you find success with our product. You know those pesky customer feedback surveys that you get after every customer support interaction? Someone on our team (it might not be us) actually reads every comment left for us. If we went the extra mile, mentioning us by name means a lot. Your happiness is a big reason why we work in support!

Customer feedback helps us do our jobs better, so don’t be shy about filling out those surveys. If you include a gif, we’ll love it even more.

We also love puns. And cookies.

4. "It Doesn’t Work" Doesn’t Help

Every customer support agent has received an email that simply states: "It doesn’t work."

We get it, that’s probably why you’re writing into support. If you can be more descriptive of the problem you are having, though, we will be able to work with you to fix it faster.

When writing into support, think of the acronym WHIP:

What’s Happening? Describe in detail what you’re seeing, and what you were trying to do. Instead of "it doesn’t work," try explaining what isn’t working.

How does it happen? What actions did you take to make this happen? Does it happen every time you take those steps?

Is it urgent? Tell us how this bug affects you. What are you trying to do? How urgent is it? We might be able to find another way to do this for you.

Pictures? Screenshots are super helpful. We can see exactly where you are in the app, and what’s going wrong.

For example, here’s an ideal email from a customer:

Hi Support!

I was trying to update my password today by clicking on the "forgot password" link. However, every time I did, an error flashed up saying “You are not authorized to do this” and nothing happens. I’ve attached a screenshot to show you what I see.

I really need to log in to get some reports for my boss today. Can you help me reset my password?

The more information you can provide, the faster we’ll be able to help. Just remember to WHIP!

5. Customer Support Isn't Entry-Level Work

I often hesitate to tell new acquaintances that I work in customer support. Or I’ll make sure to clarify, "I’m a manager." That’s because, generally, most people don’t think of customer support as a long-term, respectable career option.

But those of us who’ve worked in support for many years know that just isn’t true. For us, customer support isn’t a stepping stone to other jobs. Many of us even come from other roles in programming, user experience, or data science. Using these skills in customer support helps us provide better service to the customer and to the company.

Customer support also provides a lot of room for growth. Sandeep Kaur, a customer advocate at Kayako, shares how her skill-set has expanded through her work in customer support. She’s developed marketing and communication skills by writing on the Kayako blog and presenting customer webinars. To become more independent in troubleshooting customer issues, she’s dug into API calls and product releases. "Just by being in support," Sandeep says, “you learn and achieve a lot because the desire to help people pushes you to become more knowledgeable.”

There’s a lot more to support than meets the eye. Answering customer questions requires a deep knowledge of the product and problem-solving skills, along with a superhuman ability to communicate clearly.

In fact, most people only realize how difficult providing great support is when they first provide support to customers. This is one of the many reasons Zapier loves All Hands Support. It’s an invaluable experience to get more team members closer to the customer.

We aren’t support professionals because we can’t find other work; most of us really love what we do. For us, customer support is our career—it’s very rewarding, and we spend lots of time and effort becoming excellent at providing great support.


The main thing we want you to know is that we're people, just like you. (Well, except for those customer support chat bots. We promise we're real people.)

Even though we’re behind a computer screen, customer support agents are just as human as the colleague sitting next to you. (But pro tip: We prefer Tinder and Match.com versus customer support tickets for requests for dates. And even if a ticket is answered by someone with a traditional female name, our answers are likely just as good if we faked using a male name.)

That humanity comes with its own set of problems. We make mistakes sometimes. We get burnt out. We take things personally. But at the end of the day, we really just want to do the best job we can and help you and our other customers be successful.

So the next time you encounter a bug and need to contact support, know that you’ve got someone on your side trying to help. Send us a cat gif, a screenshot, and as much patience as you can muster, and you’ll get the best customer support in town.

Title image by Freepik


source https://zapier.com/blog/customer-support-tips/
Thursday 22 March 2018

How to Thrive as an Extrovert on a Remote Team

Hi! I’m Bethany, Product Manager and extrovert. Super nice to meet you!

Whale Hello There GIF

People often confuse being extroverted with being an outgoing person. And a lot of times the two traits do go hand-in-hand.

But to me, being extroverted isn’t about being outgoing. It describes the way an individual gains and loses energy. Nothing gives me more energy than socializing and collaborating with my friends and coworkers. When I walk out of a meeting, I feel inspired, energized, and ready to take on the world. Personal interactions are the way I recharge.

This posed a problem for me about a year ago when I joined Zapier, an all-remote team. The remote aspect of my job provides many benefits I enjoy, but the lack of in-person contact has been a real challenge for me.

With the help of my Zapier coworkers, I’ve developed a few practices that I find vital to my day-to-day well being. Here are our best practices for thriving as an extrovert on an all-remote team.

Consider Social Activities as a Form of Self-Care

When I worked in an office environment, I could be passive about social interaction because it was an inherent part of my day. On a remote team, much of our communication is written in tools like Slack. While I love communicating via emojis, it’s not the same type of communication that feeds my extroverted soul.

In a remote world, you have to be intentional about in-person socialization. This can come in a variety of ways for extroverts on our Zapier team:

I’m a runner and my running group is the way I socialize and de-stress, so I make time for it. I also prioritize meetups, hackathons, and professional groups that relate to my development as a Product Manager.

Andra Roston, Customer Champion, also prioritizes spending time with groups: “One of the best things about working remotely is that it leaves me the social energy for the times I want. I crossfit and do theatre, both of which are social activities.”

Cody Jones, Head of Partnerships, relies on his home base and community ecosystem: “I have 3 boys that love to rough-house, play, and get into all sorts of mischief. I see my parents and siblings each weekend as well. I’m also very involved in my local community—I’m a scout leader which means I spend about 4 hours each week with a bunch of boys and their parents.”

Tim Anderson, Chief Growth Officer, is intentional about making plans: “I try hard to plan to meet up with friends. In remote work, you no longer have the easy, 'who wants to grab a beer after work?' thing going, so that requires a lot more planning.”

Whether it’s sports, a hobby, or hanging out with family and friends, recognize these activities are the primary way you’ll recharge—and prioritize them appropriately.

Prioritize your social activities, because they are a form of self-care. It’s easy to blow off social activities when you’ve been working in your pajamas all day and your Netflix queue is full. Which brings me to my next tip…

Put Your Shoes On

Literally, put your shoes on in the morning. I’m twice as likely to leave the house if I stick to my morning routine and get dressed. Whether I plan to work from a coffee shop, go for a run, go to happy hour, or attend a meetup I make sure I’m dressed to do so with my shoes on before I start work in the morning.

Mike Knoop, CPO, also uses this trick: “It’s such a small thing but it works. When my shoes are on, I’m at work and I’m ready to tackle the day.”

This tiny change in your morning routine can really make a difference. For me, the simple act of putting my shoes sets a positive and intentional tone that shows up in my work and social life.

You Look Fantastic GIF

Leverage Technology

When I worked in an office, my go-to move was to grab some coworkers and head to a whiteboard. Working remotely changed that. I really missed the tactile nature of whiteboards and the ease of ad-hoc communication.

Luckily, there are tools that can help replicate in-person collaboration in a digital space. Some my team use daily include:

  • Mural.ly, a digital workspace that offers digital stickies, whiteboards, and a lot of other great features
  • Zoom, our video conferencing solution
  • Slack, where most of our day-to-day communication happens

Using these tools is a great way to recreate in-person collaboration. Chris Patrick, People Ops, finds virtual coworking sessions a useful way to connect with members of his team via technology. And Andy Wilkinson, Customer Champion, pairs up with teammates over Zoom or Slack calls when responding to customer emails.

These are great tools, but they’re only effective if you use them. So grab a colleague and open up a digital whiteboard or hop on a call to brainstorm. Make the most of the technology you have available to you, and you’ll feel a difference in your day-to-day productivity.

Engage With Your Remote Team

Because we communicate mostly in writing, it can be easy to watch conversations roll by without engaging. And, for the same reason, it can be hard to build relationships with your team.

Be diligent about participating. At Zapier, we have a culture full of jokes, gifs, and emojis in Slack. I find when I fully participate in these conversations I feel connected to my coworkers and spend a lot of my day actually Lol-ing.

Andra Roston, Customer Champion, dedicates time to relationships with remote teammates: “I try to spend time in our #fun Slack channels. I also make the absolute most of Zapier retreats, and try to maintain the relationships I forge thereafter.”

Danny Schreiber, Editorial Team Manager, takes advantage of in-person time when he does see his team (such as our company retreats) to build relationships: “When we're together in-person as a company I find myself taking full advantage of it and soaking up the time—mixing up who I dine with, grabbing drinks/coffee between things, staying up too late in the game room, etc.”

I’m fortunate to live in Austin, TX where a few other Zapiens also live. We organize monthly lunches and weekly coworking sessions at coffee shops. We even threw a holiday potluck! On the flip side, I also try to engage with my remote team. We have a weekly pair chat program and informal video hangouts that help facilitate these types of interactions.

When I focused my energy on engaging in the culture of our team and building relationships, it changed the way I perceived remote work. This type of focus builds a sense of community where we as extroverts thrive.

Finally, Ask for Help

Social interaction comes passively in an office. In a remote environment, you have to be much more intentional. That can be a hard transition.

Be proactive about your self-care. About 3 months into my employment, I felt lonely and isolated. I loved my team and the work, but spending time by myself all day, every day was negatively impacted my well being.

Answer me honestly: Do you need help? GIF

I reached out to my manager for help, and we brainstormed some solutions, like testing out a coworking space, attending meetups, and prioritizing social events. I wish I had asked for help sooner because there were two positive outcomes of that meeting.

The first is that I had the support and encouragement from my manager while I worked through this challenge. I felt less isolated immediately after that conversation.

The second is that I started being intentional about self-care as an extrovert. And that led me to raise the subject with my team and define these best practices that I’m now sharing with you.

Keep Reading:


source https://zapier.com/blog/remote-work-extrovert/

Tuesday 20 March 2018

Scrum for One: How to Apply the Scrum Framework to Personal Projects

My house is more than 100 years old. The original structure was only two rooms, built in the late 1800s. Today there are eight rooms in total—the other six added on at different times over the last century as things like indoor kitchens and bathrooms became commonplace.

While I’m grateful that my home is larger than two rooms and has amenities like indoor plumbing and electricity, it’s obvious sometimes that the previous owners prioritized low-cost over long-term when expanding the house. For example, one of my exterior walls isn’t brick or siding—it’s just roofing materials screwed into wood.

My home renovation to-do list is so long that I gave up on keeping one. I work on the project a day here and a weekend there—whenever I find time. Luckily, the project isn’t time-bound. I have no deadline and may never finish everything.

Still, I want to be as productive as possible when I do find the time to focus on my fixer-upper, so I plan my projects using the Scrum framework.

What Is Scrum?

Scrum is a framework used by development teams who practice Agile, so it’s almost impossible to define Scrum without first defining Agile.

Agile is an approach to software development formed by a group of IT software development leaders in 2001. They were seeking a way to improve the software development process—make it more flexible, adaptable, and efficient. They met at a ski resort in Utah to brainstorm ideas. The outcome of that meeting: the Agile Manifesto.

Agile Software Development Manifesto

Along with the Agile Manifesto, the authors documented twelve principles of Agile that advocate for things like collaboration, trust, self-organizing teams, sustainable work schedules, and continuous delivery.

While Agile is often referred to as a project management methodology, it’s probably better described as a set of philosophies. Agile doesn’t tell you how to work; it encourages teams to adjust how they approach and think about work.

Scrum, on the other hand, provides the “how” for Agile. It’s a process that provides instructions for applying the philosophies of Agile to project work.

Because Agile and Scrum are usually practiced together, the two terms are often used interchangeably, but they’re not the same thing.

Think of it in terms of sports. Players understand that while they all have unique talents, the best way to win a game is through teamwork. But they also use a playbook to execute specific scenarios as a team. The goal of collaborative work is Agile. The playbook is Scrum—an instructional guide for how to work as a team.

The Scrum Framework

If you want to understand all of the terminology and techniques of Scrum, take time to read the Scrum Guide. But since we’re discussing how to apply the Scrum framework to personal projects, I’m not going to cover all aspects of it—only those that apply to this specific approach.

Sprints

One of the core components of Scrum is the sprint. A sprint is a specific timeframe in which you plan to complete a set amount of work. Many software development teams work in two-week sprints, and the Scrum Guide advocates for time periods between one week and one month. But for a personal project, a sprint could be a weekend or even just a single day.

Backlog

A backlog is essentially a prioritized to-do list. Each task required for project completion goes into the backlog and gets ranked in priority order from most to least important.

Need help prioritizing? Check out this guide to using Agile prioritization for your personal projects.

Sprint Planning

The very first thing a team does at the beginning of a new sprint is plan their work for the sprint during a ceremony called Sprint Planning.

In Sprint Planning, the team reviews the highest priority backlog items, estimates how much time each item will take to complete, and plans the amount of work to take on given 1) the amount of time in the sprint and 2) the amount of time tasks will take.

If you have one day in a sprint and plan to work for eight hours, during Sprint Planning you would find eight hours’ worth of tasks in your backlog and plan to complete only those items.

Sprint Retrospective

At the end of the sprint, the team reviews and evaluates the work completed in a ceremony called the Sprint Retrospective.

In a Sprint Retrospective, each team member answers the following questions:

  • What went well?
  • What went wrong?
  • How can we improve in the future?

The goal of the retrospective is to create a list of lessons-learned that the team uses to improve how they work in future sprints.

Applying the Scrum Framework to Personal Projects

Let’s say I want to replace the exterior wall of my home that’s made with roofing materials. I need to tear down the existing wall, add insulation, and hang vinyl siding. I want to finish it over the summer because there will probably be times where I don’t have a complete wall, and I don’t want to sleep in a house that’s missing one wall when it’s below-freezing outside.

The first thing I need to do is create a backlog for the project: a list of everything I need to do. Theoretically, my backlog looks like this:

  • Purchase all materials needed for the project
  • Tear the roofing material down from the existing wall
  • Install any additional beams or framework needed for the new wall
  • Cut and install insulation
  • Install plywood needed to hang the siding
  • Install the siding
  • Paint the new siding to match the rest of the house

Once I have a backlog, I need to choose a timeframe for my sprints. The only time I can devote to the project is over the weekend, and while I might like the idea of completing some tasks Friday evening after work, I’m probably not going to have the energy for it. Each sprint, then, is one-weekend long, and I think I can do about 16 hours of work in each sprint.

Sprint 1

The first thing I do on the Saturday morning of my first sprint is Sprint Planning. I look at the highest priority tasks in my backlog and estimate how much time they will take. “Purchase all materials needed for the project” should take about 8 hours—one full day. I have to determine what I need, buy everything, and unload all of the materials.

My next tasks are “tear the roofing material down from the existing wall” and “install any additional beams or framework needed for the new wall.” I think those will both take four hours each.

With eight hours planned for task one, four for task two, and four for task three, I’m at capacity—16 hours—for the sprint. Sprint Planning is complete. I don’t need to estimate the other tasks because I’ll plan those for later sprints.

Time to get to work. I start with research to find out exactly what materials I need to buy, make a list, and head to Home Depot. Unfortunately, Home Depot doesn’t have the siding I need in stock, so I have to make a trip to Lowes. Lowes doesn’t have it in stock either. I have to order it and come back to pick it up the next weekend.

In between researching and shopping, eight hours passed, and now I’m exhausted. I decide to unload everything the next day.

The next day I get up and unload all of the materials, then I’m ready to get started removing the old roofing wall. Unfortunately, it’s held up with screws that have rusted over the years, and trying to remove them strips the screws every time. I do some research and find out that I need a special tool called a screw extractor to get them out.

My local hardware store isn’t open, so it’s back across town to Home Depot. By the time I’m back home, the day is nearly over.

Since my sprint is over, it’s time to conduct a Retrospective. I answer the following questions:

What went well?

  • I have most of the materials I need for the project.

What went wrong?

  • Local stores didn’t have the siding I need in stock.
  • The screws I need to remove are rusted.
  • I had to make an unplanned trip to Home Depot.
  • Instead of completing three tasks, I completed 75 percent of a single task.

How can I improve in the future?

  • Call ahead or check store inventories online to make sure stores have everything I need.
  • Increase my estimates for how long tasks take to accommodate unexpected complications.

Sprint 2

I start with Sprint Planning, but I have to update my backlog to account for the things that changed after the last sprint. I cross my first task off because it’s mostly complete, but I need to add a new task for picking up my siding. Now my backlog looks like this:

  • Pick up siding from Lowes
  • Remove stripped screws and tear the roofing material down from the existing wall
  • Install any additional beams or framework needed for the new wall
  • Cut and install insulation
  • Install plywood needed to hang the siding
  • Install the siding
  • Paint the new siding to match the rest of the house

During Sprint Planning, I plan to complete the first three tasks. Because I’m reflecting on my lessons-learned from my last Sprint Retrospective, I’m going to call Lowes first to make sure my siding arrived. And while I think removing the roofing material and installing additional framework should only take four hours each, I’m going to estimate six hours each in case there are more complications.

Things are going well until the middle of the second day of my sprint when it becomes apparent that it’s going to rain. I need to go buy a tarp to hang over what I’ve removed, and I have to move the wood I was planning to install into the shed so that it doesn’t get wet. Because of those unforeseen complications, I only finish the first two tasks on my list.

In my Retrospective, I note the following ideas for improvement:

  • Check the weather before each Sprint Planning.
  • Wait to buy materials until I need them.

I continue with these processes every weekend until the project is complete. Because I’m taking the time to plan my work each sprint, I’m gradually improving my estimates and coming up with more realistic plans. And because I’m documenting the lessons I learn, I make fewer mistakes over time.

Accomplish More with the Scrum Framework

When working on a project, it’s easy to fall into the trap of powering through until you’re finished. But it’s not a sustainable way to work. Powering through work is fine for short, one-off projects. But if you’re working on something long-term—something like my never-ending quest toward total home renovation—Scrum helps for three main reasons:

  • It helps you work at a sustainable pace.
  • It provides a framework for planning work over time, giving you a better sense of when you’ll finish specific tasks and projects.
  • It provides time for reflection, which enables continuous improvement.

At first, it may seem like Sprint Planning and Sprint Retrospective ceremonies simply eat into the time you could spend completing tasks. But you’ll find that the time you spend planning actually improves your productivity by helping you find better ways to work and identify unnecessary tasks you’re focusing on that eat away at your productive time.

Title photo by elefevre7 via Flickr.


source https://zapier.com/blog/scrum-framework-personal-projects/

Thursday 15 March 2018

How to Automatically Print Shipping Labels

Odds are you learned how to address an envelope as a child, perhaps as a school exercise to send your parents a postcard. It's simple enough.

Until you need to address 50 packages a day. That's when you'll start looking for a simpler solution.

You could type up your labels in a word processor to save time—but we have some better tricks. Here are 3 ways to automate your shipping label process, from simple tricks that take a couple steps each time to a fully automated workflow.

  1. Make Shipping Labels Automatically in Google Docs
  2. Create Plain Text Shipping Labels From Dropbox
  3. Automatically Make and Print Shipping Labels With Zapier

Make Shipping Labels Automatically in Google Docs

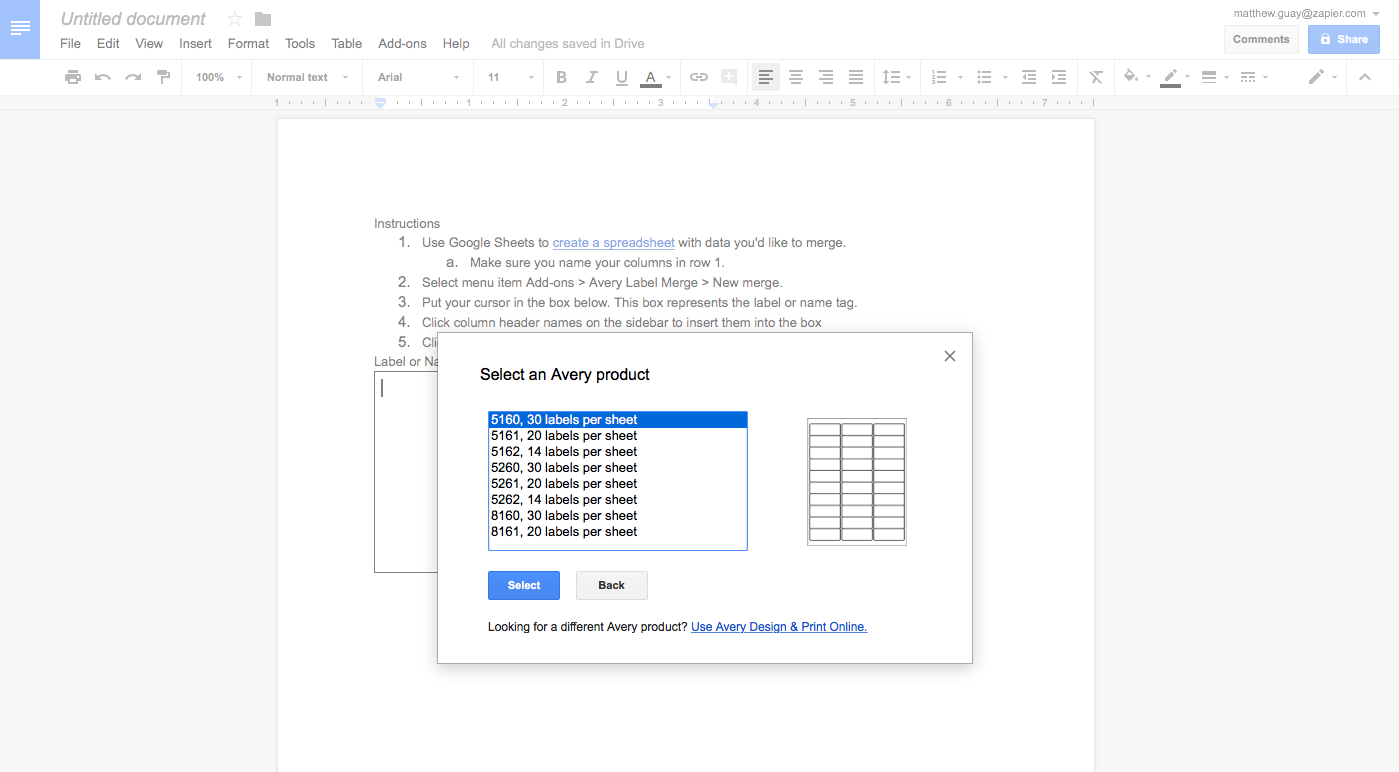
Avery Label Merge in Google Docs
Avery Label Merge can make standard sized labels in Google Docs

Let's start with the simplest option: Making shipping labels in Google Docs using the Avery Label Merge add-on. If you have a spreadsheet with addresses, it can turn them into ready-to-print labels in seconds.

First, open Google Docs, and install the Avery Label Merge add-on from that link or via the Add-ons -> Get Add-ons… menu. Once it's installed, click Add-ons -> Avery Label Merge -> New merge to start making labels. That'll open a popover where you can choose which type of label and the size of label paper you'd like to use.

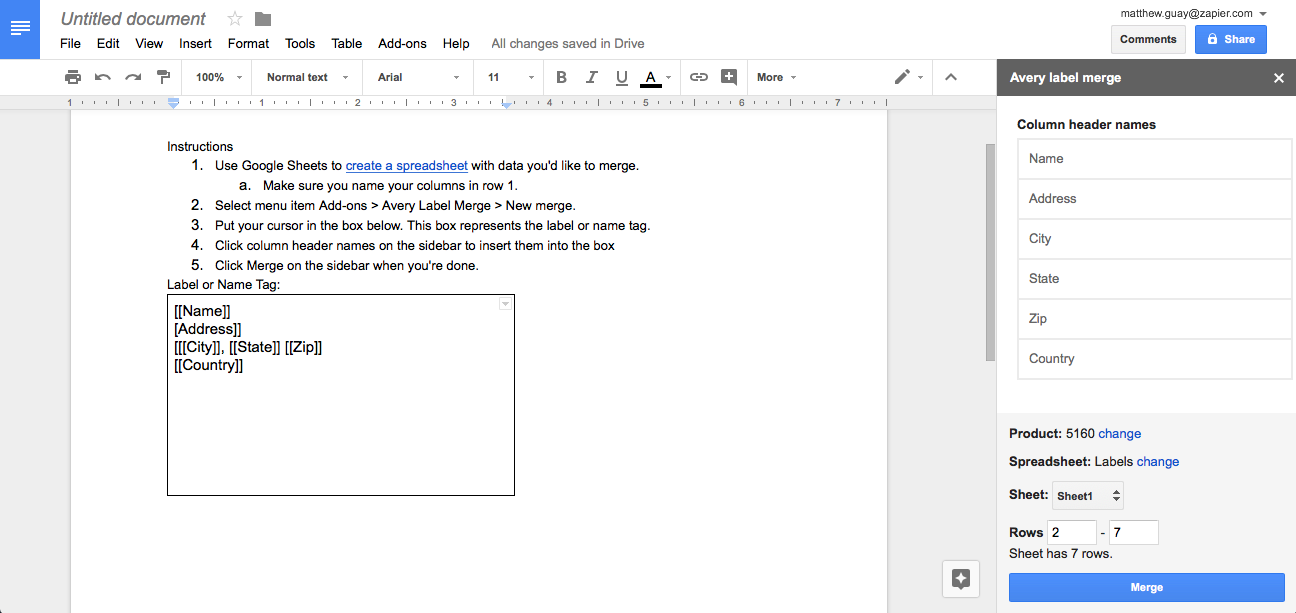
Avery Label Merge Google Sheets
Add fields from your spreadsheet to the square to arrange your label

Avery Label Merge needs a spreadsheet with the addresses you want to use in labels—and for that, it relies on Google Sheets, the spreadsheet sidekick to Google Docs. Make sure you have a spreadsheet with those names and addresses, then in the Avery Label Merge add-on in Google Docs, choose the Google Sheets spreadsheet that has your addresses. The Avery add-on will then add a square to your document—and open a sidebar on the right. Click in the square first, then click the fields from your spreadsheet you'd like to add to your label. Press your return key to add new lines, as normal, and type any extra characters you want on the label.

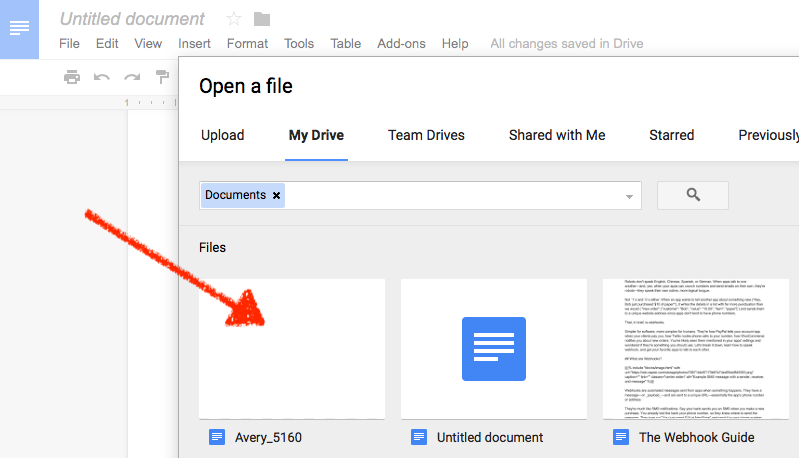
Avery labels in new Google Docs document
Your labels will be added to a new Google Docs document

Once you're finished, click the Merge button, and Avery Label Merge will make a new Google Docs document with your finished labels. Click File -> Open and select the newest document in the list—with the name of your label size, such as Avery_5160—to see your completed labels. You can then tweak the font and color of your labels, if you'd like, or print them directly.


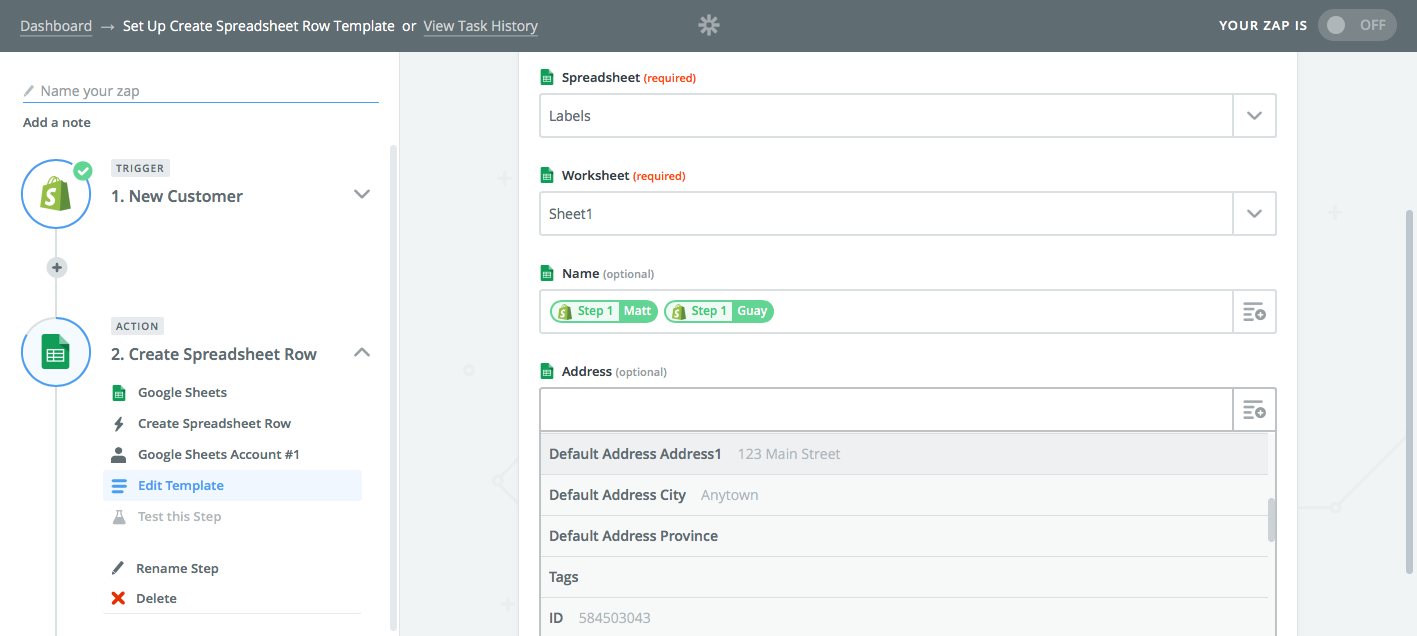
Zapier add new address to google sheets
Zapier can automatically add new orders to your address spreadsheet

Want to automate things? Anytime you get a new order in your eCommerce store, or save a new contact to Google Contacts or your CRM—or do anything else where you'd need a shipping label—automation platform Zapier can save the address to your spreadsheet automatically.

Just open zapier.com, click Make a Zap, and select the trigger app you want—the app that has the new addresses you need. Then, select Google Sheets as the action app, and choose the Create Spreadsheet Row action. Choose the spreadsheet where you're storing addresses for labels, and click the + button beside each field to add data from your store or CRM or other app to the spreadsheet.

Turn on the Zap, and every time a new contact or order or other item is added to your trigger app, Zapier will copy it to your spreadsheet. And when you're ready to print labels, open Google Docs and run the Avery Label Merge like before.

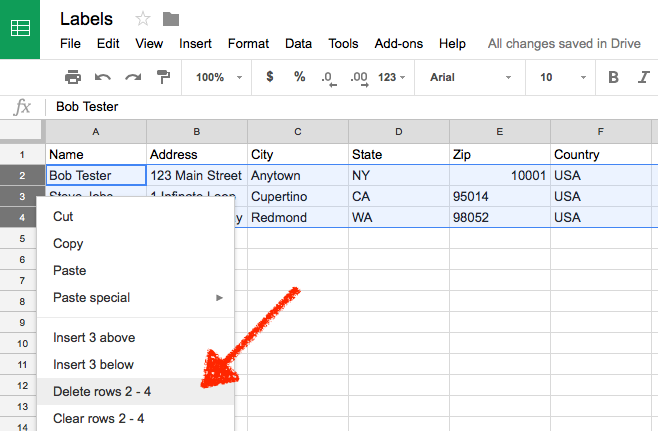
Delete Google Sheets rows
Delete your old addresses after making labels to start anew each time

You likely only want to print these labels once, so to start out with a clean slate next time, open your spreadsheet after you've made your labels. Select each row with addresses on the left of the spreadsheet, then right-click and click Delete Rows.

The next time you get a new order or contact, Zapier will start over and add it as the first address—and when you to go print labels, you'll only get the addresses you want.

Ready to automate your own labels? Here are some pre-made Zaps to help you get started adding addresses to your spreadsheet automatically:

Create Plain Text Shipping Labels From Dropbox

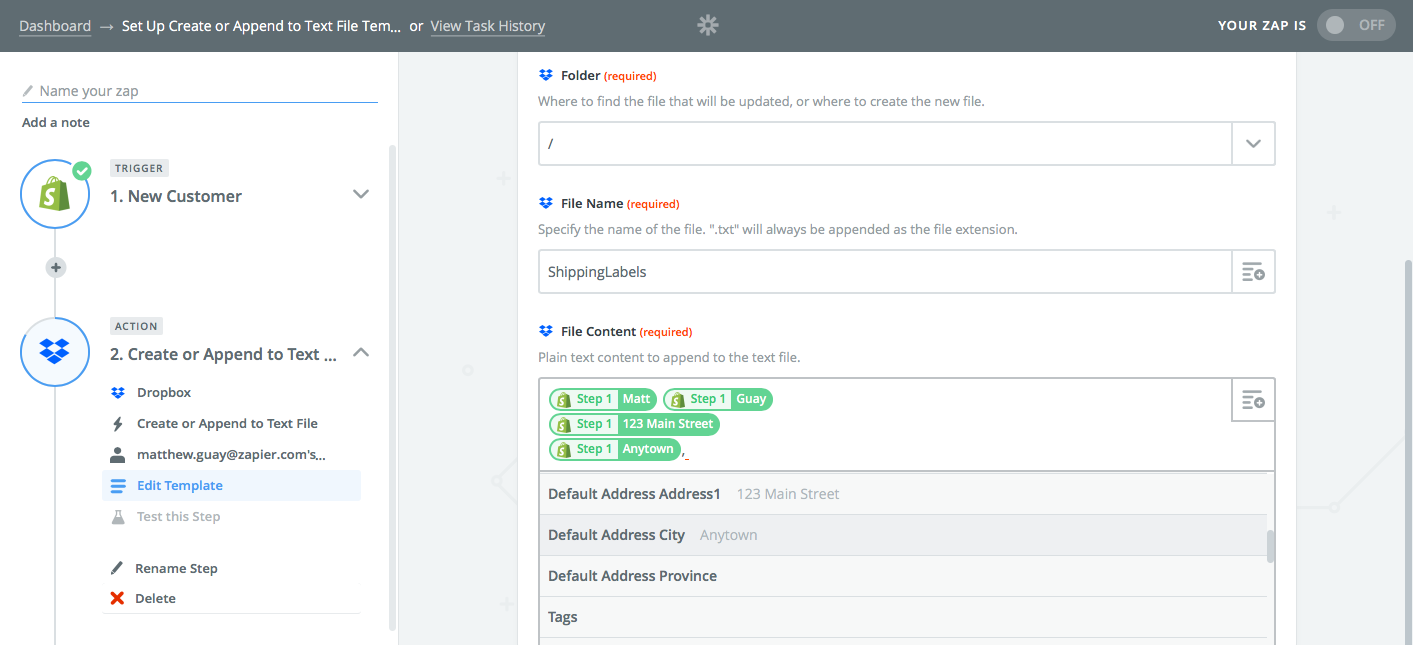
Zapier Dropbox text file integration
Zapier can add addresses to a Dropbox plain text file

Want to automatically make labels on your own with the formatting you want? Another great option is using Zapier's Dropbox integration. Zapier can add each new address to a plain text file in Dropbox, where you can then print out the page or format the labels the way you want.

Make a new Zap and choose your trigger app that'll have the new addresses as in the steps above, then choose Dropbox as the action app. Select the Create or Append to Text File action, then choose the Dropbox folder where you want to save your label file, and give the file a name.

In the File Content box, click the + icon on the right and select the address parts you want to add to the document. Add spaces, commas, and other text you want included in the labels—and include a few blank lines below the address for a gap between this and the next label. Turn on the Zap when you're finished.

plain text shipping labels
Plain text shipping labels from Dropbox

Now every time a new address comes in, Zapier will add it to your text file. When you want to print labels, open that file from Dropbox on your computer and print it for a list of labels.

Or, better yet, open it in a word processor like Microsoft Word, and add multiple columns. In Word, select the Layout tab, then click Columns and choose how many columns you need (3 tends to work well for labels). Now print the page, and you'll have all your labels ready to go.

Once the labels are printed, delete all the text in the document, and Zapier will start over adding your next new orders and contacts to the blank sheet.

Automatically Make and Print Shipping Labels With Zapier

The first two options automate away 90% of the label making work—and are quite simple to set up. But there is one more option if you have around 15 minutes to build a more advanced Zapier automation. And this time, your labels will automatically print themselves every time, without you ever needing to click anything.

Here's how it works: You'll have Zapier watch for new addresses, and save them for later. When you have enough addresses to fill a sheet of paper, Zapier adds all of them to a document template, then will print the labels automatically.

Let's give that a try.

1. Make a Shipping Label Template Document

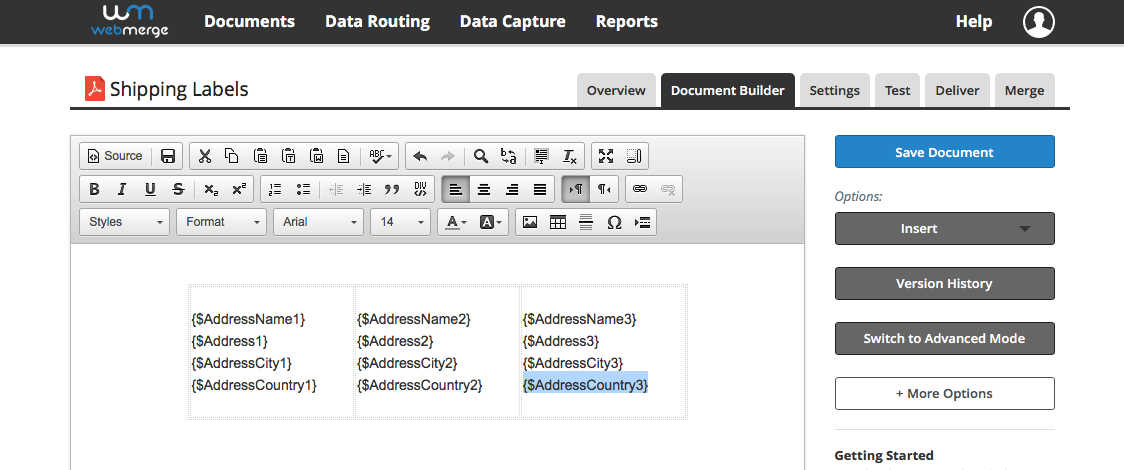
WebMerge
WebMerge is great for making template documents, even for shipping labels

Before you get started, you need to make a template shipping label document that Zapier can fill in. The best way to do that is with WebMerge, an app designed for automatically filling in template documents.

Open WebMerge, click New Document, give your document a name, then select Build Your Own. That'll open the document builder where you can add any text and formatting you want to your document. For shipping labels, you'll likely want to add a 3-column table with as many rows as you want for your addresses. In this example, we're only making one row—but you can fill out the page with as many rows as you want.

In each cell, add the address fields you want Zapier to fill in with curly brackets and a dollar symbol before the field name, like {$AddressName1} for the first address name field. Repeat that for each field—and then add the same text to the next rows and cells, changing the number so each cell has its own unique set of name and address fields, like the following:

{$AddressName1}
{$Address1}
{$AddressCity1}
{$AddressCountry1}

Click the floppy icon in the toolbar to save your document as you're working—and once you're finished, click the blue Save Document button to save the full template.

2. Count Each New Address

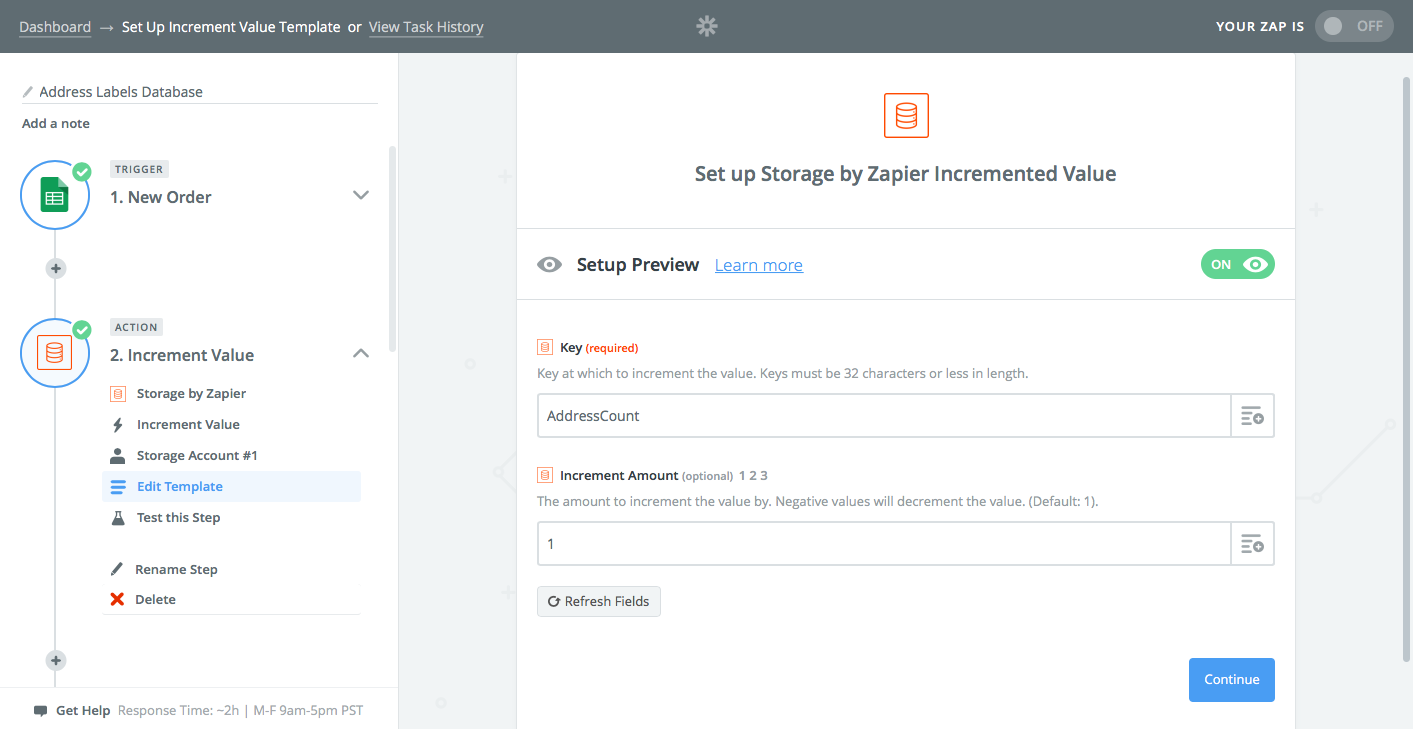
Zapier Storage counter
Zapier will watch for new addresses, and keep count as they come in

You're now ready to make your Zap. As before, you'll start by adding the trigger app that will have new addresses—your store, payments app, CRM, even a spreadsheet. Then we'll add a counter to keep track of how many addresses Zapier has found—that's important so we know when to print a full sheet of labels.

For that, add a Storage by Zapier action as your Zap's second step. Select the Increment Value action, then add a unique name that's easy to remember (we used AddressCount) and add 1 to the Increment Amount box.

This will add 1 to the count every time Zapier gets a new address.

3. Save Each Address

Save address in Zapier Storage
Zapier will save each address individually until we're ready to print

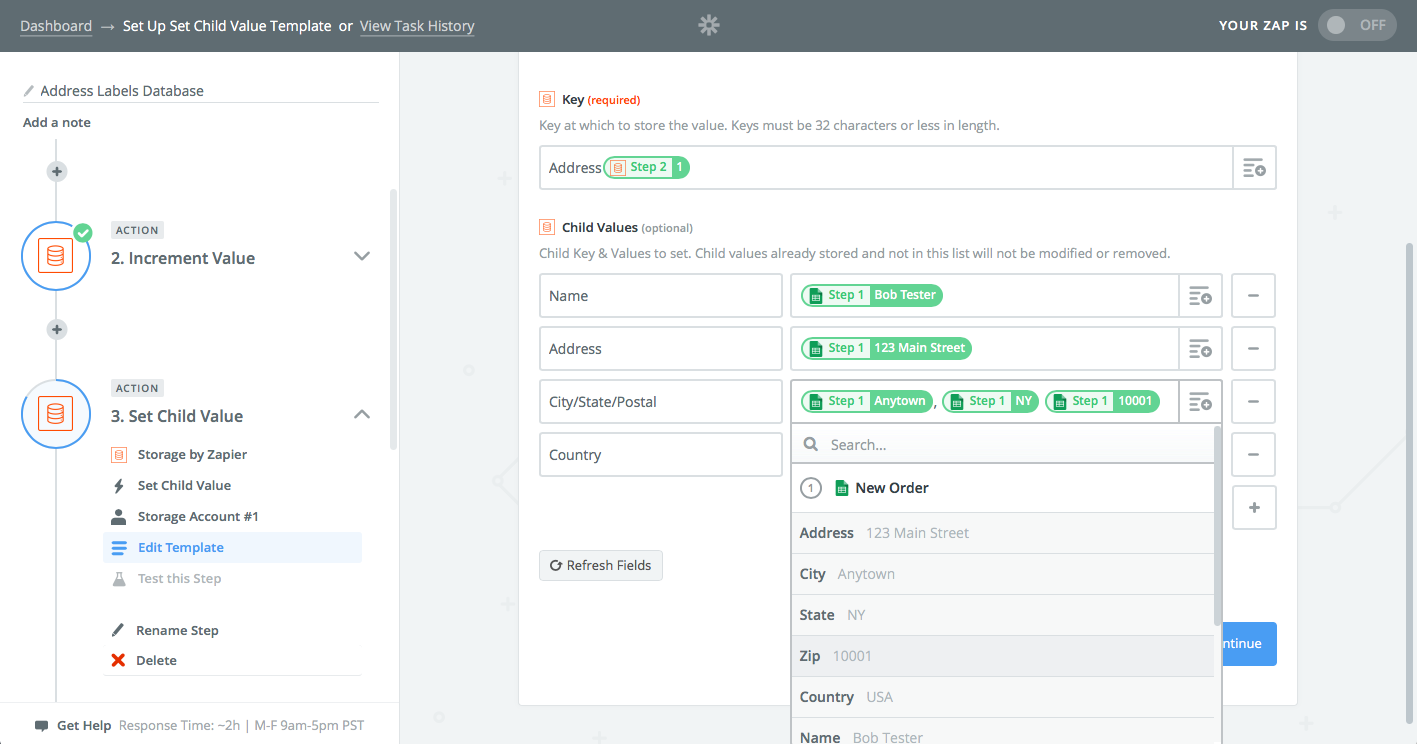
We'll then have Zapier save the address. Add a third step to your Zap, choose the Storage app again, and this time use the Set Child Value action.

We need the key to be unique for each address, so for the Key field, this time type a name (we used Address) then click the + button on the right and select the Value field from step 2. That will have Zapier save this address as Address1, then the next as Address2, and so on.

Now, add a name for each part of your address and select its corresponding field from the + button under the Child Values. We added a Name field and selected the name from our trigger app, an Address field for the address, and then for the City field we filled in the full City, State Zip style data to have everything in one line.

4. Wait Until You Have Enough Labels With a Filter

Zapier Filter
Use a Zapier filter to make sure you have enough labels to fill a page

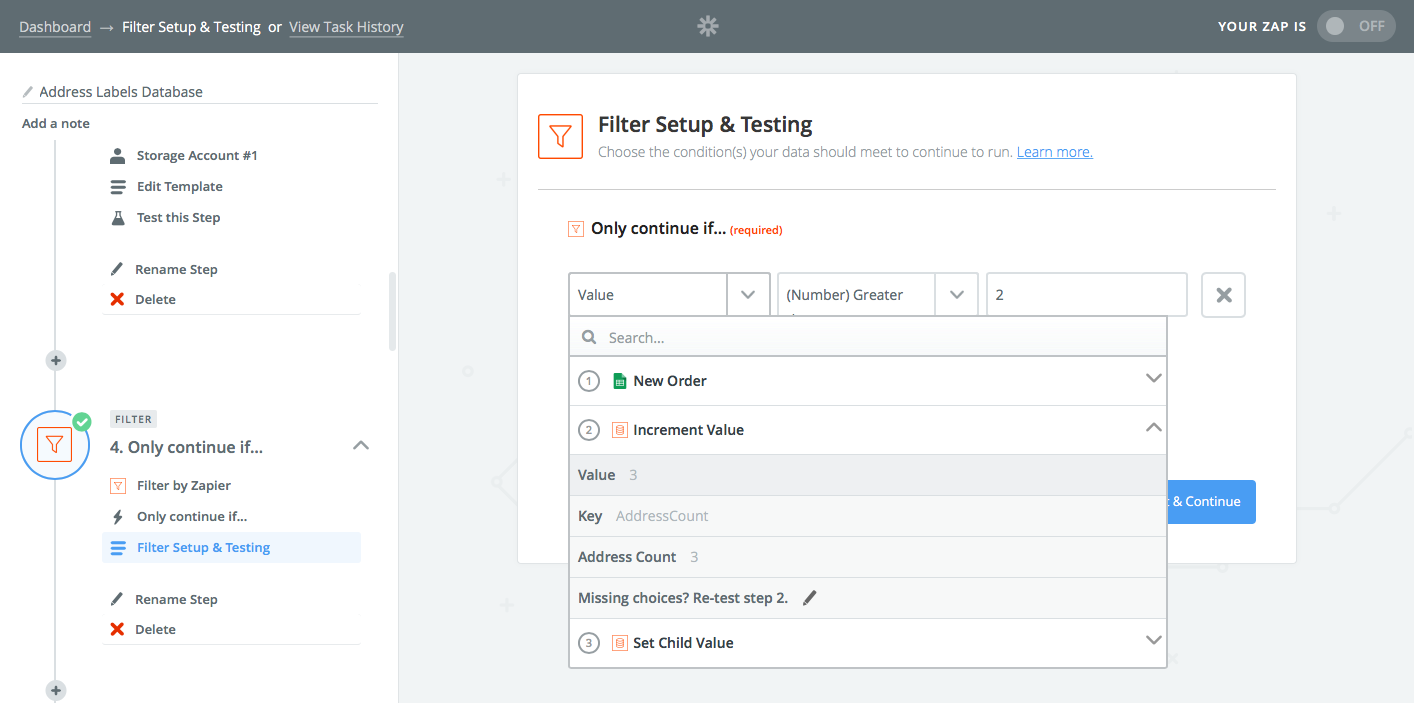
You don't want to waste your label paper—so Zapier can wait to print until you have enough addresses to fill up a sheet. Do note: the steps below are a bit tedious if you wait for a lot of addresses, so it might be best to print a row or two each time instead. Just think through how many addresses you'd like to print at once.

Add another step to your Zap and choose the Filter by Zapier action. Under the Only continue if header, click the down arrow on the left and select the Value field from your Zap's second step that's counting the addresses. In the center menu, select (Number) Greater than, and in the text field on the right, enter a number that's one less than the number of labels you want to print. For instance, we entered 2 since we want to print 3 labels.

This filter will now watch the counter, and if there are 3 labels ready, it will proceed to the next steps. Otherwise, the Zap will keep waiting for more addresses.

5. Grab Each Address Zapier Saved

Zapier get address
Get Zapier to find each of the addresses this Zap has saved, one at a time

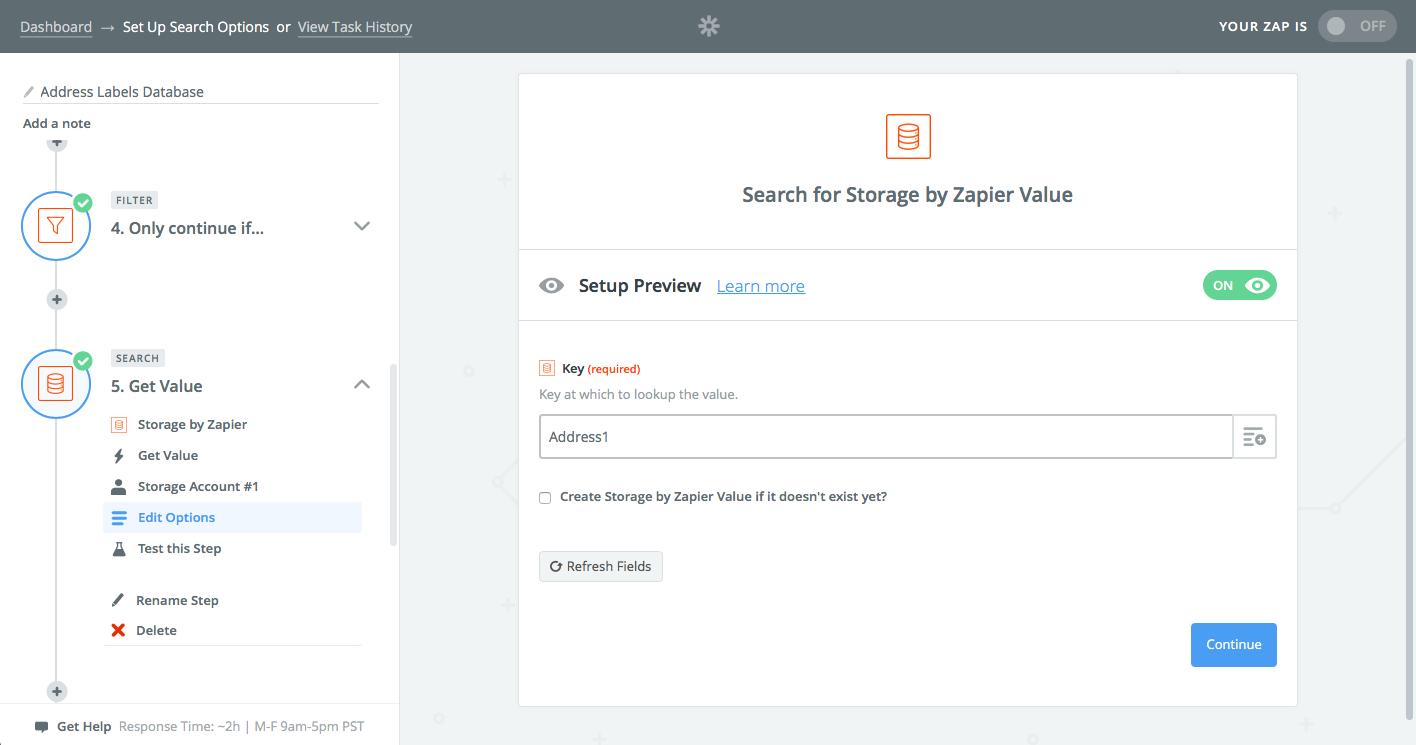
It's time to have Zapier pull up all the addresses it saved. To do so, add a Storage action again, and this time choose the Get Value trigger. In the Key field, enter the name you used for addresses in step 3 with a 1 after it—which would be Address1 if you did the same as us.

Name step in Zapier
Name each of your Get Value steps so you don't get confused

That will grab the first address—we still need to get the other ones, too. So, add one more step for each of the addresses you're saving, and add the correct key for each (aka Address2 for the second one, Address3 for the third, and so on).

In this example, we added 3 Storage Get Value actions since our Zap is waiting until we have 3 addresses until it prints. If you want to print 6 addresses at once, you'll need to add 6 Storage Get Value actions.

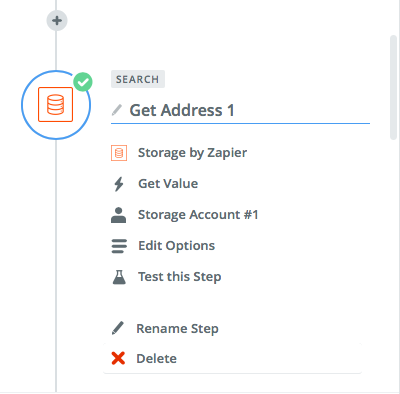
To make sure you don't get confused, click the Rename Step link at the end of each of these steps and give them a unique name so you'll know which step has which address.

6. Add the Addresses to Your Shipping Label

Zapier WebMerge
Pick your shipping label template from WebMerge...

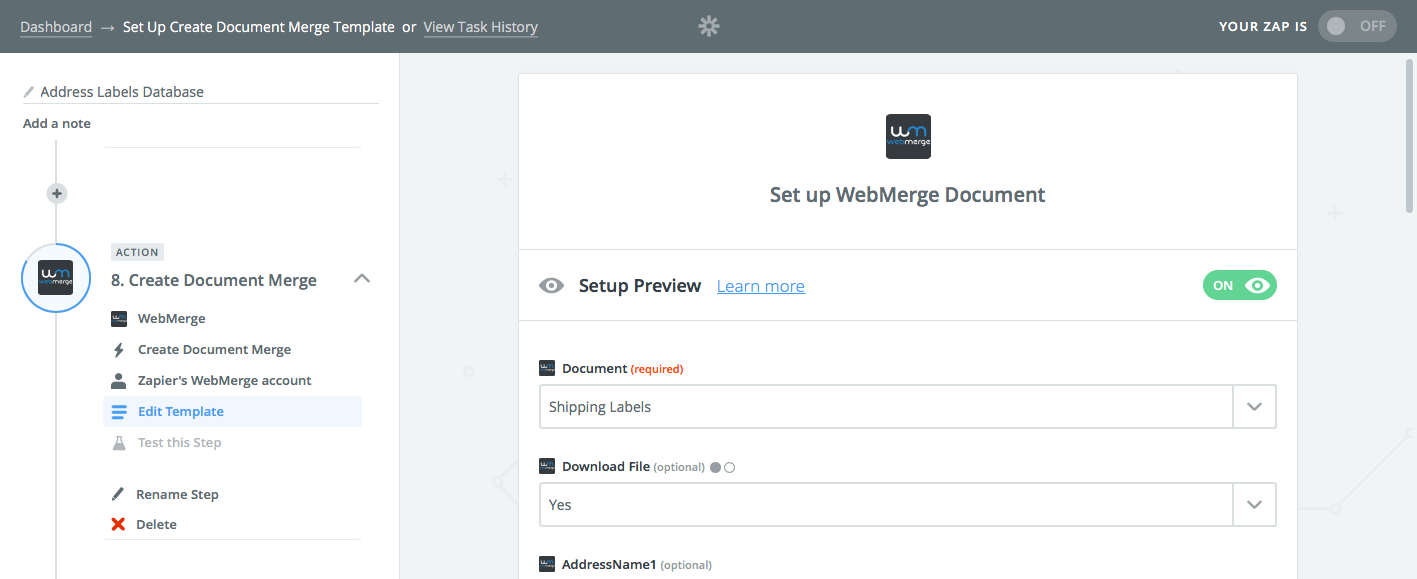
It's finally time to add the addresses to your shipping labels. Add a new action to your Zap, select WebMerge, and pick the Create Document Merge action. Pick the template you made before from the Document menu, and select Yes under Download File so Zapier will get a PDF copy of your labels to print out.

Zapier add data to WebMerge
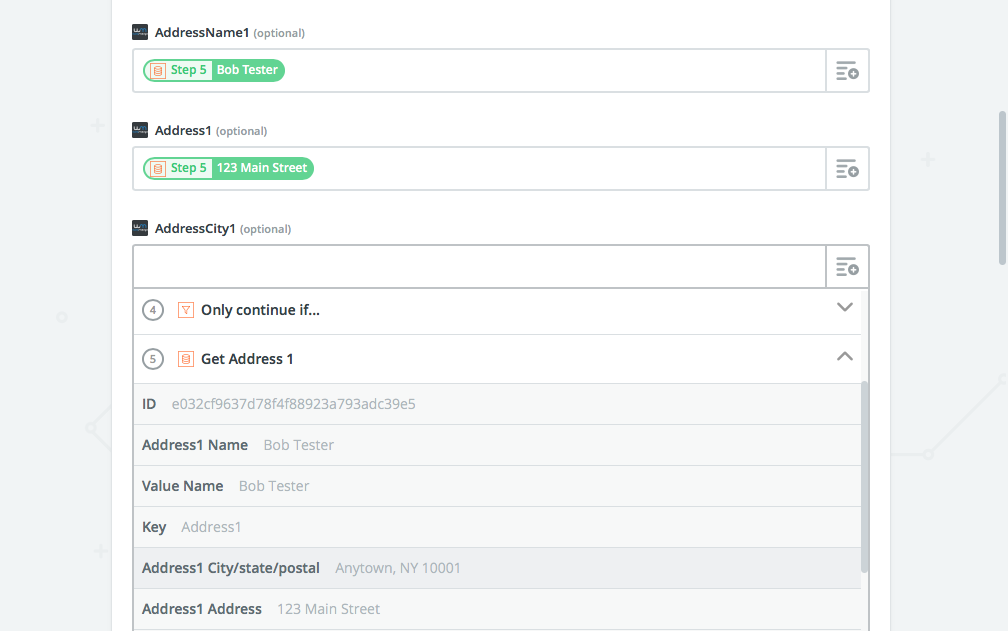
...then have Zapier add each address to WebMerge.

Then you need to add each address part to the correct address field from WebMerge—and yes, this is tedious. Start out with the first row—AddressName1 in our screenshot—and click the + button on the right, then select the Get Address 1 action and click the Name field from it. Repeat that for each Address1 field—then switch to the Get Address 2 action when you get to Address2 fields, and so on.

In a few minutes, you'll get it all filled in, and will have each of your saved addresses mapped to the correct WebMerge fields. Whenever Zapier has enough addresses in the counter, it'll copy each and add them to the correct template fields, just like you want.

7. Reset the Counter

Zapier storage reset counter
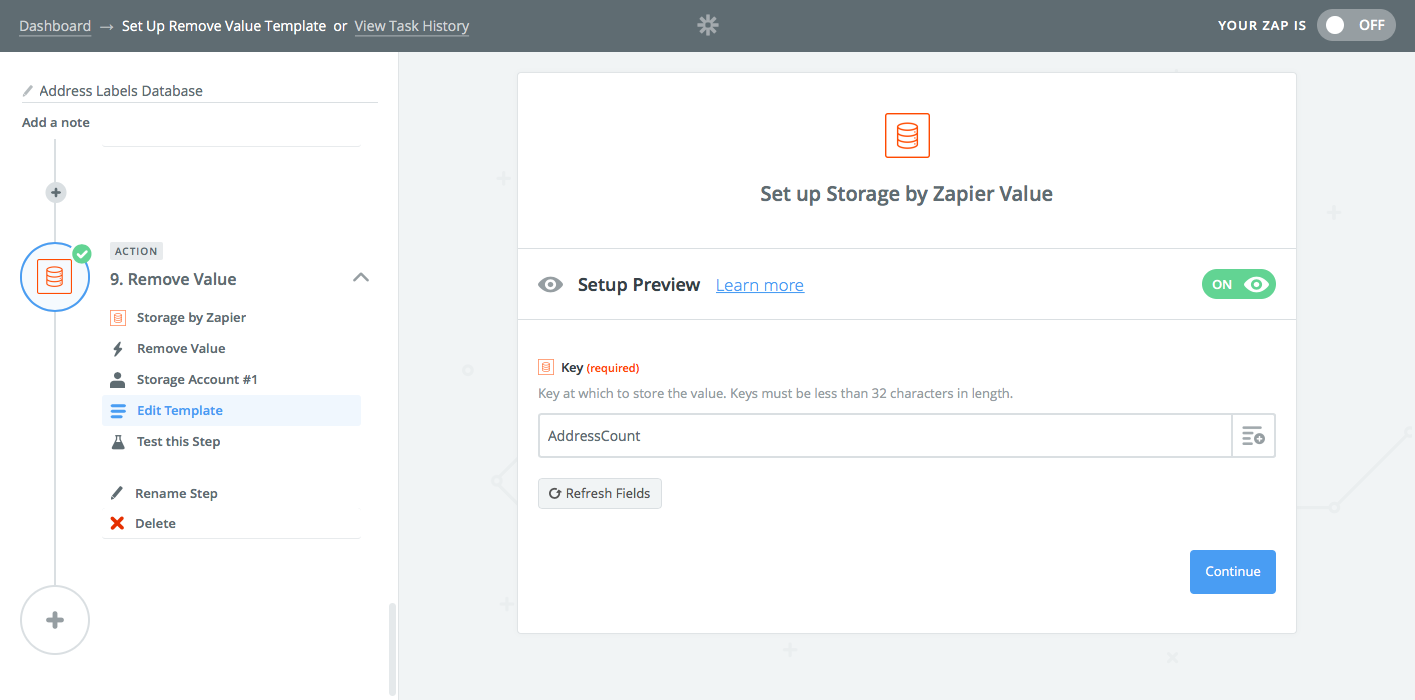
Set the counter back to 0 so Zapier will start saving new addresses again

You're almost done—but we don't want our Zap to miss any labels. So as soon as Zapier makes the template document in WebMerge, we want to reset the counter back to zero so Zapier can start saving new addresses when they come in.

Add another Storage action to your Zap and this time choose the Remove Value action. Enter the name of your counter—AddressCount, if you used the same name as us—and Zapier will switch the count back to 0.

8. Print Your Labels Automatically with Google Cloud Print

Zapier Google Cloud Print
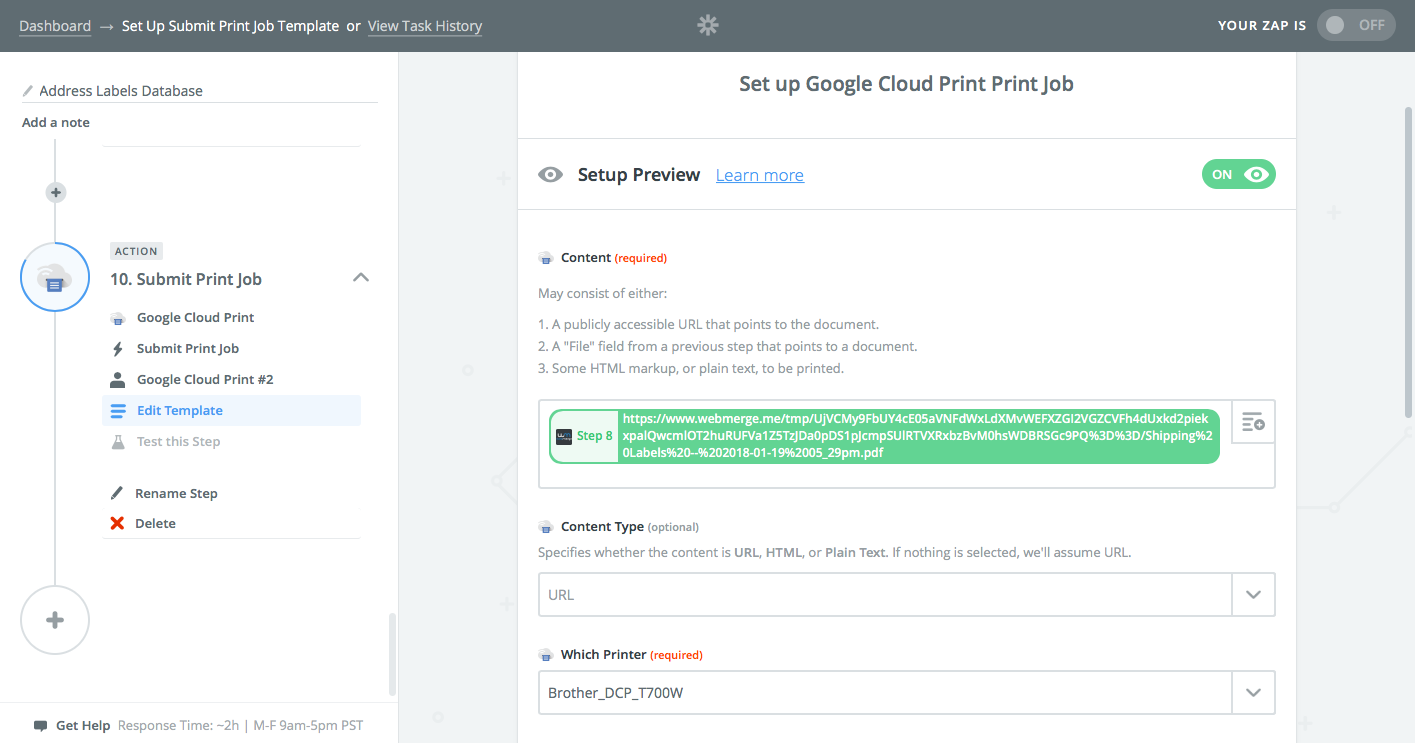
Zapier can print your labels automatically with Google Cloud Print

Now for the most fun step: Printing the labels automatically. Using Zapier's Google Cloud Print integration, you can have your labels printed out on paper automatically.

You'll need a Wi-Fi printer or one connected to your computer that's set up with Google Cloud Print—here's how if you haven't added it already. To print the labels, add a final step to your Zap and select the Google Cloud Print app.

Click the + box beside the Content field, and select the URL item from the WebMerge step—that contains a link to a PDF copy of your finished labels. Now choose the printer you want to use and test the step, and seconds later your labels should print out automatically.

Turn on the Zap, and you're finally done (yay!). The next time you get an order or have a new address saved, Zapier will copy it, wait until it has enough, then print out your labels automatically when it's ready.

Want to manually print out labels when you want, even if there aren't quite enough yet? Zapier's Chrome extension is the perfect way to do it. That, paired with Zapier's Push integration, lets you push a button in Chrome to run your Zpa whenever you want. Install the Chrome extension, then go to your Zapier dashboard, click the down arrow beside that printing Zap you just built, and select Copy. Open that new Zap, and change the trigger app to be Zapier's Push app.

Remove steps 2, 3, and 4 from your Zap, as this time you're not adding new addresses. Turn the new Zap on, and name it something easy to remember—perhaps Print Label. Now whenever you want the labels that are ready, click the Zap's button in Zapier's Chrome extension, and Zapier will print the labels out for you right then (though note, you might get some duplicates of older labels as well).


You've done it—you've automated the hard work of making labels, and the next time something needs to be shipped, you'll have a paper label ready to stick on the envelope in a few clicks, or none.

Printers still jam and run out of ink at the worst times, and your customers are still apt to mistype their address or forget to include a postal code every now and then. But this should automate away most of your label making frustration, saving you time and helping you focus on your customers.


Continue Reading: Automate Your eCommerce Store With Zapier

Ultimate Guide to eCommerce Software

Need those shipping labels for your online store? Those are far from the only routine task you'll want to automate. You'll need tools to help you list products on every marketplace you want to sell, workflows to reach out to customers and thank them for their purchase automatically, tips on how to keep everything organized and documented correctly.

We've got a book for you. In Zapier's Ultimate Guide to eCommerce Software, you'll find the apps, tips, and workflows you need to streamline your online business. And, it's free. Download your copy today to have the tips you need as you run your new eCommerce store.

Header image by Bench Accounting via Unsplash


source https://zapier.com/blog/print-shipping-labels/

Tuesday 13 March 2018

How to Manage Freelancers: 3 Hassle-Free Steps for an Organized Workflow

Hiring and working with freelancers is much easier said than done. You think you’re saving money on salaries, benefits, and overhead. And with the gig economy growing, the quality of freelancers is higher than ever before.

But once you’ve picked out your freelancers, you’ll find that there’s a lot more legwork in managing those freelancers than you anticipated. You have to keep track of their availability, skill sets, and rates—and constantly manage their workload. You need to expediently match the freelancers with appropriate projects with reasonable deadlines. And you always need a backup plan, in case a freelancer doesn’t show up.

I’ve worked on both ends of the freelancer-employer relationship, and rarely has it been painless. Recently, however, I’ve developed a system for my team that automates the process of maintaining up-to-date freelancer information and assigning work, so projects stay on track and everyone is happy. Here’s how.

Automate the Work a Project Manager Would Do

Many companies and agencies hire a project manager to deal with the headache of managing freelancers. On a daily basis, those PMs are expected to send emails, scope work, and keep track of every detail in spreadsheets and email lists. But this isn't always the best solution; sometimes, it's avoidance. You've simply passed on the same grunt work to another person— and you're paying for it.

Your company needs a system. Using just a few online tools, you can rig together a system that pairs freelancers with projects and requires minimal supervision.

There are three critical components to a project manager's job when working with freelancers:

  • Scoping client work: Project managers classify projects and scope it accurately. As each project fits a particular archetype, project managers can start quickly assembling the resources and personnel to get that project running.
  • Keeping track of talent: A project manager collects and manages up-to-date data such as location, services, rates, and availability.
  • Booking appropriate talent: Finally, the project manager connects the two: project needs with the appropriate freelancers.

All three of these tasks can run on auto-pilot, freeing up valuable hours and eliminating any need for a full-time project manager. Here’s how you can automated this process with Airtable, Calendly, and Zapier.

1. Scope Projects

Whether you’re running a product-based company or a services-based agency, there’s someone who is determining the scope of each project. At an agency, this is often the client. They’re telling you their needs and you line up the resources to make it happen. At a SaaS company, this is usually a manager. A content marketing manager, for example, might determine that they need two articles written a week at 1,200 words each.

This process usually results in messy back-and-forth. A project manager has to speak with the client or content manager and a number of freelancers while juggling deadlines, forwarding invoices, assigning editors, and lining up backup content.

To spare your team this hassle, automate the first step of this booking process. You can have internal managers or external clients fill out all the details about a project and schedule it on the work calendar.

Automate Booking with Calendly

The simplest way to do this is create a workflow in an online calendar. Clients will see your availability and tentatively book an engagement. You can create different time slots for different types of projects, so they know how much freelancer time they're asking for. From there, you can create a questionnaire that will help you automatically classify your projects.

Start by setting up an account with appointment-booking app Calendly. Once you're in, you'll want to set up meetings that correspond to your projects of services. You can name the meeting types and customize the amount of time that each takes. For a production agency, say, you might want to limit engagements to the day or half-day. For a marketing team, you might have options for only hour-long bookings.

Calendly screenshot
Create slots for each type of service that your agency offers

From there, you can make custom Invitee Questions, or screening questions that help you determine the scope of the project. You can include long-form questions, multiple-choice, or checklists to better identify their specific needs.

Calendly invitee questions
Invitee Questions can serve as screening questions for new projects, expediting the booking process

Once you've finished your questions, you can choose to add a personalized message by customizing the “Invitee Notifications.” You can craft a message that lets your potential client know that you're processing their request and will confirm the availability of the requested date. With this simple setup, you can quickly start scoping projects before assigning resources to them.

2. Keep Track of Talent in a Freelancer Database

Your first freelancer was easy to keep track of: You knew exactly how much work to assign Jack or Jill the content marketer, who has enough bandwidth to take on two projects a week. As your company grows, however, your freelancer contact list could be dozens of individuals. At this point, you or a PM needs to keep track of contact information and related paperwork, rates, skills and expertise, background and experience, and availability and bandwidth.

All of this data can change month-to-month, so a project manager needs to make sure they're constantly checking in with all your freelancers and manually updating an Excel spreadsheet. They become a gatekeeper of that data, and, should they overlook one detail, this database becomes inaccurate and creates friction in the booking process.

Instead, let freelancers save and update their own information.

Use Airtable as a Collaborative Database

Airtable is a database tool that is as easy to use as a spreadsheet and can serve as a single source of truth for all contact and project data. It allows individual contributors to update their own information— and check in on other project-related details, all in one place.

To create your freelancer database, start by creating a free Airtable account. From the home page, click the grey icon that’s labeled New Base, and select “Start from scratch.”

Then, create one table for all your contacts' information.

Airtable contacts

Add columns for each thing you need to track about freelancers—such as email address, expertise, rates, and availability. Click the “+” icon, and select what type of field this column will be. You can specify, for instance, whether you'll be using that column for names, emails, lists, or numbers.

Airtable supports a wide range of field types, but for our freelance database, you only need to be familiar with two fields that aren't self-descriptive:

Lookup: These are fields that “look up” a piece of information in a different sheet (or “table” as Airtable calls them). If you have two tables, one with project information and one with freelancer information, you might want to create a lookup field that connects the two, linking each freelancer with each project they're assigned.

Airtable lookup

Single select/multiple select: These are fields that let you categorize items. You can create a few different items, and pick one (for single select) or several (for multiple select) to classify your data fields. If you employ photographers, videographers, and designers, you might want to create these multiple select options, for instance:

Airtable single select

Once your database is set up, you can create a form in Airtable to collect data from each freelancer. The form ensures that each field is filled out and that data is entered correctly. To add the form, click the dropdown arrow in the upper-left hand corner and select “Form”.

Create an Airtable form

Now, drag and drop each field that you want freelancers to fill out. You can adjust the name of each field view, so that it gives clear instructions to the person who's filling it out. And you can skip fields if you want to add those on your own.

Airtable form builder screenshot

Once you've created the form, click the pink “Share form” button for a link that you can share with your freelancers. And, voila! Never again will you have to manually enter freelancer information into your system. One each individual fills out the form, the fields in your grid view will auto-populate.

Now you'll have all your freelancer information in one, easy-to-access place. If you want the freelancers to be able to update their information, create base-level collaborator accounts, so they can access the platform as well.

This lets freelancers see and make edits to everything that’s in this particular base. If you’re sharing your base with your freelancers, though, make sure to keep any sensitive materials in a separate base.

3. Let Freelancers Book Gigs

If you've followed along, at this point, you have all your projects booked in Calendly and all your freelancer data in Airtable. Rather than moving data between the two tools manually, connect them together so that booking requests are automatically sent to appropriate freelancers, who, in turn, can sign up for the project or assignment.

Connect Calendly and Airtable via Zapier

You can connect Calendly and Airtable via a free Zapier account. Zapier is a tool that makes it easy for your apps to speak to another. It does this, using a simple formula: When a trigger action in one app takes places, a resulting action takes place automatically in another app. For our purposes, the trigger will be a new booking created in Calendly, and the resulting action will be a new field created in Airtable.

Before we walk you through this integration, you'll need to first set up Airtable to receive the information in Calendly. You'll need to create fields in Airtable that correspond to the information that you've requested via the Calendly client questionnaire above. To keep it simple, let's use an example with a client name, an email, and a notes field that will include location information:

Airtable freelancer grid

The Calendly fields have corresponding Airtable fields, so they can automatically populate upon booking.

From here, you can connect the two apps with the corresponding fields via Zapier. The two templates below will help you get started, or you can follow along with the tutorial below to set up this Calendly to Airtable workflow yourself from scratch.

Add Airtable Records for New Calendly Invitees

Start by selecting “Create a Zap” at the top of Zapier.com when you're logged in. Now, you can fill in your formula:

Step 1: Calendly will be your trigger: Search for "Calendly" in the search bar on the right-hand panel of the Zap editor. Select Calendly, and then select “Invitee Created.” This ensures that the automation happens as soon as a client books an appointment and fills out the questionnaire.

Calendy Zapier trigger

Step 2: Next, Zapier will guide you through a series of tests to ensure your accounts are hooked up. Follow the on-screen instructions.

Step 3: After that, you want to specify the resulting action— what will happen once a client has booked an appointment. In this case, you'll want a new Airtable field to appear, so that freelancers can see the available work. So select “Airtable” as your Action app, and then select “create record.”

Step 4: Next, it'll give you the opportunity to edit the template. This is where you tell Zapier which information from Calendly goes into which Airtable fields.

Calendy Airtable integration

The plus (+) icon on the right of each field lets you look up Calendly fields and apply any inputted data into the designated Airtable fields. In the above example, The name the client writes will appear under “client name,” their email under “Client Contact Email Address,” and their location information under “Notes.”

Now you'll have client bookings automatically appear in the same Airtable base where you store your project data. This makes it easy to assign projects and tasks, and make all project-specific information accessible to relevant stakeholders.

Bonus: Create a Freelancer Marketplace

If you're ready to make this system fully hands-off, you can take this setup one step further with a marketplace that enables freelancers to pick up their own work assignments. You can do this by creating a view within Airtable that shows all unassigned work. Freelancers can log into this view and pick up projects that clients have requested or you have set up within Calendly.

Set this up by simply creating a custom filter within Airtable:

Airtable filter

Specify that the “team assignee” field is empty. From there, you can instruct your freelancers to go into this view and assign themselves projects that match their availability:

Airtable assigned projects

Once they assign the project, it will disappear from the view, so keep two separate views: one for assigned work, and one for work that's up for grabs.

Spend Time on Talent, Not Grunt Work

Don't take all human interaction out of the company-freelancer relationship. If anything, you should spend more time on your personal relationships with the people working in your team. That's what this automation helps accomplish. Automate the tasks that require an inordinate amount of data entry and cross-referencing, and you'll have more time for the rest.

Managing schedules, coordinating events, and emailing third parties is mind-numbing for the employee and expensive for your agency. Rather than keep project managers on staff or waste any of your own valuable time, set up a system that will do most of the heavy-lifting for you. Then, you can stop stressing over logistics and focus on providing the best experience for your customers.

Keep Reading:

Title image designed by Freepik


source https://zapier.com/blog/how-to-manage-freelancers/