Hiring and working with freelancers is much easier said than done. You think you’re saving money on salaries, benefits, and overhead. And with the gig economy growing, the quality of freelancers is higher than ever before.
But once you’ve picked out your freelancers, you’ll find that there’s a lot more legwork in managing those freelancers than you anticipated. You have to keep track of their availability, skill sets, and rates—and constantly manage their workload. You need to expediently match the freelancers with appropriate projects with reasonable deadlines. And you always need a backup plan, in case a freelancer doesn’t show up.
I’ve worked on both ends of the freelancer-employer relationship, and rarely has it been painless. Recently, however, I’ve developed a system for my team that automates the process of maintaining up-to-date freelancer information and assigning work, so projects stay on track and everyone is happy. Here’s how.
Automate the Work a Project Manager Would Do
Many companies and agencies hire a project manager to deal with the headache of managing freelancers. On a daily basis, those PMs are expected to send emails, scope work, and keep track of every detail in spreadsheets and email lists. But this isn't always the best solution; sometimes, it's avoidance. You've simply passed on the same grunt work to another person— and you're paying for it.
Your company needs a system. Using just a few online tools, you can rig together a system that pairs freelancers with projects and requires minimal supervision.
There are three critical components to a project manager's job when working with freelancers:
- Scoping client work: Project managers classify projects and scope it accurately. As each project fits a particular archetype, project managers can start quickly assembling the resources and personnel to get that project running.
- Keeping track of talent: A project manager collects and manages up-to-date data such as location, services, rates, and availability.
- Booking appropriate talent: Finally, the project manager connects the two: project needs with the appropriate freelancers.
All three of these tasks can run on auto-pilot, freeing up valuable hours and eliminating any need for a full-time project manager. Here’s how you can automated this process with Airtable, Calendly, and Zapier.
1. Scope Projects
Whether you’re running a product-based company or a services-based agency, there’s someone who is determining the scope of each project. At an agency, this is often the client. They’re telling you their needs and you line up the resources to make it happen. At a SaaS company, this is usually a manager. A content marketing manager, for example, might determine that they need two articles written a week at 1,200 words each.
This process usually results in messy back-and-forth. A project manager has to speak with the client or content manager and a number of freelancers while juggling deadlines, forwarding invoices, assigning editors, and lining up backup content.
To spare your team this hassle, automate the first step of this booking process. You can have internal managers or external clients fill out all the details about a project and schedule it on the work calendar.
Automate Booking with Calendly
The simplest way to do this is create a workflow in an online calendar. Clients will see your availability and tentatively book an engagement. You can create different time slots for different types of projects, so they know how much freelancer time they're asking for. From there, you can create a questionnaire that will help you automatically classify your projects.
Start by setting up an account with appointment-booking app Calendly. Once you're in, you'll want to set up meetings that correspond to your projects of services. You can name the meeting types and customize the amount of time that each takes. For a production agency, say, you might want to limit engagements to the day or half-day. For a marketing team, you might have options for only hour-long bookings.
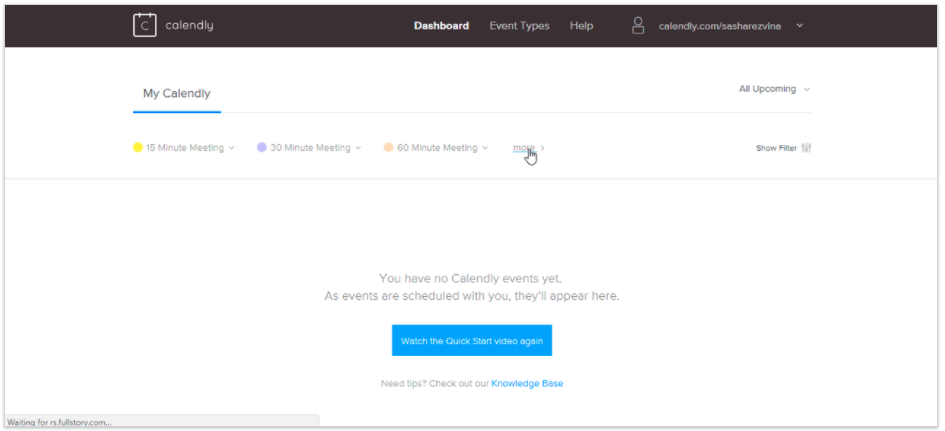
From there, you can make custom Invitee Questions, or screening questions that help you determine the scope of the project. You can include long-form questions, multiple-choice, or checklists to better identify their specific needs.
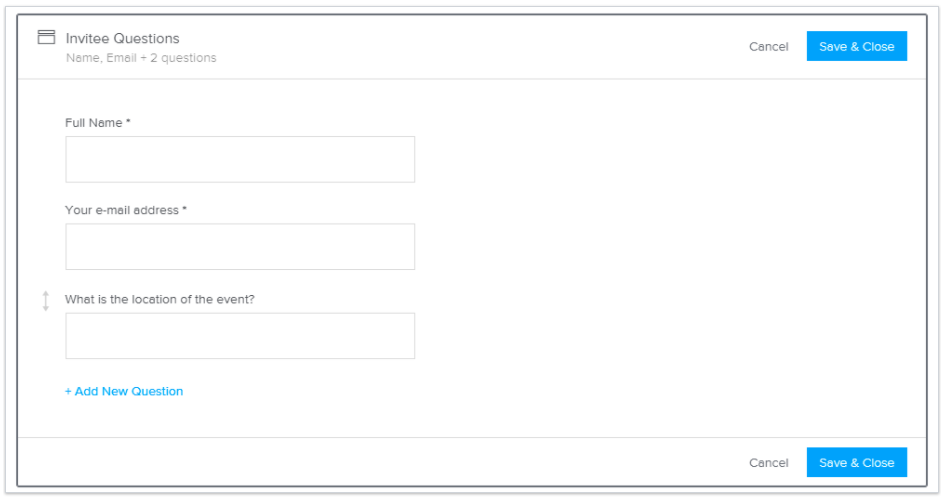
Once you've finished your questions, you can choose to add a personalized message by customizing the “Invitee Notifications.” You can craft a message that lets your potential client know that you're processing their request and will confirm the availability of the requested date. With this simple setup, you can quickly start scoping projects before assigning resources to them.
2. Keep Track of Talent in a Freelancer Database
Your first freelancer was easy to keep track of: You knew exactly how much work to assign Jack or Jill the content marketer, who has enough bandwidth to take on two projects a week. As your company grows, however, your freelancer contact list could be dozens of individuals. At this point, you or a PM needs to keep track of contact information and related paperwork, rates, skills and expertise, background and experience, and availability and bandwidth.
All of this data can change month-to-month, so a project manager needs to make sure they're constantly checking in with all your freelancers and manually updating an Excel spreadsheet. They become a gatekeeper of that data, and, should they overlook one detail, this database becomes inaccurate and creates friction in the booking process.
Instead, let freelancers save and update their own information.
Use Airtable as a Collaborative Database
Airtable is a database tool that is as easy to use as a spreadsheet and can serve as a single source of truth for all contact and project data. It allows individual contributors to update their own information— and check in on other project-related details, all in one place.
To create your freelancer database, start by creating a free Airtable account. From the home page, click the grey icon that’s labeled New Base, and select “Start from scratch.”
Then, create one table for all your contacts' information.

Add columns for each thing you need to track about freelancers—such as email address, expertise, rates, and availability. Click the “+” icon, and select what type of field this column will be. You can specify, for instance, whether you'll be using that column for names, emails, lists, or numbers.
Airtable supports a wide range of field types, but for our freelance database, you only need to be familiar with two fields that aren't self-descriptive:
Lookup: These are fields that “look up” a piece of information in a different sheet (or “table” as Airtable calls them). If you have two tables, one with project information and one with freelancer information, you might want to create a lookup field that connects the two, linking each freelancer with each project they're assigned.
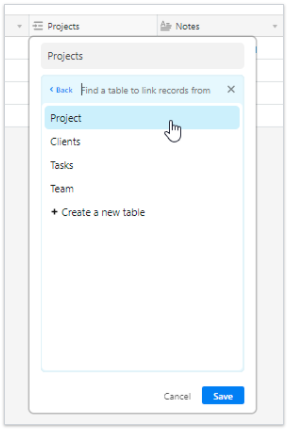
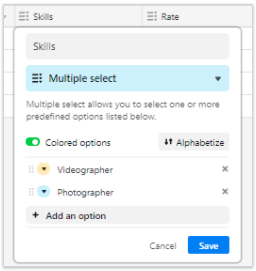
Single select/multiple select: These are fields that let you categorize items. You can create a few different items, and pick one (for single select) or several (for multiple select) to classify your data fields. If you employ photographers, videographers, and designers, you might want to create these multiple select options, for instance:
Once your database is set up, you can create a form in Airtable to collect data from each freelancer. The form ensures that each field is filled out and that data is entered correctly. To add the form, click the dropdown arrow in the upper-left hand corner and select “Form”.
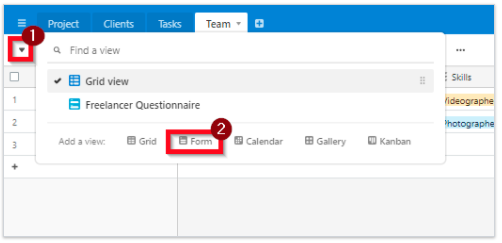
Now, drag and drop each field that you want freelancers to fill out. You can adjust the name of each field view, so that it gives clear instructions to the person who's filling it out. And you can skip fields if you want to add those on your own.
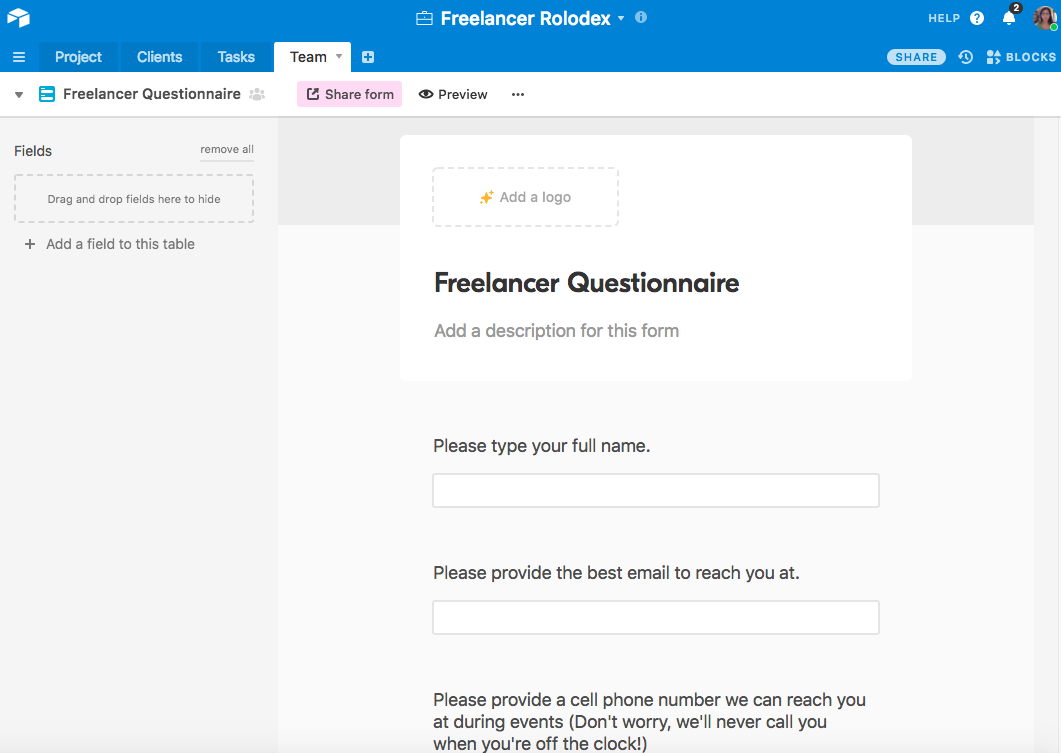
Once you've created the form, click the pink “Share form” button for a link that you can share with your freelancers. And, voila! Never again will you have to manually enter freelancer information into your system. One each individual fills out the form, the fields in your grid view will auto-populate.
Now you'll have all your freelancer information in one, easy-to-access place. If you want the freelancers to be able to update their information, create base-level collaborator accounts, so they can access the platform as well.
This lets freelancers see and make edits to everything that’s in this particular base. If you’re sharing your base with your freelancers, though, make sure to keep any sensitive materials in a separate base.
3. Let Freelancers Book Gigs
If you've followed along, at this point, you have all your projects booked in Calendly and all your freelancer data in Airtable. Rather than moving data between the two tools manually, connect them together so that booking requests are automatically sent to appropriate freelancers, who, in turn, can sign up for the project or assignment.
Connect Calendly and Airtable via Zapier
You can connect Calendly and Airtable via a free Zapier account. Zapier is a tool that makes it easy for your apps to speak to another. It does this, using a simple formula: When a trigger action in one app takes places, a resulting action takes place automatically in another app. For our purposes, the trigger will be a new booking created in Calendly, and the resulting action will be a new field created in Airtable.
Before we walk you through this integration, you'll need to first set up Airtable to receive the information in Calendly. You'll need to create fields in Airtable that correspond to the information that you've requested via the Calendly client questionnaire above. To keep it simple, let's use an example with a client name, an email, and a notes field that will include location information:

The Calendly fields have corresponding Airtable fields, so they can automatically populate upon booking.
From here, you can connect the two apps with the corresponding fields via Zapier. The two templates below will help you get started, or you can follow along with the tutorial below to set up this Calendly to Airtable workflow yourself from scratch.
Add Airtable Records for New Calendly Invitees
Start by selecting “Create a Zap” at the top of Zapier.com when you're logged in. Now, you can fill in your formula:
Step 1: Calendly will be your trigger: Search for "Calendly" in the search bar on the right-hand panel of the Zap editor. Select Calendly, and then select “Invitee Created.” This ensures that the automation happens as soon as a client books an appointment and fills out the questionnaire.
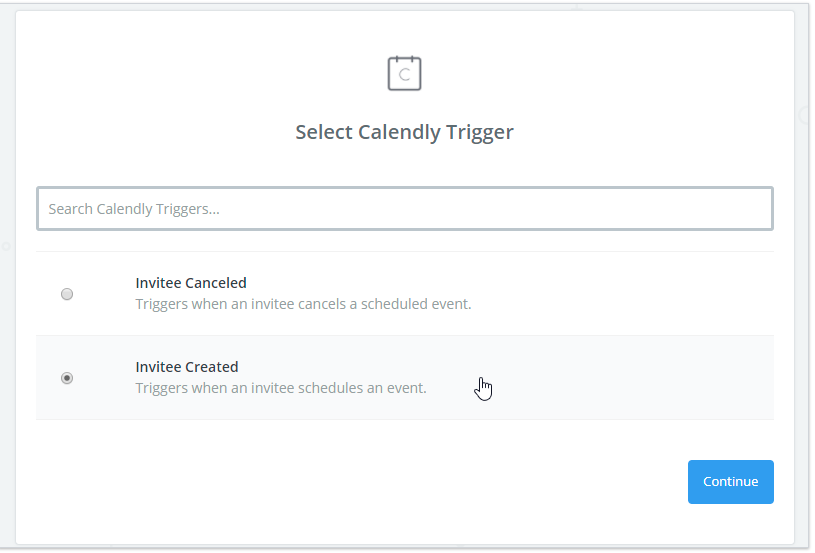
Step 2: Next, Zapier will guide you through a series of tests to ensure your accounts are hooked up. Follow the on-screen instructions.
Step 3: After that, you want to specify the resulting action— what will happen once a client has booked an appointment. In this case, you'll want a new Airtable field to appear, so that freelancers can see the available work. So select “Airtable” as your Action app, and then select “create record.”
Step 4: Next, it'll give you the opportunity to edit the template. This is where you tell Zapier which information from Calendly goes into which Airtable fields.
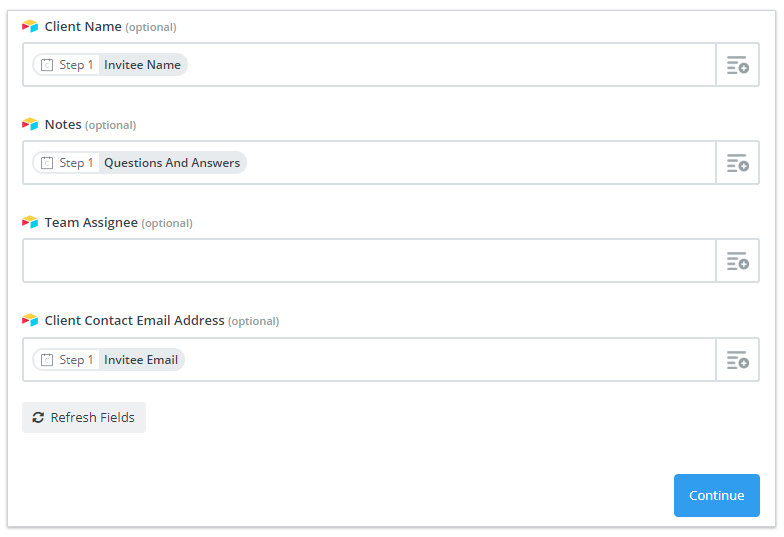
The plus (+) icon on the right of each field lets you look up Calendly fields and apply any inputted data into the designated Airtable fields. In the above example, The name the client writes will appear under “client name,” their email under “Client Contact Email Address,” and their location information under “Notes.”
Now you'll have client bookings automatically appear in the same Airtable base where you store your project data. This makes it easy to assign projects and tasks, and make all project-specific information accessible to relevant stakeholders.
Bonus: Create a Freelancer Marketplace
If you're ready to make this system fully hands-off, you can take this setup one step further with a marketplace that enables freelancers to pick up their own work assignments. You can do this by creating a view within Airtable that shows all unassigned work. Freelancers can log into this view and pick up projects that clients have requested or you have set up within Calendly.
Set this up by simply creating a custom filter within Airtable:

Specify that the “team assignee” field is empty. From there, you can instruct your freelancers to go into this view and assign themselves projects that match their availability:

Once they assign the project, it will disappear from the view, so keep two separate views: one for assigned work, and one for work that's up for grabs.
Spend Time on Talent, Not Grunt Work
Don't take all human interaction out of the company-freelancer relationship. If anything, you should spend more time on your personal relationships with the people working in your team. That's what this automation helps accomplish. Automate the tasks that require an inordinate amount of data entry and cross-referencing, and you'll have more time for the rest.
Managing schedules, coordinating events, and emailing third parties is mind-numbing for the employee and expensive for your agency. Rather than keep project managers on staff or waste any of your own valuable time, set up a system that will do most of the heavy-lifting for you. Then, you can stop stressing over logistics and focus on providing the best experience for your customers.
Keep Reading:
- Creative Marketplaces: How to Find and Hire the Best Freelancers
- How to Find, Hire, and Work with Freelancer Writers
- The Ultimate Guide to Project Management
Title image designed by Freepik
source https://zapier.com/blog/how-to-manage-freelancers/

No comments:
Post a Comment