Tuesday 30 January 2018

The Best Office Management Software, Hand-Picked by IT Pros

It’s easy to get bogged down with office management tasks like searching for an empty conference room, entering details from a hand-written form into a computer, or teaching new employees how to use their desk phones. They're all necessary parts of managing an office, but they’re not the best use of your time.

Think of all of the amazing work you could do if you weren’t responsible for any of these things. You could shop around to find discounts on office supplies. You could research new office layouts that improve employee productivity. You could drive major, profitable changes for your company.

It may sound like a pipe dream, but it’s not. Freeing up your schedule doesn’t require magic—just magical office management software. Here are 9 tools that automate those tedious office management tasks.

The Most Popular Office Management Software

You'll never get rid of those tiny tasks that take up so much of your workday, but you can automate some of them away. But we wondered: Which software programs do the best job at automating those most frustrating office management tools? We accidentally crowdsourced it. Our team at Spoke over the last several months put together IT Kit, asking IT professionals to share the apps they rely on.

We expected the list to include tools to enable multi-factor authentication, automate deployment, and monitor network performance, but were surprised to find that the recommended software was useful for a much broader audience than just IT. And thus, we'd found the best apps to manage your office.

Many of the recommended tools are the types of things that office managers could benefit from just as much as (or even more than!) IT teams. That's how we got this list—we pulled the nine apps experienced IT pros recommend most to help manage your office:

Icon:  App Best for: Plans from: Supports:
Envoy Envoy Visitors Automating visitor sign-ins Free Web, iOS, Android
Dialpad Dialpad Getting rid of desk phones Free Web, iOS, Android
Kisi Kisi Limiting building access $50/mo. Web, iOS, Android
Robin Robin Streamlining conference room booking $99/mo. Web, iOS, Android
HelloSign HelloSign Digitizing signed forms and contracts Free Web, iOS, Android
Comfy Comfy Making sure no one’s too hot or cold Unknown Web, iOS, Android
Slack Slack Communicating and sharing information Free Web, macOS, Windows, Linux, iOS, Android
Trello Trello Managing tasks and monitoring projects Free Web, iOS, Android
Zoom Zoom Worry-free video conferencing Free Web, iOS, Android

1. Envoy Visitors

Best for automating visitor sign-ins

Envoy screenshot

Tired of rushing down to sign for a package or getting calls every time someone needs to meet with someone on your team? Envoy Visitors automates signing in guests, collecting forms and signatures, and accepting deliveries. It'll keep guests from standing around aimlessly while waiting for a receptionist and free your receptionist up to focus on more important tasks.

When visitors arrive, they sign in on an iPad, and Envoy notifies the appropriate parties. You know when guests arrive even if no one is there to greet them. If the visitor needs to complete any paperwork or sign documents, they do so right on the iPad so you won't need to scan handwritten forms or signed documents again.

For offices with a high volume of visitors, Envoy helps you identify at a glance whether or not visitors checked in. Its badge-printing feature prints temporary credentials for each guest after check-in. Badges are also customizable: Create company-specific designs or include important details like entry time, entry date, and badge expiration date. It's something small that will add up to a large time savings.

  • Envoy Price: Free Basic plan for unlimited visitor sign-ins and email notifications; from $99/month Standard plan for with premium features like badge printing and document signing start at $99 per month
  • For a deeper look at Envoy, see our Envoy review
  • Automate your sign-in work with Envoy integrations on Zapier

2. Dialpad

Best for getting rid of desk phones

Dialpad screenshot

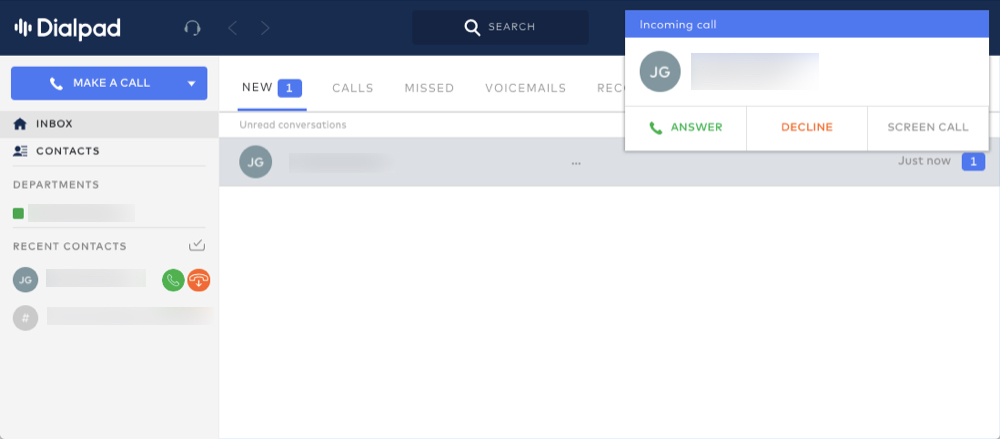
It’s time for desk phones to go the way of the dinosaur—but your team still needs to make calls. Dialpad is a business phone system that can push your calls into the future. It lets employees accept calls on their computer or smartphone, freeing up desk space and reducing your landline phone expenses.

Employees install Dialpad on the devices they use for work, and when someone calls their business phone number, an incoming phone notification appears on the screen. Dialpad supports both voice-only and video calls, as well as traditional landline features like call switching, three-way calling, and voicemail.

For administrative teams who accept and route incoming calls, Dialpad offers all of the features you need to do everything you’re used to doing with a desk phone. Accept and transfer calls, place callers on hold, and see who’s in line and how long they’ve been waiting. You can even use your computer to fax documents when needed.

  • Dialpad Price: Free for up to 5 users; from $15/month per user Standard plan for up to 100 users

3. Kisi

Best for limiting building access to approved personnel

Kisi Screenshot

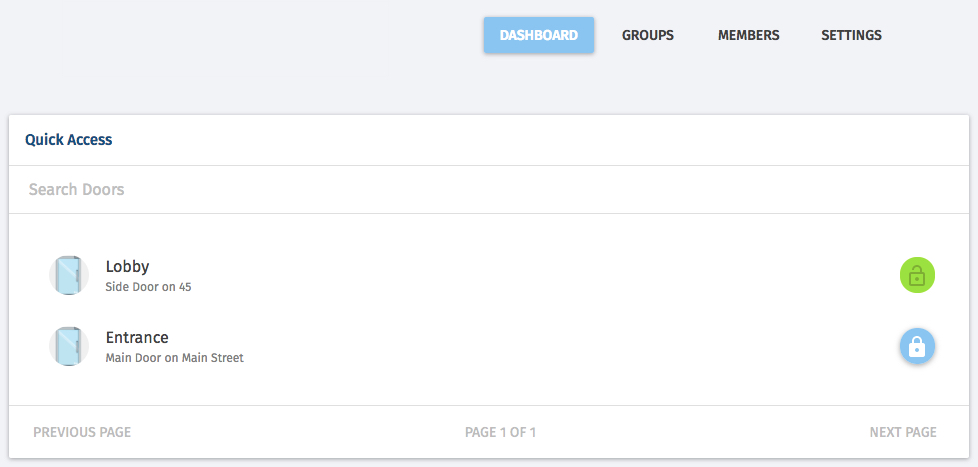
If you need to limit access to your office building—or specific areas within your office—to approved individuals, you need more than just a lock. Kisi's smart lock system lets you manage access, and doesn’t require an IT security team to set up and maintain.

After Kisi installs locks and equipment at your business, any administrator can use the Kisi app to set employees up with access rights. Add users quickly, and remove access immediately when employees leave the company. Kisi’s dashboard makes it easy to keep restricted areas secure and monitor who’s entering them.

The best part for admins is that employees can use either a keycard or their phones to unlock doors. This prevents members of your team from having to answer calls and open doors for employees who forgot their keycards at home—they’ll be able to use their phones as a backup.

  • Kisi Price: $50/month per door, plus $4/month per user for full features

4. Robin

Best for streamlining conference room booking

Robin screenshot

Of all the office management tasks, finding meeting spaces is perhaps the most time-consuming. If you work for a midsize or large business, finding the perfect meeting room may mean calling other admins to check on availability and amenities or walking around the company’s campus to check for yourself.

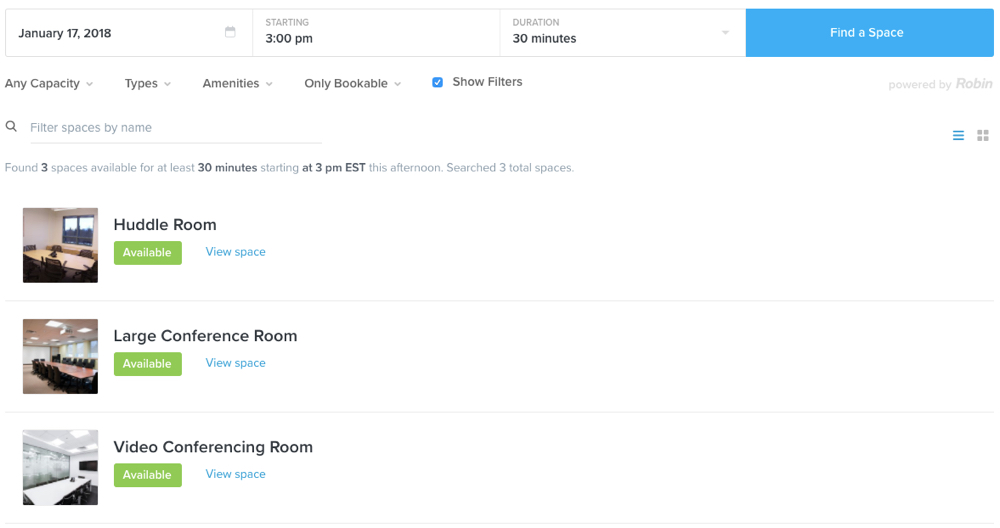
Robin gets rid of the hassle. Admins input details about all the meeting rooms available at your company, including how many people fit in the room and available room amenities (projector, whiteboard, phone, etc.). Robin collects all of these details and compiles all meeting room information in a searchable database.

It then takes care of maintaining the schedule for each available room. Rooms that are already booked don’t show up in a search, and the centralized source of record prevents double-booking and room stealing. You'll just search for a room that meets your criteria and reserve it for your meeting without having to worry that it'll be full when you get there.

  • Robin Price: from $99/month (paid annually) Basic plan for managing up to five meeting spaces with core features

5. HelloSign

Best for digitizing signed forms and contracts

HelloSign Screenshot

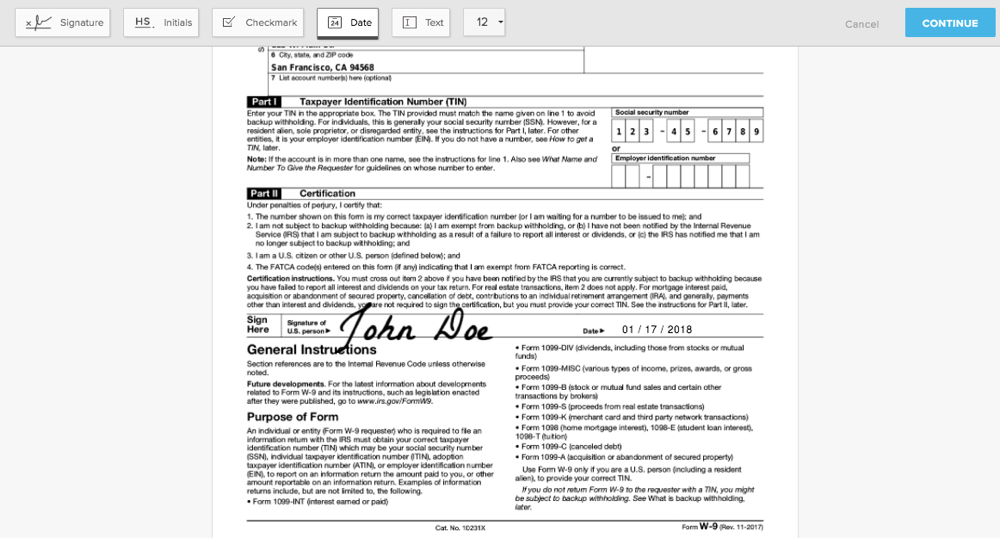
Contracts, NDAs, HIPAA policies, W-9s: admins spend lots of time collecting signatures on forms and documents. But scanning signed documents to digitize them is mundane and time-consuming, and not everyone you work with has the technology—or know-how—to email you legible copies of signed forms.

HelloSign makes it simple to collect signatures electronically. Use the app to add editable fields to the documents you send out the most, then save and send. Recipients can then read the document and fill in any extra details you might need, then sign the document electronically on their computer. Or, you can even use HelloSign's mobile apps to gather signatures in person, just like you would on paper forms.

6. Comfy

Best for making sure no one’s too hot or cold

Comfy screenshot

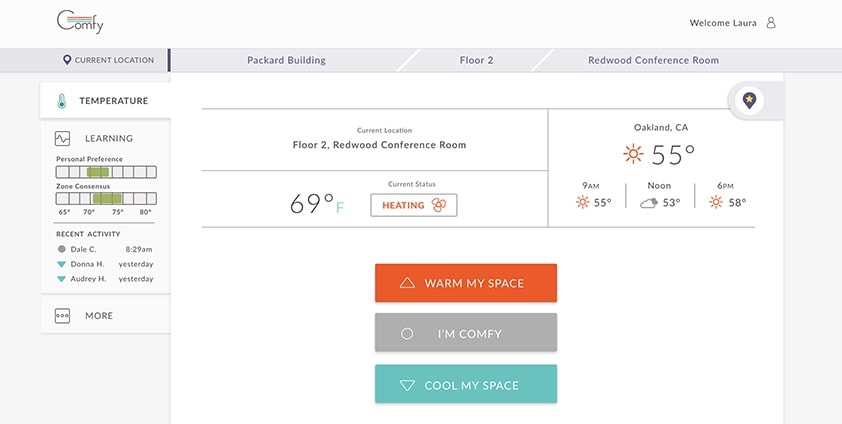
If you get a lot of complaints about the temperature in the office, your office needs Comfy. It's an app designed to keep everyone in the office happy and comfortable, with mobile apps employees can use to adjust the temperature and lighting in their workspaces.

Comfy integrates with your office’s existing systems and helps team productivity by creating an environment where no one is miserable because it’s too hot, cold, dim, or bright. It's helpful for meeting rooms, too. Comfy helps you find and book meetings rooms and locate nearby points of interest in the office, such as elevators, bathrooms, cafeterias, and coffee kiosks. And if it's too hot in the conference room, the thermostat's only a tap away.

Comfy Price: Pricing is available by quote only

7. Slack

Best for communicating and sharing information

Slack BirthdayBot screenshot

Slack is the team chat app that took the workplace by storm—a collaboration tool that scarcely needs an introduction. It's useful for way more than just chat, too. You can distribute information to the entire company and solicit feedback, send instant messages to team members and get quick answers, or share troubleshooting documents for the printer all from Slack.

And while office managers benefit from taking advantage of Slack as a communication tool, some of its best features for admins come from its add-on apps. For example:

  • Ordering a catered lunch? All you have to do is select the restaurant you want to order from on Caviar, and the bot collects employee food orders and places the order for you.
  • Struggling to remember employee birthdays? BirthdayBot sends you a message a few days before an upcoming employee birthday so you never forget to order a cake.
  • Tired of finding an empty coffee pot every time you go for your morning refill? WhoMadeCoffee uses gamification to rewards employees for refreshing the morning brew.

There are over 100 apps designed specifically for office management in Slack’s directory that will help you automate everything from ordering office supplies to scheduling meetings.

  • Slack Price: Free basic plan for 10k message history; from $8/month per user Standard plan for unlimited history
  • For a deeper look at Slack, see our Slack review
  • Build an automated chat workflow or your own Slack bots with Slack's Zapier integrations

8. Trello

Best for managing tasks and monitoring projects

Trello

A lot of task and project management programs are designed for complex IT projects and major corporate workflows. They’re full of features, but they’re also more complicated than what most admin teams need. Trello is an exception. It’s a basic task Kanban board that works like an assembly line, letting teams add and assign tasks, share and monitor progress, and more from one place.

The public "Corporate Holiday Gifts" board pictured above is a great example the unique ways you can use Trello. Each card represents a gift you need to order, and each lane represents the status of ordering the gift. As you select, order, and ship gifts, keep track of progress by dragging and dropping cards into the appropriate lanes.

Trello’s directory of public inspiration boards include a wide range of projects—including many that are great for office managers:

Or make your own boards to track the projects your office management team needs.

Trello Price: Free for unlimited boards and core features; from $9.99/month (paid annually) Business Class plan for unlimited power-ups and team board groups
- For a deeper look at Trello, see our Trello review
- Build a project management workflow with Trello's Zapier integrations

9. Zoom

Best for worry-free video conferencing

Zoom screenshot

Technology has made it easier than ever for employees scattered around the world to communicate and collaborate. But when you’re trying to organize a large video conference, it doesn’t always feel that way. Poor internet connections lead to frozen video and poor sound quality, frustrating participants and embarrassing organizers alike.

Zoom is a video call app loved for its quality. It doesn’t require all participants to have perfect internet connections for crisp video and clear audio, so it’s one less thing to worry about when it comes to organizing meetings. It manages to keep calls working well even when your internet connection is flaky.

If your company does a lot of cross-office video conferencing, it’s also worth looking into Zoom Rooms. It's a full conference room solution with touchscreen monitors, mounted conference room cameras, and wireless speakers that make it simple to have meetings with two rooms of people—even if those rooms are thousands of miles apart.

Price: Free Basic plan for up to 100 meeting participants on calls up to 40 minutes long; from $14.99/month Pro plan for unlimited meeting duration and call recording
- For a deeper look at Zoom, see our Zoom review
- Automate your calls with Zoom's Zapier integrations

Bonus: Zapier

Zapier

After learning the joys of automating visitor check-ins, birthday reminders, and meeting room scheduling, you may be hungry for more. If so, it’s time to check out Zapier. The final app of our list of IT-recommended software, Zapier’s integrations let you automate tasks across over 1,000 apps.

Whenever you want to automate something, odds are you can do it with a Zap—Zapier's term for automated app workflows. You'll choose a trigger, the app where something happens that starts your automation. Then you can add as many actions as you need to finish off a whole list of tasks at once.

Check out the Zaps below for ideas to automate the office management tools in this roundup, or explore Zapier's app directory to find more ways to integrate, automate, and improve your productivity:


Office management can be tedious, but with these list of apps, you'll have fewer tasks to worry about. Instead of having to run to answer the door, find a new conference room at the last minute, and spend half your call asking if the other people can hear you, you'll be able to focus on your main work and let your apps manage the office.

Have any other office management tools your team relies on? We'd love to hear about them in the comments below!

Title photo by NotionPic via Canva.


source https://zapier.com/blog/office-management-software/

Thursday 25 January 2018

Inspect Element: How to Temporarily Edit Any Webpage

There's a powerful tool hiding in your browser: Inspect Element.

Right-click on any webpage, click Inspect, and you'll see the innards of that site: its source code, the images and CSS that form its design, the fonts and icons it uses, the Javascript code that powers animations, and more. You can see how long the site takes to load, how much bandwidth it used to download, and the exact color in its text.

Or, you could use it to change anything you want on the page.

Inspect Element is a perfect way to learn what makes the web tick, figure out what's broken on your sites, mock up what a color and font change would look like, and keep yourself from having to Photoshop out private details in screenshots. It's a super-power you never knew your browser possessed.

Let's learn how to use Google Chrome Inspect Element to help your work, whether you're a developer or a marketer who's never written a line of code. If you're reading this on your phone, it's time to switch over to your laptop, open Google Chrome, and get ready to tweak some code.

Wait, Why Should I Use Inspect Element?

chrome inspect element
Google Chrome Inspect Element lets you view a website's source code and tweak anything you want

If you've never peeked at a website's code out of curiosity, you might wonder why you should learn how to use Inspect Element.

  • Designer: Want to preview how a site design would look on mobile? Or want to see how a different shade of green would look on a signup button? You can do both in seconds with Inspect Element.
  • Marketer: Curious what keywords competitors use in their site headers, or want to see if your site's loading too slow for Google's PageSpeed test? Inspect Element can show both.
  • Writer: Tired of blurring out your name and email in screenshots? With Inspect Element, you can change any text on a webpage in a second.
  • Support Agent: Need a better way to tell developers what needs fixed on a site? Inspect Element lets you make a quick example change to show what you're talking about.

For these and dozens of other use cases, Inspect Element is a handy tool to keep around. It's part of the Developer Tools in your browser, which includes a number of extra features: a console to run code, a View Source page to see just the raw code behind a site, a Sources page with a list of every file loaded in a website, and more. You can explore all those on your own, but for now, let's see how to use the main Elements tab to tweak a webpage on our own.

How to Get Started with Inspect Element

There are a few ways to access Google Chrome Inspect Element. Just open a website you want to try editing (to follow along with this tutorial, open Zapier.com), then open the Inspect Element tools in one of these three ways:

  • Right-click anywhere on the webpage, and at the very bottom of the menu that pops up, you will see "Inspect." Click that.
  • Click the hamburger menu (the icon with 3 stacked dots) on the far right of your Google Chrome toolbar, click More Tools, then select Developer Tools. Alternately, in the file menu, click View —> Developer —> Developer Tools.
  • Prefer keyboard shortcuts? Press CMD+Option+I on a Mac, or F12 on a PC to open Inspect Elements without clicking anything.

By default, the Developer Tools open in a pane at the very bottom of your browser and will show the Elements tab—that's the famed Inspect Element tool we've been looking for.

You won't have much space to work with Inspect Element at the bottom of your screen, so click the three vertical dots on the top right-hand side of the inspect element pane near the "X" (which you'd click to close the pane). Now, you'll see an option to move the pane to the right-hand side of your browser (right-dock view) or to open the pane in a completely separate window (undock view).

Inspect Element

For this tutorial, let's dock the pane on the right side of your browser window to give us more space to work. You can make the Developer Tools panel wider or more narrow by hovering over the left-side border. Once the cursor appears, drag the pane left to widen it or right narrow it.


Now that we're in Inspect Element, there an array of useful tools at our fingertips that we can use to make any site look exactly how we want. For this tutorial, we will focus on the Elements, Emulation, and Search tabs.

Search

The "Search" tab allows you to search a web page for specific content or an HTML element. It's a bit hidden: you'll need to click the 3 dots then click Search All Files to uncover it. Then you'll be able to search through every file in a webpage for anything you want.

Elements

"Inspect Element" is the tool we will explore most in this tutorial, and it's what opens first when you launch the Developer Tools in most browsers. Or, click the "Elements" tab in the Developer Tools to get back to it if you've been exploring elsewhere.

In the Explore tab, you can see all of the HTML, JavaScript, and CSS that built a website. It's almost the same as just viewing the source of a website, with one crucial difference: you can change any of the code, and see the changes in real-time on the site you have open. You can change anything from the copy to the typeface, then screenshot the new design or save your changes (just go to View > Developer > View Source and save the page as an HTML file, or copy the code changes to your text editor). Once you re-load the page, though, all of your changes will be gone forever.

Emulation

Ever wanted to preview a webpage on a phone without pulling your phone out of your pocket? The "Emulation" tab lets you view a web page as it would look on any device, with presets for popular devices or an option to set screen resolution and aspect ratio. You can even set an emulated internet speed, to see how quickly a site would load over dial-up.

It's also a bit hidden: you'll need to open Inspect Element and click the phone icon button to start it. Then, you'll have a perfect tool to understand how others experience a webpage.


It's time to get to work. We'll first use Search to find things on a webpage, then use Elements to edit text and more on a site, and finally will use Emulation to see how our site would look on a phone from a specific location.

Find Anything on a Site With Inspect Element Search

Wondering what goes into your favorite sites? Search is your best tool for that, aside from reading a site's entire source code. You could just open the default Elements view, press CTRL+F or CMD+F and search through the source code, but the full Search tool will let you search through every file on a page, helping you find text inside CSS and JavaScript files or locate an icon image you need for an article.

To get started, open Zapier.com in Chrome if you haven't already, then open Inspect Element, click the 3 vertical dots in the top-right corner of the Developer Tools pane (near the closing "X"), and select "Search All Files." The Search tab will appear on the bottom half of the Developer Tools pane.

Search Chrome Inspect Element

In the search field, you can type anything—ANYTHING—that you want to find on this web page, and it will appear in this pane. Let's see how we can use this.

Type meta name into the search field, press your Enter key, and you'll immediately see every occurrence of "meta name" in the code on this page. Now, you can see this page's metadata, the SEO keywords its targeting, and whether or not it's configured to let Google index it for search. That's an easy way to see what your competitors are targeting—and to make sure you didn't mess anything up on your site.

Chrome Inspect Element metadata

Let's try another query. Delete meta name, type h2 into the search field instead, and press "enter." You'll see every occurrence of "h2" in Zapier's JavaScript files at the top, but once you scroll to the bottom, you can see every "h2" header on this page.

Search is an effective tool for designers as well since you can search by color, too. Type #ff4a00 into the search field and press "enter" (and make sure to check the box beside "Ignore case" to see all of the results). You should now see every time the color #ff4a00, Zapier's shade of orange, in this site's CSS and HTML files. Then, just click the line that reads "color: #ff4a00;" to jump to that line in the site's HTML and tweak it on your own (something we'll look at in the next section).

Search for color in Chrome Inspect Element

This is a handy way for designers to make sure that a site is following their brand's style guide. With the "Search" tool, designers can easily check the CSS of a web page to see if a color is applied to the wrong element, if an incorrect font-family is used on a web page, or if you're still using your old color somewhere on your site.

The "Search" tool is also the perfect way to communicate with developers better since you can show them exactly where you've found a mistake or exactly what needs changing. Just tell them the line number where the problem exists, and you'll get your fix that much quicker.

Or, you can change the web page yourself with the Elements, the core part of Chrome's Developer Tools.

Change Anything with Elements

Front-end developers use the Inspect Element tool every day to modify the appearance of a web page and experiment with new ideas—and you can, too. Inspect Elements lets you tweak the appearance and content of a web page, by adding temporary edits to the site's CSS and HTML files.

Once you close or reload the page, your changes will be gone; you'll only see the changes on your computer and aren't actually editing the real website itself. That way, you can feel free to experiment and change anything—and then copy and save the very best changes to use again later.

Let's see what we can do with it.

Click the "Elements" tab in the Developer Tools pane—and if you want more room, tap your "Esc" key to close the search box you had open before. You should see the HTML for this page—now you know how the sausage gets made.

Chrome Inspect Element

In the top-left corner of the developer pane, you will see an icon of a mouse on top of a square. Click it, then you can select any element on the page that you would like to change. So let's change some things!

Change the Text on a Webpage

Ever wanted to change text on a site—perhaps to see how a new tagline would look on your homepage, or to take your email address off of a Gmail screenshot? Now you can.

Click the "mouse on top of a square" icon, then click any text on the page—perhaps the tagline on the Zapier homepage. In your Developer Tools pane, you will see a line of text with a blue highlight that looks something like this:

Change tagline in Chrome inspect element

Double-click the "Connect Your Apps" text that's highlighted blue in the Developer Tools pane, and it will turn into an editable text field.

Type anything you like in this text field ("Auri is a genius" should work just fine), and press enter. Voila! You've just changed the text on the web page.

Refresh the page, and everything will go back to normal.

Fun? Let's change some more things on this page.

Your Developer Tools pane re-loads with the page, but let's close it. Press the "X" in the top-right corner of the page.

Cool. Now we're going open it back up—right at the text we want to edit. All you have to do is right-click on the part of the page you want to change, then click the Inspect or Inspect Element link that appears on the bottom of the right-click menu.

Right-click to open Inspect Element

When your Developer Tools pane opens, it should automatically highlight that sentence. Pretty neat, huh? It's the little things that count.

Now that we've selected the tagline on the Zapier site let's change how it looks.

Change the Color and Font of Elements

To the right of this sentence in the Developer Tools pane, you will see a sub-pane with 3 additional tabs: Styles, Computed, and Event Listeners. Each allows you to change how this sentence looks on the page. Let's get started on "Styles" tab.

Edit Styles in Inspect Element

You may notice that some things are crossed out in the "Styles" tab. This means that these styles are not active for the element we've selected them, so changing these values will have no effect. We can ignore these for our purposes.

Let's try changing something. Click the arrow icon in the top of Inspect Element again, and select the text right under the "Sign Up" button on the page. Find "text-align" in the "Styles" tab (you may have to scroll a bit to find this).

Edit text alignment in Inspect Element

Right now, it is set to "center," but double-click "center" and type left. This makes the text left-aligned on the page.

Now let's play around with the color. Use the mouse icon in Inspect Element to select the button this time, then in the Styles tab find this line:

Button color

And double-click "#ff4a00". Type #4199ad (do not forget the #) and press "enter."

We just changed the color of our button from orange to blue! Now let's try something really cool.

Change Element States

Want to see how a button or link will look once someone hovers over or clicks it? Chrome Inspect Element can show that too with its force element state tools. You can see how the element will look once a visitor hovers over the element (hover state), selects the element (focus state), and/or has clicked that link (visited state).

Let's try this out. Make sure you've selected the signup button on the Zapier home page. Then, right-click on that code in the Elements tab, and select :active: in that menu.

change hover state

That will change the button to grey, which Zapier's site shows as you click the button.

Now change the background-color value to #FF4A00, and you should instantly see the button color change.

Try experimenting—change the :hover: color, then un-check :hover: in the right-click menu and drag your mouse over the button to see the new button color.

Change Images

You can easily change images on a web page with Inspect Element, too. Let's swap the Superhero background on the Zapier site with this dramatic photo of a solar flare from NASA.

Solar Flare

First, copy and paste this link to the image:

https://c1.staticflickr.com/9/8314/7931831962_7652860bae_b.jpg

Now, open Inspect Element on the background of the Zapier homepage, and make sure you've selected the signup-hero line in the code. Double-click the background URL link in the "Styles" pane, and paste the link you copied above.

edit image in inspect element

Press "enter" and see the difference immediately.


Editing text is handy, swapping out images is fun, and changing colors and styles just might help you quickly mockup the changes you want made to your site. But how will that new tagline and button design look on mobile?

That's where Emulation comes in—it's where everything we've reviewed so far can be applied even further. Let's see how.

Test a Site on Any Device With Emulation

Everything has to be responsive today. Websites are no longer only viewed on computers—they're more likely than ever to be viewed on a phone, tablet, TV, or just about any other type of screen. That should always be kept in mind when creating new content and designs.

Emulation is a great tool to approximate how websites will look to users across various devices, browsers, and even locations. Though this does not replace actually testing on a variety of devices and browsers, it's a great start.

In the Developer Tools pane, you'll notice a little phone icon in the top-left corner. Click it. This should change the page into a tiny, phone-styled page with a menu at the top to change the size.

Chrome Inspect Element Phone Emulation

Resize the small browser to see how things look if you were browsing on a tablet, phone, or even smaller screen. Or, click the menu at the top to select default device sizes like iPad Pro or iPhone 8 Plus—go ahead and select the latter.

The web page screen should shrink down to an iPhone 8 Plus' size, and you can zoom in a bit by clicking the + icon next to the number at the top right of the grid—that's how the site would look if someone zoomed in on mobile.

Go ahead enlarge the view by dragging the right edge of the web page emulation right. See what happens? We're no longer in the iPhone 8 Plus view. Dragging the screen along the grid allows you to see how the web page will change as the screen size changes, but your view will no longer reflect the device model that you chose previously.

Let's go back to the iPhone 8 Plus view by selecting this in the model drop-down list again. Next to the drop-down list is the word "Portrait." As you may have guessed, this allows you to toggle between the landscape and horizontal view.

Now, we can see how this post would look if you were reading it on an iPhone 8 Plus. Feel free to play around with the other devices to see how this web page and the screen resolution changes. All of the other developer tools that we have gone over so far will also react to the device view. For example, select the text of Zapier's tagline again.

In the iPhone 8 Plus view, we can see that this text is 2em, while in the default view on a computer, it's 3em.

text size

The "em" is a font-size unit that allows you to automatically change the size of text relative to the surrounding text. For example, let's say we have a user with large custom font settings on their browser. If you set your paragraph font-size to 14px, your font will always be 14px to that user no matter what. However, if you set your paragraph font-size to 1em, your user's browser will use this unit to scale your text to your user's large settings. Phones and tablets do this to zoom text nicely.

Now let's switch to the Apple iPad view and select the "testing across devices" header above. This time, the font-size is 3em. The font-size changed based on the device view, back to the default size it'd use on a computer, thanks to the tablet's larger screen.


Emulate Mobile Device Sensors

You may have noticed that your mouse now appears as a little circle on the web page. This allows you to interact with the page as if you are on your mobile device. If you click while dragging the page down, this does not highlight text like it normally would in your browser—it drags the screen down like you are on a touchscreen device. Using this view, you can see how large touch zones are on a web page. This means that you can see which buttons, icons, links, or other elements are easily touchable with the finger.

You can even make your browser act like a phone. Press your "Esc" key to open the search pane in Inspect Element again, and this time click the 3-dot menu on the left side for a menu of options. Select Sensors to get three new tools: Geolocation, Orientation, and Touch.

Chrome Inspect Element Sensors tab

Touch lets you turn on or off the default circle selector that acts more like a finger than a normal mouse cursor. Orientation lets you interact with motion-sensitive websites such as online games that let you move things by moving your phone. And Geolocation lets you pretend you're in a different location.

Let's try viewing this site from Google's Headquarters in Mountain View, CA.

Check the box next to "Emulate geolocation coordinates," and enter the value 37 into the Lat = text field and 122 into the Lon= text field. Press enter on your keyboard.

Nothing changes, right?

This is because there isn't content on this page that changes based on your location. If you change the coordinates on a site like Groupon.com that uses your location to show localized content, though, you would get different results. Go to Google.com in a different location, and you'll perhaps see a new Google logo for a holiday in another country, or at least will get the results in a different language.

Emulation is a great way to put yourself in your user's shoes and consider what the user may be seeing on your web page—and it's a fun way to explore the international web.

Emulate Mobile Networks

You can also see what it's like to browse a site on different networks, perhaps to see if your site will load even if your users are on a slower 3G network.

To give it a try, click the three circle button in the left of Inspect Element's search tab again, and select "Network Conditions". There, you can choose from fast or slow 3G, or offline to see how the page works without internet. Or, click Add… to include your own testing (perhaps add 56Kbps to test dialup internet). Now, reload the page, and you'll see just how long it'd take for the site to load on a slow connection—and how the site looks while it's loading. That'll show why you should improve your site to load faster on slow connections.

Network settings in Chrome inspect element

You can also change your user agent—uncheck "Select automatically" beside "User Agent" and select "Internet Explorer 7" perhaps to see if the site changes its rendering for older browsers. That's also a handy hack to make webpages load even if they claim they only work in a different browser like Internet Explorer.


Challenges

Let's end with a few challenges. Go show us what you've learned!

  1. Change headlines on CNN.com and tweet us a screenshot of your trending article headline.
  2. Duplicate your favorite web site using "View Source," and mess around with the HTML to make it your own.
  3. See how your website renders on a mobile device, and show your developer what could be done better by fixing it yourself!

The Marketing team at Zapier team relies on Inspect Element to tweak private information out of screenshots in our app reviews, while our design team uses it to mockup changes and see how things would look on various screens.

How do you use Inspect Element? We'd love to hear your stories in the comments below!

This tutorial was originally published on January 5, 2015, then was updated and republished on June 6, 2017 and January 25, 2018 with screenshots and steps from the latest version of Google Chrome.


source https://zapier.com/blog/inspect-element-tutorial/

Tuesday 23 January 2018

The 9 Best Accounting and Bookkeeping Software for Freelancers

When you work full-time, there’s an HR team or payroll department that takes care of things like withholding taxes from your paycheck and submitting payments to the IRS. When you’re self-employed, that responsibility is entirely your own.

Neglect to track your business income and expenses—or fail to make the required tax payments—and your freelancing career could be over. A disorganized approach to bookkeeping is almost always followed by the hard lesson of heavy tax penalties or lost income.

But you don’t need an accounting degree to keep track of what you make, what you spend on your business, and what you owe the IRS throughout the year. You just need the right financial software that will make it easy to track your income and expenses while letting you focus on your core work.

The Best Accounting, Bookkeeping, and Tax Apps for Freelancers

As the gig economy has grown, so have the number of options for self-employed accounting and bookkeeping software. But not all apps are equal. We set out to discover the best among them, those that met the following criteria:

  • They’re simple to use: A user-friendly interface makes accounting less of a chore—minimal clicks or taps to create an expense report, for example, and navigation that doesn't require multiple, lengthy video tutorials to accomplish the core purposes of the app. Compared to enterprises and small-to-medium sized businesses, freelancers usually have fewer financial things to track and take care of, such as tax documentation for employees.
  • Core product features for essential tasks: These focus on the bookkeeping tasks freelancers need to complete: invoicing clients, tracking payments, and tracking deductible expenses.
  • Beginner-friendly: Users need little-to-no knowledge of accounting and tax laws.
  • Digitization: They provide a way to digitize receipts, save them, and record the expenses from your email, phone, or scanner.
  • Free trial: They offer a free trial that doesn’t require upfront credit card information.
    After looking at nearly 40 accounting and bookkeeping apps that meet these criteria and taking advantage of their free trials to test them out, we narrowed the list down to the nine best tools.
    The following nine web and mobile accounting and bookkeeping apps will make your freelancing life easier:
Icon:  App Best for: Price Platform
QuickBooks Self Employed QuickBooks Self Employed Freelancers who file their taxes themselves using TurboTax $10/mo. Web, iOS, Android
FreshBooks FreshBooks Freelancers with complex billing needs or multiple products and services $15/mo. Web, iOS, Android
Wave Wave Free invoice tracking and collecting payments via PayPal Free Web, iOS, Android
FreeAgent FreeAgent Freelancers who need a place to create, store, and track estimates $24/mo. Web, iOS, Android
Expensify Expensify Freelancers who just want a way to keep track of expenses Free Web, iOS, Android
SlickPie SlickPie Freelancers who need to invoice in multiple currencies Free Web
Shoeboxed Shoeboxed Simple receipt digitization $15/mo. Web, iOS, Android
ZipBooks ZipBooks Freelancers planning to grow their businesses into a larger company $15/mo. Web, iOS, Android
AND CO AND CO Accounting and legal tasks Free Web, iOS, Android

QuickBooks Self Employed

Best for freelancers who file their taxes themselves using TurboTax

QuickBooks Self Employed screenshot

If you prefer to file your taxes on your own using TurboTax, QuickBooks Self-Employed saves a lot of time when tax season rolls around. Since both TurboTax and QuickBooks are Intuit products, they’re integrated. Transferring data from QuickBooks into TurboTax when it’s time to file taxes saves hours—or days—of manual calculations and data entry.

But even if you hire an accountant to prepare your taxes for you, QuickBooks Self-Employed is an excellent bookkeeping tool, particularly for tracking expenses and making quarterly tax payments to the IRS. Connect it with your business or personal bank and credit accounts to automatically capture all transactions. For US-based freelancers, QuickBooks also calculates how much you owe in federal taxes each quarter so you never overpay or underpay.

The QuickBooks mobile app provides even more features. If your business and personal accounts are combined, you can swipe left or right on the mobile app to separate business and personal expenses. And if you turn on automatic mileage tracking, the app records the number of miles traveled every time you drive, listing trips as business or personal later.

QuickBooks Self-Employed Pricing: $10 per month for the basic version; $17/month for a version that includes exporting data to TurboTax and covers the cost of federal and state tax filing.

FreshBooks

Best for freelancers with complex billing needs and multiple products or services to sell

FreshBooks screenshot

For some freelancers, billing is relatively simple: You agree on rates, and the client pays those rates each month. But for others, billing clients is much more complicated. Maybe you charge by the hour and keep track of billable time. Maybe you pay for things out of pocket and get reimbursed later. Maybe you're a writer and get paid by the word. Or maybe you hire and pay other contractors to help with clients.

If you have varying invoice needs, FreshBooks is designed for you. Within the system, you can set up multiple clients and multiple projects for each client. If you have clients that are notorious for paying late, you can set up automated payment reminders in Freshbooks that remind clients of upcoming and past due dates so you don’t have to.

FreshBooks covers nearly every use case for self-employed bookkeeping. It allows you to track time, record general business and billable expenses, send invoices, and collect payments.

FreshBooks Pricing: $15 per month for a single user and up to five active clients. Additional charges apply for more users or more than five active clients.

For a deeper look at FreshBooks, see our FreshBooks review.

See FreshBooks integrations on Zapier.

Wave

Best for a free invoice tracking tool that allows you to collect and track payments via PayPal

Wave screenshot

When you’re just starting out as a freelancer, you may not have a lot of excess cash to throw around. But even if you’re not making much, you still need to keep track of your income and expenses. Wave is a free solution that provides all the tools you need to do your business accounting—from sending professional invoices (including recurring invoices) to receipt scanning on the mobile app and even payroll processing.

Like QuickBooks and FreshBooks, Wave connects directly to your bank or credit card accounts, pulling in all of your transactions so you can easily capture business expenses. You can also upload old bank statements to the system to get caught up on past expenses you failed to record. This makes Wave handy if you neglected to do your accounting for part of the year.

You can not only create invoices in Wave but also accept direct credit card payments and bank transfers from clients. However, there is a small fee for accepting payments: 2.9% of the total + $0.30 for credit card payments and 1% for bank transfers). If you primarily accept payments through PayPal, use Wave’s simple integration to auto-populate your records with any payments accepted or sent through PayPal.

Wave Pricing: Free.

For a deeper look at Wave, see our Wave review.

See Wave integrations on Zapier.

FreeAgent

Best for freelancers who need a place to create, store, and track estimates

FreeAgent screenshot

If you create estimates for large projects as part of your business, FreeAgent may be the right accounting app for you. Directly within the tool, you can create and send project estimates to prospective clients. If those prospects become clients later, track future invoicing against those estimates to see which of your contracts are profitable and which aren’t.

Additionally, including estimates as part of your bookkeeping records allows you to get a full picture of both your historical income and potential future profits. Quickly view both received and anticipated income on your FreeAgent dashboard to stay on top of the health of your freelancing business.

FreeAgent also has helpful bonus features like time tracking and invoicing. Like some of the other apps on this list, invoicing can be set up to send automatic payment reminders that nudge late-paying clients.

FreeAgent Pricing: $12 per month for the first six months; $24 per month thereafter. Discounted pricing is available if purchasing an annual subscription.

See FreeAgent integrations on Zapier.

Expensify

Best for freelancers who just want a way to keep track of expenses

Expensify screenshot

If your accounting goal is just to have a way to keep track of your business receipts throughout the year so you can hand them off to your accountant during tax season, Expensify may be the best solution for you. Unlike the other apps on this list that offer more full-suite accounting solutions, Expensify focuses on a single goal: helping you keep track of your expenses.

With Expensify’s mobile app, quickly capture clear images of receipts and the app will automatically categorize expenses, parse the amounts and merchant names, and save all the transaction details to your Expensify account. Add entries for mileage and hours worked, if needed, to track all of your business expenses in a single view. If you connect your credit card to Expensify, that's also an easy way to select expenses and turn them into emailable reports or PDF files.

Expensify is the simplest app on this list to use, but it doesn’t have some of the options that will help if you’re filing your taxes yourself—such as auto-calculations of quarterly taxes owed or categorizing expenses based on how you’ll file them as deductions. However, if you plan to work with an accountant, Expensify probably has all the features you need.

Expensify Pricing: Free for up to 10 SmartScans of receipts each month; from $5 per user/month for more scans

See Expensify integrations on Zapier.

SlickPie

Best for freelancers who need to invoice in multiple currencies

SlickPie screenshot

SlickPie has a steeper learning curve than some of the other apps on this list, but taking time to learn how it works is worth it if you need to create invoices in various currencies. Use SlickPie to create invoices in multiple currencies—even cryptocurrencies like Bitcoin and Ethereum—and accept payments both directly and through PayPal or Stripe.

SlickPie also has a process for recording expenses from receipts, though it doesn’t use a mobile app like the other products on this list. Instead, you take a picture of a receipt—or a saved PDF of a bill—and drop it into a dedicated Dropbox folder. Then, SlickPie’s MagicBot technology processes the receipt data and adds it to the system for you.

SlickPie Pricing: Free for up to 100 receipts and 100 invoices per month; $9.95 for more than 100 receipts/invoices per month.

Shoeboxed

Best for simple receipt digitization

Shoeboxed

Another great option for freelancers who just want to hand off expenses and receipts to an accountant at the end of the year, Shoeboxed is a tool that makes it really simple to digitize all business receipts. Digitize receipts in many different ways:

  • Capture pictures of receipts on the go with the Shoeboxed mobile app.
  • Drag and drop files on your computer into the Shoeboxed Desktop Uploader.
  • Forward email receipts to Shoeboxed.
  • Set up auto-sync to have Shoeboxed automatically pull receipts from Gmail.
  • Mail a pile of receipts to have them scanned and saved by Shoeboxed.

Because Shoeboxed offers so many different options for digitizing and saving receipts, you can record every business expense—regardless of how the receipt is delivered—within seconds. It’s particularly helpful if you have boxes or file folders filled with business receipts but no time to scan them in and want to outsource that job to a service.

Shoeboxed Pricing: $15 per month for one user and up to 50 documents per month. Higher-priced packages are also available for freelancers who need to digitize more than 50 expenses per month.

ZipBooks

Best for freelancers planning to grow their businesses into a larger company

ZipBooks screenshot

Like most of the apps on this list, ZipBooks allows freelancers to connect to a bank or credit card account, automatically pull transactions, and edit the details of those expenses. Use your phone to capture images of receipts, and upload them to ZipBooks using its mobile app.

ZipBooks also allows users to create and send invoices, and one of its standout features is recurring invoices. If you work on retainers or bill certain clients the same amount every month, set up recurring invoicing to have invoices automatically created and sent on your behalf. This keeps you from forgetting to send invoices and saves lots of time.

ZipBooks may also be a good choice for freelancers who are planning to grow their business. While the basic version is simple enough for one-person businesses, it can be expanded to include the things small businesses need, such as payroll and employee/contractor time-tracking. You can even upgrade to a plan that includes a personal bookkeeper.

ZipBooks Pricing: Free; from $15/month for recurring invoicing and unlimited bank connections

AND CO

Best for managing both accounting and legal tasks

AND CO screenshot

As far as accounting tasks go, AND CO has everything freelancers need. Connect your bank/credit accounts to record business expenses, track your time, create and send invoices, accept payments, and even see when clients have viewed invoices you sent. Forward email receipts or take a picture of physical receipts and upload them using AND CO’s mobile app.

Where AND CO stands out is with its legal features. Protect yourself with AND CO’s standard freelancing contracts, written by the Freelancers Union. Turn sections of the contract on and off as needed, and collect client signatures with e-signing functionality. And when clients don’t pay, send a prewritten physical demand letter directly from the app.

AND CO Pricing: Free for one contract per month and up to 20 recorded expenses per month; from $14/month for unlimited contracts and expense recording, prices start at $14 per month.

Stop Wasting Time and Start Automating Your Bookkeeping

Every hour you spend on bookkeeping, accounting, and tax-related tasks is an hour that you’re not earning any income. As much as possible, you’ll want to automate these tasks so you can focus on building your business and your profits. With Zapier’s app automations, you can build automated workflows that handle bookkeeping tasks so you don’t have to.

Here are some examples:


As Benjamin Franklin famously wrote: “in this world nothing can be said to be certain, except death and taxes.” Whether you track your expenses or not—pay your quarterly taxes or not—tax season will come every year without fail.

As a freelancer, you’re already stuck with the burden of paying your own self-employment taxes and health insurance premiums. Don’t suffer from the added burden of paying too much in taxes because of bad bookkeeping. Save yourself a lot of time and money by finding accounting software that works for you.


Title image by Freepik


source https://zapier.com/blog/accounting-bookkeeping-software-freelance/