Thursday 30 November 2017

How to Quickly Learn Essential Keyboard Shortcuts in Any Program

Keyboard shortcuts are simple commands that keep your fingers on your keyboard instead of jumping back and forth to your mouse. You probably already know common keyboard shortcuts like CTRL + C to copy and CTRL + V to paste, but there are tons of other shortcuts to do just about anything on your computer or in a specific program. Learning those keyboard shortcuts can boost your productivity—potentially saving you 8 workdays' worth of time each year, according to e-learning expert Andrew Cohen.

But if it takes hours to memorize keyboard shortcuts, it can be hard to invest the time—even if you know it'll pay off eventually. That's why we looked for apps to help. Here are the best ways to quickly learn the keyboard shortcuts that will give you an extra week’s worth of time.

KeyRocket

For learning Windows, Gmail, and Microsoft Office keyboard shortcuts

KeyRocket for keyboard shortcuts for Windows

When your long cheat sheet of Windows shortcuts becomes too inconvenient, KeyRocket is here to teach you Windows keyboard shortcuts more intuitively.

Whenever you use your mouse to do a task that a keyboard shortcut could have accomplished more quickly, a KeyRocket popup will notify you of the shortcut. The idea is that repeated notifications will help you to learn these shortcuts naturally as you work. KeyRocket also has a searchable database of shortcuts that is easily accessible as you work and allows you to create your own custom shortcuts.

KeyRocket teaches you keyboard shortcuts for Excel, Word, Outlook, PowerPoint, and Microsoft Visual Studio, as well as the Windows operating system in general. If you use Microsoft Office for your daily work, this shortcut education is well worth the investment.

There's also a free Chrome extension for learning Gmail shortcuts, useful for Mac and Windows users alike.

KeyRocket Pricing: Free version that includes custom shortcuts and Excel and Powerpoint shortcuts; $135/yearly (discount available to students) for premium version after 7-day trial, which includes all programs and features.

CheatSheet (Mac)

For viewing keyboard shortcuts within Mac apps

CheatSheet teaches you keyboard shortcuts for Mac and Mac apps

If you've ever thought to yourself, "Hey, it'd be nice if I could instantly find all the keyboard shortcuts for the application I'm using right now," you're in luck. CheatSheet is a free Mac app that displays all available shortcuts for your Mac when you press a key. Think of it as having a printed sheet next to your keyboard, only more convenient, since it adapts to whatever application you're using at the time.

Install CheatSheet and open the app to run in the background. When you want to view the CheatSheet for the app you're using, simply hold down the key for a few seconds and a list of all the shortcuts for the app you're currently using will pop up. Quit pressing the Command key and the list will disappear—no need to minimize the window or press Esc.

We tested CheatSheet in several apps, including Google Chrome, Photoshop, Scrivener, Slack, and Finder and found it to be the simplest of all the tools we reviewed. If you're not interested in memorizing all keyboard shortcuts for every program but want to quickly look up a shortcut within your current app, CheatSheet is for you.

CheatSheet Pricing: Free

ShortcutFoo (Web)

For learning keyboard shortcuts in a game

ShortcutFoo for keyboard shortcuts

ShortcutFoo gamifies learning keyboard shortcuts for dozens of business programs, such as Trello, Zendesk, Sublime Text, and Ruby Strings. The inclusion of several top programming editors and terminals (such as Command Line and Git) make it especially handy for developers and beginner coders.

Set up a "dojo" for the program you want to learn, gain keyboard shortcut mastery through practicing with online flashcards and "fighting" against a timed AI or fellow human. Then, test your knowledge to gain rank. By learning more advanced shortcuts and remembering them, you can go from being a keyboard shortcut "Adolescent Turtle" to a "Shark Norris" productivity champ.

ShortcutFoo Pricing: Free; from $8/month to unlock all dojos

Application Shortcut Mapper (Web)

For looking up shortcuts in a keyboard image

Application Shortcut Mapper for learning keyboard shortcuts

If you want to view shortcuts without digging through a help menu, Application Shortcut Mapper will help you visualize the keyboard shortcuts you're looking for.

Explore keyboard shortcuts for various programs by clicking around the site's interactive keyboard image, selecting trigger keys like , Ctrl, Shift, and Alt. The keys with shortcuts tied to them will display text describing what the shortcut does. You can switch the view to show you keyboard shortcuts for Mac, Windows, or Linux.

Currently, Application Shortcut Mapper displays shortcuts for a handful of professional programs including Adobe Creative Suite, SketchUp, Sublime Text, JetBrains, and some AutoDesk programs—so if you rely on one of those tools, it's a valuable resource. (You can view the full list of programs supported by visiting application and pulling up their shortcut menu.)

Application Shortcut Mapper Pricing: Free

Find Keyboard Shortcuts in Any Program

Obviously, having an app like CheatSheet or a flashcard program like ShortcutFoo makes it much easier to learn keyboard shortcuts. However, since not all programs can be covered by one app, here are a few tricks for finding keyboard shortcuts that work for most programs:

  • Check the Help menu—for most apps, you can find a list of keyboard shortcuts in the help documentation.
  • Check menus—in many apps, you will see available keyboard shortcuts displayed on the right, next to the action in the menu.
  • If you're using a Google app, CMD + / or CTRL + / will show most Google keyboard shortcuts.
  • Press and hold CMD on an iPad keyboard to see all supported keyboard shortcuts in an app. This works similarly to CheatSheet, but will only work with an external keyboard connected to your iPad.

While it may still take you some time to learn the keyboard shortcuts for the applications you use every day, these tools will get shortcuts ingrained in your muscle memory more quickly, so you can focus your full attention on the work at hand.

Keyboard image by Rishi Deep.


source https://zapier.com/blog/learn-keyboard-shortcuts/

Tuesday 28 November 2017

Steal This Workflow: How to Use Zapier to Automate Everything

You found workflow automation tool Zapier, which puts you ahead of the pack. Now you can start building workflows and connecting all your apps. But where should you start? Which apps should you link together with a Zap (that's our word for the app connections you can build)?

To help you start using Zapier—and find new ways to be more efficient—we collected our customer stories and sorted them by field. If you're a marketer, see how fellow marketers automate social media posts or instantly add emails to newsletters. Work at a nonprofit? Read how other nonprofits do more with less (and save more than just time, too).

Steal these workflows and you'll give yourself back hours to focus on the things that matter.

If you're already building amazing, automated workflows, share your story with us! Fill out that form and your company and workflows could be featured on here, too.

Customer Support Designer
Developer eCommerce
Education Freelancer
Government Human Resources
Information Technology Journalist
Lawyers Marketers
Nonprofit Real Estate
Sales Small Business

Automate Customer Support with Zapier

Design More Efficiently with Zapier

How to Use Automated Workflows as a Developer

How Automation Simplifies eCommerce

How the Education Field Automates Their Work

How Freelancers Can Use Zapier

Make Government Work Efficient with Automation

Check back for more stories later! Contribute your own story, too.

Use Zapier to Automate Human Resources

How to Use Automation with Information Technology

How Journalists Work More Efficiently

Lawyers Use Zapier to Automate their Work

Are you a lawyer using Zapier? Contribute your story and you'll see yourself featured here!.

How Marketers Do More with Zapier

Nonprofits Get Creative with Automated Workflows

Add Automation to Real Estate Workflows

We'll have some stories up soon! In the meantime, have you told us how you use Zapier?

How to Automate Your Sales

How Small Business Owners Work Efficiently with Zapier


source https://zapier.com/blog/zapier-success-stories/

Organize Your Life with the Agile Method

I worked as a product owner for two years before I finally realized the value of Agile prioritization—the process of ranking items in a to-do list from most to least important. Ironically, I wasn’t at work when the benefits became clear. It happened while planning my wedding.

A month before the big day, I sat on the porch with my fiancĂ© and looked over our very long to-do list. We were paralyzed by the length of the list compared to the amount of time left to complete the tasks. We couldn’t decide what we needed to work on, so we couldn’t do anything.

Finally, my fiancĂ©—another product owner—suggested that we prioritize the list. I groaned and rolled my eyes, but his suggestion was better than the stress of doing nothing.

From that day until our wedding day, we managed to get up every day, get work done, and focus on the most critical tasks. Our perfect wedding was the direct result of prioritizing our to-do list.

I’ve used Agile prioritization at work to launch six major projects, and I’ve used it in my personal life to plan a wedding and move across the country. If you’re looking for a way to accomplish more—and feel more accomplished—take time to get to know the basics of Agile prioritization.

A Brief Introduction to Agile

Agile was created in 2001 by a group of software development leaders who were trying to solve one of the biggest problems in the industry: the fact that there's never enough time and budget to complete all project requirements.

Before Agile, most development teams followed the Waterfall model. In Waterfall, a business gives their development team a long and complex set of requirements and expects all requests to be completed on time and within the allocated budget. Time, scope, and budget are all fixed.

Agile says a realistic plan requires that one of those pieces are flexible. Generally, the flexible element in Agile is scope. A Product Owner—a representative from the business side of things who prioritizes project requirements—works with the development team to understand what amount of scope can be delivered within a fixed timeframe and on a fixed budget.

The Product Owner may have 100 requirements, but the development team may only be able to complete 10 given the time and budget constraints. The Product Owner’s job is to choose the 10 most important requirements—to prioritize the requirements—to make sure a releasable product is delivered at the end, and the delivered product has all of the most important features.

Basic Agile Prioritization

Whether it’s a plans for remodeling your kitchen or the requirements for developing a large website, most projects have multiple tasks that must be completed within a certain timeframe and budget. Agile says the best way to achieve this is to create a ranked list of priorities.

Ranked priority means if you have a list of 10 tasks, each task gets a number between 1 and 10. Two tasks can’t both be priority one. One must be priority one, and the other priority two.

Here’s an example:

Agile prioritization for wedding to-do list

It’s human nature to think every task on a list is crucial. But relative prioritization forces you to compare each task to all of the others to determine how important it really is. This makes it easier to identify flaws in the everything-is-crucial approach.

Imagine you’re building an ecommerce website. You have two tasks left, but only enough time and budget to complete one. Either set up the shopping cart to accept payments, or create a blog. You want both, but accepting payments is the obvious choice. You can’t make money without that feature.

Outside of the context of relative prioritization, that decision is much more difficult. Since you want both tasks to be completed, you’re inclined to rank both as equal priority. But when it comes down to choosing between one task and another, the decision is simple.

Of course, it’s not always so cut and dry. Let’s say the two remaining tasks were "accept Visa payments" and "accept Mastercard payments." If you release the site with just one, it creates a terrible user experience. In this scenario, it's necessary to take things a step further and add a criticality level to prioritized tasks.

Intermediate Agile Prioritization

A criticality level represents how important a specific task is to the overall project. Going back to the example of Visa and Mastercard payments: since both can’t be priority one, a criticality level can be assigned to show that—regardless of priority—both of those features must be delivered in order to have a releasable product.

There are four levels of criticality that are commonly used in Agile:

  • Critical – Critical tasks must be completed. They’re not up for debate because they’re essential. An example of a critical task for a wedding is having an officiant. Without someone who can legally perform the marriage, it’s not really a wedding.

  • High – High priority tasks are things that aren’t absolutely critical, but they are things you want more than anything else on the list. For a wedding, inviting guests isn’t critical. You can have a wedding without guests. But you probably really want to invite people. Sending out invitations, then, is a high priority.

  • Medium – Medium priority tasks are things you still want, but things you want less than the high priorities. You could definitely live without them. Having a DJ may be a medium priority for a wedding. Worst case scenario, create a playlist of songs for wedding music.

  • Low – Low priority tasks are nice-to-haves. Decorations are pretty obvious nice-to-haves for a wedding. They make things look pretty, polished, and planned, but they’re not essential to getting married or entertaining guests.

Relative prioritization and criticality levels work best when you use them together. Critical tasks are at the top of the priority list. Since they must all be completed, the rankings you assign really just represent the order you plan to complete them in. Those are followed by tasks with high criticality levels, then medium, then low.

Agile prioritization with criticality added to to-do list

For high, medium, and low tasks, relative priorities are very important. Imagine that at any point after the critical tasks are completed, you could run out of time or money. The first high priority task, then, is the thing you want more than anything else on the list.

Advanced Agile Prioritization

To get the most value from Agile prioritization, break every to-do item down into the smallest possible tasks. This helps because one large task may represent 10 small tasks, but those 10 small tasks may not all be equally important.

Some examples of breaking large tasks down into smaller tasks:

  • A large task for an ecommerce site is "accept payments." Broken down into smaller tasks, you have "accept Visa payments," "accept Mastercard payments," "accept American Express payments," and so on.

  • A large task for a wedding is "get clothes for everyone in the wedding party." Broken down into smaller tasks, that becomes "rent tuxedo," "buy wedding dress," "get wedding dress altered," "choose bridesmaids’ dresses," and so on.

To go back to my own wedding as an example: I’m a fairly frugal person, so the idea of paying several thousand dollars for a wedding venue seemed insane. I have a well-landscaped back yard, and it seemed like the perfect place for a wedding. Instead of spending money on a venue, I could spend it on home improvements and use the wedding deadline as motivation.

One of the home improvements I started—but hadn’t finished by the time I created my prioritized list—was painting the outside of my house. "Finish painting the house," was an item on my list.

But the more I looked at that task, and the more I realized how huge it was. There was almost no chance that we were going to finish painting the house and complete all of the other critical tasks on the list before the wedding.

So I broke the task down into smaller tasks:

Agile prioritization of to-do list with subtasks

The task to finish painting the siding and trim on the front of the house was a high priority because it was currently half painted, and while I could certainly have people over with a half-painted house, it would be pretty embarrassing.

Painting the trim and porches and scraping the paint off of the windows were only medium priorities. While I wanted to get to them, they were less important than things like serving food and getting a dress.

Painting the left side of the house, I decided, was actually a low priority. It’s so close to my neighbor’s house that you can’t really see it unless you’re walking between the two houses.

By breaking the task down, I discovered that one of the most massive high-priority tasks on my list was actually pretty small when I focused in on what specific things were most important.

Finally, I added a time estimate to each task. Like most Agile projects, I was working within a fixed timeframe, so an important part of creating my plan was seeing what I could accomplish within the amount of time I had left before the wedding.

But even beyond that, time estimates can be helpful in setting priorities. For example, if you have three weeks before a wedding and a single task is going to take two weeks, it gives you more perspective on the importance of the task: Am I really going to give up music, food, chairs, and decorations so I can finish painting the outside of the house?

I went through the same exercise for all of the tasks on my list. When I finished, the critical and high priority items on my list were much more manageable.

Initial Prioritized List

Agile prioritization of to-do list
To complete all of the critical and high tasks on my initial prioritized list, I estimated that it would require 20 full days of work. To complete the entire list, I would need four full weeks.

Final Prioritized List

Full Agile prioritization of to-do list
After breaking large tasks down, it will only take 9.5 days to complete all critical and high tasks. This is 10 days less than in the original plan with large tasks.

To get the biggest benefit from agile prioritization, break every task and to-do into the smallest possible tasks. This helps with prioritization, allows you to get things done faster, and makes you feel more accomplished. There’s nothing quite like marking a to-do as a complete to stay motivated over the course of a large project.

Agile Prioritization for Work and Personal Projects

The most obvious way to use Agile prioritization is in software or web development; it’s the industry the entire Agile approach was created for. But the principles of Agile can be applied to get more done in any industry and job, and even in your personal life.

Here are some examples:

  • Create a marketing strategy. There are dozens of ways to market a product and thousands of tasks for each approach. Work with your team to brainstorm as many ideas as possible, prioritize the final list, and complete tasks in order of priority to keep everyone focused. Also, take time regularly to re-prioritize based on new data.

  • Buy a house. You have to find a house, put an offer on it, get a mortgage, have the house inspected, and get homeowners insurance. On top of that, you need to pack your existing house, donate anything you don’t plan to take with you, and maybe even buy new furnishings. Simplify your to-do list and stay sane by prioritizing.

  • Plan a training session. Create a list of things that are important to cover in the training session, and add criticality levels to each topic. During the training session, enjoy some flexibility by removing medium and low priority topics. This gives you time to cover things you hadn’t considered that come up as questions during training.

  • Remodel your house. A home remodeling project may not be limited by time, but it’s certainly constrained by budget. Use a prioritized list to factor what you really want and need against the costs for each request and your overall budget.

  • Meet your annual goals at work. Break down complex goals into small tasks, and rank those tasks against the other items in your daily/weekly to-do list. You’ll need to re-prioritize frequently, but the list will keep your long-term goals fresh in your mind and help you decide which tasks are the most important to focus on.

  • Plan a vacation itinerary. You can’t visit every tourist attraction in Rome in a week, but you can definitely see the ones you’re most interested in. Create a list of things you want to do the most, and use relative prioritization to make sure you get to visit the attractions you’re most excited about.

If you want more ideas, check out these two SlideShare presentations: Agile and Scrum Beyond Software Development and Agile at Home.

Helpful Tools for Agile Prioritization

Trello for Agile prioritization

While you can’t go wrong with a handwritten to-do list, you may want something that’s easier to manage after deciding you like the approach.

For basic functionality, use Google Sheets. It’s similar to a handwritten to-do list, but it has the added bonus of letting you cut, paste, and add rows easily. This keeps you from having to rewrite your entire list every time to need to make a change.

To get even more features, use Trello or LeanKit. With these systems, you can:

  • drag and drop tasks to prioritize them
  • color-code tasks to signify criticality levels
  • add due dates
  • share the list with multiple users
  • send automatic notifications when a task is assigned to a new user

For really advanced functionality for teams that are using more aspects of agile than just prioritization, use VersionOne or CA Agile Central to create backlogs, prioritize, plan releases and sprints, add estimates, and bill hours to tasks.

And if you’re planning a vacation or prioritizing things with you family at home, you can also go with the traditional Post-it Note approach. Write tasks on sticky notes, and stick them to a chart on the wall to share priorities and to-dos with everyone in the house.

If you’re stressed or overwhelmed by a too-long list of things to do, take time to prioritize it using Agile techniques. It will help you focus on what’s important, avoid spending time on what’s not, and stay motivated to mark more tasks as complete.

Title photo by seamartini via Canva


source https://zapier.com/blog/agile-method-prioritization/

Monday 27 November 2017

Steal This Workflow: RoverPass Saves 6 Hours Every Week with Automatic Slack Notifications

Keeping your team informed can feel like an uphill battle. Do you email each new opportunity to a sales rep? What happens when a payment fails? Who talks to partners? The amount of items to share doesn't end, either. Creating the perfect workflow to notify your team is a bit like finding the perfect campsite. You know it exists, you just need to sift through a lot of sludge to get there.

Clearing the way through the overgrowth is RoverPass. You input your destination and RoverPass finds you RV parks and campsites. You can even request reservations directly through RoverPass so you don't have to track down each destination's email or phone number.

RoverPass simplifies the search and reservation process for campers and RVers. Less time spent finding a destination means more time on an adventure. To match the efficiency they bring to campers, RoverPass uses app automation tool Zapier to send team messages through Slack.

"Zapier is insanely effective at connecting independently useful apps and boosting internal efficiency. "Davina Bruno Adcock, Marketing and Content Manager, RoverPass

With a few key Zaps—bridges between two or more apps—RoverPass automates their notifications and keeps their team in-the-know. "Using Zapier has helped connect apps like Slack, Wufoo, and ScheduleOnce," Davina Bruno Adcock, Marketing and Content Manager at RoverPass, says. These apps don't natively connect with each other but with RoverPass's Zaps, it's as easy as booking a campsite.

Send Slack Notifications Automatically

Over 20,000 campsites and RV parks have a listing on RoverPass. Each of those destinations has multiple reservable sites. At any given time, hundreds of campers are on RoverPass to book, cancel, or pay for reservations. That's not even counting the parks' owners who claim their sites, too.

Tracking all that by hand would be a surefire path to insanity. In place of driving their employees to the brink, RoverPass built several Zaps to manage it all. When an RV park or campsite contacts RoverPass to claim their site's page, they respond through Wufoo. Zapier takes the relevant information from the form and sends it to Slack. This helps the sales team prioritize their responses to site owners.

You can use this Zap to stay focused on your daily tasks. No need to keep an eye on Wufoo for responses—once they arrive, Zapier will ping you in Slack.

Not everyone pays on time or with an accurate payment method. If a payment fails, suddenly you need to track down the payer and reach out to them. By pairing Stripe with Slack, RoverPass knows the moment a payment completes—and whether it's successful or fails.

Zapier sends the payer's information to Slack, too. In case of a bad payment, RoverPass has the information they need at their fingertips.

All too often, life happens and cancels an adventure. You can get notifications for these changes too.

For example, when ScheduleOnce receives a cancellation request, Zapier sends the RoverPass sales team a message in Slack. They can reach out to the customer to try and reschedule their booking for a later date or a different location.

With the customer's information sent to Slack, the sales team doesn't have to dig for phone numbers or emails.


These Zaps—and many more—save the RoverPass team six hours each week, according to Davina. With that extra time, customers and RV park owners receive more attention and better features.

"We can now spend significantly more time developing useful, engaging content instead of focusing on manually creating workflows, Davina says. RoverPass might not have found El Dorado just yet, but their efficiency is just as valuable.

All images courtesy of RoverPass.


source https://zapier.com/blog/slack-notifications-for-everything/

Friday 24 November 2017

Steal This Workflow: How a Tech Support Company Cuts Out 5 Hours of Manual Work Every Week

It's 3:47 p.m. on Friday afternoon. You can taste the weekend and it's pumpkin spiced. But then you check your to-do list. You forgot about the week's data entry. Now you need to go into application A and make sure the payment went through. It's good, so you copy the items ordered from A into tracking system B. Marketing needs that customer on mailing lists, so jump into email app C and add their email address.

Repeat ad nauseam.

It's no surprise Rush Tech Support turned to app automation tool Zapier to crush their manual work. Rush Tech Support provides their clients with an IT alternative: Remote tech support. Clients call the RTS team, connect with an agent, and the agent solves the computer's woes remotely.

Before Zapier, Andrew Lassise, owner of RTS, tracked sales manually. "Having 50 agents and keeping track of who sold what for how much was extremely tedious and time-consuming," Andrew explains. But with Zapier now in their wheelhouse, the RTS team works more efficiently than ever.

"Zapier saves me 5 hours every week in manual data entry and provides the peace of mind knowing that my data is accurate."Andrew Lassise, Owner, Rush Tech Support

Instantly Create Order Databases

Manual work is the death of productivity. "We used to process a payment on our WooCommerce shopping cart, manually enter the items purchased into Podio, manually add the customer to MailChimp, and manually create a FreshDesk ticket," Andrew explains.

Andrew knew it wasn't sustainable. "With the help of Zapier, we're able to immediately send sales from our shopping cart to Podio, which automatically keeps track of the salesperson associated with the sale."

Andrew automated their most time-consuming workflow and gave five hours back to himself and his team—every week.

When a new order is placed in WooCommerce, Zapier automatically creates a new project entry in Podio. This entry contains the tech support services RTS's client requested, which will come into play shortly.

After Zapier makes the Podio entry, the customer's email address is added to a list in MailChimp. The final step in this Zap (our word for a bridge between two or more applications) creates a Freshdesk ticket, pulling the requested service and customer information.

"Having all of these happen with one Zap helps me keep track of my customers and commissions," Andrews says. RTS essentially builds a service request database in both Podio and Freshdesk, allowing different agents to pick up a request where another left off. This history means that no matter who helps a client, they receive the same level of support from every agent.

We'll break RTS's Zap down into its components. That way, you can steal their efficiency and adapt it to your workflow.


Beyond simply handling the tedium of manual work, creating efficient workflows with Zapier allows Andrew to think bigger.

"Now that Zapier handles the workload, I can focus on larger deals knowing that our backend is extremely scalable and our data is consistent."

All images courtesy of Rush Tech Support.


source https://zapier.com/blog/automatically-track-sales-process/

Thursday 23 November 2017

The Idea File System: How to Capture and Organize All of Your Ideas

Creativity isn’t just for artists. Creative thinking—and especially, creative ideas—drive business and professional innovation in every field. Whether it’s a potential topic for a single blog post or a concept for a whole new line of business, ideas are the bedrock on which we build our breakout projects and career moves.

But ideas don’t do any good if they’re stuck in your head—or if you forget them before they become actionable. That’s why it’s crucial to develop a system for capturing and organizing your ideas in a readily accessible idea file. The more systematic you are about capturing your ideas, the easier it will be to find inspiration for your next project or fodder for your next pitch meeting.

When I left my corporate job to become a full-time freelance writer, I had to become very disciplined about capturing every single idea I have for a potential story or blog post. But I soon found that the habit of capturing every single story idea spilled over to my corporate work, too: ideas for content marketing projects, corporate trainings, or software projects all started flowing (and getting captured). It turns out that my idea file is my single greatest asset, not only when it comes to pitching editors, but also when it comes to winning and serving clients.

In this post, I’ll map out what goes in an idea file, how to build a system for capturing and organizing your ideas, and how to use your idea file to fuel your professional success.

What Goes in an Idea File

What goes in an idea file? That depends on the nature of your work, but here are some possibilities:

  • Art and entertainment: Sculpture, painting, or other project ideas. Film concepts. Novel ideas. Character ideas. Plot twists. A song lyric or melody fragment that could be built upon. A situation that would make a great jumping-off point for a book or story. A dance move. Two songs you’d like to combine in a mash-up.

  • Content marketing: A business dilemma your customers frequently mention, which could inspire a great report. White paper ideas. A brilliant blog post title. Listicle topics. How-tos you’d like to read (or write).

  • Design: An illustration concept. A new potential use for a familiar material. A visual motif to sketch. A color palette.

  • Food and hospitality: Recipe or menu ideas. Ingredients to explore/experiment with. Event concepts. Decor concepts or ideas for new spaces.

  • Management: A new hiring process. A potential business line. An idea for a team-building exercise or retreat. A position to create or fill. A potential project or initiative.

  • Marketing and advertising: Taglines and slogans. A social media campaign idea that might be right for a future client, someday. Photo concepts. A crazy idea for a street team or word-of-mouth promotion. A fun idea for swag or promotional item.

  • Product ideas: Product sketches. Market opportunities to investigate or fill. A complaint you’ve overheard (or made) that suggests a product opportunity. Two products that could be combined into one. A product category that needs to be improved.

  • Research and customer intelligence: Questions you’d like to have answered with a survey, social media data, or other data source. Customer intelligence project ideas. Academic research paper ideas. A metric you want to start measuring/tracking.

  • Sales: A pitch line to try or refine. A new potential target market. An idea for accelerating the sales cycle. A new way of packaging your products or services. A pricing innovation. A new client you want to pitch.

  • Service improvement ideas: Friction points to address. Services you’d love to use. Services that could be combined in new ways. Delivery or on-demand service opportunities.

  • Sport and fitness: Equipment that could be improved. A type of player or coach to seek out. A new type of workout routine. A new diet you'd like to try.

  • Technology: Website ideas. Apps or games you’d like to find or create. Tech workarounds you want to look for or develop. Software tools or hardware products you or your company could develop. A URL or social media handle you’d like to snag.

  • Training and presentations: Conferences you want to pitch. TED or Pecha Kucha talk ideas. Keynote ideas. Internal trainings or "lunch and learn" topics you’d like to book for your team. Jokes or lines to incorporate into your talks.

  • Writing and journalism: People you’d love to interview. An experience that leaves you scratching your head…and which you could investigate by writing about it. A conversation that could be turned into an article. A response you could write to something that really annoyed you.

When you build up an idea file, you always have a place to start on your next project. If your boss, client, or team asks for fresh ideas, you’ll be ready. Best of all, the practice of capturing your ideas helps foster creativity: the more ideas you jot down, the more ideas you’ll have.

How to Set Up Your Idea File

A successful idea file is both comprehensive and well-organized. To make sure your idea file captures everything that comes into your head, you need to make it really easy to jot down every single idea you have. To make make sure your idea file is organized, you need to get that stream-of-consciousness idea flow into a more structured form.

My approach does both. I use an Evernote notebook to capture every single idea that comes into my head. I use a Google spreadsheet to organize and review my ideas. And I use Zapier to connect my Evernote notebook to my Google spreadsheet, so that I always have an up-to-date list of all my great (and not so great!) ideas.

Your capture file

I use Evernote as my all-around note-taking application on both my computer and phone, so it was a no-brainer to make it the place I’d capture all my story ideas. But there are lots of applications that could serve this purpose for you: you just need to choose a note-taking app that works on both your computer and your mobile device(s). (Check out this list of note-taking options.) I recommend using Evernote or OneNote, since they both integrate with Zapier.

Once you’ve chosen the note-taking application you’re going to use…

  • Set up a notebook for your ideas, named something like “Ideas” or “Innovation File”
  • Make sure your note-taking app is installed on all the computers and devices you regularly use
  • Create a shortcut to your ideas file on every device
Evernote ideas file
A snapshot of my Story Ideas notebook: some notes are titles only, while some have brief notes attached.

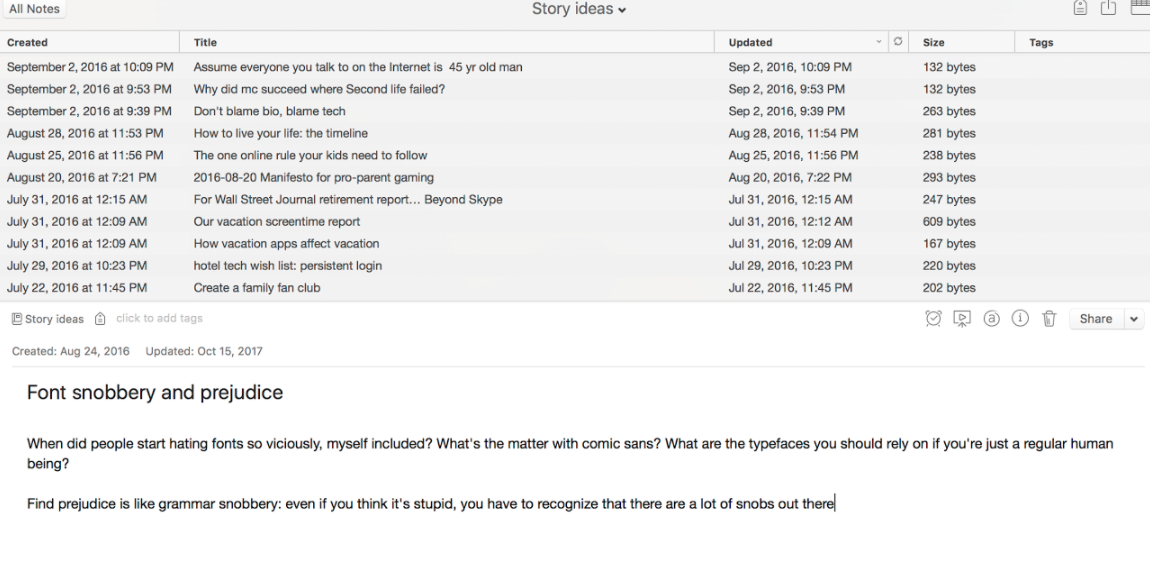
Every time you have a new idea—however half-baked—add it to this notebook. Most of the time, I use my phone to quickly dictate a new idea into my Evernote ideas notebook; if I’m on my computer when inspiration strikes, I just type it directly into Evernote, which I always have open on my Mac. Once in a blue moon, I email an idea to myself instead, using my Evernote email address to create a note via email. You’ll probably need two or three ways of quickly adding notes to your idea file: what matters is that you always have a capture tool handy, and that you’re consistent about adding every single idea to your ideas notebook.

Your ideas spreadsheet

As soon as you’ve captured more than ten or twenty ideas, your notebook will become unwieldy. I’ve been using my Evernote ideas file for 18 months, and it’s got 281 ideas. That’s way too many to scan when I need to pitch an editor or client on some project possibilities!

That’s why I use a Google spreadsheet to organize my long list of story ideas. It allows me to quickly sort ideas when I need to find a particular type of inspiration.

How you set up your idea file will depend on your particular work and the particular kind of ideas you need to capture or review. But you will almost certainly need the following columns:

  • Idea: The summary of your idea. This is whatever’s in the title of a note you capture.
  • Details: Any additional notes you’ve jotted down about your idea, from the body of your note. This is also where you’ll add any additional notes or details when you’re reviewing your ideas spreadsheet.
  • Quality: It’s easier to be relentless about capturing every single idea, however weak, if you know you’ll have a way of filtering your best ideas later.
  • Category or type: If you’re using a single Ideas sheet to track a range of ideas, this is where you’ll categorize your ideas by type, like “presentation idea,” “product idea,” or “marketing project”. If you’re only capturing one type of idea (like story ideas or product ideas) you can categorize them by type: For example, if you’re capturing product ideas for your bakery, you might categorize as “desserts,” “breads,” “breakfast items,” and so on.
Google Sheets ideas file

Once you start using your ideas file to drive your work, you’ll quickly discover whether you need additional columns. I’ve found it’s helpful to have the following in my file of story ideas:

  • Status: When I first add an idea to my sheet, it’s marked as “idea”. Once I actually send it to an editor, I mark it “pitch”. If my pitch is successful, I change that to “accepted”.
  • Pitch to: If I have an idea about where a story might land, I note it in this column. If I’ve got an idea for a report or blog post that would work for a corporate client, I note the client’s name here.
  • Date sent: When I send out a pitch, I note the date here.

You may also find it useful to create a couple of additional sheets in your Idea file so that you can archive ideas you don’t need to see anymore. I use several:

  • Assigned: Once an idea has been accepted for publication I move it to this sheet so I don’t accidentally pitch it to multiple publications.
  • Deprecated: If an idea gets dated or I decided I don’t like it anymore, I move it here.
  • Project ideas: Sometimes I chuck ideas into my story ideas file that don’t really make sense as articles, but could be interesting as a presentation, client project, or book. Those go into a separate sheet for future reference.

Once you’ve finished setting up your idea spreadsheet, take a few more steps to ensure it’s always easy to find:

  • Star your Ideas sheet in Google Sheets.
  • Bookmark your ideas spreadsheet in your web browser. (I keep mine in my Bookmarks bar, so it’s always visible.)
  • Install the Sheets app on your phone.

Your idea Zap

Now that you’ve got a notebook setup to capture your ideas and a spreadsheet ready to organize them, it’s time to create the Zap—the automated workflow in Zapier—that links the two together. Note: You’ll need to have at least one recently created note in your ideas notebook for this to work, so if you haven’t added an idea yet, create a new note called “My Great Idea” and enter a random sentence in the body of your note.

The template below will help you get started. It's best to open the link in a new window so you can follow along with the directions below to customize your Zap.

Step 1. Open Zapier and choose Make a Zap!

Step 2. Under “Choose a Trigger App”, choose the note-taking app you’re using for your idea capture file (like Evernote or OneNote). Note: If this is the first time you’ve created a Zap with your note-taking application, you’ll have to connect your account before you can proceed.

Step 3. Choose “New Note” as your trigger, then click “Continue.”

Step 4. Select the account for your note-taking app, then click “Continue.”

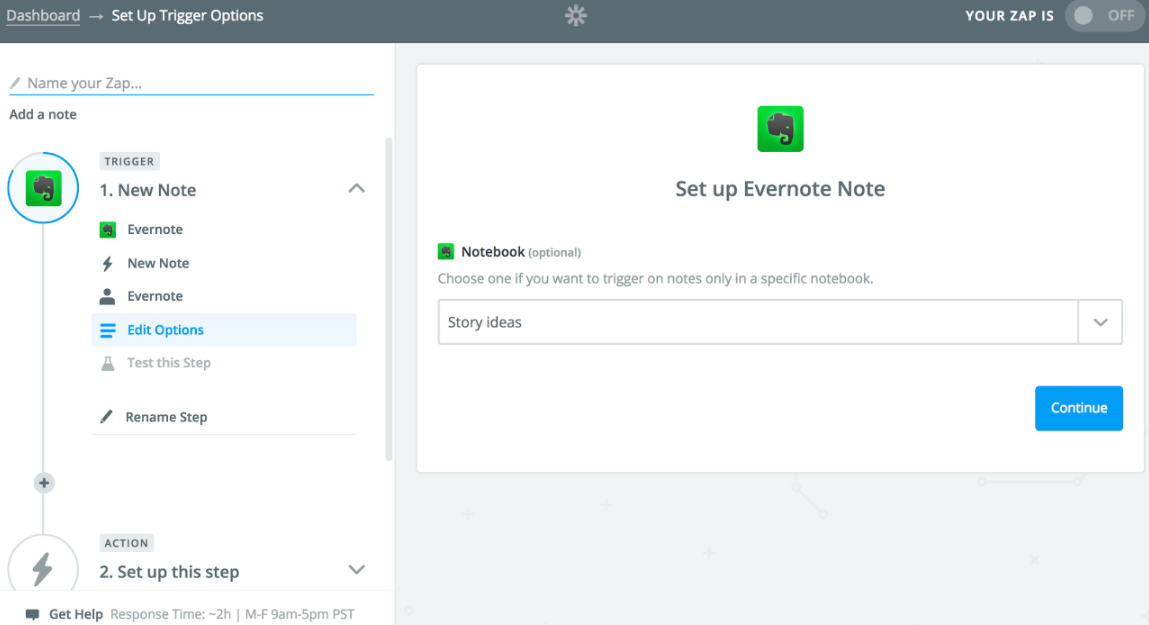
Step 5. From the Notebook dropdown, choose the name of the notebook you’ve set up to capture ideas. Then click “Continue.”

Step 6. Test your trigger by clicking “Fetch & Continue.”

Evernote to Google Sheets integration on Zapier
My Zap uses a new note in the notebook “Story Ideas” as a trigger.

Once you’ve successfully tested your trigger, it’s time to set up your action—what happens when a new note is added to Evernote.

Step 1. Under “Choose an Action App,” enter “Google Sheets.”

Step 2. Under “Select Google Sheets Action,” choose “Create Spreadsheet Row” and click “Continue.” Note: If this is your first time creating a Zap for Google Sheets, you may need to connect your account before you can continue.

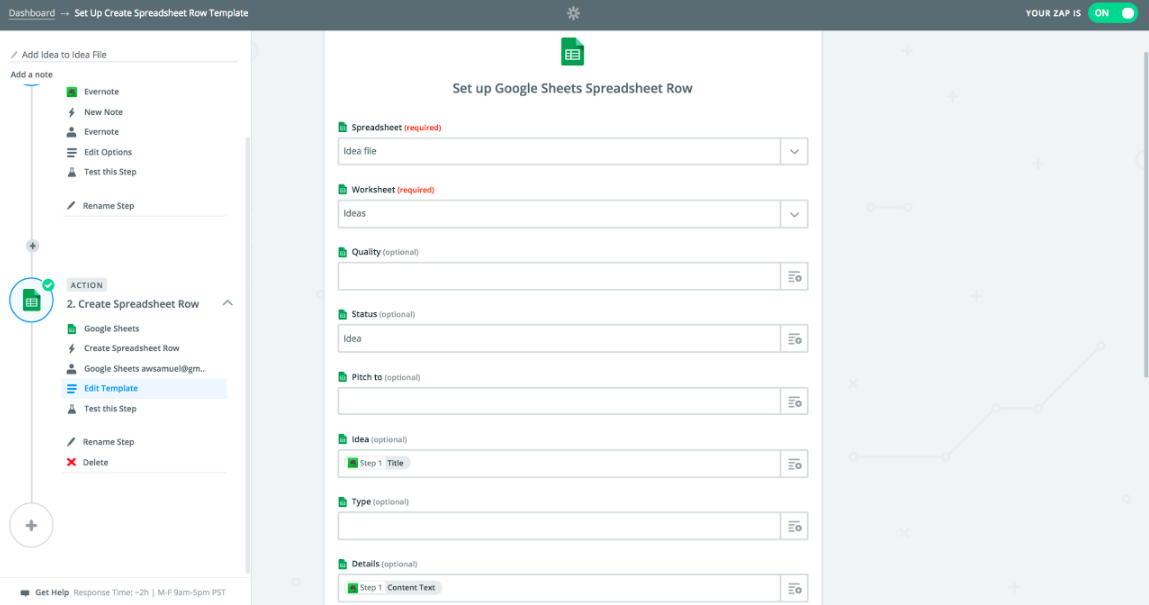
Step 3. Under “Set up a Google Sheets Spreadsheet Row,” select the following:

  • For Spreadsheet, pick the name of your sheet. (For example, “Idea file.”)
  • For Worksheet, pick the name of your the main worksheet in your spreadsheet. (For example, “Ideas Inbox.”)

The rest of the fields you see on this page will correspond to the columns you’ve set up in your Ideas File spreadsheet. Here’s how I have mine set up in Zapier:

  • For Status, I enter “Idea”. This labels any new idea as “Idea” until I update its status, so it’s easy for me to see all my new ideas.
  • For Idea, I pick “Title” from the dropdown list of Evernote fields. This takes the title of each note I create and fills it in the “Ideas” column.
  • For Details, I pick “Content text” from the dropdown list of Evernote fields. This takes the body of each note I create, and fills it in the “Details” column.

Step 4. Once you’ve filled in all the fields you want Zapier to fill in when it adds a new idea to your spreadsheet, click “Continue.”

Step 5. Zapier will test your Zap. Assuming your test works, select “Create & Continue.” Then click “Finish.”

Step 6. Name your Zap (something like “Add Idea to Idea File”) and switch it on.

Zap creation screenshot
Set up your Zap to fill in the columns of your Idea file spreadsheet with the contents of each new Idea note.

Once you’ve gotten used to using your ideas file, revisit your Zap to see if there are any other fields you want to fill in when your note gets added to your spreadsheet. Some options to consider:

  • Use tags to categorize your note when you create it, and set up your Zap so the “Tags” field populates the “Type” column in your spreadsheet.
  • Add a “Created Date” column to your spreadsheet, and set up your Zap so “Time Created Pretty” populates the “Created Date” field.

How to Use Your Idea File

Now that you’ve got your idea file set up, it’s time to put it to good use.

Grooming your idea file

To keep your idea file in shape, adopt these habits:

Review your idea file regularly: anywhere from once a week to once a month. When you’re reviewing your idea file, make it useful by adding some additional information:

  • Categorize your ideas by type or subject. Try to be consistent in how you describe each category so you can sort your spreadsheet by type.
  • Grade the quality of each idea. I use a 1-5 quality scale to rank my ideas once they’re in my spreadsheet (1 is for ideas I love and think I can sell as a story; 5 is for ideas that seem pretty weak or boring.)
  • Expand on your ideas. If you have additional thoughts on an idea, add those to the details column. You may also change the grade you’ve previously assigned to an idea, depending on shifts in your interests or in the marketplace.
  • Add new ideas. You don’t have to add all your ideas via your note-taking app: You can add them directly to your spreadsheet. When I’m reviewing my spreadsheet, I almost always get additional ideas, so I just add them in as I go.

Sort your ideas file by topic. I usually keep my story ideas sorted on the “Type” column. That way, if an editor asks me for productivity stories, I can quickly scan a list of related ideas.

Filter your ideas by quality. When I’m scanning my spreadsheet for ideas I can pitch, I use Google Sheets’ Filter function to filter my spreadsheet on the “Quality” column, and hide anything marked 4 or 5. That way I can focus my attention on the most promising ideas.

Weed out weak ideas. At a certain point, your idea file will have so many ideas that it will become hard to scan through it quickly. Once you start getting bogged down in a sea of ideas, use the “Quality” column to sort your spreadsheet, and then move all the ideas you’ve rated 4 or 5 to a separate archive worksheet.

Tap into the power of the idea file

Capturing and reviewing your ideas is almost sure to boost your creativity—but that’s far from the only benefit of maintaining a solid idea file. Your idea file should become part of your ongoing workflow, like a superpower that you can tap into simply by firing up your spreadsheet. Here are some great ways you can put that power to work:

Start every project with your ideas file. Once you get used to having a wealth of ideas at your fingertips, your idea file can be your go-to starting point in any work situation that calls for fresh thinking. Whether you’re planning a new marketing campaign, your next team retreat, or your new fall product line, peek in your ideas file to see what might get the ball rolling.

Win new professional opportunities. I look at my ideas file whenever I’m meeting with a prospective client who’s asked me for content marketing ideas; when I’ve been introduced to a new editor, and want to wow them with great story ideas; when I see a new publication is looking for pitches on a particular topic; or when I’m invited to propose presentation topics for a conference.

Get energized. Feel like your work has plateaued? Look in your ideas file for something fresh to take pursue. When I’m in the doldrums, and need a writing prompt that will get my juices flowing, there’s always something in my ideas file that I’ve longed to tackle. If you need a project that will get you fired up when you’ve just returned from a vacation, look in your ideas file.

Prepare for meetings. When you’re heading to a meeting or pitch that might require you to share some ideas, prepare by reviewing your idea file beforehand. Scan your file before a performance review, client pitch or job interview, so you can wow people with your brilliant ideas. If you’re going to a meeting where it would be awkward to take out your computer, consider pasting the most relevant ideas into a new note; Google Sheets is unwieldy to scan on a phone.

Get inspiration from your top ideas. At least once a quarter, look just at your top ideas: the ideas you’ve rated “1” in your “Quality” column. What are the ideas or projects you’re just burning to take on? Who could you pitch these ideas to? What changes would you need to make so that you’d have an opportunity to pursue the one or two ideas you’re most excited about? Use this list to inform your planning for the next quarter, or if you’re thinking about your longer-term career trajectory, your professional development strategy.

How will you use your idea file? We’d love to hear your great ideas in the comments below.

Keep Reading:
- Remember Everything with Evernote: 30+ of the Best Tips and Tricks
- Better Brainstorming: The Most Effective Ways to Generate More Ideas
- Make a Plan: How to Outline Your Ideas with 20 Powerful Tools


source https://zapier.com/blog/create-idea-file/

Wednesday 22 November 2017

Steal This Workflow: A Family Business Cut Out 90% of the Time Spent on Manual Work

Once upon a time, family-owned brick and mortar stores were everywhere. Need groceries? That's Sarah's Shoppe. Tools? Tim's Toolhouse. Books? Bob the Brain's Book Emporium. Now, it's hard to find local handmade goods and mega-retail stores dominate most towns. Farmer's markets and co-ops can be a treasure trove, but not every city has those.

Australian Woodwork started as a stall at Sydney's Rocks Markets, built from Sarah Davidson and Gregory White's mutual love of woodcraft. The pair then took their business from market stall to physical store. When their storefront closed, they transitioned online with the help of their son, Ben Davidson. The Head of Digital Sales & Marketing, Ben brought Australian Woodwork into eCommerce.

Australian Woodwork's founders, Sarah and Greg, showing off handcrafted bowls.

But instead of expanding the product line, working with new woodcrafters, or taking care of customers, Australian Woodwork found itself bogged down in the tedium of eCommerce. When Ben found app automation tool Zapier, all that changed.

"Zapier cuts down the time we spend manually copy and pasting emails or sales figures into spreadsheets by over ninety percent!"Ben Davidson, co-founder, Head of Digital Sales & Marketing, Australian Woodwork

Create MailChimp Email Lists Automatically

A perfectly timed email can add a sale (or several) to your ledger. Email provides a platform to connect with your customers on an emotional level, encouraging them to become part of your brand's story.

"By adding new customers and prospects to our mailing lists, we ensure they're integrated into our sales funnel," Ben says. "Once in there, we can upsell customers, show them similar products, and share our story."

But first, you need an email list. Australian Woodwork builds their customer email list in MailChimp from several sources. The list grows with every new Shopify customer, Jotform response, and help requests from Olark. With Zapier, Ben built a few Zaps—bridges between two or more apps—to sync each of these channels together.

Zaps connect different apps, using triggers and actions to automate your work.

When a customer purchases through Australian Woodwork's Shopify store, they have a choice to opt-in to marketing materials. If they do, Zapier grabs their email from the order and adds it to a list in MailChimp.

Australian Woodwork's 'Contact Us' form is actually a Jotform. When someone fills it out, another Zap jumps into action and adds that person to MailChimp. Support requests are also added to MailChimp lists from Olark by Zapier.

With these three Zaps, Ben did more than just eliminate tedious, manual work: "We get to work ON our business, not IN our business!" he says. Less copying and pasting means more new pieces and woodcrafters.

"[These Zaps] mean our customers go into our sales funnel instantly, instead of on a delay, which generates sales we wouldn't have otherwise."

Build a Shopify Order Database in Google Sheets

Australian Woodwork isn't the work of only Ben, Greg, and Sarah. They surround themselves with skilled woodworkers from across Australia, providing a wide talent pool and diverse products.

Each crafter at Australian Woodwork receives a percentage of the sale of their products. It's paid out weekly, and until Ben found Zapier, the percentage was calculated manually. "It was very boring, tedious work that we had to do every week," he says.

To track the sales of each contractor's products, Ben built a Zap to connect Shopify and Google Sheets. When new Shopify orders are placed, Zapier sends specific order details to Google Sheets. Instead of spending hours each week tallying products and sales, Zapier automatically sends the data to Australian Woodwork's database.

This Zap eliminates the manual work tied to monitoring each sale. If you spend an inordinate amount of time (which is any amount of time) tracking sales by hand, try this workflow:


Now that Australian Woodwork uses Zapier to create newsletter lists automatically and track sales instantly, they can focus their efforts on acquiring new customers.

"We spend more time on the activities that help most to build the business, like marketing and advertising, increasing our average order size, and much more," Ben says.

All images courtesy of Australian Woodwork.


source https://zapier.com/blog/build-mailchimp-lists-automatically/

Tuesday 21 November 2017

Growth Hacking Your Job Search: 5 Steps to Get Hired by the Company You Want

As a data engineer and analyst, I search for the best use of my time and resources by testing techniques and measuring results. That often means applying a technique from one function of a business to another—say, applying the lean product development cycle, "build-measure-learn", to your marketing efforts.

You can also use this method to search for a new job and sell yourself into a position you want. Here’s how I went about "growth hacking" my job search. When selling, you must identify your target market and learn how to appeal to them before trying to make the sale. Instead of waiting for recruiters or surfing job boards, I got proactive and took a page out of the sales playbook for some outbound job hunting.

As we come up on the holidays, many companies are defining budgets and roles for the following year. That makes this technique especially effective right now, but it works any time of year!

Step 1: Identify Your Prospects—Target Your Dream Companies

The most important step of this process is figuring out the company values, the type of products, and the roles that interest you. I value corporate transparency, remote-first mentality, commitment to building a team and company for the long term, and products that make people more efficient. That’s helped me build a list of a about a dozen companies that I would consider my dream company list.

The best way that I found to build my own list was to aggregate the lists that others make!

Leverage work that others have already done around your passion points!

Decide what’s important to you. Then, write it all down use your values to decide where to apply, and then forget about it. Why? Well, to land your dream job, it doesn't matter what you want but what the company needs. So you need to pitch the company that you're perfect for them, not that they're perfect for you. The next steps are about selling yourself for the job–even if it's not an open role at the company or one that's ever been created.

Step 2: Create the Pitch: What Do I Have to Offer?

A customer isn’t buying a product to do the company a favor. Similarly, a company won’t hire me because they’re the ideal fit for my career goals. It’s up to me to convince the company of what they will be able to achieve with me as part of the team. How can I make the organization better off?

This is one of my favorite sales memes, and it’s completely applicable in the job search, too. It’s not about what I can do, but how the team will be better off with me on it.

Super Mario image, features vs benefits

Image via Useronboard

When you’re applying for an existing position or reaching out cold to a company, frame your inquiry in terms of what you can do for the organization. How, exactly, are you planning on improving the company's bottom line?

And be careful! It’s easy to slip into describing only why you want the job, not why the company will benefit from having you on the team. The steps below will help you perfect your pitch.

Step 3: Run an Outbound Sales Process

So I know where I want to work and how to show how valuable I am to the company - what’s next?

Identify the appropriate recipients (don’t be afraid to aim high)

Start on LinkedIn. For the jobs that I want, who will be my manager? And who’s one step up from that? These are the folks I want to contact. When I don’t know how the company is structured, I can usually get a good idea from the job titles people use on Linkedin. Sometimes I can target the C-suite directly, but sometimes I have better luck with folks who don’t have an assistant filtering their emails!

Ok, but if their email isn’t listed on LinkedIn, how do I actually contact them? Luckily for us, salespeople have already conquered this challenge. Most companies have standard email patterns (e.g., firstname.lastname@companyname.com) and tools like ClearBit take advantage of that—along with some proprietary secret sauce—to find email addresses. I’ve had a 90%+ success rate when searching for someone’s email address with tools like this.

Draft an email that describes how you will help the company and why you’re a good fit

For example, here’s the email that I used to write to the CEO at one of my dream companies.

job email example

Note the structure here: There are some key components that should appear in the email:

  1. A couple of sentences about what I admire about his company - this hopefully makes them feel good, while also introducing me.

  2. A sentence or 3 about what I’m looking for.

  3. How I could make their life easier. I’m guessing that all of the projects that I listed are essentially on this person's plate. I focused here on trying to illustrate how adding me to the team would ease some of his burden.

My email is legitimately personalized, which makes it different from the typical sales email. Unlike sales, which often has an essentially unlimited number of prospective customers, there are only a few organizations that I’d consider a "dream company." Don’t skimp by using a form cover letter and just plugging in the company’s name. If you’re applying to your dream companies, take the time and effort to research each one and speak to their unique qualities and challenges.

Use trackable email tech to measure and learn what types of emails are working

Salespeople and growth marketers are well-versed in email tracking, so let’s apply some of that technology. I use Yesware here, but there are plenty of tools in the space.

email tracking screenshot

At a very granular level, a tool like Yesware can tell you when a prospect has opened my email. This does a few things:

  • I know that the email address worked.

  • I can see which subject lines are working: Is one getting more traction/opens than others?

  • If they open it more than once, I can typically assume that they really did read it, as opposed to "open and delete." That’s helpful when writing a followup message.

  • If there are 10+ opens for a single email, I can often assume that they forwarded it somewhere else on the team—that’s usually a good sign!

Keep track of what companies are in what stage of the job acquisition funnel

After I get into the swing of things, it can be tough to remember who you’re supposed to email when. I use Trello cards to keep myself organized. Every few days when I’ve blocked time to send out follow up emails, I can revisit this list to remind myself who needs another prod.

Trello job tracking screenshot

Added bonus: This snapshot is actually a combination of my last job hunt (2 years ago) and my current one. It worked as a really excellent reminder to reconnect with companies that might not have been a fit back then, but might be interested now!

Step 4: Don’t give up

Most of the time, you won’t hear back. For me, at Zapier, I went through interview processes for at least 3 different roles before we found the right mutual fit. That’s not to mention the processes, trial projects, and cold pitches that I had going elsewhere at the same time.

Plus, I didn’t include a similar email that I sent Wade in 2015 (!) before I found my last job.

Job hunting can be a slog, but the payoff from finding your dream job is worth it.

Step 0: Be really good at what you do. None of this matters if you can’t pass the skills tests

It’s great to have a system and a process for getting yourself noticed, but the best process in the world doesn’t matter if you’re not good at the job. I make sure that I can send testimonials (or LinkedIn Recommendations, case studies, and content that show I can follow through to prove myself).

Use sites like Glassdoor to understand what the interview process might look like and what type of skills are important to succeed at the job. The best interviewer in the world still needs to succeed on the job if they want to have a great career!


Good luck looking for your next dream job—if this process helps you out, we’d love to hear from you in the comments! And, by the way, Zapier is hiring.

Keep Reading:

Photo by Lukas from Pexels.


source https://zapier.com/blog/job-search-get-hired/

Monday 20 November 2017

Steal This Workflow: How to Keep Your Sales and Support Teams Happy and Efficient with Automation

It's hard to avoid the minutia of sales and support. Both require extensive cataloging, tagging, and monitoring to maintain a healthy database. If you don't catch yourself, your entire day could descend into copying data from system to system. Add in multiple support channels and lead generators and it's no surprise you're drowning in manual work.

Custom sticker producer StickerYou ran into these bottlenecks. Their support team uses Olark for live chat and Help Scout for support tickets. Their sales team generates leads from Wufoo forms and Facebook Lead Ads. These leads live in customer relationship manager (CRM) SalesforceIQ.

Multiple systems, multiple headaches.

Thankfully, StickerYou has Andriy Starchenko, SEM and Marketing Analytics Manager. He saw StickerYou had an account with app automation tool Zapier. Soon after, he crafted automated workflows that allow the support and sales to work more efficiently.

"When I got into Zapier, I realized there are so many things that simplify the life of support and sales."Andriy Starchenko, SEM and Marketing Analytics Manager, StickerYou

Create Help Scout Tickets from Forms and Chat

With StickerYou, anyone can upload and design their own custom labels, decals, and,of course, stickers. If that process gets a little confusing, StickerYou offers live chat through Olark. "We were getting quite a few chat requests for help with our online sticker editor," Andriy explains.

Via chat, the support team guides new customers through sticker creation, uploading designs and answering questions about materials. When those chats end, the customers might come back with more questions, sending an email to support. Those emails land in Help Scout, separate from the Olark chat history.

"We wanted to have every support request in one place so the goal was to integrate Olark with Help Scout," Andriy explains. "When we integrated Olark with Help Scout, it became a lot easier. People from the support team now easily find all the history of communication for each client and they're able to deliver a better level of satisfaction for our users."

Andriy's Zap—a bridge between two or more apps—sends new Olark transcripts to Help Scout. Zapier searches for a matching customer (or creates one) and creates a conversation instantly.

A Zap seamlessly connects different applications together.

Now, StickerYou's chats have a history in Help Scout. If a customer emails StickerYou after a chat, the new support rep has the story at their fingertips.

Manage New Leads Automatically

With support handled, Andriy set his sights on automating some of the sales teams' workflows. Chief among StickerYou's lead generators are Facebook Lead Ads and Wufoo. Before Zapier, the sales team would export new leads from Facebook and Wufoo regularly and import them into SalesforceIQ.

Have you ever spent time exporting data and importing into a new system? Beyond taking time to download and upload, there's always a chance for corrupted data. Maybe a cell's value has a strange symbol in it. Whatever it is, it can crash an upload. Then you have to dig through everything to find the culprit. This is a black hole (one this writer might have been sucked into a time or two).

"With Zapier, it's just so simple to build what you need."Andriy Starchenko, SEM and Marketing Analytics Manager, StickerYou

That's not even considering the multiple systems, multiple headaches scenario: "Previously, I would have to go to at least three different places to pull all of the data," Andriy explains. "Sometimes, the statuses of those leads wouldn't be up to date, so I'd have to cross-reference with actual client information in the CRM."

With Zapier, leads flow automatically into SalesforceIQ. All the sales team has to do now is turn that lead into a client and Zapier handles the maintenance. When new leads come in from Facebook Lead Ads and Wufoo, Zapier creates new relationships in SalesforceIQ.

No more export and import, download and upload. Zapier takes your leads and brings them where you need them, your CRM.


With these automated workflows, StickerYou provides their customers with a smoother experience. Support and sales reps can peruse a customer's prior contacts with a simple Help Scout search. Most importantly, though, no one is stuck in the swamp of tedious, manual work. That means more time for support and sales to interact with customers.

"Now, all I do is pull one report from SalesforceIQ and I have good visibility into the performance of each sales and support rep," Andriy says. "It's a lot easier to provide stats on how everyone performs and how satisfied our customers are."

All images courtesy of StickerYou.


source https://zapier.com/blog/efficient-support-sales/