Email helps us connect, communicate, and collaborate—but does it help too much? We receive an average of 94 business emails every day and devote almost one-third of our time at work to email management. Bottom line: the benefits of email often come at the expense of productivity.
To reclaim your time, automate your inbox. Here are the tips, tools, and templates you need to get started.
An Introduction to Inbox Automation
Let's start with a definition:
Inbox automation is the process of setting up workflows that complete repetitive email tasks automatically—so you don't have to.
When you think about it, a lot of the emails we receive are redundant. We answer the same questions over and over again, go back and forth looking for a good time to schedule a meeting, and move newsletters into a folder of emails we'll get around to reading… one of these days. These tasks are necessary, but they're usually repetitive and mindless.
They're ideal for automation.
Even if you're just automating the process of moving newsletters into a to-do folder—a task that takes no more than five seconds—the time you save adds up. And the more inbox automation workflows you create, the more time you save, and the more time you have to focus on the important tasks that happen outside of your inbox.
Start by Deciding What Tasks You Should Automate
Before automating your inbox, you need to determine what types of inbox management tasks to automate. There are a couple ways to do this:
-
Scan through a month's worth of emails in your archive to look for examples of repetitive tasks you completed recently.
-
Track the types of tasks you complete in your inbox for a month. Take notes on the types of things you do regularly.
Here are some examples of common time-wasting emails:
- Frequently answered questions: Questions you answer over and over again.
- Availability requests: People looking for openings in your schedule to set a meeting.
- Newsletters and marketing emails: Things you want to read or review… later.
- Unsolicited requests: Strangers who want you to do something for them.
- Tasks: To-dos that belong in your task management system.
Reviewing a month's worth of emails probably won't catch every task you should automate, but it will help you identify the ones that eat away at your time most often.
Once you know the types of emails you want to automate, it's time to set up your automated workflows. Follow the instructions below to set up workflows for the most common time-wasting inbox management tasks, and start reclaiming the time you waste in your inbox.
- Automate Responses to Frequently Answered Questions
- Share Your Availability Automatically
- Get Promotional Emails out of Your Inbox Automatically
- Respond to Fewer Unsolicited Requests
- Automatically Move Tasks out of Your Gmail Inbox
Automate Responses to Frequently Answered Questions
Back when I worked as a product manager, I was the go-to subject-matter expert (SME) for my product. Being an SME sounds much fancier than it is: For the most part, it just means answering the same questions over and over again—usually via email.
There are a few ways to deal with responding to FAQ's. You could
- recreate and retype the answer every time.
- find an old answer and copy-paste it into the new email.
- use a tool to save commonly used responses and add them to new emails with one click.
Door #3 requires the least amount of time and effort. And with the right tool, it's easy to set up. Here are several options to consider.
TextExpander
TextExpander lets you create and save snippets of text and insert them into new emails and replies instantly using a keyboard shortcut.
Here's how to set it up:
- Create an account and download the app from the TextExpander website.
- Create a snippet in the TextExpander app for each response you send frequently. Make sure to give your snippet a name in the "Label" field and create a keyboard shortcut in the "Abbreviation" field.

- After creating your snippets and keyboard shortcuts, just type the appropriate abbreviation into an email response, and TextExpander will automatically insert the snippet.
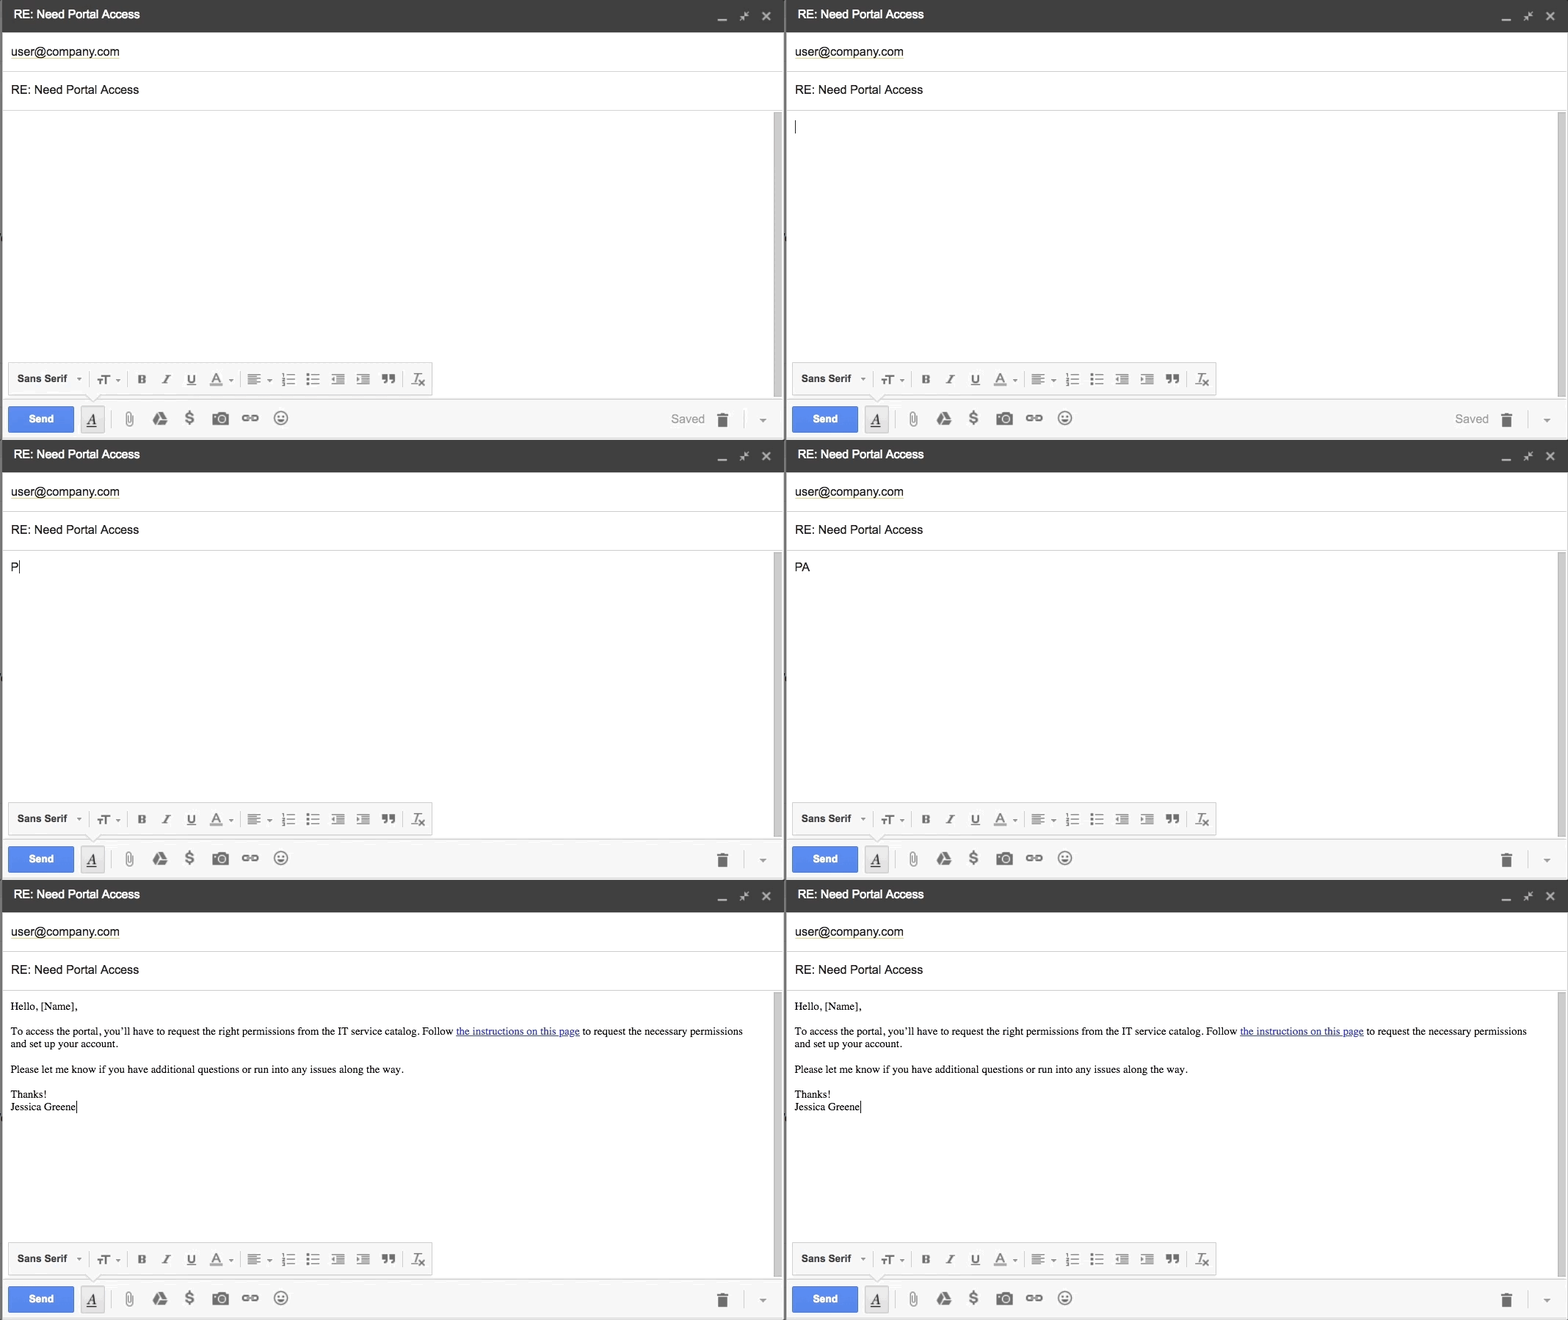
Magic.
The best thing about TextExpander is it works in every application—not just email. So if you also answer questions in Slack or over IM, you can use TextExpander in those programs too.
TextExpander pricing: From $3.33/month for the Life Hacker plan after a 30-day free trial.
Outlook 365 Quick Parts
If you use Outlook 365 and don't want to pay a monthly fee for TextExpander, use Outlook's Quick Parts feature to create and insert default responses. Here's how to set it up:
- Find a pre-typed response you want to save, or type a new response into a new email. Highlight all of the text, and click the "Insert" tab.
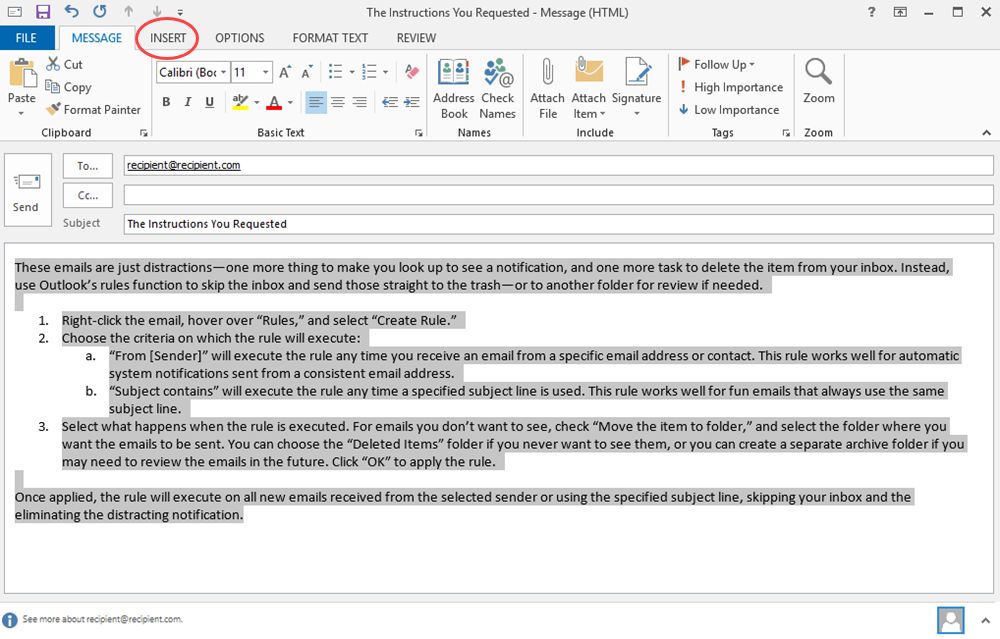
- Click "Quick Parts," and select "Save Selection to Quick Part Gallery."

- Name your Quick Part for easy identification later, and click "OK."
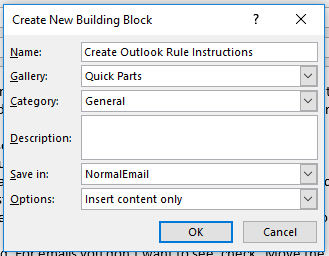
- Now, when you want to insert that response into a new email or reply, click the "Insert" tab, click "Quick Parts," and select the response you want to insert.

The text will automatically appear in the body of your email.
Quick Parts pricing: Quick Parts is a free, default feature of Outlook 365.
Gmail canned responses
Gmail also offers a solution for repeat responses: canned responses. Canned responses is a free, optional feature available in Google Labs. Here's how to set it up:
- Log in to your Gmail account.
- Click the gear icon, and select "Settings."

- If you're using the 2012 version of Gmail, click the "Labs" tab. If you're using the new 2018 interface, click "Advanced." Next to "Canned Responses (Templates)," select the "Enable" radio button. Scroll down to the bottom of the page to save your changes.

- With canned responses enabled, start creating your snippets. Find the text you want to save, or type it into a new email. Click either the down arrow (2012 Gmail) or three vertical dots (2018 Gmail) at the bottom-right of the compose email form, hover over "Canned responses," and select "New canned response."

- To insert a saved canned response into a new email or reply, click the down arrow (2012 Gmail) or three vertical dots (2018 Gmail) at the bottom-right of the compose email form, hover over "Canned responses," and select the title of the response you want to insert.

You guessed it: The text will automatically appear in the body of your email.
Gmail canned responses pricing: Canned responses is a free Gmail feature available through Google Labs.
Share Your Availability Automatically
Most companies offer a way for coworkers to view each other's availability, which makes scheduling internal meetings a breeze. But when you're trying to schedule time with someone from another organization, well, that's a different story.
It usually goes something like this:
- Do you have time this week to jump on a call?
- Sure! I'm available today from 2-3 p.m.; tomorrow from 8-9 a.m., 11-noon, and 3-4 p.m.; and Friday from 9-11 a.m.
- Sorry, none of those times work for me. How about next week?
- I can meet anytime on Monday, but I'm out of the office for the rest of the week.
And so on.
You review your calendar, type all of your open slots into an email, and hope both parties have one shared open hour. It's not a good use of anyone's time.
Instead, reclaim your time by adopting a tool that automatically shares your availability for you.
Calendly
Platforms: Google, Outlook 365, and iCloud
Calendly automatically pulls your availability from your calendar and shares openings in your schedule with anyone who has your Calendly link. It integrates directly with Google, Office 365, and iCloud calendars so you never again have to send out a diary of your availability.
Here's how to set it up:
-
Sign up for an account on the Calendly website.
-
Follow Calendly's guidance to set up your account and meeting types.
-
Grab the link to your scheduling page, and send it to anyone who asks for your availability.
-
People can select a meeting day and time from your Calendly scheduling page, and Calendly adds the meeting to your calendar and sends notifications to all participants.
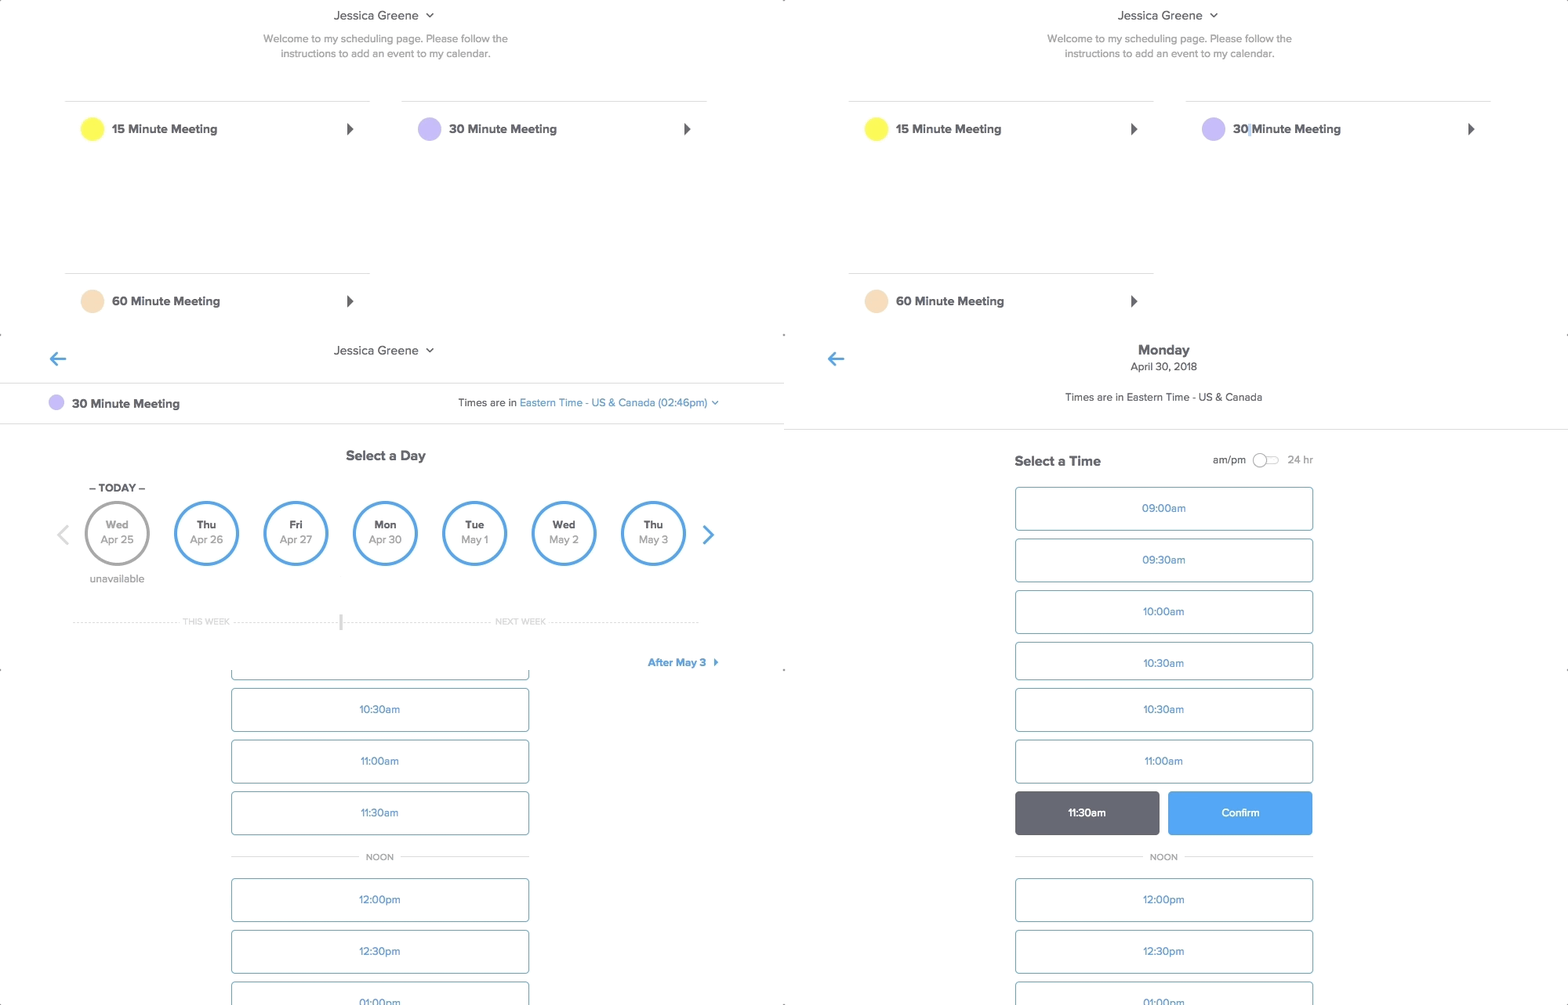
Calendly also has an option to embed your scheduling page on your website—a useful feature for salespeople looking to schedule calls or demos with leads and avoid email altogether.
Calendly pricing: Free for the Basic plan that includes one event type and a personalized Calendly scheduling link.
Mixmax
Platforms: Gmail and Google Inbox
If you don't want to make your entire calendar available to strangers, Mixmax offers a different solution: It allows you to choose available times and embed a schedule of those times directly into an email.
Here's how to set it up:
- Click the "Install for free" button on the Mixmax home page, and accept Google's confirmation that you want to install the extension.
- Open your email account, and click the "Activate Mixmax" button.
- After navigating through the installation and welcome workflows, open a new email, click the calendar icon, and select "Share availability."

- Select the times you want to share, and click "Insert times." Mixmax embeds the times you selected into the email. Recipients just need to click the time they prefer, and Mixmax schedules the meeting and sends out notifications automatically.
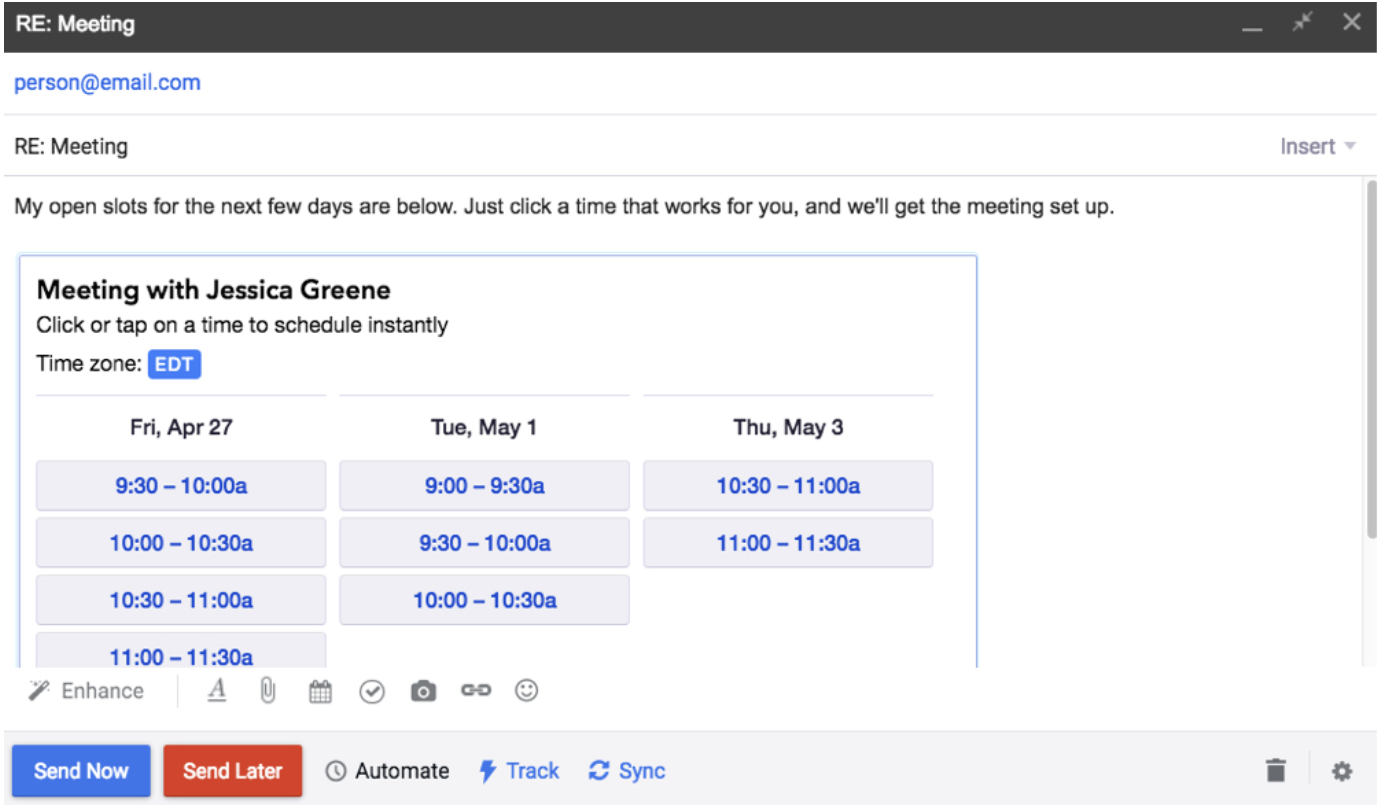
Mixmax also offers an email template feature, so if you decide it's the right scheduling tool for you, use it for FAQ's too in lieu of the tools listed in the previous section.
Mixmax pricing: From $9/month per user for the Starter plan that includes unlimited scheduling.
x.ai
Platforms: Google, Outlook.com, and Outlook 365
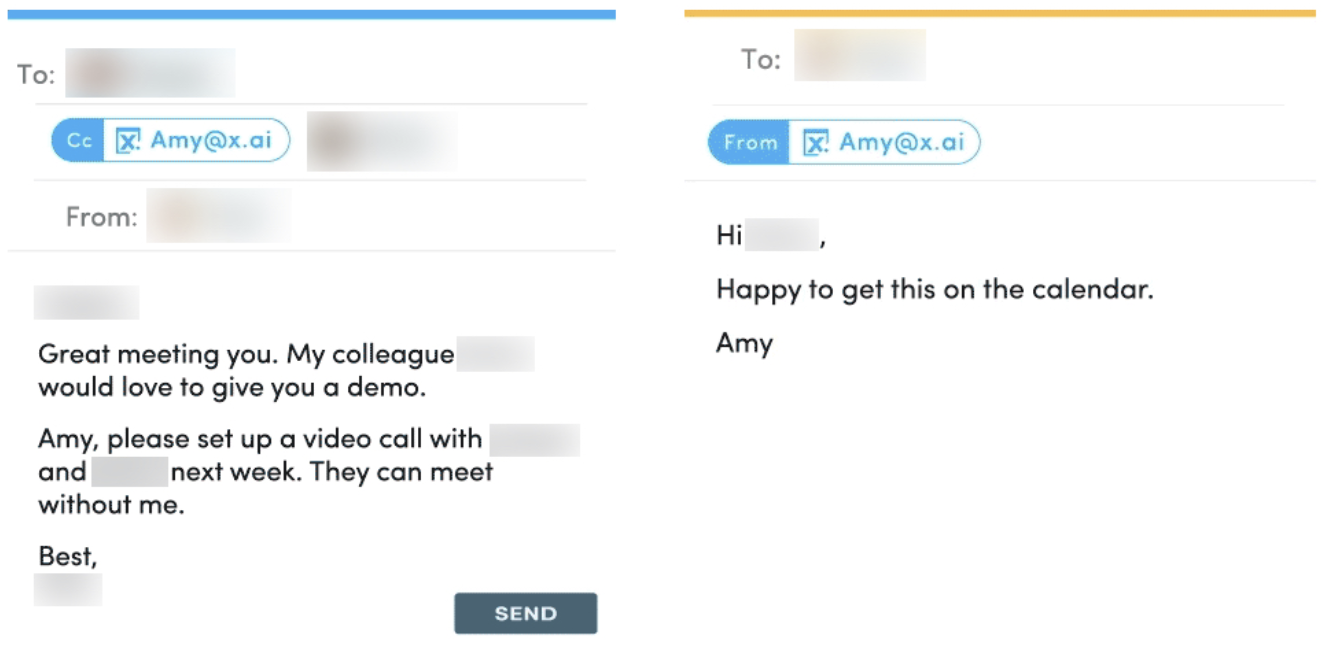
If you want to provide a more personalized experience, use X.ai. X.ai's Amy is an AI-powered personal assistant that communicates with you and your email recipients in the same way a real person would. Just copy Amy on any email and ask her to set up a meeting, and she handles all of the coordination and scheduling for you.
Sure, it's a little HAL-like, but it does the trick.
X.ai pricing: From $17/month for the Individual plan that includes all scheduling features for a single user.
Get Promotional Emails out of Your Inbox Automatically
When I see a notification that I have an email, it takes a whole lot of self control not to check it immediately. My favorite description of this phenomenon comes from Jocelyn K. Glei, author of Unsubscribe. She says email is like a slot machine: Most of the time, you lose, but sometimes, you find something amazing.
And that's why it's addictive.
The amazing emails come to mind when you see a new notification, but often what you find is a marketing email, some company's newsletter, or an Amazon receipt for something you literally just ordered and still managed to forget about.
Handling these types of emails doesn't take a lot of time, but each one you receive is a distraction. And considering it takes 16 minutes to refocus after an interruption, incoming email notifications have a bigger impact than just the 5 seconds it takes to deal with them.
To prevent promotional emails from taxing your productivity, use the following tools and tricks to get them out of your inbox and into a more appropriate queue.
Gmail filters
Set up a few filters in Gmail to move promotional emails into a to-do folder, archive them, or delete them automatically. Here's how to do it:
- When you receive a promotional email, click either the down arrow (Gmail 2012) or three vertical dots (Gmail 2018) at the top-right of the email, and select "Filter messages like this."

- Gmail will auto-populate the correct details in the "From" field of the create filter form, so on the screen that pops up, just click "Create filter with this search" (Gmail 2012) or "Create filter" (Gmail 2018).
- On the next screen, choose what you want Gmail to do with emails from that sender. Select "Skip the Inbox (Archive it)" to automatically archive those emails, "Delete it" to automatically delete those emails, or "Apply the label" to automatically move emails from that sender into your to-do queue. Finally, click "Create filter" to apply your changes.
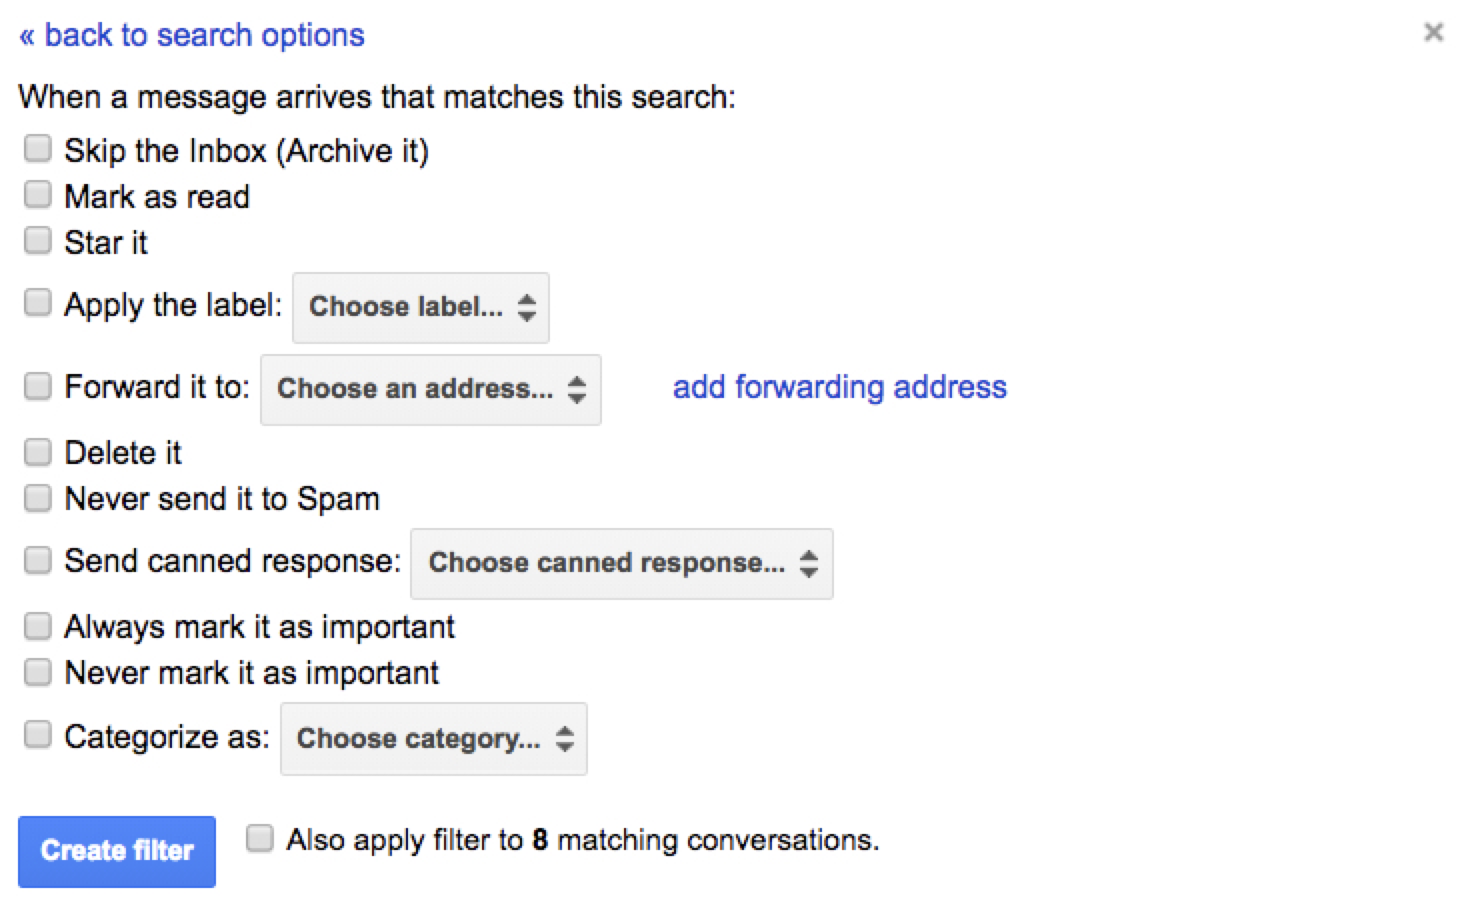
Do this for each marketing email you receive to ensure that future emails skip your inbox and go to the right place, or check out our guide to Gmail filters to discover additional tips on using filters to keep your inbox organized.
Gmail filters pricing: Filters are a free, default Gmail feature.
Outlook rules
Outlook rules do the same thing as Gmail filters: They let you establish workflows for automatically deleting or moving emails. Here's how to set them up:
- Right-click a promotional email you want to apply a rule to, hover over "Rules," and select "Create Rule."
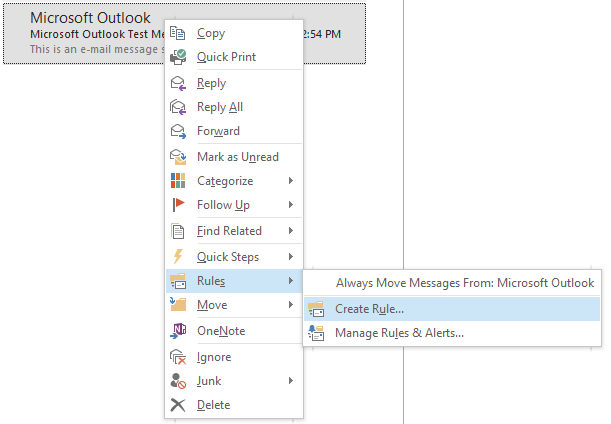
- Choose the criteria for the rule, and select "Move the item to folder." Next, select the folder where you want the emails to go. Choose "Deleted Items" to automatically delete future emails from that sender, or select a to-do folder to move future emails into a to-do queue. Click "OK" to apply your changes.

Do this for each promotional email you receive to make sure future emails skip your inbox and go to the right place.
Outlook rules pricing: Rules is a free, default feature of Outlook.com and Outlook 365.
Rules in Mail for Mac
If you manage your email with Apple's Mail program, set up rules to automatically handle incoming promotional emails. Here's how to set it up:
- From the main program menu, click "Mail" and select "Preferences."

- Select "Rules," then "Add Rule."
- Give your rule a title, select the criteria for the rule, and select what should happen when applying the rule. To automatically delete the email, select "Trash" in the "to mailbox" dropdown. To move the email into a to-do queue, select your to-do folder in the "to mailbox" dropdown. Click "OK" to apply your changes.

Do this for each promotional email you receive to make sure future emails skip your inbox and go to the right place.
Rules in Mail pricing: Rules is a free, default feature of Apple's Mail program.
Respond to Fewer Unsolicited Requests
Not too long ago, I received an email from someone asking me to link to one of their articles—from my writing portfolio. I didn't bother writing back to explain that the page is a list of links to things I've written. Even the smallest amount of effort on the sender's part would have made that clear.
Mass emails and lazy senders generally don't deserve a response, but there are times when people send emails that were obviously written just for you. I hate to be rude and ignore these emails. But every response I send takes time away from my work—the stuff that pays the bills.
Unsolicited requests are a real challenge for many industry influencers and company executives. These people get frequent interview requests from journalists, requests for advice from marketers looking to build influencer roundup articles, and general queries from other professionals looking for help from the experts they admire.
To minimize the number of unsolicited requests you have to respond to, use Earn.com to charge a fee for every email reply.
That's right: make them pay.
Earn.com lets you earn bitcoin for every email you reply to. Set up an Earn.com profile, and choose the amount you want to earn for replying to emails ($1, $5, $20, or $100). You can choose to keep the money you earn for yourself or donate it to charity.

Once you have your account set up and verified, you can start redirecting unsolicited email senders to your page on Earn.com to ask them to pay for a reply.
If you use Gmail, Earn offers an extension that automatically bounces emails from unknown senders to your Earn.com profile. Here's how to set it up:
-
Log in to Earn.com, and select the "Bounces" link.
-
Click the "Enable" button.
-
Connect Earn.com to your Gmail account.
-
Customize the response that unsolicited senders receive when the extension bounces emails to your Earn.com profile. See the suggested templates below for ideas on how to politely ask senders to pay for a reply.
-
Choose whether or not you want to automatically bounce unrecognized senders. Note: If you turn this feature on, any sender that's not in your Gmail contacts—or that you haven't manually whitelisted—will receive an auto-bounce email. This could cause problems if, for example, you get an unanticipated email from someone offering you a job or from a customer you haven't corresponded with before.
-
Whitelist specific senders or domains that you don't want to auto-bounce to Earn.

If you don't use Gmail—or if you just want complete control over which senders bounce to Earn.com—create a default response template for unsolicited emails using one of the tools/features in the frequently answered questions section above, and reply with it to any sender you want to bounce through Earn.com.
Asking people to pay for your time may go against your nature, but if you're an influencer in your field, it helps limit the number of unsolicited requests and questions you have to spend time replying to. Most people won't be willing to pay for a reply, reducing the number of to-dos in your inbox, and helping you identify the people who really need a response.
Earn.com pricing: Free to create an Earn.com profile and accept messages on the platform.
Suggested templates
Use this template if you're donating your Earn.com proceeds to a charity:
Hello,
Thanks for reaching out!
Unfortunately, my current workload prevents me from responding to every request I receive. However, I do respond to all paid emails sent through Earn.com, and I donate all of the proceeds to [name of charity].
If you're still interested, feel free to resend your message using the following link: [Earn.com profile URL].
Sincerely,
[Your Name]Use this template if you're keeping your Earn.com proceeds:
Hello,
Thanks for reaching out!
Unfortunately, my current workload prevents me from responding to every request I receive. However, I do respond to all paid emails sent through Earn.com. This helps me manage my time better and gives you the assurance of a guaranteed response.
If you're still interested, feel free to resend your message using the following link: [Earn.com profile URL].
Sincerely,
[Your Name]Automatically Move Tasks out of Your Gmail Inbox
Most people receive to-do items via email, but many of us manage our to-do lists in a separate application.
For example, I work with most of my editors over email, but I manage my assignments and due dates in Trello. I could manually copy and paste all new assignment requests from Gmail to Trello, but it's not a great use of my time. Instead, I use Zapier to automatically create a card in Trello for any emails I label as to-do.
And it's not just for Trello. Zapier offers integrations from Gmail to most popular project/task management applications:
To use these Zaps, create a label in Gmail that you'll use to trigger the workflow. To create a new label:
- Click the gear icon, select "Settings," and choose the "Labels" tab.
- Click the "Create new label" button, give your label a name, and click "Create."

- Next, visit Zapier, log in to your account, and select Gmail and your preferred task management program to see available Zaps.

- Look for a Zap that triggers on new, labeled Gmail emails, and follow the instructions to set up the Zap.
Now, when you receive an email that contains a to-do, just apply the right label, and your Zap will automatically copy the details into your task management system.
Zapier pricing: Zapier's Free plan lets you use up to five Zaps and run up to 100 tasks each month.
Regardless of whether you work for a corporation and receive nearly 100 emails a day or are a freelancer who receives fewer than 100 over the course of an entire month, every email is a distraction. Each one takes your attention away from more important work. And even if it only takes a few seconds to deal with it, that small distraction impacts your overall productivity.
Automating your inbox and letting technology take care of repetitive and time-consuming tasks frees you up to focus on more important work—to accomplish more every day.
- From the main program menu, click "Mail" and select "Preferences."
source https://zapier.com/blog/automate-email-inbox/

No comments:
Post a Comment