
The quickest way to do almost anything on your computer is with your keyboard. Copying and pasting text? Formatting a document? Searching searching your computer? A keyboard shortcut is almost guaranteed to be the fastest way to do it. And on your Mac, you can add new keyboard shortcuts to most apps to speed up your most common tasks?
But what about your favorite web apps? Many of them include keyboard shortcuts while you're using them—but what if you want to quickly add data or find something in them without opening them?
That's what Zapier's Alfred workflow lets you do. In a few minutes, you can add a quick keyboard command to add data to your favorite apps anytime you want from your Mac.
A Quick Alfred Introduction
Alfred is a productivity app for macOS that can quickly search your files and the web, launch apps, or expand your text. And, with the Alfred Powerpack, you can install or build your own workflows that—in just a few keystrokes—let Alfred manage your music, create events and notes, search through your emails, start timers, and even turn off your computer.
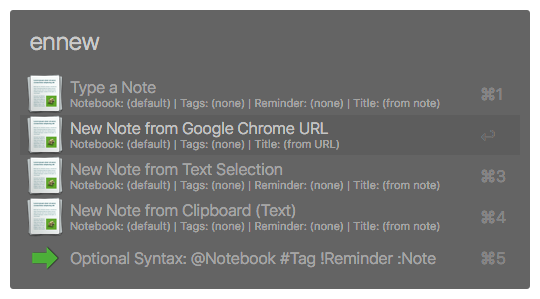
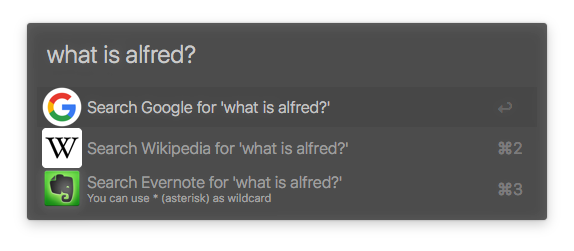
Say you want find info about penguins. You'd open Alfred (by pressing its keyboard shortcut—often Command + Space or Alt + Space), type wiki penguins, and the correct Wikipedia entry would open in your browser. With the Evernote workflow for Alfred, you could then open Alfred, type ennew, then select New Note from Google Chrome URL to save that page in your Evernote notebook.
Easy, right? It's a quick way to save time and get more done on your Mac.
Introducing Zapier for Alfred
You can use that same power to run workflows between 750+ apps, using app automation tool Zapier, anytime you want from your Mac using Alfred Workflows. Say Bob emails you and asks to be added to your MailChimp newsletter list. You could copy his email, open MailChimp, find your list, and figure out where to add his email.
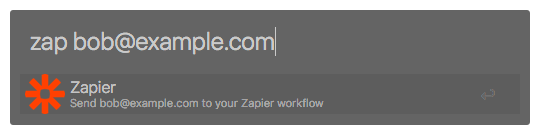
Or you could have an Alfred and Zapier workflow that adds new contacts to MailChimp. You'd type zap bob@example.com into Alfred and he'd be added to your email newsletter list.
That's how a number of people on the Zapier team use Alfred to stay productive throughout the work day. UX Research Lead Eileen Ruberto uses Alfred to add tasks to an Airtable database in seconds. I use Zapier for Alfred to save the tasks I complete throughout the day to I Done This. Customer Champion Juan Vazquez uses Alfred to make sure he never forgets the perfect gift for someone, by having Zapier add gift ideas to his list in Airtable right from Alfred.
And it's how author Paul Minors unsubscribes people from his MailChimp email list, with what he calls "the geekiest automation I've ever created."
Here's how you can kickstart a series of actions in your favorite apps with Alfred's shortcuts on your Mac and Zapier's .
1. Install Zapier for Alfred
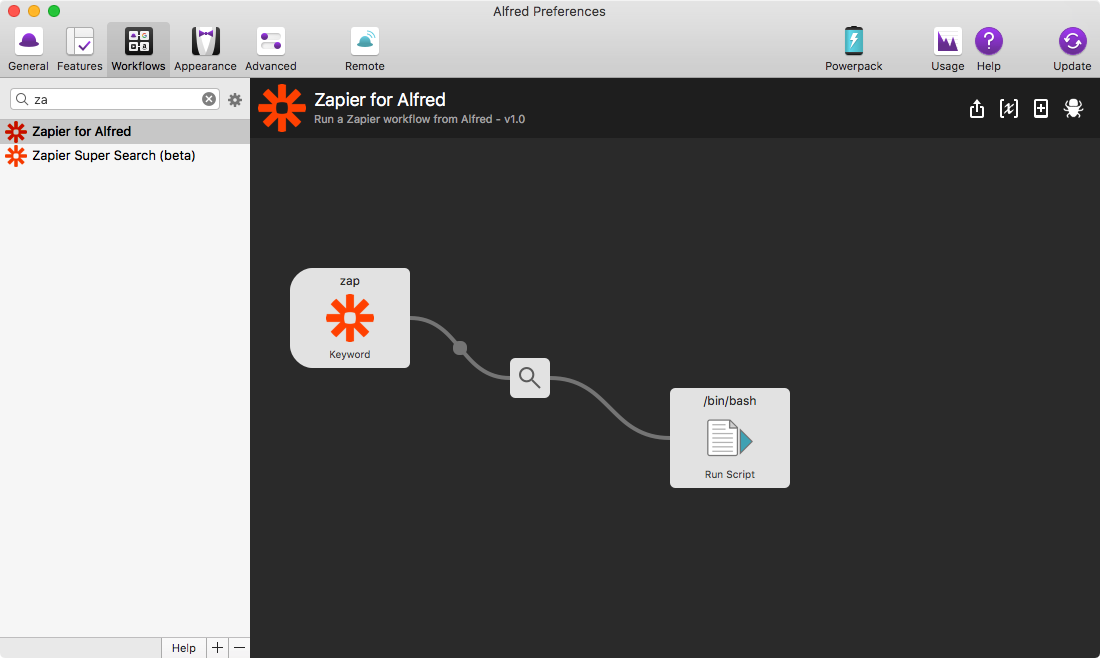
After you install Alfred, just download Zapier for Alfred and double-click the Zapier for Alfred.alfredworkflow file to add it to your collection of Alfred workflows.
2. Make a Webhooks Zap
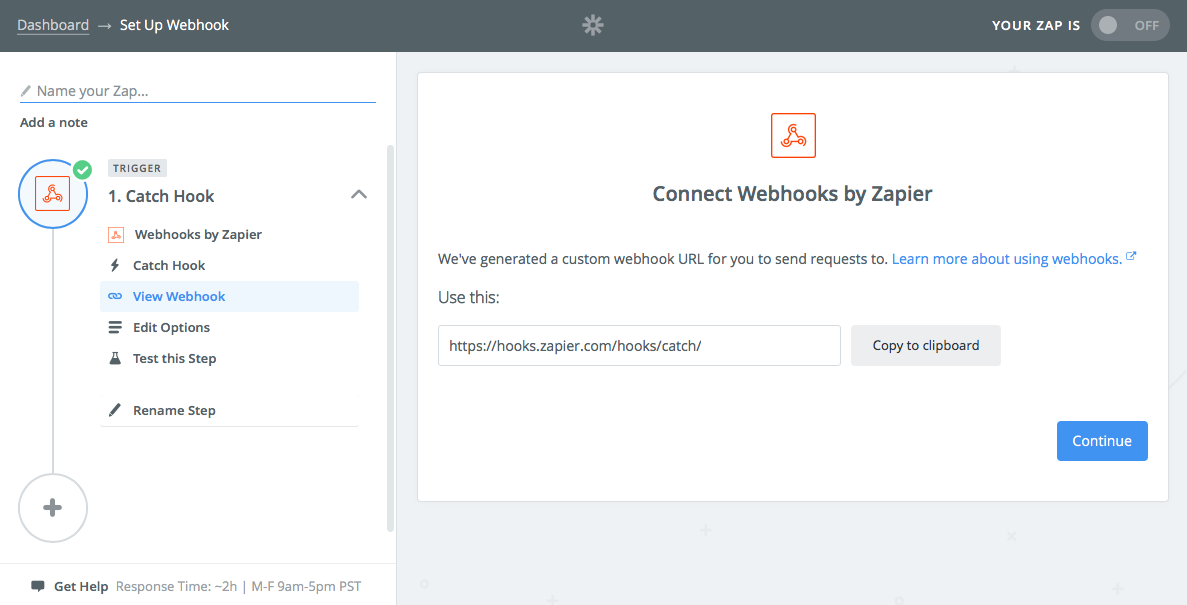
Now, let's make a Zap (an automated workflow that connect apps in Zapier) to use with Alfred. Open Zapier, click Make a Zap!, and select the Webhooks by Zapier app. That gives us a link that Alfred can use to send data back to your Zap.
Choose Catch Hook, click Continue in the "Pick off a Child Key" screen, then copy the webhook URL Zapier shows, which should be something like https://hooks.zapier.com/hooks/catch/123456/1abcde/.
3. Add the Webhooks URL to Zapier for Alfred
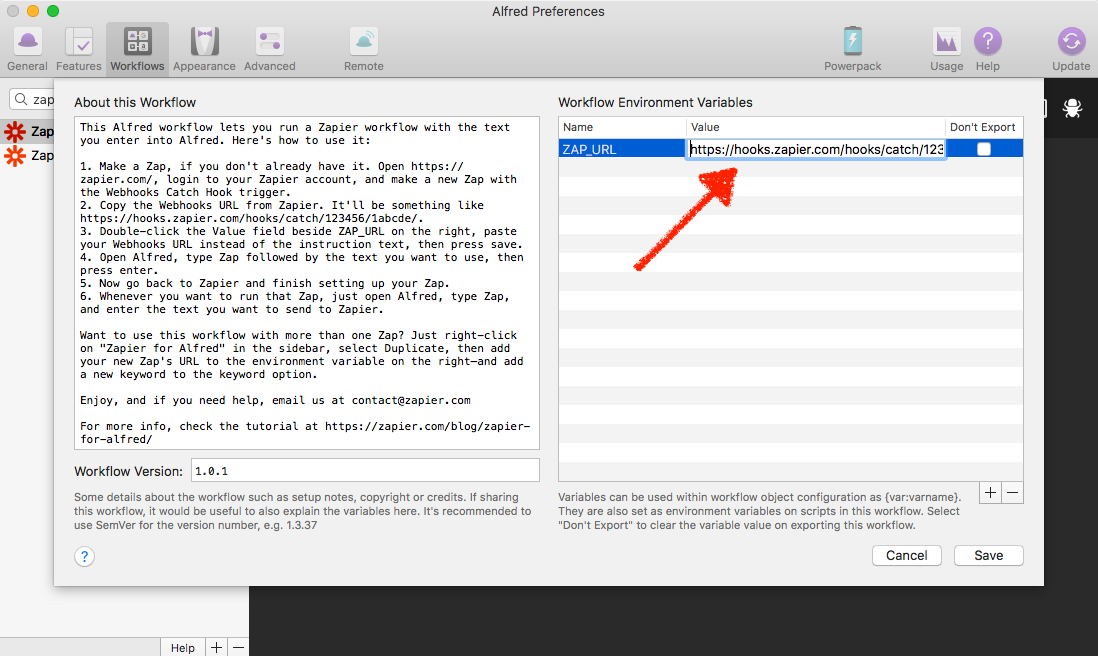
Let's leave the Zap for a second, and add that link to Alfred. When you first installed Zapier for Alfred, you should have seen a dialog box like the one above. If you don't see it, just click the [x] button in the top right corner of the workflow.
Now, double-click the text in the Value box beside the ZAP_URL environment variable on the right pane. Paste your Webhooks URL there, and press save.
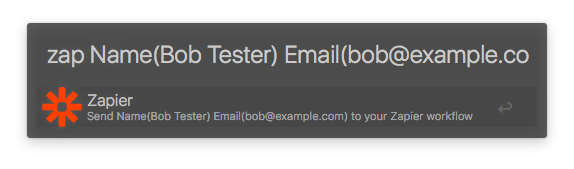
Now open the normal Alfred search pane (with Alt + Space, or your own custom keyboard shortcut) and let's try using that workflow to add a new contact, Bob, to our email list. Type zap bob@example.com into Alfred's search pane—as in the screenshot at the top of this section—and press return on your keyboard.
Now go back to your Zap, and click the "Ok, I did this" button to test your Webhook step. If you click the "View your hook" link on the resulting screen, Zapier will show the email address you just entered. Yay, it works!
4. Finish Setting up Your Zap
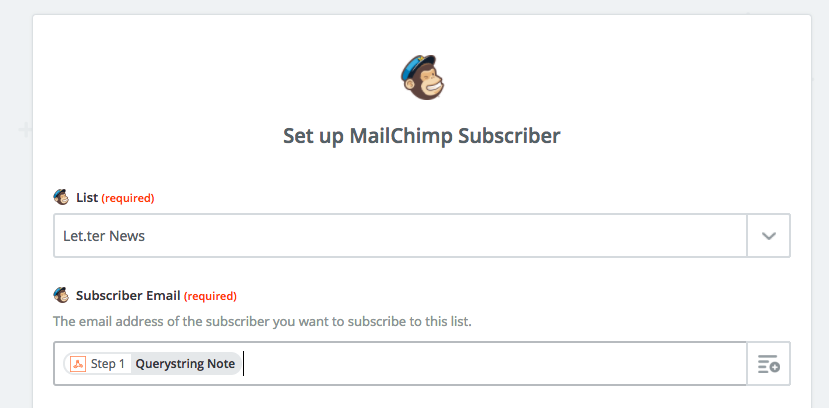
We'll now add a MailChimp action step to our Zap, to add contacts to our email list. Click "Continue" to set up the action that will happen after the webhook is triggered. Then just select MailChimp from the Action apps list, choose Add/Update Subscriber, and connect or choose your MailChimp account.
Use the dropdown box to select your MailChimp list and click the plus sign at the right of the "Subscriber email" field to select the Querystring Note item from your Webhooks step (which contains the email address you entered in Alfred search).
Save and test that Zap, and Bob will get added to your email list. Next time you need to add someone to your MailChimp list, just type zap followed by their email address into Alfred and Zapier will do it for you in a second.
5. Copy the Workflow and Repeat
Want to use Alfred to trigger more than one Zap? Sure thing.
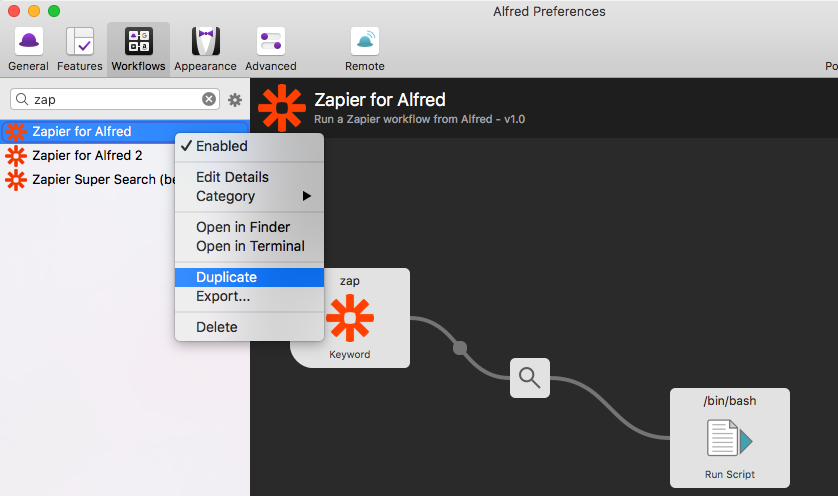
Just right-click on the Zapier for Alfred workflow in Alfred's sidebar and select Duplicate. Give this workflow a new name—perhaps one that describes what your Zap will do.
Then double-click the Keyword item in the workflow to give this Zap its own keyword. And, as before, open the workflow settings from the [x] button and add the correct Webhooks URL for your new Zap.
Search Through Your Web Apps with Alfred and Zapier
Zaps like the MailChimp one we just made are handy to add data to your favorite apps—and since Zapier supports over 750 different apps, there's a lot you can do with that.
Odds are, you're already used to using Alfred to look up data—and Zapier can help you search through your favorite web apps, too, using Search Actions.
Perhaps you need to find contact info from Salesforce, Google Contacts, or MailChimp. Maybe you need to find data from a Google Sheets spreadsheet, an Airtable database, or an Evernote note. Zapier can find that contact and send you a push notification on your Mac with the details.
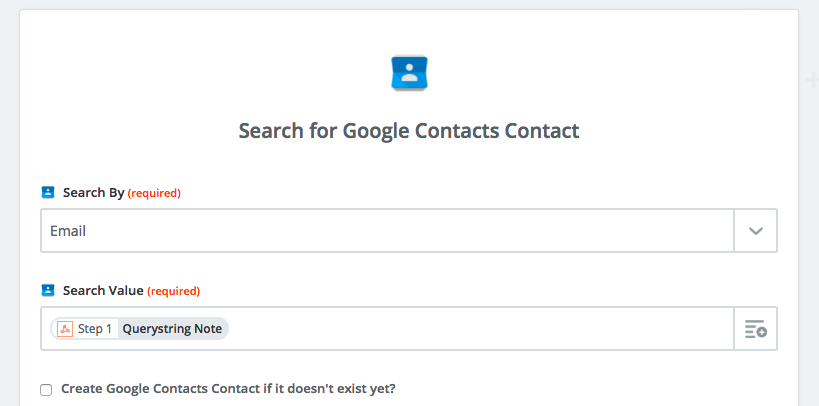
Let's try the Google Contacts one. Add a Google Contacts Find Contact step to your Zap, and add your Webhooks Notes field to search that email address you'd entered in Alfred.
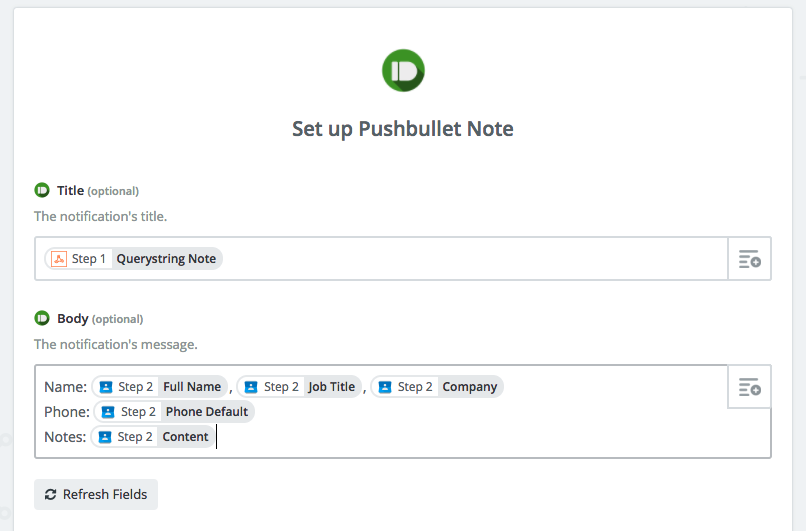
We now need to get the info back to our Mac—a notifications app like Pushbullet is perfect for that. Add another step to your Zap, select the Pushbullet app, then fill in the note with all the detail Zapier just found about your contact.
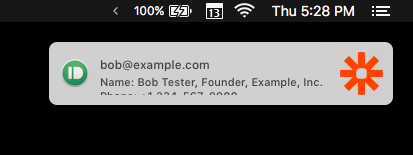
Test and turn on your Zap, and whenever you enter an email in your Alfred Zapier workflow, Zapier will send you a push notification through Pushbullet with the details. Tap the notification to copy all the details and use them in your work—without having to ever open your CRM and search for customer data again.
Send More Data to Zapier with Alfred
Entering a sentence, email, or other short text into Alfred is handy—but what if you want more? Perhaps you want to add new contacts to your CRM, with their name, email address, and phone number, all from Alfred.
You can do that too, with Zapier's Named Variables. Essentially, you'll type a category, followed by the text you want to send to Zapier in parenthesis.
To add a new contact, say, we'll enter the following in Alfred:
Name(Bob Tester) Email(bob@example.com) Phone(1-234-567-8900)
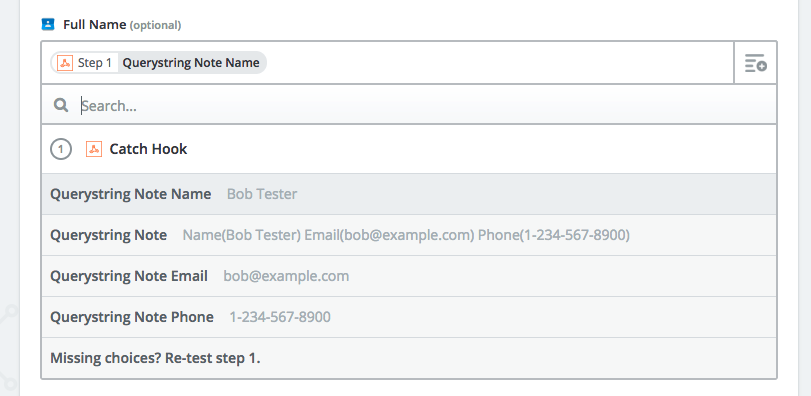
Now, in Zapier, you'll see a Name, Email, and Phone field along with your full note. You can fill out each item in, say, a Google Contacts Create Contact action to add someone to your address book.
Get Started Quickly with Premade Zaps for Alfred
In a hurry? We've made some Zapier workflows so you can get started with Zapier for Alfred quickly.
Just remember: Make a new copy of the Zapier for Alfred workflow for each Zap, give the Alfred workflow its own keyword, and always copy the Zap's Webhooks URL and add it to your Alfred workflow.
Add Contacts
Want to set up that MailChimp or Google Contacts workflow in a few clicks—or make your own contact workflows? Here are Zaps to start with:
Send Emails
Once you've added new contacts, it's a great chance to reach out to them and start a conversation. With these Zaps, you can send a template email to someone in seconds from Alfred.
Create Tasks, Projects, and Events
Opening your online project manager, calendar, or to-do list just to add one new task takes way too much time. These Zaps can do it for you automatically.
Post to Social Media
Don't open your Twitter app to share that brilliant Tweet. Odds are, you'll end up distracted, wasting valuable time instead of getting back to work. Let Zapier for Alfred post that next message for you automatically instead for distraction-free social media.
Get Notified
Need to lookup data from your work apps with Alfred? Start out with these Zap templates to quickly get notified—then once you've turned them on, edit the Zaps and add a step in the middle to find the info you need.
Bonus: Run Zaps from Terminal
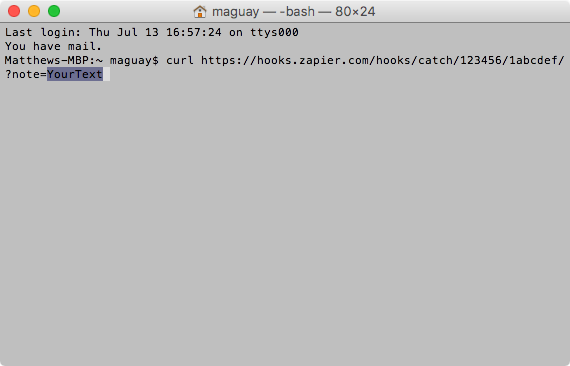
Ever wanted to trigger a Zap from Terminal? The same trick that lets you run Zaps from Alfred also works from Terminal.
Just make a Webhooks Zap the same way as normal, copy the URL, and keep it somewhere handy (perhaps in a text expander app). Then, whenever you want to run the Zap, just enter curl followed by your webhooks url, with ?note=YourText appended to the end with your text instead of YourText (and remember to replace any spaces with %20). For example:
curl https://hooks.zapier.com/hooks/catch/123456/1abcdef/?note=Hi%20Bob!
That'll send your text to Zapier right from Terminal.
Your Turn
Now that you know how to run Zaps from Alfred, it's time to make some new workflows. Perhaps you need an easy way to lookup data from your apps, or a quick tool to add info to your work software. Go make a Webhooks Zap, connect it to Alfred, and you'll have your favorite Zaps only a few keystrokes away whenever you need them.
We'd love to hear how you use Zapier with Alfred in the comments below!
Get Zapier for Chrome, Too!

Want to run Zaps from the Chrome browser on your Mac or PC instead? Check out the Push by Zapier Chrome Extension—it's another great way to run Zaps whenever you want.
source https://zapier.com/blog/zapier-for-alfred/
No comments:
Post a Comment